Ce contenu n'est pas disponible dans la langue sélectionnée.
Chapter 3. Basic Usage
All of the access to Identity Management, both through the web UI and through the command line, is done by a user authenticating to the IPA domain. This chapter covers the basics of setting up browsers to handle Kerberos authentication, logging into Identity Management, and troubleshooting some common connection issues.
3.1. Looking at the IPA UI
Copier lienLien copié sur presse-papiers!
The Identity Management web UI is designed for simplicity. This was the primary design goal, and this means that the web UI offers benefits that make using IPA simpler and clearer:
- It shows instant, visual relationships between entries (such as a user and all the groups, sudo rules, netgroups, and policies which are associated with that user).
- All entries are listed immediately without having to run a search. This makes it possible to browse entries. The UI also has a simple search box which quickly filters the list of entries.
- The interface is intuitive to use, without having to learn the command-line tools.
- The web UI can be accessed from machines outside the IPA domain, so the domain can be managed from anywhere.Using the web UI requires a valid Kerberos ticket for the IPA domain (by default), meaning that it can only be accessed from a machine within the IPA domain. Alternatively, the web UI can be configured to allow password authentication along with Kerberos authentication (Section 3.3.5, “Enabling Username/Password Authentication in Your Browser”), or a machine outside the IPA can be configured to work with Kerberos (Section 3.3.4, “Using a Browser on Another System”).
3.1.1. The UI Layout
Copier lienLien copié sur presse-papiers!
The web UI has three major functional areas which correspond to each of the major functions of IPA: identity management, policy management, and domain configuration.
| Main Menu Tab | Configuration Areas |
|---|---|
| Identity |
|
| Policy |
|
| Access controls within Identity Management |
|
The main menu at the top of every page has three tabs which correspond to the functional areas listed in Table 3.1, “Configuration Areas Per Tab”. When a tab is selected, there is a submenu of the different configuration areas. Some configuration areas may have multiple possible entries; for example, role-based access controls define user roles/groups, the areas that access can be granted or denied (privileges), and then the permissions granted to those areas. Each separate configuration entry has its own task area beneath the primary configuration area.
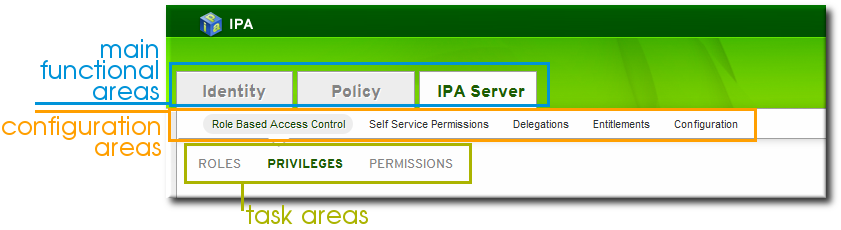
Figure 3.1. The Main Menu
All entries for a configuration area are listed together on the main page for that area. This page provides direct links to individual entry pages, as well as basic information (the attributes) about the entry. (This is usually just the description, but user entries show a lot more information.)
The page also has some tasks that can be performed on it. For a list page that shows entries, this can be creating or deleting an entry. For a list page for groups, the tasks are for establishing relationships between entities, either by adding (enrolling) or removing an entity from that group. Both individual entries and groups can be searched for through the list page.
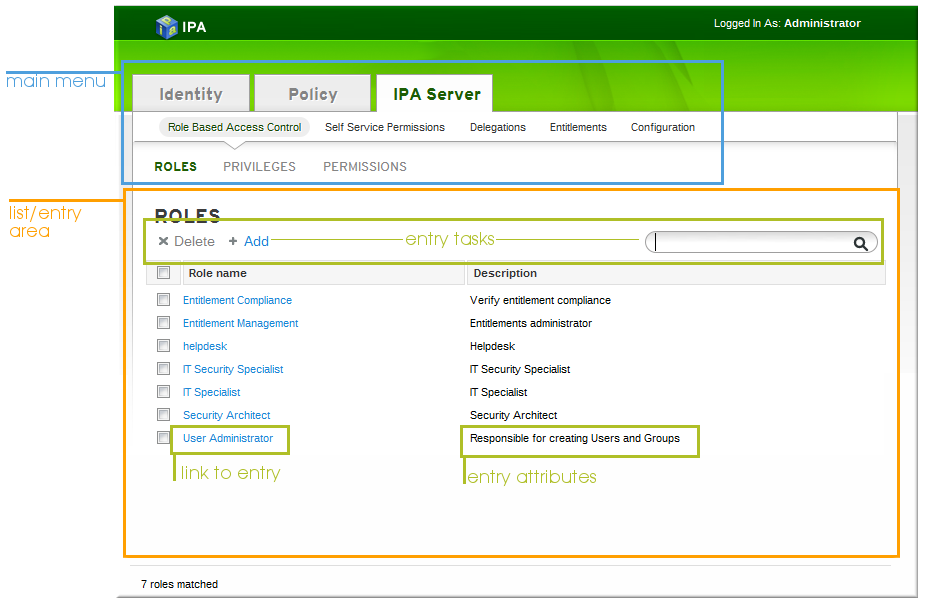
Figure 3.2. List View
Each entry page is a form which allows that entry to be edited. This is done by editing text fields or by selecting items from drop-down menus.
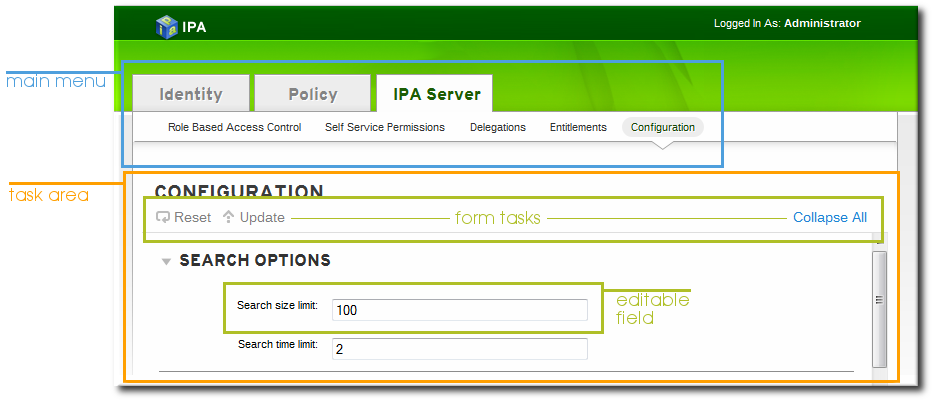
Figure 3.3. Form/Entry View
3.1.2. Page Elements
Copier lienLien copié sur presse-papiers!
The web UI uses common elements on all pages.
The most basic is that all blue text is a link to an entry or to an action.
When a task like adding an entry or saving a change is possible, the task link it blue. When it is not possible (such as no items have been selected to be deleted) then the task is grayed out.
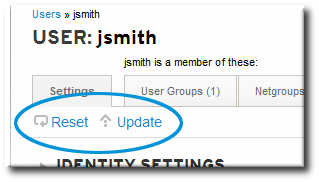
Figure 3.4. Active Task Link
All list pages display direct links to entry pages. However, some entries are essentially nested. For example, in automount configuration, the primary entry is the location, and then keys, mount points, and maps are associated with that location as children entries. This hierarchy is reflected in breadcrumb navigation near the top of the page, so it is easy to identify where you are in the UI and how this entry relates to any other related entries.
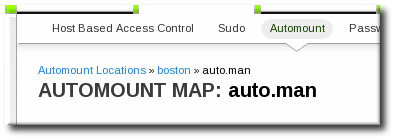
Figure 3.5. Entry Breadcrumbs
Most entries have a variety of different configuration areas. A simple user entry has account activity settings, personal information, address information, organizational information, and other contact information. Related attributes are grouped together logically in the UI. These entry form areas can be collapsed or expanded using the arrows to control the amount of information displayed on the page.
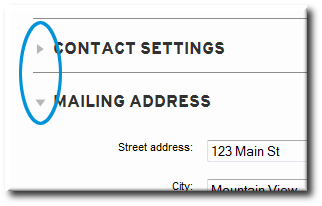
Figure 3.6. Collapsing and Expanding Form Elements
When entries are created, they are added with only the required attributes. Additional attributes can be added manually. Some attributes have default values added to the entry and simply need to be edited; other attributes may not exist at all in the new entry and need to be added.

Figure 3.7. Add an Attribute
Any changes to any attribute can be undone. A single attribute change can be undone by clicking the dynamic button; all changes can be undone by clicking the Reset link at the top of the entry details page.
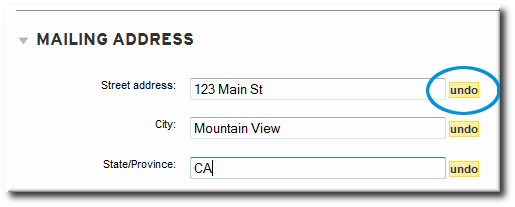
Figure 3.8. Undo Edits
3.1.3. Showing and Changing Group Members
Copier lienLien copié sur presse-papiers!
Members can be added to a group through the group configuration. There are tabs for all the member types which can belong to the group, and an administrator picks all of the marching entries and adds them as members.
However, it is also possible for an entity to be added to a group through its own configuration. Each entry has a list of tabs that displays group types that the entry can join. The list of all groups of that type are displayed, and the entity can be added to multiple groups at the same time.
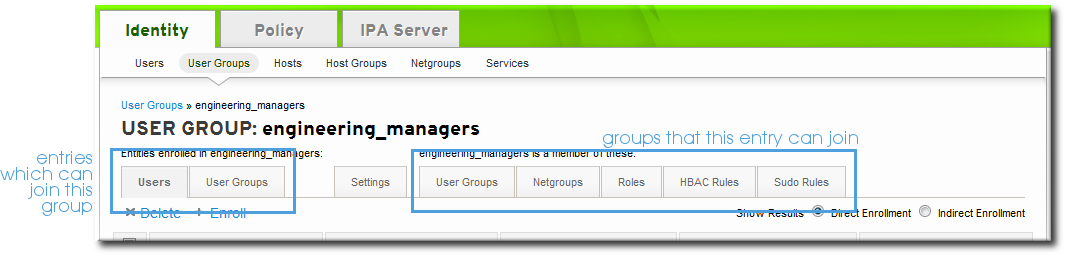
Figure 3.9. Member Of...
3.1.4. Looking at Search Results
Copier lienLien copié sur presse-papiers!
Searches can be performed on attributes that are not displayed in the UI. This means that entries can be returned in a search that do not appear to match the given filter. This is especially common if the search information is very short, which increases the likelihood of a match.