4.4. GLOBAL SETTINGS
The GLOBAL SETTINGS panel is where the you define the networking details for the primary LVS router's public and private network interfaces.
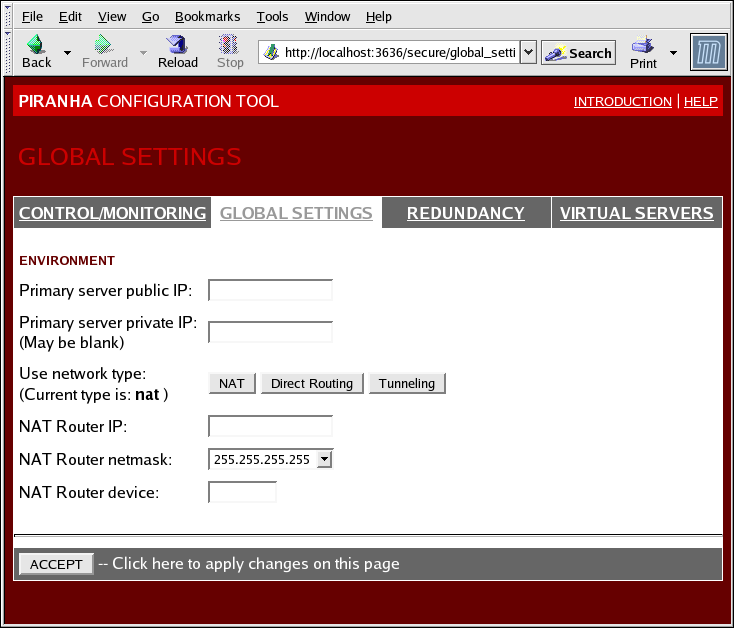
Figure 4.3. The GLOBAL SETTINGS Panel
The top half of this panel sets up the primary LVS router's public and private network interfaces. These are the interfaces already configured in Section 3.1.1, « Configuration des interfaces réseau pour LVS avec NAT ».
- Primary server public IP
- Dans ce champ, saisissez l'adresse IP réelle routable publiquement pour le noeud LVS primaire.
- Primary server private IP
- Enter the real IP address for an alternative network interface on the primary LVS node. This address is used solely as an alternative heartbeat channel for the backup router and does not have to correlate to the real private IP address assigned in Section 3.1.1, « Configuration des interfaces réseau pour LVS avec NAT ». You may leave this field blank, but doing so will mean there is no alternate heartbeat channel for the backup LVS router to use and therefore will create a single point of failure.
Note
L'adresse IP privée n'est pas nécessaire pour les configurations de , étant donné que tous les serveurs réels ainsi que les "directors" LVS partagent les mêmes adresses IP virtuelles et devraient avoir la même configuration IP route.Note
The primary LVS router's private IP can be configured on any interface that accepts TCP/IP, whether it be an Ethernet adapter or a serial port. - Use network type
- Cliquez sur le bouton pour sélectionner le routage NAT.Cliquez sur le bouton pour sélectionner le routage direct.
The next three fields deal specifically with the NAT router's virtual network interface connecting the private network with the real servers. These fields do not apply to the direct routing network type.
- NAT Router IP
- Saisissez l'adresse IP flottante directe dans cette zone de texte. Cette adresse IP flottante devrait être utilisée en tant que passerelle pour les serveurs réels.
- NAT Router netmask
- If the NAT router's floating IP needs a particular netmask, select it from drop-down list.
- NAT Router device
- Utilisez cette zone de texte afin de définir le nom du périphérique de l'interface réseau pour l'adresse IP flottante, par exemple
eth1:1.Note
Vous devriez créer un alias pour l'adresse IP flottante NAT à l'interface Ethernet connectée au réseau privé. Dans cet exemple, le réseau privé est sur l'interfaceeth1, ainsieth1:1correspond à l'adresse IP flottante.
Avertissement
Après avoir terminé cette page, cliquez sur le bouton pour être sûr de ne pas perde vos changements lors de la sélection d'un nouveau panneau.
