Chapitre 5. Configuration d'un serveur HTTP Apache actif/passif dans un cluster Red Hat High Availability
Configurez un serveur HTTP Apache actif/passif dans un cluster Red Hat Enterprise Linux High Availability Add-On à deux nœuds à l'aide de la procédure suivante. Dans ce cas d'utilisation, les clients accèdent au serveur HTTP Apache via une adresse IP flottante. Le serveur web s'exécute sur l'un des deux nœuds de la grappe. Si le nœud sur lequel le serveur web s'exécute devient inopérant, le serveur web redémarre sur le deuxième nœud du cluster avec une interruption de service minimale.
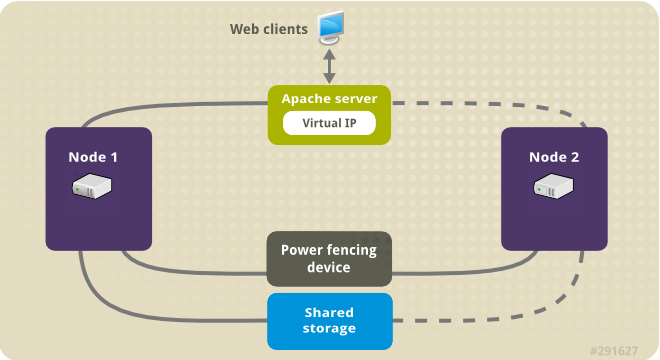
L'illustration suivante montre une vue d'ensemble du cluster dans lequel le cluster est un cluster Red Hat High Availability à deux nœuds qui est configuré avec un commutateur d'alimentation réseau et un stockage partagé. Les nœuds du cluster sont connectés à un réseau public, pour permettre aux clients d'accéder au serveur HTTP Apache par le biais d'une IP virtuelle. Le serveur Apache tourne sur le nœud 1 ou le nœud 2, chacun ayant accès au stockage sur lequel les données Apache sont conservées. Dans cette illustration, le serveur web tourne sur le nœud 1 tandis que le nœud 2 est disponible pour faire tourner le serveur si le nœud 1 devient inopérant.
Figure 5.1. Apache dans un cluster à deux nœuds Red Hat High Availability
Ce cas d'utilisation exige que votre système comprenne les composants suivants :
- Un cluster Red Hat High Availability à deux nœuds avec une clôture d'alimentation configurée pour chaque nœud. Nous recommandons l'utilisation d'un réseau privé, mais nous ne l'exigeons pas. Cette procédure utilise l'exemple de cluster fourni dans Création d'un cluster Red Hat à haute disponibilité avec Pacemaker.
- Une adresse IP virtuelle publique, requise pour Apache.
- Stockage partagé pour les nœuds de la grappe, à l'aide d'iSCSI, de Fibre Channel ou d'un autre périphérique de bloc réseau partagé.
La grappe est configurée avec un groupe de ressources Apache, qui contient les composants de la grappe dont le serveur web a besoin : une ressource LVM, une ressource de système de fichiers, une ressource d'adresse IP et une ressource de serveur web. Ce groupe de ressources peut basculer d'un nœud à l'autre de la grappe, ce qui permet à l'un ou l'autre nœud d'exécuter le serveur web. Avant de créer le groupe de ressources pour cette grappe, vous devez effectuer les procédures suivantes :
-
Configurer un système de fichiers XFS sur le volume logique
my_lv. - Configurer un serveur web.
Après avoir effectué ces étapes, vous créez le groupe de ressources et les ressources qu'il contient.
5.1. Configuration d'un volume LVM avec un système de fichiers XFS dans un cluster Pacemaker
Créez un volume logique LVM sur le stockage partagé entre les nœuds du cluster en suivant la procédure suivante.
Les volumes LVM et les partitions et périphériques correspondants utilisés par les nœuds de cluster doivent être connectés aux nœuds de cluster uniquement.
La procédure suivante permet de créer un volume logique LVM, puis un système de fichiers XFS sur ce volume pour une utilisation dans un cluster Pacemaker. Dans cet exemple, la partition partagée /dev/sdb1 est utilisée pour stocker le volume physique LVM à partir duquel le volume logique LVM sera créé.
Procédure
Sur les deux nœuds de la grappe, procédez comme suit pour définir la valeur de l'identifiant du système LVM sur la valeur de l'identifiant
unamedu système. L'ID système LVM sera utilisé pour s'assurer que seule la grappe est capable d'activer le groupe de volumes.Définissez l'option de configuration
system_id_sourcedans le fichier de configuration/etc/lvm/lvm.confsuruname.Configuration option global/system_id_source.
# Configuration option global/system_id_source.
system_id_source = "uname"
Copy to Clipboard Copied! Toggle word wrap Toggle overflow Vérifiez que l'ID du système LVM sur le nœud correspond à l'adresse
unamedu nœud.lvm systemid uname -n
# lvm systemid
  system ID: z1.example.com
# uname -n
  z1.example.com
Copy to Clipboard Copied! Toggle word wrap Toggle overflow
Créez le volume LVM et créez un système de fichiers XFS sur ce volume. Étant donné que la partition
/dev/sdb1est un espace de stockage partagé, cette partie de la procédure ne peut être exécutée que sur un seul nœud.NoteSi votre groupe de volumes LVM contient un ou plusieurs volumes physiques résidant sur un stockage en bloc distant, tel qu'une cible iSCSI, Red Hat vous recommande de vous assurer que le service démarre avant le démarrage de Pacemaker. Pour plus d'informations sur la configuration de l'ordre de démarrage d'un volume physique distant utilisé par un cluster Pacemaker, reportez-vous à Configuration de l'ordre de démarrage pour les dépendances de ressources non gérées par Pacemaker.
Créer un volume physique LVM sur la partition
/dev/sdb1.pvcreate /dev/sdb1
[root@z1 ~]# pvcreate /dev/sdb1
  Physical volume "/dev/sdb1" successfully created
Copy to Clipboard Copied! Toggle word wrap Toggle overflow NoteSi votre groupe de volumes LVM contient un ou plusieurs volumes physiques résidant sur un stockage en bloc distant, tel qu'une cible iSCSI, Red Hat vous recommande de vous assurer que le service démarre avant le démarrage de Pacemaker. Pour plus d'informations sur la configuration de l'ordre de démarrage d'un volume physique distant utilisé par un cluster Pacemaker, reportez-vous à Configuration de l'ordre de démarrage pour les dépendances de ressources non gérées par Pacemaker.
Créez le groupe de volumes
my_vgqui se compose du volume physique/dev/sdb1.Spécifiez l'indicateur
--setautoactivation npour vous assurer que les groupes de volumes gérés par Pacemaker dans un cluster ne seront pas automatiquement activés au démarrage. Si vous utilisez un groupe de volumes existant pour le volume LVM que vous créez, vous pouvez réinitialiser cet indicateur avec la commandevgchange --setautoactivation npour le groupe de volumes.vgcreate --setautoactivation n my_vg /dev/sdb1
[root@z1 ~]# vgcreate --setautoactivation n my_vg /dev/sdb1
  Volume group "my_vg" successfully created
Copy to Clipboard Copied! Toggle word wrap Toggle overflow Vérifiez que le nouveau groupe de volumes possède l'ID système du nœud sur lequel vous travaillez et à partir duquel vous avez créé le groupe de volumes.
vgs -o+systemid
[root@z1 ~]# vgs -o+systemid
  VG    #PV #LV #SN Attr   VSize  VFree  System ID
  my_vg   1   0   0 wz--n- <1.82t <1.82t z1.example.com
Copy to Clipboard Copied! Toggle word wrap Toggle overflow Créer un volume logique à l'aide du groupe de volumes
my_vg.lvcreate -L450 -n my_lv my_vg
[root@z1 ~]# lvcreate -L450 -n my_lv my_vg
  Rounding up size to full physical extent 452.00 MiB
  Logical volume "my_lv" created
Copy to Clipboard Copied! Toggle word wrap Toggle overflow Vous pouvez utiliser la commande
lvspour afficher le volume logique.lvs
[root@z1 ~]# lvs
  LV      VG      Attr      LSize   Pool Origin Data%  Move Log Copy%  Convert
  my_lv   my_vg   -wi-a---- 452.00m
  ...
Copy to Clipboard Copied! Toggle word wrap Toggle overflow Créer un système de fichiers XFS sur le volume logique
my_lv.mkfs.xfs /dev/my_vg/my_lv
[root@z1 ~]# mkfs.xfs /dev/my_vg/my_lv
meta-data=/dev/my_vg/my_lv       isize=512    agcount=4, agsize=28928 blks
         =                       sectsz=512   attr=2, projid32bit=1
...
Copy to Clipboard Copied! Toggle word wrap Toggle overflow
Ajoutez le périphérique partagé au fichier des périphériques LVM sur le deuxième nœud de la grappe.
lvmdevices --adddev /dev/sdb1
[root@z2 ~]# lvmdevices --adddev /dev/sdb1Copy to Clipboard Copied! Toggle word wrap Toggle overflow