Ce contenu n'est pas disponible dans la langue sélectionnée.
Developing and Deploying Applications
In-depth examples of how to create, build, and run JBoss Fuse applications
Copyright © 2011-2020 Red Hat, Inc. and/or its affiliates.
Abstract
Chapter 1. Red Hat JBoss Fuse Overview
Abstract
An ESB is a standards-based integration platform that combines messaging, web services, data transformation, and intelligent routing to reliably connect and coordinate the interaction of significant numbers of diverse applications across extended enterprises with transactional integrity.
| ||
| --David A. Chapell | ||
1.1. Components
Apache Camel
Apache CXF
Apache ActiveMQ
Fabric8
Switchyard
1.2. Containers
Apache Karaf
JBoss Enterprise Application Platform
1.3. Use Cases
1.3.1. Major Widgets Use Case
1.3.1.1. Major Widgets Introduction
Major Widgets Overview
Major Widgets Business Model
1.3.1.2. Major Widgets Integration Plan
Figure 1.1. Major Widgets Integration Plan

- a single order entry point into the order processing system that can be accessed via the Web and by the in-store terminals
- an intelligent order entry system that routes Web-based orders to the store closest to the delivery destination
- an order processing system (instances running locally at each store) that receives and processes orders, maintains customer accounts, and tracks and maintains inventory
- a master/slave broker cluster that provides a highly available, reliable messaging backbone for the integration solution
1.3.1.3. Major Widgets Implementation
Figure 1.2. Major Widgets Implementation Diagram
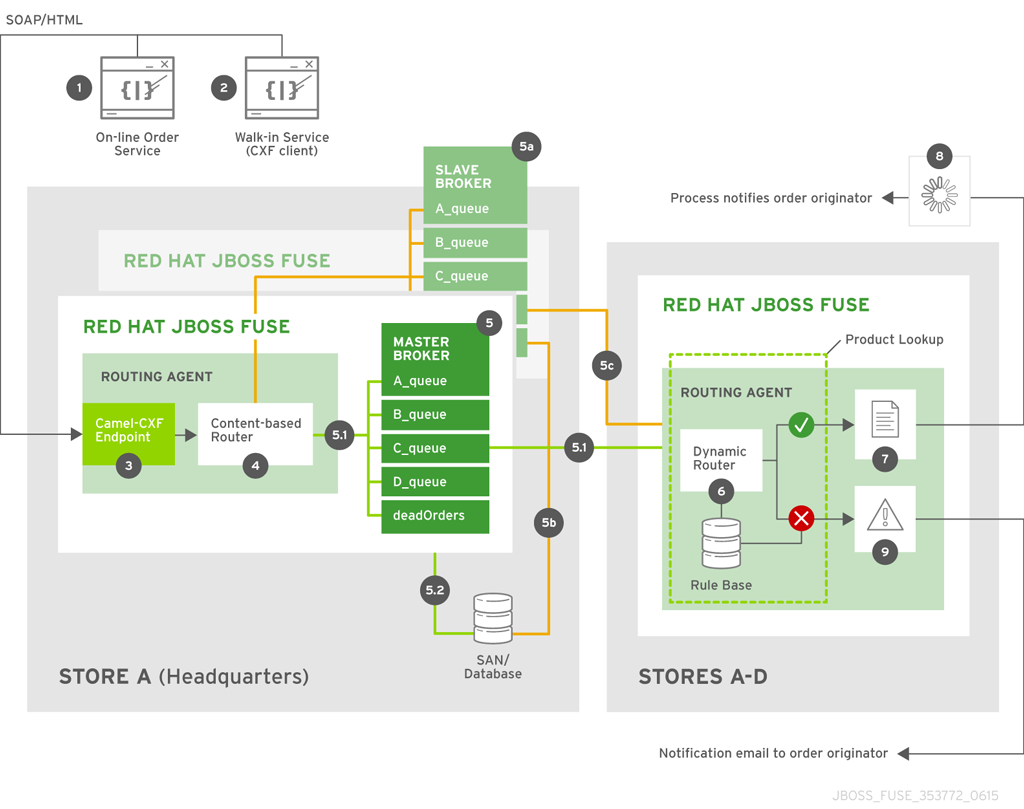
Major Widgets Components
- RESTful service—for creating a JAX-RS application that runs on each auto repair shop terminal (1), enabling customers to input part orders, via an order entry form, over the internet.
- Web service—for creating a JAX-WS front end to implement the order entry functionality on each of the in-store terminals, which receive orders from walk-in customers (2) who purchase parts over-the-counter.
camel-cxfcomponent—a routing and integration service component that creates an entry endpoint (3) that exposes Major Widgets routing logic to the outside world as a web service or a RESTful service.- Routing and integration service—for creating routes (4, 6) that direct orders received from the web/RESTful service entry point through the appropriate store's order processing back end.
- Messaging service—for creating a persistent, fault-tolerant clustered messaging system (5, 5a), which ensures that no order is ever lost due to failure of the system, the message broker, or the connections between the message broker and its various clients—the front end content-based router (4) and the back end dynamic router (6).
Major Widgets Integration Flow
- Auto repair show customersIf the parts are available, the order is submitted to the store's back end processing software (8), which informs and bills the customer (1), schedules delivery, updates inventory, and reorders parts accordingly.If the parts are unavailable, the order is submitted to a processor that generates an error message, which is emailed (9) to the customer (1).
- Walk-in customersIf the parts are available, the order is submitted to the store's back end processing software (8), which informs the store clerk (2), updates inventory, and orders parts accordingly. The store clerk retrieves the parts from stock and sells them to the customer over-the-counter.If the parts are unavailable, the order is submitted to a processor that generates an error message, which is emailed (9) to the local store's email account (2). The store clerk informs the customer, who can then decide whether he wants the store clerk to search the other stores for his parts.
1.3.2. Loans Consolidated Use Case
1.3.2.1. Loans Consolidated Introduction
Loans Consolidated Overview
Loans Consolidated Business Model
1.3.2.2. Loans Consolidated Integration Plan
- a single entry point into the order processing system where files are deposited either via a FTP server or a batch job overnight.
- an intelligent system that routes the XML files and, for house files, appraises the value of the house before sending it to a messaging broker.
- a system that retrieves information from the surrounding area to provide a better appraisal.
- the ability to provide the results of the appraisal back to the vendors.
1.3.2.3. Loans Consolidated Implementation
Figure 1.3. Loans Consolidated Implementation Diagram

Loans Consolidated Components
- Routing and integration service-for creating routes that dynamically examine the contents of the deposited XML files to determine the appropriate destination.
- Integration with the Google App Engine to pull the number of surrounding schools that will be used to update each home's appraised value.
- RESTful service-for providing all of the data with the updated appraisal back to the vendors.
Loans Consolidated Integration Flow
Chapter 2. Basic Concepts for Developers
Abstract
2.1. Development Environment
JDK
Apache Maven
Red Hat JBoss Fuse Tooling for Eclipse
2.2. Development Model
Overview
Figure 2.1. Developing a JBoss Fuse Project

Maven
- Maven directory layout—Maven has a standard directory layout that determines where you put your Java code, associated resources, XML configuration files, unit test code, and so on.
- Accessing dependencies through the Internet—Maven has the ability to download dependencies automatically through the Internet, by searching through known Maven repositories. This implies that you must have access to the Internet, when building with Maven. See the section called “Maven repositories”.
Maven archetypes
Maven POM files
pom.xml, provides the description of how to build your project. The initial version of a POM is typically generated by a Maven archetype. You can then customise the POM as needed.
- Aggregator POM—a complete application is typically composed of multiple Maven projects, which must be built in a certain order. To simplify building multi-project applications, Maven enables you to define an aggregator POM, which can build all of the sub-projects in a single step. For more details, see Section 3.3, “Create an Aggregate Maven Project”.
- Parent POM—in a multi-project application, the POMs for the sub-projects typically contain a lot of the same information. Over the long term, maintaining this information, which is spread across multiple POM files, would time-consuming and error-prone. To make the POMs more manageable, you can define a parent POM, which encapsulates all of the shared information.
Java code and resources
src/main/java, for your Java code, and for the associated resource files, src/main/resources. When Maven builds a JAR file, it automatically compiles all of the Java code and adds it to the JAR package. Likewise, all of the resource files found under src/main/resources are copied into the JAR package.
Dependency injection frameworks
Deployment metadata
META-INF/MANIFEST.MF- The JAR manifest can be used to provide deployment metadata for an OSGi bundle (in bundle headers).
META-INF/maven/groupId/artifactId/pom.xml- The POM file is normally embedded in any Maven-built JAR file.
WEB-INF/web.xml- The
web.xmlfile is the standard descriptor for an application packaged as a Web ARchive (WAR).
Administrative metadata
- Apache Karaf features—a feature specifies a related collection of packages that can be deployed together. By selecting which features to install (or uninstall), an administrator can easily control which blocks of functionality are deployed in the container.
- OSGi Config Admin properties—the OSGi Config Admin service exposes configuration properties to the administrator at run time, making it easy to customize application behavior (for example, by customizing the TCP port numbers on a server).
2.3. Maven Essentials
Overview
Build lifecycle phases
compile, test, package, and install.
mvn command, in order to indicate how far you want the build to proceed. To get started, the following are the most commonly used Maven commands:
- Build the project, run the unit tests, and install the resulting package in the local Maven repository:
mvn install
mvn installCopy to Clipboard Copied! Toggle word wrap Toggle overflow - Clean the project (deleting temporary and intermediate files):
mvn clean
mvn cleanCopy to Clipboard Copied! Toggle word wrap Toggle overflow - Build the project and run the unit tests:
mvn test
mvn testCopy to Clipboard Copied! Toggle word wrap Toggle overflow - Build and install the project, skipping the unit tests:
mvn install -Dmaven.test.skip=true
mvn install -Dmaven.test.skip=trueCopy to Clipboard Copied! Toggle word wrap Toggle overflow - Build the project in offline mode:
mvn -o install
mvn -o installCopy to Clipboard Copied! Toggle word wrap Toggle overflow Offline mode (selected by the-ooption) is useful in cases where you know that you already have all of the required dependencies in your local repository. It prevents Maven from (unnecessarily) checking for updates to SNAPSHOT dependencies, enabling the build to proceed more quickly.
Maven directory structure
pom.xml, which configures the build for this Maven project.
Example 2.1. Standard Maven Directory Layout
ProjectDir/src/main/java/ and any resource files should be stored under ProjectDir/src/main/resources/. In particular, Spring XML files (matching the pattern *.xml) should be stored under the following directory:
ProjectDir/src/main/resources/META-INF/spring/
ProjectDir/src/main/resources/META-INF/spring/*.xml) should be stored under the following directory:
ProjectDir/src/main/resources/OSGI-INF/blueprint/
ProjectDir/src/main/resources/OSGI-INF/blueprint/Convention over configuration
src/main/java directory are automatically compiled and added to the JAR. All of the resource files under the src/main/resources directory are also added to the JAR.
Maven packaging type
jar- (Default) This packaging type is used for JAR files and is the default packaging type in Maven.
bundle- This packaging type is used for OSGi bundles. To use this packaging type, you must also configure the
maven-bundle-pluginin the POM file. war- This packaging type is used for WAR files. To use this packaging type, you must also configure the
maven-war-pluginin the POM file. pom- When you build with this packaging type, the POM file itself gets installed into the local Maven repository. This packaging type is typically used for parent POM files.
Maven artifacts
Maven coordinates
groupId:artifactId:version. For example, when deploying a Maven artifact into the Red Hat JBoss Fuse container, you can reference it using a Maven URI of the form, mvn:groupId/artifactId/version.
Maven dependencies
camel-blueprint artifact:
dependency element
dependency element declares a dependency on the Maven artifact with coordinates org.apache.camel:camel-blueprint:6.3.0.redhat-xxx. You can add as many dependency elements as you like inside the dependencies element.
dependency/scope element
scope element is optional and provides some additional information about when this dependency is needed. By default (with the scope element omitted), it is assumed that the dependency is needed at build time, at unit test time, and at run time. With scope set to the value, provided, the effect depends on what kind of artifact you are building:
- OSGi bundle—(when the POM's
packagingelement is specified asbundle) theprovidedscope setting has no effect.
Transitive dependencies
Maven repositories
- Local repository—the local repository (by default, located at
~/.m2/repositoryon *NIX orC:\Documents and Settings\UserName\.m2\repositoryon Windows) is used by Maven as follows:- First search location—the local repository is the first place that Maven looks when searching for a dependency.
- Cache of downloaded dependencies—any artifacts that have ever been downloaded from a remote repository are stored permanently in the local repository, so that they can be retrieved quickly next time they are needed.
- Store of locally-built artifacts—any time that you build a local project (using
mvn install), the resulting artifact gets stored in your local repository.
- Remote repository—Maven can also search for and download artifacts from remote repositories. By default, Maven automatically tries to download an artifact from remote repositories, if it cannot find the artifact in the local repository (you can suppress this behavior by specifying the
-oflag—for example,mvn -o install). - System repository—(Red Hat JBoss Fuse container only; not used by the
mvncommand-line tool) at run time, the Red Hat JBoss Fuse container can access artifacts from the JBoss Fuse system repository, which is located atInstallDir/system/.
Specifying remote repositories
- Build time—to customize the remote repositories accessible at build time (when running the
mvncommand), edit the Mavensettings.xmlfile, at the following location:- *Nix: default location is
~/.m2/settings.xml. - Windows: default location is
C:\Documents and Settings\UserName\.m2\settings.xml.
- Run time—to customize the remote repositories accessible at run time (from within Red Hat JBoss Fuse container), edit the relevant property settings in the
InstallDir/etc/org.ops4j.pax.url.mvn.cfg.
2.4. Dependency Injection Frameworks
Overview
Blueprint or Spring?
maven-bundle-plugin configuration.
Bean registries
bean() and beanRef() DSL commands to access the bean registry of the underlying dependency injection framework (or frameworks).
Spring XML
- An injection framework—Spring is a classic injection framework, enabling you to instantiate Java objects using the
beanelement and to wire beans together, either explicitly or automatically. For details, see The IoC Container from the Spring Reference Manual. - A generic XML configuration file—Spring has an extensibility mechanism that makes it possible to use third-party XML configuration schemas in a Spring XML file. Spring uses the schema namespace as a hook for finding an extension: it searches the classpath for a JAR file that implements that particular namespace extension. In this way, it is possible to embed the following XML configurations inside a Spring XML file:
- Apache Camel configuration—usually introduced by the
camelContextelement in the schema namespace,http://camel.apache.org/schema/spring. - Apache CXF configuration—uses several different schema namespaces, depending on whether you are configuring the Bus,
http://cxf.apache.org/core, a JAX-WS binding,http://cxf.apache.org/jaxws, a JAX-RS binding,http://cxf.apache.org/jaxrs, or a Simple binding,http://cxf.apache.org/simple. - Apache ActiveMQ configuration—usually introduced by the
brokerelement in the schema namespace,http://activemq.apache.org/schema/core.
NoteWhen packaging your project as an OSGi bundle, the Spring XML extensibility mechanism can introduce additional dependencies. Because the Maven bundle plug-in does not have the ability to scan the Spring XML file and automatically discover the dependencies introduced by schema namespaces, it is generally necessary to add the additional dependencies explicitly to themaven-bundle-pluginconfiguration (by specifying the required Java packages). - An OSGi toolkit—Spring also has features (provided by Spring Dynamic Modules) to simplify integrating your application with the OSGi container. In particular, Spring DM provides XML elements that make it easy to export and consume OSGi services. For details, see The Service Registry from the Spring DM Reference Manual.
- A provider of container services—Spring also supports typical container services, such as security, persistence, and transactions. Before using such services, however, you should compare what is available from the JBoss Fuse container itself. In some cases, the JBoss Fuse container already layers a service on top of Spring (as with the transaction service, for example). In other cases, the JBoss Fuse container might provide an alternative implementation of the same service.
Spring XML file location
InstallDir/src/main/resources/META-INF/spring/*.xml
InstallDir/src/main/resources/META-INF/spring/*.xmlSpring XML sample
camelContext element, which could be used to define Apache Camel routes. For a more detailed example of Spring XML, see the section called “Customize the Web client test message”.
Blueprint XML
- An injection framework—blueprint is a classic injection framework, enabling you to instantiate Java objects using the
beanelement and to wire beans together, either explicitly or automatically. For details, see section "Dependency Injection Frameworks" in "Deploying into Apache Karaf". - A generic XML configuration file—blueprint has an extensibility mechanism that makes it possible to use third-party XML configuration schemas in a blueprint XML file. Blueprint uses the schema namespace as a hook for finding an extension: it searches the classpath for a JAR file that implements that particular namespace extension. In this way, it is possible to embed the following XML configurations inside a blueprint XML file:
- Apache Camel configuration—usually introduced by the
camelContextelement in the schema namespace,http://camel.apache.org/schema/blueprint. - Apache CXF configuration—uses several different schema namespaces, depending on whether you are configuring the Bus,
http://cxf.apache.org/blueprint/core, a JAX-WS binding,http://cxf.apache.org/blueprint/jaxws, a JAX-RS binding,http://cxf.apache.org/blueprint/jaxrs, or a Simple binding,http://cxf.apache.org/blueprint/simple. - Apache ActiveMQ configuration—usually introduced by the
brokerelement in the schema namespace,http://activemq.apache.org/schema/core.
NoteWhen packaging your project as an OSGi bundle, the blueprint XML extensibility mechanism can introduce additional dependencies, through the schema namespaces. Blueprint automatically resolves the dependencies implied by the schema namespaces at run time. - An OSGi toolkit—blueprint also has features to simplify integrating your application with the OSGi container. In particular, blueprint provides XML elements that make it easy to export and consume OSGi services. For details, see section "Dependency Injection Frameworks" in "Deploying into Apache Karaf".
Blueprint XML file location
InstallDir/src/main/resources/OSGI-INF/blueprint/*.xml
InstallDir/src/main/resources/OSGI-INF/blueprint/*.xmlBlueprint XML sample
camelContext element, which could be used to define Apache Camel routes. For a more detailed example of blueprint XML, see Example 3.1, “Configuring the Port Number in Blueprint XML”.
http://camel.apache.org/schema/blueprint, is different from the namespace used for Apache Camel in Spring XML. The two schemas are almost identical, however.
Chapter 3. Getting Started with Developing
Abstract
3.1. Create a Web Services Project
Overview
karaf-soap-archetype Maven archetype, which is a command-line wizard that creates the entire project from scratch. Instructions are then given to build the project, deploy the server to the Red Hat JBoss Fuse container, and run the test client.
Prerequisites
fusesource repository to Maven's settings.xml file. Maven looks for your settings.xml file in the following standard location:
- UNIX:
home/User/.m2/settings.xml - Windows:
Documents and Settings\User\.m2\settings.xml
settings.xml file at this location, you need to create a new settings.xml file. Modify the settings.xml file by adding the repository element and the pluginRepository element for the Maven Red Hat repository, as shown in the following example:
Create project from the command line
archetype:generate goal. First of all, create a directory to hold your getting started projects. Open a command prompt, navigate to a convenient location in your file system, and create the get-started directory, as follows:
mkdir get-started
cd get-started
mkdir get-started
cd get-startedarchetype:generate goal to invoke the karaf-soap-archetype archetype, which generates a simple Apache CXF demonstration, as follows:
get-started/cxf-basic directory.
Customize the Web client test message
cxf-basic/src/test/resources/request.xml file, replacing the xmlns:ns2="http://soap.quickstarts.fabric8.io/" namespace setting by xmlns:ns2="http://example.fusesource.org/".
request.xml file, the contents should look like the following:
Build the Web services project
cd cxf-basic
mvn install
cd cxf-basic
mvn installInitialize container security
InstallDir/etc/users.properties file:
Username=Password[,RoleA][,RoleB]...
Username=Password[,RoleA][,RoleB]...Administrator role, to enable administration of the fabric. For example:
admin=secretpassword,Administrator
admin=secretpassword,AdministratorStart up the container
cd InstallDir/bin
./fuse
cd InstallDir/bin
./fuseDeploy and start the WS server
cxf-basic Web service as an OSGi bundle, enter the following console command:
JBossFuse:karaf@root> install -s mvn:org.fusesource.example/cxf-basic/1.0-SNAPSHOT
JBossFuse:karaf@root> install -s mvn:org.fusesource.example/cxf-basic/1.0-SNAPSHOTorg.ops4j.pax.url.mvn.localRepository property in the InstallDir/etc/org.ops4j.pax.url.mvn.cfg file, before you can use the mvn: scheme to access Maven artifacts.
Bundle ID: 265
Bundle ID: 265Check that the bundle has started
list console command, which gives the status of all the bundles installed in the container:
JBossFuse:karaf@root> list
JBossFuse:karaf@root> list[ 265] [Active ] [Created ] [ ] [ 80] JBoss Fuse Quickstart: soap (1.0.0.SNAPSHOT)
[ 265] [Active ] [Created ] [ ] [ 80] JBoss Fuse Quickstart: soap (1.0.0.SNAPSHOT)list command only shows the bundles with a start level of 50 or greater (which excludes most of the system bundles).
Run the WS client
cxf-basic project also includes a simple WS client, which you can use to test the deployed Web service. In a command prompt, navigate to the cxf-basic directory and run the simple WS client as follows:
cd get-started/cxf-basic
mvn -Ptest
cd get-started/cxf-basic
mvn -PtestRunning org.fusesource.example.SoapTest the response is ====> <soap:Envelope xmlns:soap="http://schemas.xmlsoap.org/soap/envelope/"><soap:Body><ns2:sayHiResponse xmlns:ns2="http://example.fusesource.org/"><return>Hello John Doe</return></ns2:sayHiResponse></soap:Body></soap:Envelope> Tests run: 1, Failures: 0, Errors: 0, Skipped: 0, Time elapsed: 0.184 sec - in org.fusesource.example.SoapTest
Running org.fusesource.example.SoapTest
the response is ====>
<soap:Envelope xmlns:soap="http://schemas.xmlsoap.org/soap/envelope/"><soap:Body><ns2:sayHiResponse xmlns:ns2="http://example.fusesource.org/"><return>Hello John Doe</return></ns2:sayHiResponse></soap:Body></soap:Envelope>
Tests run: 1, Failures: 0, Errors: 0, Skipped: 0, Time elapsed: 0.184 sec - in org.fusesource.example.SoapTestTroubleshooting
http://localhost:8181/cxf
http://localhost:8181/cxfhttp://localhost:8181/cxf/HelloWorld?wsdl
http://localhost:8181/cxf/HelloWorld?wsdl3.2. Create a Router Project
Overview
karaf-camel-cbr-archetype Maven archetype.
Prerequisites
cxf-basic project and requires that you have already generated and built the cxf-basic project, as described in Section 3.1, “Create a Web Services Project”.
Create project from the command line
get-started directory. You can now use the archetype:generate goal to invoke the karaf-camel-cbr-archetype archetype, which generates a simple Apache Camel demonstration, as follows:
get-started/camel-basic directory.
Add the required Maven dependency
camel-jetty artifact, so that the requisite JAR files are added to the classpath. To add the dependency, edit the camel-basic/pom.xml file and add the following highlighted dependency as a child of the dependencies element:
Modify the route
camel-basic/src/main/resources/OSGI-INF/blueprint/cbr.xml. Remove the existing camelContext element and replace it with the camelContext element highlighted in the following example:
from element defines a new HTTP server port, which listens on TCP port 8282. The to element defines a HTTP client endpoint that attempts to connect to the real Web service, which is listening on TCP port 8181. To make the route a little more interesting, we add a delay element, which imposes a five second (5000 millisecond) delay on all requests passing through the route.
Change the port in the Web client test
cxf-basic project:
cxf-basic/src/test/java/org/fusesource/example/SoapTest.java
cxf-basic/src/test/java/org/fusesource/example/SoapTest.javaSoapTest.java file in your favourite text editor, and search for the following line:
URLConnection connection = new URL("http://localhost:8181/cxf/HelloWorld").openConnection();
URLConnection connection = new URL("http://localhost:8181/cxf/HelloWorld").openConnection();URLConnection connection = new URL("http://localhost:8282/cxf/HelloWorld").openConnection();
URLConnection connection = new URL("http://localhost:8282/cxf/HelloWorld").openConnection();Build the router project
cd camel-basic
mvn install
cd camel-basic
mvn installInstall the camel-jetty feature
camel-jetty feature as follows:
JBossFuse:karaf@root> features:install camel-jetty
JBossFuse:karaf@root> features:install camel-jettyDeploy and start the route
camel-basic route as an OSGi bundle, enter the following console command:
JBossFuse:karaf@root> install -s mvn:org.fusesource.example/camel-basic/1.0-SNAPSHOT
JBossFuse:karaf@root> install -s mvn:org.fusesource.example/camel-basic/1.0-SNAPSHOTBundle ID: 230
Bundle ID: 230Test the route with the WS client
cxf-basic project includes a simple WS client, which you can use to test the deployed route and Web service. In a command prompt, navigate to the cxf-basic directory and run the simple WS client as follows:
cd ../cxf-basic
mvn -Ptest
cd ../cxf-basic
mvn -Ptest------------------------------------------------------- T E S T S ------------------------------------------------------- Running org.fusesource.example.SoapTest
-------------------------------------------------------
 T E S T S
-------------------------------------------------------
Running org.fusesource.example.SoapTestthe response is ====> <soap:Envelope xmlns:soap="http://schemas.xmlsoap.org/soap/envelope/"><soap:Body><ns2:sayHiResponse xmlns:ns2="http://example.fusesource.org/"><return>Hello John Doe</return></ns2:sayHiResponse></soap:Body></soap:Envelope> Tests run: 1, Failures: 0, Errors: 0, Skipped: 0, Time elapsed: 5.153 sec - in org.fusesource.example.SoapTest
the response is ====>
<soap:Envelope xmlns:soap="http://schemas.xmlsoap.org/soap/envelope/"><soap:Body><ns2:sayHiResponse xmlns:ns2="http://example.fusesource.org/"><return>Hello John Doe</return></ns2:sayHiResponse></soap:Body></soap:Envelope>
Tests run: 1, Failures: 0, Errors: 0, Skipped: 0, Time elapsed: 5.153 sec - in org.fusesource.example.SoapTest3.3. Create an Aggregate Maven Project
Aggregate POM
Parent POM
Recommended practice
Create an aggregate POM
pom.xml file in the get-started directory and add the following contents to the file:
groupId, artifactId, and version must be defined, in order to identify this artifact uniquely. But the packaging must be set to pom. The key portion of the aggregate POM is the modules element, which defines the list of Maven sub-projects to build and defines the order in which the projects are built. The content of each module element is the relative path of a directory containing a Maven project.
Building with the aggregate POM
cd get-started
mvn install
cd get-started
mvn install3.4. Define a Feature for the Application
Why do you need a feature?
What to put in a feature
Deployment options
- Hot deploy—the simplest deployment option; just drop the XML features file straight into the hot deploy directory,
InstallDir/deploy. - Add a repository URL—you can tell the Red Hat JBoss Fuse container where to find your features repository file using the
features:addUrlconsole command (see Add the local repository URL to the features service). You can then install the feature at any time using thefeatures:installconsole command. - Through a Fuse Fabric profile—you can use the management console to deploy a feature inside a Fuse Fabric profile.
Features and Fuse Fabric
Create a custom features repository
get-started project directory, create all of the directories in the following path:
features/src/main/resources/
features/src/main/resources/get-started/features/src/main/resources directory, use a text editor to create the get-started.xml file and add the following contents:
get-started/features/ directory, use a text editor to create the Maven POM file, pom.xml, and add the following contents to it:
Install the features repository
get-started/features, and enter the following command:
cd features
mvn install
cd features
mvn installDeploy the custom feature
get-started-basic feature into the container, perform the following steps:
- If the
cxf-basicandcamel-basicbundles are already installed in the JBoss Fuse container, you must first uninstall them. At the console prompt, use thelistcommand to discover the bundle IDs for thecxf-basicandcamel-basicbundles, and then uninstall them both using the console command,uninstall BundleID. - Before you can access features from a features repository, you must tell the container where to find the features repository. Add the features repository URL to the container, by entering the following console command:
JBossFuse:karaf@root> features:addurl mvn:org.fusesource.example/get-started/1.0-SNAPSHOT/xml/features
JBossFuse:karaf@root> features:addurl mvn:org.fusesource.example/get-started/1.0-SNAPSHOT/xml/featuresCopy to Clipboard Copied! Toggle word wrap Toggle overflow You can check whether the container knows about the new features by entering the console commandfeatures:list. If necessary, you can use thefeatures:refreshurlconsole command, which forces the container to re-read its features repositories. - To install the
get-started-basicfeature, enter the following console command:JBossFuse:karaf@root> features:install get-started-basic
JBossFuse:karaf@root> features:install get-started-basicCopy to Clipboard Copied! Toggle word wrap Toggle overflow - After waiting a few seconds for the bundles to start up, you can test the application as described in the section called “Test the route with the WS client”.
- To uninstall the feature, enter the following console command:
JBossFuse:karaf@root> features:uninstall get-started-basic
JBossFuse:karaf@root> features:uninstall get-started-basicCopy to Clipboard Copied! Toggle word wrap Toggle overflow
3.5. Configure the Application
OSGi Config Admin service
- Persistent ID
- A persistent ID (PID) identifies a group of related properties. Conventionally, a PID is normally written in the same format as a Java package name. For example, the
org.ops4j.pax.webPID configures the Red Hat JBoss Fuse container's default Jetty Web server. - Properties
- A property is a name-value pair, which always belongs to a specific PID.
Setting configuration properties
- For a given a PID, PersistentID, you can create a text file under the
InstallDir/etcdirectory, which obeys the following naming convention:InstallDir/etc/PersistentID.cfg
InstallDir/etc/PersistentID.cfgCopy to Clipboard Copied! Toggle word wrap Toggle overflow You can then set the properties belonging to this PID by editing this file and adding entries of the form:Property=Value
Property=ValueCopy to Clipboard Copied! Toggle word wrap Toggle overflow - Fuse Fabric supports another mechanism for customising OSGi Config Admin properties. In Fuse Fabric, you set OSGi Config Admin properties in a fabric profile (where a profile encapsulates the data required to deploy an application). There are two alternative ways of modifying configuration settings in a profile:
- Using the management console
- Using the
fabric:profile-editcommand in a container console (see Section 4.2.2, “Create Fabric Profiles”).
Replace TCP port with a property placeholder
HelloWorld Web service from the cxf-basic project. By modifying the Blueprint XML file that defines this Web service, you can make the Web service's TCP port customisable through the OSGi Config Admin service.
Blueprint XML example
cxf-basic project, any XML files from the following location are treated as Blueprint XML files (the standard Maven location for Blueprint XML files):
cxf-basic/src/main/resources/OSGI-INF/blueprint/*.xml
cxf-basic/src/main/resources/OSGI-INF/blueprint/*.xmlblueprint.xml file from the preceding directory and add or modify the highlighted content shown in Example 3.1, “Configuring the Port Number in Blueprint XML”.
Example 3.1. Configuring the Port Number in Blueprint XML
cm namespace, the main changes are as follows:
- The
cm:property-placeholderbean contacts the OSGi Config Admin service and retrieves all of the property settings from theorg.fusesource.example.get.startedPID. The key-value pairs in thecm:default-properties/cm:propertyelements specify default values for the properties (which are overridden, if corresponding settings can be retrieved from the OSGi Config Admin service). - The
${portNumber}placeholder is used to specify the TCP port number used by theHelloWorldWeb service.
maven-bundle-plugin in the project's pom.xml file include the wildcard, *, in the packages listed in the Import-Package element (if the Import-Package element is not present, the wildcard is implied by default). Otherwise, you will get the error: Unresolved references to [org.osgi.service.blueprint] by class(es) on the Bundle-Classpath[Jar:dot]: [].
Deploying the configurable application
cxf-basic project, perform the following steps:
- Edit the Blueprint XML file,
blueprint.xml, to integrate the OSGi Config Admin service, as described in Example 3.1, “Configuring the Port Number in Blueprint XML”. - Rebuild the
cxf-basicproject with Maven. Open a command prompt, change directory to theget-started/cxf-basicdirectory, and enter the following Maven command:mvn clean install
mvn clean installCopy to Clipboard Copied! Toggle word wrap Toggle overflow - Create the following configuration file in the
etc/directory of your Red Hat JBoss Fuse installation:InstallDir/etc/org.fusesource.example.get.started.cfg
InstallDir/etc/org.fusesource.example.get.started.cfgCopy to Clipboard Copied! Toggle word wrap Toggle overflow Edit theorg.fusesource.example.get.started.cfgfile with a text editor and add the following contents:portNumber=8182
portNumber=8182Copy to Clipboard Copied! Toggle word wrap Toggle overflow - If you have previously deployed the
get-started-basicfeature (as described in Section 3.4, “Define a Feature for the Application”), uninstall it now:JBossFuse:karaf@root> features:uninstall get-started-basic
JBossFuse:karaf@root> features:uninstall get-started-basicCopy to Clipboard Copied! Toggle word wrap Toggle overflow - Deploy the
get-started-cxffeature, by entering the following console command:JBossFuse:karaf@root> features:install get-started-cxf
JBossFuse:karaf@root> features:install get-started-cxfCopy to Clipboard Copied! Toggle word wrap Toggle overflow - Deploy the
cxf-commandsfeature, by entering the following console command:JBossFuse:karaf@root> features:install cxf-commands
JBossFuse:karaf@root> features:install cxf-commandsCopy to Clipboard Copied! Toggle word wrap Toggle overflow - After waiting a few seconds for the bundles to start up, you can check the port used by the HelloWorld service, by entering the following console command:
JBossFuse:karaf@root> cxf:list-endpoints
Name                      State      Address                                                      BusID
[HelloWorldImplPort     ] [Started ] [http://0.0.0.0:8182/cxf/HelloWorld                      ] [org.fusesource.example.cxf-basic-cxf1456001875]
JBossFuse:karaf@root> cxf:list-endpoints
Name                      State      Address                                                      BusID
[HelloWorldImplPort     ] [Started ] [http://0.0.0.0:8182/cxf/HelloWorld                      ] [org.fusesource.example.cxf-basic-cxf1456001875]
Copy to Clipboard Copied! Toggle word wrap Toggle overflow You can see from this that the HelloWorld service is listening on port8182. - If you want to run the Web client test against this Web service, you must customize the URL used by the client. Using a text editor, open the
SoapTest.javafile from thecxf-basic/src/test/java/org/fusesource/exampledirectory, and change the connection URL as highlighted in the following fragment:URLConnection connection = new URL("http://localhost:8182/cxf/HelloWorld").openConnection();URLConnection connection = new URL("http://localhost:8182/cxf/HelloWorld").openConnection();Copy to Clipboard Copied! Toggle word wrap Toggle overflow - You can then test the application by opening a command prompt, changing directory to
get-started/cxf-basic, and entering the following command:mvn -Ptest
mvn -PtestCopy to Clipboard Copied! Toggle word wrap Toggle overflow - To uninstall the feature, enter the following console command:
features:uninstall get-started-cxf
features:uninstall get-started-cxfCopy to Clipboard Copied! Toggle word wrap Toggle overflow
3.6. Troubleshooting
Check the status of a deployed bundle
osgi:list console command. For example:
JBossFuse:karaf@root> osgi:list
JBossFuse:karaf@root> osgi:listcxf-basic bundle has a status line like the following:
[ 232] [Active     ] [            ] [Started] [   60]
    Fabric8 :: CXF Code First OSGi Bundle (1.0.0.SNAPSHOT)
[ 232] [Active     ] [            ] [Started] [   60]
Fabric8 :: CXF Code First OSGi Bundle (1.0.0.SNAPSHOT)Installed, Resolved, or Active). A bundle that is successfully installed and started has the status Active. If the bundle contains a blueprint XML file, the third column indicates whether the blueprint context has been successfully Created or not. If the bundle contains a Spring XML file, the fourth column indicates whether the Spring context has been successfully Started or not.
Logging
log:display console command. Usually, you will be able to find a stack trace for the failed bundle in the log.
log:set console command. For example:
JBossFuse:karaf@root> log:set DEBUG
JBossFuse:karaf@root> log:set DEBUGRedeploying bundles with dev:watch
dev:watch command. For example, given that you have already deployed the cxf-basic bundle and it has the bundle ID, 232, you can tell the runtime to watch the bundle by entering the following console command:
JBossFuse:karaf@root> dev:watch 232
Watched URLs/IDs:
232
JBossFuse:karaf@root> dev:watch 232
Watched URLs/IDs:
232cd cxf-basic mvn clean install
cd cxf-basic
mvn clean install[Watch] Updating watched bundle: cxf-basic (1.0.0.SNAPSHOT)
[Watch] Updating watched bundle: cxf-basic (1.0.0.SNAPSHOT)Chapter 4. Getting Started with Deploying
Abstract
4.1. Scalable Deployment with Fuse Fabric
Why Fuse Fabric?
- Monitoring the state of all the containers in the network
- Starting and stopping remote containers
- Provisioning remote containers to run particular applications
- Upgrading applications and rolling out patches in a live system
- Starting up and provisioning new containers quickly—for example, to cope with an increased load on the system
A sample fabric
Figure 4.1. Containers in a Fabric
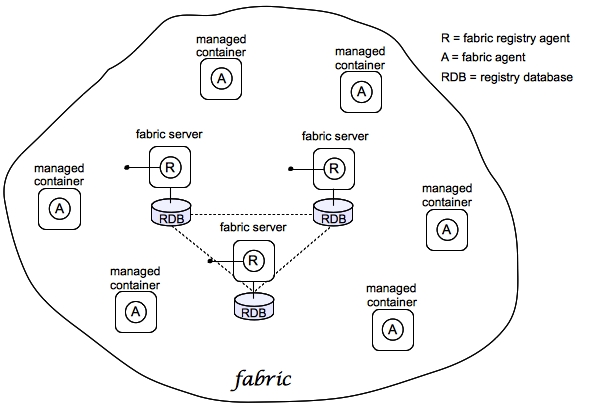
Fabric
Fabric Ensemble
Fabric Server
Fabric Container
Profile
osgi:install or features:install, respectively), these modifications are impermanent. As soon as you restart the container or refresh its contents, the Fabric Agent replaces the container's existing contents with whatever is specified by the deployed profiles.
4.2. Deploying to a Fabric
4.2.1. Create a Fabric
Overview
Figure 4.2. A Sample Fabric with Child Containers
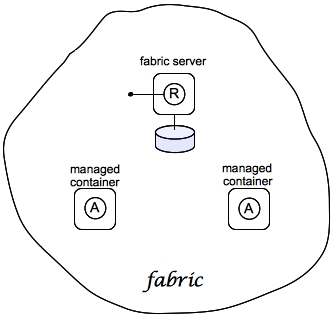
Fabric server
Child containers
InstallDir/instances directory.
Make Quickstart Examples Available
$FUSE_HOME/fabric/io.fabric8.import.profiles.properties file by uncommenting the line that starts with the following:
# importProfileURLs =
- Edit the
$FUSE_HOME/quickstarts/pom.xmlfile to add a fabric I/O plugin, for example:<plugin> <groupId>io.fabric8</groupId> <artifactId>fabric8-maven-plugin</artifactId> <version>1.2.0.redhat-630187</version> </plugin><plugin> <groupId>io.fabric8</groupId> <artifactId>fabric8-maven-plugin</artifactId> <version>1.2.0.redhat-630187</version> </plugin>Copy to Clipboard Copied! Toggle word wrap Toggle overflow - In the
$FUSE_HOME/quickstartsdirectory, change to the directory for the quickstart example you want to run, for example:cd beginner - In that directory, execute the following command:
mvn fabric8:deployYou would need to run this command in each directory that contains a quickstart example that you want to run.
Steps to create the fabric
- (Optional) Customise the name of the root container by editing the
InstallDir/etc/system.propertiesfile and specifying a different name for this property:karaf.name=root
karaf.name=rootCopy to Clipboard Copied! Toggle word wrap Toggle overflow NoteFor the first container in your fabric, this step is optional. But at some later stage, if you want to join a root container to the fabric, you must customise the new container's name to prevent it from clashing with any existing root containers in the fabric. - To create the first fabric container, which acts as the seed for the new fabric, enter this console command:
Copy to Clipboard Copied! Toggle word wrap Toggle overflow The current container, namedrootby default, becomes a Fabric Server with a registry service installed. Initially, this is the only container in the fabric. The--new-user,--new-user-password, and--new-user-roleoptions specify the credentials for a new administrator user. The Zookeeper password is used to protect sensitive data in the Fabric registry service (all of the nodes under/fabric).NoteMost of the time, you are not prompted to enter the Zookeeper password when accessing the registry service, because it is cached in the current session. When you join a container to a fabric, however, you must provide the fabric's Zookeeper password.NoteIt is recommended that you assign a static IP address to the machine that hosts a Fabric server and that you specify this port explicitly using the--resolverand--manual-ipoptions when you create the fabric. For simple tests and demonstrations, you can specify the loopback address,127.0.0.1(as here). For more details, see chapter "Creating a New Fabric" in "Fabric Guide". - Create two child containers. Assuming that your root container is named
root, enter this console command:Copy to Clipboard Copied! Toggle word wrap Toggle overflow If you are prompted to enter a JMX username and password, enter one of the username/password combinations that you defined in step 2. - Invoke the
fabric:container-listcommand to see a list of all containers in your new fabric. You should see a listing something like this:Copy to Clipboard Copied! Toggle word wrap Toggle overflow
Shutting down the containers
fabric:container-stop command. For example, to shut down the current fabric completely, enter these console commands:
JBossFuse:karaf@root> fabric:container-stop child1
JBossFuse:karaf@root> fabric:container-stop child2
JBossFuse:karaf@root> shutdown
JBossFuse:karaf@root> fabric:container-stop child1
JBossFuse:karaf@root> fabric:container-stop child2
JBossFuse:karaf@root> shutdownfabric:container-start console command.
4.2.2. Create Fabric Profiles
Overview
Contents of a profile
- The URL locations of features repositories
- A list of features to install
- A list of bundles to install (or, more generally, any suitable JAR package—including OSGi bundles, Fuse Application Bundles, and WAR files)
- A collection of configuration settings for the OSGi Config Admin service
- Java system properties that affect the Apache Karaf container (analogous to editing
etc/config.properties) - Java system properties that affect installed bundles (analogous to editing
etc/system.properties)
Base profile
Create a base profile
gs-cxf-base profile, follow these steps:
- Create the
gs-cxf-baseprofile by entering this console command:JBossFuse:karaf@root> fabric:profile-create --parent feature-cxf gs-cxf-base
JBossFuse:karaf@root> fabric:profile-create --parent feature-cxf gs-cxf-baseCopy to Clipboard Copied! Toggle word wrap Toggle overflow - Add the
get-startedfeatures repository (see Define a Feature for the Application) to thegs-cxf-baseprofile by entering this console command:JBossFuse:karaf@root> profile-edit -r mvn:org.fusesource.example/get-started/1.0-SNAPSHOT/xml/features gs-cxf-base
JBossFuse:karaf@root> profile-edit -r mvn:org.fusesource.example/get-started/1.0-SNAPSHOT/xml/features gs-cxf-baseCopy to Clipboard Copied! Toggle word wrap Toggle overflow - Add the
cxf-http-jettyfeature (which provides support for the HTTP Jetty endpoint) to thegs-cxf-baseprofile. Enter the following console command:JBossFuse:karaf@root> profile-edit --feature cxf-http-jetty gs-cxf-base
JBossFuse:karaf@root> profile-edit --feature cxf-http-jetty gs-cxf-baseCopy to Clipboard Copied! Toggle word wrap Toggle overflow - Add the
get-started-cxffeature (which provides the Web service example server) to thegs-cxf-baseprofile. Enter the following console command:JBossFuse:karaf@root> profile-edit --feature get-started-cxf gs-cxf-base
JBossFuse:karaf@root> profile-edit --feature get-started-cxf gs-cxf-baseCopy to Clipboard Copied! Toggle word wrap Toggle overflow - Add the
cxf-commandsfeature (which makes the CXF console commands available) to thegs-cxf-baseprofile. Enter the following console command:JBossFuse:karaf@root> profile-edit --feature cxf-commands gs-cxf-base
JBossFuse:karaf@root> profile-edit --feature cxf-commands gs-cxf-baseCopy to Clipboard Copied! Toggle word wrap Toggle overflow
Create the derived profiles
gs-cxf-01 and gs-cxf-02, which configure different TCP ports for the Web service. To do so, follow these steps:
- Create the
gs-cxf-01profile—which derives fromgs-cxf-base—by entering this console command:JBossFuse:karaf@root> profile-create --parent gs-cxf-base gs-cxf-01
JBossFuse:karaf@root> profile-create --parent gs-cxf-base gs-cxf-01Copy to Clipboard Copied! Toggle word wrap Toggle overflow - Create the
gs-cxf-02profile—which derives fromgs-cxf-base—by entering this console command:JBossFuse:karaf@root> profile-create --parent gs-cxf-base gs-cxf-02
JBossFuse:karaf@root> profile-create --parent gs-cxf-base gs-cxf-02Copy to Clipboard Copied! Toggle word wrap Toggle overflow - In the
gs-cxf-01profile, set theportNumberconfiguration property to 8185, by entering this console command:JBossFuse:karaf@root> profile-edit -p org.fusesource.example.get.started/portNumber=8185 gs-cxf-01
JBossFuse:karaf@root> profile-edit -p org.fusesource.example.get.started/portNumber=8185 gs-cxf-01Copy to Clipboard Copied! Toggle word wrap Toggle overflow - In the
gs-cxf-02profile, set theportNumberconfiguration property to 8186, by entering this console command:JBossFuse:karaf@root> profile-edit -p org.fusesource.example.get.started/portNumber=8186 gs-cxf-02
JBossFuse:karaf@root> profile-edit -p org.fusesource.example.get.started/portNumber=8186 gs-cxf-02Copy to Clipboard Copied! Toggle word wrap Toggle overflow
4.2.3. Deploy the Profiles
Deploy profiles to the child containers
- Deploy the
gs-cxf-01profile into thechild1container by entering this console command:JBossFuse:karaf@root> fabric:container-change-profile child1 gs-cxf-01
JBossFuse:karaf@root> fabric:container-change-profile child1 gs-cxf-01Copy to Clipboard Copied! Toggle word wrap Toggle overflow - Deploy the
gs-cxf-02profile into thechild2container by entering this console command:JBossFuse:karaf@root> fabric:container-change-profile child2 gs-cxf-02
JBossFuse:karaf@root> fabric:container-change-profile child2 gs-cxf-02Copy to Clipboard Copied! Toggle word wrap Toggle overflow
Check that the Web service is running
child container, perform the following steps:
- If the child container is not already running, start it by entering the following command:
JBossFuse:karaf@root> container-start child1
JBossFuse:karaf@root> container-start child1Copy to Clipboard Copied! Toggle word wrap Toggle overflow - Wait until the
child1container has finished starting up. You can observe the provisioning status using thewatchcommand, as follows:JBossFuse:karaf@root> watch container-list
JBossFuse:karaf@root> watch container-listCopy to Clipboard Copied! Toggle word wrap Toggle overflow - Connect to the child container, as follows:
JBossFuse:karaf@root> container-connect child1
JBossFuse:karaf@root> container-connect child1Copy to Clipboard Copied! Toggle word wrap Toggle overflow - After connecting to the
childcontainer, list the active CXF endpoints, by entering the following command:JBossFuse:admin@child1> cxf:list-endpoints Name State Address BusID [HelloWorldImplPort ] [Started ] [http://0.0.0.0:8185/cxf/HelloWorld ] [org.fusesource.example.cxf-basic-cxf481246446]
JBossFuse:admin@child1> cxf:list-endpoints Name State Address BusID [HelloWorldImplPort ] [Started ] [http://0.0.0.0:8185/cxf/HelloWorld ] [org.fusesource.example.cxf-basic-cxf481246446]Copy to Clipboard Copied! Toggle word wrap Toggle overflow
4.2.4. Update a Profile
Upgrading containers atomically
Profile versioning
Upgrade to a new profile
gs-cxf-01 profile, when it is deployed and running in a container, follow the recommended procedure:
- Create a new version, 1.1, to hold the pending changes by entering this console command:
JBossFuse:karaf@root> fabric:version-create
Created version: 1.1 as copy of: 1.0
JBossFuse:karaf@root> fabric:version-create
Created version: 1.1 as copy of: 1.0
Copy to Clipboard Copied! Toggle word wrap Toggle overflow The new version is initialised with a copy of all of the profiles from version 1.0. - Use the
fabric:profile-editcommand to change theportNumberofgs-cxf-01to the value 8187 by entering this console command:JBossFuse:karaf@root> fabric:profile-edit -p org.fusesource.example.get.started/portNumber=8187 gs-cxf-01 1.1
JBossFuse:karaf@root> fabric:profile-edit -p org.fusesource.example.get.started/portNumber=8187 gs-cxf-01 1.1Copy to Clipboard Copied! Toggle word wrap Toggle overflow Remember to specify version1.1to thefabric:profile-editcommand, so that the modifications are applied to version 1.1 of thegs-cxf-01profile. - Upgrade the
child1container to version 1.1 by entering this console command:JBossFuse:karaf@root> fabric:container-upgrade 1.1 child1
JBossFuse:karaf@root> fabric:container-upgrade 1.1 child1Copy to Clipboard Copied! Toggle word wrap Toggle overflow
Roll back to an old profile
gs-cxf-01 profile, using the fabric:container-rollback command like this:
JBossFuse:karaf@root> fabric:container-rollback 1.0 child1
JBossFuse:karaf@root> fabric:container-rollback 1.0 child1Chapter 5. Getting Started with Red Hat JBoss Fuse on EAP
Abstract
5.1. Integrating Apache Camel with JBoss EAP
5.2. Examples of JBoss Fuse on EAP
$JBOSS_HOME/quickstarts/camel directory to view the full source code of all the examples.
- Maven 3.2.3 or greater
- Java 1.7 or greater
- Red Hat JBoss Fuse 6.3
- Red Hat JBoss EAP 6.4
5.2.1. Camel ActiveMQ
camel-activemq component with JBoss Fuse on EAP, to produce and consume JMS messages.
${JBOSS_HOME}/standalone/data/orders directory and place the content to an external ActiveMQ JMS queue. A second route consumes messages from the OrdersQueue and then via a content based router, it sorts the directory of each country that are located within the $JBOSS_HOME/standalone/data/orders/processed directory.
src/main/resources/cli directory.
5.2.1.1. Running the Application
- Maven 3.2.3 or greater
- JBoss Fuse on EAP
- An ActiveMQ broker
Procedure 5.1. To run the application
- Start the application server in standalone mode.
${JBOSS_HOME}/bin/standalone.sh -c standalone-full.xml${JBOSS_HOME}/bin/standalone.sh -c standalone-full.xmlCopy to Clipboard Copied! Toggle word wrap Toggle overflow - Run the following command to build and deploy the project.
mvn install -Pdeploy
mvn install -PdeployCopy to Clipboard Copied! Toggle word wrap Toggle overflow
5.2.1.2. Configuring ActiveMQ
5.2.1.3. Undeploy the Application
mvn clean -Pdeploy
mvn clean -Pdeploy
5.2.2. Camel CDI
camel-cdi component with JBoss Fuse on EAP, to integrate CDI beans with camel routes.
5.2.2.1. Running the Application
- Maven 3.2.3 or greater
- JBoss Fuse on EAP
Procedure 5.2. To run the application
- Start the application server in standalone mode.
${JBOSS_HOME}/bin/standalone.sh -c standalone-full.xml${JBOSS_HOME}/bin/standalone.sh -c standalone-full.xmlCopy to Clipboard Copied! Toggle word wrap Toggle overflow - Run the following command to build and deploy the project.
mvn install -Pdeploy
mvn install -PdeployCopy to Clipboard Copied! Toggle word wrap Toggle overflow
5.2.2.2. Configuring Camel CDI
camel-cdi component:
5.2.2.3. Undeploy the Application
mvn clean -Pdeploy
mvn clean -Pdeploy
5.2.3. Camel JMS
camel-jms component with JBoss Fuse on EAP to produce and consume JMS messages.
${JBOSS_HOME}/standalone/data/orders directory and place the content in the OrdersQueue. A second route consumes messages from the OrdersQueue and through a content based router.
5.2.3.1. Running the Application
- Maven 3.2.3 or greater
- JBoss Fuse on EAP
Procedure 5.3. To run the application
- Start the application server in standalone mode.
${JBOSS_HOME}/bin/standalone.sh -c standalone-full.xml${JBOSS_HOME}/bin/standalone.sh -c standalone-full.xmlCopy to Clipboard Copied! Toggle word wrap Toggle overflow - Run the following command to build and deploy the project.
mvn install -Pdeploy
mvn install -PdeployCopy to Clipboard Copied! Toggle word wrap Toggle overflow
5.2.3.2. Configuring Camel JMS
5.2.3.3. Undeploy the Application
mvn clean -Pdeploy
mvn clean -Pdeploy
5.2.4. Camel JPA
camel-jpa component with JBoss Fuse on EAP to persist entities to the in-memory database.
${JBOSS_HOME}/standalone/data/customers directory. Camel then uses JAXB to unmarshal the data to a Customer entity. However, the entity is then passed to the JPA endpoint and is persisted to the customer database.
5.2.4.1. Running the Application
- Maven 3.2.3 or greater
- JBoss Fuse on EAP
Procedure 5.4. To run the application
- Start the application server in standalone mode.
${JBOSS_HOME}/bin/standalone.sh -c standalone-full.xml${JBOSS_HOME}/bin/standalone.sh -c standalone-full.xmlCopy to Clipboard Copied! Toggle word wrap Toggle overflow - Run the following command to build and deploy the project.
mvn install -Pdeploy
mvn install -PdeployCopy to Clipboard Copied! Toggle word wrap Toggle overflow
5.2.4.2. Configuring Camel JPA
camel-jpa component.
5.2.4.3. Undeploy the Application
mvn clean -Pdeploy
mvn clean -Pdeploy
5.2.5. Camel Mail
camel-mail component with JBoss Fuse on EAP to send and receive email.
src/main/resources/cli directory to see the EAP mail subsystem configuration.
java:jboss/mail/ location. You can configure the server entries for SMTP and POP3 protocols.
5.2.5.1. Running the Application
- Maven 3.2.3 or greater
- JBoss Fuse on EAP
Procedure 5.5. To run the application
- Start the application server in standalone mode.
${JBOSS_HOME}/bin/standalone.sh -c standalone-full.xml${JBOSS_HOME}/bin/standalone.sh -c standalone-full.xmlCopy to Clipboard Copied! Toggle word wrap Toggle overflow - Run the following command to build and deploy the project.
mvn install -Pdeploy
mvn install -PdeployCopy to Clipboard Copied! Toggle word wrap Toggle overflow
5.2.5.2. Configuring Camel Mail
camel-mail component.
5.2.5.3. Undeploy the Application
mvn clean -Pdeploy
mvn clean -Pdeploy
5.2.6. Camel REST
/example-camel-rest/camel are handled by the Camel REST DSL and requests made to paths >/example-camel-rest/rest are handled by the EAP JAX-RS subsystem along with the CamelProxy.
5.2.6.1. Running the Application
- Maven 3.2.3 or greater
- JBoss Fuse on EAP
Procedure 5.6. To run the application
- Start the application server in standalone mode.
${JBOSS_HOME}/bin/standalone.sh -c standalone-full.xml${JBOSS_HOME}/bin/standalone.sh -c standalone-full.xmlCopy to Clipboard Copied! Toggle word wrap Toggle overflow - Run the following command to build and deploy the project.
mvn install -Pdeploy
mvn install -PdeployCopy to Clipboard Copied! Toggle word wrap Toggle overflow
5.2.6.2. Configuring Camel REST
5.2.6.3. Undeploy the Application
mvn clean -Pdeploy
mvn clean -Pdeploy
5.2.7. Camel Transacted JMS
camel-jms component with JBoss Fuse on EAP to produce and consume JMS messages in a transacted session.
${JBOSS_HOME}/standalone/data/orders directory and place the content in the OrdersQueue. A second route consumes messages from the OrdersQueue, converts the message body to the Order entity and persists it.
5.2.7.1. Running the Application
- Maven 3.2.3 or greater
- JBoss Fuse on EAP
Procedure 5.7. To run the application
- Start the application server in standalone mode.
${JBOSS_HOME}/bin/standalone.sh -c standalone-full.xml${JBOSS_HOME}/bin/standalone.sh -c standalone-full.xmlCopy to Clipboard Copied! Toggle word wrap Toggle overflow - Run the following command to build and deploy the project.
mvn install -Pdeploy
mvn install -PdeployCopy to Clipboard Copied! Toggle word wrap Toggle overflow - When the server starts, navigate to the
example-camel-transacted-jms/ordersdirectory.
5.2.7.2. Configuring Transacted JMS
camel-jms component in a transacted session.
5.2.7.3. Undeploy the Application
mvn clean -Pdeploy
mvn clean -Pdeploy
Appendix A. Editing Profiles with the Built-In Text Editor
Abstract
profile-edit command with no arguments except for the profile's name (and optionally, version); or adding the --pid option for editing OSGi PID properties; or adding the --resource option for editing general resources.
A.1. Editing Agent Properties
Overview
Open the agent properties resource
JBossFuse:karaf@root> profile-edit Profile [Version]
JBossFuse:karaf@root> profile-edit Profile [Version]Profile is the name of the profile to edit and you can optionally specify the profile version, Version, as well. The text editor opens in the console window, showing the current profile name and version in the top-left corner of the Window. The bottom row of the editor screen summarizes the available editing commands and you can use the arrow keys to move about the screen.
Specifying feature repository locations
repository.ID=URL
repository.ID=URLID is an arbitrary unique identifier and URL gives the location of a single feature repository (only one repository URL can be specified on a line).
Specifying deployed features
feature.ID=FeatureName
feature.ID=FeatureNameID is an arbitrary unique identifier and FeatureName is the name of a feature.
Specifying deployed bundles
bundle.ID=URL
bundle.ID=URLID is an arbitrary unique identifier and URL specifies the bundle's location.
blueprint: (or spring:) URL handler to deploy a Blueprint XML resource (or a Spring XML resource) as an OSGi bundle.
Specifying bundle overrides
override.ID=URL
override.ID=URLID is an arbitrary unique identifier and URL specifies the bundle's location.
Specifying etc/config.properties properties
etc/config.properties in a standalone container), add a line in the following format:
config.Property=Value
config.Property=ValueSpecifying etc/system.properties properties
etc/system.properties in a standalone container), add a line in the following format:
system.Property=Value
system.Property=ValueProperty, is already set at the JVM level (for example, through the --jvm-opts option to the fabric:container-create command), the preceding fabric:profile-edit command will not override the JVM level setting. To override a JVM level setting, set the system property as follows:
system.karaf.override.Property=Value
system.karaf.override.Property=ValueSpecifying libraries to add to Java runtime lib/
lib/ directory of the underlying Java runtime), add a line in the following format:
lib.ID=URL
lib.ID=URLID is an arbitrary unique identifier and URL specifies the library's location.
Specifying libraries to add to Java runtime lib/ext/
lib/ext/ directory of the underlying Java runtime), add a line in the following format:
ext.ID=URL
ext.ID=URLID is an arbitrary unique identifier and URL specifies the extension library's location.
Specifying libraries to add to Java runtime lib/endorsed/
lib/endorsed/ directory of the underlying Java runtime), add a line in the following format:
endorsed.ID=URL
endorsed.ID=URLID is an arbitrary unique identifier and URL specifies the endorsed library's location.
Example
mq-client profile's agent properties for editing, enter the following console command:
JBossFuse:karaf@root> profile-edit mq-client
JBossFuse:karaf@root> profile-edit mq-client^X to quit the text editor and get back to the console prompt.
A.2. Editing OSGi Config Admin Properties
Overview
Persistent ID
PID persistent ID are defined in the PID.properties resource.
Open the Config Admin properties resource
PID persistent ID, enter the following console command:
JBossFuse:karaf@root> profile-edit --pid PID Profile [Version]
JBossFuse:karaf@root> profile-edit --pid PID Profile [Version]--resource PID.properties in the profile-edit command, instead of using the --pid PID option.
Specifying OSGi config admin properties
PID.properties resource (which is actually stored in the ZooKeeper registry). To edit the properties, add, modify, or delete lines of the following form:
Property=Value
Property=ValueExample
io.fabric8.hadoop PID in the hadoop-base profile, enter the following console command:
JBossFuse:karaf@root> profile-edit --resource io.fabric8.hadoop.properties hadoop-base 1.0
JBossFuse:karaf@root> profile-edit --resource io.fabric8.hadoop.properties hadoop-base 1.0\:). Strictly speaking, it is only necessary to escape a colon if it appears as part of a property name (left hand side of the equals sign), but the profile-edit command automatically escapes all colons when it writes to a resource. When manually editing resources using the text editor, however, you do not need to escape colons in URLs appearing on the right hand side of the equals sign.
^X to quit the text editor and get back to the console prompt.
A.3. Editing Other Resources
Overview
Creating and editing an arbitrary resource
JBossFuse:karaf@root> profile-edit --resource Resource Profile [Version]
JBossFuse:karaf@root> profile-edit --resource Resource Profile [Version]Resource is the name of the profile resource you want to edit. If Resource does not already exist, it will be created.
broker.xml example
mq-base profile has the broker.xml resource, which stores the contents of an Apache ActiveMQ broker configuration file. To edit the broker.xml resource, enter the following console command:
JBossFuse:karaf@root> profile-edit --resource broker.xml mq-base 1.0
JBossFuse:karaf@root> profile-edit --resource broker.xml mq-base 1.0^X to quit the text editor and get back to the console prompt.
Referencing a profile resource
profile:ResourceName A key characteristic of the profile URL is that the location of a resource can change dynamically at run time, as follows:
- The profile URL handler first tries to find the named resource,
ResourceName, in the current version of the current profile (where the current version is a property of the container in which the profile is running). - If the specified resource is not found under the current profile, the profile URL tries to find the resource in the current version of the parent profile.
org.ops4j.pax.web.config.url=${profile:jetty.xml}
org.ops4j.pax.web.config.url=${profile:jetty.xml}
A.4. Profile Attributes
Overview
parents attribute
parents attribute is a list of one or more parent profiles. This attribute can be set using the profile-change-parents console command. For example, to assign the parent profiles camel and cxf to the my-camel-cxf-profile profile, you would enter the following console command:
JBossFuse:karaf@root> profile-change-parents --version 1.0 my-camel-cxf-profile camel cxf
JBossFuse:karaf@root> profile-change-parents --version 1.0 my-camel-cxf-profile camel cxfabstract attribute
abstract attribute is set to true, the profile cannot be directly deployed to a container. This is useful for profiles that are only intended to be the parents of other profiles—for example, mq-base. You can set the abstract attribute from the Management Console.
locked attribute
hidden attribute
hidden attribute is a flag that is typically set on profiles that Fabric creates automatically (for example, to customize the setup of a registry server). By default, hidden profiles are not shown when you run the profile-list command, but you can see them when you add the --hidden flag, as follows:
Legal Notice
Trademark Disclaimer