Ce contenu n'est pas disponible dans la langue sélectionnée.
Chapter 1. Add compute and storage resources
Red Hat Hyperconverged Infrastructure for Virtualization (RHHI for Virtualization) can be scaled to 6, 9, or 12 nodes.
You can add compute and storage resources in several ways:
You can also increase the space available on your existing nodes to expand storage without expanding compute resources.
OpenShift Container Storage on top of Red Hat Hyperconverged Infrastructure for Virtualization (hyperconverged nodes that host virtual machines installed with Red Hat OpenShift Container Platform) is not a supported configuration.
1.1. Creating new bricks using ansible
If you want to create bricks on a lot of hosts at once, you can automate the process by creating an ansible playbook. Follow this process to create and run a playbook that creates, formats, and mounts bricks for use in a hyperconverged environment.
Prerequisites
Install the physical machines to host your new bricks.
Follow the instructions in Installing hyperconverged hosts.
Configure key-based SSH authentication without a password between all nodes.
Configure this from the node that is running the Web Console to all new nodes, and from the first new node to all other new nodes.
ImportantRHHI for Virtualization expects key-based SSH authentication without a password between these nodes for both IP addresses and FQDNs. Ensure that you configure key-based SSH authentication between these machines for the IP address and FQDN of all storage and management network interfaces.
Follow the instructions in Using key pairs instead of passwords for SSH authentication to configure key based authentication without a password.
- Verify that your hosts do not use a Virtual Disk Optimization (VDO) layer. If you have a VDO layer, use Section 1.2, “Creating new bricks above VDO layer using ansible” instead.
Procedure
Create an
inventoryfileCreate a new
inventoryfile in the/etc/ansible/roles/gluster.infra/playbooksdirectory using the following example.This file lists the hosts on which to create new bricks.
Example
inventoryfile[hosts] server4.example.com server5.example.com server6.example.com
Create a
bricks.ymlvariables fileCreate a new
bricks.ymlfile in the/etc/ansible/roles/gluster.infra/playbooksdirectory using the following example.This file defines the underlying storage infrastructure and settings to be created or used on each host.
Example
bricks.ymlvariable file# gluster_infra_disktype # Set a disk type. Options: JBOD, RAID6, RAID10 - Default: JBOD gluster_infra_disktype: RAID10 # gluster_infra_dalign # Dataalignment, for JBOD default is 256K if not provided. # For RAID{6,10} dataalignment is computed by multiplying # gluster_infra_diskcount and gluster_infra_stripe_unit_size. gluster_infra_dalign: 256K # gluster_infra_diskcount # Required only for RAID6 and RAID10. gluster_infra_diskcount: 10 # gluster_infra_stripe_unit_size # Required only in case of RAID6 and RAID10. Stripe unit size always in KiB, do # not provide the trailing `K' in the value. gluster_infra_stripe_unit_size: 128 # gluster_infra_volume_groups # Variables for creating volume group gluster_infra_volume_groups: - { vgname: 'vg_vdb', pvname: '/dev/vdb' } - { vgname: 'vg_vdc', pvname: '/dev/vdc' } # gluster_infra_thick_lvs # Variable for thick lv creation gluster_infra_thick_lvs: - { vgname: 'vg_vdb', lvname: 'vg_vdb_thicklv1', size: '10G' } # gluster_infra_thinpools # thinpoolname is optional, if not provided `vgname' followed by _thinpool is # used for name. poolmetadatasize is optional, default 16G is used gluster_infra_thinpools: - {vgname: 'vg_vdb', thinpoolname: 'foo_thinpool', thinpoolsize: '10G', poolmetadatasize: '1G' } - {vgname: 'vg_vdc', thinpoolname: 'bar_thinpool', thinpoolsize: '20G', poolmetadatasize: '1G' } # gluster_infra_lv_logicalvols # Thinvolumes for the brick. `thinpoolname' is optional, if omitted `vgname' # followed by _thinpool is used gluster_infra_lv_logicalvols: - { vgname: 'vg_vdb', thinpool: 'foo_thinpool', lvname: 'vg_vdb_thinlv', lvsize: '500G' } - { vgname: 'vg_vdc', thinpool: 'bar_thinpool', lvname: 'vg_vdc_thinlv', lvsize: '500G' } # Setting up cache using SSD disks gluster_infra_cache_vars: - { vgname: 'vg_vdb', cachedisk: '/dev/vdd', cachethinpoolname: 'foo_thinpool', cachelvname: 'cachelv', cachelvsize: '20G', cachemetalvname: 'cachemeta', cachemetalvsize: '100M', cachemode: 'writethrough' } # gluster_infra_mount_devices gluster_infra_mount_devices: - { path: '/rhgs/thicklv', vgname: 'vg_vdb', lvname: 'vg_vdb_thicklv1' } - { path: '/rhgs/thinlv1', vgname: 'vg_vdb', lvname: 'vg_vdb_thinlv' } - { path: '/rhgs/thinlv2', vgname: 'vg_vdc', lvname: 'vg_vdc_thinlv' }ImportantIf the
path:defined does not begin with/rhgsthe bricks are not detected automatically by the Administration Portal. Synchronize the host storage after running thecreate_brick.ymlplaybook to add the new bricks to the Administration Portal.Create a
create_brick.ymlplaybook fileCreate a new
create_brick.ymlfile in the/etc/ansible/roles/gluster.infra/playbooksdirectory using the following example.This file defines the work involved in creating a brick using the
gluster.infrarole and the variable file you created above.Example
create_brick.ymlplaybook file--- - name: Create a GlusterFS brick on the servers remote_user: root hosts: all gather_facts: false vars_files: - bricks.yml roles: - gluster.infraExecute the playbook
Run the following command from the
/etc/ansible/roles/gluster.infra/playbooksdirectory to run the playbook you created using the inventory and the variables files you defined above.# ansible-playbook -i inventory create_brick.yml
Verify that your bricks are available
-
Click Compute
Hosts and select the host. Click Storage Devices and check the list of storage devices for your new bricks.
If you cannot see your new bricks, click Sync and wait for them to appear in the list of storage devices.
-
Click Compute
1.2. Creating new bricks above VDO layer using ansible
If you want to create bricks on a lot of hosts at once, you can automate the process by creating an ansible playbook.
Prerequisites
Install the physical machines to host your new bricks.
Follow the instructions in Installing hyperconverged hosts.
Configure key-based SSH authentication without a password between all nodes.
Configure this from the node that is running the Web Console to all new nodes, and from the first new node to all other new nodes.
ImportantRHHI for Virtualization expects key-based SSH authentication without a password between these nodes for both IP addresses and FQDNs. Ensure that you configure key-based SSH authentication between these machines for the IP address and FQDN of all storage and management network interfaces.
Follow the instructions in Using key pairs instead of passwords for SSH authentication to configure key based authentication without a password.
- Verify that your hosts use a Virtual Disk Optimization (VDO) layer. If you do not have a VDO layer, use Section 1.1, “Creating new bricks using ansible” instead.
Procedure
Create an
inventoryfileCreate a new
inventoryfile in the/etc/ansible/roles/gluster.infra/playbooksdirectory using the following example.This file lists the hosts on which to create new bricks.
Example
inventoryfile[hosts] server4.example.com server5.example.com server6.example.com
Create a
bricks.ymlvariables fileCreate a new
bricks.ymlfile in the/etc/ansible/roles/gluster.infra/playbooksdirectory using the following example.This file defines the underlying storage infrastructure and settings to be created or used on each host.
Example
vdo_bricks.ymlvariable file# gluster_infra_disktype # Set a disk type. Options: JBOD, RAID6, RAID10 - Default: JBOD gluster_infra_disktype: RAID10 # gluster_infra_dalign # Dataalignment, for JBOD default is 256K if not provided. # For RAID{6,10} dataalignment is computed by multiplying # gluster_infra_diskcount and gluster_infra_stripe_unit_size. gluster_infra_dalign: 256K # gluster_infra_diskcount # Required only for RAID6 and RAID10. gluster_infra_diskcount: 10 # gluster_infra_stripe_unit_size # Required only in case of RAID6 and RAID10. Stripe unit size always in KiB, do # not provide the trailing `K' in the value. gluster_infra_stripe_unit_size: 128 # VDO creation gluster_infra_vdo: - { name: 'hc_vdo_1', device: '/dev/vdb' } - { name: 'hc_vdo_2', device: '/dev/vdc' } # gluster_infra_volume_groups # Variables for creating volume group gluster_infra_volume_groups: - { vgname: 'vg_vdb', pvname: '/dev/mapper/hc_vdo_1' } - { vgname: 'vg_vdc', pvname: '/dev/mapper/hc_vdo_2' } # gluster_infra_thick_lvs # Variable for thick lv creation gluster_infra_thick_lvs: - { vgname: 'vg_vdb', lvname: 'vg_vdb_thicklv1', size: '10G' } # gluster_infra_thinpools # thinpoolname is optional, if not provided `vgname' followed by _thinpool is # used for name. poolmetadatasize is optional, default 16G is used gluster_infra_thinpools: - {vgname: 'vg_vdb', thinpoolname: 'foo_thinpool', thinpoolsize: '10G', poolmetadatasize: '1G' } - {vgname: 'vg_vdc', thinpoolname: 'bar_thinpool', thinpoolsize: '20G', poolmetadatasize: '1G' } # gluster_infra_lv_logicalvols # Thinvolumes for the brick. `thinpoolname' is optional, if omitted `vgname' # followed by _thinpool is used gluster_infra_lv_logicalvols: - { vgname: 'vg_vdb', thinpool: 'foo_thinpool', lvname: 'vg_vdb_thinlv', lvsize: '500G' } - { vgname: 'vg_vdc', thinpool: 'bar_thinpool', lvname: 'vg_vdc_thinlv', lvsize: '500G' } # gluster_infra_mount_devices gluster_infra_mount_devices: - { path: '/rhgs/thicklv', vgname: 'vg_vdb', lvname: 'vg_vdb_thicklv1' } - { path: '/rhgs/thinlv1', vgname: 'vg_vdb', lvname: 'vg_vdb_thinlv' } - { path: '/rhgs/thinlv2', vgname: 'vg_vdc', lvname: 'vg_vdc_thinlv' }ImportantIf the
path:defined does not begin with/rhgsthe bricks are not detected automatically by the Administration Portal. Synchronize the host storage after running thecreate_brick.ymlplaybook to add the new bricks to the Administration Portal.Create a
create_brick.ymlplaybook fileCreate a new
create_brick.ymlfile in the/etc/ansible/roles/gluster.infra/playbooksdirectory using the following example.This file defines the work involved in creating a brick using the
gluster.infrarole and the variable file you created above.Example
create_brick.ymlplaybook file--- - name: Create a GlusterFS brick on the servers remote_user: root hosts: all gather_facts: false vars_files: - vdo_bricks.yml roles: - gluster.infraExecute the playbook
Run the following command from the
/etc/ansible/roles/gluster.infra/playbooksdirectory to run the playbook you created using the inventory and the variables files you defined above.# ansible-playbook -i inventory create_brick.yml
Verify that your bricks are available
-
Click Compute
Hosts and select the host. Click Storage Devices and check the list of storage devices for your new bricks.
If you cannot see your new bricks, click Sync and wait for them to appear in the list of storage devices.
-
Click Compute
1.3. Expanding volume from Red Hat Virtualization Manager
Follow this section to expand an existing volume across new bricks on new hyperconverged nodes.
Prerequisites
- Verify that your scaling plans are supported: Requirements for scaling.
Install three physical machines to serve as the new hyperconverged nodes.
Follow the instructions in Installing hyperconverged hosts.
Configure key-based SSH authentication without a password.
Configure this from the node that is running the Web Console to all new nodes, and from the first new node to all other new nodes.
ImportantRHHI for Virtualization expects key-based SSH authentication without a password between these nodes for both IP addresses and FQDNs. Ensure that you configure key-based SSH authentication between these machines for the IP address and FQDN of all storage and management network interfaces.
Follow the instructions in Using key pairs instead of passwords for SSH authentication to configure key based authentication without a password.
Procedure
Create new bricks
Create the bricks on the servers you want to expand your volume across by following the instructions in Creating bricks using ansible or Creating bricks above a VDO layer using ansible depending on your requirements.
ImportantIf the
path:defined does not begin with/rhgsthe bricks are not detected automatically by the Administration Portal. Synchronize the host storage after running thecreate_brick.ymlplaybook to synchronize the new bricks to the Administration Portal.-
Click Compute
Hosts and select the host. - Click Storage Devices.
- Click Sync.
Repeat for each host that has new bricks.
-
Click Compute
Add new bricks to the volume
- Log in to RHV Administration Console.
-
Click Storage
Volumes and select the volume to expand. - Click the Bricks tab.
- Click Add. The Add Bricks window opens.
Add new bricks.
- Select the brick host from the Host dropdown menu.
- Select the brick to add from the Brick Directory dropdown menu and click Add.
- When all bricks are listed, click OK to add bricks to the volume.
The volume automatically syncs the new bricks.
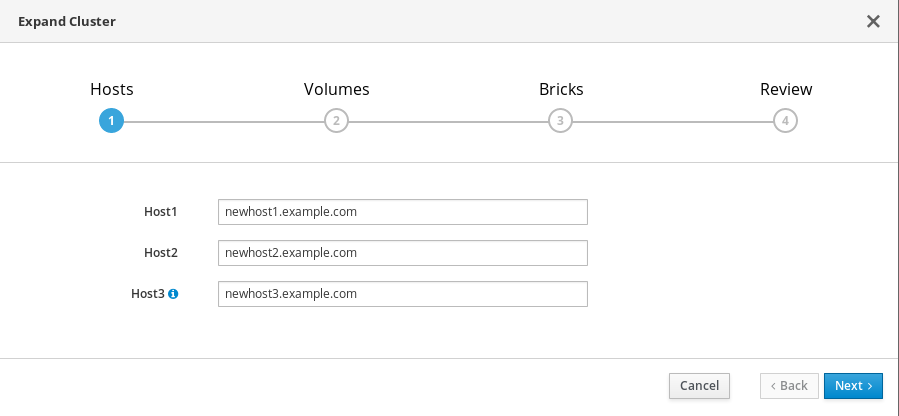
1.4. Expanding the hyperconverged cluster by adding a new volume on new nodes using the Web Console
Follow these instructions to use the Web Console to expand your hyperconverged cluster with a new volume on new nodes.
Prerequisites
- Verify that your scaling plans are supported: Requirements for scaling.
Install three physical machines to serve as the new hyperconverged nodes.
Follow the instructions in Installing hyperconverged hosts.
Configure key-based SSH authentication without a password.
Configure this from the node that is running the Web Console to all new nodes, and from the first new node to all other new nodes.
ImportantRHHI for Virtualization expects key-based SSH authentication without a password between these nodes for both IP addresses and FQDNs. Ensure that you configure key-based SSH authentication between these machines for the IP address and FQDN of all storage and management network interfaces.
Follow the instructions in Using key pairs instead of passwords for SSH authentication to configure key based authentication without a password.
Procedure
- Log in to the Web Console.
-
Click Virtualization
Hosted Engine and then click Manage Gluster. Click Expand Cluster. The Gluster Deployment window opens.
On the Hosts tab, enter the FQDN or IP address of the new hyperconverged nodes and click Next.
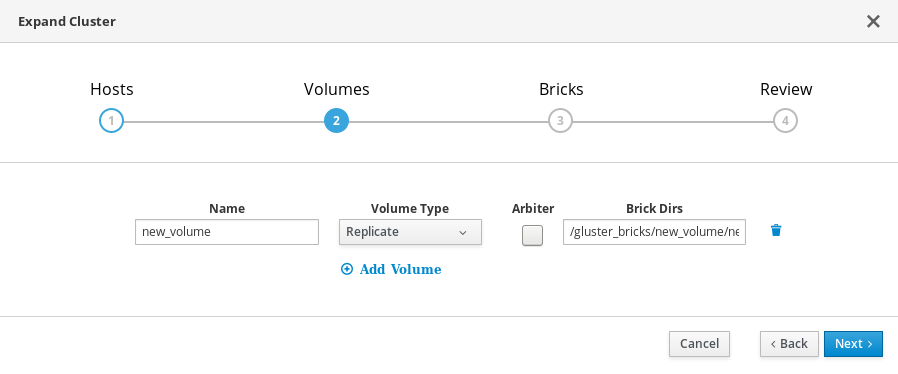
On the Volumes tab, specify the details of the volume you want to create.
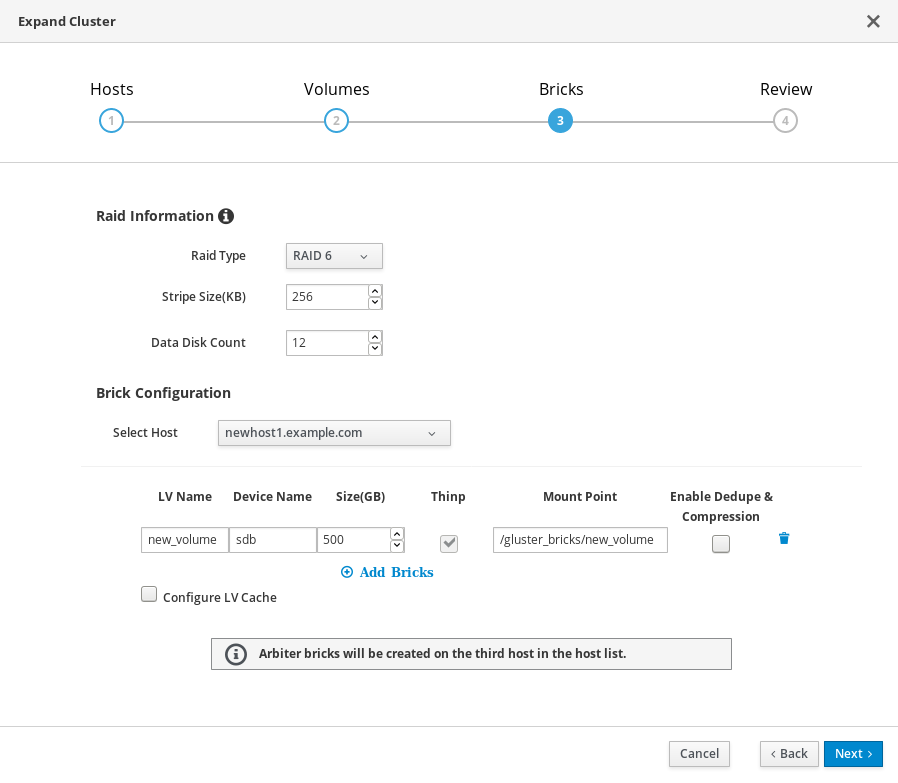
On the Bricks tab, specify the details of the disks to be used to create the Gluster volume.
On the Review tab, check the generated file for any problems. When you are satisfied, click Deploy.
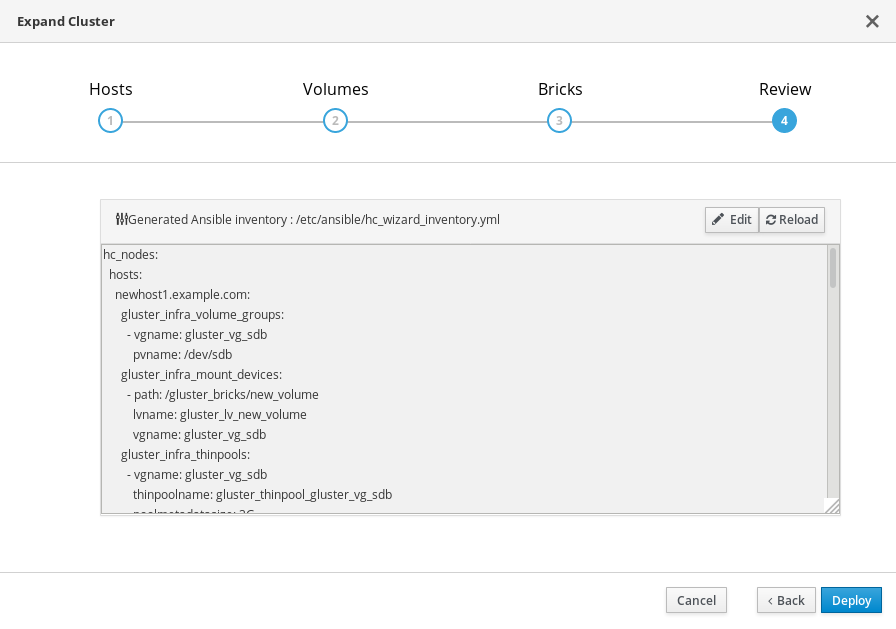
Deployment takes some time to complete. The following screen appears when the cluster has been successfully expanded.

1.4.1. Configure additional hyperconverged hosts
If your environment uses IPv6 addresses, or if you did not specify additional hyperconverged hosts as part of Configure Red Hat Gluster Storage for Hosted Engine using the Web Console, follow these steps in the Administration Portal for each of the other hyperconverged hosts.
-
Click Compute
Hosts and then click New to open the New Host window. - Provide the Name, Hostname, and Password for the host that you want to manage.
- Under Advanced Parameters, uncheck the Automatically configure host firewall checkbox, as firewall rules are already configured by the deployment process.
- In the Hosted Engine tab of the New Host dialog, set the value of Choose hosted engine deployment action to Deploy. This ensures that the hosted engine can run on the new host.
- Click OK.
Attach the gluster network to all remaining hosts
- Click the name of the newly added host to go to the host page.
- Click the Network Interfaces subtab and then click Setup Host Networks.
- Drag and drop the newly created network to the correct interface.
- Ensure that the Verify connectivity checkbox is checked.
- Ensure that the Save network configuration checkbox is checked.
- Click OK to save.
In the General subtab for this host, verify that the value of Hosted Engine HA is Active, with a positive integer as a score.
ImportantIf Score is listed as N/A, you may have forgotten to select the deploy action for Choose hosted engine deployment action. Follow the steps in Reinstalling a hyperconverged host in Maintaining Red Hat Hyperconverged Infrastructure for Virtualization to reinstall the host with the deploy action.
Verify the health of the network
Click the Network Interfaces tab and check the state of the host’s network. If the network interface enters an "Out of sync" state or does not have an IP Address, click Management
Refresh Capabilities.
See the Red Hat Virtualization 4.4 Self-Hosted Engine Guide for further details: https://access.redhat.com/documentation/en-us/red_hat_virtualization/4.4/html/self-hosted_engine_guide/chap-installing_additional_hosts_to_a_self-hosted_environment