Ce contenu n'est pas disponible dans la langue sélectionnée.
Chapter 1. Get Started Developing Applications
1.1. Introduction
1.1.1. About Red Hat JBoss Enterprise Application Platform 7
Red Hat JBoss Enterprise Application Platform 7 (JBoss EAP) is a middleware platform built on open standards and compliant with the Java Enterprise Edition 7 specification. It integrates WildFly Application Server 10 with messaging, high-availability clustering, and other technologies.
JBoss EAP includes a modular structure that allows service enabling only when required, improving startup speed.
The management console and management command-line interface (CLI) make editing XML configuration files unnecessary and add the ability to script and automate tasks.
JBoss EAP provides two operating modes for JBoss EAP instances: standalone server or managed domain. The standalone server operating mode represents running JBoss EAP as a single server instance. The managed domain operating mode allows for the management of multiple JBoss EAP instances from a single control point.
In addition, JBoss EAP includes APIs and development frameworks for quickly developing secure and scalable Java EE applications.
1.2. Become Familiar with Java Enterprise Edition 7
1.2.1. Overview of EE 7 Profiles
Java Enterprise Edition 7 (EE 7) includes support for multiple profiles, or subsets of APIs. The only two profiles that the EE 7 specification defines are the Full Profile and the Web Profile.
EE 7 Full Profile includes all APIs and specifications included in the EE 7 specification. EE 7 Web Profile includes a selected subset of APIs, which are designed to be useful to web developers.
JBoss EAP is a certified implementation of the Java Enterprise Edition 7 Full Profile and Web Profile specifications.
Java Enterprise Edition 7 Web Profile
The Web Profile is one of two profiles defined by the Java Enterprise Edition 7 specification, and is designed for web application development. The Web Profile supports the following APIs:
Java EE 7 Web Profile Requirements:
- Java Platform, Enterprise Edition 7
Java Web Technologies:
- Servlet 3.1 (JSR 340)
- JSP 2.3
- Expression Language (EL) 3.0
- JavaServer Faces (JSF) 2.2 (JSR 344)
Java Standard Tag Library (JSTL) for JSP 1.2
NoteA known security risk in JBoss EAP exists where the Java Standard Tag Library (JSTL) allows the processing of external entity references in untrusted XML documents which could access resources on the host system and, potentially, allow arbitrary code execution.
To avoid this, the JBoss EAP server has to be run with system property
org.apache.taglibs.standard.xml.accessExternalEntitycorrectly set, usually with an empty string as value. This can be done in two ways:Configuring the system properties and restarting the server.
org.apache.taglibs.standard.xml.accessExternalEntity
org.apache.taglibs.standard.xml.accessExternalEntityCopy to Clipboard Copied! Toggle word wrap Toggle overflow -
Passing
-Dorg.apache.taglibs.standard.xml.accessExternalEntity=""as an argument to thestandalone.shordomain.shscripts.
- Debugging Support for Other Languages 1.0 (JSR 45)
Enterprise Application Technologies:
- Contexts and Dependency Injection (CDI) 1.1 (JSR 346)
- Dependency Injection for Java 1.0 (JSR 330)
- Enterprise JavaBeans 3.2 Lite (JSR 345)
- Java Persistence API 2.1 (JSR 338)
- Common Annotations for the Java Platform 1.1 (JSR 250)
- Java Transaction API (JTA) 1.2 (JSR 907)
- Bean Validation 1.1 (JSR 349)
The other profile defined by the Java EE 7 specification is the Full Profile, and includes several more APIs.
Java Enterprise Edition 7 Full Profile
The Java Enterprise Edition 7 (EE 7) specification defines a concept of profiles, and defines two of them as part of the specification. The Full Profile supports the following APIs, as well as those supported in the Java Enterprise Edition 7 Web Profile:
Included in the EE 7 Full Profile:
- Batch 1.0
- JSON-P 1.0
- Concurrency 1.0
- WebSocket 1.1
- JMS 2.0
- JPA 2.1
- JCA 1.7
- JAX-RS 2.0
- JAX-WS 2.2
- Servlet 3.1
- JSF 2.2
- JSP 2.3
- EL 3.0
- CDI 1.1
- CDI Extensions
- JTA 1.2
- Interceptors 1.2
- Common Annotations 1.1
- Managed Beans 1.0
- EJB 3.2
- Bean Validation 1.1
1.3. Setting Up the Development Environment
1.3.1. Download JBoss Developer Studio
JBoss Developer Studio can be downloaded from the Red Hat Customer Portal.
- Log in to the Red Hat Customer Portal.
- Click Downloads.
- In the Product Downloads list, click Red Hat JBoss Developer Studio.
Select the desired version in the Version drop-down menu.
NoteIt is recommended to use JBoss Developer Studio version 9.1 or later.
- Find the Red Hat JBoss Developer Studio 9.x.x Stand-alone Installer entry in the table and click Download.
- Save the JAR file to the desired directory.
1.3.2. Install JBoss Developer Studio
- Open a terminal and navigate to the directory containing the downloaded JAR file.
Run the following command to launch the GUI installation program:
java -jar jboss-devstudio-BUILD_VERSION-installer-standalone.jar
$ java -jar jboss-devstudio-BUILD_VERSION-installer-standalone.jarCopy to Clipboard Copied! Toggle word wrap Toggle overflow NoteAlternatively, you may be able to double-click the JAR file to launch the installation program.
- Click Next to start the installation process.
- Select I accept the terms of this license agreement and click Next.
Adjust the installation path and click Next.
NoteIf the installation path folder does not exist, a prompt will appear. Click OK to create the folder.
- Choose a JVM, or leave the default JVM selected, and click Next.
- Click Next when asked to select platforms and servers.
- Review the installation details, and click Next.
- Click Next when the installation process is complete.
- Configure the desktop shortcuts for JBoss Developer Studio, and click Next.
- Click Done.
1.3.3. Start JBoss Developer Studio
To start JBoss Developer Studio, you can double-click on the desktop shortcut created during the installation, or you can start it from a command line. Follow the below steps to start JBoss Developer Studio using the command line.
- Open a terminal and navigate to the JBoss Developer Studio installation directory.
Run the following command to start JBoss Developer Studio:
./jbdevstudio
$ ./jbdevstudioCopy to Clipboard Copied! Toggle word wrap Toggle overflow NoteFor Windows Server, use the
jbdevstudio.batfile.
1.3.4. Add the JBoss EAP Server to JBoss Developer Studio
These instructions assume that you have not yet added any JBoss EAP servers to JBoss Developer Studio. Use the following steps to add your JBoss EAP server using the Define New Server wizard.
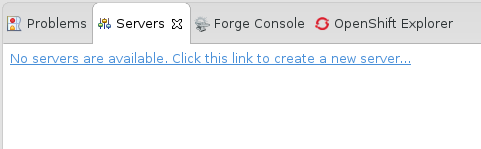
Open the Servers tab.
NoteIf the Servers tab is not shown, add it to the panel by selecting Window
Show View Servers. Click on the No servers are available. Click this link to create a new server link.
Figure 1.1. Add a New Server
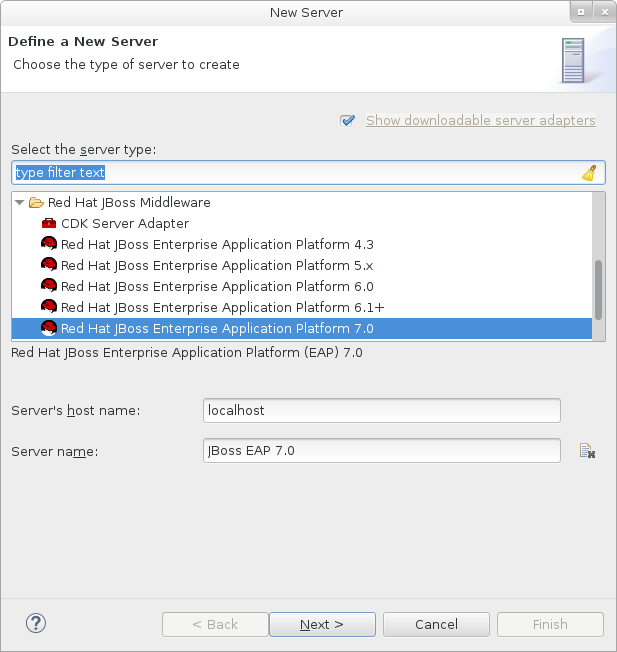
Expand Red Hat JBoss Middleware and choose JBoss Enterprise Application Platform 7.0. Enter a server name, for example,
JBoss EAP 7.0, then click Next.Figure 1.2. Define a New Server
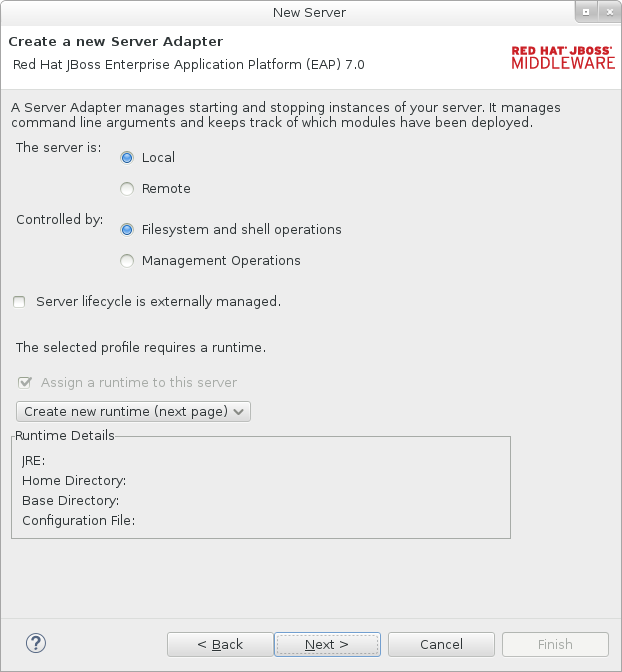
Create a server adapter to manage starting and stopping the server. Keep the defaults and click Next.
Figure 1.3. Create a New Server Adapter
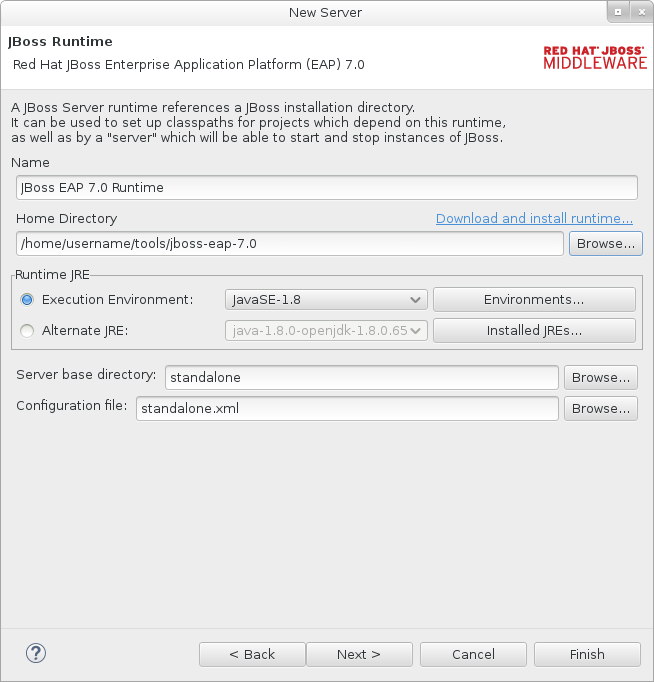
Enter a name, for example
JBoss EAP 7.0 Runtime. Click Browse next to Home Directory and navigate to your JBoss EAP installation directory. Then click Next.Figure 1.4. Add New Server Runtime Environment
NoteSome quickstarts require that you run the server with a different profile or additional arguments. For example, to deploy a quickstart that requires the full profile, you must define a new server and specify
standalone-full.xmlin the Configuration file field. Be sure to give the new server a descriptive name.Configure existing projects for the new server. Because you do not have any projects at this point, click Finish.
Figure 1.5. Modify Resources for the New Server

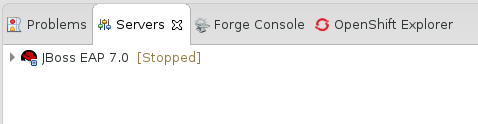
The JBoss EAP 7.0 server is now listed in the Servers tab.
Figure 1.6. Server List
1.4. Using the Quickstart Examples
1.4.1. About Maven
Apache Maven is a distributed build automation tool used in Java application development to create, manage, and build software projects. Maven uses standard configuration files called Project Object Model (POM) files to define projects and manage the build process. POMs describe the module and component dependencies, build order, and targets for the resulting project packaging and output using an XML file. This ensures that the project is built in a correct and uniform manner.
Maven achieves this by using a repository. A Maven repository stores Java libraries, plug-ins, and other build artifacts. The default public repository is the Maven 2 Central Repository, but repositories can be private and internal within a company with a goal to share common artifacts among development teams. Repositories are also available from third-parties. For more information, see the Apache Maven project and the Introduction to Repositories guide.
JBoss EAP includes a Maven repository that contains many of the requirements that Java EE developers typically use to build applications on JBoss EAP.
For more information, see Using Maven with JBoss EAP.
1.4.1.1. Using Maven with the Quickstarts
The artifacts and dependencies needed to build and deploy applications to JBoss EAP 7 are hosted on a public repository. Starting with the JBoss EAP 7 quickstarts, it is no longer necessary to configure your Maven settings.xml file to use these repositories when building the quickstarts. The Maven repositories are now configured in the quickstart project POM files. This method of configuration is provided to make it easier to get started with the quickstarts, however, is generally not recommended for production projects because it can slow down your build.
Red Hat JBoss Developer Studio includes Maven, so there is no need to download and install it separately. It is recommended to use JBoss Developer Studio version 9.1 or later.
If you plan to use the Maven command line to build and deploy your applications, then you must first download Maven from the Apache Maven project and install it using the instructions provided in the Maven documentation.
1.4.2. Download and Run the Quickstart Code Examples
1.4.2.1. Download the Quickstarts
JBoss EAP comes with a comprehensive set of quickstart code examples designed to help users begin writing applications using various Java EE 7 technologies. The quickstarts can be downloaded from the Red Hat Customer Portal.
- Log in to the Red Hat Customer Portal.
- Click Downloads.
- In the Product Downloads list, click Red Hat JBoss Enterprise Application Platform.
- Select the desired version in the Version drop-down menu.
- Find the Red Hat JBoss Enterprise Application Platform 7.0.0 Quickstarts entry in the table and click Download.
- Save the ZIP file to the desired directory.
- Extract the ZIP file.
1.4.2.2. Run the Quickstarts in JBoss Developer Studio
Once the quickstarts have been downloaded, they can be imported into JBoss Developer Studio and deployed to JBoss EAP.
Import a Quickstart into JBoss Developer Studio
Each quickstart ships with a POM file that contains its project and configuration information. Use this POM file to easily import the quickstart into JBoss Developer Studio.
If your quickstart project folder is located within the IDE workspace when you import it into JBoss Developer Studio, the IDE generates an invalid project name and WAR archive name. Be sure your quickstart project folder is located outside the IDE workspace before you begin.
- Start JBoss Developer Studio.
-
Select File
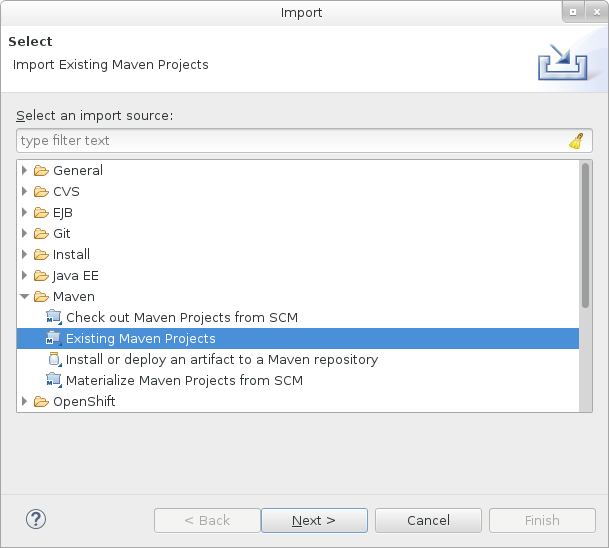
Import. Choose Maven
Existing Maven Projects, then click Next. Figure 1.7. Import Existing Maven Projects
Browse to the desired quickstart’s directory (for example the
helloworldquickstart), and click OK. The Projects list box is populated with thepom.xmlfile of the selected quickstart project.Figure 1.8. Select Maven Projects
- Click Finish.

Run the helloworld Quickstart
Running the helloworld quickstart is a simple way to verify that the JBoss EAP server is configured and running correctly.
- If you have not yet defined a server, add the JBoss EAP server to JBoss Developer Studio.
Right-click the jboss-helloworld project in the Project Explorer tab and select Run As
Run on Server. Figure 1.9. Run As - Run on Server
Select JBoss EAP 7.0 from the server list and click Next.
Figure 1.10. Run on Server
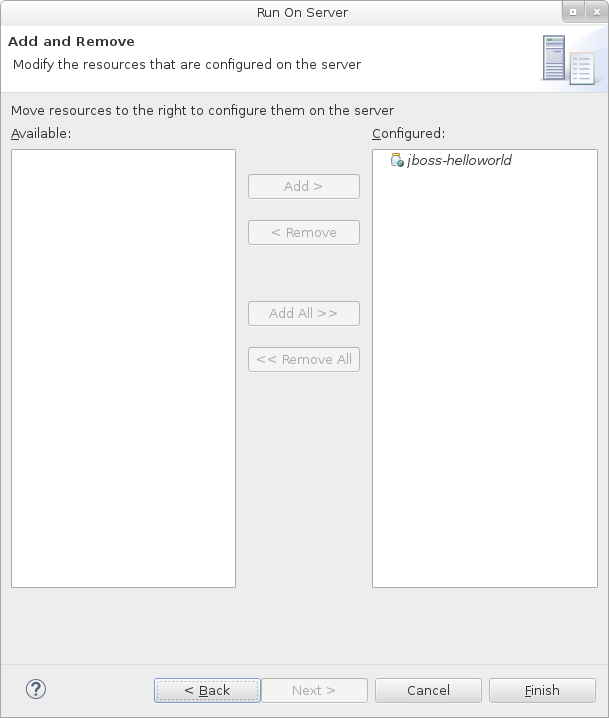
The jboss-helloworld quickstart is already listed to be configured on the server. Click Finish to deploy the quickstart.
Figure 1.11. Modify Resources Configured on the Server
Verify the results.
-
In the Server tab, the
JBoss EAP 7.0server status changes toStarted. The Console tab shows messages detailing the JBoss EAP server start and the
helloworldquickstart deployment.WFLYUT0021: Registered web context: /jboss-helloworld WFLYSRV0010: Deployed "jboss-helloworld.war" (runtime-name : "jboss-helloworld.war")
WFLYUT0021: Registered web context: /jboss-helloworld WFLYSRV0010: Deployed "jboss-helloworld.war" (runtime-name : "jboss-helloworld.war")Copy to Clipboard Copied! Toggle word wrap Toggle overflow -
The
helloworldapplication is available at http://localhost:8080/jboss-helloworld and displays the textHello World!.
-
In the Server tab, the


Run the bean-validation Quickstart
Some quickstarts, such as the bean-validation quickstart, do not provide a user interface layer and instead provide Arquillian tests to demonstrate functionality.
-
Import the
bean-validationquickstart into JBoss Developer Studio. - In the Servers tab, right-click on the server and choose Start to start the JBoss EAP server. If you do not see a Servers tab or have not yet defined a server, add the JBoss EAP server to Red Hat JBoss Developer Studio.
-
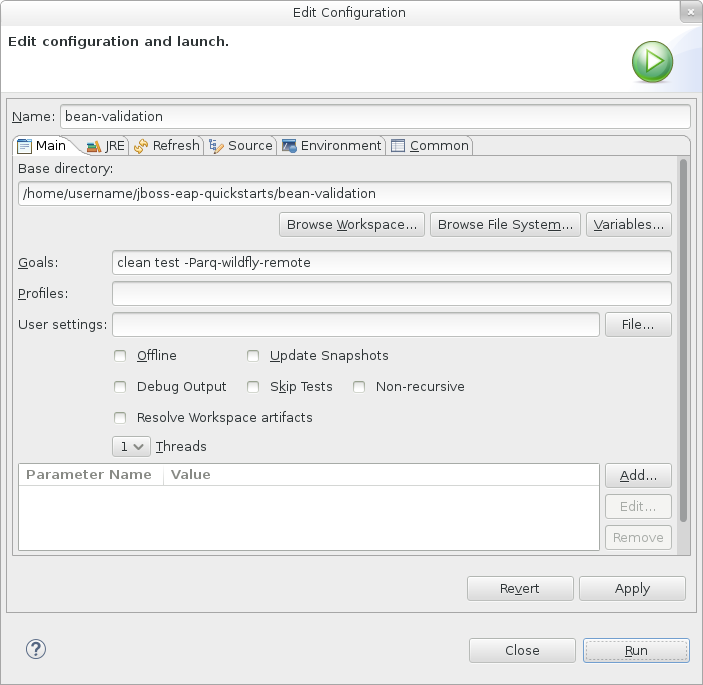
Right-click on the
jboss-bean-validationproject in the Project Explorer tab and select Run AsMaven Build. Enter the following in the Goals input field and then click Run.
clean test -Parq-wildfly-remote
clean test -Parq-wildfly-remoteCopy to Clipboard Copied! Toggle word wrap Toggle overflow Figure 1.12. Edit Configuration
Verify the results.
The Console tab shows the results of the
bean-validationArquillian tests:Copy to Clipboard Copied! Toggle word wrap Toggle overflow
1.4.2.3. Run the Quickstarts from the Command Line
You can easily build and deploy the quickstarts from the command line using Maven. If you do not yet have Maven installed, see the Apache Maven project to download and install it.
A README.md file is provided at the root directory of the quickstarts that contains general information about system requirements, configuring Maven, adding users, and running the quickstarts.
Each quickstart also contains its own README.md file that provides the specific instructions and Maven commands to run that quickstart.
Run the helloworld Quickstart from the Command Line
-
Review the
README.mdfile in the root directory of the helloworld quickstart. Start the JBoss EAP server.
EAP_HOME/bin/standalone.sh
$ EAP_HOME/bin/standalone.shCopy to Clipboard Copied! Toggle word wrap Toggle overflow - Navigate to the helloworld quickstart directory.
Build and deploy the quickstart using the Maven command provided in the quickstart’s
README.mdfile.mvn clean install wildfly:deploy
mvn clean install wildfly:deployCopy to Clipboard Copied! Toggle word wrap Toggle overflow -
The helloworld application is now available at http://localhost:8080/jboss-helloworld and displays the text
Hello World!.
1.4.3. Review the Quickstart Tutorials
1.4.3.1. Explore the helloworld Quickstart
The helloworld quickstart shows you how to deploy a simple servlet to JBoss EAP. The business logic is encapsulated in a service, which is provided as a Contexts and Dependency Injection (CDI) bean and injected into the Servlet. This quickstart is a starting point to be sure you have configured and started your server properly.
Detailed instructions to build and deploy this quickstart using the command line can be found in the README.html file at the root of the helloworld quickstart directory. This topic shows you how to use Red Hat JBoss Developer Studio to run the quickstart and assumes you have installed Red Hat JBoss Developer Studio, configured Maven, and imported and successfully run the helloworld quickstart.
Prerequisites
- Install Red Hat JBoss Developer Studio.
- Follow the instructions to run the quickstarts in JBoss Developer Studio.
-
Verify that the
helloworldquickstart was successfully deployed to JBoss EAP by opening a web browser and accessing the application at http://localhost:8080/jboss-helloworld
Examine the Directory Structure
The code for the helloworld quickstart can be found in the QUICKSTART_HOME/helloworld directory. The helloworld quickstart is comprised of a Servlet and a CDI bean. It also contains a beans.xml file in the application’s WEB-INF directory that has a version number of 1.1 and a bean-discovery-mode of all. This marker file identifies the WAR as a bean archive and tells JBoss EAP to look for beans in this application and to activate the CDI.
The src/main/webapp/ directory contains the files for the quickstart. All the configuration files for this example are located in the WEB-INF/ directory within src/main/webapp/, including the beans.xml file. The src/main/webapp/ directory also includes an index.html file, which uses a simple meta refresh to redirect the user’s browser to the Servlet, which is located at http://localhost:8080/jboss-helloworld/HelloWorld. The quickstart does not require a web.xml file.
Examine the Code
The package declaration and imports have been excluded from these listings. The complete listing is available in the quickstart source code.
Review the
HelloWorldServletcode.The
HelloWorldServlet.javafile is located in thesrc/main/java/org/jboss/as/quickstarts/helloworld/directory. This servlet sends the information to the browser.HelloWorldServlet Class Code Example
Copy to Clipboard Copied! Toggle word wrap Toggle overflow Expand Table 1.1. HelloWorldServlet Details Line Note 43
All you need to do is add the
@WebServletannotation and provide a mapping to a URL used to access the servlet.46-48
Every web page needs correctly formed HTML. This quickstart uses static Strings to write the minimum header and footer output.
50-51
These lines inject the HelloService CDI bean which generates the actual message. As long as we don’t alter the API of HelloService, this approach allows us to alter the implementation of HelloService at a later date without changing the view layer.
58
This line calls into the service to generate the message "Hello World", and write it out to the HTTP request.
Review the
HelloServicecode.The
HelloService.javafile is located in thesrc/main/java/org/jboss/as/quickstarts/helloworld/directory. This service simply returns a message. No XML or annotation registration is required.HelloService Class Code Example
Copy to Clipboard Copied! Toggle word wrap Toggle overflow
1.4.3.2. Explore the numberguess Quickstart
The numberguess quickstart shows you how to create and deploy a simple non-persistant application to JBoss EAP. Information is displayed using a JSF view and business logic is encapsulated in two CDI beans. In the numberguess quickstart, you have ten attempts to guess a number between 1 and 100. After each attempt, you’re told whether your guess was too high or too low.
The code for the numberguess quickstart can be found in the QUICKSTART_HOME/numberguess directory where QUICKSTART_HOME is the directory where you downloaded and unzipped the JBoss EAP quickstarts. The numberguess quickstart is comprised of a number of beans, configuration files, and Facelets (JSF) views, and is packaged as a WAR module.
Detailed instructions to build and deploy this quickstart using the command line can be found in the README.html file at the root of the numberguess quickstart directory. The following examples use Red Hat JBoss Developer Studio to run the quickstart.
Prerequisites
- Install Red Hat JBoss Developer Studio.
-
Follow the instructions to run the quickstarts in Red Hat JBoss Developer Studio, replacing
helloworldwith thenumberguessquickstart in the instructions. -
Verify the
numberguessquickstart was deployed successfully to JBoss EAP by opening a web browser and accessing the application at this URL: http://localhost:8080/jboss-numberguess
Examine the Configuration Files
All the configuration files for this example are located in the QUICKSTART_HOME/numberguess/src/main/webapp/WEB-INF/ directory of the quickstart.
Examine the
faces-config.xmlfile.This quickstart uses the JSF 2.2 version of
faces-config.xmlfilename. A standardized version of Facelets is the default view handler in JSF 2.2 so it requires no configuration. This file consists of only the root element and is simply a marker file to indicate JSF should be enabled in the application.Copy to Clipboard Copied! Toggle word wrap Toggle overflow Examine the
beans.xmlfile.The
beans.xmlfile contains a version number of 1.1 and abean-discovery-modeofall. This file is a marker file that identifies the WAR as a bean archive and tells JBoss EAP to look for beans in this application and to activate the CDI.Copy to Clipboard Copied! Toggle word wrap Toggle overflow
This quickstart does not need a web.xml file.
1.4.3.2.1. Examine the JSF Code
JSF uses the .xhtml file extension for source files, but delivers the rendered views with the .jsf extension. The home.xhtml file is located in the src/main/webapp/ directory.
JSF Source Code
The following line numbers correspond to those seen when viewing the file in JBoss Developer Studio.
| Line | Note |
|---|---|
| 36-40 | These are the messages which can be sent to the user: "Higher!" and "Lower!" |
| 45-48 | As the user guesses, the range of numbers they can guess gets smaller. This sentence changes to make sure they know the number range of a valid guess. |
| 55-58 | This input field is bound to a bean property using a value expression. |
| 58 | A validator binding is used to make sure the user does not accidentally input a number outside of the range in which they can guess. If the validator was not here, the user might use up a guess on an out of bounds number. |
| 59-61 | There must be a way for the user to send their guess to the server. Here we bind to an action method on the bean. |
1.4.3.2.2. Examine the Class Files
All of the numberguess quickstart source files can be found in the QUICKSTART_HOME/numberguess/src/main/java/org/jboss/as/quickstarts/numberguess/ directory. The package declaration and imports have been excluded from these listings. The complete listing is available in the quickstart source code.
Review the
Random.javaQualifier CodeA qualifier is used to remove ambiguity between two beans, both of which are eligible for injection based on their type. For more information on qualifiers, see Use a Qualifier to Resolve an Ambiguous Injection. The
@Randomqualifier is used for injecting a random number.Copy to Clipboard Copied! Toggle word wrap Toggle overflow Review the
MaxNumber.javaQualifier CodeThe
@MaxNumberqualifieris used for injecting the maximum number allowed.Copy to Clipboard Copied! Toggle word wrap Toggle overflow Review the
Generator.javaCodeThe
Generatorclass creates the random number via a producer method, exposing the maximum possible number via the same. This class is application-scoped, so you don’t get a different random each time.Copy to Clipboard Copied! Toggle word wrap Toggle overflow Review the
Game.javaCodeThe session-scoped
Gameclass is the primary entry point of the application. It is responsible for setting up or resetting the game, capturing and validating the user’s guess, and providing feedback to the user with aFacesMessage. It uses the post-construct lifecycle method to initialize the game by retrieving a random number from the@Random Instance<Integer>bean.Notice the
@Namedannotation in the class. This annotation is only required when you want to make the bean accessible to a JSF view by using Expression Language (EL), in this case#{game}.Copy to Clipboard Copied! Toggle word wrap Toggle overflow
1.5. Configure the Default Welcome Web Application
JBoss EAP includes a default Welcome application, which displays at the root context on port 8080 by default.
This default Welcome application can be replaced with your own web application. This can be configured in one of two ways:
You can also disable the welcome content.
Changing the welcome-content File Handler
Modify the existing welcome-content file handler’s path to point to the new deployment.
/subsystem=undertow/configuration=handler/file=welcome-content:write-attribute(name=path,value="/path/to/content")
/subsystem=undertow/configuration=handler/file=welcome-content:write-attribute(name=path,value="/path/to/content")Alternatively, you could create a different file handler to be used by the server’s root.
/subsystem=undertow/configuration=handler/file=NEW_FILE_HANDLER:add(path="/path/to/content")
/subsystem=undertow/server=default-server/host=default-host/location=\/:write-attribute(name=handler,value=NEW_FILE_HANDLER)
/subsystem=undertow/configuration=handler/file=NEW_FILE_HANDLER:add(path="/path/to/content")
/subsystem=undertow/server=default-server/host=default-host/location=\/:write-attribute(name=handler,value=NEW_FILE_HANDLER)Reload the server for the changes to take effect.
reload
reloadChanging the default-web-module
Map a deployed web application to the server’s root.
/subsystem=undertow/server=default-server/host=default-host:write-attribute(name=default-web-module,value=hello.war)
/subsystem=undertow/server=default-server/host=default-host:write-attribute(name=default-web-module,value=hello.war)Reload the server for the changes to take effect.
reload
reloadDisabling the Default Welcome Web Application
Disable the welcome application by removing the location entry (/) for the default-host.
/subsystem=undertow/server=default-server/host=default-host/location=\/:remove
/subsystem=undertow/server=default-server/host=default-host/location=\/:removeReload the server for the changes to take effect.
reload
reload