Ce contenu n'est pas disponible dans la langue sélectionnée.
Chapter 3. Creating a workbench and a notebook
3.1. Creating a workbench and selecting a notebook image
A workbench is an instance of your development and experimentation environment. Within a workbench you can select a notebook image for your data science work.
Prerequisites
-
You created a
My Storagedata connection as described in Storing data with data connections. - You configured a pipeline server as described in Enabling data science pipelines.
Procedure
- Navigate to the project detail page for the data science project that you created in Setting up your data science project.
Click the Create workbench button.
Fill out the name and description.
Red Hat provides several supported notebook images. In the Notebook image section, you can choose one of these images or any custom images that an administrator has set up for you. The Tensorflow image has the libraries needed for this tutorial.
Select the latest Tensorflow image.
Choose a small deployment.
Leave the default environment variables and storage options.
Under Data connections, select Use existing data connection and select
My Storage(the object storage that you configured previously) from the list.Click the Create workbench button.


Verification
In the project details page, the status of the workbench changes from Starting to Running.

If you made a mistake, you can edit the workbench to make changes.

3.2. Importing the tutorial files into the Jupyter environment
The Jupyter environment is a web-based environment, but everything you do inside it happens on Red Hat OpenShift AI and is powered by the OpenShift cluster. This means that, without having to install and maintain anything on your own computer, and without disposing of valuable local resources such as CPU, GPU and RAM, you can conduct your data science work in this powerful and stable managed environment.
Prerequisite
You created a workbench, as described in Creating a workbench and selecting a Notebook image.
Procedure
Click the Open link next to your workbench. If prompted, log in and allow the Notebook to authorize your user.
Your Jupyter environment window opens.
This file-browser window shows the files and folders that are saved inside your own personal space in OpenShift AI.
Bring the content of this tutorial inside your Jupyter environment:
On the toolbar, click the Git Clone icon:
Enter the following tutorial Git https URL:
https://github.com/rh-aiservices-bu/fraud-detection.git
https://github.com/rh-aiservices-bu/fraud-detection.gitCopy to Clipboard Copied! Toggle word wrap Toggle overflow - Check the Include submodules option.
- Click Clone.
- In the file browser, select the newly-created fraud-detection folder.
Click the Git icon and then select the
v2.8branch.


Verification
Double-click the fraud-detection folder:
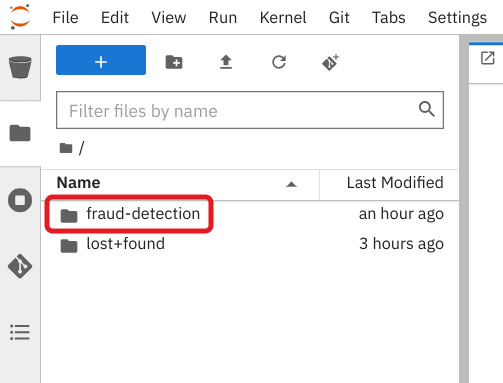
In the file browser, you should see the notebooks that you cloned from Git.

Next step
or
3.3. Running code in a notebook
If you’re already at ease with Jupyter, you can skip to the next section.
A notebook is an environment where you have cells that can display formatted text or code.
This is an empty cell:

This is a cell with some code:

Code cells contain Python code that you can run interactively. You can modify the code and then run it. The code does not run on your computer or in the browser, but directly in the environment that you are connected to, Red Hat OpenShift AI in our case.
You can run a code cell from the notebook interface or from the keyboard:
From the user interface: Select the cell (by clicking inside the cell or to the left side of the cell) and then click Run from the toolbar.
-
From the keyboard: Press
CTRLENTERto run a cell or pressSHIFTENTERto run the cell and automatically select the next one.

After you run a cell, you can see the result of its code as well as information about when the cell was run, as shown in this example:

When you save a notebook, the code and the results are saved. You can reopen the notebook to look at the results without having to run the program again, while still having access to the code.
Notebooks are so named because they are like a physical notebook: you can take notes about your experiments (which you will do), along with the code itself, including any parameters that you set. You can see the output of the experiment inline (this is the result from a cell after it’s run), along with all the notes that you want to take (to do that, from the menu switch the cell type from Code to Markdown).
3.3.1. Try it
Now that you know the basics, give it a try!
Prerequisite
- You have imported the tutorial files into your Jupyter environment as described in Importing the tutorial files into the Jupyter environment.
Procedure
In your Jupyter environment, locate the
0_sandbox.ipynbfile and double-click it to launch the notebook. The notebook opens in a new tab in the content section of the environment.Experiment by, for example, running the existing cells, adding more cells and creating functions.
You can do what you want - it’s your environment and there is no risk of breaking anything or impacting other users. This environment isolation is also a great advantage brought by OpenShift AI.
Optionally, create a new notebook in which the code cells are run by using a Python 3 kernel:
Create a new notebook by either selecting File →New →Notebook or by clicking the Python 3 tile in the Notebook section of the launcher window:


You can use different kernels, with different languages or versions, to run in your notebook.
Additional resource
To learn more about notebooks, go to the Jupyter site.
Next step
3.4. Training a model
Now that you know how the Jupyter notebook environment works, the real work can begin!
In your notebook environment, open the 1_experiment_train.ipynb file and follow the instructions directly in the notebook. The instructions guide you through some simple data exploration, experimentation, and model training tasks.

Next step