Ce contenu n'est pas disponible dans la langue sélectionnée.
Chapter 23. Use Layer 2 Gateways
23.1. Overview
This chapter describes how to use Red Hat OpenStack Platform with OpenDaylight to create an SDN overlay solution. As a result, your deployment can have seamless connectivity between bare metal workloads, legacy VLAN domains, SR-IOV-enabled workloads, and virtualized workloads.
OpenDaylight is available in this release as a Technology Preview, and therefore is not fully supported by Red Hat. It should only be used for testing, and should not be deployed in a production environment. For more information about Technology Preview features, see Technology Preview.
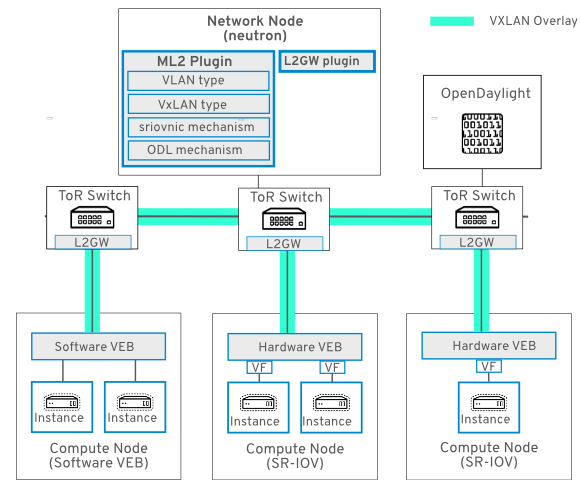
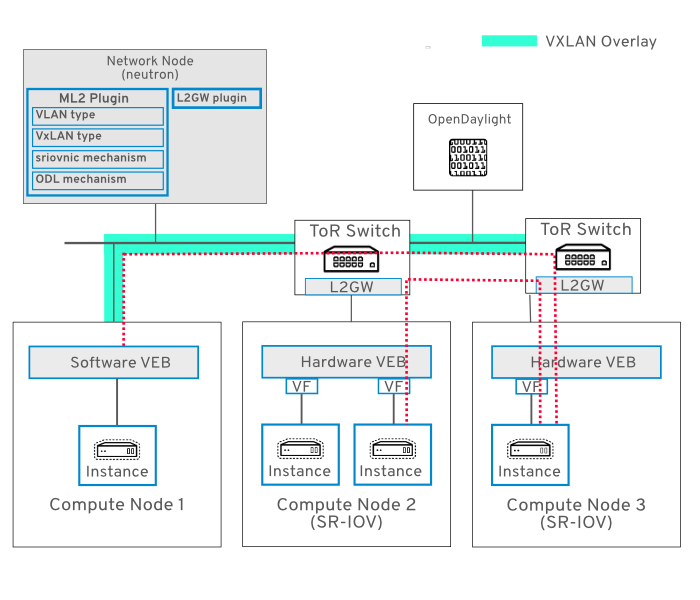
This connectivity is provided by deploying a VXLAN gateway on your physical ToR (top-of-rack) switches (also known as access switches, rather than core switches). The ToR switches must support VXLAN encapsulation and the HWVTEP schema. Network switching is performed using neutron’s multi-segment networks and the L2GW service plugin. The southbound configuration is implemented using a HWVTEP plugin, which implements the OVSDB protocol and hardware_vtep schema.
A multi-segment network is a network that is configured to trunk multiple segment IDs. This network is considered to have multiple segments, with one being VLAN, and the other being VXLAN. This allows encapsulated VXLAN traffic to be switched between the Compute node and the ToR switch.
This guide describes a series of use cases for L2GW and require that SR-IOV be configured on your Compute nodes.
For information on configuring SR-IOV, see https://access.redhat.com/documentation/en-us/red_hat_openstack_platform/12/html/network_functions_virtualization_configuration_guide/part-sriov-nfv-configuration.
23.1.1. Network Topology
This diagram demonstrates SR-IOV connectivity in an SDN overlay:
23.1.2. Requirements
- Your director-based deployment must have the OpenDaylight role enabled. See https://access.redhat.com/documentation/en-us/red_hat_openstack_platform/12/html/red_hat_opendaylight_installation_and_configuration_guide/
- For use cases 1 to 6, you need to have SR-IOV enabled on the Compute node. For director-based deployments, see https://access.redhat.com/documentation/en-us/red_hat_openstack_platform/12/html-single/network_functions_virtualization_planning_and_configuration_guide/#assembly_sriov_parameters
23.2. Use Case 1 - Two instances on one SR-IOV Compute node
This use case has two instances on the same SR-IOV-enabled compute node. In this scenario, you have a VXLAN tunnel running from ToR to the Controller node:
- When nova boots the instance, the DHCP request from the VM egresses the SR-IOV NIC and ingresses at eth2 on the ToR.
-
The ToR switch (running OVSDB with the
hardware_vtepschema) encapsulates the DHCP packet into a VXLAN tunnel. - The DHCP packet is forwarded over the VXLAN tunnel between TOR and Control Node.
- The DHCP packet egresses the VXLAN tunnel on the Controller node, the VXLAN header is removed, native DHCP packet is then processed, and a DHCP response is sent out of the Controller node.
- A VXLAN header is added to DHCP response, and goes over the VXLAN tunnel from the Controller node to the ToR switch.
- At the ToR, the VXLAN header is removed and a VLAN tag is added to DHCP packet.
- The DHCP packet (with a VLAN tag) egresses through the ToR, and ingresses at Compute node 2, where the DHCP response is received and processed by the instance.
Now that each instance has an allocated IP address, IP packets between VM1 and VM2 on the compute node are switched locally by the Intel 82599ES NIC. In this example, the NIC used is an Intel 82599ES, which supports local switching, so the IP packets between VM1 and VM2 do not egress the NIC. For vendor NICs that do not support local switching, the packets from VM1 to VM2 would be switched by the ToR.

Node 1:
- Red Hat Enterprise Linux 7
- OpenStack Controller node
- OpenStack Compute node
- OpenDaylight role
Node 2:
- Red Hat Enterprise Linux 7
- OpenStack Compute node
-
SR-IOV enabled on NIC
em1 -
Network tag:
2901
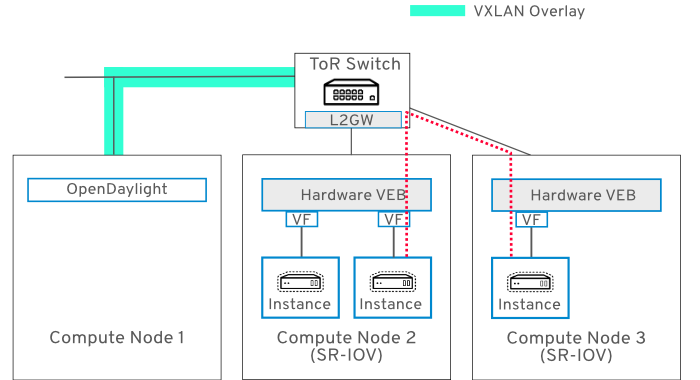
23.3. Use Case 2 - Instances on separate Compute nodes
This use case is similar to Use Case 1, and DHCP works the same way. The difference is that IP forwarding between VM1 (on Compute Node 1) and VM2 (on Compute Node 2) is performed by the ToR switch, as indicated by the dashed red line:
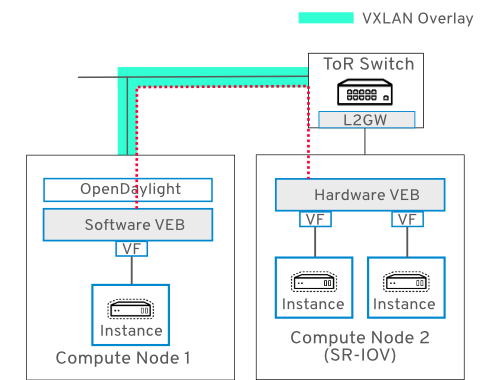
23.4. Use Case 3 - Instance on software VEB connects to instance on hardware VEB
In this use case, connectivity is established between instances attached to a software VEB (Virtual Ethernet Bridge) and a hardware VEB:
Node 1:
- Red Hat Enterprise Linux 7
- OpenStack Controller node
- OpenStack Compute node
- OpenDaylight role
Node 2:
- Red Hat Enterprise Linux 7
- OpenStack Compute node
-
SR-IOV enabled on NIC
em1 -
Network tag:
2900
23.5. Use Case 4 - Instance attached to SR-IOV Physical Function (PF)
In this use case, ingress and egress traffic for VM2 (on Compute node 2) passes through the ToR switch and traverses the SR-IOV PF attached to VM2:
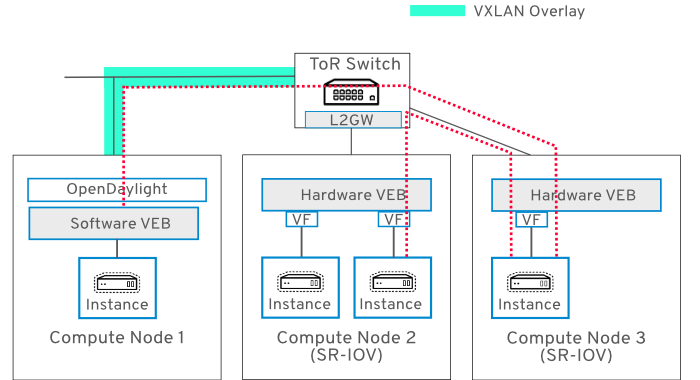
23.6. Use Case 5 - Two ToR switches
In this use case, the three Compute nodes are attached to two separate ToR switches. A single neutron network named multinet spans all three nodes, allowing the instances to connect with each other on the same logical Layer 2 network.
23.7. Use Case 6 - Instances attached to different networks sharing same interface
In this use case, VM1 and VM2 are on separate Compute nodes and share the same neutron network. VM3 and VM4 are also on separate nodes, and share the same neutron network. Traffic for both neutron networks passes through the same physical NIC on each node:

VM1 and VM2:
-
Attached to neutron network:
multinet -
VXLAN VNI:
1500 -
VLAN tag:
2901
-
Attached to neutron network:
VM3 and VM4:
-
Attached to neutron network:
multinet1 -
VXLAN VNI:
1501 -
VLAN tag:
2902
-
Attached to neutron network:
23.8. Building the SDN topology
Each ToR vendor switch will likely have specific configuration steps to setup and prepare the switch for L2GW VXLAN tunnels. Please refer to your switch vendor documentation to determine the configuration commands for the steps described below.
Each ToR switch will need:
- OVSDB enabled and configured.
- IP connectivity to the ODL controller on the data network. This is required for VXLAN tunnel transport.
- IP connectivity to the ODL controller on the management network. This is required for OVSDB control messages.
23.9. OpenDaylight configuration
- Your director-based deployment must have the OpenDaylight role enabled. See https://access.redhat.com/documentation/en-us/red_hat_openstack_platform/12/html/red_hat_opendaylight_installation_and_configuration_guide/
Once OpenDaylight (ODL) has been deployed, you will need to create the required transport zone:
23.9.1. Configure the Transport Zone
This section creates a Transport Zone for OpenDaylight. You will need to change the example IP address to suit your deployment.
Create a Transport Zone. For example:
URL:
 http://${ODL-IP}:8181/restconf/config/itm:transport-zones/
JSON:
 {
      "transport-zone": [
          {
              "zone-name": "TZA",
              "subnets": [
                  {
                      "prefix": "192.168.254.0/24",
                      "vlan-id": 0,
                      "vteps": [
                          {
                              "dpn-id": 95311090836804,
                              "portname": "eth1",
                              "ip-address": "192.168.254.31"
                          }
                      ],
                      "gateway-ip": "0.0.0.0"
                  }
              ],
              "tunnel-type": "odl-interface:tunnel-type-vxlan"
          }
      ]
 }
Add the following nodes to the Transport Zone: the Controller node and any Compute nodes that will be part of the VXLAN tunnel network (VTEPs). To do this, you will need the
dpnidof the device, which can be retrieved as shown:$ curl -s -u admin:admin -X GET http://10.8.125.240:8181/restconf/operational/odl-interface-meta:bridge-ref-info/ { "bridge-ref-info": { "bridge-ref-entry": [ { "bridge-reference": "/network-topology:network-topology/network-topology:topology[network-topology:topology-id='ovsdb:1']/network-topology:node[network-topology:node-id='ovsdb://uuid/2647ac59-281f-4968-beb1-7a7d64990f19/bridge/br-int']", "dpid": 181136841129213 } ] } }Run
sudo ovs-vsctl showto retrieve theovsdbUUID, which you will need to find thedpnidof the device from the previouscurlcommand.$ sudo ovs-vsctl show 2647ac59-281f-4968-beb1-7a7d64990f19 Manager "tcp:10.8.125.240:6640" is_connected: true Bridge br-intAdd the device to the Transport Zone, by specifying the
dpn-idretrieved using the bridge-ref curl command. Postman can be used for this; another alternative iscurl. This example adds a remote VTEP with IP address 192.168.254.31. The remote VTEP tunnel interface iseth1, and thedpn-idof the remote VTEP is as shown. If OpenDaylight is listening on a VLAN-based network, you must specify its vlan-id.$ curl -X POST -H "Authorization: Basic YWRtaW46YWRtaW4=" -H "Content-Type: application/json" -H "Cache-Control: no-cache" -H "Postman-Token: ae2ebaee-8813-79df-7114-0bc786287793" -d '{ "transport-zone": [ { "zone-name": "zone1", "subnets": [ { "prefix": "192.168.254.0/24", "vlan-id": 0, "vteps": [ { "dpn-id": 181136841129213, "portname": "eth1", "ip-address": "192.168.254.31" } ], "gateway-ip": "0.0.0.0" } ], "tunnel-type": "odl-interface:tunnel-type-vxlan" } ] } ' "http://10.8.125.240:8181/restconf/config/itm:transport-zones/"Each VTEP in the resulting list will have the following attributes:
-
ip-address- the remote VTEP IP address. -
portname- the tunnel interface port name. -
dpn-id- the value retrieved above.
-
This example
curlcommand creates a Transport Zone namedzone1:curl -X POST -H "Authorization: Basic YWRtaW46YWRtaW4=" -H "Content-Type: application/json" -H "Cache-Control: no-cache" -H "Postman-Token: ae2ebaee-8813-79df-7114-0bc786287793" -d '{ "transport-zone": [ { "zone-name": "zone1", "subnets": [ { "prefix": "192.0.2.0/24", "vlan-id": 0, "vteps": [ { "dpn-id": 92455225558023, "portname": "eth3", "ip-address": "192.0.2.6" } ], "gateway-ip": "0.0.0.0" } ], "tunnel-type": "odl-interface:tunnel-type-vxlan" } ] } ' "http://10.8.125.240:8181/restconf/config/itm:transport-zones/"- Configure your ToR switches to use the OpenDaylight node as the VTEP manager. Please refer to your ToR switch vendor documentation for configuration commands and syntax.
23.10. Create the OpenStack networks
Create a network named
multinetthat consists of 2 network segments. The first segment is of type VLAN, and will be used to set the VLAN tag of the SRIOV virtual function attached to the VM. The second segment is of type VXLAN, and will be used for the VXLAN tunnel(s) from the ToR switch to ODL control node and compute nodes:$ neutron net-create multinet --segments type=dict list=true provider:physical_network='',provider:segmentation_id=1500,provider:network_type=vxlan provider:physical_network=physnet_sriov,provider:segmentation_id=2201,provider:network_type=vlanCreate a subnet for the
multinetnetwork:$ neutron subnet-create multinet --allocation-pool start=10.100.5.2,end=10.100.5.254 --name mn-subnet --dns-nameserver 8.8.8.8 10.100.5.0/24Create a Red Hat Enterprise Linux 7 image that contains the appropriate SR-IOV driver, for example: the Intel
ixgbedriver. Once complete, import the image into glance:$ glance image-create --name rhel7 --disk-format qcow2 --container-format bare --visibility public --file /opt/images/rhel7.qcow2Create the L2 Gateway. This command creates a L2GW named
gw1, with access portseth2andeth3:NoteConsider including all the gateway ports in this command, as there are currently some limitations in the port update API.
$ neutron l2-gateway-create gw1 --tenant_id $(openstack project list | grep '\sadmin' | awk '{print $2}') --device name=hwvtep,interface_names="eth1;eth2"- name - must match the configuration in the ToR switch, defined as name in the Physical_Switch table in the hardware_vtep schema. Please refer to your ToR switch vendor documentation.
Create the L2 Gateway connection. This will establish a tunnel between the ToR switch and the VTEPs defined in the Transport Zone:
$ neutron l2-gateway-connection-create gw1 multinet --default-segmentation-id 2201
$ neutron l2-gateway-connection-create gw1 multinet1 --default-segmentation-id 2203
Note this alternative method for creating a L2GW. This example can be useful when configuring a SR-IOV PF, which does not support VLAN tag. In this example,
eth1has no tag andeth2has tag2201:$ neutron l2-gateway-create gw1 --tenant_id $(openstack project list | grep '\sadmin' | awk '{print $2}') --device name=hwvtep,interface_names="eth1|0;eth2|2201" $ neutron l2-gateway-connection-create gw1 multinet
Create SR-IOV VF ports on the Compute nodes:
$ port1_id=$(neutron port-create multinet --name sriov_port1 --binding:vnic_type direct --device-owner nova-compute | grep "\ id\ " | awk '{ print $4 }')

$ port2_id=$(neutron port-create multinet --name sriov_port2 --binding:vnic_type direct --device-owner nova-compute | grep "\ id\ " | awk '{ print $4 }')

$ port3_id=$(neutron port-create multinet --name sriov_port3 --binding:vnic_type direct --device-owner nova-compute | grep "\ id\ " | awk '{ print $4 }')
Create a
direct-physicalSR-IOV PF port on the Compute node:$ port2_id=$(neutron port-create multinet --name sriov_port2 --binding:vnic_type direct-physical --device-owner nova-compute | grep "\ id\ " | awk '{ print $4 }')Create instances on the Compute nodes. These will attach to the SR-IOV ports created in the previous steps.
NoteDHCP will only work with SR-IOV VF interfaces when the guest OS in the image uses Network Manager. For Red Hat Enterprise Linux, you will need to use virt-customize against the image and change ifcfg-eth0 to the interface name the system will use (for example, ens4).
$ nova boot --poll --flavor m1.small --image rhel7 --nic port-id=$port1_id --key-name admin_key sriov-vm1 $ nova boot --poll --flavor m1.small --image rhel7 --nic port-id=$port3_id --key-name admin_key sriov-vm3 $ nova boot --poll --flavor m1.small --image rhel7 --nic port-id=$port2_id --key-name admin_key sriov-vm2 $ nova boot --poll --flavor m1.small --image rhel7 --nic net-id=$(neutron net-list | grep -w multinet | awk '{print $2}') --key-name admin_key vmvx01NoteThis section describes how to interconnect instances using SR-IOV interfaces, but note that you can still use the L2GW neutron driver to establish basic connectivity: This involves extending the L2 broadcast domain of a VXLAN-based project network into an external VLAN-based provider network. For this use case, you do not need to create a multi-provider network, just a regular VXLAN network; this allows you to connect regular instances with external appliances.
23.11. Review
As the result of following these steps, you should be able to SSH into one of the instances and ping an instance hosted on the other Compute node. The resulting ICMP traffic will traverse the OVS and ToR switches as an encapsulated layer 2 tunnel.