Ce contenu n'est pas disponible dans la langue sélectionnée.
Chapter 5. Users and organizations
Before creating repositories to contain your container images in Quay.io, you should consider how these repositories will be structured. With Quay.io, each repository requires a connection with either an Organization or a User. This affiliation defines ownership and access control for the repositories.
5.1. Tenancy model
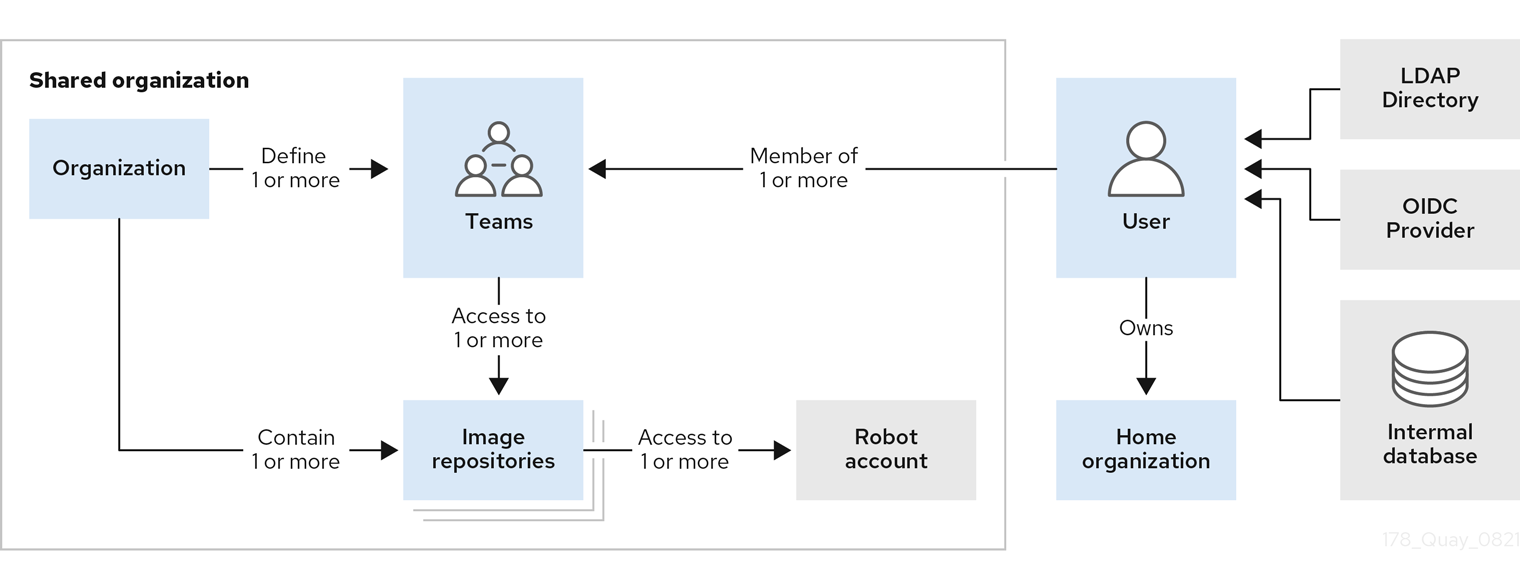
- Organizations provide a way of sharing repositories under a common namespace that does not belong to a single user. Instead, these repositories belong to several users in a shared setting, such as a company.
- Teams provide a way for an Organization to delegate permissions. Permissions can be set at the global level (for example, across all repositories), or on specific repositories. They can also be set for specific sets, or groups, of users.
-
Users can log in to a registry through the web UI or a by using a client, such as Podman or Docker, using their respective login commands, for example,
$ podman login. Each user automatically gets a user namespace, for example,<quay-server.example.com>/<user>/<username>, orquay.io/<username>. - Robot accounts provide automated access to repositories for non-human users like pipeline tools. Robot accounts are similar to OpenShift Container Platform Service Accounts. Permissions can be granted to a robot account in a repository by adding that account like you would another user or team.
5.2. Logging into Quay
A user account for Quay.io represents an individual with authenticated access to the platform’s features and functionalities. Through this account, you gain the capability to create and manage repositories, upload and retrieve container images, and control access permissions for these resources. This account is pivotal for organizing and overseeing your container image management within Quay.io.
Not all features on Quay.io require that users be logged in. For example, you can anonymously pull an image from Quay.io without being logged in, so long as the image you are pulling comes from a public repository.
Users have two options for logging into Quay.io:
By logging in through Quay.io.
This option provides users with the legacy UI, as well as an option to user the beta UI environment, which adheres to PatternFly UI principles.
By logging in through the Red Hat Hybrid Cloud Console.
This option uses Red Hat SSO for authentication, and is a public managed service offering by Red Hat. This option always requires users to login. Like other managed services, Quay on the Red Hat Hybrid Cloud Console enhances the user experience by adhering to PatternFly UI principles.
Differences between using Quay.io directly and Quay on the Red Hat Hybrid Cloud Console are negligible, including for users on the free tier. Whether you are using Quay.io directly, on the Hybrid Cloud Console, features that require login, such as pushing to a repository, use your Quay.io username specifications.
5.2.1. Logging into Quay.io
Use the following procedure to log into Quay.io.
Prerequisites
- You have created a Red Hat account and a Quay.io account. For more information, see "Creating a Quay.io account".
Procedure
- Navigate to Quay.io.
- In the navigation pane, select Sign In and log in using your Red Hat credentials.
If it is your first time logging in, you must confirm the automatically-generated username. Click Confirm Username to log in.
You are redirected to the Quay.io repository landing page.

5.2.2. Logging into Quay through the Hybrid Cloud Console
Prerequisites
- You have created a Red Hat account and a Quay.io account. For more information, see "Creating a Quay.io account".
Procedure
Navigate to the Quay on the Red Hat Hybrid Cloud Console and log in using your Red Hat account. You are redirected to the Quay repository landing page:

5.3. Creating a repository
A repository provides a central location for storing a related set of container images. These images can be used to build applications along with their dependencies in a standardized format.
Repositories are organized by namespaces. Each namespace can have multiple repositories. For example, you might have a namespace for your personal projects, one for your company, or one for a specific team within your organization.
With a paid plan, Quay.io provides users with access controls for their repositories. Users can make a repository public, meaning that anyone can pull, or download, the images from it, or users can make it private, restricting access to authorized users or teams.
The free tier of Quay.io does not allow for private repositories. You must upgrade to a paid tier of Quay.io to create a private repository. For more information, see "Information about Quay.io pricing".
There are two ways to create a repository in Quay.io: by pushing an image with the relevant docker or podman command, or by using the Quay.io UI.
If you push an image through the command-line interface (CLI) without first creating a repository on the UI, the created repository is set to Private, regardless of the plan you have.
It is recommended that you create a repository on the Quay.io UI before pushing an image. Quay.io checks the plan status and does not allow creation of a private repository if a plan is not active.
5.3.1. Creating an image repository by using the UI
Use the following procedure to create a repository using the Quay.io UI.
Procedure
- Log in to your user account through the web UI.
On the Quay.io landing page, click Create New Repository. Alternatively, you can click the + icon
New Repository. For example: 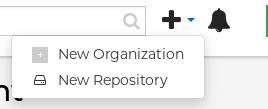
On the Create New Repository page:
Append a Repository Name to your username or to the Organization that you wish to use.
ImportantDo not use the following words in your repository name: *
build*trigger*tagWhen these words are used for repository names, users are unable access the repository, and are unable to permanently delete the repository. Attempting to delete these repositories returns the following error:
Failed to delete repository <repository_name>, HTTP404 - Not Found.- Optional. Click Click to set repository description to add a description of the repository.
- Click Public or Private depending on your needs.
- Optional. Select the desired repository initialization.
- Click Create Private Repository to create a new, empty repository.
5.3.2. Creating an image repository by using the CLI
With the proper credentials, you can push an image to a repository using either Docker or Podman that does not yet exist in your Quay.io instance. Pushing an image refers to the process of uploading a container image from your local system or development environment to a container registry like Quay.io. After pushing an image to Quay.io, a repository is created.
If you push an image through the command-line interface (CLI) without first creating a repository on the UI, the created repository is set to Private, regardless of the plan you have.
It is recommended that you create a repository on the Quay.io UI before pushing an image. Quay.io checks the plan status and does not allow creation of a private repository if a plan is not active.
Use the following procedure to create an image repository by pushing an image.
Prerequisites
-
You have download and installed the
podmanCLI. - You have logged into Quay.io.
- You have pulled an image, for example, busybox.
Procedure
Pull a sample page from an example registry. For example:
$ podman pull busyboxExample output
Trying to pull docker.io/library/busybox...
Getting image source signatures
Copying blob 4c892f00285e done
Copying config 22667f5368 done
Writing manifest to image destination
Storing signatures
22667f53682a2920948d19c7133ab1c9c3f745805c14125859d20cede07f11f9
Tag the image on your local system with the new repository and image name. For example:
$ podman tag docker.io/library/busybox quay.io/quayadmin/busybox:testPush the image to the registry. Following this step, you can use your browser to see the tagged image in your repository.
$ podman push --tls-verify=false quay.io/quayadmin/busybox:testExample output
Getting image source signatures
Copying blob 6b245f040973 done
Copying config 22667f5368 done
Writing manifest to image destination
Storing signatures
5.4. Managing access to repositories
As a Quay.io user, you can create your own repositories and make them accessible to other users that are part of your instance. Alternatively, you can create a specific Organization to allow access to repositories based on defined teams.
In both User and Organization repositories, you can allow access to those repositories by creating credentials associated with Robot Accounts. Robot Accounts make it easy for a variety of container clients, such as Docker or Podman, to access your repositories without requiring that the client have a Quay.io user account.
5.4.1. Allowing access to user repositories
When you create a repository in a user namespace, you can add access to that repository to user accounts or through Robot Accounts.
5.4.1.1. Allowing user access to a user repository
Use the following procedure to allow access to a repository associated with a user account.
Procedure
- Log into Quay.io with your user account.
- Select a repository under your user namespace that will be shared across multiple users.
- Select Settings in the navigation pane.
Type the name of the user to which you want to grant access to your repository. As you type, the name should appear. For example:
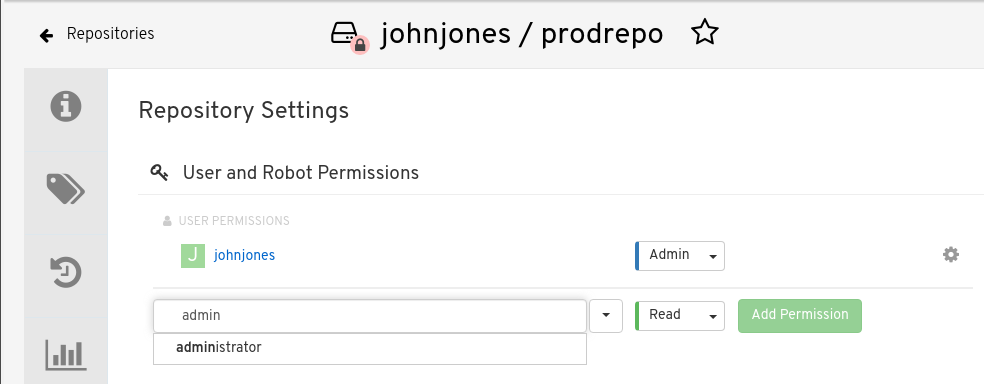
In the permissions box, select one of the following:
- Read. Allows the user to view and pull from the repository.
- Write. Allows the user to view the repository, pull images from the repository, or push images to the repository.
- Admin. Provides the user with all administrative settings to the repository, as well as all Read and Write permissions.
- Select the Add Permission button. The user now has the assigned permission.
- Optional. You can remove or change user permissions to the repository by selecting the Options icon, and then selecting Delete Permission.
5.4.1.2. Allowing robot access to a user repository
Robot Accounts are used to set up automated access to the repositories in your Quay.io registry. They are similar to OpenShift Container Platform service accounts.
Setting up a Robot Account results in the following:
- Credentials are generated that are associated with the Robot Account.
- Repositories and images that the Robot Account can push and pull images from are identified.
- Generated credentials can be copied and pasted to use with different container clients, such as Docker, Podman, Kubernetes, Mesos, and so on, to access each defined repository.
Each Robot Account is limited to a single user namespace or Organization. For example, the Robot Account could provide access to all repositories for the user jsmith. However, it cannot provide access to repositories that are not in the user’s list of repositories.
Use the following procedure to set up a Robot Account that can allow access to your repositories.
Procedure
- On the Repositories landing page, click the name of a user.
- Click Robot Accounts on the navigation pane.
- Click Create Robot Account.
- Provide a name for your Robot Account.
- Optional. Provide a description for your Robot Account.
-
Click Create Robot Account. The name of your Robot Account becomes a combination of your username plus the name of the robot, for example,
jsmith+robot - Select the repositories that you want the Robot Account to be associated with.
Set the permissions of the Robot Account to one of the following:
- None. The Robot Account has no permission to the repository.
- Read. The Robot Account can view and pull from the repository.
- Write. The Robot Account can read (pull) from and write (push) to the repository.
- Admin. Full access to pull from, and push to, the repository, plus the ability to do administrative tasks associated with the repository.
- Click the Add permissions button to apply the settings.
- On the Robot Accounts page, select the Robot Account to see credential information for that robot.
Under the Robot Account option, copy the generated token for the robot by clicking Copy to Clipboard. To generate a new token, you can click Regenerate Token.
NoteRegenerating a token makes any previous tokens for this robot invalid.
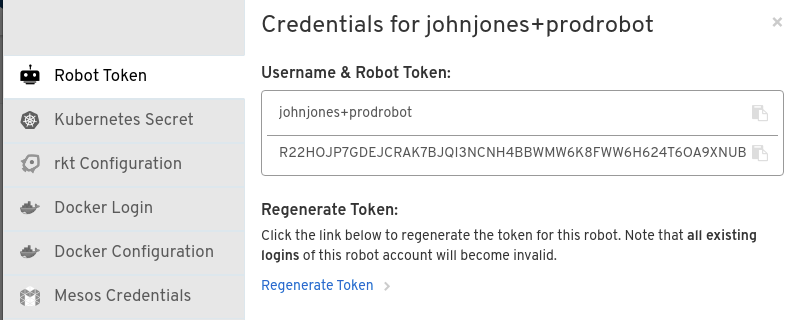
Obtain the resulting credentials in the following ways:
- Kubernetes Secret: Select this to download credentials in the form of a Kubernetes pull secret yaml file.
-
rkt Configuration: Select this to download credentials for the rkt container runtime in the form of a
.jsonfile. -
Docker Login: Select this to copy a full
docker logincommand line that includes the credentials. -
Docker Configuration: Select this to download a file to use as a Docker
config.jsonfile, to permanently store the credentials on your client system. - Mesos Credentials: Select this to download a tarball that provides the credentials that can be identified in the URI field of a Mesos configuration file.
5.4.2. Organization repositories
After you have created an Organization, you can associate a set of repositories directly to that Organization. An Organization’s repository differs from a basic repository in that the Organization is intended to set up shared repositories through groups of users. In Quay.io, groups of users can be either Teams, or sets of users with the same permissions, or individual users.
Other useful information about Organizations includes the following:
- You cannot have an Organization embedded within another Organization. To subdivide an Organization, you use teams.
Organizations cannot contain users directly. You must first add a team, and then add one or more users to each team.
NoteIndividual users can be added to specific repositories inside of an organization. Consequently, those users are not members of any team on the Repository Settings page. The Collaborators View on the Teams and Memberships page shows users who have direct access to specific repositories within the organization without needing to be part of that organization specifically.
- Teams can be set up in Organizations as just members who use the repositories and associated images, or as administrators with special privileges for managing the Organization.
5.4.2.1. Creating an Organization
Use the following procedure to create an Organization.
Procedure
- On the Repositories landing page, click Create New Organization.
- Under Organization Name, enter a name that is at least 2 characters long, and less than 225 characters long.
- Under Organization Email, enter an email that is different from your account’s email.
- Choose a plan for your Organization, selecting either the free plan, or one of the paid plans.
- Click Create Organization to finalize creation.
5.4.2.1.1. Creating another Organization by using the API
You can create another Organization by using the API. To do this, you must have created the first Organization by using the UI. You must also have generated an OAuth Access Token.
Use the following procedure to create another Organization by using the Red Hat Quay API endpoint.
Prerequisites
- You have already created at least one Organization by using the UI.
- You have generated an OAuth Access Token. For more information, see "Creating an OAuth Access Token".
Procedure
Create a file named
data.jsonby entering the following command:$ touch data.jsonAdd the following content to the file, which will be the name of the new Organization:
{"name":"testorg1"}Enter the following command to create the new Organization using the API endpoint, passing in your OAuth Access Token and Red Hat Quay registry endpoint:
$ curl -X POST -k -d @data.json -H "Authorization: Bearer <access_token>" -H "Content-Type: application/json" http://<quay-server.example.com>/api/v1/organization/Example output
"Created"
5.4.2.2. Adding a team to an organization
When you create a team for your Organization you can select the team name, choose which repositories to make available to the team, and decide the level of access to the team.
Use the following procedure to create a team for your Organization.
Prerequisites
- You have created an organization.
Procedure
- On the Repositories landing page, select an Organization to add teams to.
- In the navigation pane, select Teams and Membership. By default, an owners team exists with Admin privileges for the user who created the Organization.
- Click Create New Team.
- Enter a name for your new team. Note that the team must start with a lowercase letter. It can also only use lowercase letters and numbers. Capital letters or special characters are not allowed.
- Click Create team.
- Click the name of your team to be redirected to the Team page. Here, you can add a description of the team, and add team members, like registered users, robots, or email addresses. For more information, see "Adding users to a team".
- Click the No repositories text to bring up a list of available repositories. Select the box of each repository you will provide the team access to.
Select the appropriate permissions that you want the team to have:
- None. Team members have no permission to the repository.
- Read. Team members can view and pull from the repository.
- Write. Team members can read (pull) from and write (push) to the repository.
- Admin. Full access to pull from, and push to, the repository, plus the ability to do administrative tasks associated with the repository.
- Click Add permissions to save the repository permissions for the team.
5.4.2.3. Setting a Team role
After you have added a team, you can set the role of that team within the Organization.
Prerequisites
- You have created a team.
Procedure
- On the Repository landing page, click the name of your Organization.
- In the navigation pane, click Teams and Membership.
Select the TEAM ROLE drop-down menu, as shown in the following figure:
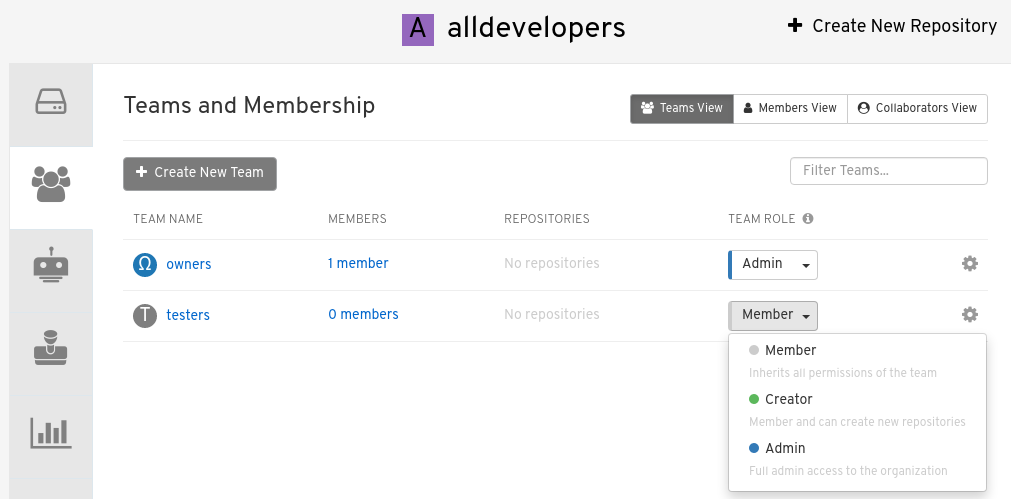
For the selected team, choose one of the following roles:
- Member. Inherits all permissions set for the team.
- Creator. All member permissions, plus the ability to create new repositories.
- Admin. Full administrative access to the organization, including the ability to create teams, add members, and set permissions.
5.4.2.4. Adding users to a Team
With administrative privileges to an Organization, you can add users and robot accounts to a team. When you add a user, Quay.io sends an email to that user. The user remains pending until they accept the invitation.
Use the following procedure to add users or robot accounts to a team.
Procedure
- On the Repository landing page, click the name of your Organization.
- In the navigation pane, click Teams and Membership.
- Select the team you want to add users or robot accounts to.
In the Team Members box, enter information for one of the following:
- A username from an account on the registry.
- The email address for a user account on the registry.
The name of a robot account. The name must be in the form of <organization_name>+<robot_name>.
NoteRobot Accounts are immediately added to the team. For user accounts, an invitation to join is mailed to the user. Until the user accepts that invitation, the user remains in the INVITED TO JOIN state. After the user accepts the email invitation to join the team, they move from the INVITED TO JOIN list to the MEMBERS list for the Organization.
5.5. User settings
The User Settings page provides users a way to set their email address, password, account type, set up desktop notifications, select an avatar, delete an account, adjust the time machine setting, and view billing information.
5.5.2. Adjusting user settings
Use the following procedure to adjust user settings.
Procedure
- To change your email address, select the current email address for Email Address. In the pop-up window, enter a new email address, then, click Change Email. A verification email will be sent before the change is applied.
- To change your password, click Change password. Enter the new password in both boxes, then click Change Password.
- Change the account type by clicking Individual Account, or the option next to Account Type. In some cases, you might have to leave an organization prior to changing the account type.
- Adjust your desktop notifications by clicking the option next to Desktop Notifications. Users can either enable, or disable, this feature.
You can delete an account by clicking Begin deletion. You cannot delete an account if you have an active plan, or if you are a member of an organization where you are the only administrator. You must confirm deletion by entering the namespace.
ImportantDeleting an account is not reversible and will delete all of the account’s data including repositories, created build triggers, and notifications.
- You can set the time machine feature by clicking the drop-box next to Time Machine. This feature dictates the amount of time after a tag is deleted that the tag is accessible in time machine before being garbage collected. After selecting a time, click Save Expiration Time.
5.5.3. Billing information
You can view billing information on the User Settings. In this section, the following information is available:
- Current Plan. This section denotes the current plan Quay.io plan that you are signed up for. It also shows the amount of private repositories you have.
- Invoices. If you are on a paid plan, you can click View Invoices to view a list of invoices.
- Receipts. If you are on a paid plan, you can select whether to have receipts for payment emailed to you, another user, or to opt out of receipts altogether.