Ce contenu n'est pas disponible dans la langue sélectionnée.
Chapter 3. Securing a sample application
Now that you have an admin account, a realm, and a user, you can use Red Hat Single Sign-On to secure a sample JBoss EAP servlet application. You install a JBoss EAP client adapter, register the application in the admin console, modify the JBoss EAP instance to work with Red Hat Single Sign-On, and use Red Hat Single Sign-On with some sample code to secure the application.
Prerequisites
- You need to adjust the port used by Red Hat Single Sign-On to avoid port conflicts with JBoss EAP.
3.1. Adjusting the port used by Red Hat Single Sign-On
The instructions in this guide apply to running JBoss EAP on the same machine as the Red Hat Single Sign-On server. In this situation, even though JBoss EAP is bundled with Red Hat Single Sign-On, you cannot use JBoss EAP as an application container. You must run a separate JBoss EAP instance for your servlet application.
To avoid port conflicts, you need different ports to run Red Hat Single Sign-On and JBoss EAP.
Prerequisites
- You have an admin account for the admin console.
- You created a demo realm.
- You created a user in the demo realm.
Procedure
- Download JBoss EAP 7.4 from the Red Hat customer portal.
Unzip the downloaded JBoss EAP.
$ unzip <filename>.zip- Change to the Red Hat Single Sign-On root directory.
Start the Red Hat Single Sign-On server by supplying a value for the
jboss.socket.binding.port-offsetsystem property. This value is added to the base value of every port opened by the Red Hat Single Sign-On server. In this example, 100 is the value.Linux/Unix
$ cd bin
$ ./standalone.sh -Djboss.socket.binding.port-offset=100
Windows
> ...\bin\standalone.bat -Djboss.socket.binding.port-offset=100Windows Powershell
> ...\bin\standalone.bat -D"jboss.socket.binding.port-offset=100"Confirm that the Red Hat Single Sign-On server is running. Go to http://localhost:8180/auth/admin/ .
If the admin console opens, you are ready to install a client adapter that enables JBoss EAP to work with Red Hat Single Sign-On.
3.2. Installing the JBoss EAP client adapter
When JBoss EAP and Red Hat Single Sign-On are installed on the same machine, JBoss EAP requires some modification. To make this modification, you install a Red Hat Single Sign-On client adapter.
Prerequisites
- JBoss EAP is installed.
-
You have a backup of the
../standalone/configuration/standalone.xmlfile if you have customized this file.
Procedure
- Download the Client Adapter for EAP 7 from the Red Hat customer portal.
- Change to the root directory of JBoss EAP.
Unzip the downloaded client adapter in this directory. For example:
$ unzip <filename>.zipChange to the bin directory.
$ cd binRun the appropriate script for your platform.
NoteIf you receive a
file not found, make sure that you usedunzipin the previous step. This method of extraction installs the files in the right place.Linux/Unix
$ ./jboss-cli.sh --file=adapter-elytron-install-offline.cliWindows
> jboss-cli.bat --file=adapter-elytron-install-offline.cliNoteThis script makes the necessary edits to the
…/standalone/configuration/standalone.xmlfile.Start the application server.
Linux/Unix
$ ./standalone.shWindows
> ...\standalone.bat
3.3. Registering the JBoss EAP application
You can now define and register the client in the Red Hat Single Sign-On admin console.
Prerequisites
- You installed a client adapter to work with JBoss EAP.
Procedure
- Log in to the admin console with your admin account: http://localhost:8180/auth/admin/
-
In the top left drop-down list, select the
Demorealm. Click
Clientsin the left side menu to open the Clients page.Clients
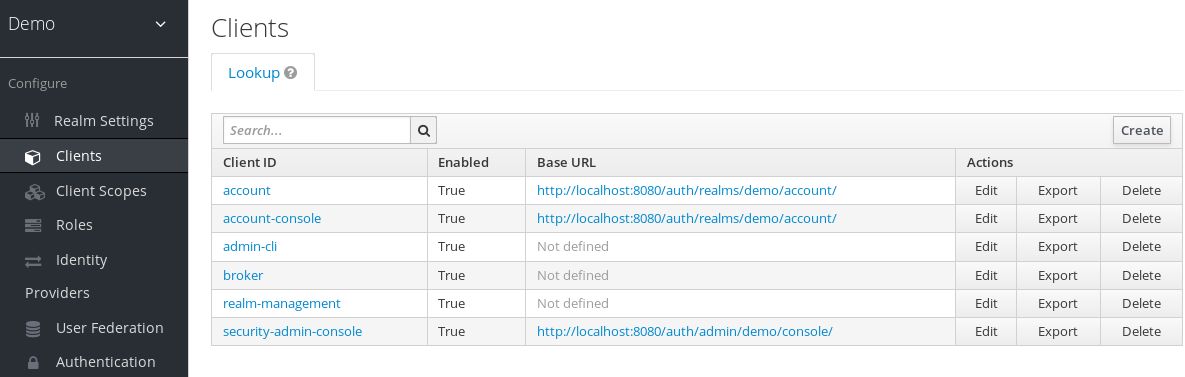
- On the right side, click Create.
On the Add Client dialog, create a client called vanilla by completing the fields as shown below:
Add Client
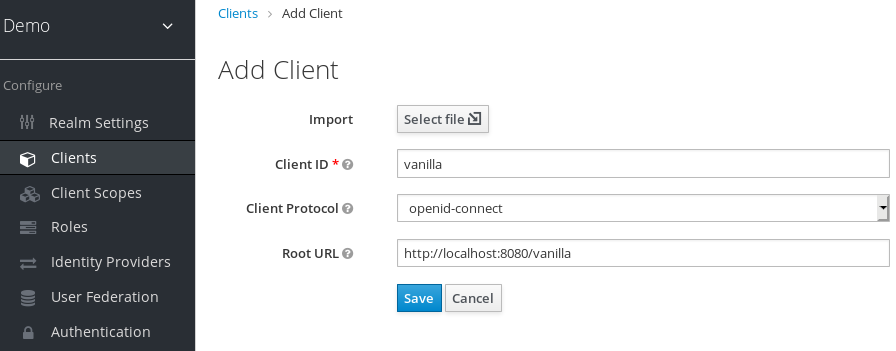
- Click Save.
- On the Vanilla client page that appears, click the Installation tab.
Select Keycloak OIDC JSON to generate a file that you need in a later procedure.
Keycloak.json file
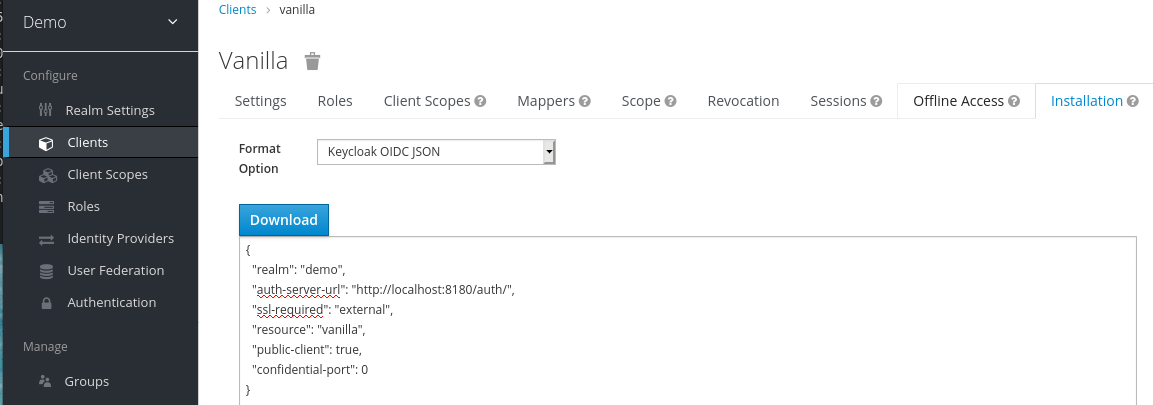
- Click Download to save Keycloak.json in a location that you can find later.
Select Keycloak OIDC JBoss Subsystem XML to generate an XML template.
Template XML
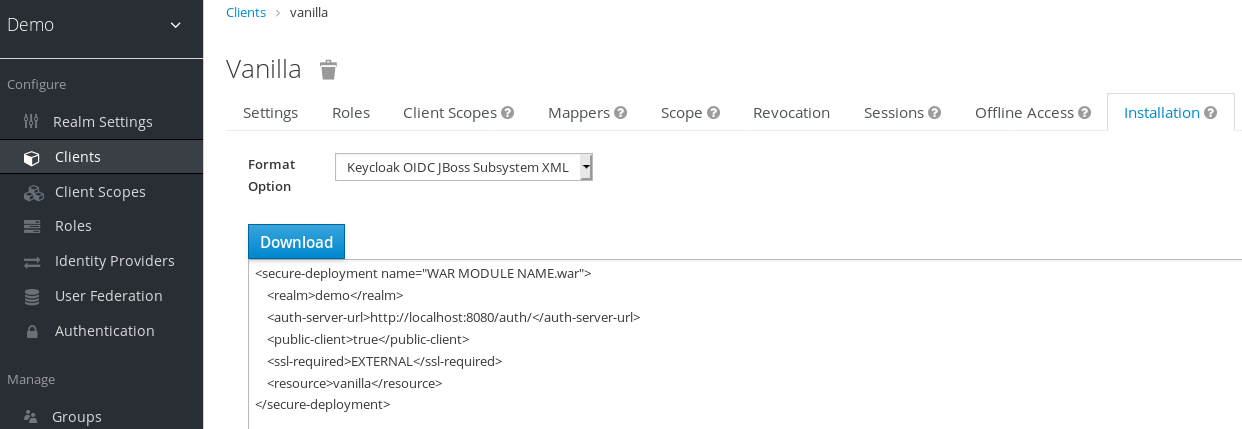
- Click Download to save a copy for use in the next procedure, which involves JBoss EAP configuration.
3.4. Modifying the JBoss EAP instance
The JBoss EAP servlet application requires additional configuration before it is secured by Red Hat Single Sign-On.
Prerequisites
- You created a client named vanilla in the demo realm.
- You saved a template XML file for this client.
Procedure
-
Go to the
standalone/configurationdirectory in your JBoss EAP root directory. Open the
standalone.xmlfile and search for the following text:<subsystem xmlns="urn:jboss:domain:keycloak:1.1"/>Change the XML entry from self-closing to using a pair of opening and closing tags as shown here:
<subsystem xmlns="urn:jboss:domain:keycloak:1.1">
</subsystem>
Paste the contents of the XML template within the
<subsystem>element, as shown in this example:<subsystem xmlns="urn:jboss:domain:keycloak:1.1"> <secure-deployment name="WAR MODULE NAME.war"> <realm>demo</realm> <auth-server-url>http://localhost:8180/auth</auth-server-url> <public-client>true</public-client> <ssl-required>EXTERNAL</ssl-required> <resource>vanilla</resource> </secure-deployment> </subsystem>Change
WAR MODULE NAME.wartovanilla.war:<subsystem xmlns="urn:jboss:domain:keycloak:1.1"> <secure-deployment name="vanilla.war"> ... </subsystem>- Reboot the application server.
3.5. Installing sample code to secure the application
The final procedure is to make this application secure by installing some sample code from the https://github.com/redhat-developer/redhat-sso-quickstarts repository. The quickstarts work with the most recent Red Hat Single Sign-On release.
The sample code is the app-profile-jee-vanilla quickstart. It demonstrates how to change a Jakarta EE application that is secured with basic authentication without changing the WAR. The Red Hat Single Sign-On client adapter subsystem changes the authentication method and injects the configuration.
Prerequisites
You have the following installed on your machine and available in your PATH.
- Java JDK 8
- Apache Maven 3.1.1 or higher
- Git
You have a keycloak.json file.
Procedure
- Make sure your JBoss EAP application server is started.
Download the code and change directories using the following commands.
$ git clone https://github.com/redhat-developer/redhat-sso-quickstarts $ cd redhat-sso-quickstarts/app-profile-jee-vanilla/config-
Copy the
keycloak.jsonfile to the current directory. -
Move one level up to the
app-profile-jee-vanilladirectory. Install the code using the following command.
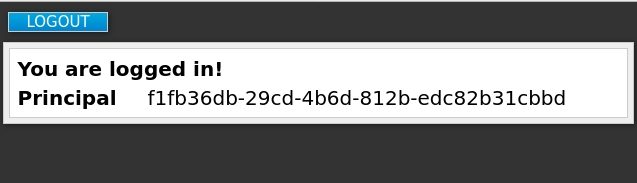
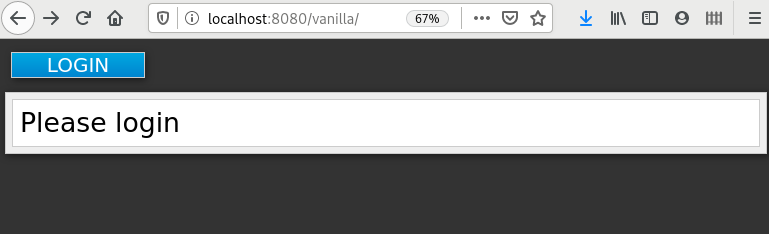
$ mvn clean wildfly:deployConfirm that the application installation succeeded. Go to http://localhost:8080/vanilla where a login page is displayed.
Login page confirming success
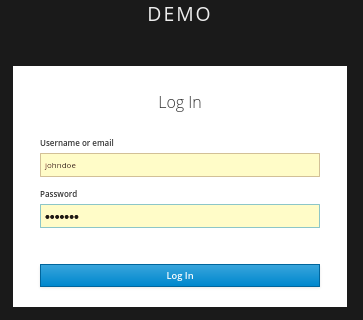
Log in using the account that you created in the demo realm.
Login page to demo realm
A message appears indicating you have completed a successful use of Red Hat Single Sign-On to protect a sample JBoss EAP application. Congratulations!
Complete success