Ce contenu n'est pas disponible dans la langue sélectionnée.
Chapter 1. Accessing the VM Portal
1.1. What is the VM Portal?
The VM Portal presents a comprehensive view of a virtual machine and allows the user to start, stop, edit, and view details of a virtual machine. The actions available to a user in the VM Portal are set by a system administrator. System administrators can delegate additional administration tasks to a user, such as:
- Create, edit, and remove virtual machines
- Manage virtual disks and network interfaces
- Create and use snapshots to restore virtual machines to previous states
Direct connection to virtual machines is facilitated with SPICE or VNC clients. Both protocols provide the user with an environment similar to a locally installed desktop. The administrator specifies the protocol used to connect to a virtual machine at the time of the virtual machine’s creation.
1.2. Browser Requirements
The following browser versions and operating systems can be used to access the Administration Portal and the VM Portal.
Browser support is divided into tiers:
- Tier 1: Browser and operating system combinations that are fully tested and fully supported. Red Hat Engineering is committed to fixing issues with browsers on this tier.
- Tier 2: Browser and operating system combinations that are partially tested, and are likely to work. Limited support is provided for this tier. Red Hat Engineering will attempt to fix issues with browsers on this tier.
- Tier 3: Browser and operating system combinations that are not tested, but may work. Minimal support is provided for this tier. Red Hat Engineering will attempt to fix only minor issues with browsers on this tier.
| Support Tier | Operating System Family | Browser |
|---|---|---|
| Tier 1 | Red Hat Enterprise Linux | Mozilla Firefox Extended Support Release (ESR) version |
| Any | Most recent version of Google Chrome, Mozilla Firefox, or Microsoft Edge | |
| Tier 2 | ||
| Tier 3 | Any | Earlier versions of Google Chrome or Mozilla Firefox |
| Any | Other browsers |
1.3. Client Requirements
Virtual machine consoles can only be accessed using supported Remote Viewer (virt-viewer) clients on Red Hat Enterprise Linux and Windows. To install virt-viewer, see Installing Supporting Components on Client Machines in the Virtual Machine Management Guide. Installing virt-viewer requires Administrator privileges.
You can access virtual machine consoles using the SPICE, VNC, or RDP (Windows only) protocols. You can install the QXLDOD graphical driver in the guest operating system to improve the functionality of SPICE. SPICE currently supports a maximum resolution of 2560x1600 pixels.
Client Operating System SPICE Support
Supported QXLDOD drivers are available on Red Hat Enterprise Linux 7.2 and later, and Windows 10.
SPICE may work with Windows 8 or 8.1 using QXLDOD drivers, but it is neither certified nor tested.
1.4. Installing the CA certificate
The first time you access the VM Portal, you must install the certificate used by the Red Hat Virtualization Manager to avoid security warnings.
Installing the CA certificate in Firefox
- Go to the VM Portal URL, and on the welcome page, click CA Certificate
-
A file named
pki-resource(with no file extension) will download. Open the Options/Preferences window:
- Windows: Open the Tools menu and select Options…
- Mac: Open the Firefox menu and select Preferences…
- Linux: Open the Edit menu and select Preferences
- Select Privacy & Security, and scroll down to Certificates.
- Click View Certificates…. This opens the Certificate Manager.
- Select the Authorities tab.
- Click Import…
- Select the file of the Root Certificate that you want to import (change file type to All Files to view the downloaded file).
- Select the check boxes indicating the trust options, and click .
- Click in the Certificate Manager, and close the Options/Preferences window.
- Make sure all Firefox processes are stopped.
- Restart Firefox and go to the VM Portal URL. A lock icon in the address bar indicates that the CA certificate is installed.
Installing the CA certificate in Google Chrome
- Go to the VM Portal URL, and on the welcome page, click CA Certificate
-
A file named
pki-resource(with no file extension) will download. -
Go to
tab and click IMPORT. - Select the file of the Root Certificate that you want to import (change file type to All Files to view the downloaded file).
- Select all the check boxes indicating the trust options, and click .
- Close Chrome and makes sure all the Chrome processes are stopped.
- Restart Chrome and go to the VM Portal URL. A lock icon in the address bar indicates that the CA certificate is installed.
1.5. Logging in to the VM Portal
Procedure
- Enter the provided server address into the web browser to access the Manager welcome screen.
- Select the required language from the drop-down list.
- Click VM Portal. An SSO login page displays. SSO login enables you to log in to the VM Portal and the Administration Portal (if you have permission) at the same time.
- Enter your User Name and Password. Use the Profile drop-down list to select the correct domain.
- Click . The list of virtual machines and pools assigned to you displays.
To log out of the Portal, click your user name in the header bar and select Log out. You are logged out of all portals and the Manager welcome screen displays.
1.6. Graphical user interface elements
You can perform common virtual machine tasks, change log-in options, and view messages in the VM Portal screen.
Key graphical user interface elements
Header bar
The header bar contains the following buttons:
- - manually refreshes the display. See also Refresh Interval.
- enables setting of logged-in user preferences that are persisted on the server.
- - allows you to reset all options back to initial installation defaults.
General - displays the user name, email address, and allows you to change the UI language.
NoteChanging the language setting will override the language chosen in a landing page or by a URL query. See also Advanced Options.
- Refresh Interval - set the automatic UI refresh rate interval.
- Notifications - allows you to mute all notifications for a given time interval. This option is not server persisted, so a page reload will clear this settings.
Console - settings are applied globally for all VMs.
- Select your preferred console. This will be the first console option displayed in the VM card (VNC console, VNC console (Browser), SPICE console, Remote desktop).
Connect automatically - automatic console login option. Enables automatically connecting to the VM’s console of the chosen VM after the user logs in to the VM Portal.
NoteLog in is detected based on the age of the session. The default is 60 seconds, and can be changed using the
sessionAgeFirstLoginThresholdInSecondsparameter in theovirt-web-ui.configfile. Setting this parameter to zero disables log in detection, and a console connection will be made on every page reload.- VNC Options
- VNC (Browser) Options
- SPICE Options
- Serial Console Options - SSH Key for authentication.
- Advanced Options - enable language settings to persist on the server. Enable the the chosen language/URL query language parameter on the landing page to override the chosen user settings language after each login. This enables compatibility with previous language settings behavior.
- displays the user name of the currently logged in user.
- About - VM Portal version information.
- Log out - to log out of the VM Portal.
- - displays notifications.
Toolbar
The toolbar allows you to create new virtual machines (the button is only available to authorized users), and search for virtual machines using a filter for the Name, Status, or Operating System of virtual machines or pool entities.
The number of currently displayed virtual machines or pool entities and the total number available is displayed.
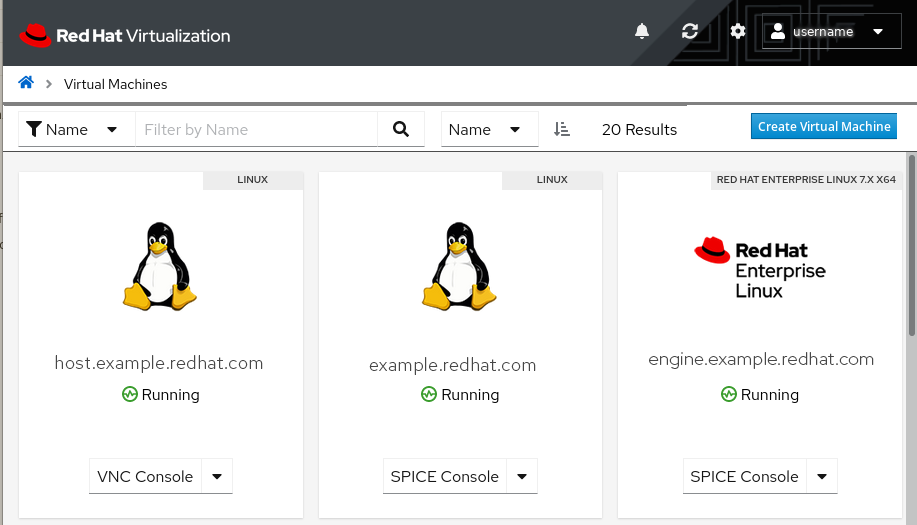
Virtual machines pane
The virtual machines pane displays virtual machine cards with the icon, operating system, name, status, and management options for each virtual machine or virtual machine pool.
Virtual machine pool cards - include a colored label of the pool name, an icon, operating system label, name, Allocated VMs number, the number of Available VMs from this Pool, and a button that allows the user to Take a virtual Machine.
Virtual machine pools are always displayed for Administrator level users, and for non-admin users that have permissions to view those pools and take pooled virtual machines out of those pools.
Virtual machine entities that belong to a pool are similar to a regular virtual machine card, with an added colored label with the pool name to which this virtual machine belongs.
VM management options:
Run (available when the virtual machine is off or suspended)
When the virtual machine is running, the preferred console is displayed first:
- VNC console
- VNC console (browser)
- Remote desktop (Windows virtual machines only)
- SPICE console
- Take a virtual machine (available only for Pool entities)
- Suspend
- Shutdown
- Reboot