Questo contenuto non è disponibile nella lingua selezionata.
Chapter 31. The CMP Engine
This chapter will explore the use of container managed persistence (CMP) in JBoss. We will assume a basic familiarity the EJB CMP model and focus on the operation of the JBoss CMP engine. Specifically, we will look at how to configure and optimize CMP applications on JBoss. For more introductory coverage of basic CMP concepts, we recommend Enterprise Java Beans, Fourth Edition (O'Reilly 2004).
31.1. Example Code
Copia collegamentoCollegamento copiato negli appunti!
This chapter is example-driven. We will work with the crime portal application which stores information about imaginary criminal organizations. The data model we will be working with is shown in Figure 31.1, “The crime portal example classes”.
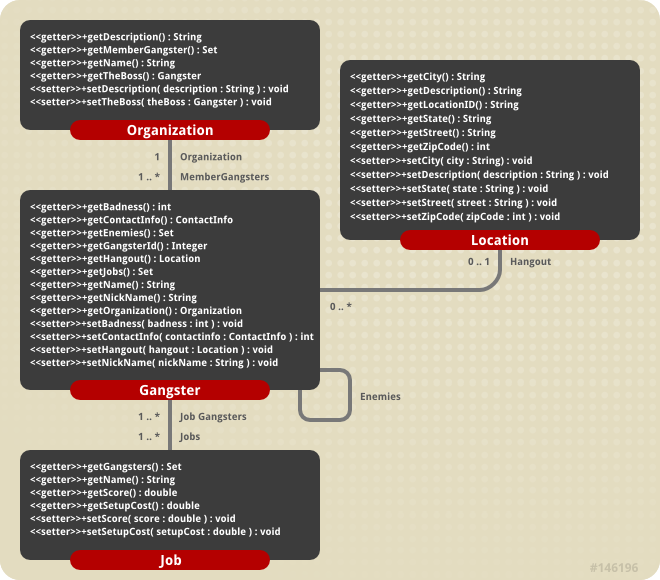
Figure 31.1. The crime portal example classes
The source code for the crime portal is available in the
src/main/org/jboss/cmp2 directory of the example code. To build the example code, run Ant as shown below
ant -Dchap=cmp2 config
[examples]$ ant -Dchap=cmp2 config
This command builds and deploys the application to the server. When you start your server, or if it is already running, you should see the following deployment messages:
Since the beans in the examples are configured to have their tables removed on undeployment, anytime you restart the server you need to rerun the config target to reload the example data and re-deploy the application.
31.1.1. Enabling CMP Debug Logging
Copia collegamentoCollegamento copiato negli appunti!
In order to get meaningful feedback from the chapter tests, increase the log level of the CMP subsystem before running the test. To enable debug logging add the following category to your
log4j.xml file:
<category name="org.jboss.ejb.plugins.cmp">
    <priority value="DEBUG"/>
</category>
<category name="org.jboss.ejb.plugins.cmp">
    <priority value="DEBUG"/>
</category>
In addition to this, it is necessary to decrease the threshold on the
CONSOLE appender to allow debug level messages to be logged to the console. The following changes also need to be applied to the log4j.xml file.
To see the full workings of the CMP engine you would need to enable the custom
TRACE level priority on the org.jboss.ejb.plugins.cmp category as shown here:
<category name="org.jboss.ejb.plugins.cmp">
    <priority value="TRACE" class="org.jboss.logging.XLevel"/>
</category>
<category name="org.jboss.ejb.plugins.cmp">
    <priority value="TRACE" class="org.jboss.logging.XLevel"/>
</category>
31.1.2. Running the examples
Copia collegamentoCollegamento copiato negli appunti!
The first test target illustrates a number of the customization features that will be discussed throughout this chapter. To run these tests execute the following ant target:
ant -Dchap=cmp2 -Dex=test run-example
[examples]$ ant -Dchap=cmp2 -Dex=test run-example
These tests exercise various finders, selectors and object to table mapping issues. We will refer to the tests throughout the chapter.
The other main target runs a set of tests to demonstrate the optimized loading configurations presented in Section 31.7, “Optimized Loading”. Now that the logging is setup correctly, the read-ahead tests will display useful information about the queries performed. Note that you do not have to restart the server for it to recognize the changes to the log4j.xml file, but it may take a minute or so. The following shows the actual execution of the readahead client:
ant -Dchap=cmp2 -Dex=readahead run-example
[examples]$ ant -Dchap=cmp2 -Dex=readahead run-example
When the readahead client is executed, all of the SQL queries executed during the test are displayed in the server console. The important items of note when analyzing the output are the number of queries executed, the columns selected, and the number of rows loaded. The following shows the read-ahead none portion of the server console output from readahead:
We will revisit this example and explore the output when we discuss the settings for optimized loading.