Questo contenuto non è disponibile nella lingua selezionata.
Chapter 4. Working with nodes
4.1. Viewing and listing the nodes in your OpenShift Container Platform cluster
You can list all the nodes in your cluster to obtain information such as status, age, memory usage, and details about the nodes.
When you perform node management operations, the CLI interacts with node objects that are representations of actual node hosts. The master uses the information from node objects to validate nodes with health checks.
4.1.1. About listing all the nodes in a cluster
You can get detailed information on the nodes in the cluster.
The following command lists all nodes:
$ oc get nodesThe following example is a cluster with healthy nodes:
$ oc get nodesExample output
NAME                   STATUS    ROLES     AGE       VERSION
master.example.com     Ready     master    7h        v1.18.3
node1.example.com      Ready     worker    7h        v1.18.3
node2.example.com      Ready     worker    7h        v1.18.3
The following example is a cluster with one unhealthy node:
$ oc get nodesExample output
NAME                   STATUS                      ROLES     AGE       VERSION
master.example.com     Ready                       master    7h        v1.20.0
node1.example.com      NotReady,SchedulingDisabled worker    7h        v1.20.0
node2.example.com      Ready                       worker    7h        v1.20.0
The conditions that trigger a
NotReadystatus are shown later in this section.The
-o wideoption provides additional information on nodes.$ oc get nodes -o wideExample output
NAME                STATUS   ROLES    AGE    VERSION           INTERNAL-IP    EXTERNAL-IP   OS-IMAGE                                                      KERNEL-VERSION                 CONTAINER-RUNTIME
master.example.com  Ready    master   171m   v1.20.0+39c0afe   10.0.129.108   <none>        Red Hat Enterprise Linux CoreOS 48.83.202103210901-0 (Ootpa)   4.18.0-240.15.1.el8_3.x86_64   cri-o://1.21.0-30.rhaos4.8.gitf2f339d.el8-dev
node1.example.com   Ready    worker   72m    v1.20.0+39c0afe   10.0.129.222   <none>        Red Hat Enterprise Linux CoreOS 48.83.202103210901-0 (Ootpa)   4.18.0-240.15.1.el8_3.x86_64   cri-o://1.21.0-30.rhaos4.8.gitf2f339d.el8-dev
node2.example.com   Ready    worker   164m   v1.20.0+39c0afe   10.0.142.150   <none>        Red Hat Enterprise Linux CoreOS 48.83.202103210901-0 (Ootpa)   4.18.0-240.15.1.el8_3.x86_64   cri-o://1.21.0-30.rhaos4.8.gitf2f339d.el8-dev
The following command lists information about a single node:
$ oc get node <node>For example:
$ oc get node node1.example.comExample output
NAME                   STATUS    ROLES     AGE       VERSION
node1.example.com      Ready     worker    7h        v1.20.0
The following command provides more detailed information about a specific node, including the reason for the current condition:
$ oc describe node <node>For example:
$ oc describe node node1.example.comExample output
Name: node1.example.com1 Roles: worker2 Labels: beta.kubernetes.io/arch=amd643 beta.kubernetes.io/instance-type=m4.large beta.kubernetes.io/os=linux failure-domain.beta.kubernetes.io/region=us-east-2 failure-domain.beta.kubernetes.io/zone=us-east-2a kubernetes.io/hostname=ip-10-0-140-16 node-role.kubernetes.io/worker= Annotations: cluster.k8s.io/machine: openshift-machine-api/ahardin-worker-us-east-2a-q5dzc4 machineconfiguration.openshift.io/currentConfig: worker-309c228e8b3a92e2235edd544c62fea8 machineconfiguration.openshift.io/desiredConfig: worker-309c228e8b3a92e2235edd544c62fea8 machineconfiguration.openshift.io/state: Done volumes.kubernetes.io/controller-managed-attach-detach: true CreationTimestamp: Wed, 13 Feb 2019 11:05:57 -0500 Taints: <none>5 Unschedulable: false Conditions:6 Type Status LastHeartbeatTime LastTransitionTime Reason Message ---- ------ ----------------- ------------------ ------ ------- OutOfDisk False Wed, 13 Feb 2019 15:09:42 -0500 Wed, 13 Feb 2019 11:05:57 -0500 KubeletHasSufficientDisk kubelet has sufficient disk space available MemoryPressure False Wed, 13 Feb 2019 15:09:42 -0500 Wed, 13 Feb 2019 11:05:57 -0500 KubeletHasSufficientMemory kubelet has sufficient memory available DiskPressure False Wed, 13 Feb 2019 15:09:42 -0500 Wed, 13 Feb 2019 11:05:57 -0500 KubeletHasNoDiskPressure kubelet has no disk pressure PIDPressure False Wed, 13 Feb 2019 15:09:42 -0500 Wed, 13 Feb 2019 11:05:57 -0500 KubeletHasSufficientPID kubelet has sufficient PID available Ready True Wed, 13 Feb 2019 15:09:42 -0500 Wed, 13 Feb 2019 11:07:09 -0500 KubeletReady kubelet is posting ready status Addresses:7 InternalIP: 10.0.140.16 InternalDNS: ip-10-0-140-16.us-east-2.compute.internal Hostname: ip-10-0-140-16.us-east-2.compute.internal Capacity:8 attachable-volumes-aws-ebs: 39 cpu: 2 hugepages-1Gi: 0 hugepages-2Mi: 0 memory: 8172516Ki pods: 250 Allocatable: attachable-volumes-aws-ebs: 39 cpu: 1500m hugepages-1Gi: 0 hugepages-2Mi: 0 memory: 7558116Ki pods: 250 System Info:9 Machine ID: 63787c9534c24fde9a0cde35c13f1f66 System UUID: EC22BF97-A006-4A58-6AF8-0A38DEEA122A Boot ID: f24ad37d-2594-46b4-8830-7f7555918325 Kernel Version: 3.10.0-957.5.1.el7.x86_64 OS Image: Red Hat Enterprise Linux CoreOS 410.8.20190520.0 (Ootpa) Operating System: linux Architecture: amd64 Container Runtime Version: cri-o://1.16.0-0.6.dev.rhaos4.3.git9ad059b.el8-rc2 Kubelet Version: v1.18.3 Kube-Proxy Version: v1.18.3 PodCIDR: 10.128.4.0/24 ProviderID: aws:///us-east-2a/i-04e87b31dc6b3e171 Non-terminated Pods: (13 in total)10 Namespace Name CPU Requests CPU Limits Memory Requests Memory Limits --------- ---- ------------ ---------- --------------- ------------- openshift-cluster-node-tuning-operator tuned-hdl5q 0 (0%) 0 (0%) 0 (0%) 0 (0%) openshift-dns dns-default-l69zr 0 (0%) 0 (0%) 0 (0%) 0 (0%) openshift-image-registry node-ca-9hmcg 0 (0%) 0 (0%) 0 (0%) 0 (0%) openshift-ingress router-default-76455c45c-c5ptv 0 (0%) 0 (0%) 0 (0%) 0 (0%) openshift-machine-config-operator machine-config-daemon-cvqw9 20m (1%) 0 (0%) 50Mi (0%) 0 (0%) openshift-marketplace community-operators-f67fh 0 (0%) 0 (0%) 0 (0%) 0 (0%) openshift-monitoring alertmanager-main-0 50m (3%) 50m (3%) 210Mi (2%) 10Mi (0%) openshift-monitoring grafana-78765ddcc7-hnjmm 100m (6%) 200m (13%) 100Mi (1%) 200Mi (2%) openshift-monitoring node-exporter-l7q8d 10m (0%) 20m (1%) 20Mi (0%) 40Mi (0%) openshift-monitoring prometheus-adapter-75d769c874-hvb85 0 (0%) 0 (0%) 0 (0%) 0 (0%) openshift-multus multus-kw8w5 0 (0%) 0 (0%) 0 (0%) 0 (0%) openshift-sdn ovs-t4dsn 100m (6%) 0 (0%) 300Mi (4%) 0 (0%) openshift-sdn sdn-g79hg 100m (6%) 0 (0%) 200Mi (2%) 0 (0%) Allocated resources: (Total limits may be over 100 percent, i.e., overcommitted.) Resource Requests Limits -------- -------- ------ cpu 380m (25%) 270m (18%) memory 880Mi (11%) 250Mi (3%) attachable-volumes-aws-ebs 0 0 Events:11 Type Reason Age From Message ---- ------ ---- ---- ------- Normal NodeHasSufficientPID 6d (x5 over 6d) kubelet, m01.example.com Node m01.example.com status is now: NodeHasSufficientPID Normal NodeAllocatableEnforced 6d kubelet, m01.example.com Updated Node Allocatable limit across pods Normal NodeHasSufficientMemory 6d (x6 over 6d) kubelet, m01.example.com Node m01.example.com status is now: NodeHasSufficientMemory Normal NodeHasNoDiskPressure 6d (x6 over 6d) kubelet, m01.example.com Node m01.example.com status is now: NodeHasNoDiskPressure Normal NodeHasSufficientDisk 6d (x6 over 6d) kubelet, m01.example.com Node m01.example.com status is now: NodeHasSufficientDisk Normal NodeHasSufficientPID 6d kubelet, m01.example.com Node m01.example.com status is now: NodeHasSufficientPID Normal Starting 6d kubelet, m01.example.com Starting kubelet. ...- 1
- The name of the node.
- 2
- The role of the node, either
masterorworker. - 3
- The labels applied to the node.
- 4
- The annotations applied to the node.
- 5
- The taints applied to the node.
- 6
- The node conditions and status. The
conditionsstanza lists theReady,PIDPressure,PIDPressure,MemoryPressure,DiskPressureandOutOfDiskstatus. These condition are described later in this section. - 7
- The IP address and host name of the node.
- 8
- The pod resources and allocatable resources.
- 9
- Information about the node host.
- 10
- The pods on the node.
- 11
- The events reported by the node.
Among the information shown for nodes, the following node conditions appear in the output of the commands shown in this section:
| Condition | Description |
|---|---|
|
|
If |
|
|
If |
|
|
If |
|
|
If |
|
|
If |
|
|
If |
|
|
If |
|
| Pods cannot be scheduled for placement on the node. |
4.1.2. Listing pods on a node in your cluster
You can list all the pods on a specific node.
Procedure
To list all or selected pods on one or more nodes:
$ oc describe node <node1> <node2>For example:
$ oc describe node ip-10-0-128-218.ec2.internalTo list all or selected pods on selected nodes:
$ oc describe --selector=<node_selector>$ oc describe node --selector=kubernetes.io/osOr:
$ oc describe -l=<pod_selector>$ oc describe node -l node-role.kubernetes.io/workerTo list all pods on a specific node, including terminated pods:
$ oc get pod --all-namespaces --field-selector=spec.nodeName=<nodename>
4.1.3. Viewing memory and CPU usage statistics on your nodes
You can display usage statistics about nodes, which provide the runtime environments for containers. These usage statistics include CPU, memory, and storage consumption.
Prerequisites
-
You must have
cluster-readerpermission to view the usage statistics. - Metrics must be installed to view the usage statistics.
Procedure
To view the usage statistics:
$ oc adm top nodesExample output
NAME                                   CPU(cores)   CPU%      MEMORY(bytes)   MEMORY%
ip-10-0-12-143.ec2.compute.internal    1503m        100%      4533Mi          61%
ip-10-0-132-16.ec2.compute.internal    76m          5%        1391Mi          18%
ip-10-0-140-137.ec2.compute.internal   398m         26%       2473Mi          33%
ip-10-0-142-44.ec2.compute.internal    656m         43%       6119Mi          82%
ip-10-0-146-165.ec2.compute.internal   188m         12%       3367Mi          45%
ip-10-0-19-62.ec2.compute.internal     896m         59%       5754Mi          77%
ip-10-0-44-193.ec2.compute.internal    632m         42%       5349Mi          72%
To view the usage statistics for nodes with labels:
$ oc adm top node --selector=''You must choose the selector (label query) to filter on. Supports
=,==, and!=.
4.2. Working with nodes
As an administrator, you can perform a number of tasks to make your clusters more efficient.
4.2.1. Understanding how to evacuate pods on nodes
Evacuating pods allows you to migrate all or selected pods from a given node or nodes.
You can only evacuate pods backed by a replication controller. The replication controller creates new pods on other nodes and removes the existing pods from the specified node(s).
Bare pods, meaning those not backed by a replication controller, are unaffected by default. You can evacuate a subset of pods by specifying a pod-selector. Pod selectors are based on labels, so all the pods with the specified label will be evacuated.
Procedure
Mark the nodes unschedulable before performing the pod evacuation.
Mark the node as unschedulable:
$ oc adm cordon <node1>Example output
node/<node1> cordonedCheck that the node status is
NotReady,SchedulingDisabled:$ oc get node <node1>Example output
NAME        STATUS                        ROLES     AGE       VERSION
<node1>     NotReady,SchedulingDisabled   worker    1d        v1.18.3
Evacuate the pods using one of the following methods:
Evacuate all or selected pods on one or more nodes:
$ oc adm drain <node1> <node2> [--pod-selector=<pod_selector>]Force the deletion of bare pods using the
--forceoption. When set totrue, deletion continues even if there are pods not managed by a replication controller, replica set, job, daemon set, or stateful set:$ oc adm drain <node1> <node2> --force=trueSet a period of time in seconds for each Pod to terminate gracefully, use
--grace-period. If negative, the default value specified in the Pod will be used:$ oc adm drain <node1> <node2> --grace-period=-1Ignore pods managed by daemon sets using the
--ignore-daemonsetsflag set totrue:$ oc adm drain <node1> <node2> --ignore-daemonsets=trueSet the length of time to wait before giving up using the
--timeoutflag. A value of0sets an infinite length of time:$ oc adm drain <node1> <node2> --timeout=5sDelete pods even if there are pods using emptyDir using the
--delete-local-dataflag set totrue. Local data is deleted when the node is drained:$ oc adm drain <node1> <node2> --delete-local-data=trueList objects that will be migrated without actually performing the evacuation, using the
--dry-runoption set totrue:$ oc adm drain <node1> <node2> --dry-run=trueInstead of specifying specific node names (for example,
<node1> <node2>), you can use the--selector=<node_selector>option to evacuate pods on selected nodes.
Mark the node as schedulable when done.
$ oc adm uncordon <node1>
4.2.2. Understanding how to update labels on nodes
You can update any label on a node.
Node labels are not persisted after a node is deleted even if the node is backed up by a Machine.
Any change to a MachineSet object is not applied to existing machines owned by the machine set. For example, labels edited or added to an existing MachineSet object are not propagated to existing machines and nodes associated with the machine set.
The following command adds or updates labels on a node:
$ oc label node <node> <key_1>=<value_1> ... <key_n>=<value_n>For example:
$ oc label nodes webconsole-7f7f6 unhealthy=trueThe following command updates all pods in the namespace:
$ oc label pods --all <key_1>=<value_1>For example:
$ oc label pods --all status=unhealthy
4.2.3. Understanding how to mark nodes as unschedulable or schedulable
By default, healthy nodes with a Ready status are marked as schedulable, meaning that new pods are allowed for placement on the node. Manually marking a node as unschedulable blocks any new pods from being scheduled on the node. Existing pods on the node are not affected.
The following command marks a node or nodes as unschedulable:
Example output
$ oc adm cordon <node>For example:
$ oc adm cordon node1.example.comExample output
node/node1.example.com cordoned

NAME                 LABELS                                        STATUS
node1.example.com    kubernetes.io/hostname=node1.example.com      Ready,SchedulingDisabled
The following command marks a currently unschedulable node or nodes as schedulable:
$ oc adm uncordon <node1>Alternatively, instead of specifying specific node names (for example,
<node>), you can use the--selector=<node_selector>option to mark selected nodes as schedulable or unschedulable.
4.2.4. Configuring master nodes as schedulable
You can configure master nodes to be schedulable, meaning that new pods are allowed for placement on the master nodes. By default, master nodes are not schedulable.
You can set the masters to be schedulable, but must retain the worker nodes.
You can deploy OpenShift Container Platform with no worker nodes on a bare metal cluster. In this case, the master nodes are marked schedulable by default.
You can allow or disallow master nodes to be schedulable by configuring the mastersSchedulable field.
Procedure
Edit the
schedulers.config.openshift.ioresource.$ oc edit schedulers.config.openshift.io clusterConfigure the
mastersSchedulablefield.apiVersion: config.openshift.io/v1 kind: Scheduler metadata: creationTimestamp: "2019-09-10T03:04:05Z" generation: 1 name: cluster resourceVersion: "433" selfLink: /apis/config.openshift.io/v1/schedulers/cluster uid: a636d30a-d377-11e9-88d4-0a60097bee62 spec: mastersSchedulable: false1 policy: name: "" status: {}- 1
- Set to
trueto allow master nodes to be schedulable, orfalseto disallow master nodes to be schedulable.
- Save the file to apply the changes.
4.2.5. Deleting nodes
4.2.5.1. Deleting nodes from a cluster
When you delete a node using the CLI, the node object is deleted in Kubernetes, but the pods that exist on the node are not deleted. Any bare pods not backed by a replication controller become inaccessible to OpenShift Container Platform. Pods backed by replication controllers are rescheduled to other available nodes. You must delete local manifest pods.
Procedure
To delete a node from the OpenShift Container Platform cluster, edit the appropriate MachineSet object:
If you are running cluster on bare metal, you cannot delete a node by editing MachineSet objects. Machine sets are only available when a cluster is integrated with a cloud provider. Instead you must unschedule and drain the node before manually deleting it.
View the machine sets that are in the cluster:
$ oc get machinesets -n openshift-machine-apiThe machine sets are listed in the form of <clusterid>-worker-<aws-region-az>.
Scale the machine set:
$ oc scale --replicas=2 machineset <machineset> -n openshift-machine-api
For more information on scaling your cluster using a machine set, see Manually scaling a machine set.
4.2.5.2. Deleting nodes from a bare metal cluster
When you delete a node using the CLI, the node object is deleted in Kubernetes, but the pods that exist on the node are not deleted. Any bare pods not backed by a replication controller become inaccessible to OpenShift Container Platform. Pods backed by replication controllers are rescheduled to other available nodes. You must delete local manifest pods.
Procedure
Delete a node from an OpenShift Container Platform cluster running on bare metal by completing the following steps:
Mark the node as unschedulable:
$ oc adm cordon <node_name>Drain all pods on your node:
$ oc adm drain <node_name> --force=trueDelete your node from the cluster:
$ oc delete node <node_name>
Although the node object is now deleted from the cluster, it can still rejoin the cluster after reboot or if the kubelet service is restarted. To permanently delete the node and all its data, you must decommission the node.
4.2.6. Adding kernel arguments to Nodes
In some special cases, you might want to add kernel arguments to a set of nodes in your cluster. This should only be done with caution and clear understanding of the implications of the arguments you set.
Improper use of kernel arguments can result in your systems becoming unbootable.
Examples of kernel arguments you could set include:
- enforcing=0: Configures Security Enhanced Linux (SELinux) to run in permissive mode. In permissive mode, the system acts as if SELinux is enforcing the loaded security policy, including labeling objects and emitting access denial entries in the logs, but it does not actually deny any operations. While not recommended for production systems, permissive mode can be helpful for debugging.
-
nosmt: Disables symmetric multithreading (SMT) in the kernel. Multithreading allows multiple logical threads for each CPU. You could consider
nosmtin multi-tenant environments to reduce risks from potential cross-thread attacks. By disabling SMT, you essentially choose security over performance.
See Kernel.org kernel parameters for a list and descriptions of kernel arguments.
In the following procedure, you create a MachineConfig object that identifies:
- A set of machines to which you want to add the kernel argument. In this case, machines with a worker role.
- Kernel arguments that are appended to the end of the existing kernel arguments.
- A label that indicates where in the list of machine configs the change is applied.
Prerequisites
- Have administrative privilege to a working OpenShift Container Platform cluster.
Procedure
List existing
MachineConfigobjects for your OpenShift Container Platform cluster to determine how to label your machine config:$ oc get MachineConfigExample output
NAME                                                        GENERATEDBYCONTROLLER                      IGNITIONVERSION   CREATED
00-master                                                   577c2d527b09cd7a481a162c50592139caa15e20   2.2.0             30m
00-worker                                                   577c2d527b09cd7a481a162c50592139caa15e20   2.2.0             30m
01-master-container-runtime                                 577c2d527b09cd7a481a162c50592139caa15e20   2.2.0             30m
01-master-kubelet                                           577c2d527b09cd7a481a162c50592139caa15e20   2.2.0             30m
01-worker-container-runtime                                 577c2d527b09cd7a481a162c50592139caa15e20   2.2.0             30m
01-worker-kubelet                                           577c2d527b09cd7a481a162c50592139caa15e20   2.2.0             30m
99-master-1131169f-dae9-11e9-b5dd-12a845e8ffd8-registries   577c2d527b09cd7a481a162c50592139caa15e20   2.2.0             30m
99-master-ssh                                                                                          2.2.0             30m
99-worker-114e8ac7-dae9-11e9-b5dd-12a845e8ffd8-registries   577c2d527b09cd7a481a162c50592139caa15e20   2.2.0             30m
99-worker-ssh                                                                                          2.2.0             30m
rendered-master-b3729e5f6124ca3678188071343115d0            577c2d527b09cd7a481a162c50592139caa15e20   2.2.0             30m
rendered-worker-18ff9506c718be1e8bd0a066850065b7            577c2d527b09cd7a481a162c50592139caa15e20   2.2.0             30m
Create a
MachineConfigobject file that identifies the kernel argument (for example,05-worker-kernelarg-selinuxpermissive.yaml)apiVersion: machineconfiguration.openshift.io/v1 kind: MachineConfig metadata: labels: machineconfiguration.openshift.io/role: worker1 name: 05-worker-kernelarg-selinuxpermissive2 spec: config: ignition: version: 2.2.0 kernelArguments: - enforcing=03 Create the new machine config:
$ oc create -f 05-worker-kernelarg-selinuxpermissive.yamlCheck the machine configs to see that the new one was added:
$ oc get MachineConfigExample output
NAME                                                        GENERATEDBYCONTROLLER                      IGNITIONVERSION   CREATED
00-master                                                   577c2d527b09cd7a481a162c50592139caa15e20   2.2.0             31m
00-worker                                                   577c2d527b09cd7a481a162c50592139caa15e20   2.2.0             31m
01-master-container-runtime                                 577c2d527b09cd7a481a162c50592139caa15e20   2.2.0             31m
01-master-kubelet                                           577c2d527b09cd7a481a162c50592139caa15e20   2.2.0             31m
01-worker-container-runtime                                 577c2d527b09cd7a481a162c50592139caa15e20   2.2.0             31m
01-worker-kubelet                                           577c2d527b09cd7a481a162c50592139caa15e20   2.2.0             31m

05-worker-kernelarg-selinuxpermissive                                                                  3.1.0             105s

99-master-1131169f-dae9-11e9-b5dd-12a845e8ffd8-registries   577c2d527b09cd7a481a162c50592139caa15e20   2.2.0             31m
99-master-ssh                                                                                          2.2.0             30m
99-worker-114e8ac7-dae9-11e9-b5dd-12a845e8ffd8-registries   577c2d527b09cd7a481a162c50592139caa15e20   2.2.0             31m
99-worker-ssh                                                                                          2.2.0             31m
rendered-master-b3729e5f6124ca3678188071343115d0            577c2d527b09cd7a481a162c50592139caa15e20   2.2.0             31m
rendered-worker-18ff9506c718be1e8bd0a066850065b7            577c2d527b09cd7a481a162c50592139caa15e20   2.2.0             31m
Check the nodes:
$ oc get nodesExample output
NAME                           STATUS                     ROLES    AGE   VERSION
ip-10-0-136-161.ec2.internal   Ready                      worker   28m   v1.18.3
ip-10-0-136-243.ec2.internal   Ready                      master   34m   v1.18.3
ip-10-0-141-105.ec2.internal   Ready,SchedulingDisabled   worker   28m   v1.18.3
ip-10-0-142-249.ec2.internal   Ready                      master   34m   v1.18.3
ip-10-0-153-11.ec2.internal    Ready                      worker   28m   v1.18.3
ip-10-0-153-150.ec2.internal   Ready                      master   34m   v1.18.3
You can see that scheduling on each worker node is disabled as the change is being applied.
Check that the kernel argument worked by going to one of the worker nodes and listing the kernel command line arguments (in
/proc/cmdlineon the host):$ oc debug node/ip-10-0-141-105.ec2.internalExample output
Starting pod/ip-10-0-141-105ec2internal-debug ...
To use host binaries, run `chroot /host`

sh-4.2# cat /host/proc/cmdline
BOOT_IMAGE=/ostree/rhcos-... console=tty0 console=ttyS0,115200n8
rootflags=defaults,prjquota rw root=UUID=fd0... ostree=/ostree/boot.0/rhcos/16...
coreos.oem.id=qemu coreos.oem.id=ec2 ignition.platform.id=ec2 enforcing=0

sh-4.2# exit
You should see the
enforcing=0argument added to the other kernel arguments.
4.2.7. Additional resources
For more information on scaling your cluster using a MachineSet, see Manually scaling a MachineSet.
4.3. Managing nodes
OpenShift Container Platform uses a KubeletConfig custom resource (CR) to manage the configuration of nodes. By creating an instance of a KubeletConfig object, a managed machine config is created to override setting on the node.
Logging in to remote machines for the purpose of changing their configuration is not supported.
4.3.1. Modifying nodes
To make configuration changes to a cluster, or machine pool, you must create a custom resource definition (CRD), or KubeletConfig object. OpenShift Container Platform uses the Machine Config Controller to watch for changes introduced through the CRD to apply the changes to the cluster.
Procedure
Obtain the label associated with the static CRD, Machine Config Pool, for the type of node you want to configure. Perform one of the following steps:
Check current labels of the desired machine config pool.
For example:
$ oc get machineconfigpool --show-labelsExample output
NAME      CONFIG                                             UPDATED   UPDATING   DEGRADED   LABELS
master    rendered-master-e05b81f5ca4db1d249a1bf32f9ec24fd   True      False      False      operator.machineconfiguration.openshift.io/required-for-upgrade=
worker    rendered-worker-f50e78e1bc06d8e82327763145bfcf62   True      False      False
Add a custom label to the desired machine config pool.
For example:
$ oc label machineconfigpool worker custom-kubelet=enabled
Create a
kubeletconfigcustom resource (CR) for your configuration change.For example:
Sample configuration for a custom-config CR
apiVersion: machineconfiguration.openshift.io/v1
kind: KubeletConfig
metadata:
  name: custom-config
1 spec: machineConfigPoolSelector: matchLabels: custom-kubelet: enabled2 kubeletConfig:3 podsPerCore: 10 maxPods: 250 systemReserved: cpu: 2000m memory: 1GiCreate the CR object.
$ oc create -f <file-name>For example:
$ oc create -f master-kube-config.yaml
Most KubeletConfig Options can be set by the user. The following options are not allowed to be overwritten:
- CgroupDriver
- ClusterDNS
- ClusterDomain
- RuntimeRequestTimeout
- StaticPodPath
4.4. Managing the maximum number of pods per node
In OpenShift Container Platform, you can configure the number of pods that can run on a node based on the number of processor cores on the node, a hard limit or both. If you use both options, the lower of the two limits the number of pods on a node.
Exceeding these values can result in:
- Increased CPU utilization by OpenShift Container Platform.
- Slow pod scheduling.
- Potential out-of-memory scenarios, depending on the amount of memory in the node.
- Exhausting the IP address pool.
- Resource overcommitting, leading to poor user application performance.
A pod that is holding a single container actually uses two containers. The second container sets up networking prior to the actual container starting. As a result, a node running 10 pods actually has 20 containers running.
The podsPerCore parameter limits the number of pods the node can run based on the number of processor cores on the node. For example, if podsPerCore is set to 10 on a node with 4 processor cores, the maximum number of pods allowed on the node is 40.
The maxPods parameter limits the number of pods the node can run to a fixed value, regardless of the properties of the node.
4.4.1. Configuring the maximum number of pods per node
Two parameters control the maximum number of pods that can be scheduled to a node: podsPerCore and maxPods. If you use both options, the lower of the two limits the number of pods on a node.
For example, if podsPerCore is set to 10 on a node with 4 processor cores, the maximum number of pods allowed on the node will be 40.
Prerequisites
Obtain the label associated with the static
MachineConfigPoolCRD for the type of node you want to configure. Perform one of the following steps:View the machine config pool:
$ oc describe machineconfigpool <name>For example:
$ oc describe machineconfigpool workerExample output
apiVersion: machineconfiguration.openshift.io/v1
kind: MachineConfigPool
metadata:
  creationTimestamp: 2019-02-08T14:52:39Z
  generation: 1
  labels:
    custom-kubelet: small-pods
1 - 1
- If a label has been added it appears under
labels.
If the label is not present, add a key/value pair:
$ oc label machineconfigpool worker custom-kubelet=small-pods
Procedure
Create a custom resource (CR) for your configuration change.
Sample configuration for a
max-podsCRapiVersion: machineconfiguration.openshift.io/v1 kind: KubeletConfig metadata: name: set-max-pods1 spec: machineConfigPoolSelector: matchLabels: custom-kubelet: small-pods2 kubeletConfig: podsPerCore: 103 maxPods: 2504 NoteSetting
podsPerCoreto0disables this limit.In the above example, the default value for
podsPerCoreis10and the default value formaxPodsis250. This means that unless the node has 25 cores or more, by default,podsPerCorewill be the limiting factor.List the
MachineConfigPoolCRDs to see if the change is applied. TheUPDATINGcolumn reportsTrueif the change is picked up by the Machine Config Controller:$ oc get machineconfigpoolsExample output
NAME     CONFIG                        UPDATED   UPDATING   DEGRADED
master   master-9cc2c72f205e103bb534   False     False      False
worker   worker-8cecd1236b33ee3f8a5e   False     True       False
Once the change is complete, the
UPDATEDcolumn reportsTrue.$ oc get machineconfigpoolsExample output
NAME     CONFIG                        UPDATED   UPDATING   DEGRADED
master   master-9cc2c72f205e103bb534   False     True       False
worker   worker-8cecd1236b33ee3f8a5e   True      False      False
4.5. Using the Node Tuning Operator
Learn about the Node Tuning Operator and how you can use it to manage node-level tuning by orchestrating the tuned daemon.
The Node Tuning Operator helps you manage node-level tuning by orchestrating the Tuned daemon. The majority of high-performance applications require some level of kernel tuning. The Node Tuning Operator provides a unified management interface to users of node-level sysctls and more flexibility to add custom tuning specified by user needs.
The Operator manages the containerized Tuned daemon for OpenShift Container Platform as a Kubernetes daemon set. It ensures the custom tuning specification is passed to all containerized Tuned daemons running in the cluster in the format that the daemons understand. The daemons run on all nodes in the cluster, one per node.
Node-level settings applied by the containerized Tuned daemon are rolled back on an event that triggers a profile change or when the containerized Tuned daemon is terminated gracefully by receiving and handling a termination signal.
The Node Tuning Operator is part of a standard OpenShift Container Platform installation in version 4.1 and later.
4.5.1. Accessing an example Node Tuning Operator specification
Use this process to access an example Node Tuning Operator specification.
Procedure
Run:
$ oc get Tuned/default -o yaml -n openshift-cluster-node-tuning-operator
The default CR is meant for delivering standard node-level tuning for the OpenShift Container Platform platform and it can only be modified to set the Operator Management state. Any other custom changes to the default CR will be overwritten by the Operator. For custom tuning, create your own Tuned CRs. Newly created CRs will be combined with the default CR and custom tuning applied to OpenShift Container Platform nodes based on node or pod labels and profile priorities.
While in certain situations the support for pod labels can be a convenient way of automatically delivering required tuning, this practice is discouraged and strongly advised against, especially in large-scale clusters. The default Tuned CR ships without pod label matching. If a custom profile is created with pod label matching, then the functionality will be enabled at that time. The pod label functionality might be deprecated in future versions of the Node Tuning Operator.
4.5.2. Custom tuning specification
The custom resource (CR) for the Operator has two major sections. The first section, profile:, is a list of Tuned profiles and their names. The second, recommend:, defines the profile selection logic.
Multiple custom tuning specifications can co-exist as multiple CRs in the Operator’s namespace. The existence of new CRs or the deletion of old CRs is detected by the Operator. All existing custom tuning specifications are merged and appropriate objects for the containerized Tuned daemons are updated.
Profile data
The profile: section lists Tuned profiles and their names.
profile:
- name: tuned_profile_1
  data: |
    # Tuned profile specification
    [main]
    summary=Description of tuned_profile_1 profile

    [sysctl]
    net.ipv4.ip_forward=1
    # ... other sysctl's or other Tuned daemon plug-ins supported by the containerized Tuned

# ...

- name: tuned_profile_n
  data: |
    # Tuned profile specification
    [main]
    summary=Description of tuned_profile_n profile

    # tuned_profile_n profile settings
Recommended profiles
The profile: selection logic is defined by the recommend: section of the CR. The recommend: section is a list of items to recommend the profiles based on a selection criteria.
recommend:
<recommend-item-1>
# ...
<recommend-item-n>
The individual items of the list:
- machineConfigLabels:
<mcLabels>
match:
<match>
priority: <priority>
profile: <tuned_profile_name> - 1
- Optional.
- 2
- A dictionary of key/value
MachineConfiglabels. The keys must be unique. - 3
- If omitted, profile match is assumed unless a profile with a higher priority matches first or
machineConfigLabelsis set. - 4
- An optional list.
- 5
- Profile ordering priority. Lower numbers mean higher priority (
0is the highest priority). - 6
- A Tuned profile to apply on a match. For example
tuned_profile_1.
<match> is an optional list recursively defined as follows:
- label: <label_name>
value: <label_value>
type: <label_type>
<match>
If <match> is not omitted, all nested <match> sections must also evaluate to true. Otherwise, false is assumed and the profile with the respective <match> section will not be applied or recommended. Therefore, the nesting (child <match> sections) works as logical AND operator. Conversely, if any item of the <match> list matches, the entire <match> list evaluates to true. Therefore, the list acts as logical OR operator.
If machineConfigLabels is defined, machine config pool based matching is turned on for the given recommend: list item. <mcLabels> specifies the labels for a machine config. The machine config is created automatically to apply host settings, such as kernel boot parameters, for the profile <tuned_profile_name>. This involves finding all machine config pools with machine config selector matching <mcLabels> and setting the profile <tuned_profile_name> on all nodes that match the machine config pools' node selectors.
The list items match and machineConfigLabels are connected by the logical OR operator. The match item is evaluated first in a short-circuit manner. Therefore, if it evaluates to true, the machineConfigLabels item is not considered.
When using machine config pool based matching, it is advised to group nodes with the same hardware configuration into the same machine config pool. Not following this practice might result in Tuned operands calculating conflicting kernel parameters for two or more nodes sharing the same machine config pool.
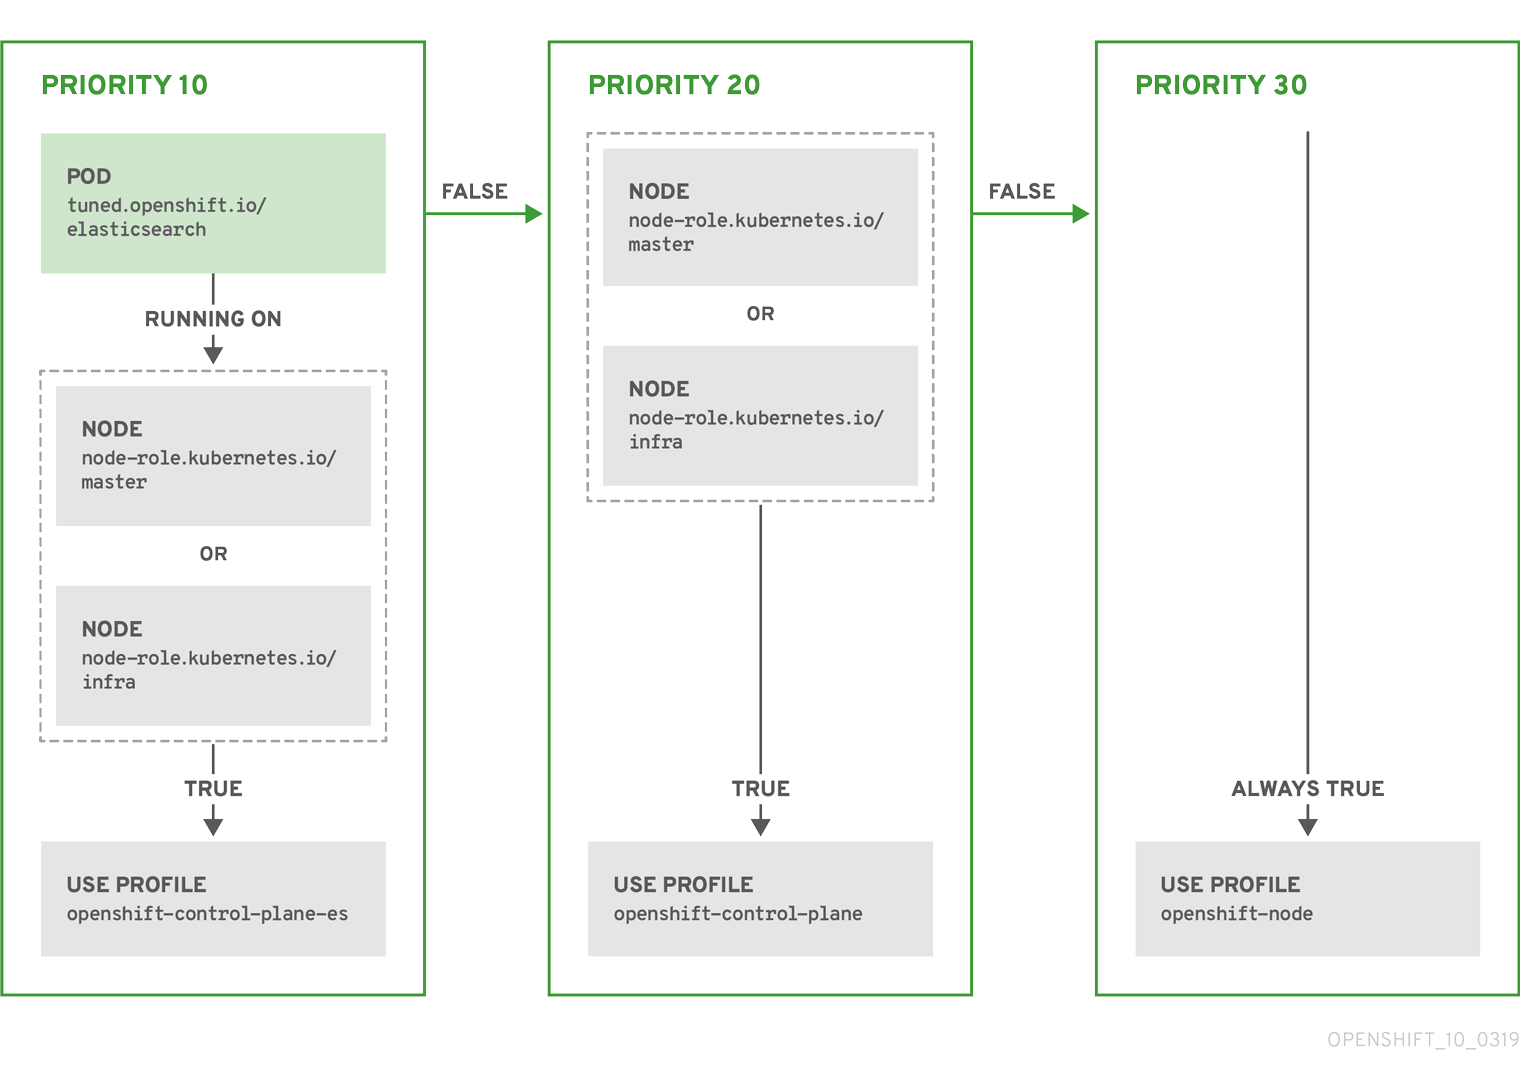
Example: node or pod label based matching
- match:
  - label: tuned.openshift.io/elasticsearch
    match:
    - label: node-role.kubernetes.io/master
    - label: node-role.kubernetes.io/infra
    type: pod
  priority: 10
  profile: openshift-control-plane-es
- match:
  - label: node-role.kubernetes.io/master
  - label: node-role.kubernetes.io/infra
  priority: 20
  profile: openshift-control-plane
- priority: 30
  profile: openshift-node
The CR above is translated for the containerized Tuned daemon into its recommend.conf file based on the profile priorities. The profile with the highest priority (10) is openshift-control-plane-es and, therefore, it is considered first. The containerized Tuned daemon running on a given node looks to see if there is a pod running on the same node with the tuned.openshift.io/elasticsearch label set. If not, the entire <match> section evaluates as false. If there is such a pod with the label, in order for the <match> section to evaluate to true, the node label also needs to be node-role.kubernetes.io/master or node-role.kubernetes.io/infra.
If the labels for the profile with priority 10 matched, openshift-control-plane-es profile is applied and no other profile is considered. If the node/pod label combination did not match, the second highest priority profile (openshift-control-plane) is considered. This profile is applied if the containerized Tuned pod runs on a node with labels node-role.kubernetes.io/master or node-role.kubernetes.io/infra.
Finally, the profile openshift-node has the lowest priority of 30. It lacks the <match> section and, therefore, will always match. It acts as a profile catch-all to set openshift-node profile, if no other profile with higher priority matches on a given node.
Example: machine config pool based matching
apiVersion: tuned.openshift.io/v1
kind: Tuned
metadata:
  name: openshift-node-custom
  namespace: openshift-cluster-node-tuning-operator
spec:
  profile:
  - data: |
      [main]
      summary=Custom OpenShift node profile with an additional kernel parameter
      include=openshift-node
      [bootloader]
      cmdline_openshift_node_custom=+skew_tick=1
    name: openshift-node-custom

  recommend:
  - machineConfigLabels:
      machineconfiguration.openshift.io/role: "worker-custom"
    priority: 20
    profile: openshift-node-custom
To minimize node reboots, label the target nodes with a label the machine config pool’s node selector will match, then create the Tuned CR above and finally create the custom machine config pool itself.
4.5.3. Default profiles set on a cluster
The following are the default profiles set on a cluster.
apiVersion: tuned.openshift.io/v1
kind: Tuned
metadata:
  name: default
  namespace: openshift-cluster-node-tuning-operator
spec:
  profile:
  - name: "openshift"
    data: |
      [main]
      summary=Optimize systems running OpenShift (parent profile)
      include=${f:virt_check:virtual-guest:throughput-performance}

      [selinux]
      avc_cache_threshold=8192

      [net]
      nf_conntrack_hashsize=131072

      [sysctl]
      net.ipv4.ip_forward=1
      kernel.pid_max=>4194304
      net.netfilter.nf_conntrack_max=1048576
      net.ipv4.conf.all.arp_announce=2
      net.ipv4.neigh.default.gc_thresh1=8192
      net.ipv4.neigh.default.gc_thresh2=32768
      net.ipv4.neigh.default.gc_thresh3=65536
      net.ipv6.neigh.default.gc_thresh1=8192
      net.ipv6.neigh.default.gc_thresh2=32768
      net.ipv6.neigh.default.gc_thresh3=65536
      vm.max_map_count=262144

      [sysfs]
      /sys/module/nvme_core/parameters/io_timeout=4294967295
      /sys/module/nvme_core/parameters/max_retries=10

  - name: "openshift-control-plane"
    data: |
      [main]
      summary=Optimize systems running OpenShift control plane
      include=openshift

      [sysctl]
      # ktune sysctl settings, maximizing i/o throughput
      #
      # Minimal preemption granularity for CPU-bound tasks:
      # (default: 1 msec#  (1 + ilog(ncpus)), units: nanoseconds)
      kernel.sched_min_granularity_ns=10000000
      # The total time the scheduler will consider a migrated process
      # "cache hot" and thus less likely to be re-migrated
      # (system default is 500000, i.e. 0.5 ms)
      kernel.sched_migration_cost_ns=5000000
      # SCHED_OTHER wake-up granularity.
      #
      # Preemption granularity when tasks wake up.  Lower the value to
      # improve wake-up latency and throughput for latency critical tasks.
      kernel.sched_wakeup_granularity_ns=4000000

  - name: "openshift-node"
    data: |
      [main]
      summary=Optimize systems running OpenShift nodes
      include=openshift

      [sysctl]
      net.ipv4.tcp_fastopen=3
      fs.inotify.max_user_watches=65536
      fs.inotify.max_user_instances=8192

  recommend:
  - profile: "openshift-control-plane"
    priority: 30
    match:
    - label: "node-role.kubernetes.io/master"
    - label: "node-role.kubernetes.io/infra"

  - profile: "openshift-node"
    priority: 40
4.5.4. Supported Tuned daemon plug-ins
Excluding the [main] section, the following Tuned plug-ins are supported when using custom profiles defined in the profile: section of the Tuned CR:
- audio
- cpu
- disk
- eeepc_she
- modules
- mounts
- net
- scheduler
- scsi_host
- selinux
- sysctl
- sysfs
- usb
- video
- vm
There is some dynamic tuning functionality provided by some of these plug-ins that is not supported. The following Tuned plug-ins are currently not supported:
- bootloader
- script
- systemd
See Available Tuned Plug-ins and Getting Started with Tuned for more information.
4.6. Understanding node rebooting
To reboot a node without causing an outage for applications running on the platform, it is important to first evacuate the pods. For pods that are made highly available by the routing tier, nothing else needs to be done. For other pods needing storage, typically databases, it is critical to ensure that they can remain in operation with one pod temporarily going offline. While implementing resiliency for stateful pods is different for each application, in all cases it is important to configure the scheduler to use node anti-affinity to ensure that the pods are properly spread across available nodes.
Another challenge is how to handle nodes that are running critical infrastructure such as the router or the registry. The same node evacuation process applies, though it is important to understand certain edge cases.
4.6.1. About rebooting nodes running critical infrastructure
When rebooting nodes that host critical OpenShift Container Platform infrastructure components, such as router pods, registry pods, and monitoring pods, ensure that there are at least three nodes available to run these components.
The following scenario demonstrates how service interruptions can occur with applications running on OpenShift Container Platform when only two nodes are available:
- Node A is marked unschedulable and all pods are evacuated.
- The registry pod running on that node is now redeployed on node B. Node B is now running both registry pods.
- Node B is now marked unschedulable and is evacuated.
- The service exposing the two pod endpoints on node B loses all endpoints, for a brief period of time, until they are redeployed to node A.
When using three nodes for infrastructure components, this process does not result in a service disruption. However, due to pod scheduling, the last node that is evacuated and brought back into rotation does not have a registry pod. One of the other nodes has two registry pods. To schedule the third registry pod on the last node, use pod anti-affinity to prevent the scheduler from locating two registry pods on the same node.
Additional information
- For more information on pod anti-affinity, see Placing pods relative to other pods using affinity and anti-affinity rules.
4.6.2. Rebooting a node using pod anti-affinity
Pod anti-affinity is slightly different than node anti-affinity. Node anti-affinity can be violated if there are no other suitable locations to deploy a pod. Pod anti-affinity can be set to either required or preferred.
With this in place, if only two infrastructure nodes are available and one is rebooted, the container image registry pod is prevented from running on the other node. oc get pods reports the pod as unready until a suitable node is available. Once a node is available and all pods are back in ready state, the next node can be restarted.
Procedure
To reboot a node using pod anti-affinity:
Edit the node specification to configure pod anti-affinity:
apiVersion: v1
kind: Pod
metadata:
  name: with-pod-antiaffinity
spec:
  affinity:
    podAntiAffinity:
1 preferredDuringSchedulingIgnoredDuringExecution:2 - weight: 1003 podAffinityTerm: labelSelector: matchExpressions: - key: registry4 operator: In5 values: - default topologyKey: kubernetes.io/hostname- 1
- Stanza to configure pod anti-affinity.
- 2
- Defines a preferred rule.
- 3
- Specifies a weight for a preferred rule. The node with the highest weight is preferred.
- 4
- Description of the pod label that determines when the anti-affinity rule applies. Specify a key and value for the label.
- 5
- The operator represents the relationship between the label on the existing pod and the set of values in the
matchExpressionparameters in the specification for the new pod. Can beIn,NotIn,Exists, orDoesNotExist.
This example assumes the container image registry pod has a label of
registry=default. Pod anti-affinity can use any Kubernetes match expression.-
Enable the
MatchInterPodAffinityscheduler predicate in the scheduling policy file.
4.6.3. Understanding how to reboot nodes running routers
In most cases, a pod running an OpenShift Container Platform router exposes a host port.
The PodFitsPorts scheduler predicate ensures that no router pods using the same port can run on the same node, and pod anti-affinity is achieved. If the routers are relying on IP failover for high availability, there is nothing else that is needed.
For router pods relying on an external service such as AWS Elastic Load Balancing for high availability, it is that service’s responsibility to react to router pod restarts.
In rare cases, a router pod may not have a host port configured. In those cases, it is important to follow the recommended restart process for infrastructure nodes.
4.7. Freeing node resources using garbage collection
As an administrator, you can use OpenShift Container Platform to ensure that your nodes are running efficiently by freeing up resources through garbage collection.
The OpenShift Container Platform node performs two types of garbage collection:
- Container garbage collection: Removes terminated containers.
- Image garbage collection: Removes images not referenced by any running pods.
4.7.1. Understanding how terminated containers are removed though garbage collection
Container garbage collection can be performed using eviction thresholds.
When eviction thresholds are set for garbage collection, the node tries to keep any container for any pod accessible from the API. If the pod has been deleted, the containers will be as well. Containers are preserved as long the pod is not deleted and the eviction threshold is not reached. If the node is under disk pressure, it will remove containers and their logs will no longer be accessible using oc logs.
- eviction-soft - A soft eviction threshold pairs an eviction threshold with a required administrator-specified grace period.
- eviction-hard - A hard eviction threshold has no grace period, and if observed, OpenShift Container Platform takes immediate action.
If a node is oscillating above and below a soft eviction threshold, but not exceeding its associated grace period, the corresponding node would constantly oscillate between true and false. As a consequence, the scheduler could make poor scheduling decisions.
To protect against this oscillation, use the eviction-pressure-transition-period flag to control how long OpenShift Container Platform must wait before transitioning out of a pressure condition. OpenShift Container Platform will not set an eviction threshold as being met for the specified pressure condition for the period specified before toggling the condition back to false.
4.7.2. Understanding how images are removed though garbage collection
Image garbage collection relies on disk usage as reported by cAdvisor on the node to decide which images to remove from the node.
The policy for image garbage collection is based on two conditions:
- The percent of disk usage (expressed as an integer) which triggers image garbage collection. The default is 85.
- The percent of disk usage (expressed as an integer) to which image garbage collection attempts to free. Default is 80.
For image garbage collection, you can modify any of the following variables using a custom resource.
| Setting | Description |
|---|---|
|
| The minimum age for an unused image before the image is removed by garbage collection. The default is 2m. |
|
| The percent of disk usage, expressed as an integer, which triggers image garbage collection. The default is 85. |
|
| The percent of disk usage, expressed as an integer, to which image garbage collection attempts to free. The default is 80. |
Two lists of images are retrieved in each garbage collector run:
- A list of images currently running in at least one pod.
- A list of images available on a host.
As new containers are run, new images appear. All images are marked with a time stamp. If the image is running (the first list above) or is newly detected (the second list above), it is marked with the current time. The remaining images are already marked from the previous spins. All images are then sorted by the time stamp.
Once the collection starts, the oldest images get deleted first until the stopping criterion is met.
4.7.3. Configuring garbage collection for containers and images
As an administrator, you can configure how OpenShift Container Platform performs garbage collection by creating a kubeletConfig object for each machine config pool.
OpenShift Container Platform supports only one kubeletConfig object for each machine config pool.
You can configure any combination of the following:
- soft eviction for containers
- hard eviction for containers
- eviction for images
For soft container eviction you can also configure a grace period before eviction.
Prerequisites
Obtain the label associated with the static
MachineConfigPoolCRD for the type of node you want to configure. Perform one of the following steps:View the machine config pool:
$ oc describe machineconfigpool <name>For example:
$ oc describe machineconfigpool workerExample output
Name:         worker
Namespace:
Labels:       custom-kubelet=small-pods
1 - 1
- If a label has been added it appears under
Labels.
If the label is not present, add a key/value pair:
$ oc label machineconfigpool worker custom-kubelet=small-pods
Procedure
Create a custom resource (CR) for your configuration change.
Sample configuration for a container garbage collection CR:
apiVersion: machineconfiguration.openshift.io/v1
kind: KubeletConfig
metadata:
  name: worker-kubeconfig
1 spec: machineConfigPoolSelector: matchLabels: custom-kubelet: small-pods2 kubeletConfig: evictionSoft:3 memory.available: "500Mi"4 nodefs.available: "10%" nodefs.inodesFree: "5%" imagefs.available: "15%" imagefs.inodesFree: "10%" evictionSoftGracePeriod:5 memory.available: "1m30s" nodefs.available: "1m30s" nodefs.inodesFree: "1m30s" imagefs.available: "1m30s" imagefs.inodesFree: "1m30s" evictionHard: memory.available: "200Mi" nodefs.available: "5%" nodefs.inodesFree: "4%" imagefs.available: "10%" imagefs.inodesFree: "5%" evictionPressureTransitionPeriod: 0s6 imageMinimumGCAge: 5m7 imageGCHighThresholdPercent: 808 imageGCLowThresholdPercent: 759 - 1
- Name for the object.
- 2
- Selector label.
- 3
- Type of eviction:
EvictionSoftandEvictionHard. - 4
- Eviction thresholds based on a specific eviction trigger signal.
- 5
- Grace periods for the soft eviction. This parameter does not apply to
eviction-hard. - 6
- The duration to wait before transitioning out of an eviction pressure condition
- 7
- The minimum age for an unused image before the image is removed by garbage collection.
- 8
- The percent of disk usage (expressed as an integer) which triggers image garbage collection.
- 9
- The percent of disk usage (expressed as an integer) to which image garbage collection attempts to free.
Create the object:
$ oc create -f <file-name>.yamlFor example:
$ oc create -f gc-container.yamlExample output
kubeletconfig.machineconfiguration.openshift.io/gc-container createdVerify that garbage collection is active. The Machine Config Pool you specified in the custom resource appears with
UPDATINGas 'true` until the change is fully implemented:$ oc get machineconfigpoolExample output
NAME     CONFIG                                   UPDATED   UPDATING
master   rendered-master-546383f80705bd5aeaba93   True      False
worker   rendered-worker-b4c51bb33ccaae6fc4a6a5   False     True
4.8. Allocating resources for nodes in an OpenShift Container Platform cluster
To provide more reliable scheduling and minimize node resource overcommitment, reserve a portion of the CPU and memory resources for use by the underlying node components, such as kubelet and kube-proxy, and the remaining system components, such as sshd and NetworkManager. By specifying the resources to reserve, you provide the scheduler with more information about the remaining CPU and memory resources that a node has available for use by pods.
4.8.1. Understanding how to allocate resources for nodes
CPU and memory resources reserved for node components in OpenShift Container Platform are based on two node settings:
| Setting | Description |
|---|---|
|
|
This setting is not used with OpenShift Container Platform. Add the CPU and memory resources that you planned to reserve to the |
|
|
This setting identifies the resources to reserve for the node components and system components. The default settings depend on the OpenShift Container Platform and Machine Config Operator versions. Confirm the default |
If a flag is not set, the defaults are used. If none of the flags are set, the allocated resource is set to the node’s capacity as it was before the introduction of allocatable resources.
Any CPUs specifically reserved using the reservedSystemCPUs parameter are not available for allocation using kube-reserved or system-reserved.
4.8.1.1. How OpenShift Container Platform computes allocated resources
An allocated amount of a resource is computed based on the following formula:
[Allocatable] = [Node Capacity] - [system-reserved] - [Hard-Eviction-Thresholds]
The withholding of Hard-Eviction-Thresholds from Allocatable improves system reliability because the value for Allocatable is enforced for pods at the node level.
If Allocatable is negative, it is set to 0.
Each node reports the system resources that are used by the container runtime and kubelet. To simplify configuring the system-reserved parameter, view the resource use for the node by using the node summary API. The node summary is available at /api/v1/nodes/<node>/proxy/stats/summary.
4.8.1.2. How nodes enforce resource constraints
The node is able to limit the total amount of resources that pods can consume based on the configured allocatable value. This feature significantly improves the reliability of the node by preventing pods from using CPU and memory resources that are needed by system services such as the container runtime and node agent. To improve node reliability, administrators should reserve resources based on a target for resource use.
The node enforces resource constraints by using a new cgroup hierarchy that enforces quality of service. All pods are launched in a dedicated cgroup hierarchy that is separate from system daemons.
Administrators should treat system daemons similar to pods that have a guaranteed quality of service. System daemons can burst within their bounding control groups and this behavior must be managed as part of cluster deployments. Reserve CPU and memory resources for system daemons by specifying the amount of CPU and memory resources in system-reserved.
Enforcing system-reserved limits can prevent critical system services from receiving CPU and memory resources. As a result, a critical system service can be ended by the out-of-memory killer. The recommendation is to enforce system-reserved only if you have profiled the nodes exhaustively to determine precise estimates and you are confident that critical system services can recover if any process in that group is ended by the out-of-memory killer.
4.8.1.3. Understanding Eviction Thresholds
If a node is under memory pressure, it can impact the entire node and all pods running on the node. For example, a system daemon that uses more than its reserved amount of memory can trigger an out-of-memory event. To avoid or reduce the probability of system out-of-memory events, the node provides out-of-resource handling.
You can reserve some memory using the --eviction-hard flag. The node attempts to evict pods whenever memory availability on the node drops below the absolute value or percentage. If system daemons do not exist on a node, pods are limited to the memory capacity - eviction-hard. For this reason, resources set aside as a buffer for eviction before reaching out of memory conditions are not available for pods.
The following is an example to illustrate the impact of node allocatable for memory:
-
Node capacity is
32Gi -
--system-reserved is
3Gi -
--eviction-hard is set to
100Mi.
For this node, the effective node allocatable value is 28.9Gi. If the node and system components use all their reservation, the memory available for pods is 28.9Gi, and kubelet evicts pods when it exceeds this threshold.
If you enforce node allocatable, 28.9Gi, with top-level cgroups, then pods can never exceed 28.9Gi. Evictions are not performed unless system daemons consume more than 3.1Gi of memory.
If system daemons do not use up all their reservation, with the above example, pods would face memcg OOM kills from their bounding cgroup before node evictions kick in. To better enforce QoS under this situation, the node applies the hard eviction thresholds to the top-level cgroup for all pods to be Node Allocatable + Eviction Hard Thresholds.
If system daemons do not use up all their reservation, the node will evict pods whenever they consume more than 28.9Gi of memory. If eviction does not occur in time, a pod will be OOM killed if pods consume 29Gi of memory.
4.8.1.4. How the scheduler determines resource availability
The scheduler uses the value of node.Status.Allocatable instead of node.Status.Capacity to decide if a node will become a candidate for pod scheduling.
By default, the node will report its machine capacity as fully schedulable by the cluster.
4.8.2. Configuring allocated resources for nodes
OpenShift Container Platform supports the CPU and memory resource types for allocation. The ephemeral-resource resource type is supported as well. For the cpu type, the resource quantity is specified in units of cores, such as 200m, 0.5, or 1. For memory and ephemeral-storage, it is specified in units of bytes, such as 200Ki, 50Mi, or 5Gi.
As an administrator, you can set these using a custom resource (CR) through a set of <resource_type>=<resource_quantity> pairs (e.g., cpu=200m,memory=512Mi).
Prerequisites
To help you determine values for the
system-reservedsetting, you can introspect the resource use for a node by using the node summary API. Enter the following command for your node:$ oc get --raw /api/v1/nodes/<node>/proxy/stats/summaryFor example, to access the resources from
cluster.node22node, you can enter:$ oc get --raw /api/v1/nodes/cluster.node22/proxy/stats/summaryExample output
{
    "node": {
        "nodeName": "cluster.node22",
        "systemContainers": [
            {
                "cpu": {
                    "usageCoreNanoSeconds": 929684480915,
                    "usageNanoCores": 190998084
                },
                "memory": {
                    "rssBytes": 176726016,
                    "usageBytes": 1397895168,
                    "workingSetBytes": 1050509312
                },
                "name": "kubelet"
            },
            {
                "cpu": {
                    "usageCoreNanoSeconds": 128521955903,
                    "usageNanoCores": 5928600
                },
                "memory": {
                    "rssBytes": 35958784,
                    "usageBytes": 129671168,
                    "workingSetBytes": 102416384
                },
                "name": "runtime"
            }
        ]
    }
}
Obtain the label associated with the static
MachineConfigPoolCRD for the type of node you want to configure. Perform one of the following steps:View the Machine Config Pool:
$ oc describe machineconfigpool <name>For example:
$ oc describe machineconfigpool workerExample output
apiVersion: machineconfiguration.openshift.io/v1
kind: MachineConfigPool
metadata:
  creationTimestamp: 2019-02-08T14:52:39Z
  generation: 1
  labels:
    custom-kubelet: small-pods
1 - 1
- If a label has been added it appears under
labels.
If the label is not present, add a key/value pair:
$ oc label machineconfigpool worker custom-kubelet=small-pods
Procedure
Create a custom resource (CR) for your configuration change.
Sample configuration for a resource allocation CR
apiVersion: machineconfiguration.openshift.io/v1
kind: KubeletConfig
metadata:
  name: set-allocatable
1 spec: machineConfigPoolSelector: matchLabels: custom-kubelet: small-pods2 kubeletConfig: systemReserved: cpu: 1000m memory: 1Gi
4.9. Allocating specific CPUs for nodes in a cluster
When using the static CPU Manager policy, you can reserve specific CPUs for use by specific nodes in your cluster. For example, on a system with 24 CPUs, you could reserve CPUs numbered 0 - 3 for the control plane allowing the compute nodes to use CPUs 4 - 23.
4.9.1. Reserving CPUs for nodes
To explicitly define a list of CPUs that are reserved for specific nodes, create a KubeletConfig custom resource (CR) to define the reservedSystemCPUs parameter. This list supersedes the CPUs that might be reserved using the systemReserved and kubeReserved parameters.
Procedure
Obtain the label associated with the machine config pool (MCP) for the type of node you want to configure:
$ oc describe machineconfigpool <name>For example:
$ oc describe machineconfigpool workerExample output
Name:         worker
Namespace:
Labels:       machineconfiguration.openshift.io/mco-built-in=
              pools.operator.machineconfiguration.openshift.io/worker=
1 Annotations: <none> API Version: machineconfiguration.openshift.io/v1 Kind: MachineConfigPool ...- 1
- Get the MCP label.
Create a YAML file for the
KubeletConfigCR:apiVersion: machineconfiguration.openshift.io/v1 kind: KubeletConfig metadata: name: set-reserved-cpus1 spec: kubeletConfig: reservedSystemCPUs: "0,1,2,3"2 machineConfigPoolSelector: matchLabels: pools.operator.machineconfiguration.openshift.io/worker: ""3 Create the CR object:
$ oc create -f <file_name>.yaml
Additional resources
-
For more information on the
systemReservedandkubeReservedparameters, see Allocating resources for nodes in an OpenShift Container Platform cluster.
4.10. Machine Config Daemon metrics
The Machine Config Daemon is a part of the Machine Config Operator. It runs on every node in the cluster. The Machine Config Daemon manages configuration changes and updates on each of the nodes.
4.10.1. Machine Config Daemon metrics
Beginning with OpenShift Container Platform 4.3, the Machine Config Daemon provides a set of metrics. These metrics can be accessed using the Prometheus Cluster Monitoring stack.
The following table describes this set of metrics.
Metrics marked with * in the Name and Description columns represent serious errors that might cause performance problems. Such problems might prevent updates and upgrades from proceeding.
While some entries contain commands for getting specific logs, the most comprehensive set of logs is available using the oc adm must-gather command.
| Name | Format | Description | Notes |
|---|---|---|---|
| mcd_host_os_and_version | []string{"os", "version"} | Shows the OS that MCD is running on, such as RHCOS or RHEL. In case of RHCOS, the version is provided. | |
| ssh_accessed | counter | Shows the number of successful SSH authentications into the node. | The non-zero value shows that someone might have made manual changes to the node. Such changes might cause irreconcilable errors due to the differences between the state on the disk and the state defined in the machine configuration. |
| mcd_drain* | {"drain_time", "err"} | Logs errors received during failed drain. * |
While drains might need multiple tries to succeed, terminal failed drains prevent updates from proceeding. The For further investigation, see the logs by running:
|
| mcd_pivot_err* | []string{"pivot_target", "err"} | Logs errors encountered during pivot. * | Pivot errors might prevent OS upgrades from proceeding. For further investigation, run this command to access the node and see all its logs:
Alternatively, you can run this command to only see the logs from the
|
| mcd_state | []string{"state", "reason"} | State of Machine Config Daemon for the indicated node. Possible states are "Done", "Working", and "Degraded". In case of "Degraded", the reason is included. | For further investigation, see the logs by running:
|
| mcd_kubelet_state* | []string{"err"} | Logs kubelet health failures. * | This is expected to be empty, with failure count of 0. If failure count exceeds 2, the error indicating threshold is exceeded. This indicates a possible issue with the health of the kubelet. For further investigation, run this command to access the node and see all its logs:
|
| mcd_reboot_err* | []string{"message", "err"} | Logs the failed reboots and the corresponding errors. * | This is expected to be empty, which indicates a successful reboot. For further investigation, see the logs by running:
|
| mcd_update_state | []string{"config", "err"} | Logs success or failure of configuration updates and the corresponding errors. |
The expected value is For further investigation, see the logs by running:
|
Additional resources