Questo contenuto non è disponibile nella lingua selezionata.
Chapter 2. Governance and risk
Enterprises must meet internal standards for software engineering, secure engineering, resiliency, security, and regulatory compliance for workloads hosted on private, multi and hybrid clouds. Red Hat Advanced Cluster Management for Kubernetes governance provides an extensible policy framework for enterprises to introduce their own security policies.
2.1. Governance architecture
Enhance the security for your cluster with the Red Hat Advanced Cluster Management for Kubernetes governance lifecycle. The product governance lifecycle is based on defined policies, processes, and procedures to manage security and compliance from a central interface page. View the following diagram of the governance architecture:
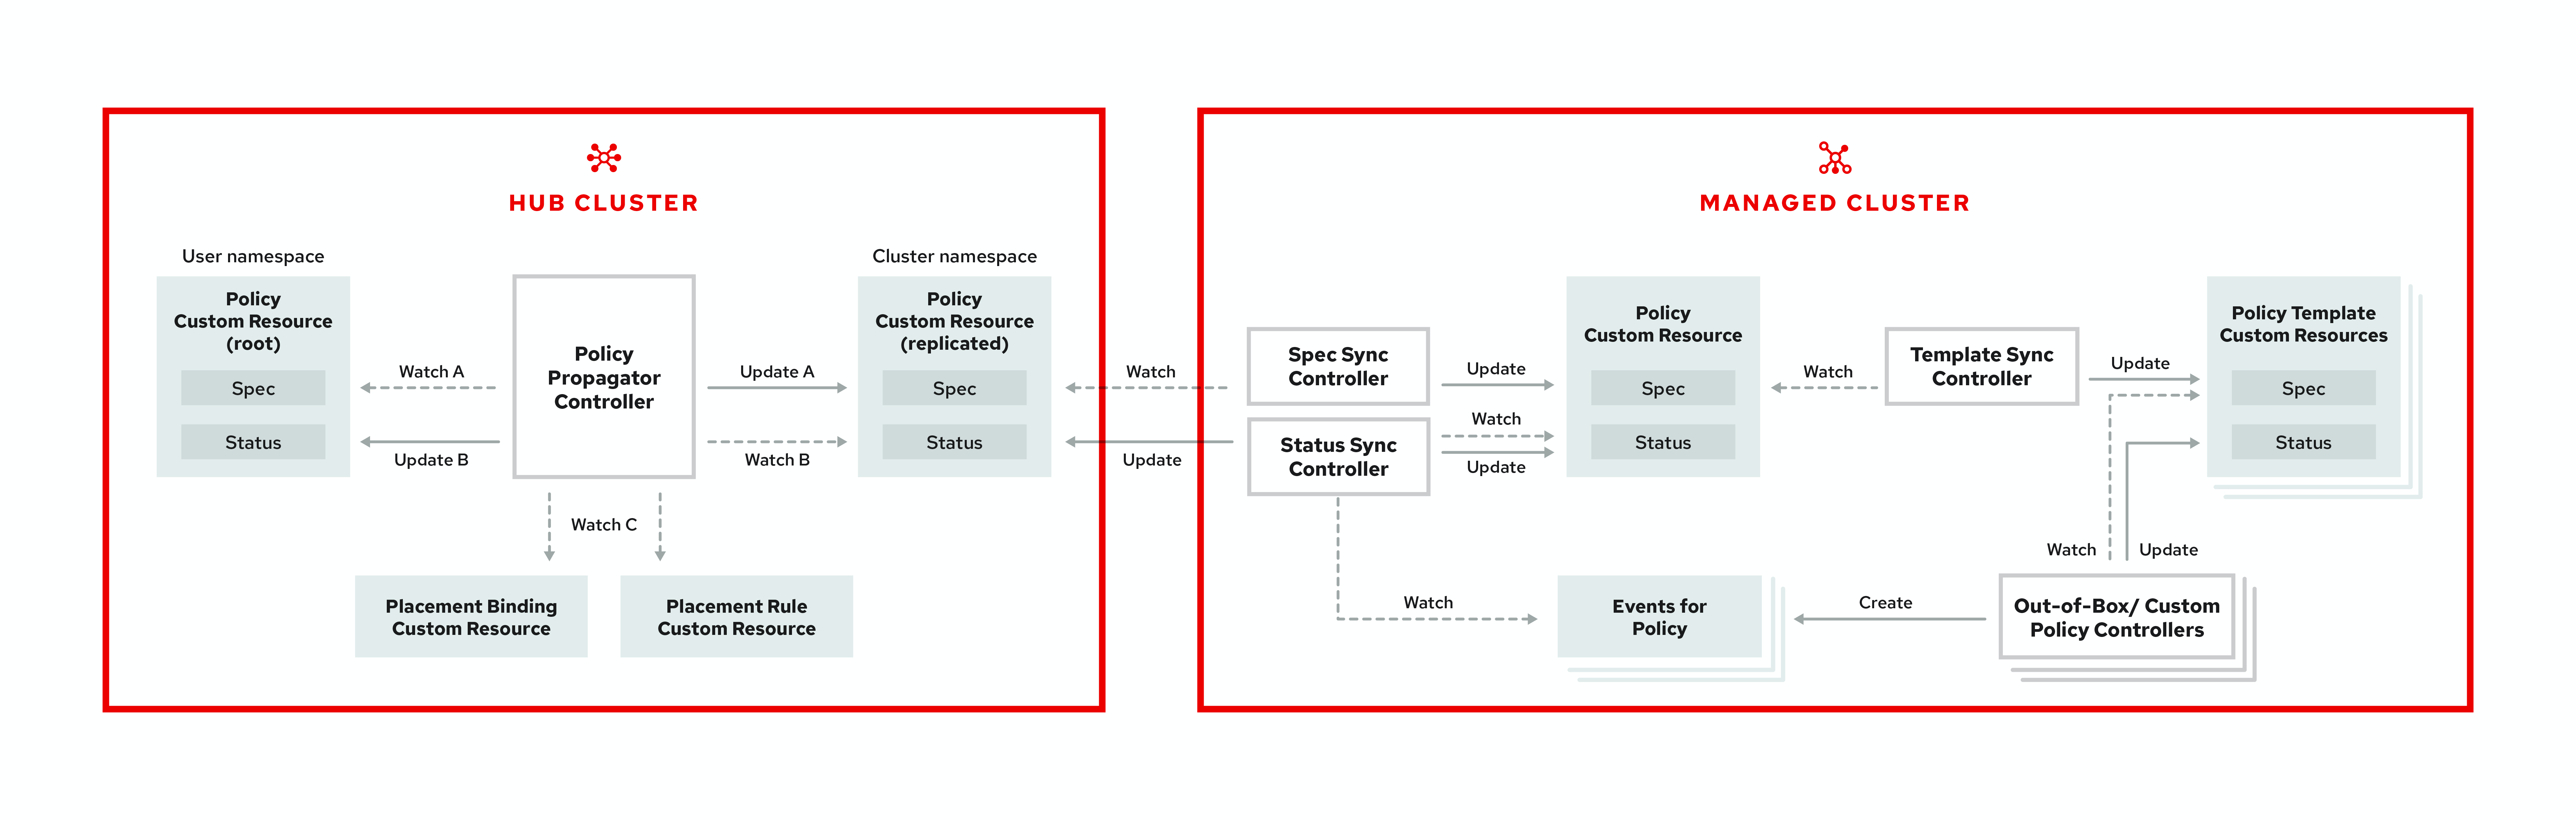
The governance architecture is composed of the following components:
Governance and risk dashboard: Provides a summary of your cloud governance and risk details, which include policy and cluster violations.
Notes:
-
When a policy is propagated to a managed cluster, the replicated policy is named
namespaceName.policyName. When you create a policy, make sure that the length of thenamespaceName.policyNamemust not exceed 63 characters due to the Kubernetes limit for object names. -
When you search for a policy in the hub cluster, you might also receive the name of the replicated policy on your managed cluster. For example, if you search for
policy-dhaz-cert, the following policy name from the hub cluster might appear:default.policy-dhaz-cert.
-
When a policy is propagated to a managed cluster, the replicated policy is named
-
Policy-based governance framework: Supports policy creation and deployment to various managed clusters based on attributes associated with clusters, such as a geographical region. See the
policy-collectionrepository to view examples of the predefined policies, and instructions on deploying policies to your cluster. You can also contribute custom policy controllers and policies. - Policy controller: Evaluates one or more policies on the managed cluster against your specified control and generates Kubernetes events for violations. Violations are propagated to the hub cluster. Policy controllers that are included in your installation are the following: Kubernetes configuration, Certificate, and IAM. You can also create a custom policy controller.
-
Open source community: Supports community contributions with a foundation of the Red Hat Advanced Cluster Management policy framework. Policy controllers and third-party policies are also a part of the
open-cluster-management/policy-collectionrepository. Learn how to contribute and deploy policies using GitOps. For more information, see Deploy policies using GitOps. Learn how to integrate third-party policies with Red Hat Advanced Cluster Management for Kubernetes. For more information, see Integrate third-party policy controllers.
Learn about the structure of an Red Hat Advanced Cluster Management for Kubernetes policy framework, and how to use the Red Hat Advanced Cluster Management for Kubernetes Governance and risk dashboard.
2.2. Policy overview
Use the Red Hat Advanced Cluster Management for Kubernetes security policy framework to create custom policy controllers and other policies. Kubernetes custom resource definition (CRD) instance are used to create policies. For more information about CRDs, see Extend the Kubernetes API with CustomResourceDefinitions.
Each Red Hat Advanced Cluster Management for Kubernetes policy can have at least one or more templates. For more details about the policy elements, view the following Policy YAML table section on this page.
The policy requires a PlacementRule that defines the clusters that the policy document is applied to, and a PlacementBinding that binds the Red Hat Advanced Cluster Management for Kubernetes policy to the placement rule.
Important:
-
You must create a
PlacementRuleto apply your policies to the managed cluster, and bind thePlacementRulewith aPlacementBinding. - You can create a policy in any namespace on the hub cluster except the cluster namespace. If you create a policy in the cluster namespace, it is deleted by Red Hat Advanced Cluster Management for Kubernetes.
- Each client and provider is responsible for ensuring that their managed cloud environment meets internal enterprise security standards for software engineering, secure engineering, resiliency, security, and regulatory compliance for workloads hosted on Kubernetes clusters. Use the governance and security capability to gain visibility and remediate configurations to meet standards.
2.2.1. Policy YAML structure
When you create a policy, you must include required parameter fields and values. Depending on your policy controller, you might need to include other optional fields and values. View the following YAML structure for the explained parameter fields:
2.2.2. Policy YAML table
| Field | Description |
|---|---|
| apiVersion |
Required. Set the value to |
| kind |
Required. Set the value to |
| metadata.name | Required. The name for identifying the policy resource. |
| metadata.annotations | Optional. Used to specify a set of security details that describes the set of standards the policy is trying to validate. All annotations documented here are represented as a string that contains a comma-separated list. Note: You can view policy violations based on the standards and categories that you define for your policy on the Policies page, from the console. |
| annotations.policy.open-cluster-management.io/standards | The name or names of security standards the policy is related to. For example, National Institute of Standards and Technology (NIST) and Payment Card Industry (PCI). |
| annotations.policy.open-cluster-management.io/categories | A security control category represent specific requirements for one or more standards. For example, a System and Information Integrity category might indicate that your policy contains a data transfer protocol to protect personal information, as required by the HIPAA and PCI standards. |
| annotations.policy.open-cluster-management.io/controls | The name of the security control that is being checked. For example, the certificate policy controller. |
| spec.policy-templates | Required. Used to create one or more policies to apply to a managed cluster. |
| spec.disabled |
Required. Set the value to |
| spec.remediationAction |
Optional. Specifies the remediation of your policy. The parameter values are |
2.2.3. Policy sample file
See Managing security policies to create and update a policy. You can also enable and updateRed Hat Advanced Cluster Management policy controllers to validate the compliance of your policies. Refer to Policy controllers. To learn more policy topics, see Governance and risk.
2.3. Policy controllers
Policy controllers monitor and report whether your cluster is compliant with a policy. Use the Red Hat Advanced Cluster Management for Kubernetes policy framework by using the out of the box policy templates to apply predefined policy controllers, and policies. The policy controllers are Kubernetes custom resource definition (CRD) instance. For more information about CRDs, see Extend the Kubernetes API with CustomResourceDefinitions. Policy controllers remediate policy violations to make the cluster status be compliant.
You can create custom policies and policy controllers with the product policy framework. See Creating a custom policy controller for more information.
Important: Only the configuration policy controller supports the enforce feature. You must manually remediate policies, where the policy controller does not support the enforce feature.
View the following topics to learn more about the following Red Hat Advanced Cluster Management for Kubernetes policy controllers:
Refer to Governance and risk for more topics about managing your policies.
2.3.1. Kubernetes configuration policy controller
Configuration policy controller can be used to configure any Kubernetes resource and apply security policies across your clusters.
The configuration policy controller communicates with the local Kubernetes API server to get the list of your configurations that are in your cluster. For more information about CRDs, see Extend the Kubernetes API with CustomResourceDefinitions.
The configuration policy controller is created on the hub cluster during installation. Configuration policy controller supports the enforce feature and monitors the compliance of the following policies:
When the remediationAction for the configuration policy is set to enforce, the controller creates a replicate policy on the target managed clusters.
2.3.1.1. Configuration policy controller YAML structure
2.3.1.2. Configuration policy sample
2.3.1.3. Configuration policy YAML table
| Field | Description |
|---|---|
| apiVersion |
Required. Set the value to |
| kind |
Required. Set the value to |
| metadata.name | Required. The name of the policy. |
| spec | Required. Specifications of which configuration policy to monitor and how to remediate them. |
| spec.namespace |
Required for namespaced objects or resources. The namespaces in the hub cluster that the policy is applied to. Enter at least one namespace for the |
| spec.remediationAction |
Required. Specifies the remediation of your policy. Enter |
| spec.remediationAction.severity |
Required. Specifies the severity when the policy is non-compliant. Use the following parameter values: |
| spec.remediationAction.complianceType | Required. Used to list expected behavior for roles and other Kubernetes object that must be evaluated or applied to the managed clusters. You must use the following verbs as parameter values:
|
See the policy samples that use NIST Special Publication 800-53 (Rev. 4), and are supported by Red Hat Advanced Cluster Management from the CM-Configuration-Management folder. Learn about how policies are applied on your hub cluster, see Supported policies for more details.
Learn how to create and customize policies, see Manage security policies. Refer to Policy controllers for more details about controllers.
2.3.2. Certificate policy controller
Certificate policy controller can be used to detect certificates that are close to expiring, and detect time durations (hours) that are too long or contain DNS names that fail to match specified patterns.
Configure and customize the certificate policy controller by updating the following parameters in your controller policy:
-
minimumDuration -
minimumCADuration -
maximumDuration -
maximumCADuration -
allowedSANPattern -
disallowedSANPattern
Your policy might become non-compliant due to either of the following scenarios:
- When a certificate expires in less than the minimum duration of time or exceeds the maximum time.
- When DNS names fail to match the specified pattern.
The certificate policy controller is created on your managed cluster. The controller communicates with the local Kubernetes API server to get the list of secrets that contain certificates and determine all non-compliant certificates. For more information about CRDs, see Extend the Kubernetes API with CustomResourceDefinitions.
Certificate policy controller does not support the enforce feature.
2.3.2.1. Certificate policy controller YAML structure
View the following example of a certificate policy and review the element in the YAML table:
2.3.2.1.1. Certificate policy controller YAML table
| Field | Description |
|---|---|
| apiVersion |
Required. Set the value to |
| kind |
Required. Set the value to |
| metadata.name | Required. The name to identify the policy. |
| metadata.namespace | Required. The namespaces within the managed cluster where the policy is created. |
| metadata.labels |
Optional. In a certificate policy, the |
| spec | Required. Specifications of which certificates to monitor and refresh. |
| spec.namespaceSelector |
Required. Managed cluster namespace to which you want to apply the policy. Enter parameter values for
• When you create multiple certificate policies and apply them to the same managed cluster, each policy
• If the |
| spec.remediationAction |
Required. Specifies the remediation of your policy. Set the parameter value to |
| spec.severity |
Optional. Informs the user of the severity when the policy is non-compliant. Use the following parameter values: |
| spec.minimumDuration |
Required. When a value is not specified, the default value is |
| spec.minimumCADuration |
Optional. Set a value to identify signing certificates that might expire soon with a different value from other certificates. If the parameter value is not specified, the CA certificate expiration is the value used for the |
| spec.maximumDuration | Optional. Set a value to identify certificates that have been created with a duration that exceeds your desired limit. The parameter uses the time duration format from Golang. See Golang Parse Duration for more information. |
| spec.maximumCADuration | Optional. Set a value to identify signing certificates that have been created with a duration that exceeds your defined limit. The parameter uses the time duration format from Golang. See Golang Parse Duration for more information. |
| spec.allowedSANPattern | Optional. A regular expression that must match every SAN entry that you have defined in your certificates. This parameter checks DNS names against patterns. See the Golang Regular Expression syntax for more information. |
| spec.disallowedSANPattern |
Optional. A regular expression that must not match any SAN entries you have defined in your certificates. This parameter checks DNS names against patterns. See the Golang Regular Expression syntax for more information. |
2.3.2.2. Certificate policy sample
When your certificate policy controller is created on your hub cluster, a replicated policy is created on your managed cluster. See policy-certificate.yaml to view the certificate policy sample.
Learn how to manage a certificate policy, see Managing certificate policies for more details. Refer to Policy controllers for more topics.
2.3.3. IAM policy controller
Identity and Access Management (IAM) policy controller can be used to receive notifications about IAM policies that are non-compliant. The compliance check is based on the parameters that you configure in the IAM policy.
The IAM policy controller checks for compliance of the number of cluster administrators that you allow in your cluster. IAM policy controller communicates with the local Kubernetes API server. For more information, see Extend the Kubernetes API with CustomResourceDefinitions.
The IAM policy controller runs on your managed cluster.
2.3.3.1. IAM policy YAML structure
View the following example of an IAM policy and review the parameters in the YAML table:
2.3.3.2. IAM policy YAMl table
View the following parameter table for descriptions:
| Field | Description |
|---|---|
| apiVersion |
Required. Set the value to |
| kind |
Required. Set the value to |
| metadata.name | Required. The name for identifying the policy resource. |
| spec | Required. Add configuration details for your policy. |
| spec.severity |
Optional. Informs the user of the severity when the policy is non-compliant. Use the following parameter values: |
| spec.namespaceSelector |
Required. The namespaces within the hub cluster that the policy is applied to. Enter at least one namespace for the |
| spec.remediationAction |
Optional. Specifies the remediation of your policy. Enter |
| spec.maxClusterRoleBindingUsers | Required. Maximum number of IAM role bindings that are available before a policy is considered non-compliant. |
2.3.3.3. IAM policy sample
See policy-limitclusteradmin.yaml to view the IAM policy sample. Learn how to manage an IAM policy, see Managing IAM policies for more details. Refer to Policy controllers for more topics.
2.3.4. Integrate third-party policy controllers
Integrate third-party policies to create custom annotations within the policy templates to specify one or more compliance standards, control categories, and controls.
You can also use the third-party party policies from the policy-collection/community.
Learn to integrate the following third-party policies:
2.3.5. Creating a custom policy controller
Learn to write, apply, view, and update your custom policy controllers. You can create a YAML file for your policy controller to deploy onto your cluster. View the following sections to create a policy controller:
2.3.5.1. Writing a policy controller
Use the policy controller framework that is in the governance-policy-framework repository. Complete the following steps to create a policy controller:
Clone the
governance-policy-frameworkrepository by running the following command:git clone git@github.com:stolostron/governance-policy-framework.git
git clone git@github.com:stolostron/governance-policy-framework.gitCopy to Clipboard Copied! Toggle word wrap Toggle overflow Customize the controller policy by updating the policy schema definition. Your policy might resemble the following content:
Copy to Clipboard Copied! Toggle word wrap Toggle overflow Update the policy controller to watch for the
SamplePolicykind. Run the following command:for file in $(find . -name "*.go" -type f); do sed -i "" "s/SamplePolicy/g" $file; done for file in $(find . -name "*.go" -type f); do sed -i "" "s/samplepolicy-controller/samplepolicy-controller/g" $file; done
for file in $(find . -name "*.go" -type f); do sed -i "" "s/SamplePolicy/g" $file; done for file in $(find . -name "*.go" -type f); do sed -i "" "s/samplepolicy-controller/samplepolicy-controller/g" $file; doneCopy to Clipboard Copied! Toggle word wrap Toggle overflow Recompile and run the policy controller by completing the following steps:
- Log in to your cluster.
- Select the user icon, then click Configure client.
- Copy and paste the configuration information into your command line, and press Enter.
Run the following commands to apply your policy CRD and start the controller:
Copy to Clipboard Copied! Toggle word wrap Toggle overflow You might receive the following output that indicates that your controller runs:
{“level”:”info”,”ts”:1578503280.511274,”logger”:”controller-runtime.manager”,”msg”:”starting metrics server”,”path”:”/metrics”}
{“level”:”info”,”ts”:1578503281.215883,”logger”:”controller-runtime.controller”,”msg”:”Starting Controller”,”controller”:”samplepolicy-controller”}
{“level”:”info”,”ts”:1578503281.3203468,”logger”:”controller-runtime.controller”,”msg”:”Starting workers”,”controller”:”samplepolicy-controller”,”worker count”:1}
Waiting for policies to be available for processing…
{“level”:”info”,”ts”:1578503280.511274,”logger”:”controller-runtime.manager”,”msg”:”starting metrics server”,”path”:”/metrics”} {“level”:”info”,”ts”:1578503281.215883,”logger”:”controller-runtime.controller”,”msg”:”Starting Controller”,”controller”:”samplepolicy-controller”} {“level”:”info”,”ts”:1578503281.3203468,”logger”:”controller-runtime.controller”,”msg”:”Starting workers”,”controller”:”samplepolicy-controller”,”worker count”:1} Waiting for policies to be available for processing…Copy to Clipboard Copied! Toggle word wrap Toggle overflow Create a policy and verify that the controller retrieves it and applies the policy onto your cluster. Run the following command:
kubectl apply -f deploy/crds/policy.open-cluster-management.io_samplepolicies_crd.yaml
kubectl apply -f deploy/crds/policy.open-cluster-management.io_samplepolicies_crd.yamlCopy to Clipboard Copied! Toggle word wrap Toggle overflow When the policy is applied, a message appears to indicate that policy is monitored and detected by your custom controller. The mesasge might resemble the following contents:
Copy to Clipboard Copied! Toggle word wrap Toggle overflow Check the
statusfield for compliance details by running the following command:kubectl describe SamplePolicy example-samplepolicy -n default
kubectl describe SamplePolicy example-samplepolicy -n defaultCopy to Clipboard Copied! Toggle word wrap Toggle overflow Your output might resemble the following contents:
Copy to Clipboard Copied! Toggle word wrap Toggle overflow Change the policy rules and policy logic to introduce new rules for your policy controller. Complete the following steps:
Add new fields in your YAML file by updating the
SamplePolicySpec. Your specification might resemble the following content:Copy to Clipboard Copied! Toggle word wrap Toggle overflow -
Update the
SamplePolicySpecstructure in the samplepolicy_controller.go with new fields. -
Update the
PeriodicallyExecSamplePoliciesfunction in thesamplepolicy_controller.gofile with new logic to run the policy controller. View an example of thePeriodicallyExecSamplePoliciesfield, see stolostron/multicloud-operators-policy-controller. - Recompile and run the policy controller. See Writing a policy controller
Your policy controller is functional.
2.3.5.2. Deploying your controller to the cluster
Deploy your custom policy controller to your cluster and integrate the policy controller with the Governance and risk dashboard. Complete the following steps:
Build the policy controller image by running the following command:
make build
docker build . -f build/Dockerfile -t <username>/multicloud-operators-policy-controller:latest
make build
docker build . -f build/Dockerfile -t <username>/multicloud-operators-policy-controller:latest
Copy to Clipboard Copied! Toggle word wrap Toggle overflow Run the following command to push the image to a repository of your choice. For example, run the following commands to push the image to Docker Hub:
docker login

docker push <username>/multicloud-operators-policy-controller
docker login

docker push <username>/multicloud-operators-policy-controller
Copy to Clipboard Copied! Toggle word wrap Toggle overflow -
Configure
kubectlto point to a cluster managed by Red Hat Advanced Cluster Management for Kubernetes. Replace the operator manifest to use the built-in image name and update the namespace to watch for policies. The namespace must be the cluster namespace. Your manifest might resemble the following contents:
sed -i "" 's|open-cluster-management/multicloud-operators-policy-controller|ycao/multicloud-operators-policy-controller|g' deploy/operator.yaml
sed -i "" 's|value: default|value: <namespace>|g' deploy/operator.yaml
sed -i "" 's|open-cluster-management/multicloud-operators-policy-controller|ycao/multicloud-operators-policy-controller|g' deploy/operator.yaml
sed -i "" 's|value: default|value: <namespace>|g' deploy/operator.yaml
Copy to Clipboard Copied! Toggle word wrap Toggle overflow Update the RBAC role by running the following commands:
sed -i "" 's|samplepolicies|testpolicies|g' deploy/cluster_role.yaml
sed -i "" 's|namespace: default|namespace: <namespace>|g' deploy/cluster_role_binding.yaml
sed -i "" 's|samplepolicies|testpolicies|g' deploy/cluster_role.yaml
sed -i "" 's|namespace: default|namespace: <namespace>|g' deploy/cluster_role_binding.yaml
Copy to Clipboard Copied! Toggle word wrap Toggle overflow Deploy your policy controller to your cluster:
Set up a service account for cluster by runnng the following command:
kubectl apply -f deploy/service_account.yaml -n <namespace>
kubectl apply -f deploy/service_account.yaml -n <namespace>Copy to Clipboard Copied! Toggle word wrap Toggle overflow Set up RBAC for the operator by running the following commands:
kubectl apply -f deploy/role.yaml -n <namespace>

kubectl apply -f deploy/role_binding.yaml -n <namespace>
kubectl apply -f deploy/role.yaml -n <namespace>

kubectl apply -f deploy/role_binding.yaml -n <namespace>
Copy to Clipboard Copied! Toggle word wrap Toggle overflow Set up RBAC for your policy controller. Run the following commands:
kubectl apply -f deploy/cluster_role.yaml
kubectl apply -f deploy/cluster_role_binding.yaml
kubectl apply -f deploy/cluster_role.yaml
kubectl apply -f deploy/cluster_role_binding.yaml
Copy to Clipboard Copied! Toggle word wrap Toggle overflow Set up a custom resource definition (CRD) by running the following command:
kubectl apply -f deploy/crds/policies.open-cluster-management.io_samplepolicies_crd.yaml
kubectl apply -f deploy/crds/policies.open-cluster-management.io_samplepolicies_crd.yamlCopy to Clipboard Copied! Toggle word wrap Toggle overflow Deploy the
multicloud-operator-policy-controllerby running the following command:kubectl apply -f deploy/operator.yaml -n <namespace>
kubectl apply -f deploy/operator.yaml -n <namespace>Copy to Clipboard Copied! Toggle word wrap Toggle overflow Verify that the controller is functional by running the following command:
kubectl get pod -n <namespace>
kubectl get pod -n <namespace>Copy to Clipboard Copied! Toggle word wrap Toggle overflow
-
You must integrate your policy controller by creating a
policy-templatefor the controller to monitor. For more information, see Creating a cluster security policy from the console.
2.3.5.2.1. Scaling your controller deployment
Policy controller deployments do not support deletetion or removal. You can scale your deployment to update which pods the deployment is applied to. Complete the following steps:
- Log in to your managed cluster.
- Navigate to the deployment for your custom policy controller.
- Scale the deployment. When you scale your deployment to zero pods, the policy controler deployment is disabled.
For more information on deployments, see OpenShift Container Platform Deployments.
Your policy controller is deployed and integrated on your cluster. View the product policy controllers, see Policy controllers for more information.
2.4. Supported policies
View the supported policies to learn how to define rules, processes, and controls on the hub cluster when you create and manage policies in Red Hat Advanced Cluster Management for Kubernetes.
Note: You can copy and paste an existing policy in to the Policy YAML. The values for the parameter fields are automatically entered when you paste your existing policy. You can also search the contents in your policy YAML file with the search feature.
View the following policy samples to view how specific policies are applied:
Refer to Governance and risk for more topics.
2.4.1. Memory usage policy
Kubernetes configuration policy controller monitors the status of the memory usage policy. Use the memory usage policy to limit or restrict your memory and compute usage. For more information, see Limit Ranges in the Kubernetes documentation. Learn more details about the memory usage policy structure in the following sections.
2.4.1.1. Memory usage policy YAML structure
Your memory usage policy might resemble the following YAML file:
2.4.1.2. Memory usage policy table
| Field | Description |
|---|---|
| apiVersion |
Required. Set the value to |
| kind |
Required. Set the value to |
| metadata.name | Required. The name for identifying the policy resource. |
| metadata.namespaces | Optional. |
| spec.namespace |
Required. The namespaces within the hub cluster that the policy is applied to. Enter parameter values for |
| remediationAction |
Optional. Specifies the remediation of your policy. The parameter values are |
| disabled |
Required. Set the value to |
| spec.complianceType |
Required. Set the value to |
| spec.object-template | Optional. Used to list any other Kubernetes object that must be evaluated or applied to the managed clusters. |
2.4.1.3. Memory usage policy sample
See the policy-limitmemory.yaml to view a sample of the policy. View Managing memory usage policies for more information. Refer to Kubernetes configuration policy controller to view other configuration policies that are monitored by the controller.
2.4.2. Namespace policy
Kubernetes configuration policy controller monitors the status of your namespace policy. Apply the namespace policy to define specific rules for your namespace. Learn more details about the namespace policy structure in the following sections.
2.4.2.1. Namespace policy YAML structure
2.4.2.2. Namespace policy YAML table
| Field | Description |
|---|---|
| apiVersion |
Required. Set the value to |
| kind |
Required. Set the value to |
| metadata.name | Required. The name for identifying the policy resource. |
| metadata.namespaces | Optional. |
| spec.namespace |
Required. The namespaces within the hub cluster that the policy is applied to. Enter parameter values for |
| remediationAction |
Optional. Specifies the remediation of your policy. The parameter values are |
| disabled |
Required. Set the value to |
| spec.complianceType |
Required. Set the value to |
| spec.object-template | Optional. Used to list any other Kubernetes object that must be evaluated or applied to the managed clusters. |
2.4.2.3. Namespace policy sample
See policy-namespace.yaml to view the policy sample.
View Managing namespace policies for more information. Refer to Kubernetes configuration policy controller to learn about other configuration policies.
2.4.3. Image vulnerability policy
Apply the image vulnerability policy to detect if container images have vulnerabilities by leveraging the Container Security Operator. The policy installs the Container Security Operator on your managed cluster if it is not installed.
The image vulnerability policy is checked by the Kubernetes configuration policy controller. For more information about the Security Operator, see the Container Security Operator from the Quay repository.
Note: Image vulnerability policy is not functional during a disconnected installation.
2.4.3.1. Image vulnerability policy YAML structure
2.4.3.2. Image vulnerability policy YAML table
| Field | Description |
|---|---|
| apiVersion |
Required. Set the value to |
| kind |
Required. Set the value to |
| metadata.name | Required. The name for identifying the policy resource. |
| metadata.namespaces | Optional. |
| spec.namespace |
Required. The namespaces within the hub cluster that the policy is applied to. Enter parameter values for |
| remediationAction |
Optional. Specifies the remediation of your policy. The parameter values are |
| disabled |
Required. Set the value to |
| spec.complianceType |
Required. Set the value to |
| spec.object-template | Optional. Used to list any other Kubernetes object that must be evaluated or applied to the managed clusters. |
2.4.3.3. Image vulnerability policy sample
See policy-imagemanifestvuln.yaml. View Managing image vulnerability policies for more information. Refer to Kubernetes configuration policy controller to view other configuration policies that are monitored by the configuration controller.
2.4.4. Pod policy
Kubernetes configuration policy controller monitors the status of you pod policies. Apply the pod policy to define the container rules for your pods. A pod must exist in your cluster to use this information.
2.4.4.1. Pod policy YAML structure
2.4.4.2. Pod policy table
| Field | Description |
|---|---|
| apiVersion |
Required. Set the value to |
| kind |
Required. Set the value to |
| metadata.name | Required. The name for identifying the policy resource. |
| metadata.namespaces | Optional. |
| spec.namespace |
Required. The namespaces within the hub cluster that the policy is applied to. Enter parameter values for |
| remediationAction |
Optional. Specifies the remediation of your policy. The parameter values are |
| disabled |
Required. Set the value to |
| spec.complianceType |
Required. Set the value to |
| spec.object-template | Optional. Used to list any other Kubernetes object that must be evaluated or applied to the managed clusters. |
2.4.4.3. Pod policy sample
See policy-pod.yaml to view the policy sample. Learn how to manage a pod policy, see Managing pod policies for more details.
Refer to Kubernetes configuration policy controller to view other configuration policies that are monitored by the configuration controller. See Manage security policies to manage other policies.
2.4.5. Pod security policy
Kubernetes configuration policy controller monitors the status of the pod security policy. Apply a pod security policy to secure pods and containers. For more information, see Pod Security Policies in the Kubernetes documentation. Learn more details about the pod security policy structure in the following sections.
2.4.5.1. Pod security policy YAML structure
2.4.5.2. Pod security policy table
| Field | Description |
|---|---|
| apiVersion |
Required. Set the value to |
| kind |
Required. Set the value to |
| metadata.name | Required. The name for identifying the policy resource. |
| metadata.namespaces | Optional. |
| spec.namespace |
Required. The namespaces within the hub cluster that the policy is applied to. Enter parameter values for |
| remediationAction |
Optional. Specifies the remediation of your policy. The parameter values are |
| disabled |
Required. Set the value to |
| spec.complianceType |
Required. Set the value to |
| spec.object-template | Optional. Used to list any other Kubernetes object that must be evaluated or applied to the managed clusters. |
2.4.5.3. Pod security policy sample
See policy-psp.yaml to view the sample policy. View Managing pod security policies for more information. Refer to Kubernetes configuration policy controller to view other configuration policies that are monitored by the controller.
2.4.6. Role policy
Kubernetes configuration policy controller monitors the status of role policies. Define roles in the object-template to set rules and permissions for specific roles in your cluster. Learn more details about the role policy structure in the following sections.
2.4.6.1. Role policy YAML structure
2.4.6.2. Role policy table
| Field | Description |
|---|---|
| apiVersion |
Required. Set the value to |
| kind |
Required. Set the value to |
| metadata.name | Required. The name for identifying the policy resource. |
| metadata.namespaces | Optional. |
| spec.namespace |
Required. The namespaces within the hub cluster that the policy is applied to. Enter parameter values for |
| remediationAction |
Optional. Specifies the remediation of your policy. The parameter values are |
| disabled |
Required. Set the value to |
| spec.complianceType |
Required. Set the value to |
| spec.object-template | Optional. Used to list any other Kubernetes object that must be evaluated or applied to the managed clusters. |
2.4.6.3. Role policy sample
Apply a role policy to set rules and permissions for specific roles in your cluster. For more information on roles, see Role-based access control. View a sample of a role policy, see policy-role.yaml.
To learn how to manage role policies, refer to Managing role policies for more information. See the Kubernetes configuration policy controller to view other configuration policies that are monitored the controller.
2.4.7. Role binding policy
Kubernetes configuration policy controller monitors the status of your role binding policy. Apply a role binding policy to bind a policy to a namespace in your managed cluster. Learn more details about the namespace policy structure in the following sections.
2.4.7.1. Role binding policy YAML structure
2.4.7.2. Role binding policy table
| Field | Description |
|---|---|
| apiVersion |
Required. Set the value to |
| kind |
Required. Set the value to |
| metadata.name | Required. The name to identify the policy resource. |
| metadata.namespaces | Required. The namespace within the managed cluster where the policy is created. |
| spec | Required. Specifications of how compliance violations are identified and fixed. |
| metadata.name | Required. The name for identifying the policy resource. |
| metadata.namespaces | Optional. |
| spec.complianceType |
Required. Set the value to |
| spec.namespace |
Required. Managed cluster namespace to which you want to apply the policy. Enter parameter values for |
| spec.remediationAction |
Required. Specifies the remediation of your policy. The parameter values are |
| spec.object-template | Required. Used to list any other Kubernetes object that must be evaluated or applied to the managed clusters. |
2.4.7.3. Role binding policy sample
See policy-rolebinding.yaml to view the policy sample. Learn how to manage a role binding policy, see Managing role binding policies for more details. Refer to Kubernetes configuration policy controller to learn about other configuration policies. See Manage security policies to manage other policies.
2.4.8. Security Context Constraints policy
Kubernetes configuration policy controller monitors the status of your Security Context Constraints (SCC) policy. Apply an Security Context Constraints (SCC) policy to control permissions for pods by defining conditions in the policy. Learn more details about SCC policies in the following sections.
2.4.8.1. SCC policy YAML structure
2.4.8.2. SCC policy table
| Field | Description |
|---|---|
| apiVersion |
Required. Set the value to |
| kind |
Required. Set the value to |
| metadata.name | Required. The name to identify the policy resource. |
| metadata.namespace | Required. The namespace within the managed cluster where the policy is created. |
| spec.complianceType |
Required. Set the value to |
| spec.remediationAction |
Required. Specifies the remediation of your policy. The parameter values are |
| spec.namespace |
Required. Managed cluster namespace to which you want to apply the policy. Enter parameter values for |
| spec.object-template | Required. Used to list any other Kubernetes object that must be evaluated or applied to the managed clusters. |
For explanations on the contents of a SCC policy, see Managing Security Context Constraints from the OpenShift Container Platform documentation.
2.4.8.3. SCC policy sample
Apply a Security context constraints (SCC) policy to control permissions for pods by defining conditions in the policy. For more information see, Managing Security Context Constraints (SCC).
See policy-scc.yaml to view the policy sample. To learn how to manage an SCC policy, see Managing Security Context Constraints policies for more details.
Refer to Kubernetes configuration policy controller to learn about other configuration policies. See Manage security policies to manage other policies.
2.4.9. ETCD encryption policy
Apply the etcd-encryption policy to detect, or enable encryption of sensitive data in the ETCD data-store. Kubernetes configuration policy controller monitors the status of the etcd-encryption policy. For more information, see Encrypting etcd data in the OpenShift Container Platform documentation. Note: The ETCD encryption policy only supports Red Hat OpenShift Container Platform 4 and later.
Learn more details about the etcd-encryption policy structure in the following sections:
2.4.9.1. ETCD encryption policy YAML structure
Your etcd-encryption policy might resemble the following YAML file:
2.4.9.2. ETCD encryption policy table
| Field | Description |
|---|---|
| apiVersion |
Required. Set the value to |
| kind |
Required. Set the value to |
| metadata.name | Required. The name for identifying the policy resource. |
| metadata.namespaces | Optional. |
| spec.namespace |
Required. The namespaces within the hub cluster that the policy is applied to. Enter parameter values for |
| remediationAction |
Optional. Specifies the remediation of your policy. The parameter values are |
| disabled |
Required. Set the value to |
| spec.complianceType |
Required. Set the value to |
| spec.object-template | Optional. Used to list any other Kubernetes object that must be evaluated or applied to the managed clusters. See Encrypting etcd data in the OpenShift Container Platform documentation. |
2.4.9.3. Etcd encryption policy sample
See policy-etcdencryption.yaml for the policy sample. View Managing ETCD encryption policies for more information. Refer to Kubernetes configuration policy controller to view other configuration policies that are monitored by the controller.
2.4.10. Integrating gatekeeper constraints and constraint templates
Gatekeeper is a validating webhook that enforces custom resource definition (CRD) based policies that are run with the Open Policy Agent (OPA). You can install gatekeeper on your cluster by using the gatekeeper operator policy. Gatekeeper policy can be used to evaluate Kubernetes resource compliance. You can leverage a OPA as the policy engine, and use Rego as the policy language.
The gatekeeper policy is created as a Kubernetes configuration policy in Red Hat Advanced Cluster Management. Gatekeeper policies include constraint templates (ConstraintTemplates) and Constraints, audit templates, and admission templates. For more information, see the Gatekeeper upstream repository.
Red Hat Advanced Cluster Management applies the following constraint templates in your Red Hat Advanced Cluster Management gatekeeper policy:
ConstraintTemplatesand constraints: Use thepolicy-gatekeeper-k8srequiredlabelspolicy to create a gatekeeper constraint template on the managed cluster.Copy to Clipboard Copied! Toggle word wrap Toggle overflow audit template: Use the
policy-gatekeeper-auditto periodically check and evaluate existing resources against the gatekeeper policies that are enforced to detect existing miscongfigurations.Copy to Clipboard Copied! Toggle word wrap Toggle overflow admission template: Use the
policy-gatekeeper-admissionto check for misconfigurations that are created by the gatekeeper admission webhook:Copy to Clipboard Copied! Toggle word wrap Toggle overflow
See policy-gatekeeper-sample.yaml for more details.
Learn how to use Red Hat Advanced Cluster Management gatekeeper operator policy to install gatekeeper and create a Red Hat Advanced Cluster Management gatekeeper operator policy, see Creating a gatekeeper policy from the console for more details. Refer to Governance and risk for more topics on the security framework.
2.4.11. Compliance operator policy
Compliance operator is an operator that runs OpenSCAP and allows you to keep your Red Hat OpenShift Container Platform cluster compliant with the security benchmark that you need. You can install the compliance operator on your managed cluster by using the compliance operator policy.
The compliance operator policy is created as a Kubernetes configuration policy in Red Hat Advanced Cluster Management. OpenShift Container Platform 4.7 and 4.6, support the compliance operator policy. For more information, see Understanding the Compliance Operator in the OpenShift Container Platform documentation for more details.
2.4.11.1. Compliance operator resources
When you create a compliance operator policy, the following resources are created:
-
A compliance operator namespace (
openshift-compliance) for the operator installation:
-
An operator group (
compliance-operator) to specify the target namespace:
-
A subscription (
comp-operator-subscription) to reference the name and channel. The subscription pulls the profile, as a container, that it supports:
After you install the compliance operator policy, the following pods are created: compliance-operator, ocp4, and rhcos4. See a sample of the policy-compliance-operator-install.yaml.
You can also create and apply the E8 scan policy after you have installed the compliance operator. For more information, see E8 scan policy.
To learn about managing compliance operator policies, see Managing compliance operator policies for more details. Refer to Kubernetes configuration policy controller for more topics about configuration policies.
2.4.12. E8 scan policy
An Essential 8 (E8) scan policy deploys a scan that checks the master and worker nodes for compliance with the E8 security profiles. You must install the compliance operator to apply the E8 scan policy.
The E8 scan policy is created as a Kubernetes configuration policy in Red Hat Advanced Cluster Management. OpenShift Container Platform 4.7 and 4.6, support the E8 scan policy. For more information, see Understanding the Compliance Operator in the OpenShift Container Platform documentation for more details.
2.4.12.1. E8 scan policy resources
When you create an E8 scan policy the following resources are created:
A
ScanSettingBindingresource (e8) to identify which profiles to scan:Copy to Clipboard Copied! Toggle word wrap Toggle overflow A
ComplianceSuiteresource (compliance-suite-e8) to verify if the scan is complete by checking thestatusfield:Copy to Clipboard Copied! Toggle word wrap Toggle overflow A
ComplianceCheckResultresource (compliance-suite-e8-results) which reports the results of the scan suite by checking theComplianceCheckResultcustom resources (CR):Copy to Clipboard Copied! Toggle word wrap Toggle overflow
See a sample of the policy-compliance-operator-e8-scan.yaml file. For more information on creating an E8 scan policy, see Managing E8 scan policies.
2.5. Manage security policies
Use the Governance and risk dashboard to create, view, and manage your security policies and policy violations. You can create YAML files for your policies from the CLI and console.
From the Governance and risk page, you can customize your Summary view by filtering the violations by categories or standards, collapse the summary to see less information, and you can search for policies. You can also filter the violation table view by policies or cluster violations.
The table of policies list the following details of a policy: Policy name, Namespace, Remediation, Cluster violation, Standards, Categories, and Controls. You can edit, disable, inform or remove a policy by selecting the Actions icon.
When you select a policy in the table list, the following tabs of information are displayed from the console:
- Details: Select the Details tab to view Policy details, Placement details, and a table list of Policy templates.
- Status: Select the Status tab to view a table list of violations. You can filter your view by Clusters or Templates. To view the compliance status of your policy, select the Status tab. Click the View history link to view a list of violation messages.
- YAML: Select the YAML tab to view, and or edit your policy with the editor. Select the YAML toggle to view or hide the editor.
Review the following topics to learn more about creating and updating your security policies:
- Managing security policies
- Managing configuration policies
- Managing image vulnerability policies
- Managing memory usage policies
- Managing namespace policies
- Managing pod policies
- Managing pod security policies
- Managing role policies
- Managing role binding policies
- Managing Security Context Constraints policies
- Managing certificate policies
- Managing IAM policies
- Managing ETCD encryption policies
- Managing gatekeeper policies
- Managing compliance operator policies
- Managing E8 scan policies
Refer to Governance and risk for more topics.
2.5.1. Deploy policies using GitOps
You can deploy a set of policies across a fleet of managed clusters with the governance framework. You can add to the open source community, policy-collection by contributing to and using the policies in the repository. For more information, see Contributing a custom policy. Policies in each of the stable and community folders from the open source community are further organized according to NIST Special Publication 800-53.
Continue reading to learn best practices to use GitOps to automate and track policy updates and creation through a Git repository.
Prerequsite: Before you begin, be sure to fork the policy-collection repository.
2.5.1.1. Customizing your local repository
Customize your local repository by consolidating the stable and community policies into a single folder. Remove the policies you do not want to use. Complete the following steps to customize your local repository:
Create a new directory in the repository to hold the policies that you want to deploy. Be sure that you are in your local
policy-collectionrepository on your main default branch for GitOps. Run the following command:mkdir my-policies
mkdir my-policiesCopy to Clipboard Copied! Toggle word wrap Toggle overflow Copy all of the
stableandcommunitypolicies into yourmy-policiesdirectory. Start with thecommunitypolicies first, in case thestablefolder contains duplicates of what is available in the community. Run the following commands:cp -R community/* my-policies/ cp -R stable/* my-policies/
cp -R community/* my-policies/ cp -R stable/* my-policies/Copy to Clipboard Copied! Toggle word wrap Toggle overflow Now that you have all of the policies in a single parent directory structure, you can edit the policies in your fork.
Tips:
- It is best practice to remove the policies you are not planning to use.
Learn about policies and the definition of the policies from the following list:
- Purpose: Understand what the policy does.
Remediation Action: Does the policy only inform you of compliance, or enforce the policy and make changes? See the
spec.remediationActionparameter. If changes are enforced, make sure you understand the functional expectation. Remember to check which policies support enforcement. For more information, view the Validate section.Note: The
spec.remediationActionset for the policy overrides any remediation action that is set in the individualspec.policy-templates.-
Placement: What clusters is the policy deployed to? By default, most policies target the clusters with the
environment: devlabel. Some policies may target OpenShift Container Platform clusters or another label. You can update or add additional labels to include other clusters. When there is no specific value, the policy is applied to all of your clusters. You can also create multiple copies of a policy and customize each one if you want to use a policy that is configured one way for one set of clusters and configured another way for another set of clusters.
2.5.1.2. Committing to your local repository
After you are satisfied with the changes you have made to your directory, commit and push your changes to Git so that they can be accessed by your cluster.
Note: This example is used to show the basics of how to use policies with GitOps, so you might have a different workflow to get changes to your branch.
Complete the following steps:
From your terminal, run
git statusto view your recent changes in your directory that you previously created. Add your new directory to the list of changes to be committed with the following command:git add my-policies/
git add my-policies/Copy to Clipboard Copied! Toggle word wrap Toggle overflow Commit the changes and customize your message. Run the following command:
git commit -m “Policies to deploy to the hub cluster”
git commit -m “Policies to deploy to the hub cluster”Copy to Clipboard Copied! Toggle word wrap Toggle overflow Push the changes to the branch of your forked repository that is used for GitOps. Run the following command:
git push origin <your_default_branch>master
git push origin <your_default_branch>masterCopy to Clipboard Copied! Toggle word wrap Toggle overflow
Your changes are committed.
2.5.1.3. Deploying policies to your cluster
After you push your changes, you can deploy the policies to your Red Hat Advanced Cluster Management for Kubernetes installation. Post deployment, your hub cluster is conncted to your Git repository. Any further changes to your chosen branch of the Git repository is reflected in your cluster.
The deploy.sh script creates Channel and Subscription resources in your hub cluster. The channel connects to the Git repository, and the subscription specifies the data to bring to the cluster through the channel. As a result, all policies defined in the specified subdirectory are created on your hub.
After the policies are created by the subscription, Red Hat Advanced Cluster Management analyzes the policies and creates additional policy resources in the namespace associated with each managed cluster that the policy is applied to, based on the defined placement rule.
The policy is then copied to the managed cluster from its respective managed cluster namespace on the hub cluster. As a result, the policies in your Git repository are pushed to all managed clusters that have labels that match the clusterSelector that are defined in the placement rule of your policy.
Complete the following steps:
From the
policy-collectionfolder, run the following command to change the directory:cd deploy
cd deployCopy to Clipboard Copied! Toggle word wrap Toggle overflow Make sure that your command line interface (CLI) is configured to create resources on the correct cluster with the following command:
oc cluster-info
oc cluster-infoCopy to Clipboard Copied! Toggle word wrap Toggle overflow The output of the command displays the API server details for the cluster, where Red Hat Advanced Cluster Management is installed. If the correct URL is not displayed, configure your CLI to point to the correct cluster. See Using the OpenShift CLI for more information.
Create a namespace where your policies are created to control access and to organize the policies. Run the following command:
oc create namespace policy-namespace
oc create namespace policy-namespaceCopy to Clipboard Copied! Toggle word wrap Toggle overflow Run the following command to deploy the policies to your cluster:
./deploy.sh -u https://github.com/<your-repository>/policy-collection -p my-policies -n policy-namespace
./deploy.sh -u https://github.com/<your-repository>/policy-collection -p my-policies -n policy-namespaceCopy to Clipboard Copied! Toggle word wrap Toggle overflow Replace
your-repositorywith your Git user name or repository name.Note: For reference, the full list of arguments for the
deploy.shscript uses the following syntax:./deploy.sh [-u <url>] [-b <branch>] [-p <path/to/dir>] [-n <namespace>] [-a|--name <resource-name>]
./deploy.sh [-u <url>] [-b <branch>] [-p <path/to/dir>] [-n <namespace>] [-a|--name <resource-name>]Copy to Clipboard Copied! Toggle word wrap Toggle overflow View the following explanations for each argument:
-
URL: The URL to the repository that you forked from the main
policy-collectionrepository. The default URL ishttps://github.com/stolostron/policy-collection.git. -
Branch: Branch of the Git repository to point to. The default branch is
main. -
Subdirectory Path: The subdirectory path you created to contain the policies you want to use. In the previous sample, we used the
my-policiessubdirectory, but you can also specify which folder you want start with. For example, you can usemy-policies/AC-Access-Control. The default folder isstable. -
Namespace: The namespace where the resources and policies are created on the hub cluster. These instructions use the
policy-namespacenamespace. The default namespace ispolicies. -
Name Prefix: Prefix for the
ChannelandSubscriptionresources. The default isdemo-stable-policies. After you run thedeploy.shscript, any user with access to the repository can commit changes to the branch, which pushes changes to exisiting policies on your clusters.
-
URL: The URL to the repository that you forked from the main
2.5.1.4. Verifying GitOps policy deployments from the console
Verify that your changes were applied to your policies from the console. You can also make more changes to your policy from the console. Complete the following steps:
- Log in to your Red Hat Advanced Cluster Management cluster.
- From the navigation menu, select Govern risk.
Check for the following policy details:
- Why is a specific policy compliant or non-compliant on the clusters that it was distributed to?
- Are the policies applied to the correct clusters?
- If this policy is not distributed to any clusters, why?
Identify the GitOps deployed policies that you created or modified. The GitOps deployed policies can be identified by the annotation that is applied automatically. Annotations for the GitOps deployed policies resemble the following paths:
apps.open-cluster-management.io/hosting-deployable: policies/deploy-stable-policies-Policy-policy-role9

apps.open-cluster-management.io/hosting-subscription: policies/demo-policies

apps.open-cluster-management.io/sync-source: subgbk8s-policies/demo-policies
apps.open-cluster-management.io/hosting-deployable: policies/deploy-stable-policies-Policy-policy-role9

apps.open-cluster-management.io/hosting-subscription: policies/demo-policies

apps.open-cluster-management.io/sync-source: subgbk8s-policies/demo-policies
Copy to Clipboard Copied! Toggle word wrap Toggle overflow GitOps annotations are valuable to see which subscription created the policy. You can also add your own labels to your policies so that you can write runtime queries that select policies based on labels.
For example, you can add a label to a policy with the following command:
oc label policy <policy-name> -n <policy-namespace> <key>=<value>
oc label policy <policy-name> -n <policy-namespace> <key>=<value>Copy to Clipboard Copied! Toggle word wrap Toggle overflow Then, you can query policies that have labels with the following command:
oc get policies -n <policy-namespace> -l <key>=<value>
oc get policies -n <policy-namespace> -l <key>=<value>Copy to Clipboard Copied! Toggle word wrap Toggle overflow
Your policies are deployed using GitOps.
2.5.2. Managing security policies
Create a security policy to report and validate your cluster compliance based on your specified security standards, categories, and controls. To create a policy for Red Hat Advanced Cluster Management for Kubernetes, you must create a YAML file on your managed clusters.
Note: You can copy and paste an existing policy in to the Policy YAML. The values for the parameter fields are automatically entered when you paste your existing policy. You can also search the contents in your policy YAML file with the search feature.
2.5.2.1. Creating a security policy
You can create a security policy from the command line interface (CLI) or from the console. Cluster administrator access is required.
Important: You must define a PlacementPolicy and PlacementBinding to apply your policy to a specific cluster. Enter a value for the Cluster selector field to define a PlacementPolicy and PlacementBinding. View the definitions of the objects that are required for your Red Hat Advanced Cluster Management policy:
- PlacementRule: Defines a cluster selector where the policy must be deployed.
- PlacementBinding: Binds the placement to a PlacementPolicy.
View more descriptions of the policy YAML files in the Policy overview.
2.5.2.1.1. Creating a security policy from the command line interface
Complete the following steps to create a policy from the command line interface (CLI):
Create a policy by running the following command:
kubectl create -f policy.yaml -n <namespace>
kubectl create -f policy.yaml -n <namespace>Copy to Clipboard Copied! Toggle word wrap Toggle overflow Define the template that the policy uses. Edit your
.yamlfile by adding atemplatesfield to define a template. Your policy might resemble the following YAML file:Copy to Clipboard Copied! Toggle word wrap Toggle overflow Define a
PlacementRule. Be sure to change thePlacementRuleto specify the clusters where the policies need to be applied, either byclusterNames, orclusterLabels. View Creating and managing placement rules. YourPlacementRulemight resemble the following content:Copy to Clipboard Copied! Toggle word wrap Toggle overflow Define a
PlacementBindingto bind your policy and yourPlacementRule. YourPlacementBindingmight resemble the following YAML sample:Copy to Clipboard Copied! Toggle word wrap Toggle overflow
2.5.2.1.1.1. Viewing your security policy from the CLI
Complete the following steps to view your security policy from the CLI:
View details for a specific security policy by running the following command:
kubectl get securityepolicy <policy-name> -n <namespace> -o yaml
kubectl get securityepolicy <policy-name> -n <namespace> -o yamlCopy to Clipboard Copied! Toggle word wrap Toggle overflow View a description of your security policy by running the following command:
kubectl describe securitypolicy <name> -n <namespace>
kubectl describe securitypolicy <name> -n <namespace>Copy to Clipboard Copied! Toggle word wrap Toggle overflow
2.5.2.1.2. Creating a cluster security policy from the console
As you create your new policy from the console, a YAML file is also created in the YAML editor.
- From the navigation menu, click Govern risk.
- To create a policy, click Create policy.
Enter or select values for the following parameters:
- Name
- Specifications
- Cluster selector
- Remediation action
- Standards
- Categories
- Controls
View the following example Red Hat Advanced Cluster Management for Kubernetes security policy definition. Copy and paste the YAML file for your policy.
Your YAML file might resemble the following policy:
Copy to Clipboard Copied! Toggle word wrap Toggle overflow - Click Create Policy.
A security policy is created from the console.
2.5.2.1.2.1. Viewing your security policy from the console
You can view any security policy and its status from the console.
- Log in to your cluster from the console.
From the navigation menu, click Governance and risk to view a table list of your policies.
Note: You can filter the table list of your policies by selecting the Policies tab or Cluster violations tab.
Select one of your policies to view more details. The Overview tab, Status tab, and YAML tab are displayed.
When the cluster or policy status cannot be determined, the following message is displayed:
No status.
2.5.2.2. Updating security policies
Learn to update security policies by viewing the following section.
2.5.2.2.1. Disabling security policies
Your policy is enabled by default. You can disable your policy by completing the following steps:
- Log in to your Red Hat Advanced Cluster Management for Kubernetes console.
- From the navigation menu, click Govern risk to view a table list of your policies.
- Disable your policy by clicking the Actions icon > Disable policy. The Disable Policy dialog box appears.
- Click Disable policy.
Your policy is disabled.
2.5.2.2.2. Deleting a security policy
Delete a security policy from the CLI or the console.
Delete a security policy from the CLI:
- Delete a security policy by running the following command:
kubectl delete policy <securitypolicy-name> -n <open-cluster-management-namespace>
kubectl delete policy <securitypolicy-name> -n <open-cluster-management-namespace>Copy to Clipboard Copied! Toggle word wrap Toggle overflow + After your policy is deleted, it is removed from your target cluster or clusters. Verify that your policy is removed by running the following command:
kubectl get policy <securitypolicy-name> -n <open-cluster-management-namespace>Delete a security policy from the console:
- From the navigation menu, click Govern risk to view a table list of your policies.
- Click the Actions icon for the policy you want to delete in the policy violation table.
- Click Remove.
- From the Remove policy dialog box, click Remove policy
To manage other policies, see Managing security policies for more information. Refer to Governance and risk for more topics about policies.
2.5.3. Managing configuration policies
Learn to create, apply, view, and update your configuration policies.
2.5.3.1. Creating a configuration policy
You can create a YAML file for your configuration policy from the command line interface (CLI) or from the console. View the following sections to create a configuration policy:
2.5.3.1.1. Creating a configuration policy from the CLI
Complete the following steps to create a configuration policy from the (CLI):
Create a YAML file for your configuration policy. Run the following command:
kubectl create -f configpolicy-1.yaml
kubectl create -f configpolicy-1.yamlCopy to Clipboard Copied! Toggle word wrap Toggle overflow Your configuration policy might resemble the following policy:
Copy to Clipboard Copied! Toggle word wrap Toggle overflow Apply the policy by running the following command:
kubectl apply -f <policy-file-name> --namespace=<namespace>
kubectl apply -f <policy-file-name> --namespace=<namespace>Copy to Clipboard Copied! Toggle word wrap Toggle overflow Verify and list the policies by running the following command:
kubectl get policy --namespace=<namespace>
kubectl get policy --namespace=<namespace>Copy to Clipboard Copied! Toggle word wrap Toggle overflow
Your configuration policy is created.
2.5.3.1.1.1. Viewing your configuration policy from the CLI
Complete the following steps to view your configuration policy from the CLI:
View details for a specific configuration policy by running the following command:
kubectl get policy <policy-name> -n <namespace> -o yaml
kubectl get policy <policy-name> -n <namespace> -o yamlCopy to Clipboard Copied! Toggle word wrap Toggle overflow View a description of your configuration policy by running the following command:
kubectl describe policy <name> -n <namespace>
kubectl describe policy <name> -n <namespace>Copy to Clipboard Copied! Toggle word wrap Toggle overflow
2.5.3.1.2. Creating a configuration policy from the console
As you create a configuration policy from the console, a YAML file is also created in the YAML editor. Complete the following steps to create a configuration policy from the console:
- Log in to your cluster from the console.
- From the navigation menu, click Governance and risk.
- Click Create policy.
Specify the policy you want to create by selecting one of the configuration policies for the specification parameter. Continue to enter or select the appropriate values for the following fields:
- Name
- Specifications
- Cluster selector
- Remediation action
- Standards
- Categories
- Controls
- Click Create.
2.5.3.1.2.1. Viewing your configuration policy from the console
You can view any configuration policy and its status from the console.
- Log in to your cluster from the console.
From the navigation menu, click Govern risk to view a table list of your policies.
Note: You can filter the table list of your policies by selecting the All policies tab or Cluster violations tab.
- Select one of your policies to view more details. The Overview tab, Status tab, and YAML tab are displayed.
2.5.3.2. Updating configuration policies
Learn to update configuration policies by viewing the following section.
2.5.3.2.1. Disabling configuration policies
Complete the following steps to disable your configuration policy:
- Log in to your Red Hat Advanced Cluster Management for Kubernetes console.
- From the navigation menu, click Govern risk to view a table list of your policies.
- Disable your policy by clicking the Actions icon > Disable. The Disable Policy dialog box appears.
- Click Disable policy.
Your policy is disabled.
2.5.3.3. Deleting a configuration policy
Delete a configuration policy from the CLI or the console.
Delete a configuration policy from the CLI:
Delete a configuration policy by running the following command:
kubectl delete policy <policy-name> -n <namespace>
kubectl delete policy <policy-name> -n <namespace>Copy to Clipboard Copied! Toggle word wrap Toggle overflow After your policy is deleted, it is removed from your target cluster or clusters.
- Verify that your policy is removed by running the following command:
kubectl get policy <policy-name> -n <namespace>
kubectl get policy <policy-name> -n <namespace>Copy to Clipboard Copied! Toggle word wrap Toggle overflow Delete a configuration policy from the console:
- From the navigation menu, click Govern risk to view a table list of your policies.
- Click the Actions icon for the policy you want to delete in the policy violation table.
- Click Remove.
- From the Remove policy dialog box, click Remove policy.
Your policy is deleted.
See configuration policy samples that are supported by Red Hat Advanced Cluster Management from the CM-Configuration-Management folder.
Alternatively, you can refer to Kubernetes configuration policy controller to view other configuration policies that are monitored by the controller. For details to manage other policies, refer to Managing security policies.
2.5.4. Managing image vulnerability policies
Configuration policy controller monitors the status of image vulnerability policies. Image vulnerability policies are applied to check if your containers have vulnerabilities. Learn to create, apply, view, and update your image vulnerability policy.
2.5.4.1. Creating an image vulnerability policy
You can create a YAML for your image vulnerability policy from the command line interface (CLI) or from the console. View the following sections to create an image vulnerability policy:
2.5.4.1.1. Creating an image vulnerability policy from the CLI
Complete the following steps to create an image vulnerability policy from the CLI:
Create a YAML file for your image vulnerability policy by running the following command:
kubectl create -f imagevulnpolicy-1.yaml
kubectl create -f imagevulnpolicy-1.yamlCopy to Clipboard Copied! Toggle word wrap Toggle overflow Apply the policy by running the following command:
kubectl apply -f <imagevuln-policy-file-name> --namespace=<namespace>
kubectl apply -f <imagevuln-policy-file-name> --namespace=<namespace>Copy to Clipboard Copied! Toggle word wrap Toggle overflow List and verify the policies by running the following command:
kubectl get imagevulnpolicy --namespace=<namespace>
kubectl get imagevulnpolicy --namespace=<namespace>Copy to Clipboard Copied! Toggle word wrap Toggle overflow
Your image vulnerability policy is created.
2.5.4.1.1.1. Viewing your image vulnerability policy from the CLI
Complete the following steps to view your image vulnerability policy from the CLI:
View details for a specific image vulnerability policy by running the following command:
kubectl get imagevulnpolicy <policy-name> -n <namespace> -o yaml
kubectl get imagevulnpolicy <policy-name> -n <namespace> -o yamlCopy to Clipboard Copied! Toggle word wrap Toggle overflow View a description of your image vulnerability policy by running the following command:
kubectl describe imagevulnpolicy <name> -n <namespace>
kubectl describe imagevulnpolicy <name> -n <namespace>Copy to Clipboard Copied! Toggle word wrap Toggle overflow
2.5.4.2. Creating an image vulnerability policy from the console
As you create an image vulnerability policy from the console, a YAML file is also created in the YAML editor. Complete the following steps to create the image vulnerability policy from the console:
- Log in to your cluster from the console.
- From the navigation menu, click Governance and risk.
- Click Create policy.
- Select ImageManifestVulnPolicy from the Specifications field. Parameter values are automatically set. You can edit your values.
- Click Create.
An image vulnerability policy is created.
2.5.4.3. Viewing image vulnerability violations from the console
- From the navigation menu, click Govern risk to view a table list of your policies.
Select
policy-imagemanifestvulnpolicy> Status to view the cluster location of the violation.Your image vulnerability violation might resemble the following:
imagemanifestvulns exist and should be deleted: [sha256.7ac7819e1523911399b798309025935a9968b277d86d50e5255465d6592c0266] in namespace default; [sha256.4109631e69d1d562f014dd49d5166f1c18b4093f4f311275236b94b21c0041c0] in namespace calamari; [sha256.573e9e0a1198da4e29eb9a8d7757f7afb7ad085b0771bc6aa03ef96dedc5b743, sha256.a56d40244a544693ae18178a0be8af76602b89abe146a43613eaeac84a27494e, sha256.b25126b194016e84c04a64a0ad5094a90555d70b4761d38525e4aed21d372820] in namespace open-cluster-management-agent-addon; [sha256.64320fbf95d968fc6b9863581a92d373bc75f563a13ae1c727af37450579f61a] in namespace openshift-cluster-version
imagemanifestvulns exist and should be deleted: [sha256.7ac7819e1523911399b798309025935a9968b277d86d50e5255465d6592c0266] in namespace default; [sha256.4109631e69d1d562f014dd49d5166f1c18b4093f4f311275236b94b21c0041c0] in namespace calamari; [sha256.573e9e0a1198da4e29eb9a8d7757f7afb7ad085b0771bc6aa03ef96dedc5b743, sha256.a56d40244a544693ae18178a0be8af76602b89abe146a43613eaeac84a27494e, sha256.b25126b194016e84c04a64a0ad5094a90555d70b4761d38525e4aed21d372820] in namespace open-cluster-management-agent-addon; [sha256.64320fbf95d968fc6b9863581a92d373bc75f563a13ae1c727af37450579f61a] in namespace openshift-cluster-versionCopy to Clipboard Copied! Toggle word wrap Toggle overflow - Navigate to your OpenShift Container Platform console by selecting the Cluster link.
- From the navigation menu on the OpenShift Container Platform console, click Administration > Custom Resource Definitions.
-
Select
imagemanifestvulns> Instances tab to view all of theimagemanifestvulnsinstances. - Select an entry to view more details.
2.5.4.4. Updating image vulnerability policies
Learn to update image vulnerability policies by viewing the following section.
2.5.4.4.1. Disabling image vulnerability policies
Complete the following steps to disable your image vulnerability policy:
- Log in to your Red Hat Advanced Cluster Management for Kubernetes console.
- From the navigation menu, click Govern risk to view a table list of your policies.
- Disable your policy by clicking the Actions icon > Disable. The Disable Policy dialog box appears.
- Click Disable policy.
Your policy is disabled.
2.5.4.4.2. Deleting an image vulnerability policy
Delete the image vulnerability policy from the CLI or the console.
Delete an image vulnerability policy from the CLI:
- Delete a certificate policy by running the following command:
kubectl delete policy <imagevulnpolicy-name> -n <namespace>
kubectl delete policy <imagevulnpolicy-name> -n <namespace>Copy to Clipboard Copied! Toggle word wrap Toggle overflow + After your policy is deleted, it is removed from your target cluster or clusters.
Verify that your policy is removed by running the following command:
kubectl get policy <imagevulnpolicy-name> -n <namespace>
kubectl get policy <imagevulnpolicy-name> -n <namespace>Copy to Clipboard Copied! Toggle word wrap Toggle overflow
Delete an image vulnerability policy from the console:
- From the navigation menu, click Govern risk to view a table list of your policies.
- Click the Actions icon for the policy you want to delete in the policy violation table.
- Click Remove.
- From the Remove policy dialog box, click Remove policy.
Your image vulnerability policy is deleted.
View a sample of an image vulnerability policy, see Image vulnerability policy sample from the Image vulnerability policy page. See Kubernetes configuration policy controller to learn about other policies that are monitored by the Kubernetes configuration policy controller. See Managing security policies to manage other policies.
2.5.5. Managing memory usage policies
Apply a memory usage policy to limit or restrict your memory and compute usage. Learn to create, apply, view, and update your memory usage policy in the following sections.
2.5.5.1. Creating a memory usage policy
You can create a YAML file for your memory usage policy from the command line interface (CLI) or from the console. View the following sections to create a memory usage policy:
2.5.5.1.1. Creating a memory usage policy from the CLI
Complete the following steps to create a memory usage policy from the CLI:
Create a YAML file for your memory usage policy by running the following command:
kubectl create -f memorypolicy-1.yaml
kubectl create -f memorypolicy-1.yamlCopy to Clipboard Copied! Toggle word wrap Toggle overflow Apply the policy by running the following command:
kubectl apply -f <memory-policy-file-name> --namespace=<namespace>
kubectl apply -f <memory-policy-file-name> --namespace=<namespace>Copy to Clipboard Copied! Toggle word wrap Toggle overflow List and verify the policies by running the following command:
kubectl get memorypolicy --namespace=<namespace>
kubectl get memorypolicy --namespace=<namespace>Copy to Clipboard Copied! Toggle word wrap Toggle overflow
Your memory usage policy is created from the CLI.
2.5.5.1.1.1. Viewing your policy from the CLI
Complete the following steps to view your memory usage policy from the CLI:
View details for a specific memory usage policy by running the following command:
kubectl get memorypolicy <policy-name> -n <namespace> -o yaml
kubectl get memorypolicy <policy-name> -n <namespace> -o yamlCopy to Clipboard Copied! Toggle word wrap Toggle overflow View a description of your memory usage policy by running the following command:
kubectl describe memorypolicy <name> -n <namespace>
kubectl describe memorypolicy <name> -n <namespace>Copy to Clipboard Copied! Toggle word wrap Toggle overflow
2.5.5.1.2. Creating an memory usage policy from the console
As you create a memory usage policy from the console, a YAML file is also created in the YAML editor. Complete the following steps to create the memory usage policy from the console:
- Log in to your Red Hat Advanced Cluster Management for Kubernetes console.
- From the navigation menu, click Governance and risk.
- Click Create policy.
- Select Limitrange from the Specifications field. Parameter values are automatically set. You can edit your values.
- Click Create.
2.5.5.1.2.1. Viewing your memory usage policy from the console
You can view any memory usage policy and its status from the console.
- Log in to your cluster from the console.
From the navigation menu, click Govern risk to view a table list of your policies.
Note: You can filter the table list of your policies by selecting the Policies tab or Cluster violations tab.
- Select one of your policies to view more details.
- View the policy violations by selecting the Status tab.
2.5.5.2. Updating memory usage policies
Learn to update memory usage policies by viewing the following section.
2.5.5.2.1. Disabling memory usage policies
Complete the following steps to disable your memory usage policy:
- Log in to your Red Hat Advanced Cluster Management for Kubernetes console.
- From the navigation menu, click Govern risk to view a table list of your policies.
- Disable your policy by clicking the Actions icon > Disable. The Disable Policy dialog box appears.
- Click Disable policy.
Your policy is disabled.
2.5.5.2.2. Deleting a memory usage policy
Delete the memory usage policy from the CLI or the console.
Delete a memory usage policy from the CLI:
Delete a memory usage policy by running the following command:
kubectl delete policy <memorypolicy-name> -n <namespace>
kubectl delete policy <memorypolicy-name> -n <namespace>Copy to Clipboard Copied! Toggle word wrap Toggle overflow After your policy is deleted, it is removed from your target cluster or clusters.
Verify that your policy is removed by running the following command:
kubectl get policy <memorypolicy-name> -n <namespace>
kubectl get policy <memorypolicy-name> -n <namespace>Copy to Clipboard Copied! Toggle word wrap Toggle overflow
Delete a memory usage policy from the console:
- From the navigation menu, click Govern risk to view a table list of your policies.
- Click the Actions icon for the policy you want to delete in the policy violation table.
- Click Remove.
- From the Remove policy dialog box, click Remove policy.
Your memory usage policy is deleted.
View a sample of a memory usage policy, see Memory usage policy sample from the Memory usage policy page. See Kubernetes configuration policy controller to learn about other configuration policies. See Managing security policies to manage other policies.
2.5.6. Managing namespace policies
Namespace policies are applied to define specific rules for your namespace. Learn to create, apply, view, and update your namespace policy in the following sections.
2.5.6.1. Creating a namespace policy
You can create a YAML file for your namespace policy from the command line interface (CLI) or from the console. View the following sections to create a namespace policy:
2.5.6.1.1. Creating a namespace policy from the CLI
Complete the following steps to create a namespace policy from the CLI:
Create a YAML file for your namespace policy by running the following command:
kubectl create -f namespacepolicy-1.yaml
kubectl create -f namespacepolicy-1.yamlCopy to Clipboard Copied! Toggle word wrap Toggle overflow Apply the policy by running the following command:
kubectl apply -f <namespace-policy-file-name> --namespace=<namespace>
kubectl apply -f <namespace-policy-file-name> --namespace=<namespace>Copy to Clipboard Copied! Toggle word wrap Toggle overflow List and verify the policies by running the following command:
kubectl get namespacepolicy --namespace=<namespace>
kubectl get namespacepolicy --namespace=<namespace>Copy to Clipboard Copied! Toggle word wrap Toggle overflow
Your namespace policy is created from the CLI.
2.5.6.1.1.1. Viewing your namespace policy from the CLI
Complete the following steps to view your namespace policy from the CLI:
View details for a specific namespace policy by running the following command:
kubectl get namespacepolicy <policy-name> -n <namespace> -o yaml
kubectl get namespacepolicy <policy-name> -n <namespace> -o yamlCopy to Clipboard Copied! Toggle word wrap Toggle overflow View a description of your namespace policy by running the following command:
kubectl describe namespacepolicy <name> -n <namespace>
kubectl describe namespacepolicy <name> -n <namespace>Copy to Clipboard Copied! Toggle word wrap Toggle overflow
2.5.6.1.2. Creating a namespace policy from the console
As you create a namespace policy from the console, a YAML file is also created in the YAML editor. Complete the following steps to create a namespace policy from the console:
- Log in to your Red Hat Advanced Cluster Management for Kubernetes console.
- From the navigation menu, click Governance and risk.
- Click Create policy.
- Select Namespace from the Specifications field. Parameter values are automatically set. You can edit your values.
- Click Create.
2.5.6.1.2.1. Viewing your namespace policy from the console
You can view any namespace policy and its status from the console.
- Log in to your cluster from the console.
From the navigation menu, click Governance and risk to view a table list of your policies.
Note: You can filter the table list of your policies by selecting the Policies tab or Cluster violations tab.
- Select one of your policies to view more details.
- View the policy violations by selecting the Status tab.
2.5.6.2. Updating namespace policies
Learn to update namespace policies by viewing the following section.
2.5.6.2.1. Disabling namespace policies
Complete the following steps to disable your namespace policy:
- Log in to your Red Hat Advanced Cluster Management for Kubernetes console.
- From the navigation menu, click Govern risk to view a table list of your policies.
- Disable your policy by clicking the Actions icon > Disable. The Disable Policy dialog box appears.
- Click Disable policy.
Your policy is disabled.
2.5.6.2.2. Deleting a namespace policy
Delete a namespace policy from the CLI or the console.
Delete a namespace policy from the CLI:
- Delete a namespace policy by running the following command:
kubectl delete policy <namespacepolicy-name> -n <namespace>
kubectl delete policy <namespacepolicy-name> -n <namespace>Copy to Clipboard Copied! Toggle word wrap Toggle overflow + After your policy is deleted, it is removed from your target cluster or clusters.
Verify that your policy is removed by running the following command:
kubectl get policy <namespacepolicy-name> -n <namespace>
kubectl get policy <namespacepolicy-name> -n <namespace>Copy to Clipboard Copied! Toggle word wrap Toggle overflow
Delete a namespace policy from the console:
- From the navigation menu, click Govern risk to view a table list of your policies.
- Click the Actions icon for the policy you want to delete in the policy violation table.
- Click Remove.
- From the Remove policy dialog box, click Remove policy.
Your namespace policy is deleted.
View a sample of a namespace policy, see Namespace policy sample on the Namespace policy page. See Kubernetes configuration policy controller to learn about other configuration policies. See Managing security policies to manage other policies.
2.5.7. Managing pod policies
Kubernetes configuration policy controller monitors the status of you pod policies. Pod policies are applied to define the container rules for your pods. Learn to create, apply, view, and update your pod policy.
2.5.7.1. Creating a pod policy
You can create a YAML for your pod policy from the command line interface (CLI) or from the console. View the following sections to create a pod policy:
2.5.7.1.1. Creating a pod policy from the CLI
Complete the following steps to create a pod policy from the CLI:
Create a YAML file for your pod policy by running the following command:
kubectl create -f podpolicy-1.yaml
kubectl create -f podpolicy-1.yamlCopy to Clipboard Copied! Toggle word wrap Toggle overflow Apply the policy by running the following command:
kubectl apply -f <pod-policy-file-name> --namespace=<namespace>
kubectl apply -f <pod-policy-file-name> --namespace=<namespace>Copy to Clipboard Copied! Toggle word wrap Toggle overflow List and verify the policies by running the following command:
kubectl get podpolicy --namespace=<namespace>
kubectl get podpolicy --namespace=<namespace>Copy to Clipboard Copied! Toggle word wrap Toggle overflow
Your image pod policy is created from the CLI.
2.5.7.1.1.1. Viewing your policy from the CLI
Complete the following steps to view your pod policy from the CLI:
View details for a specific pod policy by running the following command:
kubectl get podpolicy <policy-name> -n <namespace> -o yaml
kubectl get podpolicy <policy-name> -n <namespace> -o yamlCopy to Clipboard Copied! Toggle word wrap Toggle overflow View a description of your pod policy by running the following command:
kubectl describe podpolicy <name> -n <namespace>
kubectl describe podpolicy <name> -n <namespace>Copy to Clipboard Copied! Toggle word wrap Toggle overflow
2.5.7.2. Creating an pod policy from the console
As you create a pod policy from the console, a YAML file is also created in the YAML editor. Complete the following steps to create the pod policy from the console:
- Log in to your Red Hat Advanced Cluster Management for Kubernetes console.
- From the navigation menu, click Govern risk.
- Click Create policy.
- Select Pod from the Specifications field. Parameter values are automatically set. You can edit your values.
- Click Create.
Viewing your pod policy from the console
You can view any pod policy and its status from the console.
- Log in to your cluster from the console.
From the navigation menu, click Govern risk to view a table list of your policies.
Note: You can filter the table list of your policies by selecting the Policies tab or Cluster violations tab.
- Select one of your policies to view more details.
- View the policy violations by selecting the Status tab.
2.5.7.3. Updating pod policies
Learn to update pod policies by viewing the following section.
2.5.7.3.1. Disabling pod policies
Complete the following steps to disable your pod policy:
- Log in to your Red Hat Advanced Cluster Management for Kubernetes console.
- From the navigation menu, click Govern risk to view a table list of your policies.
- Disable your policy by clicking the Actions icon > Disable. The Disable Policy dialog box appears.
- Click Disable policy.
Your policy is disabled.
2.5.7.3.2. Deleting a pod policy
Delete the pod policy from the CLI or the console.
Delete a pod policy from the CLI:
- Delete a pod policy by running the following command:
kubectl delete policy <podpolicy-name> -n <namespace>
kubectl delete policy <podpolicy-name> -n <namespace>Copy to Clipboard Copied! Toggle word wrap Toggle overflow + After your policy is deleted, it is removed from your target cluster or clusters.
Verify that your policy is removed by running the following command:
kubectl get policy <podpolicy-name> -n <namespace>
kubectl get policy <podpolicy-name> -n <namespace>Copy to Clipboard Copied! Toggle word wrap Toggle overflow
Delete a pod policy from the console:
- From the navigation menu, click Govern risk to view a table list of your policies.
- Click the Actions icon for the policy you want to delete in the policy violation table.
- Click Remove.
- From the Remove policy dialog box, click Remove policy.
Your pod policy is deleted.
View a sample of a pod policy, see Pod policy sample from the Pod policy page. See Kubernetes configuration policy controller to learn about other configuration policies. See Managing security policies to manage other policies.
2.5.8. Managing pod security policies
Apply a pod security policy to secure pods and containers. Learn to create, apply, view, and update your pod security policy in the following sections.
2.5.8.1. Creating a pod security policy
You can create a YAML file for your pod security policy from the command line interface (CLI) or from the console. View the following sections to create a pod security policy:
2.5.8.1.1. Creating a pod security policy from the CLI
Complete the following steps to create a pod security from the CLI:
Create a YAML file for your pod security policy by running the following command:
kubectl create -f podsecuritypolicy-1.yaml
kubectl create -f podsecuritypolicy-1.yamlCopy to Clipboard Copied! Toggle word wrap Toggle overflow Apply the policy by running the following command:
kubectl apply -f <podsecurity-policy-file-name> --namespace=<namespace>
kubectl apply -f <podsecurity-policy-file-name> --namespace=<namespace>Copy to Clipboard Copied! Toggle word wrap Toggle overflow List and verify the policies by running the following command:
kubectl get podsecuritypolicy --namespace=<namespace>
kubectl get podsecuritypolicy --namespace=<namespace>Copy to Clipboard Copied! Toggle word wrap Toggle overflow
Your pod security policy is created from the CLI.
2.5.8.1.1.1. Viewing your pod security policy from the CLI
Complete the following steps to view your pod security policy from the CLI:
View details for a specific pod security policy by running the following command:
kubectl get podsecuritypolicy <policy-name> -n <namespace> -o yaml
kubectl get podsecuritypolicy <policy-name> -n <namespace> -o yamlCopy to Clipboard Copied! Toggle word wrap Toggle overflow View a description of your pod security policy by running the following command:
kubectl describe podsecuritypolicy <name> -n <namespace>
kubectl describe podsecuritypolicy <name> -n <namespace>Copy to Clipboard Copied! Toggle word wrap Toggle overflow
2.5.8.1.2. Creating a pod security policy from the console
As you create a pod security policy from the console, a YAML file is also created in the YAML editor. Complete the following steps to create the pod security policy from the console:
- Log in to your Red Hat Advanced Cluster Management for Kubernetes console.
- From the navigation menu, click Govern risk.
- Click Create policy.
- Select Podsecuritypolicy from the Specifications field. Parameter values are automatically set. You can edit your values.
- Click Create.
2.5.8.1.2.1. Viewing your pod security policy from the console
You can view any pod security policy and its status from the console.
- Log in to your cluster from the console.
From the navigation menu, click Govern risk to view a table list of your policies.
Note: You can filter the table list of your policies by selecting the Policies tab or Cluster violations tab.
- Select one of your policies to view more details.
- View the policy violations by selecting the Status tab.
2.5.8.2. Updating pod security policies
Learn to update pod security policies by viewing the following section.
2.5.8.2.1. Disabling pod security policies
Complete the following steps to disable your pod security policy:
- Log in to your Red Hat Advanced Cluster Management for Kubernetes console.
- From the navigation menu, click Govern risk to view a table list of your policies.
- Disable your policy by clicking the Actions icon > Disable. The Disable Policy dialog box appears.
- Click Disable policy.
Your policy is disabled.
2.5.8.2.2. Deleting a pod security policy
Delete the pod security policy from the CLI or the console.
Delete a pod security policy from the CLI:
- Delete a pod security policy by running the following command:
kubectl delete policy <podsecurity-policy-name> -n <namespace>
kubectl delete policy <podsecurity-policy-name> -n <namespace>Copy to Clipboard Copied! Toggle word wrap Toggle overflow + After your policy is deleted, it is removed from your target cluster or clusters.
Verify that your policy is removed by running the following command:
kubectl get policy <podsecurity-policy-name> -n <namespace>
kubectl get policy <podsecurity-policy-name> -n <namespace>Copy to Clipboard Copied! Toggle word wrap Toggle overflow
Delete a pod security policy from the console:
- From the navigation menu, click Govern risk to view a table list of your policies.
- Click the Actions icon for the policy you want to delete in the policy violation table.
- Click Remove.
- From the Remove policy dialog box, click Remove policy.
Your pod security policy is deleted.
View a sample of a pod security policy, see Pod security policy sample on the Pod security policy page. See Kubernetes configuration policy controller to learn about other configuration policies. See Managing security policies to manage other policies.
2.5.9. Managing role policies
Kubernetes configuration policy controller monitors the status of role policies. Apply a role policy to set rules and permissions for specific roles in your cluster. Learn to create, apply, view, and update your role policy in the following sections.
2.5.9.1. Creating a role policy
You can create a YAML file for your role policy from the command line interface (CLI) or from the console. View the following sections to create a role policy:
2.5.9.1.1. Creating a role policy from the CLI
Complete the following steps to create a role from the CLI:
Create a YAML file for your role policy by running the following command:
kubectl create -f rolepolicy-1.yaml
kubectl create -f rolepolicy-1.yamlCopy to Clipboard Copied! Toggle word wrap Toggle overflow Apply the policy by running the following command:
kubectl apply -f <role-policy-file-name> --namespace=<namespace>
kubectl apply -f <role-policy-file-name> --namespace=<namespace>Copy to Clipboard Copied! Toggle word wrap Toggle overflow List and verify the policies by running the following command:
kubectl get rolepolicy --namespace=<namespace>
kubectl get rolepolicy --namespace=<namespace>Copy to Clipboard Copied! Toggle word wrap Toggle overflow
Your role policy is created from the CLI.
2.5.9.1.1.1. Viewing your role policy from the CLI
Complete the following steps to view your role policy from the CLI:
View details for a specific role policy by running the following command:
kubectl get rolepolicy <policy-name> -n <namespace> -o yaml
kubectl get rolepolicy <policy-name> -n <namespace> -o yamlCopy to Clipboard Copied! Toggle word wrap Toggle overflow View a description of your role policy by running the following command:
kubectl describe rolepolicy <name> -n <namespace>
kubectl describe rolepolicy <name> -n <namespace>Copy to Clipboard Copied! Toggle word wrap Toggle overflow
2.5.9.1.2. Creating a role policy from the console
As you create a role policy from the console, a YAML file is also created in the YAML editor. Complete the following steps to create the role policy from the console:
- Log in to your Red Hat Advanced Cluster Management for Kubernetes console.
- From the navigation menu, click Govern risk.
- Click Create policy.
- Select Role from the Specifications field. Parameter values are automatically set. You can edit your values.
- Click Create.
2.5.9.1.2.1. Viewing your role policy from the console
You can view any role policy and its status from the console.
- Log in to your cluster from the console.
From the navigation menu, click Govern risk to view a table list of your policies.
Note: You can filter the table list of your policies by selecting the Policies tab or Cluster violations tab.
- Select one of your policies to view more details.
- View the policy violations by selecting the Status tab.
2.5.9.2. Updating role policies
Learn to update role policies by viewing the following section.
2.5.9.2.1. Disabling role policies
Complete the following steps to disable your role policy:
- Log in to your Red Hat Advanced Cluster Management for Kubernetes console.
- From the navigation menu, click Govern risk to view a table list of your policies.
- Disable your policy by clicking the Actions icon > Disable. The Disable Policy dialog box appears.
- Click Disable policy.
Your policy is disabled.
2.5.9.2.2. Deleting a role policy
Delete the role policy from the CLI or the console.
Delete a role policy from the CLI:
Delete a role policy by running the following command:
kubectl delete policy <podsecurity-policy-name> -n <namespace>
kubectl delete policy <podsecurity-policy-name> -n <namespace>Copy to Clipboard Copied! Toggle word wrap Toggle overflow After your policy is deleted, it is removed from your target cluster or clusters.
Verify that your policy is removed by running the following command:
kubectl get policy <podsecurity-policy-name> -n <namespace>
kubectl get policy <podsecurity-policy-name> -n <namespace>Copy to Clipboard Copied! Toggle word wrap Toggle overflow
Delete a role policy from the console:
- From the navigation menu, click Govern risk to view a table list of your policies.
- Click the Actions icon for the policy you want to delete in the policy violation table.
- Click Remove.
- From the Remove policy dialog box, click Remove policy.
Your role policy is deleted.
See the policy-role.yaml for the sample policy. Refer to Kubernetes configuration policy controller to view other configuration policies that are monitored by the controller.
For details to manage other policies, refer to Managing security policies.
2.5.10. Managing role binding policies
Learn to create, apply, view, and update your role binding policies.
2.5.10.1. Creating a role binding policy
You can create a YAML file for your role binding policy from the command line interface (CLI) or from the console. View the following sections to create a role binding policy:
2.5.10.1.1. Creating a role binding policy from the CLI
Complete the following steps to create a role binding policy from the CLI:
Create a YAML file for your role binding policy. Run the following command:
kubectl create -f rolebindingpolicy.yaml
kubectl create -f rolebindingpolicy.yamlCopy to Clipboard Copied! Toggle word wrap Toggle overflow Apply the policy by running the following command:
kubectl apply -f <rolebinding-policy-file-name> --namespace=<namespace>
kubectl apply -f <rolebinding-policy-file-name> --namespace=<namespace>Copy to Clipboard Copied! Toggle word wrap Toggle overflow Verify and list the policies by running the following command:
kubectl get rolebindingpolicy --namespace=<namespace>
kubectl get rolebindingpolicy --namespace=<namespace>Copy to Clipboard Copied! Toggle word wrap Toggle overflow
Your role binding policy is created.
2.5.10.1.1.1. Viewing your role binding policy from the CLI
Complete the following steps to view your role binding policy from the CLI:
View details for a specific role binding policy by running the following command:
kubectl get rolebindingpolicy <policy-name> -n <namespace> -o yaml
kubectl get rolebindingpolicy <policy-name> -n <namespace> -o yamlCopy to Clipboard Copied! Toggle word wrap Toggle overflow View a description of your role binding policy by running the following command:
kubectl describe rolebindingpolicy <name> -n <namespace>
kubectl describe rolebindingpolicy <name> -n <namespace>Copy to Clipboard Copied! Toggle word wrap Toggle overflow
2.5.10.1.2. Creating a role binding policy from the console
As you create a role binding policy from the console, a YAML file is also created in the YAML editor. Complete the following steps to create a role binding policy from the console:
- Log in to your cluster from the console.
- From the navigation menu, click Governance and risk.
- Click Create policy.
Enter or select the appropriate values for the following fields:
- Name
- Specifications
- Cluster selector
- Remediation action
- Standards
- Categories
- Controls
- Disabled
- Click Create.
A role binding policy is created.
2.5.10.1.2.1. Viewing your role binding policy from the console
You can view any role binding policy and its status from the console.
- Log in to your cluster from the console.
From the navigation menu, click Governance and risk to view a table list of your policies.
Note: You can filter the table list of your policies by selecting the Policies tab or Cluster violations tab.
- Select one of your policies to view more details.
- View the role binding policy violations by selecting the Status tab.
2.5.10.2. Updating role binding policies
Learn to update role binding policies by viewing the following section.
2.5.10.2.1. Disabling role binding policies
Complete the following steps to disable your role binding policy:
- Log in to your Red Hat Advanced Cluster Management for Kubernetes console.
- From the navigation menu, click Govern risk to view a table list of your policies.
- Disable your policy by clicking the Actions icon > Disable. The Disable Policy dialog box appears.
- Click Disable policy.
Your policy is disabled.
2.5.10.2.2. Deleting a role binding policy
Delete the role binding policy from the CLI or the console.
Delete a role binding policy from the CLI:
Delete a role binding policy by running the following command:
kubectl delete policy <rolebinding-policy-name> -n <namespace>
kubectl delete policy <rolebinding-policy-name> -n <namespace>Copy to Clipboard Copied! Toggle word wrap Toggle overflow After your policy is deleted, it is removed from your target cluster or clusters.
Verify that your policy is removed by running the following command:
kubectl get policy <rolebinding-policy-name> -n <namespace>
kubectl get policy <rolebinding-policy-name> -n <namespace>Copy to Clipboard Copied! Toggle word wrap Toggle overflow
Delete a role binding policy from the console:
- From the navigation menu, click Govern risk to view a table list of your policies.
- Click the Actions icon for the policy you want to delete in the policy violation table.
- Click Remove.
- From the Remove policy dialog box, click Remove policy.
Your role binding policy is deleted.
View a sample of a role binding policy, see Role binding policy sample on the Role binding policy page. See Kubernetes configuration policy controller to learn about other configuration policies. See Managing security policies to manage other policies.
2.5.11. Managing Security Context Constraints policies
Learn to create, apply, view, and update your Security Context Constraints (SCC) policies.
2.5.11.1. Creating an SCC policy
You can create a YAML file for your SCC policy from the command line interface (CLI) or from the console. View the following sections to create an SCC policy:
2.5.11.1.1. Creating an SCC policy from the CLI
See Creating Security Context Constraints in the OpenShift Container Platform documentation for more details.
2.5.11.1.1.1. Viewing your SCC policy from the CLI
See Examining an SCC in the OpenShift Container Platform documentation for more details.
2.5.11.1.2. Creating an SCC policy from the console
As you create an SCC policy from the console, a YAML file is also created in the YAML editor. Complete the following steps to create an SCC policy from the console:
- Log in to your cluster from the console.
- From the navigation menu, click Governance and risk.
- Click Create policy.
Enter or select the appropriate values for the following fields:
- Name
- Specifications
- Cluster selector
- Remediation action
- Standards
- Categories
- Controls
- Disabled
- Click Create.
An SCC policy is created.
2.5.11.1.2.1. Viewing your SCC policy from the console
You can view any SCC policy and its status from the console.
- Log in to your cluster from the console.
From the navigation menu, click Governance and risk to view a table list of your policies.
Note: You can filter the table list of your policies by selecting the Policies tab or Cluster violations tab.
- Select one of your policies to view more details.
- View the SCC policy violations by selecting the Status tab.
2.5.11.2. Updating SCC policies
Learn to update SCC policies by viewing the following sections.
2.5.11.2.1. Disabling SCC policies
Complete the following steps to disable your SCC policy:
- Log in to your Red Hat Advanced Cluster Management for Kubernetes console.
- From the navigation menu, click Govern risk to view a table list of your policies.
- Disable your policy by clicking the Actions icon > Disable. The Disable Policy dialog box appears.
- Click Disable policy.
Your policy is disabled.
2.5.11.2.2. Deleting an SCC policy
Delete the SCC policy from the CLI or the console.
See Deleting an SCC in the OpenShift Container Platform documentation to learn more about deleting an SCC policy from the CLI.
Delete an SCC policy from the console:
- From the navigation menu, click Govern risk to view a table list of your policies.
- Click the Actions icon for the policy you want to delete in the policy violation table.
- Click Remove.
- From the Remove policy dialog box, click Remove policy.
Your SCC policy is deleted.
To view a sample of an SCC policy, see the Security context constraint policy sample section of Security Context Constraints policy. See Kubernetes configuration policy controller to learn about other configuration policies. See Managing security policies to manage other policies.
2.5.12. Managing certificate policies
Learn to create, apply, view, and update your certificate policies.
2.5.12.1. Creating a certificate policy
You can create a YAML file for your certificate policy from the command line interface (CLI) or from the console. View the following sections to create a certificate policy:
2.5.12.1.1. Creating a certificate policy from the CLI
Complete the following steps to create a certificate policy from the CLI:
Create a YAML file for your certificate policy. Run the following command:
kubectl create -f policy-1.yaml
kubectl create -f policy-1.yamlCopy to Clipboard Copied! Toggle word wrap Toggle overflow Apply the policy by running the following command:
kubectl apply -f <certificate-policy-file-name> --namespace=<namespace>
kubectl apply -f <certificate-policy-file-name> --namespace=<namespace>Copy to Clipboard Copied! Toggle word wrap Toggle overflow Verify and list the policies by running the following command:
kubectl get certificatepolicy --namespace=<namespace>
kubectl get certificatepolicy --namespace=<namespace>Copy to Clipboard Copied! Toggle word wrap Toggle overflow
Your certificate policy is created.
2.5.12.1.1.1. Viewing your certificate policy from the CLI
Complete the following steps to view your certificate policy from the CLI:
View details for a specific certificate policy by running the following command:
kubectl get certificatepolicy <policy-name> -n <namespace> -o yaml
kubectl get certificatepolicy <policy-name> -n <namespace> -o yamlCopy to Clipboard Copied! Toggle word wrap Toggle overflow View a description of your certificate policy by running the following command:
kubectl describe certificatepolicy <name> -n <namespace>
kubectl describe certificatepolicy <name> -n <namespace>Copy to Clipboard Copied! Toggle word wrap Toggle overflow
2.5.12.1.2. Creating a certificate policy from the console
As you create a certificate policy from the console, a YAML file is also created in the YAML editor. Complete the following steps to create a certificate policy from the console:
- Log in to your cluster from the console.
- From the navigation menu, click Governance and risk.
- Click Create policy.
- Select CertificatePolicy for the Specifications parameter. Values for the remaining parameters are automatically set when you select the policy. You can edit your values.
- Click Create.
A certificate policy is created.
2.5.12.1.2.1. Viewing your certificate policy from the console
You can view any certificate policy and its status from the console.
- Log in to your cluster from the console.
From the navigation menu, click Govern risk to view a table list of your policies.
Note: You can filter the table list of your policies by selecting the Policies tab or Cluster violations tab.
- Select one of your policies to view more details. The Details tab, Status tab, and YAML tab are displayed.
- To view the compliance status of your policy, select the Status tab. Click the View history link to view a list of violation messages.
2.5.12.2. Updating certificate policies
2.5.12.2.1. Bringing your own certificates
You can monitor your own certificates with the certificate policy controller. You must complete one of the following requirements to monitor your own certificates:
- Create a Kubernetes TLS Secret for your certificate.
-
Add the label
certificate_key_nameinto your Kubernetes secret to monitor your certificates.
Create a Kubernetes TLS secret to monitor your own certificates by running the following command:
kubectl -n <namespace> create secret tls <secret name> --cert=<path to certificate>/<certificate name> --key=<path to key>/<key name>
kubectl -n <namespace> create secret tls <secret name> --cert=<path to certificate>/<certificate name> --key=<path to key>/<key name>2.5.12.2.2. Adding a label into your Kubernetes secret
Update the metadata parameter in your TLS Secret by adding the certificate_key_name label. Run the following command to add the certificate_key_name label:
kubectl label secret my-certificate -n default certificate_key_name=cert
kubectl label secret my-certificate -n default certificate_key_name=certYour updated TLS Secret might resemble the following content:
Note: When you add the label from the console, you must manually add the label into the TLS Secret YAML file.
2.5.12.2.3. Disabling certificate policies
When you create a certificate policy, it is enabled by default. Complete the following steps to disable a certificate policy from the CLI or the console:
Disable a certificate policy from the console:
- Log in to your Red Hat Advanced Cluster Management for Kubernetes console.
- From the navigation menu, click Govern risk to view a table list of your policies.
- Disable your policy by clicking the Actions icon > Disable. The Disable Policy dialog box appears.
- Click Disable policy.
Your policy is disabled.
2.5.12.2.4. Deleting a certificate policy
Delete the certificate policy from the CLI or the console.
Delete a certificate policy from the CLI:
- Delete a certificate policy by running the following command:
kubectl delete policy <cert-policy-name> -n <namespace>
kubectl delete policy <cert-policy-name> -n <namespace>Copy to Clipboard Copied! Toggle word wrap Toggle overflow + After your policy is deleted, it is removed from your target cluster or clusters.
Verify that your policy is removed by running the following command:
kubectl get policy <policy-name> -n <mcm namespace>
kubectl get policy <policy-name> -n <mcm namespace>Copy to Clipboard Copied! Toggle word wrap Toggle overflow
Delete a certificate policy from the console:
- From the navigation menu, click Govern risk to view a table list of your policies.
- Click the Actions icon for the policy you want to delete in the policy violation table.
- Click Remove.
- From the Remove policy dialog box, click Remove policy.
Your certificate policy is deleted.
View a sample of a certificate policy, see policy-certificate.yaml. Refer to Certificate policy controller for more details.
For more information about other policy controllers, see Policy controllers. See Managing security policies to manage other policies.
2.5.13. Managing IAM policies
Apply an IAM policy to check the number of cluster administrators that you allow in your managed cluster. Learn to create, apply, view, and update your IAM policies in the following sections.
2.5.13.1. Creating an IAM policy
You can create a YAML file for your IAM policy from the command line interface (CLI) or from the console.
2.5.13.1.1. Creating an IAM policy from the CLI
Complete the following steps to create an IAM policy from the CLI:
Create a YAML file with the IAM policy definition. Run the following command:
kubectl create -f iam-policy-1.yaml
kubectl create -f iam-policy-1.yamlCopy to Clipboard Copied! Toggle word wrap Toggle overflow Your IAM policy might resemble the following YAML file:
Copy to Clipboard Copied! Toggle word wrap Toggle overflow Apply the policy by running the following command:
kubectl apply -f <iam-policy-file-name> --namespace=<namespace>
kubectl apply -f <iam-policy-file-name> --namespace=<namespace>Copy to Clipboard Copied! Toggle word wrap Toggle overflow Verify and list the policy by running the following command:
kubectl get <iam-policy-file-name> --namespace=<namespace>
kubectl get <iam-policy-file-name> --namespace=<namespace>Copy to Clipboard Copied! Toggle word wrap Toggle overflow
Your IAM policy is created.
2.5.13.1.1.1. Viewing your IAM policy from the CLI
Complete the following steps to view your IAM policy:
View details for specific IAM policy by running the following command:
kubectl get iampolicy <policy-name> -n <namespace> -o yaml
kubectl get iampolicy <policy-name> -n <namespace> -o yamlCopy to Clipboard Copied! Toggle word wrap Toggle overflow View a description of your IAM policy by running the following command:
kubectl describe iampolicy <name> -n <namespace>
kubectl describe iampolicy <name> -n <namespace>Copy to Clipboard Copied! Toggle word wrap Toggle overflow
2.5.13.1.2. Creating an IAM policy from the console
As you create your IAM policy from the console, a YAML file is also created in the YAML editor. Complete the following steps to create an IAM policy from the console:
- Log in to your cluster from the console.
- From the navigation menu, click Govern risk.
- Click Create policy.
- Select IamPolicy from the Specifications field. Values for the remaining parameters are set automatically when you select the policy. You can edit your values.
- Click Create.
An IAM policy is created.
2.5.13.1.2.1. Viewing your IAM policy from the console
You can view any IAM policy and its status from the console.
- Log in to your cluster from the console.
From the navigation menu, click Govern risk to view a table list of your policies.
Note: You can filter the table list of your policies by selecting the Policies tab or Cluster violations tab.
- Select one of your policies to view more details.
- View the IAM policy violations by selecting the Status tab.
2.5.13.2. Updating IAM policies
Learn to update IAM policies by viewing the following section.
2.5.13.2.1. Disabling IAM policies
Complete the following steps to disable your IAM policy:
- Log in to your Red Hat Advanced Cluster Management for Kubernetes console.
- From the navigation menu, click Govern risk to view a table list of your policies.
- Disable your policy by clicking the Actions icon > Disable. The Disable Policy dialog box appears.
- Click Disable policy.
Your policy is disabled.
2.5.13.2.2. Deleting an IAM policy
Delete a configuration policy from the CLI or the console.
Delete an IAM policy from the CLI:
Delete an IAM policy by running the following command:
kubectl delete policy <iam-policy-name> -n <namespace>
kubectl delete policy <iam-policy-name> -n <namespace>Copy to Clipboard Copied! Toggle word wrap Toggle overflow After your policy is deleted, it is removed from your target cluster or clusters.
- Verify that your policy is removed by running the following command:
kubectl get policy <iam-policy-name> -n <namespace>
kubectl get policy <iam-policy-name> -n <namespace>Copy to Clipboard Copied! Toggle word wrap Toggle overflow Delete an IAM policy from the console:
- From the navigation menu, click Govern risk to view a table list of your policies.
- Click the Actions icon for the policy you want to delete in the policy violation table.
- Click Remove.
- From the Remove policy dialog box, click Remove policy.
Your policy is deleted.
View the IAM policy sample from the IAM policy controller page. See Managing security policies for more topics.
2.5.14. Managing ETCD encryption policies
Apply an encryption policy to detect, or enable encryption of sensitive data in the ETCD data-store. Learn to create, apply, view, and update your encryption policy in the following sections.
2.5.14.1. Creating an encryption policy
You can create a YAML file for your encryption policy from the command line interface (CLI) or from the console. View the following sections to create a encryption policy:
2.5.14.1.1. Creating an encryption policy from the CLI
Complete the following steps to create an encryption policy from the CLI:
Create a YAML file for your encryption policy by running the following command:
kubectl create -f etcd-encryption-policy-1.yaml
kubectl create -f etcd-encryption-policy-1.yamlCopy to Clipboard Copied! Toggle word wrap Toggle overflow Apply the policy by running the following command:
kubectl apply -f <etcd-encryption-policy-file-name> --namespace=<namespace>
kubectl apply -f <etcd-encryption-policy-file-name> --namespace=<namespace>Copy to Clipboard Copied! Toggle word wrap Toggle overflow List and verify the policies by running the following command:
kubectl get etcd-encryption-policy --namespace=<namespace>
kubectl get etcd-encryption-policy --namespace=<namespace>Copy to Clipboard Copied! Toggle word wrap Toggle overflow
Your encryption policy is created from the CLI.
2.5.14.1.1.1. Viewing your encryption policy from the CLI
Complete the following steps to view your encryption policy from the CLI:
View details for a specific encryption policy by running the following command:
kubectl get etcd-encryption-policy <policy-name> -n <namespace> -o yaml
kubectl get etcd-encryption-policy <policy-name> -n <namespace> -o yamlCopy to Clipboard Copied! Toggle word wrap Toggle overflow View a description of your encryption policy by running the following command:
kubectl describe etcd-encryption-policy <name> -n <namespace>
kubectl describe etcd-encryption-policy <name> -n <namespace>Copy to Clipboard Copied! Toggle word wrap Toggle overflow
2.5.14.1.2. Creating an encryption policy from the console
As you create a encryption policy from the console, a YAML file is also created in the YAML editor. Complete the following steps to create the encryption policy from the console:
- Log in to your Red Hat Advanced Cluster Management for Kubernetes console.
- From the navigation menu, click Govern risk.
- Click Create policy.
- Select EtcdEncryption from the Specifications field. Values for the remaining parameters are set automatically when you select the policy. You can edit your values.
- Click Create.
2.5.14.1.2.1. Viewing your encryption policy from the console
You can view any encryption policy and its status from the console.
- Log in to your cluster from the console.
From the navigation menu, click Govern risk to view a table list of your policies.
Note: You can filter the table list of your policies by selecting the All policies tab or _Cluster violations+ tab.
- Select one of your policies to view more details. The Overview tab, Status tab, and YAML tab are displayed.
2.5.14.2. Updating encryption policies
Learn to update encryption policies by viewing the following section.
2.5.14.2.1. Disabling encryption policies
Complete the following steps to disable your encryption policy:
- Log in to your Red Hat Advanced Cluster Management for Kubernetes console.
- From the navigation menu, click Govern risk to view a table list of your policies.
- Disable your policy by clicking the Actions icon > Disable. The Disable Policy dialog box appears.
- Click Disable policy.
Your policy is disabled.
2.5.14.2.2. Deleting an encryption policy
Delete the encryption policy from the CLI or the console.
Delete an encryption policy from the CLI:
- Delete an encryption policy by running the following command:
kubectl delete policy <podsecurity-policy-name> -n <namespace>
kubectl delete policy <podsecurity-policy-name> -n <namespace>Copy to Clipboard Copied! Toggle word wrap Toggle overflow + After your policy is deleted, it is removed from your target cluster or clusters.
Verify that your policy is removed by running the following command:
kubectl get policy <podsecurity-policy-name> -n <namespace>
kubectl get policy <podsecurity-policy-name> -n <namespace>Copy to Clipboard Copied! Toggle word wrap Toggle overflow
Delete a encryption policy from the console:
- From the navigation menu, click Govern risk to view a table list of your policies.
- Click the Actions icon for the policy you want to delete in the policy violation table.
- Click Remove.
- From the Remove policy dialog box, click Remove policy.
Your encryption policy is deleted.
View a sample of an encryption policy, see ETCD encryption policy sample on the ETCD encryption policy page. See Kubernetes configuration policy controller to learn about other configuration policies. See Managing security policies to manage other policies.
2.5.15. Managing gatekeeper operator policies
Use the gatekeeper operator policy to install the gatekeeper operator and gatekeeper on a managed cluster. Learn to create, view, and update your gatekeeper operator policies in the following sections.
Required access: Cluster administrator
2.5.15.1. Installing gatekeeper using a gatekeeper operator policy
Use the governance framework to install the gatekeeper operator. Gatekeeper operator is available in the OpenShift Container Platform catalog. See Adding Operators to a cluster in the OpenShift Container Platform documentation for more information.
Use the configuration policy controller to install the gatekeeper operator policy. During the install, the operator group and subscription pull the gatekeeper operator to install it in your managed cluster. Then, the gatekeeper operator creates a gatekeeper CR to configure gatekeeper. View the Gatekeeper operator CR sample.
Gatekeeper operator policy is monitored by the Red Hat Advanced Cluster Management configuration policy controller, where enforce remediation action is supported. Gatekeeper operator policies are created automatically by the controller when set to enforce.
2.5.15.2. Creating a gatekeeper policy from the console
Complete the following steps to install the gatekeeper operator policy from the console:
- Log in to your cluster.
- From the navigation menu, click Govern risk.
- Create a policy by selecting Create policy.
As you complete the form, select GatekeeperOperator from the Specifications field. The parameter values for your policy are automatically populated and the policy is set to
informby default. Set your remediation action toenforceto install gatekeeper. Seepolicy-gatekeeper-operator.yamlto view an the sample.Note: Consider that default values can be generated by the operator. See Gatekeeper Helm Chart for an explanation of the optional parameters that can be used for the gatekeeper operator policy.
2.5.15.2.1. Gatekeeper operator CR
2.5.15.3. Upgrading gatekeeper and the gatekeeper operator
You can upgrade the versions for gatekeeper and the gatekeeper operator. Complete the following steps:
-
When you install the gatekeeper operator with the gatekeeper operator policy, notice the value for
installPlanApproval. The operator upgrades automatically wheninstallPlanApprovalis set toAutomatic. You must approve the upgrade of the gatekeeper operator manually, for each cluster, wheninstallPlanApprovalis set toManual. Upgrade the gatekeeper version manually by completing the following steps:
- Identify the latest version for gatekeeper, see Red Hat Ecosystem Catalog - gatekeeper.
-
Select the drop-down menu of the Tag filter to find the latest static tag. For example,
v3.3.0-1. Edit the gatekeeper operator policy and update the
imagetag to use the latest static tag. View the following example of the updated line in the gatekeeper operator policy:image: 'registry.redhat.io/rhacm2/gatekeeper-rhel8:v3.3.0-1'
image: 'registry.redhat.io/rhacm2/gatekeeper-rhel8:v3.3.0-1'Copy to Clipboard Copied! Toggle word wrap Toggle overflow For more information, see How to use Gatekeeper.
2.5.15.4. Updating gatekeeper operator policy
Learn to update the gatekeeper operator policy by viewing the following section.
2.5.15.4.1. Viewing gatekeeper operator policy from the console
You can view your gatekeeper operator policy and its status from the console.
- Log in to your cluster from the console.
From the navigation menu, click Govern risk to view a table list of your policies.
Note: You can filter the table list of your policies by selecting the Policies tab or Cluster violations tab.
-
Select the
policy-gatekeeper-operatorpolicy to view more details. - View the policy violations by selecting the Status tab.
2.5.15.4.2. Disabling gatekeeper operator policy
Complete the following steps to disable your gatekeeper operator policy:
- Log in to your Red Hat Advanced Cluster Management for Kubernetes console.
- From the navigation menu, click Govern risk to view a table list of your policies.
- Disable your policy by clicking the Actions icon > Disable. The Disable Policy dialog box appears.
- Click Disable policy.
Your policy is disabled.
2.5.15.4.3. Deleting gatekeeper operator policy
Delete the gatekeeper operator policy from the CLI or the console.
Delete gatekeeper operator policy from the CLI:
Delete gatekeeper operator policy by running the following command:
kubectl delete policy <policy-gatekeeper-operator-name> -n <namespace>
kubectl delete policy <policy-gatekeeper-operator-name> -n <namespace>Copy to Clipboard Copied! Toggle word wrap Toggle overflow After your policy is deleted, it is removed from your target cluster or clusters.
Verify that your policy is removed by running the following command:
kubectl get policy <policy-gatekeeper-operator-name> -n <namespace>
kubectl get policy <policy-gatekeeper-operator-name> -n <namespace>Copy to Clipboard Copied! Toggle word wrap Toggle overflow
Delete gatekeeper operator policy from the console:
- From the navigation menu, click Govern risk to view a table list of your policies.
-
Click the Actions icon for the
policy-gatekeeper-operatorpolicy to delete in the policy violation table. - Click Remove.
- From the Remove policy dialog box, click Remove policy.
Your gatekeeper operator policy is deleted.
2.5.15.5. Uninstalling gatekeeper policy, gatekeeper, and gatekeeper operator policy
Complete the following steps to uninstall gatekeeper policy, gatekeeper, and gatekeeper operator policy:
Remove the gatekeeper
ConstraintandConstraintTemplatethat is applied on your managed cluster:-
Edit your gatekeeper operator policy. Locate the
ConfigurationPolicytemplate that you used to create the gatekeeperConstraintandConstraintTemplate. -
Change the value for
complianceTypeof theConfigurationPolicytemplate tomustnothave. - Save and apply the policy.
-
Edit your gatekeeper operator policy. Locate the
Remove gatekeeper instance from your managed cluster:
-
Edit your gatekeeper operator policy. Locate the
ConfigurationPolicytemplate that you used to create the Gatekeeper custom resource (CR). -
Change the value for
complianceTypeof theConfigurationPolicytemplate tomustnothave.
-
Edit your gatekeeper operator policy. Locate the
Remove the gatekeeper operator that is on your managed cluster:
-
Edit your gatekeeper operator policy. Locate the
ConfigurationPolicytemplate that you used to create the Subscription CR. -
Change the value for
complianceTypeof theConfigurationPolicytemplate tomustnothave.
-
Edit your gatekeeper operator policy. Locate the
Gatekeeper policy, gatekeeper, and gatekeeper operator policy are uninstalled.
See Integrating gatekeeper constraints and constraint templates for details about gatekeeper. For a list of topics to integrate third-party policies with the product, see Integrate third-party policy controllers.
2.5.16. Managing compliance operator policies
Apply a compliance operator policy to install the Red Hat OpenShift Container Platform compliance operator. Learn to create, update, apply, and view your compliance operator policy in the following sections.
2.5.16.1. Creating a compliance operator policy from the console
As you create a compliance operator policy from the console, a YAML file is also created in the YAML editor. Complete the following steps to create a compliance operator policy from the console:
- Log in to your hub cluster.
- From the navigation menu, select Govern risk.
Click Create policy. As you complete the YAML form, select ComplianceOperator from the Specifications field.
The following resources are created: compliance operator namespace (
openshift-compliance), an operator group (compliance-operator), and a subscription (comp-operator-subscription).Note: Enforce is supported. When you set the remediation action to
enforcethe policy installs the compliance operator.
A compliance operator policy is created.
2.5.16.2. Updating a compliance operator policy
Learn to update the compliance operator policy by viewing the following section.
2.5.16.2.1. Viewing a compliance operator policy from the console
You can view any compliance operator policy and its status from the console.
- Log in to your cluster from the console.
From the navigation menu, click Govern risk to view a table list of your policies.
Note: You can filter the table list of your policies by selecting the Policies tab or Cluster violations tab.
-
Select
policy-comp-operatorpolicy to view more details. - View the policy violations by selecting the Status tab.
2.5.16.2.2. Disabling a compliance operator policy
Complete the following steps to disable your compliance operator policy:
- Log in to your Red Hat Advanced Cluster Management for Kubernetes console.
- From the navigation menu, click Govern risk to view a table list of your policies.
-
Disable
policy-comp-operatorby clicking the Actions icon > Disable. The Disable Policy dialog box appears. - Click Disable policy.
Your policy is disabled.
2.5.16.2.3. Deleting a compliance operator policy
Delete the compliance operator policy from the CLI or the console.
Delete compliance operator policy from the CLI:
Delete compliance operator policy by running the following command:
kubectl delete policy <policy-comp-operator-name> -n <namespace>
kubectl delete policy <policy-comp-operator-name> -n <namespace>Copy to Clipboard Copied! Toggle word wrap Toggle overflow After your policy is deleted, it is removed from your target cluster or clusters.
Verify that your policy is removed by running the following command:
kubectl get policy <policy-comp-operator-name> -n <namespace>
kubectl get policy <policy-comp-operator-name> -n <namespace>Copy to Clipboard Copied! Toggle word wrap Toggle overflow
Delete compliance operator policy from the console:
- From the navigation menu, click Govern risk to view a table list of your policies.
-
Click the Actions icon for the
policy-comp-operatorpolicy to delete in the policy violation table. - Click Remove.
- From the Remove policy dialog box, click Remove policy.
Your compliance operator policy is deleted.
For more details about the compliance operator policy, see Compliance operator policy.
2.5.17. Managing E8 scan policies
Apply an E8 scan policy to scan master and worker nodes for compliance with the E8 profiles. Learn to create, update, apply, and view your E8 scan policy in the following sections.
2.5.17.1. Creating an E8 scan policy from the console
As you create an E8 scan policy from the console, a YAML file is also created in the YAML editor. Note: The compliance operator must be installed. For more details, see Creating a compliance operator policy from the console.
Complete the following steps to create a E8 scan policy from the console:
- Log in to your hub cluster.
- From the navigation menu, select Govern risk.
Click Create policy. Select Custom specification from the Specification field. Copy and paste the
policy-e8-scanfrom the policy-collection repository.The following resources are created:
ScanSettingBinding(e8), aComplianceSuite(compliance-suite-e8), and aComplianceCheckResult(compliance-suite-e8-results).Note: Automatic remediation is supported. Set the remediation action to
enforceto createScanSettingBindingresource.
An E8 scan policy is created.
2.5.17.2. Updating an E8 scan policy
Learn to update the E8 scan policy by viewing the following section.
2.5.17.2.1. Viewing an E8 scan policy from the console
You can view any E8 scan policy and its status from the console.
- Log in to your cluster from the console.
From the navigation menu, click Govern risk to view a table list of your policies.
Note: You can filter the table list of your policies by selecting the Policies tab or Cluster violations tab.
-
Select
policy-compliance-operator-e8-scanpolicy to view more details. - View the policy violations by selecting the Status tab.
2.5.17.2.2. Disabling an E8 scan policy
Complete the following steps to disable your compliance operator policy:
- Log in to your Red Hat Advanced Cluster Management for Kubernetes console.
- From the navigation menu, click Govern risk to view a table list of your policies.
-
Disable
policy-compliance-operator-e8-scanby clicking the Actions icon > Disable. The Disable Policy dialog box appears. - Click Disable policy.
Your policy is disabled.
2.5.17.2.3. Deleting an E8 scan policy
Delete the E8 scan policy from the CLI or the console.
Delete an E8 scan policy from the CLI:
Delete an E8 policy by running the following command:
kubectl delete policy <policy-compliance-operator-e8-scan> -n <namespace>
kubectl delete policy <policy-compliance-operator-e8-scan> -n <namespace>Copy to Clipboard Copied! Toggle word wrap Toggle overflow After your policy is deleted, it is removed from your target cluster or clusters.
Verify that your policy is removed by running the following command:
kubectl get policy <policy-compliance-operator-e8-scan> -n <namespace>
kubectl get policy <policy-compliance-operator-e8-scan> -n <namespace>Copy to Clipboard Copied! Toggle word wrap Toggle overflow
Delete an E8 scan policy from the console:
- From the navigation menu, click Govern risk to view a table list of your policies.
-
Click the Actions icon for the
policy-compliance-operator-e8-scanpolicy to delete in the policy violation table. - Click Remove.
- From the Remove policy dialog box, click Remove policy.
Your E8 scan policy is deleted.
For more details about the E8 scan policy, see E8 scan policy.