Questo contenuto non è disponibile nella lingua selezionata.
Chapter 1. Customizing the devfile and plug-in registries
CodeReady Workspaces 2.0 introduces two registries: the plug-in registry and the devfile registry. They are static websites where the metadata of CodeReady Workspaces plug-ins and CodeReady Workspaces devfiles is published.
The plug-in registry makes it possible to share a plug-in definition across all the users of the same instance of CodeReady Workspaces. Only plug-ins that are published in a registry can be used in a devfile.
The devfile registry holds the definitions of the CodeReady Workspaces stacks. These are available on the CodeReady Workspaces user dashboard when selecting Create Workspace. It contains the list of CodeReady Workspaces technological stack samples with example projects.
The devfile and plug-in registries run in two separate pods and are deployed when the CodeReady Workspaces server is deployed (that is the default behavior of the Helm chart or the CodeReady Workspaces Operator). The metadata of the plug-ins and devfiles are versioned on GitHub and follow the CodeReady Workspaces server life cycle.
In this document, the following two ways to customize the default registries that are deployed with CodeReady Workspaces (to modify the plug-ins or devfile metadata) are described:
- Building a custom image of the registries
- Running the default images but modifying them at runtime
1.1. Building and running a custom registry image
This section describes the building of registries and updating a running CodeReady Workspaces server to point to the registries.
1.1.1. Building a custom devfile registry
This section describes how to build a custom devfiles registry. Following operations are covered:
- Getting a copy of the source code necessary to build a devfiles registry.
- Adding a new devfile.
- Building the devfiles registry.
Procedure
Clone the devfile registry repository:
$ git clone git@github.com:redhat-developer/codeready-workspaces.git
$ cd codeready-workspaces/dependencies/che-devfile-registry
In the
./che-devfile-registry/devfiles/directory, create a subdirectory<devfile-name>/and add thedevfile.yamlandmeta.yamlfiles.File organization for a devfile
./che-devfile-registry/devfiles/ └── <devfile-name> ├── devfile.yaml └── meta.yaml-
Add valid content in the
devfile.yamlfile. For a detailed description of the devfile format, see the Making a workspace portable using a Devfile section. Ensure that the
meta.yamlfile conforms to the following structure:Expand Table 1.1. Parameters for a devfile meta.yaml Attribute Description descriptionDescription as it appears on the user dashboard.
displayNameName as it appears on the user dashboard.
globalMemoryLimitThe sum of the expected memory consumed by all the components launched by the devfile. This number will be visible on the user dashboard. It is informative and is not taken into account by the CodeReady Workspaces server.
iconLink to an
.svgfile that is displayed on the user dashboard.tagsList of tags. Tags usually include the tools included in the stack.
Example devfile
meta.yamldisplayName: Rust description: Rust Stack with Rust 1.39 tags: ["Rust"] icon: https://www.eclipse.org/che/images/logo-eclipseche.svg globalMemoryLimit: 1686MiBuild the containers for the custom devfile registry:
$ docker build -t my-devfile-registry .
1.1.2. Building a custom plug-in registry
This section describes how to build a custom plug-in registry. Following operations are covered:
- Getting a copy of the source code necessary to build a custom plug-in registry.
- Adding a new plug-in.
- Building the custom plug-in registry.
Procedure
Clone the plug-in registry repository:
$ git clone git@github.com:redhat-developer/codeready-workspaces.git
$ cd codeready-workspaces/dependencies/che-plugin-registry
In the
./che-plugin-registry/v3/plugins/directory, create new directories<publisher>/<plugin-name>/<plugin-version>/and ameta.yamlfile in the last directory.File organization for a plugin
./che-plugin-registry/v3/plugins/ ├── <publisher> │ └── <plugin-name> │ ├── <plugin-version> │ │ └── meta.yaml │ └── latest.txt-
Add valid content to the
meta.yamlfile. See the “Using a Visual Studio Code extension in CodeReady Workspaces” section or the README.md file in theeclipse/che-plugin-registryrepository for a detailed description of themeta.yamlfile format. Create a file named
latest.txtwith content the name of the latest<plugin-version>directory.Example$ tree che-plugin-registry/v3/plugins/redhat/java/ che-plugin-registry/v3/plugins/redhat/java/ ├── 0.38.0 │ └── meta.yaml ├── 0.43.0 │ └── meta.yaml ├── 0.45.0 │ └── meta.yaml ├── 0.46.0 │ └── meta.yaml ├── 0.50.0 │ └── meta.yaml └── latest.txt $ cat che-plugin-registry/v3/plugins/redhat/java/latest.txt 0.50.0Build the containers for the custom plug-in registry:
$ docker build -t my-devfile-registry .
1.1.3. Deploying the registries
Prerequisites
The my-plug-in-registry and my-devfile-registry images used in this section are built using the docker command. This section assumes that these images are available on the OpenShift cluster where CodeReady Workspaces is deployed.
This is true on Minikube, for example, if before running the docker build commands, the user executed the eval $\{minikube docker-env} command (or, the eval $\{minishift docker-env} command for Minishift).
Otherwise, these images can be pushed to a container registry (public, such as quay.io, or the DockerHub, or a private registry).
1.1.3.1. Deploying registries in OpenShift
Procedure
A Helm chart for the plug-in registry is available in the /kubernetes/che-plugin-registry/ directory of the GitHub repository.
To deploy the plug-in registry using the Helm chart, run the following command:
NAMESPACE=<namespace-name>1 DOMAIN=<kubernetes-cluster-domain>2 IMAGE="my-plug-in-registry" helm upgrade --install che-plugin-registry \ --debug \ --namespace $\{NAMESPACE} \ --set global.ingressDomain=$\{DOMAIN} \ --set chePluginRegistryImage=$\{IMAGE} \ --set chePluginRegistryImagePullPolicy="IfNotPresent" \ ./kubernetes/che-plugin-registry/The devfile registry also has a Helm chart in the
deploy/kubernetes/che-devfile-registry/directory of the GitHub repository. To deploy it, run the command:NAMESPACE=<namespace-name>1 DOMAIN=<kubernetes-cluster-domain>2 IMAGE="my-devfile-registry" helm upgrade --install che-devfile-registry \ --debug \ --namespace $\{NAMESPACE} \ --set global.ingressDomain=$\{DOMAIN} \ --set cheDevfileRegistryImage=$\{IMAGE} \ --set cheDevfileRegistryImagePullPolicy="IfNotPresent" \ ./deploy/kubernetes/che-devfile-registry/The Helm chart creates a pod, a service, and an Ingress. To get them, use
app=che-plugin-registry(orapp=che-plugin-registryfor the devfile registry).$ oc get -o custom-columns=TYPE:.kind,NAME:.metadata.name \ -l app=che-plugin-registry pod,svc,ingress TYPE NAME Pod che-plugin-registry-5c7cd8d5c9-zlqlz Service che-plugin-registry Ingress che-plugin-registryTo verify that the new plug-in is correctly published to the plug-in registry, make a request to the registry path
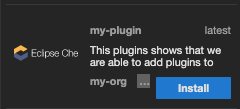
/v3/plugins/index.json(or/devfiles/index.jsonfor the devfile registry).$ URL=$(oc get -o 'custom-columns=URL:.spec.rules[0].host' \ -l app=che-plugin-registry ingress --no-headers) $ INDEX_JSON=$(curl -sSL http://$\{URL}/v3/plugins/index.json) $ echo $\{INDEX_JSON} | grep -A 4 -B 5 "\"name\":\"my-plug-in\"" ,\{ "id": "my-org/my-plug-in/1.0.0", "displayName":"This is my first {prod-short} plug-in", "version":"1.0.0", "type":"VS Code extension", "name":"my-plug-in", "description":"This plugins shows that we are able to add plugins to the registry...", "publisher":"my-org", "links": \{"self":"/v3/plugins/my-org/my-plug-in/1.0.0" } } -- -- ,\{ "id": "my-org/my-plug-in/latest", "displayName":"This is my first {prod-short} plug-in", "version":"latest", "type":"VS Code extension", "name":"my-plug-in", "description":"This plugins shows that we are able to add plugins to the registry...", "publisher":"my-org", "links": \{"self":"/v3/plugins/my-org/my-plug-in/latest" } }Verify that the CodeReady Workspaces server points to the URL of the registry. To do this, compare the value of the
CHE_WORKSPACE_PLUGIN__REGISTRY__URLparameter in theworkspacesConfigMap (orCHE_WORKSPACE_DEVFILE__REGISTRY__URLfor the devfile registry):$ oc get \ -o "custom-columns=URL:.data['CHE_WORKSPACE_PLUGIN__REGISTRY__URL']" \ --no-headers cm/che URL http://che-plugin-registry-che.192.168.99.100.mycluster.mycompany.com/v3with the URL of the Ingress:
$ oc get -o 'custom-columns=URL:.spec.rules[0].host' \
  -l app=che-plugin-registry ingress --no-headers
che-plugin-registry-che.192.168.99.100.mycluster.mycompany.com
If they do not match, update the ConfigMap and restart the CodeReady Workspaces server.
$ oc edit cm/che
(...)
$ oc scale --replicas=0 deployment/che
$ oc scale --replicas=1 deployment/che
When the new registries are deployed and the CodeReady Workspaces server is configured to use them, the new plug-ins are available in the Plugin view of a workspace.
The new stacks are displayed in the New Workspace tab of the user dashboard.

1.1.3.2. Deploying registries in OpenShift
Procedure
An OpenShift template to deploy the plug-in registry is available in the openshift/ directory of the GitHub repository.
To deploy the plug-in registry using the OpenShift template, run the following command:
NAMESPACE=<namespace-name>1 IMAGE_NAME="my-plug-in-registry" IMAGE_TAG="latest" oc new-app -f openshift/che-plugin-registry.yml \ -n "$\{NAMESPACE}" \ -p IMAGE="$\{IMAGE_NAME}" \ -p IMAGE_TAG="$\{IMAGE_TAG}" \ -p PULL_POLICY="IfNotPresent"- 1
- The default CodeReady Workspaces namespace is
workspaces.
The devfile registry has an OpenShift template in the
deploy/openshift/directory of the GitHub repository. To deploy it, run the command:NAMESPACE=<namespace-name>1 IMAGE_NAME="my-devfile-registry" IMAGE_TAG="latest" oc new-app -f openshift/che-devfile-registry.yml \ -n "$\{NAMESPACE}" \ -p IMAGE="$\{IMAGE_NAME}" \ -p IMAGE_TAG="$\{IMAGE_TAG}" \ -p PULL_POLICY="IfNotPresent"- 1
- The default CodeReady Workspaces namespace is
workspaces.
- Check if the registries are deployed successfully on OpenShift. The steps to check are similar to the OpenShift steps. For details, see the Section 1.1.3.1, “Deploying registries in OpenShift” section. The only difference is that, on OpenShift, Ingresses are replaced with routes.
1.2. Including the plug-in binaries in the registry image
The plug-in registry only hosts CodeReady Workspaces plug-in metadata. The binaries are usually referred through a link in the meta.yaml file. In some cases, such as offline environments, it may be necessary to make the binaries available inside the registry image.
This section describes how to modify a plug-in meta.yaml file to point to a local file inside the container and rebuild a new registry that contains the modified plug-in meta.yaml file and the binary. In the following example, the Java plug-in that refers to two remote VS Code extensions binaries is considered.
Procedure
Download the binaries locally.
$ ORG=redhat
$ NAME=java11
$ VERSION=latest
$ URL_VS_CODE_EXT1="https://github.com/microsoft/vscode-java-debug/releases/download/0.19.0/vscode-java-debug-0.19.0.vsix[_https://github.com/microsoft/vscode-java-debug/releases/download/0.19.0/vscode-java-debug-0.19.0.vsix_]"
$ URL_VS_CODE_EXT2="https://download.jboss.org/jbosstools/static/jdt.ls/stable/java-0.46.0-1549.vsix[_https://download.jboss.org/jbosstools/static/jdt.ls/stable/java-0.46.0-1549.vsix_]"
$ VS_CODE_EXT1=https://github.com/microsoft/vscode-java-debug/releases/download/0.19.0/vscode-java-debug-0.19.0.vsix[_vscode-java-debug-0.19.0.vsix_]
$ VS_CODE_EXT2=https://download.jboss.org/jbosstools/static/jdt.ls/stable/java-0.46.0-1549.vsix[_java-0.46.0-1549.vsix_]
$ curl -sSL -o ./che-plugin-registry/v3/plugins/$\{ORG}/$\{NAME}/$\{VERSION}/$\{VS_CODE_EXT1} \
  $\{URL_VS_CODE_EXT1}
$ curl -sSL -o ./che-plugin-registry/v3/plugins/$\{ORG}/$\{NAME}/$\{VERSION}/$\{VS_CODE_EXT2} \
  $\{URL_VS_CODE_EXT2}
Retrieve the plug-in-registry URL.
FIXMEUpdate the URLs in the
meta.yamlfile, so that they point to the VS Code extension binaries that are saved in the registry container:$ NEW_URL_VS_CODE_EXT1=http://$\{PLUGIN_REG_URL}/v3/plugins/$\{ORG}/$\{NAME}/$\{VERSION}/$\{VS_CODE_EXT1} $ NEW_URL_VS_CODE_EXT2=http://$\{PLUGIN_REG_URL}/v3/plugins/$\{ORG}/$\{NAME}/$\{VERSION}/$\{VS_CODE_EXT2} $ sed -i -e 's/$\{URL_PLUGIN1}/$\{NEW_URL_VS_CODE_EXT1}/g' \ ./che-plugin-registry/v3/plugins/$\{ORG}/$\{NAME}/$\{VERSION}/meta.yaml $ sed -i -e 's/$\{URL_PLUGIN2}/$\{NEW_URL_VS_CODE_EXT2}/g' \ ./che-plugin-registry/v3/plugins/$\{ORG}/$\{NAME}/$\{VERSION}/meta.yaml- Build and deploy the plug-in registry using the instructions in the Building and running a custom registry image section.
1.3. Editing a devfile and plug-in at runtime
An alternative to building a custom registry image is to:
- Start a registry
- Modify its content at runtime
This approach is simpler and faster. But the modifications are lost as soon as the container is deleted.
1.3.1. Adding a plug-in at runtime
Procedure
To add a plug-in:
Get the name of the OpenShift pod that hosts the plug-in registry container. To do this, filter the
app=che-plugin-registrylabel:$ PLUGIN_REG_POD=$(oc get -o custom-columns=NAME:.metadata.name \ --no-headers -l app=che-plugin-registry pod)Create the new plug-in directory in the plug-in registry container, if it does not exist:
$ ORG="my-org"
$ PLUGIN="my-plug-in"
$ VERSION="1.0.1"
$ oc exec ${PLUGIN_REG_POD} -i -t -- \
  mkdir -p /var/www/html/v3/plugins/${ORG}/${PLUGIN}/${VERSION}
Copy the
meta.yamlfile in the container:LOCAL_META="${PWD}/meta.yaml" $ oc cp "${LOCAL_META}" \ ${PLUGIN_REG_POD}:/var/www/html/v3/plugins/${ORG}/${PLUGIN}/${VERSION}Update the
index.jsonfile of the registry:$ oc exec ${PLUGIN_REG_POD} -i -t -- \ /var/www/html/index_v2.sh v3 > /var/www/html/v3/plugins/index.json- The new plug-in can now be used from a CodeReady Workspaces instance.
1.3.2. Adding a devfile at runtime
Procedure
To add a devfile:
Get the name of the OpenShift pod that hosts the devfile registry container. To do this, filter the
app=che-devfile-registrylabel:$ DEVFILE_REG_POD=$(oc get -o custom-columns=NAME:.metadata.name \ --no-headers -l app=che-devfile-registry pod)Create the new devfile directory in the devfile registry container, if it does not exist.
$ STACK="my-stack"
$ oc exec $\{DEVFILE_REG_POD} -i -t -- \
  mkdir -p /var/www/html/devfiles/$\{STACK}
Copy the
devfile.yamlfile and themeta.yamlfile to the container.$ LOCAL_META="$(PWD)/meta.yaml" $ LOCAL_DEVFILE="$(PWD)/devfile.yaml" $ oc cp "$\{LOCAL_META}" \ $\{DEVFILE_REG_POD}:/var/www/html/devfiles/$\{STACK} $ oc cp "$\{LOCAL_DEVFILE}" \ $\{DEVFILE_REG_POD}:/var/www/html/devfiles/$\{STACK}Update the
index.jsonfile of the registry.$ oc exec $\{DEVFILE_REG_POD} -i -t -- \ /var/www/html/index.sh > /var/www/html/devfiles/index.json