Questo contenuto non è disponibile nella lingua selezionata.
Chapter 3. Installing Red Hat Development Suite on macOS and Windows
3.1. Prerequisites
- Sign Up for the Red Hat Developer Program: Join the program here: Red Hat Developer Program. After signing up, you must wait approximately fifteen minutes to allow the new account information to propagate to the Red Hat Subscription Management system.
Ensure Virtualization is enabled on your machine.
If macOS: In a terminal, run the
sysctl -a | grep machdep.cpu.featurescommand. The result will be a string of features. If the output includesVMX, the machine has Virtualization enabled. If not enabled see your system’s documentation for instruction.If Windows: Ensure that Virtualization is enabled in your machine’s BIOS settings. If Red Hat Development Suite is run on a new system, ensure that Virtualization is enabled in the BIOS settings. This is required to run VirtualBox. See your system’s documentation for instructions to change BIOS settings.
Ensure that you are logged in as an Administrator.
NoteIf Windows, do not run Red Hat Development Suite using a non-Administrator account with the Run as Administrator option because this does not supply the required permissions.
- (Optional) Install Docker individually to use Docker for Windows: Red Hat Development Suite includes the Docker tooling, but to use the full version of Docker for Windows (Docker Machine or Boot2Docker), you must install Docker and test it before installing any Eclipse Docker tools. This is only applicable to using Docker outside of JBoss Developer Studio, such as Docker for Windows or Docker for macOS.
Ensure that Java SE 1.8.0 is installed:
If macOS: Download and install Java SE 1.8.0 Build 111 from the Oracle website: Java Download.
3.2. Downloading and Setting up Red Hat Development Suite
Before you install Red Hat Development Suite, you have to prepare your environment.
- Log in and download Red Hat Development Suite from the Red Hat Developers Portal product download page.
If macOS: Unzip the macOS installers. If you are using the Safari browser, the macOS installer is automatically unzipped.
If Windows: Go to the next step.
- Run the downloaded installation file.
On the Welcome window, click Next to continue.
NoteIf a newer version of the installer is available you can download the latest version of the installer from the Welcome window
On the Target Folder window, add a path to the target directory for the Red Hat Development Suite installation.
If macOS: The default path for macOS is
/Applications/DevelopmentSuite.If Windows: The default path for Windows is
%PROGRAMFILES%\DevelopmentSuite.Figure 3.1. Set the Target Directory
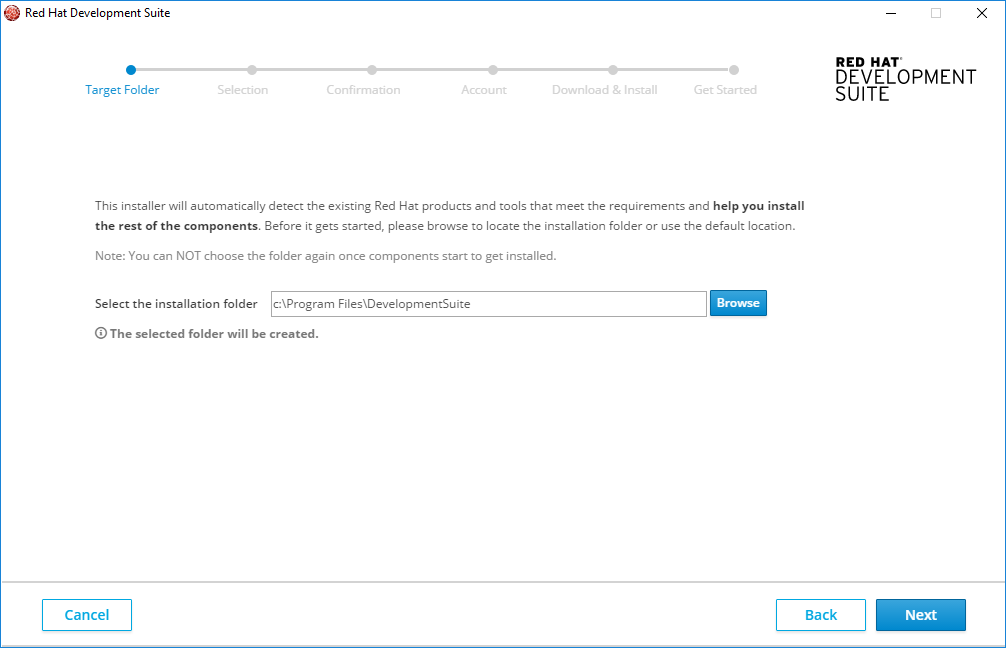
On the Target Folder window, click Next to continue.
NoteYou can not use spaces in the Windows username. See Chapter 5 Troubleshooting information for this error.
3.3. Installing All Components of Red Hat Development Suite
To install the entire Red Hat Development Suite, take these steps:
On the Selection window:
- Click All.
- Click Select All.
Click Next to continue.
Figure 3.2. All Components Selection

On the Confirmation window:
- Verify the summary of selected components.
- Click Next to continue.
On the Account window:
- Enter your existing Red Hat Developer login credentials.
- Click Download and Install to continue.
The progress bar displays the download and installation progress for each component.
If the installation is successful go to Section 3.9, “Next Steps After Installation on Microsoft Windows and macOS”.
If the installation is unsuccessful go to Chapter 6, Troubleshooting.
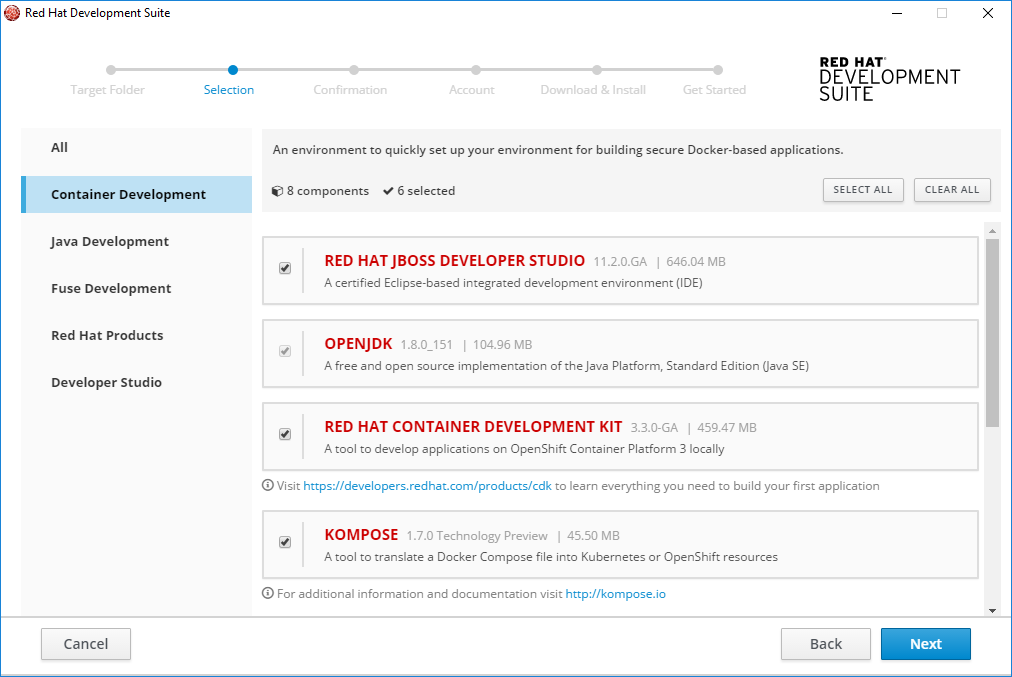
3.4. Installing Container Development Tools
You can install any combination of these tools in the Container Development channel:
- Red Hat JBoss Developer Studio
- OpenJDK
- Red Hat Container Development Kit
- Kompose
- Cygwin
- Eclipse Che
To install tools in the Container Development channel, take these steps:
On the Selection window:
- Click Container Development.
Either click the checkbox or anywhere in the component pane to select the component(s) to install. Or you can click Select All to select all components in the channel to install.
If Windows: Use Oracle VirtualBox (preselected) or enable Hyper-V. If you want to enable Hyper-V, do this from the Windows Features panel, reboot and restart Red Hat Development Suite. Once Red Hat Development Suite detects that Hyper-V is enabled, VirtualBox no longer displays on the component list.
Click Next to continue.
Figure 3.3. Container Development Selection
On the Confirmation window:
- Verify the summary of selected components.
- Click Next to continue.
On the Account window:
- Enter your existing Red Hat Developer login credentials.
- Click Download and Install to continue.
The progress bar displays the download and installation progress for each component.
If the installation is successful go to Section 3.9, “Next Steps After Installation on Microsoft Windows and macOS”.
If the installation is unsuccessful go to Chapter 6, Troubleshooting.
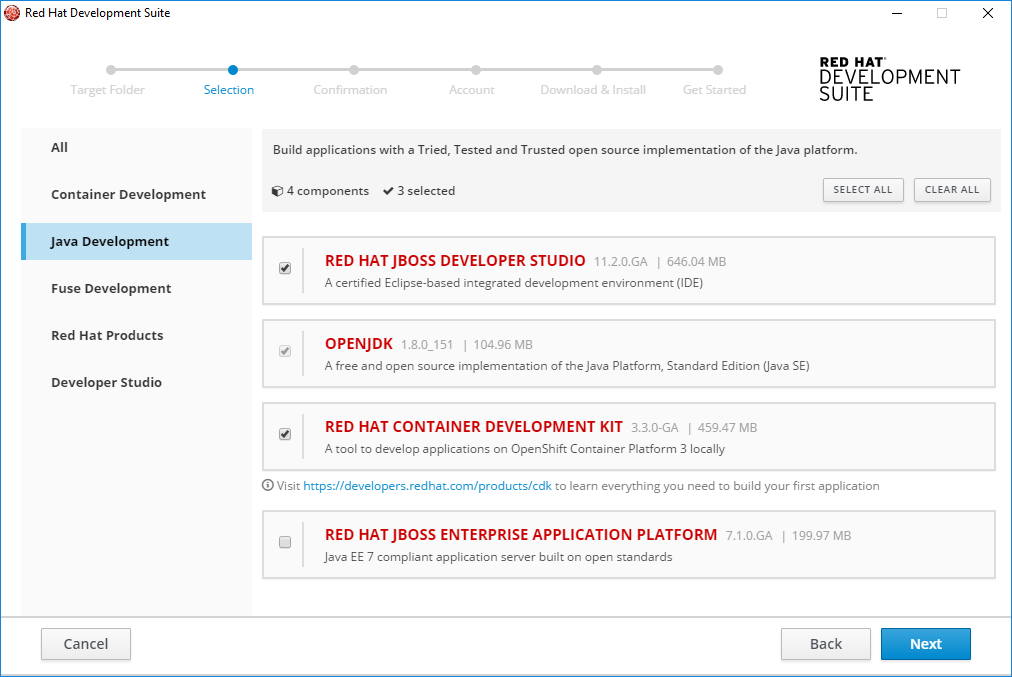
3.5. Installing Java Development Tools
You can install any combination of these tools in the Java Development channel:
- Red Hat JBoss Developer Studio
- OpenJDK
- Red Hat Container Development Kit
- Red Hat JBoss Enterprise Application Platform
To install tools in the Java Development channel, take these steps:
On the Selection window:
- Click Java Development.
- Either click the checkbox or anywhere in the component card to select the component(s) to install. Or you can click Select All to select all components in the channel to install.
Click Next to continue.
Figure 3.4. Java Development Selection
On the Confirmation window:
- Verify the summary of selected components.
- Click Next to continue.
On the Account window:
- Enter your existing Red Hat Developer login credentials.
- Click Download and Install to continue.
The progress bar displays the download and installation progress for each component.
If the installation is successful go to Section 3.9, “Next Steps After Installation on Microsoft Windows and macOS”.
If the installation is unsuccessful go to Chapter 6, Troubleshooting.
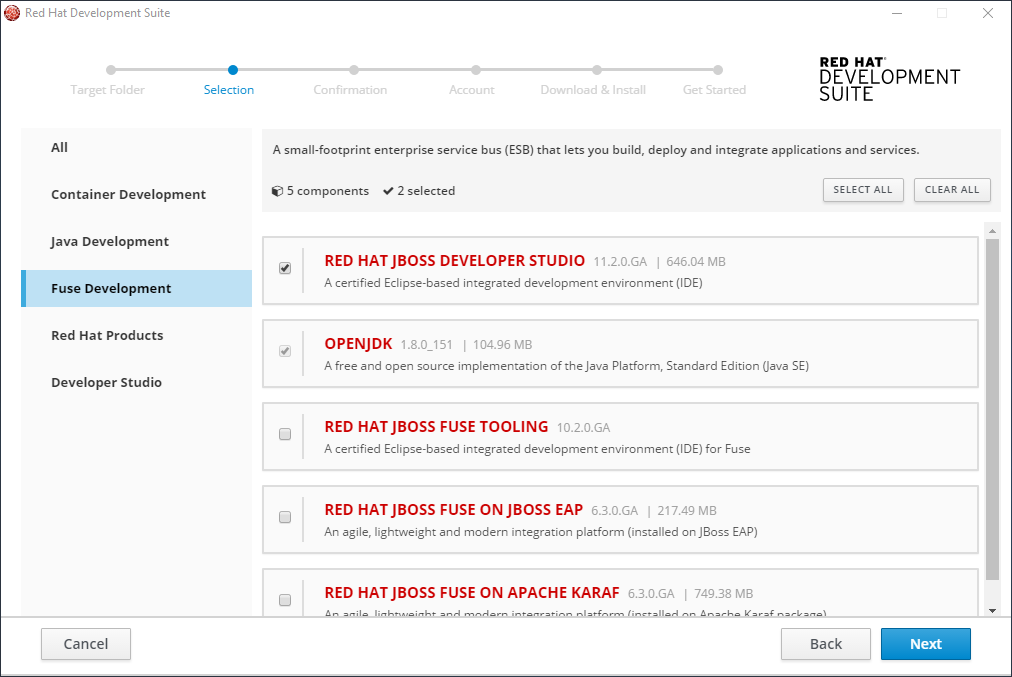
3.6. Installing Fuse Development Tools
You can install any combination of these tools in the Fuse Development channel:
- Red Hat JBoss Developer Studio
- OpenJDK
- Red Hat JBoss Fuse Tooling
- Red Hat JBoss Fuse on JBoss EAP
- Red Hat JBoss Fuse on Apache Karaf
To install tools in the Fuse Development channel, take these steps:
On the Selection window:
- Click Fuse Development.
- Either click the checkbox or anywhere in the component card to select the component(s) to install. Or you can click Select All to select all components in the channel to install.
Click Next to continue.
Figure 3.5. Fuse Development Selection
On the Confirmation window:
- Verify the summary of selected components.
- Click Next to continue.
On the Account window:
- Enter your existing Red Hat Developer login credentials.
- Click Download and Install to continue.
The progress bar displays the download and installation progress for each component.
If the installation is successful go to Section 3.9, “Next Steps After Installation on Microsoft Windows and macOS”.
If the installation is unsuccessful go to Chapter 6, Troubleshooting.
3.7. Installing Red Hat Products
You can install any combination of these tools in the Red Hat Products channel:
- Red Hat JBoss Developer Studio
- OpenJDK
- Red Hat Container Development Kit
- Red Hat JBoss Fuse Tooling
- Red Hat JBoss Fuse on JBoss EAP
- Red Hat JBoss Fuse on Apache Karaf
- Red Hat JBoss Enterprise Application Platform
To install tools in the Red Hat Products channel, take these steps:
On the Selection window:
- Click Red Hat Products.
- Either click the checkbox or anywhere in the component pane to select the component(s) to install. Or you can click Select All to select all components in the channel to install.
Click Next to continue.
Figure 3.6. Red Hat Products Selection

On the Confirmation window:
- Verify the summary of selected components.
- Click Next to continue.
On the Account window:
- Enter your existing Red Hat Developer login credentials.
- Click Download and Install to continue.
The progress bar displays the download and installation progress for each component.
If the installation is successful go to Section 3.9, “Next Steps After Installation on Microsoft Windows and macOS”.
If the installation is unsuccessful go to Chapter 6, Troubleshooting.
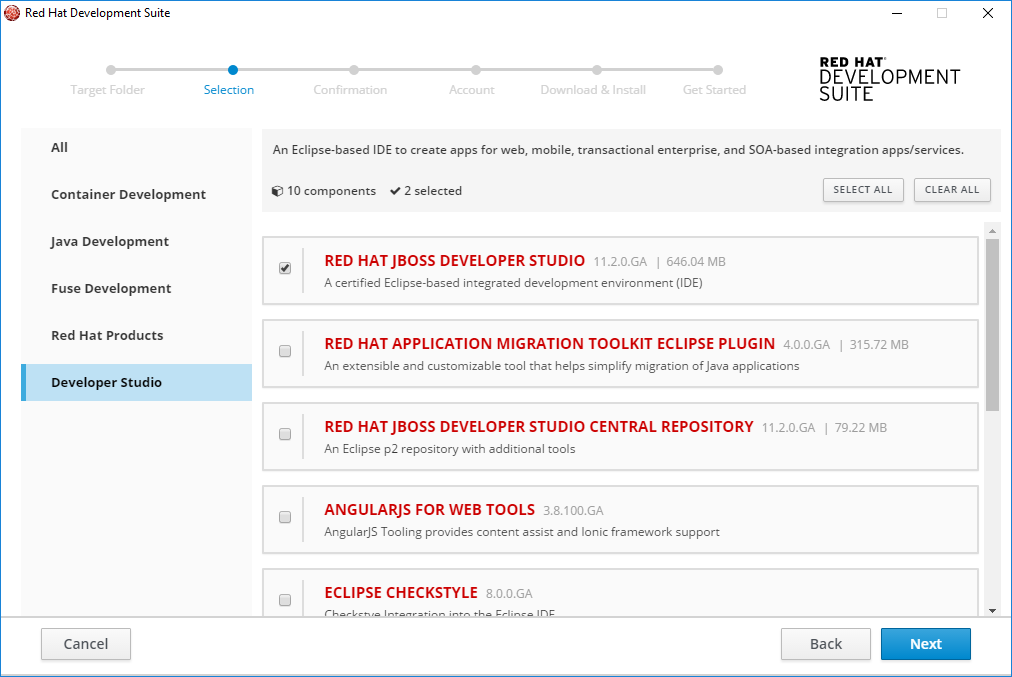
3.8. Installing Developer Studio
You can install any combination of these tools in the Developer Studio channel:
- Red Hat JBoss Developer Studio
- Red Hat Application Migration Kit Plugin for Eclipse
- Red Hat JBoss Developer Studio Central Repository
- AngularJS for Web Tools
- Eclipse Checkstyle
- JBoss Business Process and Rules Tools
- OpenJDK
- Red Hat JBoss Fuse Tooling
To install tools in the Developer Studio channel, take these steps:
On the Selection window:
- Click Developer Studio.
- Either click the checkbox or anywhere in the component pane to select the component(s) to install. Or you can click Select All to select all components in the channel to install.
- Click Next to continue.
Figure 3.7. Developer Studio Selection
On the Confirmation window:
- Verify the summary of selected components.
- Click Next to continue.
On the Account window:
- Enter your existing Red Hat Developer login credentials.
- Click Download and Install to continue.
The progress bar displays the download and installation progress for each component.
If the installation is successful go to Section 3.9, “Next Steps After Installation on Microsoft Windows and macOS”.
If the installation is unsuccessful go to Chapter 6, Troubleshooting.
3.9. Next Steps After Installation on Microsoft Windows and macOS
When the installation is complete, the Red Hat Development Suite window indicates that the download and install were successful and provides a link to the Red Hat Container Development Kit Getting Started page.
The following links have more information on next steps:
- To start a local OpenShift cluster with Minishift, see the Minishift documentation.
- To start using the Red Hat Container Development Kit Server Adapter, see Getting Started with Container and Cloud-based Development.
- To create a workspace on Che, see Minishift Che Add-on README.
3.9.1. Deleting Temporary Folders
During installation, Red Hat Development Suite stores files in a temporary folder. To free up space after installation, you must delete the temporary files. Refer to documentation based on your platform for more information on deleting temporary folders.
3.9.2. Changing Admin Console Passwords
After installation, you may change the admin console password for JBoss EAP and JBoss Fuse.
-
To reset the password for JBoss Fuse on Apache Karaf, update the following file with the new password:
${targetfolder}\fuseplatformkaraf\etc\users.properties -
To reset the password for Red Hat JBoss Enterprise Application Platform and for Red Hat JBoss Fuse on JBoss EAP, run the script located in
$JBoss_HOME/bin/add-user.sh(for Red Hat Enterprise Linux) or$JBoss_HOME\bin\add-user.sh(for Windows).