Questo contenuto non è disponibile nella lingua selezionata.
Using the desktop environment in RHEL 8
Configuring and customizing the GNOME 3 desktop environment on RHEL 8
Abstract
Providing feedback on Red Hat documentation
We appreciate your feedback on our documentation. Let us know how we can improve it.
Submitting feedback through Jira (account required)
- Log in to the Jira website.
- Click Create in the top navigation bar.
- Enter a descriptive title in the Summary field.
- Enter your suggestion for improvement in the Description field. Include links to the relevant parts of the documentation.
- Click Create at the bottom of the dialogue.
Chapter 1. Getting started with GNOME
1.1. What GNOME 3 is
Red Hat Enterprise Linux 8 is shipped with the default desktop environment GNOME 3.
GNOME 3 represents a presentation layer that provides a graphical user interface as well as the focused working environment, which enables you to access all your work from one place.
To function properly, GNOME requires your system to support 3D acceleration. This includes bare metal systems, as well as hypervisor solutions such as VMWare.
If GNOME does not start or performs poorly on your VMWare virtual machine (VM), see Why does the GUI fail to start on my VMware virtual machine? (Red Hat Knowledgebase)
1.2. GNOME environments, back ends, and display protocols
GNOME 3 provides two user environments:
- GNOME Standard
- GNOME Classic
Both environments can use two different protocols as their graphical back ends:
- The X11 protocol, which uses X.Org as the display server.
The Wayland protocol, which uses GNOME Shell as the Wayland compositor and display server.
This solution of display server is further referred as GNOME Shell on Wayland.
The default combination in RHEL 8 is GNOME Standard environment using GNOME Shell on Wayland as the display server. However, due to certain Wayland limitations, you might want to switch the graphics protocol stack to X11. You may also want to switch from GNOME Standard to GNOME Classic.
1.3. Launching applications in GNOME
This section describes various approaches that you can use to launch available applications in GNOME 3.
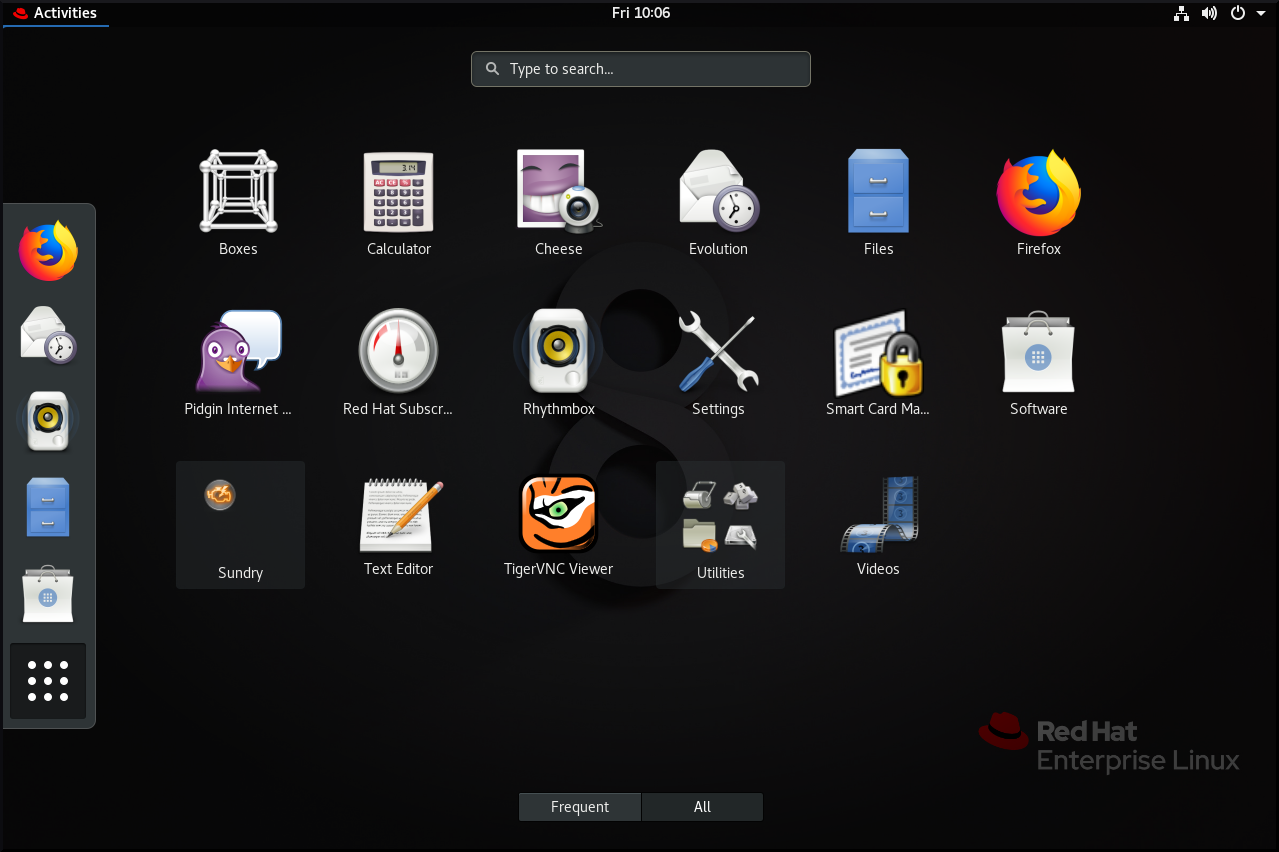
1.3.1. Launching an application in GNOME Standard
This procedure launches a graphical application in the GNOME Standard user environment.
Prerequisites
- You are using the GNOME Standard environment.
Procedure
- Go to the Activities Overview screen by moving the cursor to the area of the upper-left corner and push the cursor to the screen corner. The Activities Overview menu opens automatically.
Find the application using either of the following ways:
Click the Show Applications icon in the vertical bar on the left side.
Optionally, you can choose between displaying all or just the frequent applications by using the Frequent or All switch at the bottom of the screen.
- Start typing the name of the required application in the search entry.
- Click an application from the displayed list.
1.3.2. Launching an application in GNOME Classic
This procedure launches a graphical application in the GNOME Classic user environment.
Prerequisites
- You are using the GNOME Classic environment.
Procedure
- Go to the Applications menu.
Choose the required application from the available categories, which include:
- Favorites
- Accessories
- Internet
- Office
- Sound & Video
- Sundry
- System Tools
- Utilities
1.3.3. Launching an application in GNOME using a command
This procedure launches a graphical application in GNOME by entering a command.
Prerequisites
- You know the command that starts the application.
Procedure
Open a command prompt using either of the following ways:
- Open a terminal.
Press the Alt+F2 shortcut to open the Enter a Command screen.
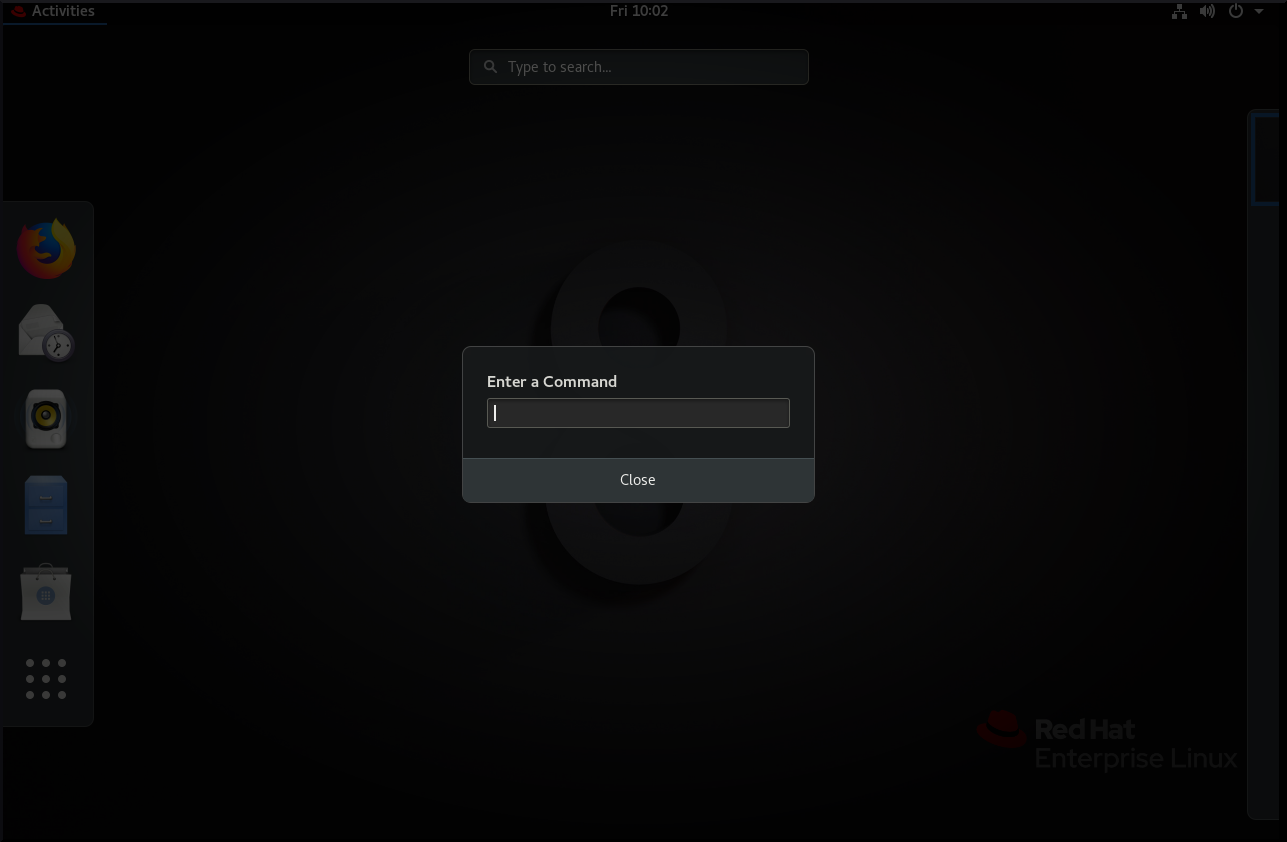
- Write the command in the command prompt.
- Confirm the command by pressing Enter.
1.4. Managing desktop icons
You can enable the desktop icons functionality and move files to the desktop.
1.4.1. Desktop icons in RHEL 8
In RHEL 8, the Files application no longer provides the desktop icons functionality. Instead, desktop icons are provided by the Desktop icons GNOME Shell extension, which is available from the gnome-shell-extension-desktop-icons package.
Desktop icons in GNOME Classic
The GNOME Classic environment includes the gnome-shell-extension-desktop-icons package by default. Desktop icons are always on, and you cannot turn them off.
Desktop icons in GNOME Standard
In GNOME Standard, desktop icons are disabled by default.
If you have only the GNOME Standard environment available, and not GNOME Classic, you must install the gnome-shell-extension-desktop-icons package.
1.4.2. Enabling desktop icons in GNOME Standard
This procedure enables the desktop icons functionality in the GNOME Standard environment.
Procedure
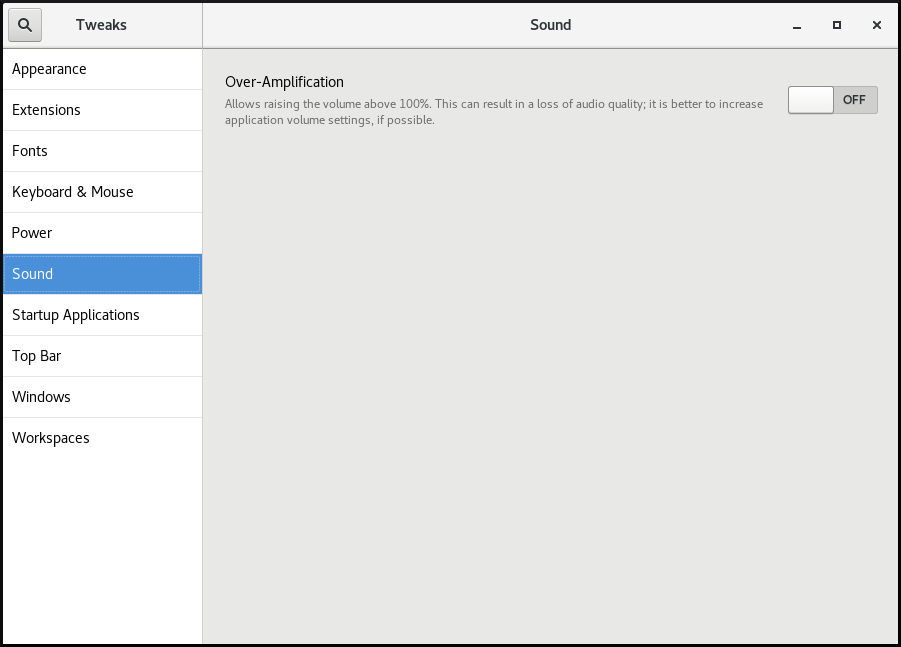
- Open the Tweaks application.
Select → , and enable the extension.

1.4.3. Creating a desktop icon for a file
This procedure creates a desktop icon for an existing file.
Prerequisites
- The Desktop icons extension is enabled.
Procedure
-
Move the selected file into the
~/Desktop/directory.
Verification
- Check that the icon for the file appears on the desktop.
1.5. Disabling the hot corner functionality on GNOME Shell
The GNOME environment provides the hot corner functionality, which is enabled by default. This means that when you move the cursor to the area of the upper-left corner and push the cursor to the screen corner, the Activities Overview menu opens automatically.
However, you may want to disable this feature to not open Activities Overview unintentionally.
To do so, you can use the following tools:
- The dconf Editor application
- The gsettings command-line utility
- The No topleft hot corner extension
The selection of the tool might depend on whether you want to disable the hot corner functionality for a single user or for all users on the system. By using dconf Editor or gsettings, you can disable hot corner only for a single user. To disable hot corner system-wide, use the No topleft hot corner extension.
1.5.1. Disabling the hot corner functionality for a single user
To disable the hot corner functionality for a single user, you can use either the dconf Editor application or the gsettings command-line utility.
1.5.1.1. Disabling hot corner using dconf Editor
To disable the hot corner functionality using the dconf Editor application, follow this procedure.
This procedure disables the hot corner functionality for a single user.
Prerequisites
The dconf Editor application is installed on the system:
yum install dconf-editor
# yum install dconf-editorCopy to Clipboard Copied! Toggle word wrap Toggle overflow
Procedure
- Open the dconf Editor application.
-
Choose the
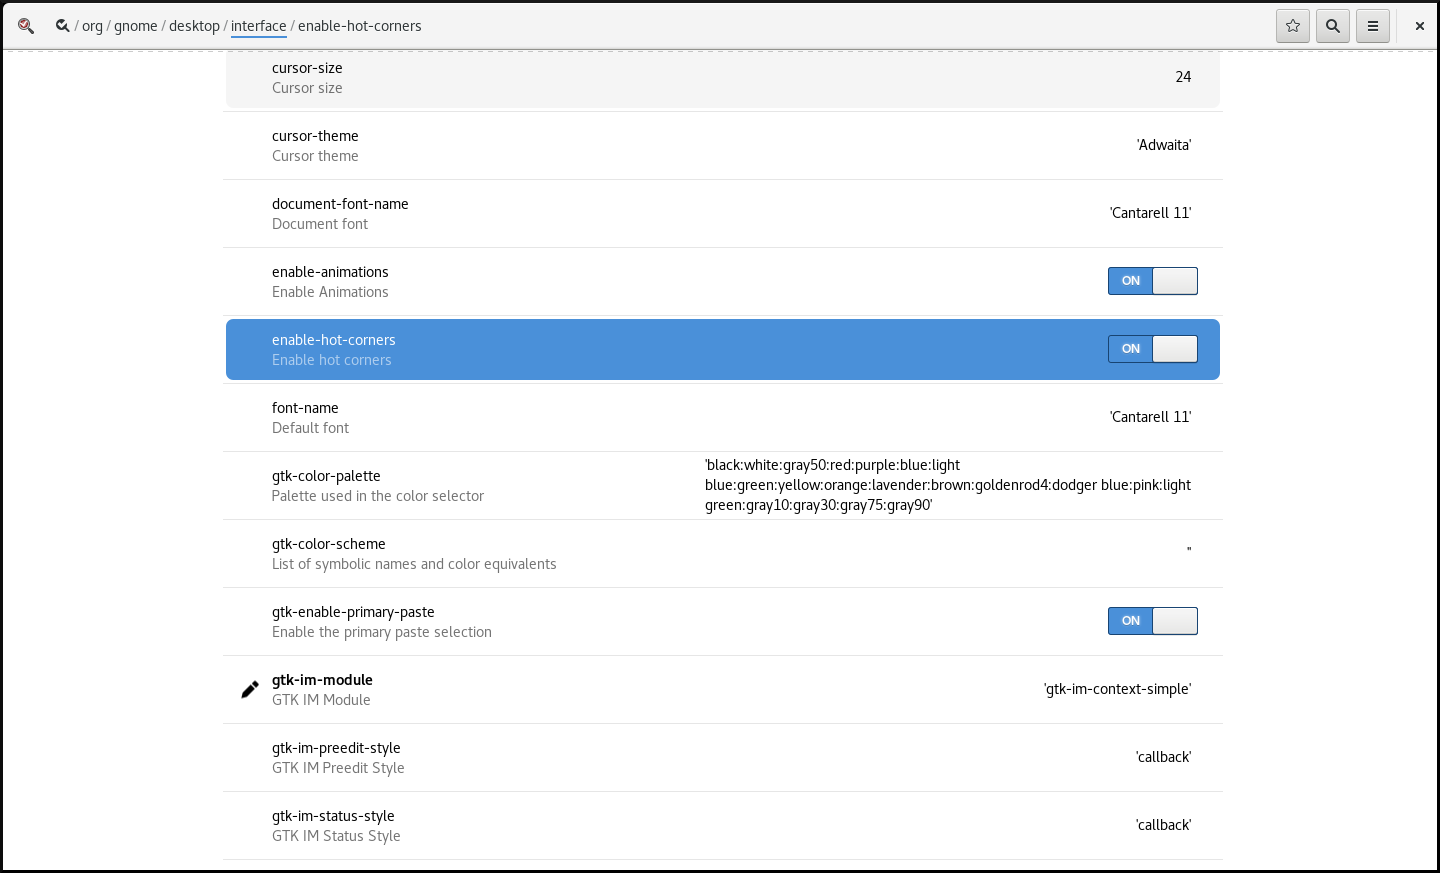
org.gnome.desktop.interfacemenu. Find the
enable-hot-cornersoption.This option is by default set to
On.Default settings of enable-hot-corners
Set
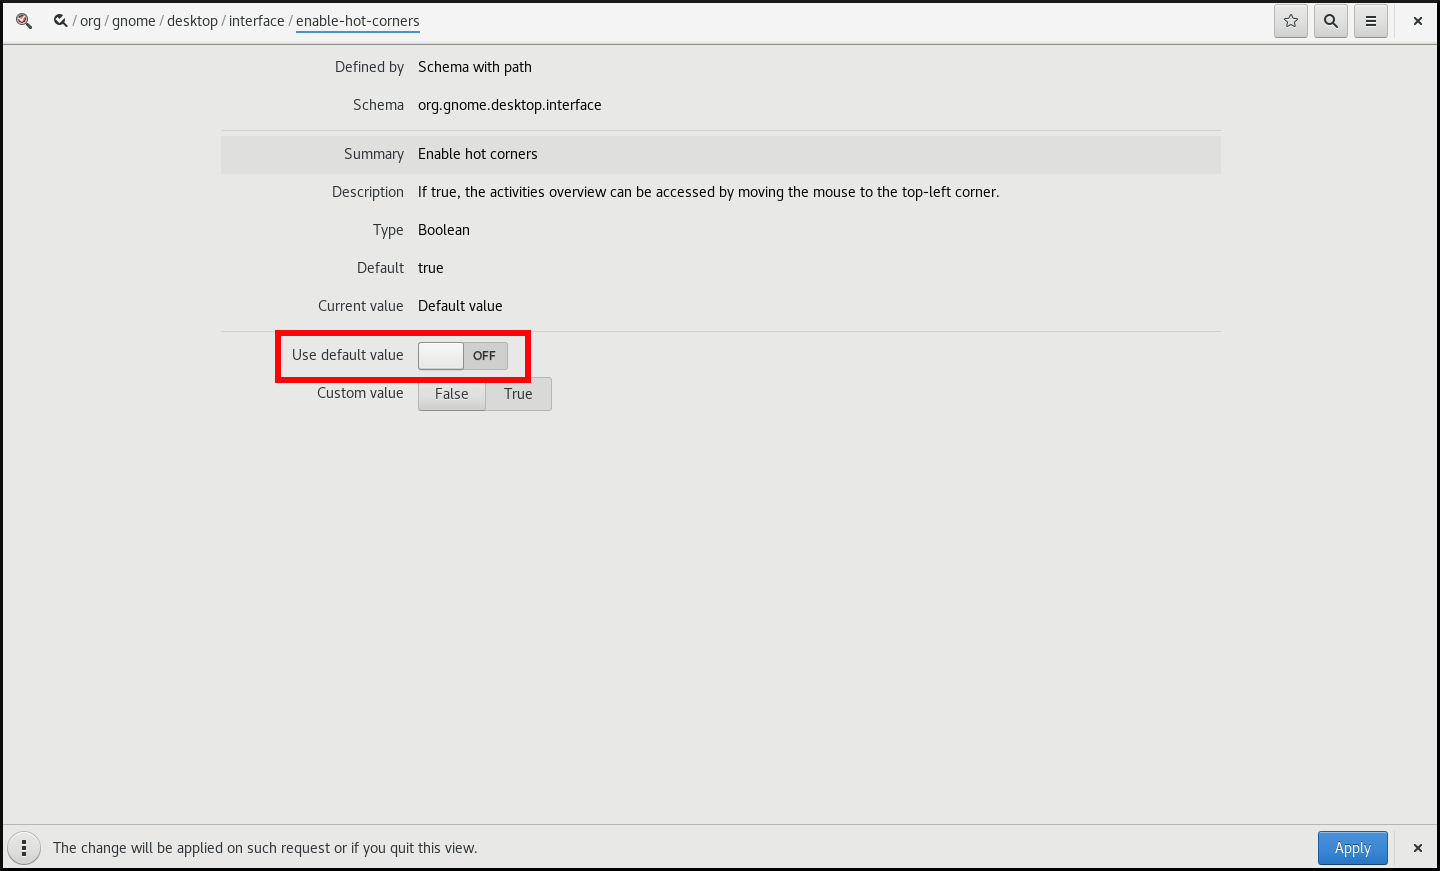
enable-hot-cornerstoOff.You can do this either by:
-
Setting
enable-hot-cornerstoOffin the same window. Clicking the line with
enable-hot-corners, and proceeding to a new window.In the new window, you can switch the hot corner feature off.
Switching the hot corner functionality off
-
Setting
1.5.1.2. Disabling hot corner using gsettings
To disable the hot corner functionality using the gsettings command-line utility, follow this procedure.
This procedure disables the hot corner functionality for a single user.
Procedure
Disable the hot corner feature:
gsettings set org.gnome.desktop.interface enable-hot-corners false
$ gsettings set org.gnome.desktop.interface enable-hot-corners falseCopy to Clipboard Copied! Toggle word wrap Toggle overflow
Verification
Optionally, verify that the hot corner feature is disabled:
gsettings get org.gnome.desktop.interface enable-hot-corners
$ gsettings get org.gnome.desktop.interface enable-hot-corners

false
Copy to Clipboard Copied! Toggle word wrap Toggle overflow
1.5.2. Disabling the hot corner functionality for all users
With the GNOME Shell extension called No topleft hot corner provided by the gnome-shell-extension-no-hot-corner package, you can disable the hot corner feature system-wide.
Prerequisites
The
gnome-shell-extension-no-hot-cornerpackage is installed on the system:yum install gnome-shell-extension-no-hot-corner
# yum install gnome-shell-extension-no-hot-cornerCopy to Clipboard Copied! Toggle word wrap Toggle overflow
Procedure
Enable the No topleft hot corner extension by switching it on in the Tweaks tool.
For more information about how to use Tweaks, see Section 1.10, “Customizing GNOME Shell environment with the Tweaks tool”.
- Log out, and restart the user session so that the extension can take effect.
1.6. Configuring sound in GNOME
You can configure sound volume and other sound options in GNOME.
1.6.1. Sound configuration tools in GNOME
In RHEL 8, the PulseAudio sound server handles sound output and input. PulseAudio lets programs output the audio using the pulseaudio daemon.
To configure sound, you can use one of the following graphical applications in GNOME:
System menu
The system menu is located in the top-right screen corner. It enables you only to set the intensity of the sound output or sound input through the sound bar. The sound bar for input sound is available only if you are running an application that is using an internal microphone (built-in audio), such as some teleconference tools.

GNOME Control Center
The GNOME Control Center (Settings) application provides other general options to configure sound.
Tweaks
The Tweaks application enables you to configure only volume over-amplification.
1.6.2. Accessing sound configuration in GNOME Control Center
This procedure opens the sound configuration screen in the GNOME Control Center application.
Procedure
Launch GNOME Control Center.
You can use one of the approaches described in Section 1.3, “Launching applications in GNOME”. Alternatively, you can also launch it from the system menu by clicking on its icon.
- In GNOME Control Center, choose Sound from the left vertical bar.
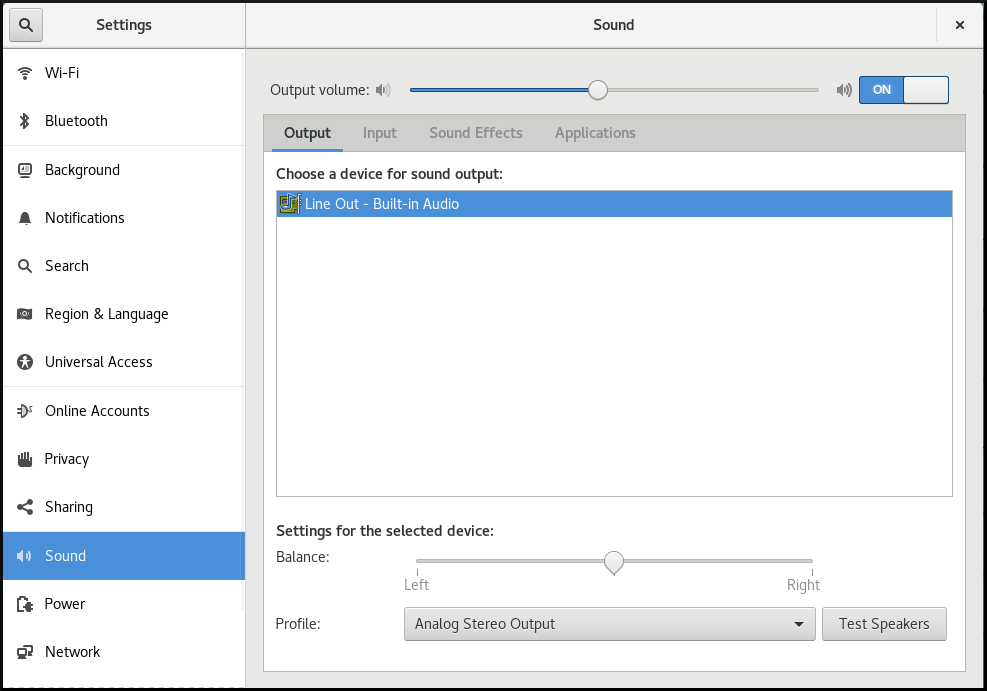
1.6.3. Sound options in GNOME Control Center
Through the Sound menu in GNOME Control Center, you can configure the following sound options:
- Output and Input
The Output and Input menus show only the built-in audio devices unless you connect any external device that can handle sound.
The Output menu enables you to select the required profile from available analog or digital profiles that are displayed depending on available output devices.
- Sound Effects
- The Sound Effects menu sets the volume and theme of system audio alerts.
- Applications
- The Applications menu shows all currently running applications that can process sound, and allows you to amplify or lower the sound of a particular application.
The Output tab on the sound configuration screen
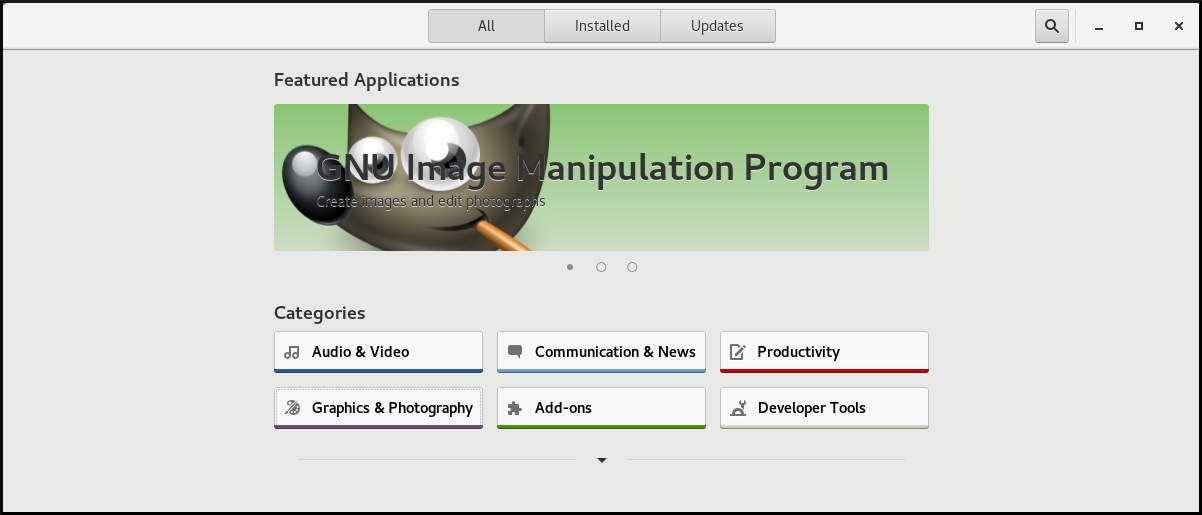
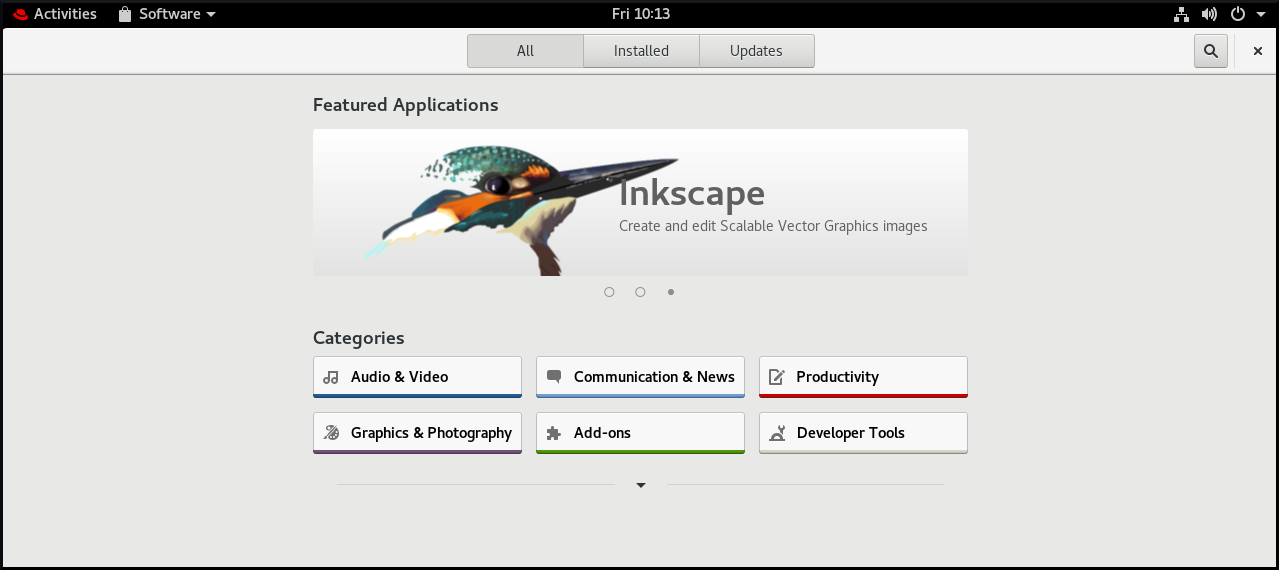
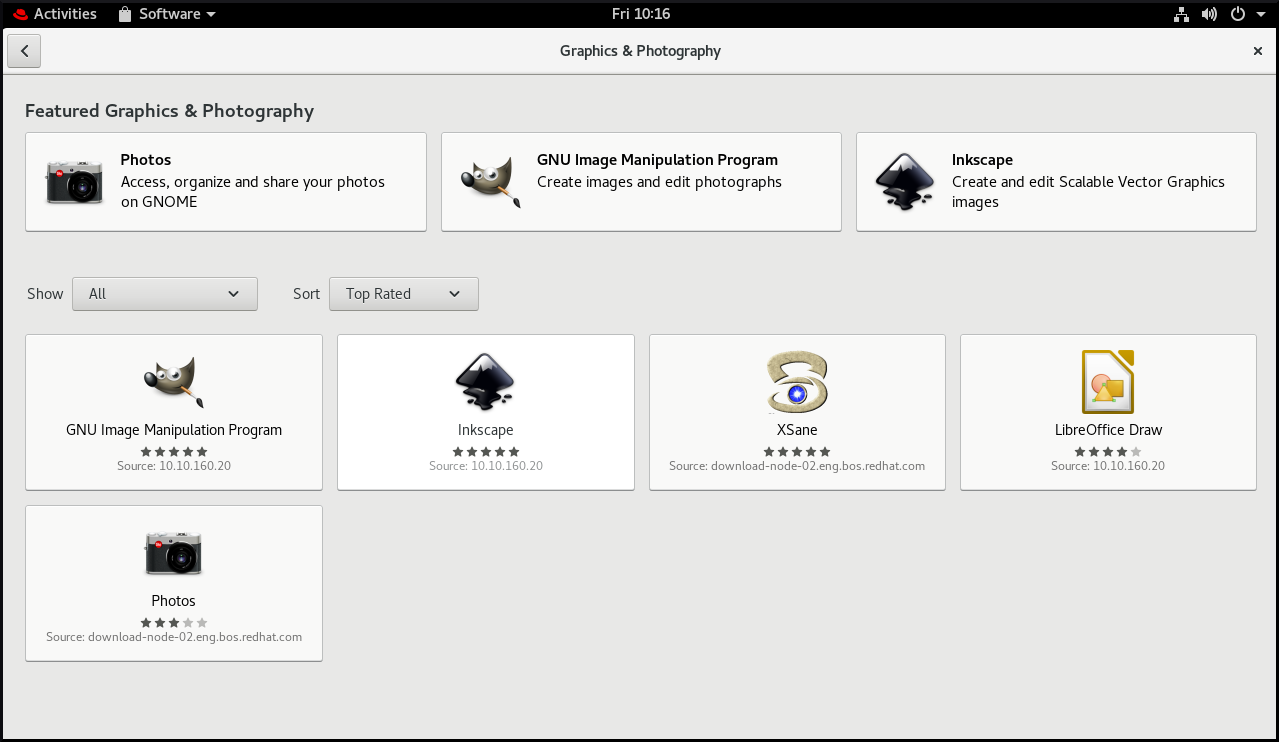
1.7. Handling graphics and photos
GNOME provides multiple tools to handle graphics and photography.
You can check the available tools under the Graphics & Photography menu in GNOME Software.
Procedure
Open GNOME Software.
-
Go to Graphics & Photography.

Browse the available tools, such as the following:
- Photos
- For accessing, organizing and sharing your photos.
- GNU Image Manipulation Program
- For creating images and editing photographs.
- Inkspace
- For creating and editing scalable vector graphics images.
- XSane
- For scanning images with a scanner.
- LibreOffice Draw
- For create and editing drawings, flow charts, and logos.
1.8. Handling printing
In GNOME, you can set up printing using the Settings application.
1.8.1. Starting the Settings application for setting up printing
Procedure
Use one of the approaches described in Section 1.3, “Launching applications in GNOME” to start the Settings application.
Moreover, you can also start the Settings application from the system menu in the top right corner by clicking on the "Settings" icon.
When the Settings application appears, go to → .
Figure 1.1. Settings configuration tool
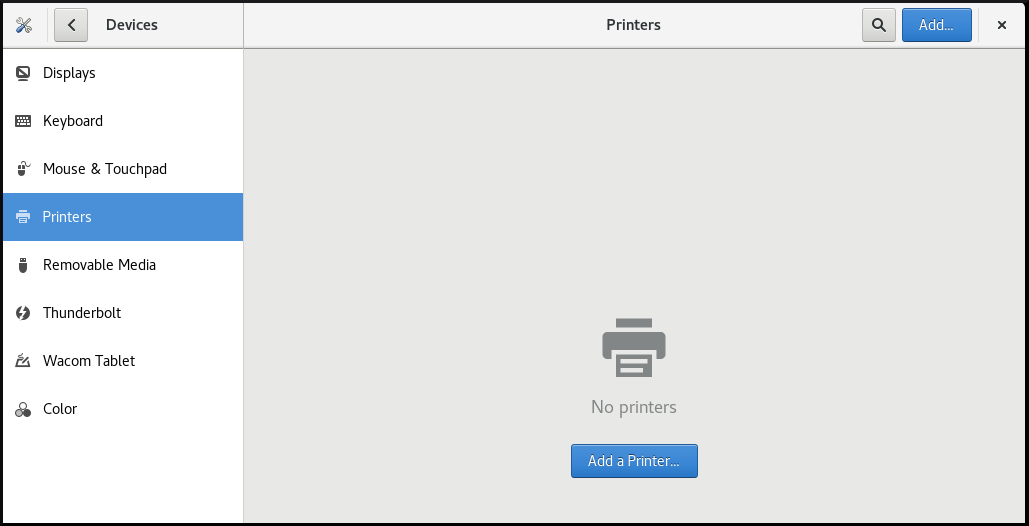
1.8.2. Adding a new printer in Settings
You can add a new printer using the Settings application.
Prerequisites
Click the button, which appears near the upper-right corner of the Printers screen, and authenticate as one of the following users:
- Superuser
-
Any user with the administrative access provided by
sudo(users listed within/etc/sudoers) -
Any user belonging to the
printadmingroup in/etc/group

Procedure
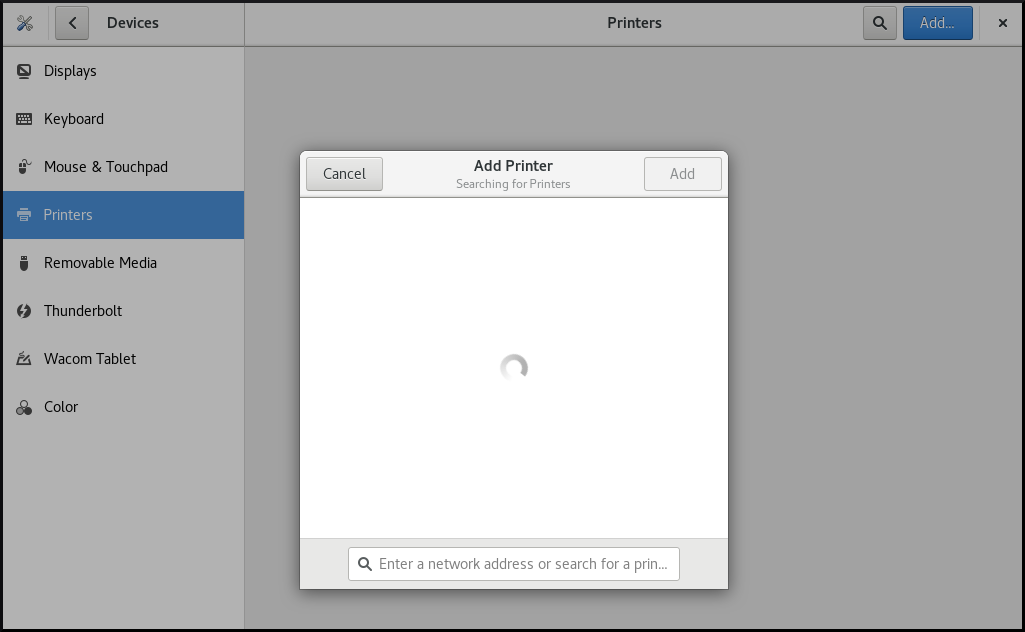
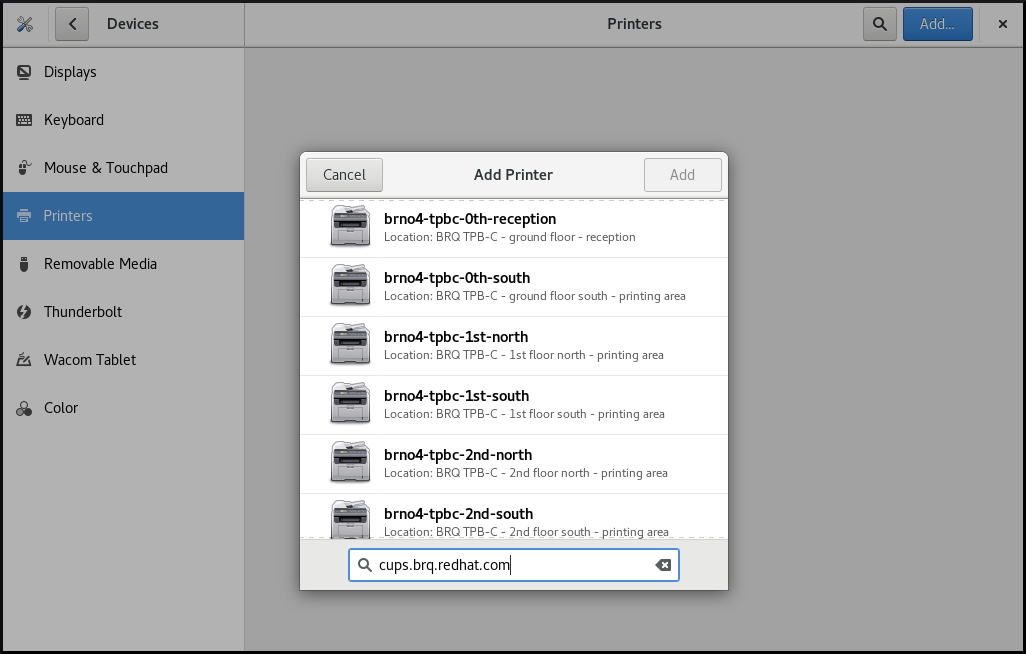
Open the Add Printer dialog.
Select one of the available printers (including also network printers), or enter printer IP address or the host name of a printer server.
1.8.3. Configuring a printer in the Settings application
You can configure a new printer and maintain a configuration of a printer using the Settings application.
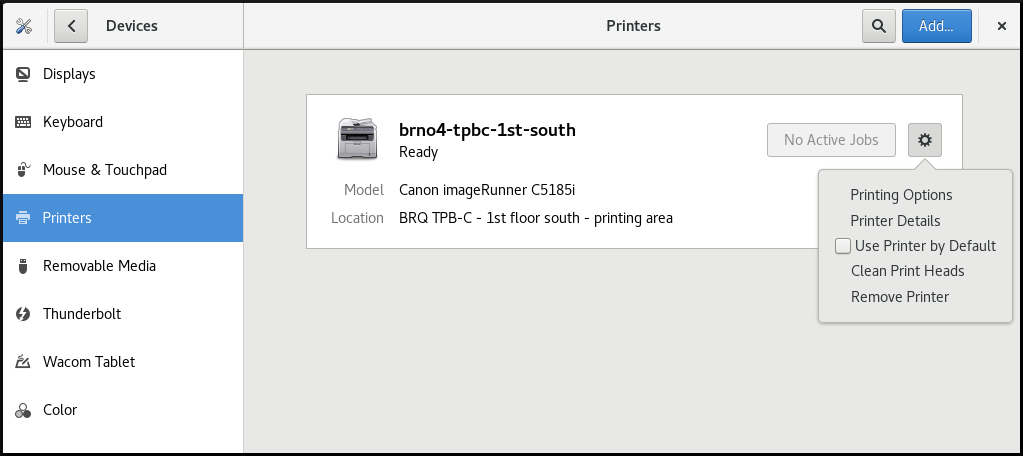
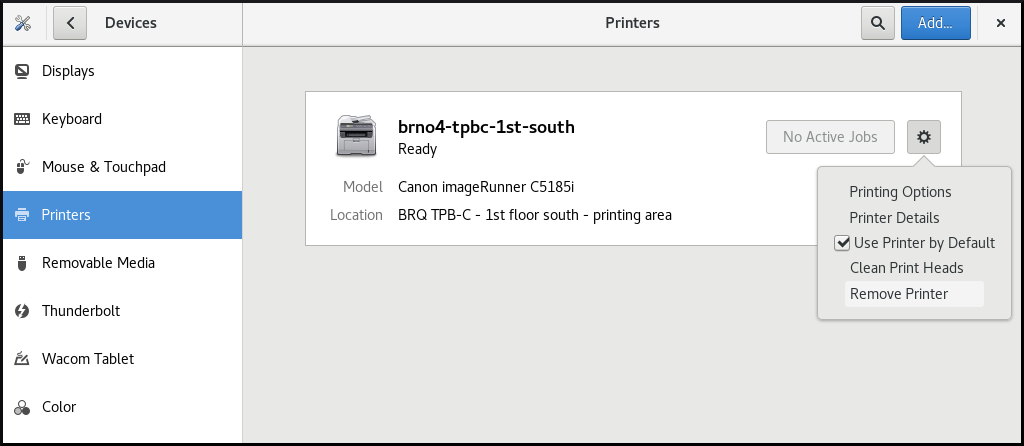
Displaying printer’s settings menu
Procedure
Click the settings (⚙️) button on the right to display a settings menu for the selected printer:
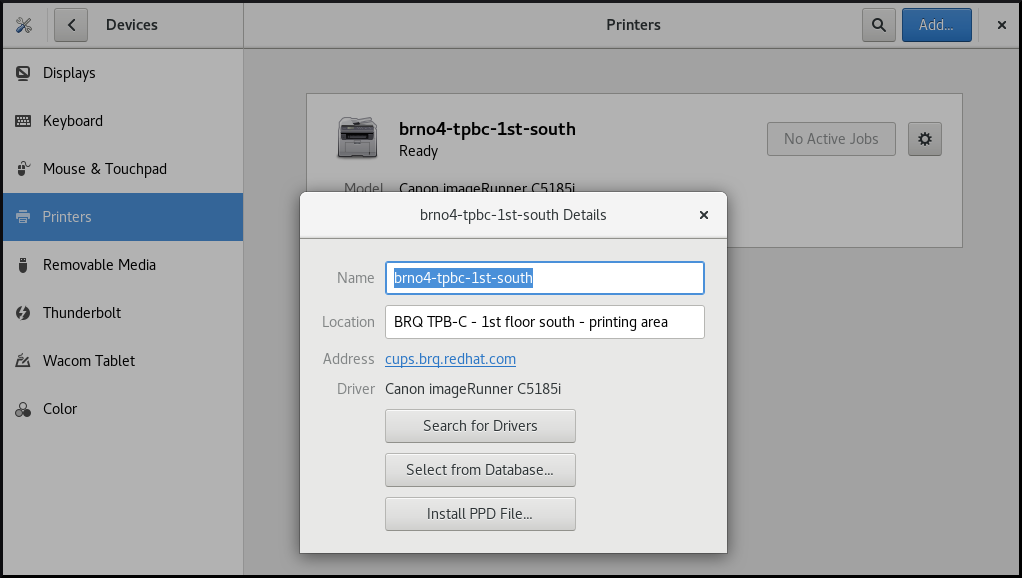
Displaying and modifying printer’s details
Procedure
Click Printer Details to display and modify selected printer’s settings:
In this menu, you can select the following actions:
- Search for Drivers
- GNOME Control Center communicates with PackageKit that searches for a suitable driver suitable in available repositories.
- Select from Database
- This option enables you to select a suitable driver from databases that have already been installed on the system.
- Install PPD File
- This option enables you to select from a list of available postscript printer description (PPD) files that can be used as a driver for your printer.
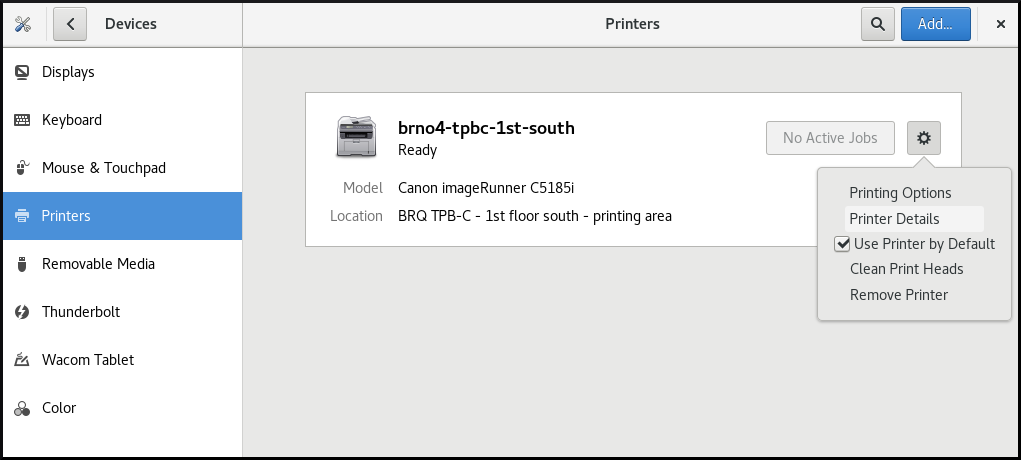
Setting the default printer
Procedure
Click Use Printer by Default to set the selected printer as the default printer:

Removing a printer
Procedure
Click Remove Printer to remove the selected printer:
1.8.4. Printing a test page in the Setting application
You can print a test page to make sure that the printer functions properly.
You might want to print a test page if one of the below prerequisites is met.
Prerequisites
- A printer has been set up.
- A printer configuration has been changed.
Procedure
Click the settings (⚙️) button on the right to display a settings menu for the selected printer:
- Click → .
1.8.5. Setting print options using the Settings application
You can set print options using the Settings application.
Procedure
Click the settings (⚙️) button on the right to display a settings menu for the selected printer:
- Click Printing Options.
1.9. Sharing media between applications
Red Hat Enterprise Linux 8 includes the PipeWire media server, which ensures access to multimedia devices and media sharing between applications.
When running a remote desktop session on GNOME Shell on Wayland, PipeWire and the VNC server is used. The functionality of remote desktop session is provided by the gnome-remote-desktop and pipewire packages.
On X.Org, just VNC is needed to run a remote desktop session. This functionality on X.Org is provided by the vino package.
PipeWire is used also with teleconference tools such as BlueJeans when running on GNOME Shell on Wayland. In such case, the pipewire service is activated automatically when you start sharing your screen within the teleconference tool.
To check the status of the pipewire service, run:
systemctl --user status pipewire
~]$ systemctl --user status pipewire1.10. Customizing GNOME Shell environment with the Tweaks tool
You can customize the GNOME Shell environment for a particular user by using the Tweaks tool.
Procedure
Open Tweaks.
The Tweaks tool
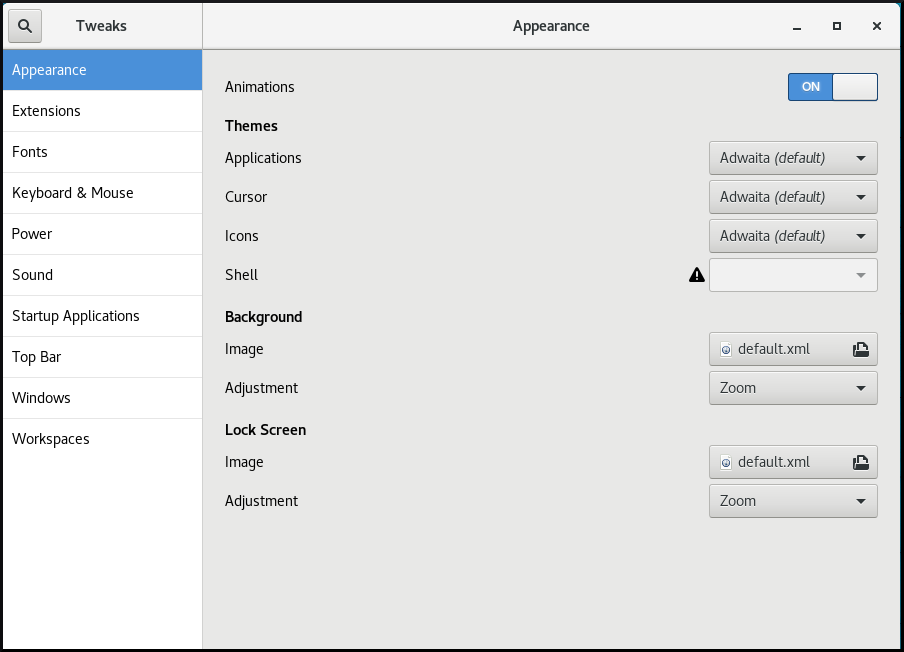
Select the item that you want to customize in the left side bar.
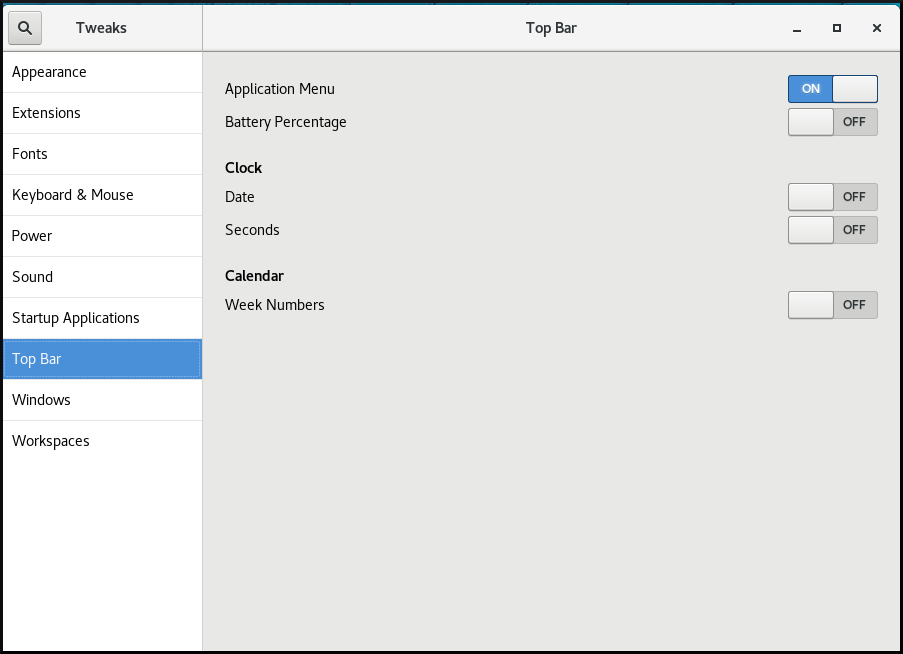
For example, you can set applications to start automatically when you log in by using the Startup Applications menu, or you can customize your top bar appearance by using the Top Bar menu.
Customizing startup applications in Tweaks

Customizing the appearance of your top bar in Tweaks
Chapter 2. Overview of GNOME environments
You can switch between several user interfaces in GNOME. Additionally, GNOME can run on several different graphics back ends.
To function properly, GNOME requires your system to support 3D acceleration. This includes bare metal systems, as well as hypervisor solutions such as VMWare.
If GNOME does not start or performs poorly on your VMWare virtual machine (VM), see Why does the GUI fail to start on my VMware virtual machine? (Red Hat Knowledgebase)
2.1. GNOME environments, back ends, and display protocols
GNOME 3 provides two user environments:
- GNOME Standard
- GNOME Classic
Both environments can use two different protocols as their graphical back ends:
- The X11 protocol, which uses X.Org as the display server.
The Wayland protocol, which uses GNOME Shell as the Wayland compositor and display server.
This solution of display server is further referred as GNOME Shell on Wayland.
The default combination in RHEL 8 is GNOME Standard environment using GNOME Shell on Wayland as the display server. However, due to certain Wayland limitations, you might want to switch the graphics protocol stack to X11. You may also want to switch from GNOME Standard to GNOME Classic.
2.2. GNOME Standard
GNOME Standard user interface includes these major components:
- Top bar
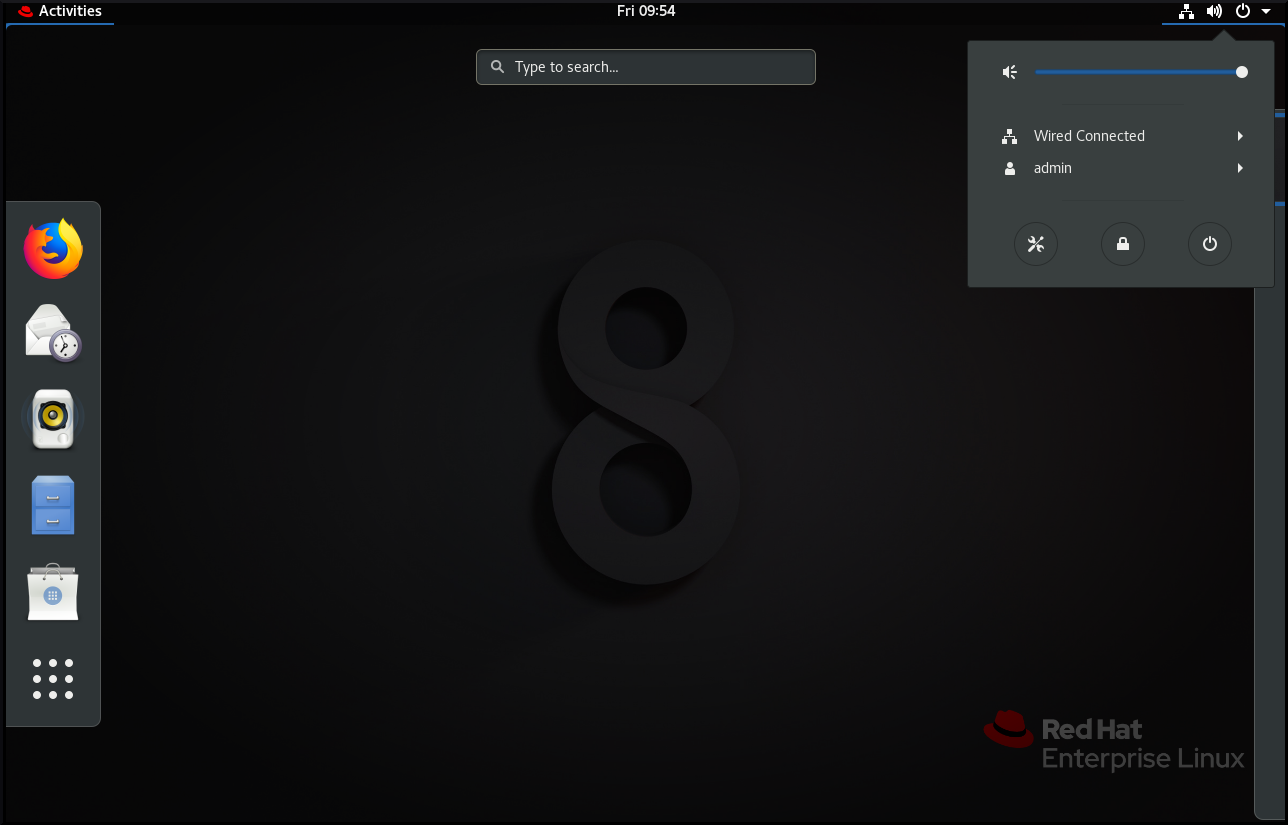
- The horizontal bar at the top of the screen provides access to some of the basic functions of GNOME Standard, such as the Activities Overview, clock and calendar, system status icons, and the system menu.
- System menu
The system menu is located in the top right corner, and enables you:
- Updating settings
- Controlling the sound bar
- Finding information about your Wi-Fi connection
- Switching user
- Logging out
- Turning off the computer
- Activities Overview
The Activities Overview features windows and applications views that let the user run applications and windows and switch between them.
The search entry at the top allows for searching various items available on the desktop, including applications, documents, files, and configuration tools.
The vertical bar on the left side contains a list of favorite and running applications. You can add or remove applications from the default list of favorites according to your needs.
The workspace list displayed on the right side allows the user to switch between multiple workspaces, or move applications and windows from one workspace to another.
- Message tray
- The message tray provides access to pending notifications. The message tray shows when the user presses Super+M.
The GNOME 3 Standard Desktop
2.3. GNOME Classic
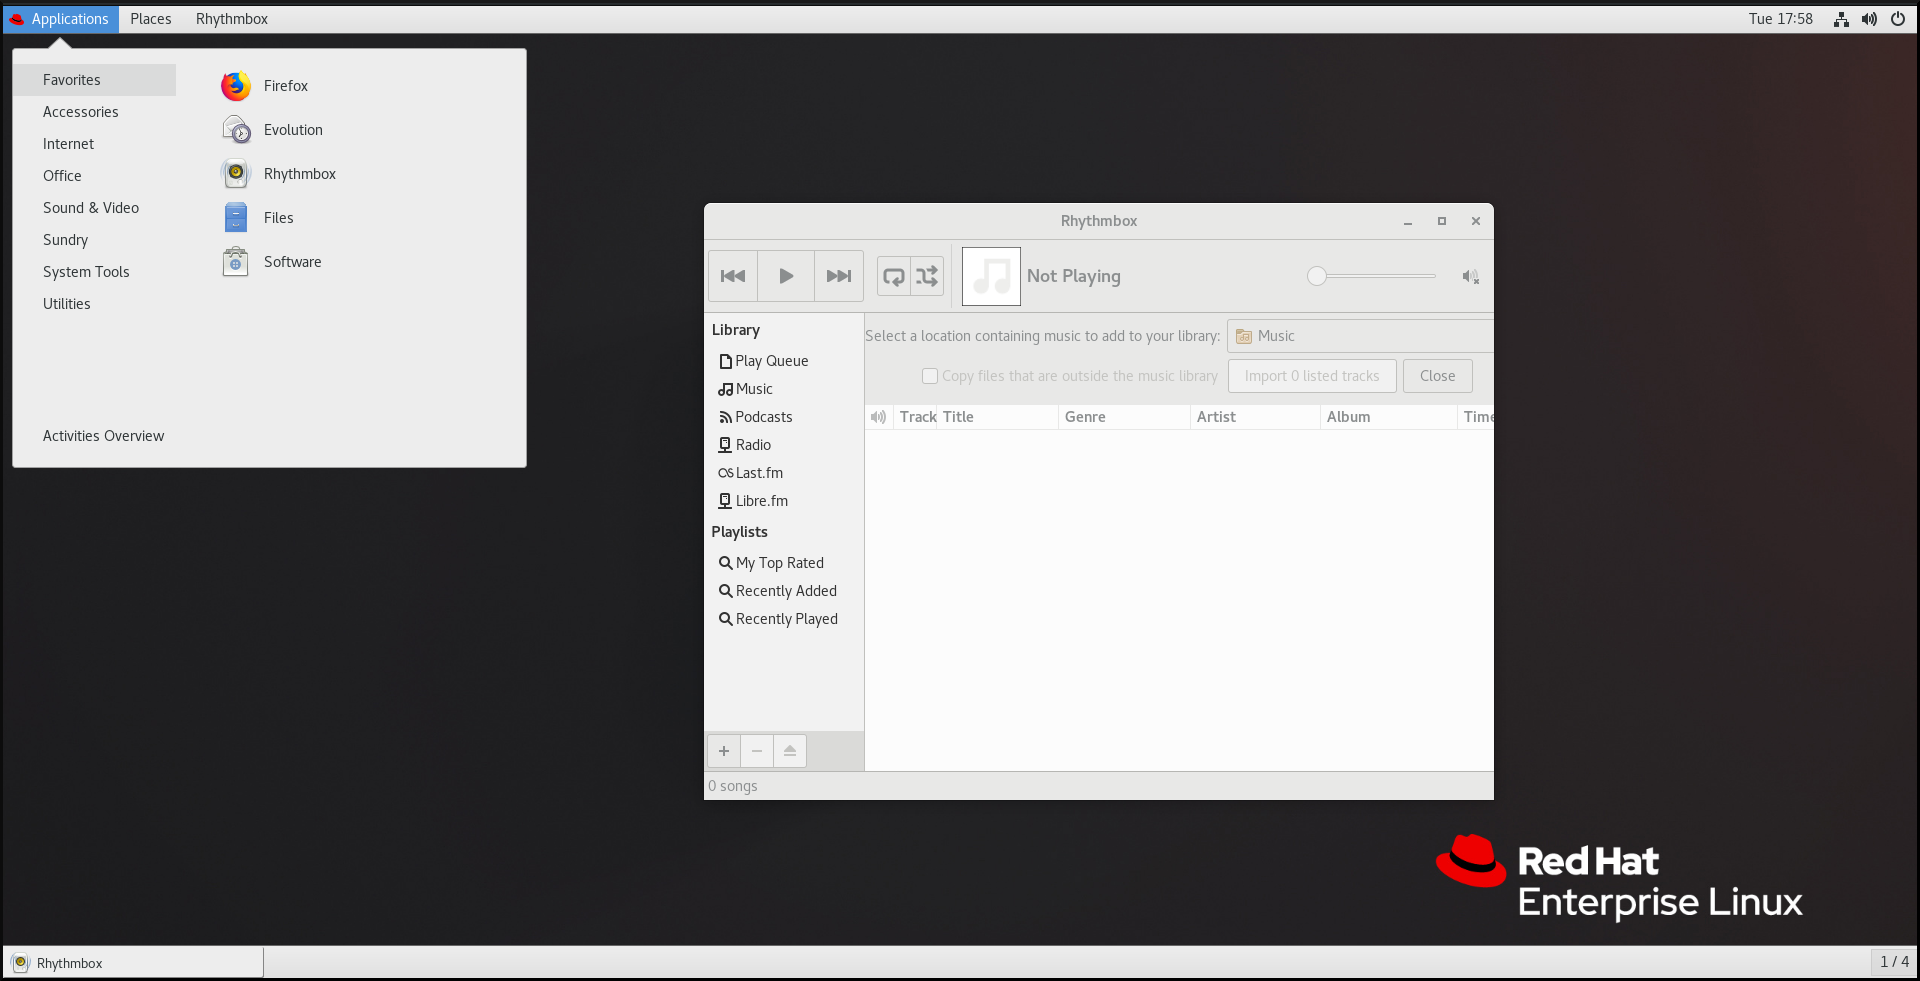
GNOME Classic represents a mode for users who prefer a more traditional desktop experience that is similar to GNOME 2 environment used with Red Hat Enterprise Linux 6. It is based on GNOME 3 technologies, and at the same time it includes multiple features similar to GNOME 2.
GNOME Classic user interface consists of these major components:
- Applications and Places
The Applications menu is displayed at the top left of the screen. It gives the user access to applications organized into categories. If you enable window overview, you can also open the Activities Overview from that menu.
The Places menu is displayed next to the Applications menu on the top bar. It gives the user quick access to important folders, for example Downloads or Pictures.
- Taskbar
The taskbar is displayed at the bottom of the screen, and features:
- A window list
- A notification icon displayed next to the window list
- A short identifier for the current workspace and total number of available workspaces displayed next to the notification icon
- Four available workspaces
- In GNOME Classic, the number of workspaces available to the user is by default set to 4.
- Minimize and maximize buttons
- Window titlebars in GNOME Classic feature the minimize and maximize buttons that let the user quickly minimize the windows to the window list, or maximize them to take up all of the space on the desktop.
- A traditional Super+Tab window switcher
- In GNOME Classic, windows in the Super+Tab window switcher are not grouped by application.
- System menu
The system menu is located in the top right corner, and enables the following actions:
- Updating settings
- Controlling the sound bar
- Finding information about your Wi-Fi connection
- Switching user
- Logging out
- Turning off the computer
The GNOME 3 Classic desktop with the Rhythmbox application and the Favorites submenu of the Applications menu
In GNOME Classic, the overview of windows that are open is not available by default. You can see the list of all open windows in the taskbar at the bottom of the screen. However, you can enable the windows overview similar to what is by default available in GNOME Standard by changing the default settings of the GNOME Classic environment as described in Section 2.4, “Enabling window overview in GNOME Classic”.
2.4. Enabling window overview in GNOME Classic
In GNOME Classic, the overview of open windows is not available by default. This procedure enables the window overview for all users on the system.
Enabling the window overview by this procedure is not a permanent change. Each update of the gnome-classic-session package overwrites the configuration file to the default settings, which disable the window overview.
To keep the window overview enabled, apply the procedure after each update of gnome-classic-session.
Procedure
-
Open the
/usr/share/gnome-shell/modes/classic.jsonfile as therootuser. Find the following line in the file:
"hasOverview": false
"hasOverview": falseCopy to Clipboard Copied! Toggle word wrap Toggle overflow Change the line to the following:
"hasOverview": true
"hasOverview": trueCopy to Clipboard Copied! Toggle word wrap Toggle overflow -
Save changes, and close the
/usr/share/gnome-shell/modes/classic.jsonfile. - Restart the user session.
Verification
- In your GNOME Classic session, open multiple windows.
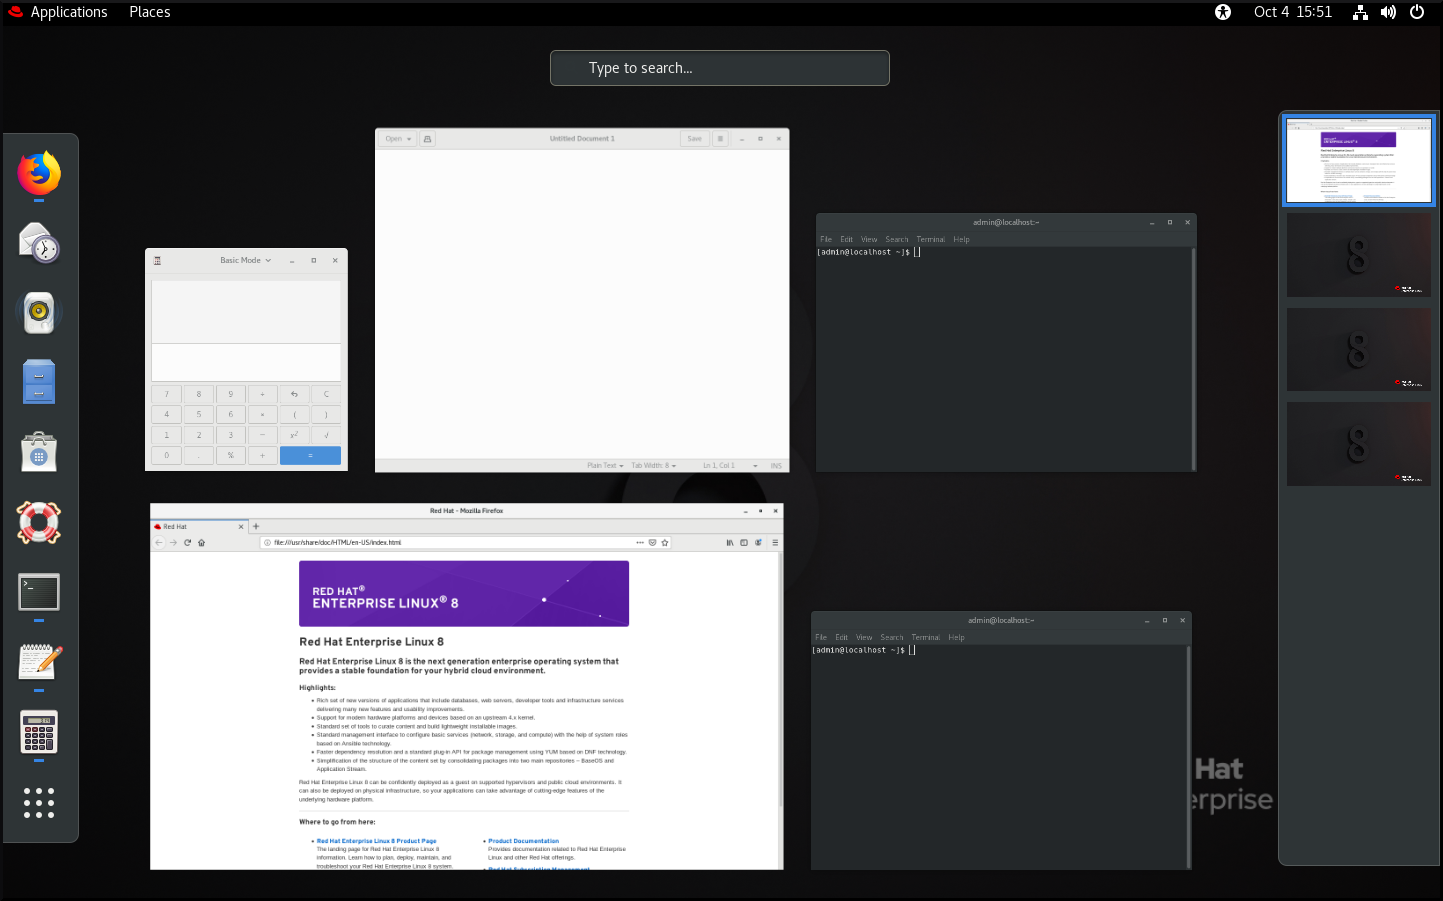
- Press the Super key to open the window overview.
In the overview, check that:
- The Dash (the vertical panel on the left side of the screen) is displayed.
- The bottom panel is not displayed.
The workspace switcher is displayed on the right side of the screen.
Window overview with "hasOverview": true
With the default settings (
"hasOverview": false), the overview has the following features:- The Dash is not displayed.
The bottom panel is displayed. It includes the Window picker button in its left part and the workspace switcher in its right part.
Window overview with "hasOverview": false

2.5. Graphics back ends in RHEL 8
In RHEL 8, you can choose between two protocols to build a graphical user interface:
- X11
- The X11 protocol uses X.Org as the display server. Displaying graphics based on this protocol works the same way as in RHEL 7, where this was the only option.
- Wayland
- The Wayland protocol on RHEL 8 uses GNOME Shell as its compositor and display server, which is further referred as GNOME Shell on Wayland. Displaying graphics based on the Wayland protocol has some differences and limitation compared to X11.
New installations of RHEL 8 automatically select GNOME Shell on Wayland. However, you can switch to X.Org, or select the required combination of GNOME environment and display server as described in Section 2.8, “Selecting GNOME environment and display protocol”.
Note that there are also a few environments where X.Org is preferred over GNOME Shell on Wayland, such as:
- Cirrus graphics used in a VM environment
- Matrox graphics
- Aspeed graphics
- QXL graphics used in a VM environment
- Nvidia graphics when used with the proprietary driver
The Nvidia graphics by default use nouveau, which is an open source driver. nouveau is supported on Wayland, hence you can use Nvidia graphics with nouveau on GNOME Shell on Wayland without any limitations. However, using Nvidia graphics with proprietary Nvidia binary drivers is not supported on GNOME Shell on Wayland. In this case, you need to switch to X.Org as described in Section 2.8, “Selecting GNOME environment and display protocol”.
2.6. Key differences between the Wayland and X11 protocol
X11 applications
Client applications need to be ported to the Wayland protocol or use a graphical toolkit that has a Wayland backend, such as GTK, to be able to work natively with the compositor and display server based on Wayland.
Legacy X11 applications that cannot be ported to Wayland automatically use Xwayland as a proxy between the X11 legacy clients and the Wayland compositor. Xwayland functions both as an X11 server and a Wayland client. The role of Xwayland is to translate the X11 protocol into the Wayland protocol and reversely, so that X11 legacy applications can work with the display server based on Wayland.
On GNOME Shell on Wayland, Xwayland is started automatically at startup, which ensures that most X11 legacy applications work as expected when using GNOME Shell on Wayland. However, the X11 and Wayland protocols are different, and hence some clients relying on X11-specific features may behave differently under Xwayland. For such specific clients, you can switch to the X.Org display server as described in Section 2.8, “Selecting GNOME environment and display protocol”.
libinput
Red Hat Enterprise Linux 8 uses a new unified input stack, libinput, which manages all common device types, such as mice, touchpads, touchscreens, tablets, trackballs and pointing sticks. This unified stack is used both by the X.Org and by the GNOME Shell on Wayland compositor.
GNOME Shell on Wayland uses libinput directly for all devices, and no switchable driver support is available. Under X.Org, libinput is implemented as the X.Org libinput driver, and driver support is outlined below.
- Mice, touchscreens, trackballs, pointing sticks
-
Red Hat Enterprise Linux 8 uses the X.Org
libinputdriver for these devices. TheX.Org evdevdriver, which was used in Red Hat Enterprise Linux 7, is available as fallback where required. - Touchpads
-
Red Hat Enterprise Linux 8 uses the X.Org
libinputdriver for touchpads. TheX.Org synapticsdriver, which was used for touchpads in Red Hat Enterprise Linux 7, is no longer available. - Graphics tablets
-
Red Hat Enterprise Linux 8 continues using the X.Org
wacomdriver, which was used for tablet devices in Red Hat Enterprise Linux 7. However, the X.Orglibinputdriver is available where required. - Other input devices
-
Red Hat Enterprise Linux 7 used the X.Org
evdevdriver for other input devices that are not included in the above categories. Red Hat Enterprise Linux 8 uses the X.Orglibinputdriver by default but can fall back to the X.Orgevdevdriver if a device is incompatible withlibinput.
Gestures
GNOME Shell on Wayland supports new touchpad and touchscreen gestures. These gestures include:
- Switching workspaces by dragging up or down with four fingers.
- Opening the Activities overview by bringing three fingers closer together.
2.7. Current Wayland limitations
Nvidia drivers
Proprietary Nvidia binary drivers are not supported with GNOME Shell on Wayland. To avoid any complications while using the Nvidia GPU, GNOME Shell automatically falls back to X.Org, which means that the login screen does not provide any option based on the Wayland protocol.
The nouveau driver is still supported and is the default driver for Nvidia graphics.
Remote desktop
With GNOME Shell on Wayland, VNC support is provided by the gnome-remote-desktop package. Remote access using VNC via gnome-remote-desktop currently requires an already logged in session, and only the primary monitor is accessible. Screen sharing with GNOME Shell on Wayland is possible using the PipeWire media server. For more details on the PipeWire media server, see PipeWire project.
For more advanced VNC usage, you need to switch to X.org, where traditional VNC tools are available. For more information, see Overview of GNOME environments .
X Display Manager
The X Display Manager Control Protocol (XDMCP) is not supported with GNOME Shell on Wayland.
Hence, it is not possible to use the X display manager to start a session on the X.Org display server from the same or another computer.
Additional limitations
The following additional limitations related to the Wayland protocol should be noted:
- X.Org screen manipulation utilities are not available.
-
The
xrandrutility is not supported because Wayland handles layout, rotations, and resolutions differently. - GNOME Shell cannot be restarted using the Alt+F2 r shortcut.
-
Due to stability issues, using X.org instead of Wayland is recommended in virtual environments. The graphics based on the Wayland protocol are not available for virtual machines that use the
qxldriver. -
Wayland does not support the custom or niche input devices that cannot be handled by the
libinputdriver.
2.8. Selecting GNOME environment and display protocol
The default desktop environment for Red Hat Enterprise Linux 8 is GNOME Standard with GNOME Shell on Wayland as the display server. However, due to certain limitations of Wayland, you might want to switch the graphics protocol stack. You might also want to switch from GNOME Standard to GNOME Classic.
Procedure
From the login screen (GDM), click the gear button next to the Sign In button.
NoteYou cannot access this option from the lock screen. The login screen appears when you first start Red Hat Enterprise Linux 8 or when you log out of your current session.
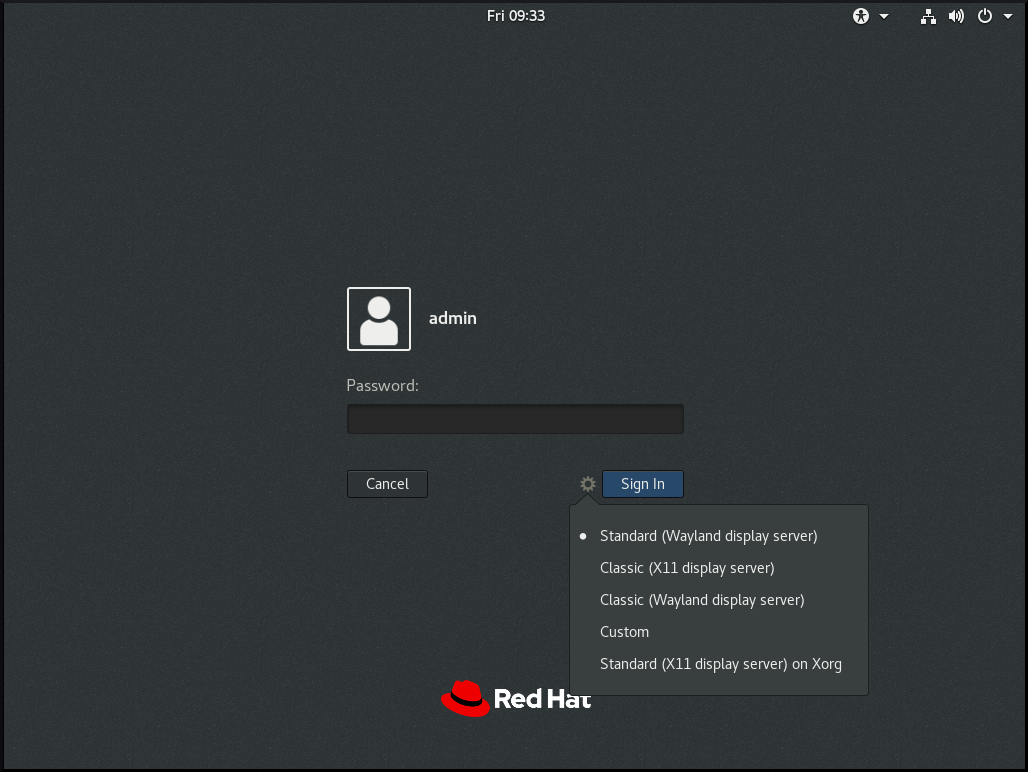
From the drop-down menu that appears, select the option that you prefer.
NoteNote that in the menu that appears on the login screen, the X.Org display server is marked as X11 display server.
The change of GNOME environment and graphics protocol stack resulting from the above procedure is persistent across user logouts, and also when powering off or rebooting the computer.
Chapter 3. Installing applications in GNOME
This section describes various approaches that you can use to install a new application in GNOME 3.
Prerequisites
- Administrator priveleges.
3.1. The GNOME Software application
GNOME Software is an utility that enables you to install and update applications, software components, and GNOME Shell extensions in a graphical interface.
GNOME Software provides a catalog of graphical applications, which are the applications that include a *.desktop file. The available applications are grouped into multiple categories according to their purpose.
GNOME Software uses the PackageKit and Flatpak technologies as its back ends.
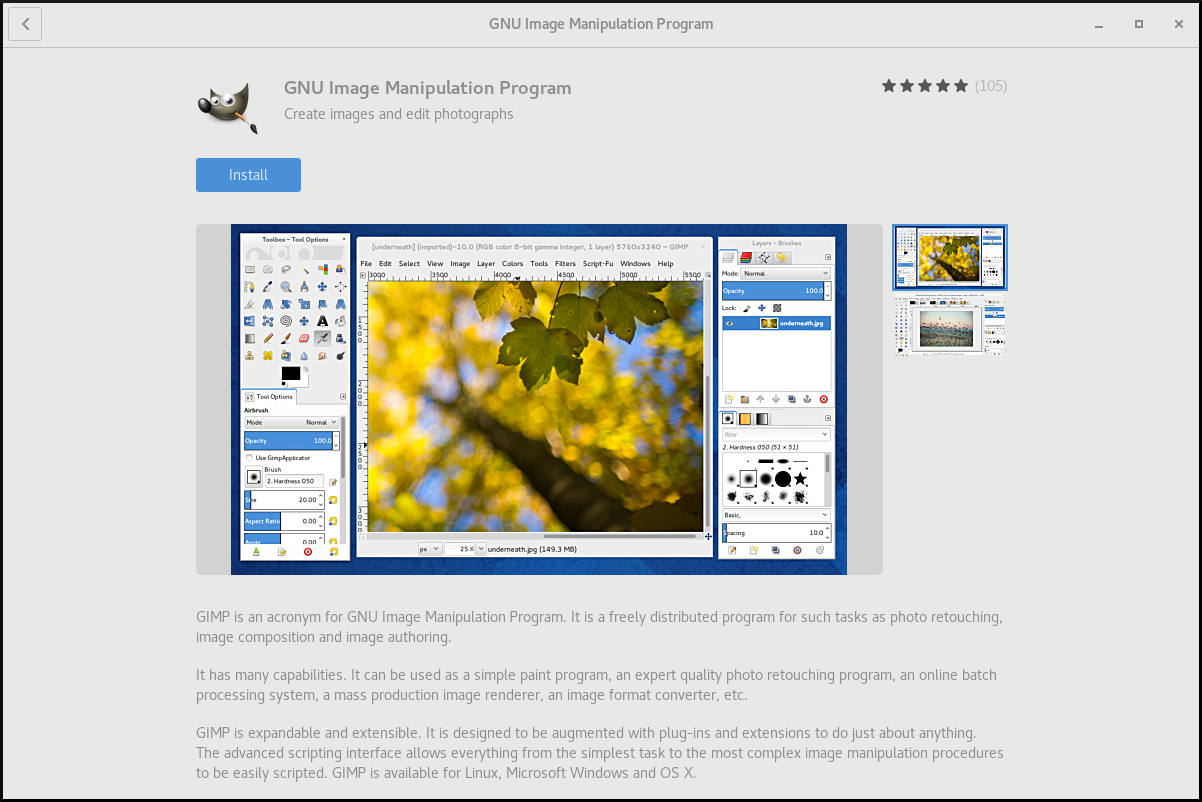
3.2. Installing an application using GNOME Software
This procedure installs a graphical application using the GNOME Software installer.
Procedure
- Launch the GNOME Software application.
Find the application to be installed in the available categories:
- Audio & Video
- Communication & News
- Productivity
- Graphics & Photography
Add-ons
Add-ons include for example GNOME Shell extensions, codecs, or fonts.
- Developer Tools
- Utilities
Click the selected application.
Click the button.

3.3. Installing an application to open a file type
This procedure installs an application that can open a given file type.
Prerequisites
- You can access a file of the required file type in your file system.
Procedure
- Try opening a file that is associated with an application that is currently not installed on your system.
- GNOME automatically identifies the suitable application that can open the file, and offers to download the application.
3.4. Installing an RPM package in GNOME
This procedure installs an RPM software package that you manually downloaded as a file.
Procedure
- Download the required RPM package.
In the Files application, open the directory that stores the downloaded RPM package.
NoteBy default, downloaded files are stored in the
/home/user/Downloads/directory.- Double-click the icon of the RPM package to install it.
3.5. Installing an application from the application search in GNOME
This procedure installs a graphical application that you find in the GNOME application search.
Procedure
- Open the Activities Overview screen.
Start typing the name of the required application in the search entry.

GNOME automatically finds the application in a repository, and displays the application’s icon.
Click the application’s icon to open GNOME Software.
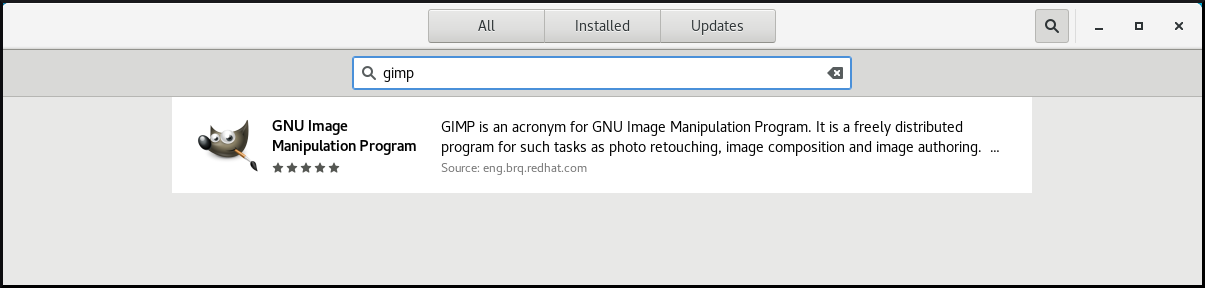
Click the icon of the application again.
- Click to finish the installation in GNOME Software.
Chapter 4. Registering the system for updates using GNOME
You must register your system to get software updates for your system. This section explains how you can register your system using GNOME.
Prerequisites
A valid account with Red Hat customer portal
See the Create a Red Hat Login page for new user registration.
- Activation Key or keys, if you are registering the system with activation key
- A registration server, if you are registering system using the registration server
4.1. Registering a system using an activation key on GNOME
Follow the steps in this procedure to register your system with an activation key. You can get the activation key from your organization administrator.
Prerequisites
Activation key or keys.
See the Activation Keys page for creating new activation keys.
Procedure
Open the system menu, which is accessible from the upper-right screen corner, and click the Settings icon.
- In the → section, click .
- Select Registration Server.
- If you are not using the Red Hat server, enter the server address in the URL field.
- In the Registration Type menu, select Activation Keys.
Under Registration Details:
Enter your activation keys in the Activation Keys field.
Separate your keys by a comma (
,).- Enter the name or ID of your organization in the Organization field.
- Click .
4.2. Unregistering the system using GNOME
Follow the steps in this procedure to unregister your system. After unregistering, your system no longer receives software updates.
Procedure
Open the system menu, which is accessible from the upper-right screen corner, and click the Settings icon.
In the → section, click .
The Registration Details screen appears.
Click .
A warning appears about the impact of unregistering the system.
- Click .
Chapter 5. Accessing the desktop remotely
You can connect to the desktop on a RHEL server from a remote client.
5.1. Remote desktop access options
RHEL provides several options for remotely connecting to the desktop. Each option fits a different use case:
- Single-user access using GNOME tools
This method enables remote access on the client and the server using graphical GNOME applications. It configures a Virtual Network Computing (VNC) session so that only a single user can connect to the desktop on the server at a given time.
Depending on the session type, this method uses different components to implement screen sharing:
-
In an X11 session, it uses the
vinocomponent. In a Wayland session, it uses the
gnome-remote-desktopcomponent.This method always uses display number 0. As a consequence, the VNC session always connects to the user who is logged into the server system.
The VNC client application must support
tls_anonconnections. For example, you can use the Remote Desktop Viewer (vinagre) application on Linux systems. Before you can connect from Microsoft Windows clients, such as RealVNC, you must disable the VNC encryption on the server.
-
In an X11 session, it uses the
- Multi-user access using command-line tools
This method configures a VNC session so that multiple remote clients can connect to the server in parallel. You must first enable the VNC access on the client and the server using command-line tools.
Any VNC client application can connect to a server configured using this method.
- Accessing a single application using X11 forwarding over SSH
This method executes an SSH command on the client that launches an individual graphical on the server. The application window opens on the client.
This method is useful when you do not require a full remote desktop session.
5.2. Remotely accessing the desktop as a single user
You can remotely connect to the desktop on a RHEL server using graphical GNOME applications. Only a single user can connect to the desktop on the server at a given time.
5.2.1. Enabling desktop sharing on the server using GNOME
This procedure configures a RHEL server to enable a remote desktop connection from a single client.
Prerequisites
The GNOME Remote Desktop service is installed:
yum install gnome-remote-desktop
# yum install gnome-remote-desktopCopy to Clipboard Copied! Toggle word wrap Toggle overflow
Procedure
Configure a firewall rule to enable VNC access to the server:
firewall-cmd --permanent --add-service=vnc-server
# firewall-cmd --permanent --add-service=vnc-server
success
Copy to Clipboard Copied! Toggle word wrap Toggle overflow Reload firewall rules:
firewall-cmd --reload
# firewall-cmd --reload
success
Copy to Clipboard Copied! Toggle word wrap Toggle overflow - Open Settings in GNOME.
Navigate to the Sharing menu:

Click Screen Sharing.
The screen sharing configuration opens:
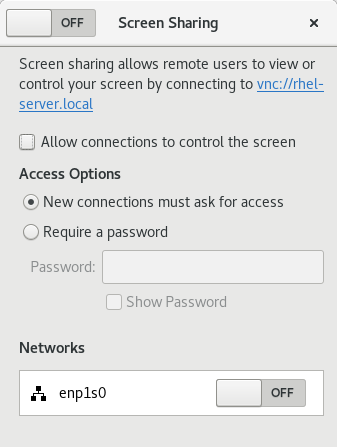
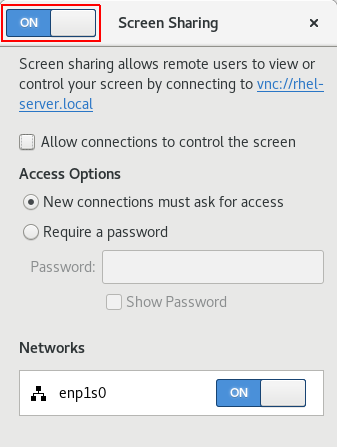
Click the switch button in the window header to enable screen sharing:
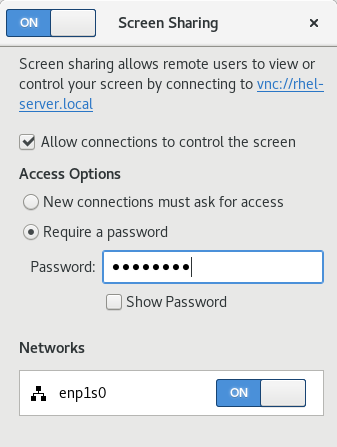
- Select the Allow connections to control the screen check box.
- Under Access Options, select the Require a password option.
Set a password in the Password field.
Remote clients must enter this password when connecting to the desktop on the server.
5.2.2. Connecting to a shared desktop using GNOME
This procedure connects to a remote desktop session using the Remote Desktop Viewer application (vinagre). It connects to the graphical session of the user that is currently logged in on the server.
Prerequisites
- A user is logged into the GNOME graphical session on the server.
- The desktop sharing is enabled on the server. For details, see Section 5.2.1, “Enabling desktop sharing on the server using GNOME”.
Procedure
Install the Remote Desktop Viewer application on the client:
yum install vinagre
# yum install vinagreCopy to Clipboard Copied! Toggle word wrap Toggle overflow -
Launch the Remote Desktop Viewer application (
vinagre). Click .

- In the Protocol menu, select VNC.
In the Host field, enter the IP address of the server.
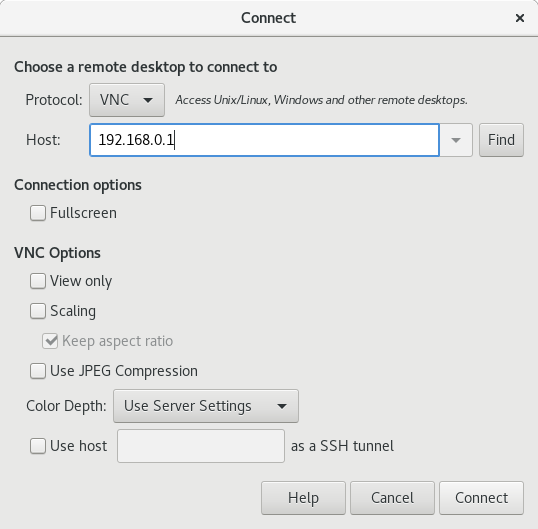
- Click .
Verification
- On the client, check that you can see the shared server desktop.
On the server, a screen sharing indicator appears on the right side of the top panel:
You can control the screen sharing in the system menu.
5.2.3. Disabling encryption in GNOME VNC
You can disable encryption in the GNOME remote desktop solution. This enables VNC clients that do not support the encryption to connect to the server.
Procedure
As the server user, set the
encryptionkey oforg.gnome.desktop.remote-desktop.vncGSettings schema to['none'].gsettings set org.gnome.desktop.remote-desktop.vnc encryption "['none']"
$ gsettings set org.gnome.desktop.remote-desktop.vnc encryption "['none']"Copy to Clipboard Copied! Toggle word wrap Toggle overflow Optional: Red Hat recommends that you tunnel the VNC connection over SSH to your VNC port. As a result, the SSH tunnel keeps the connection encrypted.
For example:
On the client, configure the port forwarding.
ssh -N -T -L 5901:server-ip-address:5901 user@server-ip-address
# ssh -N -T -L 5901:server-ip-address:5901 user@server-ip-addressCopy to Clipboard Copied! Toggle word wrap Toggle overflow -
Connect to the VNC session on the
localhost:5901address.
5.3. Remotely accessing the desktop as multiple users
You can remotely connect to the desktop on a RHEL server and open multiple sessions as different users at the same time.
The following instructions apply to RHEL 8.3 and later. If you are using RHEL 8.0 to 8.2, see the Red Hat Knowledgebase solution How to configure user specific VNC Server in Red Hat Enterprise Linux 8.0 - 8.2? instead.
Prerequisites
Install the VNC server:
yum install tigervnc-server
# yum install tigervnc-serverCopy to Clipboard Copied! Toggle word wrap Toggle overflow Install the VNC client:
yum install tigervnc
# yum install tigervncCopy to Clipboard Copied! Toggle word wrap Toggle overflow
5.3.1. The mapping of port and display numbers to users in VNC
With VNC, the client can connect to the desktop sessions of different users on the server. A display number and a TCP port number are attached to each server user that exports a VNC session. The client uses the port number to specify which server user it connects to.
If several clients connect using the same port number, they all open a VNC session to the same server user.
You must configure a mapping for each server user that exports a VNC session. For every such user, you must pick a unique port and display number.
The recommended mapping
Red Hat recommends that you start with port number 5902 and display number 2 for the first user, and increment the numbers by one for each additional server user.
Port number 5900 and display number 0 represent the server user that is currently logged into the graphical session. You cannot start a VNC server for the user who is already logged into the graphical session.
| Port number | Display number | Note |
|---|---|---|
| 5900 | 0 | The logged-in user |
| 5901 | 1 | |
| 5902 | 2 | The first recommended VNC user |
| 5903 | 3 | |
| … | … |
Red Hat recommends that you do not configure the root user to export a VNC session. A root VNC session is unsafe and certain elements of the session might not work as expected.
Firewall rules
You must open the selected ports in your firewall configuration. Allowing the vnc-server service in your firewall opens ports from 5900 to 5903. If you need to enable access to additional server users, you must open ports above 5903 by manually specifying the port numbers.
5.3.2. VNC server configuration files
Several configuration files affect the behavior of the VNC server. You can configure the user mapping and various global options.
Starting with TigerVNC 1.14, the configuration files are stored under $HOME/.config/tigervnc and the state files, such as logs and saved_sessions, under $HOME/.local/state/tigervnc.
General options
You can configure general options of the VNC server in the /etc/tigervnc/vncserver-config-defaults configuration file. The file uses the following format:
option1=value
option2
option1=value
option2For example:
session=gnome
alwaysshared
securitytypes=vncauth,tlsvnc
desktop=sandbox
geometry=2000x1200
session=gnome
alwaysshared
securitytypes=vncauth,tlsvnc
desktop=sandbox
geometry=2000x1200The priority of configuration files
The VNC server reads the following files for general options, in order from most important to least important:
/etc/tigervnc/vncserver-config-mandatoryThis file replaces the default configuration and has a higher priority than the per-user configuration. It is intended for system administrators who want to enforce particular VNC options.
$HOME/.vnc/configIndividual users can override the default VNC configuration in this file.
/etc/tigervnc/vncserver-config-defaultsThis file stores the default VNC configuration.
User mapping
You can configure the mapping between users and their associated port and display numbers in the /etc/tigervnc/vncserver.users configuration file. The file uses the following format:
:number=user
:number=userFor example:
:2=test
:3=vncuser
:2=test
:3=vncuser5.3.3. Enabling multi-user VNC access on the server
This procedure configures a RHEL server so that multiple users can open VNC sessions on it at the same time.
Prerequisites
If you previously configured VNC using
systemdunit files, remove any outdated VNC configuration:rm /etc/systemd/system/vncserver@.service
[root]# rm /etc/systemd/system/vncserver@.serviceCopy to Clipboard Copied! Toggle word wrap Toggle overflow
Procedure
Map users to display and port numbers.
In the
/etc/tigervnc/vncserver.usersconfiguration file, add a line for each server user that will export a VNC session::user-number=user-name
:user-number=user-nameCopy to Clipboard Copied! Toggle word wrap Toggle overflow - Replace user-number with the port and display number mapped to the selected existing user.
- Replace user-name with the user name of the selected existing user.
For example:
:2=vncuser
:2=vncuserCopy to Clipboard Copied! Toggle word wrap Toggle overflow Open TCP ports 5900 to 5903 in the firewall:
firewall-cmd --permanent --add-service=vnc-server
[root]# firewall-cmd --permanent --add-service=vnc-serverCopy to Clipboard Copied! Toggle word wrap Toggle overflow Reload the firewall rules:
firewall-cmd --reload
[root]# firewall-cmd --reloadCopy to Clipboard Copied! Toggle word wrap Toggle overflow Add the following lines to the
/etc/tigervnc/vncserver-config-defaultsconfiguration file:session=gnome alwaysshared
session=gnome alwayssharedCopy to Clipboard Copied! Toggle word wrap Toggle overflow This configuration has the following effects:
- The VNC server starts the GNOME session when a remote user logs in.
- Multiple users can connect to the VNC server at the same time.
As each server user that exports a VNC session, set the VNC password for the user:
vncpasswd
[regular-user]$ vncpasswdCopy to Clipboard Copied! Toggle word wrap Toggle overflow Remote clients must enter this password when connecting to the desktop on the server.
If you previously configured VNC for the user, ensure that the configuration files have the correct SELinux context:
restorecon -RFv ~/.vnc
[regular-user]$ restorecon -RFv ~/.vncCopy to Clipboard Copied! Toggle word wrap Toggle overflow Enable and start the VNC server unit for the regular user:
systemctl enable --now vncserver@:user-number
[root]# systemctl enable --now vncserver@:user-numberCopy to Clipboard Copied! Toggle word wrap Toggle overflow If the server uses the proprietary Nvidia driver, disable Wayland:
-
Uncomment the
WaylandEnable=Falseline in the/etc/gdm/custom.confconfiguration file. -
Add the
DefaultSession=gnome-xorg.desktopoption to the[daemon]section of the configuration file. - Reboot the server.
-
Uncomment the
5.3.4. Connecting to the VNC server as multiple users
This procedure connects to a remote desktop session using the vncviewer application. You can open multiple connections to the remote desktop at the same time.
Prerequisites
- Remote desktop access for multiple users is enabled on the server. For details, see Enabling multi-user VNC access on the server.
Procedure
Connect to the VNC server:
vncviewer --shared server-ip:display
$ vncviewer --shared server-ip:displayCopy to Clipboard Copied! Toggle word wrap Toggle overflow - Replace server-ip with the IP address of the server that you are connecting to.
- Replace display with the display number where the server user exports the VNC session.
5.4. Remotely accessing an individual application
You can remotely launch a graphical application on a RHEL server and use it from the remote client using X11 forwarding.
5.4.1. Enabling X11 forwarding on the server
Configure a RHEL server so that remote clients can use graphical applications on the server over SSH.
Procedure
Install basic X11 packages:
yum install xorg-x11-xauth xorg-x11-fonts-\* xorg-x11-utils dbus-x11
# yum install xorg-x11-xauth xorg-x11-fonts-\* xorg-x11-utils dbus-x11Copy to Clipboard Copied! Toggle word wrap Toggle overflow NoteYour applications might rely on additional graphical libraries.
Enable the
X11Forwardingoption in the/etc/ssh/sshd_configconfiguration file:X11Forwarding yes
X11Forwarding yesCopy to Clipboard Copied! Toggle word wrap Toggle overflow The option is disabled by default in RHEL.
Restart the
sshdservice:systemctl restart sshd.service
# systemctl restart sshd.serviceCopy to Clipboard Copied! Toggle word wrap Toggle overflow
5.4.2. Launching an application remotely using X11 forwarding
Access a graphical application on a RHEL server from a remote client using SSH.
Prerequisites
- X11 forwarding over SSH is enabled on the server. For details, see Section 5.4.1, “Enabling X11 forwarding on the server”.
Ensure that an X11 display server is running on your system:
- On RHEL, X11 is available by default in the graphical interface.
- On Microsoft Windows, install an X11 server such as Xming.
- On macOS, install the XQuartz X11 server.
- You have configured and restarted an OpenSSH server. For details, see Configuring and starting an OpenSSH server.
Procedure
Log in to the server using SSH:
ssh -X -Y remote-server
[local-user]$ ssh -X -Y remote-server
The authenticity of host 'remote-server (192.168.122.120)' can't be established.
ECDSA key fingerprint is SHA256:uYwFlgtP/2YABMHKv5BtN7nHK9SHRL4hdYxAPJVK/kY.
Are you sure you want to continue connecting (yes/no/[fingerprint])?
Copy to Clipboard Copied! Toggle word wrap Toggle overflow Confirm that a server key is valid by checking its fingerprint.
NoteIf you plan to log in to the server on a regular basis, add the user’s public key to the server using the
ssh-copy-idcommand.Continue connecting by typing yes.
Warning: Permanently added 'remote-server' (ECDSA) to the list of known hosts.
Warning: Permanently added 'remote-server' (ECDSA) to the list of known hosts.Copy to Clipboard Copied! Toggle word wrap Toggle overflow When prompted, type the server password.
local-user's password:
[local-user ~]$
local-user's password:
[local-user ~]$
Copy to Clipboard Copied! Toggle word wrap Toggle overflow Launch the application from the command line:
application-binary
[remote-user]$ application-binaryCopy to Clipboard Copied! Toggle word wrap Toggle overflow
To skip the intermediate terminal session, use the following command:
ssh user@server -X -Y -C binary_application
$ ssh user@server -X -Y -C binary_applicationChapter 6. Configuring GNOME at low level
6.1. Introduction to configuring GNOME
The following components store settings in the GNOME desktop environment:
- GSettings
- A high-level API for GNOME application settings.
- The
dconfdatabase - A key-based Binary Large Object (BLOB) database for storing GNOME configurations. It manages user settings such as GDM, application, and proxy settings, and serves as the back end for GSettings.
You can view and edit GSettings values using either of the following tools:
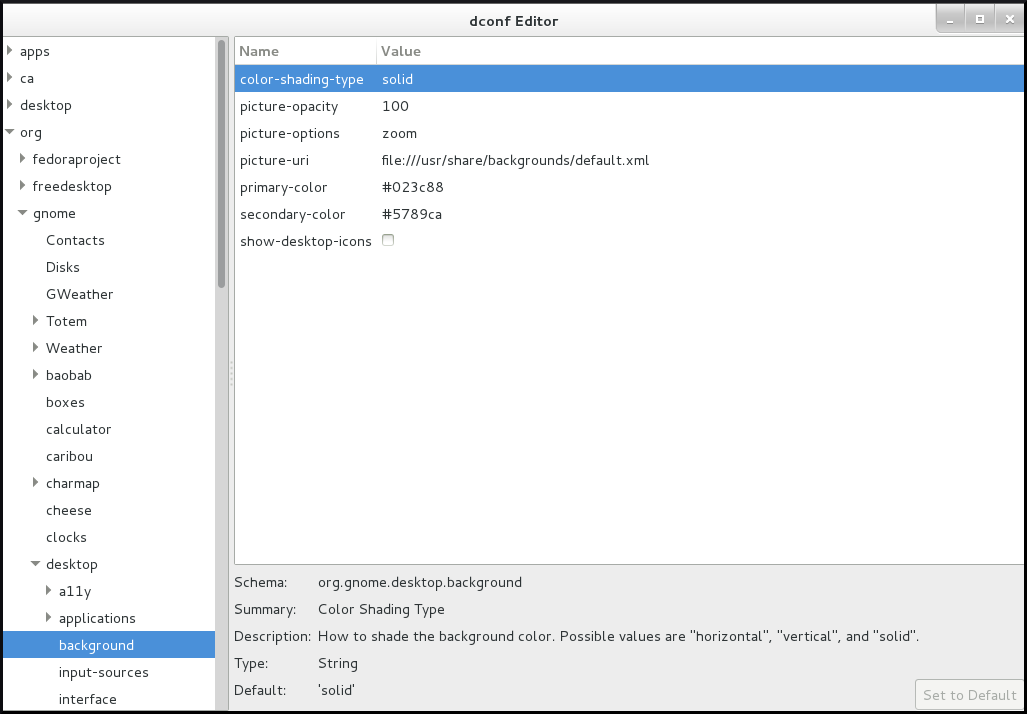
- The dconf-editor graphical application
- The dconf-editor provides a GUI for browsing the settings and their editing. It presents the hierarchy of settings in a tree-view and also displays additional information about each setting, including the description, type and default value.
- The
gsettingscommand-line utility -
The
gsettingsutility can be used to display and setdconfvalues. Thegsettingsutility supports Bash completion for commands and settings. This tools also enables you to automate configuration in shell scripts. - The
dconfcommand-line utility A command-line utility which is used for reading and writing individual values or entire directories from and to a
dconfdatabase.WarningAs a user or application developer, do not use the
dconfutility directly.To manipulate
dconfvalues, always use the dconf editor application or thegsettingsutility.The only exception to use
dconfdirectly is when setting system-wide default configurations, because the other tools do not allow to manipulate such configurations.
These tools share the following features:
- Browsing and changing options for system and application preferences
- Changing preferences
- Running by regular users, because both tools are intended to browse and modify the current user’s GSettings database
Figure 6.1. dconf editor showing the org.gnome.desktop.background keys
6.2. GSettings schemas and keys
The GSettings database stores all settings in a tree of schemas and keys:
- A key stores a particular value of a setting.
- A schema defines a group and subgroups of related settings, including a summary and description of each setting and its default value.
Usually, there is a specific, well-known path associated with each schema in the GSettings database. However, in some situations schemas are relocatable, so that they can be applied to more than one path in the GSettings database. A relocatable schema can have an arbitrary number of instances. For example, this is useful if the schema describes an account, and you want to be able to store a arbitrary number of accounts in GSettings.
A schema path usually refers to a domain name associated with the configured program or library.
The gsettings utility specifies schemas and keys in a format where the key is separated with a space:
domain.name key
domain.name keyIf a schema is relocatable, you must also specify a path after the schema name:
domain.name:path key
domain.name:path key
The dconf utility specifies schemas and keys as a single slash-separated string:
/domain/name/key
/domain/name/keyExample 6.1. The folder view setting in Files
You can access the setting that controls the folder view in the Files application using the following format.
With gsettings:
org.gnome.nautilus.preferences default-folder-viewer
org.gnome.nautilus.preferences default-folder-viewer
With dconf:
/org/gnome/nautilus/preferences/default-folder-viewer
/org/gnome/nautilus/preferences/default-folder-viewer6.3. GSettings values
Each GSettings key stores the value of a particular setting as a GVariant data type. To modify the value of a key, you must specify the value in the GVariant text format.
GVariant supports the following data types:
| Data type | GVariant text format examples |
|---|---|
| Boolean |
|
| String |
|
| Number |
|
| Tuple |
|
| Array |
|
| Dictionary |
|
| Variant |
|
| Maybe |
|
| Byte string |
|
6.4. Managing user and system GNOME Settings
The dconf database provides several levels of control over GNOME configuration for system administrators and users:
- Administrators can define default settings that apply to all users.
- Users can override the defaults with their own settings.
- Administrators can also lock settings to prevent users from overriding them.
6.5. dconf profiles
A dconf profile is a list of system’s hardware and software configuration databases, which the dconf system collects.
The dconf profiles enable you to compare identical systems to troubleshoot hardware or software problems.
The dconf system stores its profiles in the text files that can be located either within the /etc/dconf/profile/ directory or elsewhere. The $DCONF_PROFILE environment variable can specify a relative path to the file from /etc/dconf/profile/, or an absolute path, such as in a user’s home directory.
Note that key pairs that are set in a dconf profile override the default settings.
On startup, dconf consults the $DCONF_PROFILE environment variable to find the name of the dconf profile to open. The result depends on whether the variable is set or not:
-
If set,
dconfattempts to open the profile named in the variable and aborts if this step fails. -
If not set,
dconfattempts to open the profile nameduserand uses an internal hard-wired configuration if this step fails.
Each line in a dconf profile specifies one dconf database.
The first line indicates the database used to write changes. The remaining lines show read-only databases.
The following is a sample profile stored in /etc/dconf/profile/user:
user-db:user
system-db:local
system-db:site
user-db:user
system-db:local
system-db:site
In this example, the dconf profile specifies three databases:
user-
The name of the user database that can be found in
~/.config/dconf localandsite-
System databases, located in
/etc/dconf/db/
To apply a new dconf user profile to the user’s session, you need to log out and log in, because the dconf profile for a session is determined at login.
6.6. Configuring custom default values
You can set machine-wide default settings by providing a default for a key in a dconf profile. Users can override these defaults.
Procedure
Identify the GSettings schemas, keys, and allowed values of the settings that you want to configure.
You cna either use the dconf editor application or the
gsettingsutility. For details ongsettings, see Working with GSettings keys on command line.Ensure that the
/etc/dconf/profile/userconfiguration file enables the user profile:user-db:user system-db:local
user-db:user system-db:localCopy to Clipboard Copied! Toggle word wrap Toggle overflow Create a plain text keyfile for the default settings in the
/etc/dconf/db/local.d/directory.Choose a file name that represents the settings. The file name usually starts with a number, such as
/etc/dconf/db/local.d/01-background.In the keyfile, specify the default settings in the following format:
[path/to/schema] key-name=value another-key-name=another-value
[path/to/schema] key-name=value another-key-name=another-valueCopy to Clipboard Copied! Toggle word wrap Toggle overflow ImportantSeparate the schema components with a slash (
/), not a dot (.) here.Example 6.2. A default background
For example, to set a default desktop background, specify the following configuration in
/etc/dconf/db/local.d/01-background:[org/gnome/desktop/background] picture-uri='file:///usr/local/share/backgrounds/wallpaper.jpg' picture-options='scaled' primary-color='000000' secondary-color='FFFFFF'
[org/gnome/desktop/background] picture-uri='file:///usr/local/share/backgrounds/wallpaper.jpg'1 picture-options='scaled'2 primary-color='000000'3 secondary-color='FFFFFF'4 Copy to Clipboard Copied! Toggle word wrap Toggle overflow Update the system databases:
dconf update
# dconf updateCopy to Clipboard Copied! Toggle word wrap Toggle overflow - The user must log out and log in again for the changes to take effect.
6.7. Locking down specific settings
By default, any settings that users make take precedence over the system settings. Therefore, users can override the system settings with their own. Using the lockdown mode in dconf, you can prevent users from changing specific settings.
Procedure
-
Create the
/etc/dconf/db/local.d/locks/directory. - In this directory, add any number of files listing keys that you want to lock.
Example 6.3. Locking the settings for the default wallpaper
- Set a default wallpaper.
-
Create the
/etc/dconf/db/local.d/locks/directory. Create the
/etc/dconf/db/local.d/locks/00-default-wallpaperfile with the following content, listing one key per line:Prevent users from changing values for the following keys:
# Prevent users from changing values for the following keys: /org/gnome/desktop/background/picture-uri /org/gnome/desktop/background/picture-options /org/gnome/desktop/background/primary-color /org/gnome/desktop/background/secondary-colorCopy to Clipboard Copied! Toggle word wrap Toggle overflow Update the system databases:
dconf update
# dconf updateCopy to Clipboard Copied! Toggle word wrap Toggle overflow
6.9. Working with GSettings keys on command line
You can use the gsettings utility to configure, manipulate and manage GSettings keys. Look at the examples of use cases that involve using the gsettings utility:
6.9.1. Setting the value of a key
gsettings set SCHEMA[:PATH] KEY VALUE
$ gsettings set SCHEMA[:PATH] KEY VALUENote that the value is specified as a serialised GVariant.
If the operation succeeds, the command display no output. The change is valid immediately.
Example 6.4. Adding selected applications among your favorite applications
gsettings set org.gnome.shell favorite-apps \
"['firefox.desktop', 'evolution.desktop', 'rhythmbox.desktop']"
$ gsettings set org.gnome.shell favorite-apps \
"['firefox.desktop', 'evolution.desktop', 'rhythmbox.desktop']"6.9.2. Monitoring key changes
To monitor a key for changes and print values that change:
gsettings monitor SCHEMA[:PATH] [KEY]
$ gsettings monitor SCHEMA[:PATH] [KEY]
If you do not specify the KEY argument, all keys in the schema are monitored. Monitoring continues until you stop the process.
Example 6.5. Monitoring changes of the favorite applications key
To monitor the changes in your favorite applications:
Monitor the
favorite-appskey:gsettings monitor org.gnome.shell favorite-apps
$ gsettings monitor org.gnome.shell favorite-appsCopy to Clipboard Copied! Toggle word wrap Toggle overflow In another terminal, change the
favorite-appskey:gsettings set org.gnome.shell favorite-apps \ "['firefox.desktop', 'evolution.desktop', 'rhythmbox.desktop']"$ gsettings set org.gnome.shell favorite-apps \ "['firefox.desktop', 'evolution.desktop', 'rhythmbox.desktop']"Copy to Clipboard Copied! Toggle word wrap Toggle overflow As a result, the command in the first terminal displays a notification that the
favorite-appskey has changed:favorite-apps: ['firefox.desktop', 'evolution.desktop', 'rhythmbox.desktop']
favorite-apps: ['firefox.desktop', 'evolution.desktop', 'rhythmbox.desktop']Copy to Clipboard Copied! Toggle word wrap Toggle overflow
6.9.3. Checking whether a key is writable
gsettings writable SCHEMA[:PATH] KEY
$ gsettings writable SCHEMA[:PATH] KEYExample 6.6. Checking whether the favorite applications key is writable
The following key is writable:
gsettings writable org.gnome.shell favorite-apps
$ gsettings writable org.gnome.shell favorite-apps
True6.9.4. Listing the valid values for a key
gsettings range SCHEMA[:PATH] KEY
$ gsettings range SCHEMA[:PATH] KEYExample 6.7. Checking the range of valid values for the remember-mount-password key
The following key stores a Boolean value:
gsettings range org.gnome.shell remember-mount-password
$ gsettings range org.gnome.shell remember-mount-password
type bFor more information, see GVariant Format Strings.
6.9.5. Displaying the description of a key
gsettings describe SCHEMA[:PATH] KEY
$ gsettings describe SCHEMA[:PATH] KEYExample 6.8. Displaying the description of the picture-uri key
gsettings describe org.gnome.desktop.screensaver picture-uri
$ gsettings describe org.gnome.desktop.screensaver picture-uri
URI to use for the background image. Note that the backend only supports local `file://` URIs.6.9.6. Displaying the value of a key
gsettings get SCHEMA[:PATH] KEY
$ gsettings get SCHEMA[:PATH] KEYNote that the value is displayed as a serialised GVariant.
Example 6.9. Displaying value of the remember-mount-password key
gsettings get org.gnome.shell remember-mount-password
$ gsettings get org.gnome.shell remember-mount-password
false6.9.7. Resetting the value of a key
gsettings reset SCHEMA[:PATH] KEY
$ gsettings reset SCHEMA[:PATH] KEYIf resetting succeeds, the command displays no output.
Default values are stored in dconf and gsettings-desktop-schemas files.
Example 6.10. Resetting the lock-delay key to its default value
The default value of the lock-delay key is 0, and it is stored in the /usr/share/glib-2.0/schemas/org.gnome.desktop.screensaver.gschema.xml file.
gsettings reset org.gnome.desktop.screensaver lock-delay
$ gsettings reset org.gnome.desktop.screensaver lock-delay
As a result, the value of lock-delay value is set to 0.
6.9.8. Resetting a whole schema
gsettings reset-recursively SCHEMA[:PATH]
$ gsettings reset-recursively SCHEMA[:PATH]Example 6.11. Resetting the org.gnome.desktop.screensaver schema to its default values
gsettings reset-recursively org.gnome.desktop.screensaver
$ gsettings reset-recursively org.gnome.desktop.screensaver
As a result, the lock-delay value is reset to 0, and other keys within the org.gnome.desktop.screensaver schema that were changed by user are reset to their defaults as well.
6.9.9. Listing installed non-relocatable schemas
gsettings list-schemas
$ gsettings list-schemasExample 6.12. Listing installed non-relocatable schemas
To list all schemas installed on your system that are non-relocatable:
6.9.10. Listing all keys in a schema
gsettings list-keys SCHEMA[:PATH]
$ gsettings list-keys SCHEMA[:PATH]Example 6.13. Listing all keys in the org.gnome.shell schema
6.9.11. Listing all schemas nested in a schema
gsettings list-children SCHEMA[:PATH]
$ gsettings list-children SCHEMA[:PATH]Note that the list is empty if the schema contains no other schemas.
Example 6.14. Listing schemas in the org.gnome.shell schema
gsettings list-children org.gnome.shell
$ gsettings list-children org.gnome.shell
keyboard org.gnome.shell.keyboard
keybindings org.gnome.shell.keybindings6.9.12. Listing the keys and values in a schema recursively
gsettings list-recursively [SCHEMA[:PATH]]
$ gsettings list-recursively [SCHEMA[:PATH]]If you do not specify any schema, the command lists all keys within all schemas.
Example 6.15. Listing all keys and values on the system recursively
6.10. Acknowledgements
Certain portions of this text first appeared in the GNOME Desktop System Administration Guide. Copyright © 2014 The GNOME Project, Michael Hill, Jim Campbell, Jeremy Bicha, Ekaterina Gerasimova, minnie_eg, Aruna Sankaranarayanan, Sindhu S, Shobha Tyagi, Shaun McCance, David King, and others. Licensed under a Creative Commons Attribution-ShareAlike 3.0 Unported License.
The editors of this Red Hat Enterprise Linux 8 documentation would like to thank the GNOME community members for their valuable contributions to the GNOME Desktop System Administration Guide.
Chapter 7. Configuring file associations
You can configure RHEL to open or access files with different formats.
In GNOME, MIME (Multipurpose Internet Mail Extension) types help to identify the format of a file and applications to use to open these files.
7.1. Multipurpose Internet Mail Extension types
The GNOME desktop uses MIME types to:
- Determine which application should open a specific file format by default.
- Register other applications that can open files of a specific format.
- Set a string describing the type of a file, for example, in a file properties dialog of the files application.
- Set an icon representing a specific file format, for example, in a file properties dialog of the files application.
MIME type names follow a given format:
media-type/subtype-identifier
media-type/subtype-identifier
In the image/jpeg MIME type name, image is a media type and jpeg is the subtype identifier.
GNOME follows Multipurpose Internet Mail Extension (MIME) info specification from the Freedesktop.org to determine:
- The machine-wide and user-specific location to store all the MIME type specification files.
- How to register a MIME type so that the desktop environment knows which application you can use to open a specific file format.
- How users can change which applications should open with what file formats.
MIME database
The MIME database is a collection of all the MIME type specification files that GNOME uses to store information about known MIME types.
The most important part of the MIME database from the system administrator’s point of view is the /usr/share/mime/packages/ directory, where the MIME type-related files specifying information about known MIME types are stored. One example of such a file is /usr/share/mime/packages/freedesktop.org.xml, specifying information about the standard MIME types available on the system, by default. The shared-mime-info package provides this file.
7.2. Adding a custom MIME type for all users
You can add a custom MIME type for all the users on the system and register a default application for that MIME type.
Procedure
Create the
/usr/share/mime/packages/application-x-newtype.xmlfile with following content:Copy to Clipboard Copied! Toggle word wrap Toggle overflow The sample
application-x-newtype.xmlfile here defines a new MIME typeapplication/x-newtypeand assigns file names with the.xyzextension to that MIME type.Create a new
.desktopfile named, for example,myapplication1.desktopin the/usr/share/applications/with following content:[Desktop Entry] Type=Application MimeType=application/x-newtype Name=My Application 1 Exec=myapplication1 field_code
[Desktop Entry] Type=Application MimeType=application/x-newtype Name=My Application 1 Exec=myapplication1 field_codeCopy to Clipboard Copied! Toggle word wrap Toggle overflow The sample
myapplication1.desktopfile here associates theapplication/x-newtypeMIME type with an application namedMy Application 1. It is run by a commandmyapplication1.Based on how
myapplication1gets started, choose one respective field code from Desktop Entry Specification. For example, for an application capable of opening multiple files, use:Exec=myapplication1 %F
Exec=myapplication1 %FCopy to Clipboard Copied! Toggle word wrap Toggle overflow As a root user, update the MIME database for your changes to take effect.
update-mime-database /usr/share/mime
# update-mime-database /usr/share/mimeCopy to Clipboard Copied! Toggle word wrap Toggle overflow As a root user, update the application database.
update-desktop-database /usr/share/applications
# update-desktop-database /usr/share/applicationsCopy to Clipboard Copied! Toggle word wrap Toggle overflow
Verification
To verify that you have successfully associated
*.xyzfiles with theapplication/x-newtypeMIME type, first create an empty file, for example test.xyz and execute the following commands:touch test.xyz gvfs-info test.xyz | grep "standard::content-type"
$ touch test.xyz $ gvfs-info test.xyz | grep "standard::content-type" standard::content-type: application/x-newtypeCopy to Clipboard Copied! Toggle word wrap Toggle overflow To verify
myapplication1.desktopis correctly set as the default registered application for theapplication/x-newtypeMIME type, execute following command:Copy to Clipboard Copied! Toggle word wrap Toggle overflow
7.3. Adding a custom MIME type for individual users
You can add a custom MIME type for individual user on the system and register a default application for that MIME type.
Procedure
Create the
~/.local/share/mime/packages/application-x-newtype.xmlfile with following content:Copy to Clipboard Copied! Toggle word wrap Toggle overflow The sample
application-x-newtype.xmlfile here defines a new MIME typeapplication/x-newtypeand assigns file names with the.xyzextension to that MIME type.Create a new .desktop file named, for example,
myapplication1.desktop, and place it in the~/.local/share/applications/directory with following content:[Desktop Entry] Type=Application MimeType=application/x-newtype Name=My Application 1 Exec=myapplication1 field_code
[Desktop Entry] Type=Application MimeType=application/x-newtype Name=My Application 1 Exec=myapplication1 field_codeCopy to Clipboard Copied! Toggle word wrap Toggle overflow The sample
myapplication1.desktopfile above associates theapplication/x-newtypeMIME type with an application named My Application 1. It is run by a commandmyapplication1.Based on how
myapplication1gets started, choose one respective field code from Desktop Entry Specification. For example, for an application capable of opening multiple files, use:Exec=myapplication1 %F
Exec=myapplication1 %FCopy to Clipboard Copied! Toggle word wrap Toggle overflow Update the MIME database for your changes to take effect:
update-mime-database ~/.local/share/mime
$ update-mime-database ~/.local/share/mimeCopy to Clipboard Copied! Toggle word wrap Toggle overflow Update the application database:
update-desktop-database ~/.local/share/applications
$ update-desktop-database ~/.local/share/applicationsCopy to Clipboard Copied! Toggle word wrap Toggle overflow
Verification
To verify that you have successfully associated
*.xyzfiles with theapplication/x-newtypeMIME type, first create an empty file, for example, test.xyz and execute the following commands:touch test.xyz gvfs-info test.xyz | grep "standard::content-type"
$ touch test.xyz $ gvfs-info test.xyz | grep "standard::content-type" standard::content-type: application/x-newtypeCopy to Clipboard Copied! Toggle word wrap Toggle overflow To verify that
myapplication1.desktopis correctly set as the default registered application for theapplication/x-newtypeMIME type, execute following command:Copy to Clipboard Copied! Toggle word wrap Toggle overflow
7.4. Options to override default MIME types
By default, the package-installed /usr/share/applications/mimeapps.list and /usr/share/applications/gnome-mimeapps.list files specify which application is registered to open specific MIME types.
System administrators can create the /etc/xdg/mimeapps.list or /etc/xdg/gnome-mimeapps.list file with a list of MIME types they want to override with the default registered application.
Local users can create the ~/.local/share/applications/mimeapps.list or ~/.local/share/applications/gnome-mimeapps.list file with a list of MIME types for which they want to override the default registered application.
Configurations are applied in the following order:
-
/usr/share/applications/ -
/etc/xdg/ -
~/.local/share/application/
Within a particular location, the configurations are applied in the following order:
- mimeapps.list
- gnome-mimeapps.list
7.5. Overriding default registered application for all the users
As a system administer, you can update the configuration based on the requirements. System administrator’s configuration takes precedence over default package configuration. Within each, the desktop-specific configuration takes precedence over the configuration that does not specify the desktop environment.
Procedure
Consult the
/usr/share/applications/mimeapps.listfile to determine the MIME types for which you want to change the default registered application. For example, the following sample of themimeapps.listfile specifies the default registered application for thetext/htmlandapplication/xhtml+xmlMIME types:[Default Applications] text/html=firefox.desktop application/xhtml+xml=firefox.desktop
[Default Applications] text/html=firefox.desktop application/xhtml+xml=firefox.desktopCopy to Clipboard Copied! Toggle word wrap Toggle overflow This example above specifies default application (Mozilla Firefox) by specifying its corresponding
.desktopfile (firefox.desktop). You can find.desktopfiles for other applications in the/usr/share/applications/directory.Create the
/etc/xdg/mimeapps.listfile and specify the MIME types and their corresponding default registered applications in this file.[Default Applications] text/html=myapplication1.desktop application/xhtml+xml=myapplication2.desktop
[Default Applications] text/html=myapplication1.desktop application/xhtml+xml=myapplication2.desktopCopy to Clipboard Copied! Toggle word wrap Toggle overflow This example above sets the default registered application for the
text/htmlMIME type tomyapplication1.desktopandapplication/xhtml+xmlMIME type tomyapplication2.desktop.
Verification
-
For these settings to function correctly, ensure that both the
myapplication1.desktopandmyapplication2.desktopfiles are placed in the/usr/share/applications/directory. Verify that the default registered application is set correctly:
Copy to Clipboard Copied! Toggle word wrap Toggle overflow
7.6. Overriding default registered application for individual users
Individual users can also update the configuration based on the requirements. This configuration takes precedence over the system administrator’s configuration and the system administrator’s configuration takes precedence over the package configuration. Within each, the desktop-specific configuration takes precedence over the configuration that does not specify the desktop environment.
Procedure
Consult the
/usr/share/applications/mimeapps.listfile to determine the MIME types for which you want to change the default registered application. For example, the following sample of themimeapps.listfile specifies the default registered application for thetext/htmlandapplication/xhtml+xmlMIME types:[Default Applications] text/html=firefox.desktop application/xhtml+xml=firefox.desktop
[Default Applications] text/html=firefox.desktop application/xhtml+xml=firefox.desktopCopy to Clipboard Copied! Toggle word wrap Toggle overflow This example above specifies default application (Mozilla Firefox) by specifying its corresponding
.desktopfile (firefox.desktop). You can find.desktopfiles for other applications in the/usr/share/applications/directory.Create the
~/.local/share/applications/mimeapps.listfile and specify the MIME types and their corresponding default registered applications in this file.[Default Applications] text/html=myapplication1.desktop application/xhtml+xml=myapplication2.desktop
[Default Applications] text/html=myapplication1.desktop application/xhtml+xml=myapplication2.desktopCopy to Clipboard Copied! Toggle word wrap Toggle overflow This example above sets the default registered application for the
text/htmlMIME type tomyapplication1.desktopandapplication/xhtml+xmlMIME type tomyapplication2.desktop.
Verification
-
For these settings to function correctly, ensure that both the
myapplication1.desktopandmyapplication2.desktopfiles are placed in the/usr/share/applications/directory. Execute the
gio mime querycommand to verify that the default registered application is set correctly.Copy to Clipboard Copied! Toggle word wrap Toggle overflow
Chapter 8. Customizing desktop appearance
This section explains how system administrators can customize appearance of the desktop environment for different users of the system.
8.1. Customizing desktop backgrounds
As a system administrator, you can configure the default desktop background, add extra backgrounds, or add multiple backgrounds available to all users of the system.
If the users are not permitted to change background from the defaults, you must lock the settings using the locks directory. Otherwise, each user can customize the background according to their preferences.
8.1.1. Customizing the default desktop background
You can configure the default desktop background and its appearance by setting the relevant GSettings keys in the org.gnome.desktop.background schema.
Procedure
Create a local database for machine-wide settings in
/etc/dconf/db/local.d/00-background:Copy to Clipboard Copied! Toggle word wrap Toggle overflow - 1
- Specify the path to the desktop background image file.
- 2
- Specify one of the rendering options for the background image:
-
none -
wallpaper -
centered -
scaled -
stretched -
zoom -
spanned
-
- 3
- Specify the left or top color when drawing gradients or the solid color.
- 4
- Specify the right or bottom color when drawing gradients.
Optional: If you want to prevent a user from changing the default background, override the user’s setting in the
/etc/dconf/db/local.d/locks/backgroundfile:List the keys used to configure the desktop background
# List the keys used to configure the desktop background /org/gnome/desktop/background/picture-uri /org/gnome/desktop/background/picture-options /org/gnome/desktop/background/primary-color /org/gnome/desktop/background/secondary-colorCopy to Clipboard Copied! Toggle word wrap Toggle overflow Update the system databases:
dconf update
# dconf updateCopy to Clipboard Copied! Toggle word wrap Toggle overflow - Users must log out and back in again before the system-wide settings take effect.
8.1.2. Adding extra backgrounds
You can make extra backgrounds available to users on your system.
Procedure
-
Create the
/usr/share/gnome-background-properties/extra-backgrounds.xmlfile. In the new file, specify the extra background files and their appearance in the following format:
Copy to Clipboard Copied! Toggle word wrap Toggle overflow - The new backgrounds are now available to all users in the Background section of the Settings application.
8.1.3. Frequently used background schema keys
The following configuration controls the behavior of desktop backgrounds in the GSettings system.
| Key name | XML name | Possible values | Description |
|---|---|---|---|
|
|
|
|
Determines how the image set by |
|
|
|
| Determines the shade of the background color. |
|
|
|
default: | Left or Top color when drawing gradients, or the solid color. |
|
|
|
default: | Right or Bottom color when drawing gradients, not used for solid color. |
Example 8.1. An extra backgrounds file with one <wallpaper> element
Example 8.2. An extra backgrounds file with two <wallpaper> elements
In one configuration file, you can specify multiple <wallpaper> elements to add more backgrounds as shown in the following example with two <wallpaper> elements, adding two different backgrounds.
8.1.4. Setting the screen shield
Screen shield is the screen that slides down when you lock the system. You can set a default screen shield picture for all users on the system.
Procedure
Create the
/etc/dconf/db/gdm.d/01-screensaverfile:[org/gnome/desktop/screensaver] picture-uri='file:///opt/corp/background.jpg'
[org/gnome/desktop/screensaver] picture-uri='file:///opt/corp/background.jpg'Copy to Clipboard Copied! Toggle word wrap Toggle overflow Replace
/opt/corp/background.jpgwith the absolute path to the image file that you want to use as the default screen shield. Supported formats are PNG, JPG, JPEG, and TGA. Note that the screen shield scales your image if necessary to fit the screen.Update the system databases:
dconf update
# dconf updateCopy to Clipboard Copied! Toggle word wrap Toggle overflow - Users must log out and back in again before the system-wide settings take effect.
Troubleshooting
If the screen shield does not update:
Verify that you have updated the system databases:
dconf update
# dconf updateCopy to Clipboard Copied! Toggle word wrap Toggle overflow Try restarting GDM:
systemctl restart gdm.service
# systemctl restart gdm.serviceCopy to Clipboard Copied! Toggle word wrap Toggle overflow WarningRestarting the
gdmservice terminates all currently running GNOME sessions of all desktop users who are logged in. This might result in users losing unsaved data.
8.2. Customizing the branding of the login screen
You can change the logo that appears on the GNOME login screen (GDM) using a dconf profile.
Prerequisites
- Prepare an image file in any of the supported formats: ANI, BPM, GIF, GTIFF, ICNS, ICO, JPEG, JPEG 2000, PCX, PNM, PBM, PGM, PPM, RAS, SVG, TGA, TIFF, WBMP, XBM, or XPM.
- The image must be around 48 pixels in height. If it is significantly larger, it will exceed the logo area.
-
Store the image file in a location that the
gdmuser can access. For example, select a universally readable system directory such as/opt/or/usr/local/.
Procedure
Create the
/etc/dconf/db/gdm.d/01-override-logoconfiguration file with the following content:[org/gnome/login-screen] logo='/path/to/logo.png'
[org/gnome/login-screen] logo='/path/to/logo.png'Copy to Clipboard Copied! Toggle word wrap Toggle overflow Replace
/path/to/logo.pngwith the full path to the image file that you want to use as the login screen logo.Update the system databases:
dconf update
# dconf updateCopy to Clipboard Copied! Toggle word wrap Toggle overflow
Verification
- Log out or otherwise switch to the login screen.
- Check if it displays the logo that you selected.
If the logo does not update, restart GDM:
systemctl restart gdm
# systemctl restart gdmCopy to Clipboard Copied! Toggle word wrap Toggle overflow WarningRestarting the
gdmservice terminates all currently running GNOME sessions of all desktop users who are logged in. This might result in users losing unsaved data.
8.3. Using GNOME Shell extensions to customize desktop environment
GNOME Shell extensions allow for the customization of the default GNOME Shell interface and its parts, such as window management and application launching.
Before deploying third-party GNOME Shell extensions on Red Hat Enterprise Linux, make sure to read the following document to learn about the Red Hat support policy for third-party software: How does Red Hat Global Support Services handle third-party software, drivers, and/or uncertified hardware/hypervisors?
8.3.1. Overview of GNOME Shell extensions
The following is an overview of GNOME Shell extensions available on RHEL 8, including the name of the package providing a particular extension, and the description of what each extension does.
| Package name | Extension name | Description |
|---|---|---|
| gnome-shell-extension-apps-menu | apps-menu | Applications menu for GNOME Shell |
| gnome-shell-extension-top-icons | Top Icons | Show legacy icons on top |
| gnome-shell-extension-user-theme | user-theme | Support for custom themes in GNOME Shell |
| gnome-shell-extension-drive-menu | drive-menu | Drive status menu for GNOME Shell |
| gnome-shell-extension-window-list | window-list | Display a window list at the bottom of the screen in GNOME Shell |
| gnome-shell-extension-dash-to-dock | Dash to Dock | Dock for the Gnome Shell by micxgx.gmail.com |
| gnome-shell-extension-desktop-icons | Desktop Icons | Desktop icons support for the GNOME Classic experience |
| gnome-shell-extension-no-hot-corner | nohotcorner | Disable the hot corner in GNOME Shell |
| gnome-shell-extension-systemMonitor | systemMonitor | System Monitor for GNOME Shell |
| gnome-shell-extension-updates-dialog | Updates Dialog | Show a modal dialog when there are software updates |
| gnome-shell-extension-window-grouper | window-grouper | Keep windows that belong to the same process on the same workspace |
| gnome-shell-extension-panel-favorites | panel-favorites | Favorite launchers in GNOME Shell’s top bar |
| gnome-shell-extension-windowsNavigator | windowNavigator | Support for keyboard selection of windows and workspaces in GNOME shell |
| gnome-shell-extension-auto-move-windows | Autom Move Windows | Assign specific workspaces to applications in GNOME Shell |
| gnome-shell-extension-launch-new-instance | launch-new-instance | Always launch a new application instance for GNOME Shell |
| gnome-shell-extension-workspace-indicator | workspace-indicator | Workspace indicator for GNOME Shell |
| gnome-shell-extension-disable-screenshield | Disable Screen Shield | Disable GNOME Shell screen shield if lock is disabled |
| gnome-shell-extension-native-window-placement | native-window-placement | Native window placement for GNOME Shell |
| gnome-shell-extension-screenshot-window-sizer | screenshot-window-sizer | Screenshot window sizer for GNOME Shell |
| gnome-shell-extension-horizontal-workspaces | horizontal-workspaces | Desktop icons support for the GNOME Classic experience |
| gnome-shell-extension-places-menu | places-menu | Places status menu for GNOME Shell |
| gnome-classic-session | - | GNOME Classic mode session |
8.3.2. Enabling machine-wide extensions
Prerequisites
To make extensions available to all users on the system, install them in the /usr/share/gnome-shell/extensions directory.
Procedure
Create a local database file for machine-wide settings in
/etc/dconf/db/local.d/00-extensions:[org/gnome/shell] # List all extensions that you want to have enabled for all users enabled-extensions=['myextension1@myname.example.com', 'myextension2@myname.example.com']
[org/gnome/shell] # List all extensions that you want to have enabled for all users enabled-extensions=['myextension1@myname.example.com', 'myextension2@myname.example.com']Copy to Clipboard Copied! Toggle word wrap Toggle overflow The
enabled-extensionskey specifies the enabled extensions using the extensions' UUID (myextension1@myname.example.comandmyextension2@myname.example.com).Update the system databases:
dconf update
# dconf updateCopy to Clipboard Copied! Toggle word wrap Toggle overflow Users must log out and back in again before the system-wide settings take effect.
NoteThere is currently no way to enable additional extensions for users who have already logged in. This does not apply for existing users who have installed and enabled their own GNOME extensions.
8.3.3. Locking down enabled extensions
You can prevent the user from enabling or disabling extensions by locking down the org.gnome.shell.enabled-extensions key.
Procedure
Create a local database file for machine-wide settings in
/etc/dconf/db/local.d/00-extensions:[org/gnome/shell] # List all extensions that you want to have enabled for all users enabled-extensions=['myextension1@myname.example.com', 'myextension2@myname.example.com']
[org/gnome/shell] # List all extensions that you want to have enabled for all users enabled-extensions=['myextension1@myname.example.com', 'myextension2@myname.example.com']Copy to Clipboard Copied! Toggle word wrap Toggle overflow The
enabled-extensionskey specifies the enabled extensions using the extensions' UUID (myextension1@myname.example.comandmyextension2@myname.example.com).Override the user’s setting and prevent the user from changing it in
/etc/dconf/db/local.d/locks/extensions:Lock the list of mandatory extensions
# Lock the list of mandatory extensions /org/gnome/shell/enabled-extensionsCopy to Clipboard Copied! Toggle word wrap Toggle overflow Update the system databases:
dconf update
# dconf updateCopy to Clipboard Copied! Toggle word wrap Toggle overflow - Users must log out and back in again before the system-wide settings take effect.
After locking down the org.gnome.shell.enabled-extensions, any extensions installed in ~/.local/share/gnome-shell/extensions or /usr/share/gnome-shell/extensions that are not listed in the org.gnome.shell.enabled-extensions key will not be loaded by GNOME Shell, thus preventing the user from using them.
8.3.4. Setting up mandatory extensions
In GNOME Shell, you can provide a set of extensions that the user has to use.
Prerequisites
The extensions must be installed under the /usr/share/gnome-shell/extensions directory.
Procedure
Create a local database file for machine-wide settings in
/etc/dconf/db/local.d/00-extensions-mandatory:[org/gnome/shell] # List all mandatory extensions enabled-extensions=['myextension1@myname.example.com', 'myextension2@myname.example.com']
[org/gnome/shell] # List all mandatory extensions enabled-extensions=['myextension1@myname.example.com', 'myextension2@myname.example.com']Copy to Clipboard Copied! Toggle word wrap Toggle overflow The
enabled-extensionskey specifies the enabled extensions using the extensions' UUID (myextension1@myname.example.comandmyextension2@myname.example.com).Override the user’s setting and prevent the user from changing it in
/etc/dconf/db/local.d/locks/extensions-mandatory:Lock the list of mandatory extensions
# Lock the list of mandatory extensions /org/gnome/shell/enabled-extensionsCopy to Clipboard Copied! Toggle word wrap Toggle overflow Update the system databases:
dconf update
# dconf updateCopy to Clipboard Copied! Toggle word wrap Toggle overflow - Users must log out and back in again before the system-wide settings take effect.
Chapter 9. Customizing GNOME desktop features
9.1. Changing the language by using desktop GUI
You can change the system language using the desktop GUI.
Prerequisites
- Required language packages are installed on your system
Procedure
Open the Settings application from the system menu by clicking on its icon.
- In Settings, choose Region & Language from the left vertical bar.
Click the Language menu.
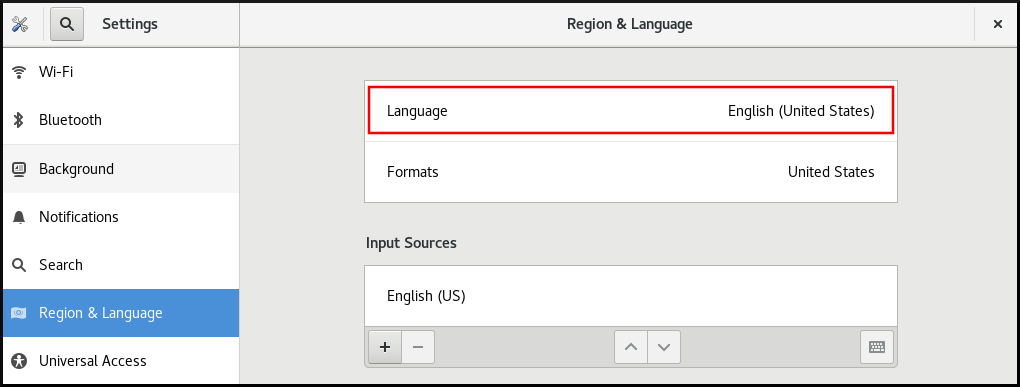
Select the required region and language from the menu.
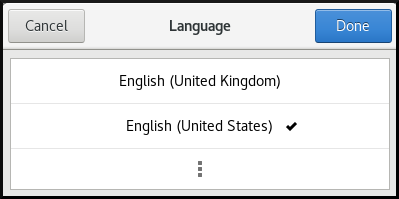
If your region and language are not listed, scroll down, and click More to select from available regions and languages.

- Click Done.
Click Restart for changes to take effect.

Some applications do not support certain languages. The text of an application that cannot be translated into the selected language remains in US English.
9.2. Enabling the Ctrl+Alt+Backspace shortcut
The Ctrl+Alt+Backspace shortcut key combination is used for terminating the X.Org display server.
You might want to terminate X.Org especially when:
- A program caused X.Org to stop working.
- You need to switch from your logged-in session quickly.
- You have launched a program that failed.
- You cannot operate in the current session.
- Your screen freezes.
Procedure
Create a local database for machine-wide settings in
/etc/dconf/db/local.d/00-input-sources:[org/gnome/desktop/input-sources] # Enable Ctrl-Alt-Backspace for all users xkb-options=['terminate:ctrl_alt_bksp']
[org/gnome/desktop/input-sources] # Enable Ctrl-Alt-Backspace for all users xkb-options=['terminate:ctrl_alt_bksp']Copy to Clipboard Copied! Toggle word wrap Toggle overflow Override the user’s setting, and prevent the user from changing it in
/etc/dconf/db/local.d/locks/input-sources:Lock the list of enabled XKB options
# Lock the list of enabled XKB options /org/gnome/desktop/input-sources/xkb-optionsCopy to Clipboard Copied! Toggle word wrap Toggle overflow Update the system databases for the changes to take effect:
dconf update
# dconf updateCopy to Clipboard Copied! Toggle word wrap Toggle overflow - Users must log out and back in again before the system-wide settings take effect.
If the Ctrl+Alt+Backspace key combination is enabled, all users can terminate X.Org , which brings them back to the login prompt.
9.3. Disabling command-line access
To disable command-line access for a desktop user, you need to make configuration changes in a number of different contexts:
- Section 9.3.1, “Setting the org.gnome.desktop.lockdown.disable-command-line Key”
- Section 9.3.2, “Disabling virtual terminal switching on X.Org”
- Remove Terminal and any other application that provides access to the terminal from the Applications menu and the Activities Overview in GNOME Shell. This is done by removing menu items for those applications.
The following steps do not remove the desktop user’s permissions to access a command line, but rather remove the ways that the desktop user could access command line.
9.3.1. Setting the org.gnome.desktop.lockdown.disable-command-line Key
This approach prevents the user from:
- Accessing the terminal
- Specifying a command line to be executed by using the Alt+F2 command prompt
Procedure
Create a local database for machine-wide settings in
/etc/dconf/db/local.d/00-lockdown:[org/gnome/desktop/lockdown] # Disable command-line access disable-command-line=true
[org/gnome/desktop/lockdown] # Disable command-line access disable-command-line=trueCopy to Clipboard Copied! Toggle word wrap Toggle overflow Override the user’s setting and prevent the user from changing it in
/etc/dconf/db/local.d/locks/lockdown:Lock the disabled command-line access
# Lock the disabled command-line access /org/gnome/desktop/lockdown/disable-command-lineCopy to Clipboard Copied! Toggle word wrap Toggle overflow Update the system databases:
dconf update
# dconf updateCopy to Clipboard Copied! Toggle word wrap Toggle overflow - Users must log out and back in again before the system-wide settings take effect.
9.3.2. Disabling virtual terminal switching on X.Org
With the X.Org display server, users can normally use the Ctrl+Alt+function key shortcuts to switch from the GNOME Desktop and X.Org to a virtual terminal. You can disable access to all virtual terminals by modifying the X.Org configuration.
You cannot apply the procedure if GNOME Shell on Wayland is used as the display server.
Procedure
Create or edit an X configuration file in the
/etc/X11/xorg.conf.d/directory:NoteBy convention, these host-specific configuration file names start with two digits and a hyphen and always have the
.confextension. Thus, the following file name can be/etc/X11/xorg.conf.d/10-xorg.conf.Section "Serverflags" Option "DontVTSwitch" "yes" EndSection
Section "Serverflags" Option "DontVTSwitch" "yes" EndSectionCopy to Clipboard Copied! Toggle word wrap Toggle overflow - Restart the X.Org display server for the changes to take effect.
9.4. Preventing the computer from suspending when closing the lid
When closing the lid of your laptop, the computer by default suspends in order to save power. You can prevent the computer from suspending when closing the lid by changing the setting for that behavior.
Some laptops can overheat if they are left running with the lid closed, especially if they are in a confined place. Therefore, consider whether changing the default setting from suspend to an other option is beneficial in your case.
Procedure
-
Open the
/etc/systemd/logind.conffile for editing. Find the
HandleLidSwitch=suspendline in the file.If it is quoted out with the
#character at the start, unquote it by removing#.If the line is not present in the file, add it.
Replace the default
suspendparameter with:-
lockfor the screen to lock -
ignorefor nothing to happen -
powerofffor the computer to switch off
For example:
[Login] HandleLidSwitch=lock
[Login] HandleLidSwitch=lockCopy to Clipboard Copied! Toggle word wrap Toggle overflow -
- Save your changes, and close the editor.
Run the following command so that your changes preserve the next restart of the system:
systemctl restart systemd-logind.service
# systemctl restart systemd-logind.serviceCopy to Clipboard Copied! Toggle word wrap Toggle overflow WarningRestarting the service forcibly interrupts any currently running GNOME session of any desktop user who is logged in. This can result in users losing unsaved data.
For more information about the /etc/systemd/logind.conf file, see the logind.conf man page on your system.
9.5. Changing the power button behavior
When you press the power button on your computer, it suspends or shuts down the system by default. You can customize this behavior according to your preferences.
9.5.1. Changing the behavior of the power button when pressing the button and GNOME is not running
When you press the power button in a non-graphical systemd target, it shuts down the system by default. You can customize this behavior according to your preferences.
Prerequisites
- Administrative access.
Procedure
Edit the
/etc/systemd/logind.confconfiguration file and set theHandlePowerKey=poweroffvariable to one of the following options:poweroff- Shut down the computer.
reboot- Reboot the system.
halt- Initiate a system halt.
kexec-
Initiate a
kexecreboot. suspend- Suspend the system.
hibernate- Initiate system hibernation.
ignore- Do nothing.
For example, to reboot the system upon pressing the power button, use this setting:
HandlePowerKey=reboot
HandlePowerKey=rebootCopy to Clipboard Copied! Toggle word wrap Toggle overflow
9.5.2. Changing the behavior of the power button when pressing the button and GNOME is running
On the graphical login screen or in the graphical user session, pressing the power button suspends the machine by default. This happens both in cases when the user presses the power button physically or when pressing a virtual power button from a remote console. You can select a different power button behavior.
Procedure
Create a local database for system-wide settings in the
/etc/dconf/db/local.d/01-powerfile with the following content:[org/gnome/settings-daemon/plugins/power] power-button-action=<value>
[org/gnome/settings-daemon/plugins/power] power-button-action=<value>Copy to Clipboard Copied! Toggle word wrap Toggle overflow Replace
<value>with one of the following power button actions:nothing- Does nothing .
suspend- Suspends the system.
hibernate- Hibernates the system.
interactiveShows a pop-up query asking the user what to do.
With interactive mode, the system powers off automatically after 60 seconds when pressing the power button. However, you can choose a different behavior from the pop-up query.
Optional: Override the user’s setting, and prevent the user from changing it. Enter the following configuration in the
/etc/dconf/db/local.d/locks/01-powerfile:/org/gnome/settings-daemon/plugins/power/power-button-action
/org/gnome/settings-daemon/plugins/power/power-button-actionCopy to Clipboard Copied! Toggle word wrap Toggle overflow Update the system databases:
dconf update
# dconf updateCopy to Clipboard Copied! Toggle word wrap Toggle overflow - Log out and back in again for the system-wide settings to take effect.
Chapter 10. Connecting Bluetooth devices
You can wirelessly connect Bluetooth devices like keyboards, mouse, headsets, and other Bluetooth supported devices to your Red Hat Enterprise Linux system. Bluetooth settings in the GNOME desktop environment provide an interface to discover, pair, and manage your Bluetooth devices.
You can connect Bluetooth devices using the graphical user interface and the bluetoothctl command-line utility.
10.1. Connecting Bluetooth devices with GUI
Connect your Bluetooth devices from the Settings application in the GNOME desktop environment.
Prerequisites
-
The
bluetooth.serviceunit is enabled.
Procedure
- On your Red Hat Enterprise Linux, go to Settings > Bluetooth.
- Toggle the button at the top-right corner to switch ON the Bluetooth. Your system automatically starts scanning for nearby discoverable devices.
- Put the device you want to connect within range of your system into pairing mode.
- When your device is discovered, click on it and follow the on-screen instructions to pair.
- Optional: Verify the PIN between your Bluetooth device and your system.
Click Confirm.
NoteThe devices you previously paired might connect automatically when they are turned on and within range.
Verification
- When your device is connected, click on it. You can verify connection status, device type, physical address, and other information of your device.
10.2. Connecting Bluetooth devices with bluetoothctl
bluetoothctl is a command-line utility to scan for, pair, connect, and manage connections without relying on a graphical user interface.
Prerequisites
-
The
bluetooth.serviceunit is enabled.
Procedure
Enter into the
bluetoothctlinteractive prompt:bluetoothctl
$ bluetoothctlCopy to Clipboard Copied! Toggle word wrap Toggle overflow Check the status of Bluetooth on your system:
show
[bluetoothctl]# show Powered: no Discoverable: no DiscoverableTimeout: 0x000000b4 Pairable: noCopy to Clipboard Copied! Toggle word wrap Toggle overflow If
bluetoothctlis not powered on, enter:power on
[bluetoothctl]# power onCopy to Clipboard Copied! Toggle word wrap Toggle overflow
Set the device you want to connect within range of your system into pairing mode and make your system discoverable and pairable:
discoverable on
[bluetoothctl]# discoverable onCopy to Clipboard Copied! Toggle word wrap Toggle overflow pairable on
[bluetoothctl]# pairable onCopy to Clipboard Copied! Toggle word wrap Toggle overflow Start scanning for Bluetooth devices:
scan on
[bluetoothctl]# scan onCopy to Clipboard Copied! Toggle word wrap Toggle overflow The list of discovered devices is displayed with their MAC addresses and names (if available).
When you find your device, stop scanning:
scan off
[bluetoothctl]# scan offCopy to Clipboard Copied! Toggle word wrap Toggle overflow - Note the MAC address of the device you want to connect.
Pair the device:
pair XX:XX:XX:XX:XX:XX
[bluetoothctl]# pair XX:XX:XX:XX:XX:XXCopy to Clipboard Copied! Toggle word wrap Toggle overflow You might be prompted to confirm a pairing code on your system.
Trust the device you paired:
trust XX:XX:XX:XX:XX:XX
[bluetoothctl]# trust XX:XX:XX:XX:XX:XXCopy to Clipboard Copied! Toggle word wrap Toggle overflow Optional: If you want this device to automatically connect in the future, you can set it as the default:
default XX:XX:XX:XX:XX:XX
[bluetoothctl]# default XX:XX:XX:XX:XX:XXCopy to Clipboard Copied! Toggle word wrap Toggle overflow Quit
bluetoothctlwhen you are done:quit
[bluetoothctl]# quitCopy to Clipboard Copied! Toggle word wrap Toggle overflow
Verification
Verify the status of device you connected:
devices
[bluetoothctl]# devices Device AA:BB:CC:DD:EE:FF Headphones (Connected: yes) Device 11:22:33:44:55:66 Keyboard (Connected: no)Copy to Clipboard Copied! Toggle word wrap Toggle overflow info AA:BB:CC:DD:EE:FF
[bluetoothctl]# info AA:BB:CC:DD:EE:FF <device information> Connected: yesCopy to Clipboard Copied! Toggle word wrap Toggle overflow
Chapter 11. Displaying system security classification
As an administrator of deployments where the user must be aware of the security classification of the system, you can set up a notification of the security classification. This can be either a permanent banner or a temporary notification, and it can appear on login screen, in the GNOME session, and on the lock screen.
11.1. Enabling system security classification banners
You can create a permanent classification banner to state the overall security classification level of the system. This is useful for deployments where the user must always be aware of the security classification level of the system that they are logged into.
The permanent classification banner can appear within the running session, the lock screen, and login screen, and customize its background color, its font, and its position within the screen.
This procedure creates a red banner with a white text placed on both the top and bottom of the login screen.
Procedure
Install the
gnome-shell-extension-classification-bannerpackage:yum install gnome-shell-extension-classification-banner
# yum install gnome-shell-extension-classification-bannerCopy to Clipboard Copied! Toggle word wrap Toggle overflow NoteThe package is only available in RHEL 8.6 and later.
Create the
99-class-bannerfile at either of the following locations:-
To configure a notification at the login screen, create
/etc/dconf/db/gdm.d/99-class-banner. -
To configure a notification in the user session, create
/etc/dconf/db/local.d/99-class-banner.
-
To configure a notification at the login screen, create
Enter the following configuration in the created file:
Copy to Clipboard Copied! Toggle word wrap Toggle overflow WarningThis configuration overrides similar configuration files that also enable an extension, such as Notifying of the system security classification.
To enable multiple extensions, specify all of them in the
enabled-extensionslist. For example:enabled-extensions=['heads-up-display@gnome-shell-extensions.gcampax.github.com', 'classification-banner@gnome-shell-extensions.gcampax.github.com']
enabled-extensions=['heads-up-display@gnome-shell-extensions.gcampax.github.com', 'classification-banner@gnome-shell-extensions.gcampax.github.com']Copy to Clipboard Copied! Toggle word wrap Toggle overflow Update the
dconfdatabase:dconf update
# dconf updateCopy to Clipboard Copied! Toggle word wrap Toggle overflow - Reboot the system.
Troubleshooting
- If the classification banners are not displayed for an existing user, log in as the user and enable the Classification banner extension using the Tweaks application.
11.2. Notifying of the system security classification
You can set up a notification that contains a predefined message in an overlay banner. This is useful for deployments where the user is required to read the security classification of the system before logging in.
Depending on your configuration, the notification can appear at the login screen, after logging in, on the lock screen, or after a longer time with no user activity. You can always dismiss the notification when it appears.
Procedure
Install the
gnome-shell-extension-heads-up-displaypackage:yum install gnome-shell-extension-heads-up-display
# yum install gnome-shell-extension-heads-up-displayCopy to Clipboard Copied! Toggle word wrap Toggle overflow Create the
99-hud-messagefile at either of the following locations:-
To configure a notification at the login screen, create
/etc/dconf/db/gdm.d/99-hud-message. -
To configure a notification in the user session, create
/etc/dconf/db/local.d/99-hud-message.
-
To configure a notification at the login screen, create
Enter the following configuration in the created file:
Copy to Clipboard Copied! Toggle word wrap Toggle overflow Replace the following values with text that describes the security classification of your system:
- Security classification title
- A short heading that identifies the security classification.
- Security classification description
- A longer message that provides additional details, such as references to various guidelines.
WarningThis configuration overrides similar configuration files that also enable an extension, such as Enabling system security classification banners.
To enable multiple extensions, specify all of them in the
enabled-extensionslist. For example:enabled-extensions=['heads-up-display@gnome-shell-extensions.gcampax.github.com', 'classification-banner@gnome-shell-extensions.gcampax.github.com']
enabled-extensions=['heads-up-display@gnome-shell-extensions.gcampax.github.com', 'classification-banner@gnome-shell-extensions.gcampax.github.com']Copy to Clipboard Copied! Toggle word wrap Toggle overflow Update the
dconfdatabase:dconf update
# dconf updateCopy to Clipboard Copied! Toggle word wrap Toggle overflow - Reboot the system.
Troubleshooting
- If the notifications are not displayed for an existing user, log in as the user and enable the Heads-up display message extension using the Tweaks application.
Chapter 12. Enabling Chinese, Japanese, or Korean text input
If you write with Chinese, Japanese, or Korean characters, you can configure RHEL to input text in your language.
12.1. Input methods
Certain scripts, such as Chinese, Japanese, or Korean, require keyboard input to go through an Input Method Engine (IME) to enter native text.
An input method is a set of conversion rules between the text input and the selected script. An IME is a software that performs the input conversion specified by the input method.
To input text in these scripts, you must set up an IME. If you installed the system in your native language and selected your language at the GNOME Initial Setup screen, the input method for your language is enabled by default.
12.2. Available input method engines
The following input method engines (IMEs) are available on RHEL from the listed packages:
| Languages | Scripts | IME name | Package |
|---|---|---|---|
| Chinese | Simplified Chinese | Intelligent Pinyin |
|
| Chinese | Traditional Chinese | New Zhuyin |
|
| Japanese | Kanji, Hiragana, Katakana | Kana Kanji |
|
| Korean | Hangul | Hangul |
|
| Other | Various | M17N |
|
12.3. Installing input method engines
This procedure installs input method engines (IMEs) that you can use to input Chinese, Japanese, and Korean text.
Procedure
Install all available input method packages:
yum install @input-methods
# yum install @input-methodsCopy to Clipboard Copied! Toggle word wrap Toggle overflow
12.4. Switching the input method in GNOME
This procedure sets up the input method for your script, such as for Chinese, Japanese, or Korean scripts.
Prerequisites
- The input method packages are installed.
Procedure
Go to the system menu, which is accessible from the top-right screen corner, and click Settings.
- Select the Region & Language section.
In the Input Sources list, review the currently enabled input methods.
If your input method is missing:
Click the button under the Input Sources list.
Select your language.
NoteIf you cannot find your language in the menu, click the three dots icon (More…) at the end of the menu.
Select the input method that you want to use. A cog wheel icon marks all input methods to distinguish them from simple keyboard layouts.
- Confirm your selection by clicking .
Switch the active input method using one of the following ways:
Click the input method indicator on the right side of the top panel and select your input method.
- Switch between the enabled input methods using the Super+Space keyboard shortcut.
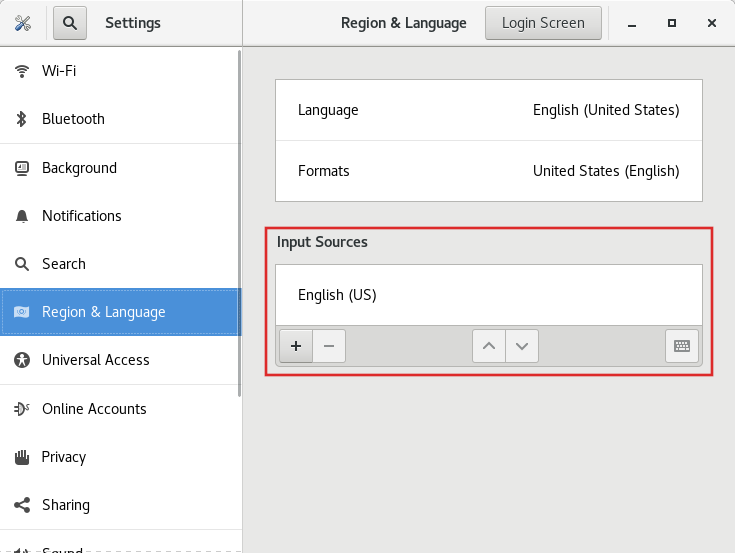
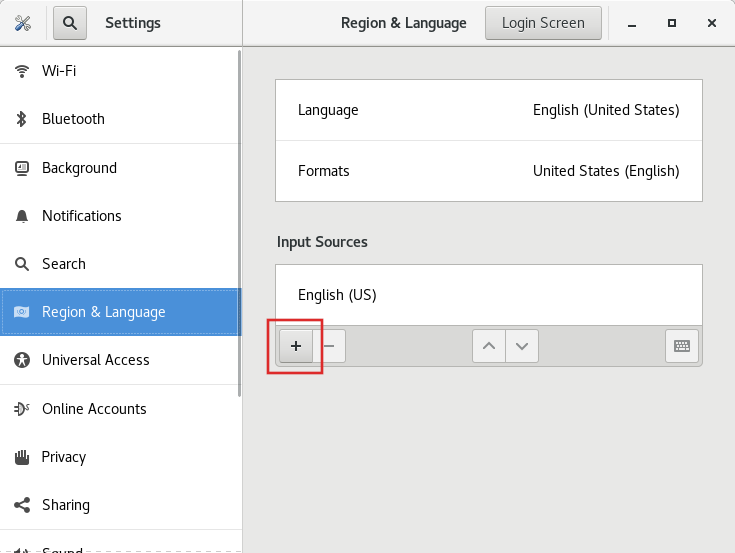
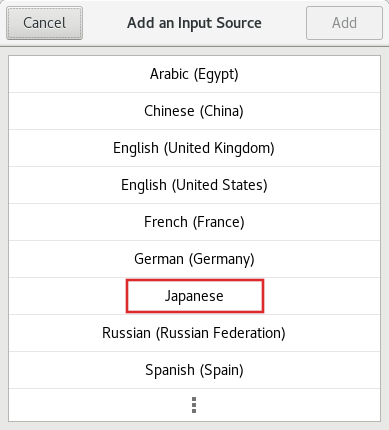
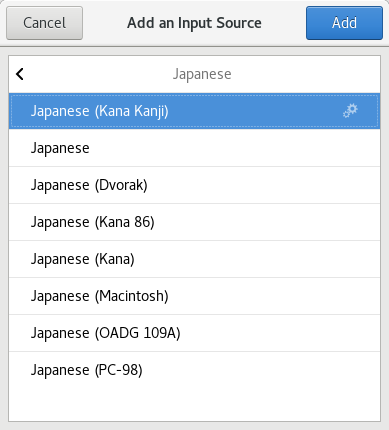
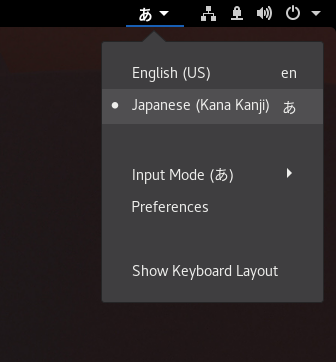
Verification
- Open a text editor.
- Type text in your language.
- Verify that the text appears in your native script.
Chapter 13. Using special characters in GNOME
In GNOME, you can use the Compose Key to type special characters from different languages and symbol sets, including those not available on your keyboard. You can enter and view special characters from different languages and symbol sets, making it easy to work with diverse character sets in GNOME.
To input these special characters, you can define one of the existing keys on your keyboard as a Compose Key. Once enabled, the Compose Key allows you to type special characters and symbols by pressing multiple keys in a specific sequence.
13.1. Enabling the Compose key for an individual user with the Tweaks application
To enable the Compose key for an individual user by Tweaks application follow these steps.
Prerequisites
The Tweaks application is installed on your system.
yum install gnome-tweaks
# yum install gnome-tweaksCopy to Clipboard Copied! Toggle word wrap Toggle overflow
Procedure
- Open the Tweaks application.
- Select Keyboard & Mouse in the side bar.
- Enable Compose Key.
Choose which key from the listed keys triggers the Compose functionality.
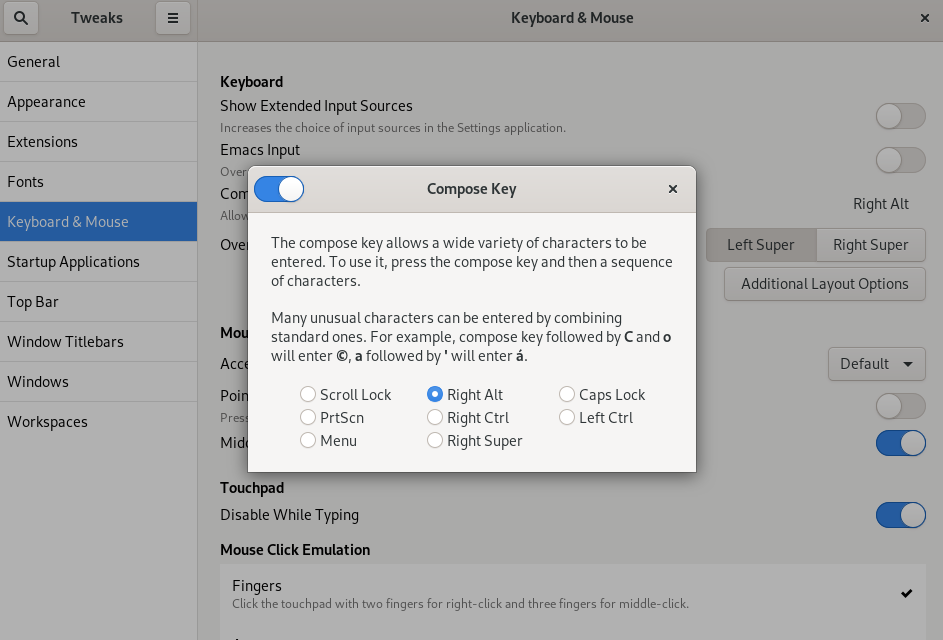
13.2. Enabling the Compose Key for another user
You can enable the Compose Key for another user with the gsettings utility.
Prerequisites
- Administrative access.
Procedure
Allow all clients to connect to the X server:
xhost +
# xhost +Copy to Clipboard Copied! Toggle word wrap Toggle overflow Run the following command to set the Compose Key:
su - <username> -c "gsettings set org.gnome.desktop.input-sources xkb-options \"['compose:<compose_key>']\""
# su - <username> -c "gsettings set org.gnome.desktop.input-sources xkb-options \"['compose:<compose_key>']\""Copy to Clipboard Copied! Toggle word wrap Toggle overflow Replace
<username>with the username of the user for whom you want to enable the Compose Key. Replace<compose_key>with the key you want to use as the Compose Key. You can use theraltoption to designate the right Alt key as the Compose Key.To see other Compose Key options that you can use to set up a Compose Key on your keyboard, use:
grep compose /usr/share/X11/xkb/rules/evdev.lst
$ grep compose /usr/share/X11/xkb/rules/evdev.lstCopy to Clipboard Copied! Toggle word wrap Toggle overflow Resets the access control:
xhost -
# xhost -Copy to Clipboard Copied! Toggle word wrap Toggle overflow
Verification
To check the Compose Key settings for another user, use:
su - <username> -c "gsettings get org.gnome.desktop.input-sources xkb-options"
# su - <username> -c "gsettings get org.gnome.desktop.input-sources xkb-options"Copy to Clipboard Copied! Toggle word wrap Toggle overflow Replace
<username>with the username of the user for whom you want to check the Compose Key setting.
13.3. Enabling the Compose key for all users
To enable the Compose key for all users, follow these steps.
Procedure
-
Open the
/etc/dconf/db/local.d/00-input-sourcesfile as therootuser. Enter the following content in the file:
[org/gnome/desktop/input-sources] # Enable the Compose key xkb-options=['compose:selected-key']
[org/gnome/desktop/input-sources] # Enable the Compose key xkb-options=['compose:selected-key']Copy to Clipboard Copied! Toggle word wrap Toggle overflow Replace
selected-keywith the key that triggers Compose. For example, useraltto set the right Alt key.To override the user’s Compose settings and prevent the user from changing them, create the
/etc/dconf/db/local.d/locks/input-sourcesfile and enter the following:Lock the list of enabled XKB options
# Lock the list of enabled XKB options /org/gnome/desktop/input-sources/xkb-optionsCopy to Clipboard Copied! Toggle word wrap Toggle overflow Update the system databases for the changes to take effect:
dconf update
# dconf updateCopy to Clipboard Copied! Toggle word wrap Toggle overflow - Users must log out and back in again before the system-wide settings take effect.
13.4. Compose Key sequences for special characters
The table showcases Compose Key sequences used to input special characters with diacritics or accents in GNOME. Each row displays a Compose Key sequence alongside its corresponding result
| Compose Key Sequence | Result |
|---|---|
| Compose+'+letter | Letter with acute accent (é, á, ñ) |
| Compose+`+letter | Letter with grave accent (è, ù, ò) |
| Compose+"+letter | Letter with umlaut or diaeresis (ë, ö, ü) |
| Compose+-+letter | Letter with macron (ā, ē, ō) |
| Compose+/+letter | Letter with stroke or diacritic (ø, ł, ǿ) |
| Compose+=+letter | Letter with double acute accent (ő, ű, ȁ) |
| Compose+.+letter | Letter with dot above (ȧ, ċ, ḋ) |
| Compose+,+letter | Letter with cedilla (ç, ş, ņ) |
| Compose+^+letter | Letter with circumflex accent (â, ê, î) |
| Compose+~+letter | Letter with tilde accent (ã, ñ, õ) |
Chapter 14. Typing emoji characters
You can type emoji characters using several different methods in GNOME, depending on the type of the application.
14.1. Typing emoji characters in GTK applications
This procedure inserts an emoji character in an application that uses the GTK graphical toolkit, such as in native GNOME applications.
Prerequisites
- Make sure that the application is built on the GTK toolkit.
Procedure
- Open a GTK application.
- Make sure that a text field is active.
Press Ctrl+..
The emoji selection menu opens.
Browse the emoji characters or type a keyword that identifies the emoji character that you want to insert, such as
smile.For the full list of keywords associated with emoji characters, see the Other Keywords column on the Emoji List page.
- Click the selected character, or navigate to it using the cursor keys and press Enter.
Verification
- Check that the intended emoji character now appears at your cursor.
14.2. Typing emoji characters in any applications
This procedure inserts an emoji character in any application, regardless of the graphical toolkit that the application uses.
Procedure
- Open an application.
- Make sure that a text field is active.
Press Ctrl+Shift+e.
The underscored letter
eappears at your cursor.Type a keyword that identifies the emoji character that you want to insert, such as
smile.For the full list of keywords associated with emoji characters, see the Other Keywords column on the Emoji List page.
- Repeatedly press Space to browse the emoji characters that match your keyword.
- Confirm the selected emoji character by pressing Enter.
Verification
- Check that the intended emoji character now appears at your cursor.
Chapter 15. Managing storage volumes in GNOME
This section describes how you can manage storage volumes in GNOME with a virtual file system. GNOME Virtual File System (GVFS) is an extension of the virtual file system interface provided by the libraries the GNOME desktop is built on.
15.1. The GVFS system
GVFS provides complete virtual file system infrastructure and handles storage in the GNOME desktop. It uses addresses for full identification based on the Uniform Resource Identifier (URI) standard, syntactically similar to URL addresses in web browsers. These addresses in the form of schema://user@server/path are the key information determining the kind of service.
GVFS helps to mount the resources. These mounts are shared between multiple applications. Resources are tracked globally within the running desktop session, which means that even if you quit an application that triggered the mount, the mount continues to be available for any other application. Multiple applications can access the mount at the same time unless it is limited by a back end. Some protocols by design permit only a single channel.
GVFS mounts removable media in the /run/media/ directory.
15.2. The format of the GVFS URI string
You must form a URI string to use back end services. This string is a basic identifier used in GVFS, which carries all necessary information needed for unique identification, such as type of service, back end ID, absolute path, or user name if required. You can see this information in the Files address bar and GTK+ open or save file dialog.
The following example is a very basic form of the URI string, which points to a root directory (/) of the File Transfer Protocol (FTP) server running at the ftp.myserver.net domain:
Example 15.1. A URI string pointing to the root FTP directory
ftp://ftp.myserver.net/
ftp://ftp.myserver.net/Example 15.2. A URI string pointing to a text file on FTP
ssh://joe@ftp.myserver.net/home/joe/todo.txt
ssh://joe@ftp.myserver.net/home/joe/todo.txt15.3. Mounting a storage volume in GNOME
You can manually mount a local storage volume or a network share in the Files application.
Procedure
- Open the Files application.
Click Other Locations in the side bar.
The window lists all connected storage volumes and all network shares that are publicly available on your local area network.
If you can see the volume or network share in this list, mount it by clicking the item.
If you want to connect to a different network share, use the following steps.
- Enter the GVFS URI string to the network share in the Connect to Server field.
- Press .
- If the dialog asks you for login credentials, enter your name and password into the relevant fields.
- When the mounting process finishes, you can browse the files on the volume or network share.
15.4. Unmounting a storage volume in GNOME
You can unmount a storage volume, a network share, or another resource in the Files application.
Procedure
- Open the Files application.
- In the side bar, click the Unmount (⏏) icon next to the chosen mount.
- Wait until the mount disappears from the side bar or a notification about the safe removal appears.
15.5. Access to GVFS mounts in the file system
Learn more about FUSE, the main daemon for the GVFS virtual file system.
Applications built with the GIO library can access GVFS mounts. In addition, GVFS provides a FUSE daemon which exposes active GVFS mounts. Any application can access active GVFS mounts using the standard POSIX APIs as though mounts were regular file systems.
In certain applications, additional library dependency and new virtual file system (VFS) subsystem specifics might be unsuitable or too complicated. For such reasons and to boost compatibility, GVFS provides a File System in Userspace (FUSE) daemon, which exposes active mounts through its mount for standard Portable Operating System Interface (POSIX) access. This daemon transparently translates incoming requests to imitate a local file system for applications.
You might experience difficulties with certain combinations of applications and GVFS back ends.
The FUSE daemon starts automatically with the main gvfs daemon and mounts volumes either in the /run/user/UID/gvfs/ or ~/.gvfs/ directories as a fallback.
Manual browsing shows individual directories for each GVFS mount. The system passes the transformed path as an argument when you are opening documents from GVFS locations with non-native applications. Note that native GIO applications automatically translate this path back to a native URI.
15.6. Available GIO commands
GIO provides several commands that might be useful for scripting or testing.
Here is a set of POSIX commands counterparts as follows:
| Command | Description |
|---|---|
|
| Displays the content of a file. |
|
| Creates a new directory. |
|
| Renames a file. |
|
|
Provides access to various aspects of the |
|
| Sets a file attribute on a file. |
|
| Makes a copy of a file. |
|
| Lists directory contents. |
|
| Moves a file from one location to another. |
|
| Removes a file. |
|
|
Sends files or directories to the |
|
| Displays information of the given locations. |
|
| Reads from standard input and saves the data to the given location. |
|
| Lists the contents of the given locations recursively, in a tree-like format. If no location is given, it defaults to the current directory. |
Following additional commands provide more control of GIO specifics:
| Command | Description |
|---|---|
|
| Monitors files or directories for changes, such as creation, deletion, content and attribute changes, and mount and unmount operations affecting the monitored locations. |
|
| Lists the registered and recommended applications for the mimetype if no handler is given, else, it is set as the default handler for the mimetype. |
|
| Opens files with the default application that is registered to handle files of this type. |
For user convenience, bash completion is provided as a part of the package.
All these commands are native GIO clients, there is no need for the fallback FUSE daemon to be running. Their purpose is not to be drop-in replacements for POSIX commands, in fact, a very little range of switches is supported. In their basic form, these commands take an URI string as an argument instead of a local path.
15.7. Sample GIO commands
The following section provides a few examples of the GIO commands usage.
Example 15.3. List all files in the local /tmp directory
gio list file:///tmp
$ gio list file:///tmpExample 15.4. List the content of a text file from a remote system
gio cat ssh://joe@ftp.myserver.net/home/joe/todo.txt
$ gio cat ssh://joe@ftp.myserver.net/home/joe/todo.txtExample 15.5. Copy the previous text file to a local /tmp directory
gio copy ssh://joe@ftp.myserver.net/home/joe/todo.txt /tmp/
$ gio copy ssh://joe@ftp.myserver.net/home/joe/todo.txt /tmp/15.8. Overview of GVFS metadata
The GVFS metadata storage is implemented as a set of key-and-value pairs that bind information to a particular file. Thus, there is a tool for a user or application to save small data designed for runtime information such as icon position, last-played location, position in a document, emblems, notes, and so on.
Whenever you move a file or directory, GVFS moves the metadata accordingly so that metadata stays connected to the respective file. The GVFS stores all metadata privately, so metadata is available only on the machine. However, GVFS tracks mounts and removable media as well.
GVFS mounts removable media in the /run/media/ directory.
To view and manipulate with metadata, you can use:
-
the
gio infocommand, -
the
gio setcommand, or - any other native GIO way of working with attributes.
15.9. Setting custom GIO metadata attribute
This procedure describes how to set a custom metadata attribute.
Notice the differences between particular gio info calls and data persistence after a move or rename. Note the gio info command output.
Procedure
Create an empty file:
touch /tmp/myfile
$ touch /tmp/myfileCopy to Clipboard Copied! Toggle word wrap Toggle overflow View the metadata of this file:
gio info -a 'metadata::*' /tmp/myfile
$ gio info -a 'metadata::*' /tmp/myfile uri: file:///tmp/myfile attributes:Copy to Clipboard Copied! Toggle word wrap Toggle overflow Set a string to this file:
gio set -t string /tmp/myfile 'metadata::mynote' 'Please remember to delete this file!'
$ gio set -t string /tmp/myfile 'metadata::mynote' 'Please remember to delete this file!'Copy to Clipboard Copied! Toggle word wrap Toggle overflow View the metadata:
gio info -a 'metadata::*' /tmp/myfile
$ gio info -a 'metadata::*' /tmp/myfile uri: file:///tmp/myfile attributes: metadata::mynote: Please remember to delete this file!Copy to Clipboard Copied! Toggle word wrap Toggle overflow Move this file to a new location:
gio move /tmp/myfile /tmp/newfile
$ gio move /tmp/myfile /tmp/newfileCopy to Clipboard Copied! Toggle word wrap Toggle overflow View the metadata:
gio info -a 'metadata::*' /tmp/newfile
$ gio info -a 'metadata::*' /tmp/newfile uri: file:///tmp/newfile attributes: metadata::mynote: Please remember to delete this file!Copy to Clipboard Copied! Toggle word wrap Toggle overflow
The metadata persists when you move the file using the GIO API.
15.10. Password management of GVFS mounts
Learn more about the GVFS mount authentication.
A typical GVFS mount authenticates on its activation unless the resource allows anonymous authentication or does not require any authentication at all.
In a standard GTK+ dialog, you can choose whether to store the password.
When you select the persistent storage, the password is stored in the user keyring. GNOME Keyring is a central place for secrets storage. The password is encrypted and automatically unlocked on desktop session start using the password provided on login. For protecting it by a different password, you can set the password at the first use.
The Passwords and Keys application helps to manage the stored password and GNOME Keyring. It allows removing individual records or changing passwords.
15.11. GVFS back ends
Back ends in GVFS provide access to a specific type of resource. This section provides a list of available GVFS back ends and their specifications.
Some back ends are packaged separately and not installed by default. For installing additional back ends, use the yum package manager.
| Back end | Description |
|---|---|
|
| Similar to Media Transfer Protocol (MTP), exposes files on your Apple iDevice connected through USB. |
|
| An Apple Filing Protocol (AFP) client to access file services of macOS and the original Mac operation system. |
|
| Handles various archiving files (ZIP, TAR) in read-only way. |
|
| Provides administrator access to the local file system. |
|
| A virtual back end that burning applications use as a temporary storage for new CD, DVD, or BD medium content. |
|
| Exposes Audio CD through separate Waveform Audio File Format (WAV) files. |
|
| A virtual back end consolidating active mounts and physical volumes. Acts similarly to a signpost. Previously used by Files for its Computer view. |
|
| A WebDAV client, including secure variant. Authentication is possible only during mount. The back end does not support later re-authentication on per-folder basis. |
|
| DNS Service Discovery: An Avahi client, used during network browsing, forms persistent URIs to discovered services. |
|
|
A fully featured File Transfer Protocol (FTP) client. Supports passive transfers by default. Also, handles secure mode over |
|
| A Picture Transfer Protocol (PTP) client to access your camera attached by USB or FireWire. |
|
| Provides access to Google Drive. The Google Drive account needs to be configured in the Online Accounts settings. |
|
| Handles all HTTP requests. Useful for easy downloading files from web in client applications. |
|
|
A simple testing back end that proxies the |
|
| A Media Transfer Protocol (MTP) back end for accessing media player and smart phone memory. |
|
| Allows you to browse Window Network and show shares discovered over Avahi. |
|
| A back end used in the file chooser dialog to list recent files used by GNOME applications. |
|
| A fully-featured SSH File Transfer Protocol (SFTP) client. |
|
| Accesses Samba and Windows shares. |
|
| A trash back end that allows to restore deleted files. |
Chapter 16. Troubleshooting volume management in GNOME
Following are some common errors of volume management in GNOME and ways to resolve them.
16.1. Troubleshooting access to GVFS locations from non-GIO clients
If you have problems accessing GVFS locations from your application, it might mean that it is not native GIO client. Native GIO clients are typically all GNOME applications using GNOME libraries (glib, gio). The gvfs-fuse service is provided as a fallback for non-GIO clients.
Prerequisites
The
gvfs-fusepackage is installed.yum install gvfs-fuse
$ yum install gvfs-fuseCopy to Clipboard Copied! Toggle word wrap Toggle overflow
Procedure
Ensure that
gvfs-fuseis running.ps ax | grep gvfsd-fuse
$ ps ax | grep gvfsd-fuseCopy to Clipboard Copied! Toggle word wrap Toggle overflow If
gvfs-fuseis not running, log out and log back in. Red Hat does not recommend startinggvfs-fusemanually.Find the system user ID (UID) for the
/run/user/UID/gvfs/path.The
gvfsd-fusedaemon requires a path where it can expose its services. When the/run/user/UID/gvfs/path is unavailable,gvfsd-fuseuses the~/.gvfspath.id -u
$ id -uCopy to Clipboard Copied! Toggle word wrap Toggle overflow If
gvfsd-fuseis still not running, start thegvfsd-fusedaemon:/usr/libexec/gvfsd-fuse -f /run/user/_UID_/gvfs
$ /usr/libexec/gvfsd-fuse -f /run/user/_UID_/gvfsCopy to Clipboard Copied! Toggle word wrap Toggle overflow Now, the FUSE mount is available, and you can manually browse for the path in your application.
-
Find the GVFS mounts under the
/run/user/UID/gvfs/or~/.gvfslocations.
16.2. Troubleshooting an invisible connected USB disk
When you connect a flash drive, the GNOME Desktop might not display it. If your flash drive is not visible in Files, but you can see it in the Disks application, you can attempt to set the Show in user interface option in Disks.
Procedure
- Open the Disks application.
- Select the disk in the side bar.
- Below Volumes, click Additional partition options > Edit Mount Options
- Click Show in user interface.
- Confirm by clicking .
- If the flash drive is still not visible, you can try to physically remove the drive and try connecting it again.
16.3. Troubleshooting unknown or unwanted partitions listed in Files
You might see unknown or unwanted partitions when you plug a disk in. For example, when you plug in a flash disk, it is automatically mounted and its volumes are shown in the Files side bar. Some devices have a special partition with backups or help files, which you might not want to see each time you plug in the device.
Procedure
- Open the Disks application.
- Select the disk in the side bar.
- Below Volumes, click Additional partition options > Edit Mount Options
- Deselect Show in user interface.
- Confirm by clicking .
16.5. Troubleshooting a busy disk in GNOME
If you receive a notification about your disk being busy, determine the programs that are accessing the disk. Then, you can end the programs that are running. You can also use the System Monitor application to kill the programs forcefully.
Prerequisites
The
iotoputility is installed:yum install iotop
# yum install iotopCopy to Clipboard Copied! Toggle word wrap Toggle overflow
Procedure
Examine the list of open files.
-
Run the
lsofcommand to get the list of open files. -
If
lsofis not available, run theps axcommand. - You can use System Monitor to display the running processes in a GUI.
-
Run the
When you have determined the programs, terminate them using any of the following methods:
-
On the command line, execute the
killcommand. - In System Monitor, right-click the line with the program process name, and click End or Kill from the context menu.
-
On the command line, execute the
Chapter 17. Managing bookmarks in GNOME
In GNOME, you can edit the bookmarks that are displayed in applications and dialogs that manage files.
17.1. Bookmarks in GNOME
Bookmarks integrate into GTK+ and in the GNOME desktop. Every application that presents a standard GTK+ Open and Save dialog (GtkFileChooser) lists bookmarks in the left panel of the dialog. Also, Files and its clones present bookmarks in a sidebar.
Besides bookmarks, GtkFileChooser lists all other available GVFS volumes and mounts in the sidebar.
While activating a bookmark for the first time, the GVFS subsystem looks for existing mounts and tries to mount the location if the mount does not exist yet. This way, you can authenticate even within the Open or Save dialog.
Bookmarks are located in the ~/.config/gtk-3.0/bookmarks file. In the following example, the bookmarked locations are ~/Music, ~/Pictures, ~/Videos, ~/Downloads, and ~/bin, so the content of the ~/.config/gtk-3.0/bookmarks file looks as follows:
file:///home/username/Music file:///home/username/Pictures file:///home/username/Videos file:///home/username/Downloads file:///home/username/bin
file:///home/username/Music
file:///home/username/Pictures
file:///home/username/Videos
file:///home/username/Downloads
file:///home/username/binReplace username with the user name you are logged in.
You can use this file to edit bookmarks based on your requirements.
17.2. Adding a bookmark in Files
You can save a reference to a location by bookmarking it.
Procedure
- Select the folder or file you want to bookmark.
Do one of the following:
- Press Ctrl+D or
- Drag and drop the file or folder to the sidebar.
17.3. Adding a bookmark for all users
As a system administrator, you can set a bookmark for several users at once so that file shares are easily accessible to all the users.
Procedure
-
In the home directory of each existing user, edit the
~user/.config/gtk-3.0/bookmarksfile. In the file, add a Uniform Resource Identifiers (URI) line that identifies the bookmark.
For example, the following lines add bookmarks to the
/usr/share/doc/directory and to the GNOME FTP network share:file:///usr/share/doc/ ftp://ftp.gnome.org/
file:///usr/share/doc/ ftp://ftp.gnome.org/Copy to Clipboard Copied! Toggle word wrap Toggle overflow Optional: To also add the bookmarks for every newly created user on the system:
-
Create the
/etc/skel/.config/gtk-3.0/bookmarksfile. - Enter the bookmark URI lines in the file.
-
Create the
Chapter 18. Customizing default favorite applications
You can customize frequently used applications as your favorite applications. You can see these favorite applications on the GNOME Shell dash in the Activities overview. You can use dconf to set the favorite applications for an individual user or for all users.
18.1. Setting different favorite applications for individual users
You can set the default favorite applications for individual users.
Procedure
- Open the Activities overview by clicking at the top left of the screen.
Add applications into your favorite list using any of the following methods:
- Click the grid button to find the application you want, right-click the application icon, and select Add to Favorites.
- Click-and-drag the icon into the dash.
View all the applications that exists in the favorite list:
dconf read /org/gnome/shell/favorite-apps
$ dconf read /org/gnome/shell/favorite-appsCopy to Clipboard Copied! Toggle word wrap Toggle overflow
If you want to lock down the above settings to prevent users from changing them, see Locking down selected tasks.
18.2. Setting the same favorite applications for all users
You can modify system database files using dconf keyfiles to set the same favorites for all users. The following steps edit the dconf profile and then create a keyfile to set default favorite applications for all users in the local configuration database.
Procedure
Create the key file
/etc/dconf/db/local.d/00-favorite-appsto provide information for the local database./etc/dconf/db/local.d/00-favorite-appscontents:Snippet sets gedit, terminal and nautilus as default favorites for all users
# Snippet sets gedit, terminal and nautilus as default favorites for all users [org/gnome/shell] favorite-apps = ['gedit.desktop', 'gnome-terminal.desktop', 'nautilus.desktop']Copy to Clipboard Copied! Toggle word wrap Toggle overflow To prevent users from overriding these settings, create the file
/etc/dconf/db/local.d/locks/favorite-appswith the following content:Lock default favorite applications
# Lock default favorite applications /org/gnome/shell/favorite-appsCopy to Clipboard Copied! Toggle word wrap Toggle overflow -
Run the
dconf updatecommand to incorporate your changes into the system databases. - Logout and login again for system-wide changes to take effect.
Chapter 19. Authenticating the user in the desktop environment
You can perform the following operations:
- Configure enterprise login options in GNOME,
- Enable smart card authentication, and
- Enable fingerprint authentication.
19.1. Using enterprise credentials to authenticate in GNOME
You can use your enterprise domain credentials to access your system. This section explains how to log in using enterprise credentials in GNOME, configure enterprise credentials at the GNOME welcome screen, and add an authenticated user with enterprise credentials in GNOME.
19.1.1. Logging in with Enterprise Credentials in GNOME
You can use your domain credentials to login to GNOME if your network has an Active Directory or Identity Management domain available, and you have a domain account.
Prerequisites
System is configured to use enterprise domain accounts.
For more information, see Joining a RHEL 8 system to an IdM domain using the web console.
Procedure
While logging in, enter the domain user name followed by an @ sign, and then your domain name.
For example, if your domain name is example.com and the user name is User, enter:
User@example.com
User@example.comCopy to Clipboard Copied! Toggle word wrap Toggle overflow NoteIf the machine is already configured for domain accounts, you should see a helpful hint describing the login format.
19.1.2. Configuring enterprise credentials at the GNOME welcome screen
Perform the following steps to configure workstation for enterprise credentials using the welcome screen that belongs to the GNOME Initial Setup program.
The initial setup runs only when you create a new user and log into that account for the first time.
Procedure
- At the login welcome screen, choose Use Enterprise Login.
- Enter your domain name into the Domain field.
- Enter your domain account user name and password.
- Click Next.
- Depending on the domain configuration, a pop up prompts for the domain administrator’s credentials.
19.1.3. Adding an authenticated user with enterprise credentials in GNOME
This procedure helps to create a new user through the GNOME Settings application. The user is authenticated using enterprise credentials.
Prerequisites
- Configured enterprise credentials at the GNOME welcome screen. For more information, see Configuring enterprise credentials at the GNOME welcome screen.
Procedure
- Open the Settings window clicking icons in the top right corner of the screen.
- From the list of items, select Details > Users.
- Click Unlock and enter the administrator’s password.
- Click Add user…
- Click Enterprise Login.
- Fill out the Domain, Username, and Password fields for your enterprise account.
- Click Add.
- Depending on the domain configuration, a pop up prompts for the domain administrator’s credentials.
19.1.4. Troubleshooting enterprise login in GNOME
You can use the realm utility and its various sub-commands to troubleshoot the enterprise login configuration.
Procedure
To see whether the machine is configured for enterprise logins, run the following command:
realm list
$ realm listCopy to Clipboard Copied! Toggle word wrap Toggle overflow
Network administrators can configure and pre-join workstations to the relevant domains using the kickstart realm join command, or running realm join in an automated fashion from a script.
19.2. Enabling smart card authentication
You can enable workstations to authenticate using smart cards. In order to do so, you must configure GDM to allow prompting for smart cards and configure operating system to log in using a smart card.
You can use two ways to configure the GDM to allow prompting for smart card authentication with GUI or using the command line.
19.2.1. Configuring smart card authentication in GDM using the GUI
You can enable smart card authentication using dconf editor GUI. The dconf Editor application helps to update the configuration-related values on a dconf database.
Prerequisites
Install the dconf-editor package:
yum install dconf-editor
# yum install dconf-editorCopy to Clipboard Copied! Toggle word wrap Toggle overflow
Procedure
-
Open the dconf-Editor application and navigate to
/org/gnome/login-screen. - Turn on the enable-password-authentication option.
- Turn on the enable-smartcard-authentication option.
19.2.2. Configuring smart card authentication in GDM using the command line
You can use the dconf command-line utility to enable the GDM login screen to recognize smart card authentication.
Procedure
Create a keyfile for the GDM database in /
etc/dconf/db/gdm.d/login-screen, which contains the following content:[org/gnome/login-screen] enable-password-authentication='false' enable-smartcard-authentication='true'
[org/gnome/login-screen] enable-password-authentication='false' enable-smartcard-authentication='true'Copy to Clipboard Copied! Toggle word wrap Toggle overflow Update the system
dconfdatabases:dconf update
# dconf updateCopy to Clipboard Copied! Toggle word wrap Toggle overflow
19.2.3. Enabling the smart card authentication method in the system
For smart card authentication you can use the system-config-authentication tool to configure the system to allow you to use smart cards. Thus, you can avail GDM as a valid authentication method for the graphical environment. The tool is provided by the authconfig-gtk package.
Prerequisites
-
Install
authconfig-gtkpackage - Configure GDM for smart card authentication
19.3. Fingerprint authentication
You can use the system-config-authentication tool to enable fingerprint authentication to allow users to login using their enrolled fingerprints. The tool is provided by the authconfig-gtk package.
Chapter 20. Locking down selected tasks
This section describes how to lock down for users the following tasks:
- Printing
- File saving on disk
- Repartitioning
- User logout and user switching
20.1. Locking down printing
You can disable the print dialog from being shown to users. This can be useful if you are giving temporary access to a user or you do not want the user to print to network printers.
The feature only works in applications which support it. Not all GNOME and third party applications have this feature enabled. The changes do not have effect on applications which do not support this feature.
To prevent applications from printing, lock down the org.gnome.desktop.lockdown.disable-printing key:
Procedure
Create the user profile in
/etc/dconf/profile/userunless it already exists:user-db:user system-db:local
user-db:user
system-db:local
Copy to Clipboard Copied! Toggle word wrap Toggle overflow Create a local database for machine-wide settings in the
etc/dconf/db/local.d/00-lockdownfile:[org/gnome/desktop/lockdown] # Prevent applications from printing disable-printing=true
[org/gnome/desktop/lockdown] # Prevent applications from printing disable-printing=trueCopy to Clipboard Copied! Toggle word wrap Toggle overflow Override the user’s setting and prevent the user from changing it in the
/etc/dconf/db/local.d/locks/lockdownfile:List the keys used to configure lockdown
# List the keys used to configure lockdown /org/gnome/desktop/lockdown/disable-printingCopy to Clipboard Copied! Toggle word wrap Toggle overflow Update the system databases:
dconf update
# dconf updateCopy to Clipboard Copied! Toggle word wrap Toggle overflow
Having followed these steps, applications supporting this lockdown key, such as Evolution, Evince, or Gedit, will disable printing.
20.2. Locking file saving on disk
You can disable the Save and Save As dialogs. This can be useful if you are giving temporary access to a user or you do not want the user to save files to the computer.
The feature only works in applications which support it. Not all GNOME and third party applications have this feature enabled. The changes will have no effect on applications which do not support this feature.
To prevent applications from file saving, lock down the org.gnome.desktop.lockdown.disable-save-to-disk key:
Procedure
Create the user profile in
/etc/dconf/profile/userunless it already exists:user-db:user system-db:local
user-db:user system-db:localCopy to Clipboard Copied! Toggle word wrap Toggle overflow Create a local database for machine-wide settings in the
/etc/dconf/db/local.d/00-lockdownfile:[org/gnome/desktop/lockdown] # Prevent the user from saving files on disk disable-save-to-disk=true
[org/gnome/desktop/lockdown] # Prevent the user from saving files on disk disable-save-to-disk=trueCopy to Clipboard Copied! Toggle word wrap Toggle overflow Override the user’s setting and prevent the user from changing it in the
/etc/dconf/db/local.d/locks/lockdownfile:Lock this key to disable saving files on disk
# Lock this key to disable saving files on disk /org/gnome/desktop/lockdown/disable-save-to-diskCopy to Clipboard Copied! Toggle word wrap Toggle overflow Update the system databases:
dconf update
# dconf updateCopy to Clipboard Copied! Toggle word wrap Toggle overflow
Having followed these steps, applications supporting this lockdown key, for example Videos, Image Viewer, Evolution, Document Viewer, or GNOME Shell, will disable their Save As dialogs.
20.3. Locking repartitioning
polkit enables you to set permissions for individual operations. For udisks2, the utility for disk management services, the configuration is located at /usr/share/polkit-1/actions/org.freedesktop.udisks2.policy. This file contains a set of actions and default values, which can be overridden by system administrator.
polkit configuration stored in /etc overrides the configuration shipped by packages in /usr/share/.
Procedure
Create a file with the same content as in
/usr/share/polkit-1/actions/org.freedesktop.udisks2.policy:cp /usr/share/polkit-1/actions/org.freedesktop.udisks2.policy /etc/share/polkit-1/actions/org.freedesktop.udisks2.policy
cp /usr/share/polkit-1/actions/org.freedesktop.udisks2.policy /etc/share/polkit-1/actions/org.freedesktop.udisks2.policyCopy to Clipboard Copied! Toggle word wrap Toggle overflow Do not change the
/usr/share/polkit-1/actions/org.freedesktop.udisks2.policyfile, your changes will be overwritten by the next package update.Delete the action you do not need, and add the following lines to the
/etc/polkit-1/actions/org.freedesktop.udisks2.policyfile:Copy to Clipboard Copied! Toggle word wrap Toggle overflow Replace
nobyauth_adminif you want to ensure only therootuser is able to perform the action.- Save the changes.
When the user tries to change the disks settings, the following message is returned:
Authentication is required to modify the disks settings.
Authentication is required to modify the disks settings.20.4. Locking down user logout and user switching
To prevent the user from logging out, use the following procedure.
Procedure
Create the
/etc/dconf/profile/userprofile, which contains the following lines:user-db:user system-db:local
user-db:user
system-db:local
Copy to Clipboard Copied! Toggle word wrap Toggle overflow where
localis the name of a dconf database-
Create the
/etc/dconf/db/local.d/directory if it does not already exist. Create the
/etc/dconf/db/local.d/00-logoutkey file to provide information for the local database:[org/gnome/desktop/lockdown] # Prevent the user from user switching disable-log-out=true
[org/gnome/desktop/lockdown] # Prevent the user from user switching disable-log-out=trueCopy to Clipboard Copied! Toggle word wrap Toggle overflow Override the user’s setting, and prevent the user from changing it in the
/etc/dconf/db/local.d/locks/lockdownfile:Lock this key to disable user logout
# Lock this key to disable user logout /org/gnome/desktop/lockdown/disable-log-outCopy to Clipboard Copied! Toggle word wrap Toggle overflow Update the system databases:
dconf update
# dconf updateCopy to Clipboard Copied! Toggle word wrap Toggle overflow - Users must log out and back in again before the system-wide settings take effect.
Users can evade the logout lockdown by switching to a different user. To prevent such scenario, lock down user switching as well.
To lock down user switching, use the following procedure:
Procedure
Create the
/etc/dconf/profile/userprofile, which contains the following lines:user-db:user system-db:local
user-db:user system-db:localCopy to Clipboard Copied! Toggle word wrap Toggle overflow where
localis the name of a dconf database-
Create the
/etc/dconf/db/local.d/directory if it does not already exist. Create the
/etc/dconf/db/local.d/00-user-switchingkey file to provide information for the local database:Copy to Clipboard Copied! Toggle word wrap Toggle overflow Override the user’s setting, and prevent the user from changing it in the
/etc/dconf/db/local.d/locks/lockdownfile:Lock this key to disable user switching
# Lock this key to disable user switching
/org/gnome/desktop/lockdown/disable-user-switching
/org/gnome/desktop/screensaver/user-switch-enabled
Copy to Clipboard Copied! Toggle word wrap Toggle overflow Update the system databases:
dconf update
# dconf updateCopy to Clipboard Copied! Toggle word wrap Toggle overflow - Users must log out and back in again before the system-wide settings take effect.
Chapter 21. Restricting the session to a single application
You can start the GNOME session in single-application mode, also known as kiosk mode. In this session, GNOME displays only a full-screen window of the application that you have selected.
21.1. Single-application mode
Single-application mode is a modified GNOME session that reconfigures the Mutter window manager into an interactive kiosk. This session locks down certain behavior to make the standard desktop more restrictive. The user can interact only with a single application selected by the administrator.
You can set up single-application mode for several use cases, such as:
- In the communication, entertainment, or education fields
- As a self-serve machine
- As an event manager
- As a registration point
The gnome-session-kiosk-session package provides the single-application mode configuration and sessions in RHEL 8.
21.2. Enabling single-application mode
This procedure installs and enables single-application mode, which restricts the GNOME session to a single application.
Procedure
Install the
gnome-session-kiosk-sessionpackage:yum install gnome-session-kiosk-session
# yum install gnome-session-kiosk-sessionCopy to Clipboard Copied! Toggle word wrap Toggle overflow As the user that will open the single-application session, create the
/home/user/.local/bin/redhat-kioskfile:mkdir -p ~/.local/bin touch ~/.local/bin/redhat-kiosk
[user]$ mkdir -p ~/.local/bin

[user]$ touch ~/.local/bin/redhat-kiosk
Copy to Clipboard Copied! Toggle word wrap Toggle overflow Edit the
/home/user/.local/bin/redhat-kioskfile and enter the executable name of the application that you want to launch in single-application mode.For example, to launch the Firefox browser in single-application mode, enter the following content:
#!/bin/sh

while true; do
    firefox --kiosk https://example.org
done
#!/bin/sh while true; do firefox --kiosk https://example.org doneCopy to Clipboard Copied! Toggle word wrap Toggle overflow The
while trueloop ensures that the application restarts if it terminates for any reason.Make the file executable:
chmod +x ~/.local/bin/redhat-kiosk
[user]$ chmod +x ~/.local/bin/redhat-kioskCopy to Clipboard Copied! Toggle word wrap Toggle overflow If you created the file or its containing directories as a different user than the single-application user, such as
root, ensure that the file has the correct permissions:chown -R user:group ~user/.local
# chown -R user:group ~user/.localCopy to Clipboard Copied! Toggle word wrap Toggle overflow - At the GNOME login screen, select the Kiosk session from the gear button menu and log in as the single-application user.
Chapter 22. Managing user sessions
22.1. What GDM is
The GNOME Display Manager (GDM) is a graphical login program running in the background that runs and manages the X.Org display servers for both local and remote logins.
GDM is a replacement for XDM, the X Display Manager. However, GDM is not derived from XDM and does not contain any original XDM code. In addition, there is no support for a graphical configuration tool in GDM, so editing the /etc/gdm/custom.conf configuration file is necessary to change the GDM settings.
22.2. Restarting GDM
When you make changes to the system configuration such as setting up the login screen banner message, login screen logo, or login screen background, restart GDM for your changes to take effect.
Restarting the gdm service terminates all currently running GNOME sessions of all desktop users who are logged in. This might result in users losing unsaved data.
Procedure
To restart the GDM service, run the following command:
systemctl restart gdm.service
# systemctl restart gdm.serviceCopy to Clipboard Copied! Toggle word wrap Toggle overflow
Procedure
To display results of the GDM configuration, run the following command:
DCONF_PROFILE=gdm gsettings list-recursively org.gnome.login-screen
$ DCONF_PROFILE=gdm gsettings list-recursively org.gnome.login-screenCopy to Clipboard Copied! Toggle word wrap Toggle overflow
22.3. Adding an autostart application for all users
You can set application to start automatically when any user logs into the GNOME environment.
Procedure
Create a
.desktopfile in the/etc/xdg/autostart/directory, such as/etc/xdg/autostart/nautilus.desktop. Enter the following content in the file:Copy to Clipboard Copied! Toggle word wrap Toggle overflow -
Replace
Fileswith the name of the application. -
Replace
/usr/bin/nautilus -nwith the command that starts the application. Use the full file path.
-
Replace
Optional: Configure the application to start only when a selected GSettings key is enabled. GNOME then runs the application automatically if the key’s value is true. If the key’s value changes in the running session, GNOME starts or stops the application to match the new value.
Add the following line in the
.desktopfile:AutostartCondition=GSettings org.gnome.desktop.background show-desktop-icons
AutostartCondition=GSettings org.gnome.desktop.background show-desktop-iconsCopy to Clipboard Copied! Toggle word wrap Toggle overflow -
Replace
org.gnome.desktop.background show-desktop-iconswith the GSettings schema and key that the automatic start depends on.
-
Replace
22.4. Configuring automatic login
As an administrator, you can enable automatic login from the Users panel in GNOME Settings, or you can set up automatic login manually in the GDM custom configuration file, as follows.
Run the following procedure to set up automatic login for a user john.
Procedure
Edit the
/etc/gdm/custom.conffile, and make sure that the[daemon]section in the file specifies the following:[daemon] AutomaticLoginEnable=True AutomaticLogin=john
[daemon] AutomaticLoginEnable=True AutomaticLogin=johnCopy to Clipboard Copied! Toggle word wrap Toggle overflow Replace
johnwith the user that you want to be automatically logged in.
22.5. Configuring automatic logout
User sessions that have been idle for a specific period of time can be ended automatically. You can set different behavior based on whether the machine is running from a battery or from mains power by setting the corresponding GSettings key, then locking it.
Users can potentially lose unsaved data if an idle session is automatically ended.
To set automatic logout for a mains powered machine:
Procedure
Create a local database for machine-wide settings in the
/etc/dconf/db/local.d/00-autologoutfile:[org/gnome/settings-daemon/plugins/power] # Set the timeout to 900 seconds when on mains power sleep-inactive-ac-timeout=900 # Set action after timeout to be logout when on mains power sleep-inactive-ac-type='logout'
[org/gnome/settings-daemon/plugins/power] # Set the timeout to 900 seconds when on mains power sleep-inactive-ac-timeout=900 # Set action after timeout to be logout when on mains power sleep-inactive-ac-type='logout'Copy to Clipboard Copied! Toggle word wrap Toggle overflow Override the user’s setting, and prevent the user from changing it in the
/etc/dconf/db/local.d/locks/autologoutfile:Lock automatic logout settings
# Lock automatic logout settings
/org/gnome/settings-daemon/plugins/power/sleep-inactive-ac-timeout
/org/gnome/settings-daemon/plugins/power/sleep-inactive-ac-type
Copy to Clipboard Copied! Toggle word wrap Toggle overflow Update the system databases:
dconf update
# dconf updateCopy to Clipboard Copied! Toggle word wrap Toggle overflow - Users must log out and back in again before the system-wide settings take effect.
The following GSettings keys are of interest:
org.gnome.settings-daemon.plugins.power.sleep-inactive-ac-timeout
The number of seconds that the computer needs to be inactive before it goes to sleep if it is running from AC power.
org.gnome.settings-daemon.plugins.power.sleep-inactive-ac-type
What should happen when the timeout has passed if the computer is running from AC power.
org.gnome.settings-daemon.plugins.power.sleep-inactive-battery-timeout
The number of seconds that the computer needs to be inactive before it goes to sleep if it is running from power.
org.gnome.settings-daemon.plugins.power.sleep-inactive-battery-type
What should happen when the timeout has passed if the computer is running from battery power.
If you want to list available values for a key, use the following procedure:
Procedure
-
Run the
gsettings rangecommand on the required key. For example:
22.6. Setting a default desktop session for all users
You can configure a default desktop session that is preselected for all users that have not logged in yet.
If a user logs in using a different session than the default, their selection persists to their next login.
Procedure
Copy the configuration file template:
cp /usr/share/accountsservice/user-templates/standard \
     /etc/accountsservice/user-templates/standard
# cp /usr/share/accountsservice/user-templates/standard \ /etc/accountsservice/user-templates/standardCopy to Clipboard Copied! Toggle word wrap Toggle overflow -
Edit the new
/etc/accountsservice/user-templates/standardfile. On theSession=gnomeline, replacegnomewith the session that you want to set as the default. Optional: To configure an exception to the default session for a certain user, follow these steps:
Copy the template file to
/var/lib/AccountsService/users/user-name:cp /usr/share/accountsservice/user-templates/standard \ /var/lib/AccountsService/users/user-name# cp /usr/share/accountsservice/user-templates/standard \ /var/lib/AccountsService/users/user-nameCopy to Clipboard Copied! Toggle word wrap Toggle overflow -
In the new file, replace variables such as
${USER}and${ID}with the user values. -
Edit the
Sessionvalue.
22.7. Setting screen brightness and idle time
By creating a local database, you can, for example:
- Configure the drop in the brightness level
- Set brightness level
- Set idle time
Configuring the drop in the brightness level
To set the drop in the brightness level when the device has been idle for some time:
Procedure
Create a local database for machine-wide settings in the
/etc/dconf/db/local.d/00-powerfile including these lines:[org/gnome/settings-daemon/plugins/power] idle-dim=true
[org/gnome/settings-daemon/plugins/power] idle-dim=trueCopy to Clipboard Copied! Toggle word wrap Toggle overflow Update the system databases:
dconf update
# dconf updateCopy to Clipboard Copied! Toggle word wrap Toggle overflow - Users must log out and back in again before the system-wide settings take effect.
Setting brightness level
To set brightness level:
Procedure
Create a local database for machine-wide settings in the
/etc/dconf/db/local.d/00-powerfile, as in the following example:[org/gnome/settings-daemon/plugins/power] idle-brightness=30
[org/gnome/settings-daemon/plugins/power] idle-brightness=30Copy to Clipboard Copied! Toggle word wrap Toggle overflow Replace
30with the integer value you want to use.Update the system databases:
dconf update
# dconf updateCopy to Clipboard Copied! Toggle word wrap Toggle overflow - Users must log out and back in again before the system-wide settings take effect.
Setting idle time
To set idle time after which the screen is blanked and the default screensaver is displayed:
Procedure
Create a local database for machine-wide settings in
/etc/dconf/db/local.d/00-session, as in the following example:[org/gnome/desktop/session] idle-delay=uint32 900
[org/gnome/desktop/session] idle-delay=uint32 900Copy to Clipboard Copied! Toggle word wrap Toggle overflow Replace
900with the integer value you want to use.You must include the
uint32along with the integer value as shown.Update the system databases:
dconf update
# dconf updateCopy to Clipboard Copied! Toggle word wrap Toggle overflow - Users must log out and back in again before the system-wide settings take effect.
22.8. Locking the screen when the user is idle
To enable the screensaver and make the screen lock automatically when the user is idle, follow this procedure:
Procedure
Create a local database for system-wide settings in the
etc/dconf/db/local.d/00-screensaverfile:Copy to Clipboard Copied! Toggle word wrap Toggle overflow You must include the
uint32along with the integer key values as shown.Override the user’s setting, and prevent the user from changing it in the
/etc/dconf/db/local.d/locks/screensaverfile:Lock desktop screensaver settings
# Lock desktop screensaver settings
/org/gnome/desktop/session/idle-delay
/org/gnome/desktop/screensaver/lock-enabled
/org/gnome/desktop/screensaver/lock-delay
Copy to Clipboard Copied! Toggle word wrap Toggle overflow Update the system databases:
dconf update
# dconf updateCopy to Clipboard Copied! Toggle word wrap Toggle overflow - Users must log out and back in again before the system-wide settings take effect.
22.9. Screencast recording
GNOME Shell features a built-in screencast recorder. The recorder allows users to record desktop or application activity during their session and distribute the recordings as high-resolution video files in the webm format.
To make a screencast:
Procedure
To start the recording, press the Ctrl+Alt+Shift+R shortcut.
When the recorder is capturing the screen activity, it displays a red circle in the top-right corner of the screen.
To stop the recording, press the Ctrl+Alt+Shift+R shortcut.
The red circle in the top-right corner of the screen disappears.
-
Navigate to the
~/Videosdirectory where you can find the recorded video with a file name that starts with Screencast and includes the date and time of the recording.
The built-in recorder always captures the entire screen, including all monitors in multi-monitor setups.
Chapter 23. Configuring screen rotation
23.1. Configuring screen rotation for a single user
This procedure sets screen rotation for the current user.
Procedure
Go to the system menu, which is accessible from the top-right screen corner, and click the Settings icon.
- In the → section, choose Displays.
- Configure the rotation using the Orientation field.
- Confirm your choice by clicking .
- If you are satisfied with the new setup preview, click on .
The setting persists to your next login.
23.2. Configuring screen rotation for all users
This procedure sets a default screen rotation for all users on a system and is suitable for mass deployment of homogenized display configuration.
Procedure
- Prepare the preferable setup for a single user as in Configuring the screen rotation for a single user.
Copy the transform section of the
~/.config/monitors.xmlconfiguration file, which configures the screen rotation. An example portrait orientation:Copy to Clipboard Copied! Toggle word wrap Toggle overflow -
Paste the content in the
/etc/xdg/monitors.xmlfile that stores system-wide configuration. - Save the changes.
The new setup takes effect for all the users the next time they log in in the system.
23.3. Configuring screen rotation for multiple monitors
In a multi-monitor setup, you can configure individual monitors with different screen rotation so that you can adjust monitor layout to your display needs.
Procedure
- In the Settings application, go to Displays.
Identify the monitor that you want to rotate from the visual representation of your connected monitors.
- Select the monitor whose orientation you want to configure.
Select orientation:
- Landscape: Default orientation.
- Portrait Right: Rotates the screen by 90 degrees to the right.
- Portrait Left: Rotates the screen by 90 degrees to the left.
- Landscape (flipped): Rotates the screen by 180 degrees upside down.
- Click Apply to display preview.
- If you are satisfied with the preview, click Keep Changes. Alternatively, go back to the original orientation by clicking Revert Changes.

Chapter 24. Enabling accessibility for visually impaired users
As a system administrator, you can configure the desktop environment to support users with a visual impairment.
To enable accessibility, perform the following procedures.
24.1. Components that provide accessibility features
On the RHEL 8 desktop, the Orca screen reader ensures accessibility for users with a visual impairment. Orca is included in the default RHEL installation.
Orca reads information from the screen and communicates it to you using the following components:
- Speech Dispatcher
- Orca uses Speech Dispatcher to communicate with the speech synthesizer. Speech Dispatcher supports various speech synthesis backends, ensures that messages from other applications do not to interrupt the messages from Orca, and provides other functionality.
- Speech synthesizer
- Provides a speech output. The default speech synthesizer is eSpeak-NG.
- Braille display
- Provides a tactile output. The BRLTTY service enables this functionality.
24.2. Enabling the Universal Access menu
You can enable the Universal Access Menu icon in the top panel, which provides a menu with several accessibility options.
Procedure
- Open the Settings application.
- Select Universal Access.
Enable the Always Show Universal Access Menu item.
Enabling the Universal Access menu in Settings

Verification
Check that the Universal Access Menu icon is displayed on the top bar even when all options from this menu are switched off.

24.3. Enabling the screen reader
You can enable the Orca screen reader in your desktop environment. The screen reader then reads the text displayed on the screen to improve accessibility.
Procedure
Enable the screen reader using either of the following ways:
- Press the Super+Alt+S keyboard shortcut.
- If the top panel shows the Universal Access menu, select Screen Reader in the menu.
Verification
- Open an application with text content.
- Check that the screen reader reads the text in the application.
24.4. Enabling a Braille display device
The Braille display is a device that uses the brltty service to provide tactile output for visually impaired users.
In order for the Braille display to work correctly, perform the following procedures.
24.4.1. Supported types of Braille display device
The following types of Braille display devices are supported on RHEL 8.
| Braille device type | Syntax of the type | Note |
|---|---|---|
| Serial device |
|
Relative paths are at |
| USB device |
|
The brackets ( |
| Bluetooth device |
|
24.4.2. Enabling the brltty service
To enable the Braille display, enable the brltty service to start automatically on boot. By default, brltty is disabled.
Prerequisites
Ensure that the
brlttypackage is installed:yum install brltty
# yum install brlttyCopy to Clipboard Copied! Toggle word wrap Toggle overflow Optionally, you can install speech synthesis support for
brltty:yum install brltty-espeak-ng
# yum install brltty-espeak-ngCopy to Clipboard Copied! Toggle word wrap Toggle overflow
Procedure
Enable the
brlttyservice to start on boot:systemctl enable --now brltty
# systemctl enable --now brlttyCopy to Clipboard Copied! Toggle word wrap Toggle overflow
Verification
- Reboot the system.
Check that the
brlttyservice is running:Copy to Clipboard Copied! Toggle word wrap Toggle overflow
24.4.3. Authorizing users of a Braille display device
To use a Braille display device, you must set the users who are authorized to use the Braille display device.
Procedure
In the
/etc/brltty.conffile, ensure thatkeyfileis set to/etc/brlapi.key:api-parameters Auth=keyfile:/etc/brlapi.key
api-parameters Auth=keyfile:/etc/brlapi.keyCopy to Clipboard Copied! Toggle word wrap Toggle overflow This is the default value. Your organization might have overridden it.
Authorize the selected users by adding them to the
brlapigroup:usermod --append -G brlapi user-name
# usermod --append -G brlapi user-nameCopy to Clipboard Copied! Toggle word wrap Toggle overflow
24.4.4. Setting the driver for a Braille display device
The brltty service automatically chooses a driver for your Braille display device. If the automatic detection fails or takes too long, you can set the driver manually.
Prerequisites
- The automatic driver detection has failed or takes too long.
Procedure
-
Open the
/etc/brltty.confconfiguration file. -
Find the
braille-driverdirective, which specifies the driver for your Braille display device. Specify the identification code of the required driver in the
braille-driverdirective.Choose the identification code of required driver from the list provided in
/etc/brltty.conf. For example, to use the XWindow driver:XWindow
# XWindow
braille-driver	xw
Copy to Clipboard Copied! Toggle word wrap Toggle overflow To set multiple drivers, list them separated by commas. Automatic detection then chooses from the listed drivers.
24.4.5. Connecting a Braille display device
The brltty service automatically connects to your Braille display device. If the automatic detection fails, you can set the connection method manually.
Prerequisites
- The Braille display device is physically connected to your system.
- The automatic connection has failed.
Procedure
If the device is connected by a serial-to-USB adapter, find the actual device name in the kernel messages on the device plug:
journalctl --dmesg | fgrep ttyUSB
# journalctl --dmesg | fgrep ttyUSBCopy to Clipboard Copied! Toggle word wrap Toggle overflow -
Open the
/etc/brltty.confconfiguration file. -
Find the
braille-devicedirective. In the
braille-devicedirective, specify the connection.You can also set multiple devices, separated by commas, and each of them will be probed in turn.
For example:
Example 24.1. Settings for the first serial device
braille-device serial:ttyS0
braille-device serial:ttyS0Copy to Clipboard Copied! Toggle word wrap Toggle overflow Example 24.2. Settings for the first USB device matching Braille driver
braille-device usb:
braille-device usb:Copy to Clipboard Copied! Toggle word wrap Toggle overflow Example 24.3. Settings for a specific USB device by serial number
braille-device usb:nnnnn
braille-device usb:nnnnnCopy to Clipboard Copied! Toggle word wrap Toggle overflow Example 24.4. Settings for a serial-to-USB adapter
Use the device name that you found earlier in the kernel messages:
braille-device serial:ttyUSB0
braille-device serial:ttyUSB0Copy to Clipboard Copied! Toggle word wrap Toggle overflow NoteSetting
braille-devicetousb:does not work for a serial-to-USB adapter.Example 24.5. Settings for a specific Bluetooth device by address
braille-device bluetooth:xx:xx:xx:xx:xx:xx
braille-device bluetooth:xx:xx:xx:xx:xx:xxCopy to Clipboard Copied! Toggle word wrap Toggle overflow
24.4.6. Setting the text table
The brltty service automatically selects a text table based on your system language. If your system language does not match the language of a document that you want to read, you can set the text table manually.
Procedure
-
Edit the
/etc/brltty.conffile. Identify the code of your selected text table.
You can find all available text tables in the
/etc/brltty/Text/directory. The code is the file name of the text table without its file suffix.Specify the code of the selected text table in the
text-tabledirective.For example, to use the text table for American English:
text-table en_US # English (United States)
text-table en_US # English (United States)Copy to Clipboard Copied! Toggle word wrap Toggle overflow
24.4.7. Setting the contraction table
You can select which table is used to encode the abbreviations with a Braille display device. Relative paths to particular contraction tables are stored within the /etc/brltty/Contraction/ directory.
If no table is specified, the brltty service does not use a contraction table.
Procedure
Choose a contraction table from the list in the
/etc/brltty.conffile.For example, to use the contraction table for American English, grade 2:
contraction-table en-us-g2 # English (US, grade 2)
contraction-table en-us-g2 # English (US, grade 2)Copy to Clipboard Copied! Toggle word wrap Toggle overflow
Chapter 25. Graphics tablets
To manage Wacom tablets connected to your system, use the following tools:
-
The
gnome-settings-daemonservice The
Wacom Tabletsettings panel in the GNOME environmentThe Wacom Tablet settings panel for a tablet
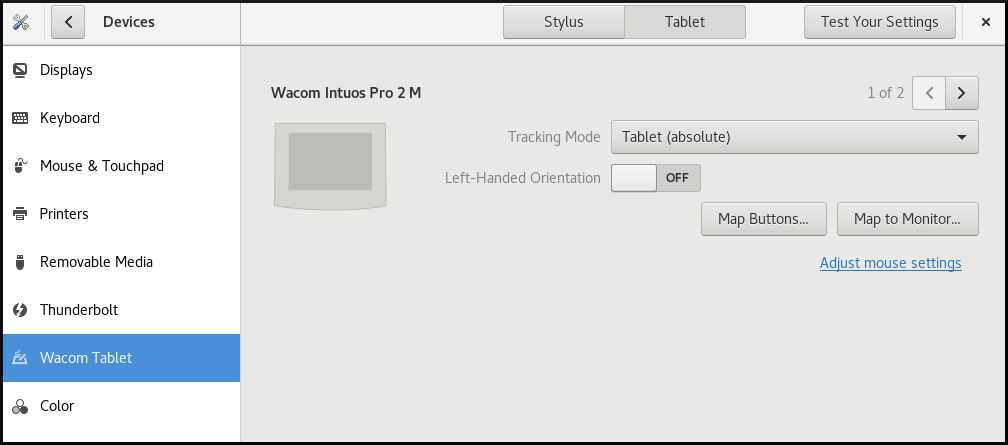
The Wacom Tablet settings panel for a grip pen

Both these tools, as well as the libinput stack, use the libwacom tablet client library, which stores the data about Wacom tablets.
If you want to add support for a new tablet into the libwacom library, you must ensure that a definition file for this new tablet exists.
25.1. Preparing a tablet definition file
You must prepare a definition file for the tablet you want to add.
Prerequisites
List all local devices recognized by
libwacom:libwacom-list-local-devices
$ libwacom-list-local-devicesCopy to Clipboard Copied! Toggle word wrap Toggle overflow Make sure that your device is recognized in the output.
If your device is not listed, the device is missing from the
libwacomdatabase. However, the device might still be visible as an event device in the kernel under/proc/bus/input/devices, and if you use the X.Org display server, in the X11 session on thexinputlist.
Procedure
Install the package that provides tablet definition files:
yum install libwacom-data
# yum install libwacom-dataCopy to Clipboard Copied! Toggle word wrap Toggle overflow The package installs tablet definitions in the
/usr/share/libwacom/directory.Check whether the definition file is available in the
/usr/share/libwacom/directory.To use the screen mapping correctly, support for your tablet must be included in the
libwacomdatabase and in theudevrules file.ImportantA common indicator that a device is not supported by
libwacomis that it works normally in a GNOME session, but the device is not correctly mapped to the screen.If the definition file for your device is not available in
/usr/share/libwacom/, you have these options:- The required definition file may already be available in the linuxwacom/libwacom upstream repository. You can try to find the definition file there. If you find your tablet model in the list, copy the file to the local machine.
You can create a new tablet definition file. Use the
data/wacom.examplefile below, and edit particular lines based on the characteristics of your device.Example 25.1. Example model file description for a tablet
Copy to Clipboard Copied! Toggle word wrap Toggle overflow
25.2. Adding support for a new tablet
You can add support for a new tablet into the libwacom tablet information client library by adding the definition file for the tablet that you want to add.
Prerequisites
The definition file for the tablet that you want to add exists.
For more information about ensuring that the definition file exists, see Section 25.1, “Preparing a tablet definition file”.
Procedure
Add and install the definition file with the
.tabletsuffix:cp <tablet_definition_file>.tablet /usr/share/libwacom/
# cp <tablet_definition_file>.tablet /usr/share/libwacom/Copy to Clipboard Copied! Toggle word wrap Toggle overflow After it is installed, the tablet is part of the
libwacomdatabase. The tablet is then available throughlibwacom-list-local-devices.Create a new
/etc/udev/rules/99-libwacom-override.rulesfile with the following content so that your settings are not overwritten:Copy to Clipboard Copied! Toggle word wrap Toggle overflow - Reboot your system.
25.3. Listing available Wacom tablet configuration paths
Wacom tablet and stylus configuration files are saved in the following locations by default:
- Tablet configuration
-
/org/gnome/settings-daemon/peripherals/wacom/<D-Bus_machine-id>-<device_id> - Wacom tablet configuration schema
-
org.gnome.settings-daemon.peripherals.wacom - Stylus configuration
-
/org/gnome/settings-daemon/peripherals/wacom/<device_id>/<tool_id>. If your product range does not support<tool_id>, a generic identifier is used instead. - Stylus configuration schema for
-
org.gnome.settings-daemon.peripherals.wacom.stylus - Eraser configuration schema
-
org.gnome.settings-daemon.peripherals.wacom.eraser
Prerequisites
-
The
gnome-settings-daemonpackage is installed on your system.
Procedure
List all tablet configuration paths used on your system:
/usr/libexec/gsd-list-wacom
$ /usr/libexec/gsd-list-wacomCopy to Clipboard Copied! Toggle word wrap Toggle overflow
Using machine-id, device-id, and tool-id in configuration paths allows for shared home directories with independent tablet configuration per system. However, when sharing home directories between systems, the Wacom settings apply only to one system.
This is because the machine-id for your Wacom tablet is included in the configuration path of the /org/gnome/settings-daemon/peripherals/wacom/machine-id-device-id GSettings key, which stores your tablet settings.
Chapter 26. Installing applications using Flatpak
You can install certain applications using the Flatpak package manager. The following sections describe how to search for, install, launch, and update Flatpak applications on the command line and in the graphical interface.
Red Hat provides Flatpak applications only as a Technology Preview feature. Technology Preview features are not supported with Red Hat production service level agreements (SLAs) and might not be functionally complete. Red Hat does not recommend using them in production. These features provide early access to upcoming product features, enabling customers to test functionality and provide feedback during the development process. For more information about the support scope of Red Hat Technology Preview features, see https://access.redhat.com/support/offerings/techpreview.
The Flatpak package manager itself is fully supported.
26.1. The Flatpak technology
Flatpak provides a sandbox environment for application building, deployment, distribution, and installation.
Applications that you launch using Flatpak have minimum access to the host system, which protects the system installation against third-party applications. Flatpak provides application stability regardless of the versions of libraries installed on the host system.
Flatpak applications are distributed from repositories called remotes. Red Hat provides a remote with RHEL applications. Additionally, third-party remotes are available as well. Red Hat does not support applications from third-party remotes.
26.2. Setting up Flatpak
This procedure installs the Flatpak package manager.
Procedure
Install the
flatpakpackage:yum install flatpak
# yum install flatpakCopy to Clipboard Copied! Toggle word wrap Toggle overflow
26.3. Enabling the Red Hat Flatpak remote
This procedure configures the Red Hat Container Catalog as a Flatpak remote on your system.
Prerequisites
You have an account on the Red Hat Customer Portal.
NoteFor large-scale deployments where the users do not have Customer Portal accounts, Red Hat recommends using registry service accounts. For details, see Registry Service Accounts.
Procedure
Enable the
rhelFlatpak remote:flatpak remote-add \ --if-not-exists \ rhel \ https://flatpaks.redhat.io/rhel.flatpakrepo$ flatpak remote-add \ --if-not-exists \ rhel \ https://flatpaks.redhat.io/rhel.flatpakrepoCopy to Clipboard Copied! Toggle word wrap Toggle overflow Log into the Red Hat Container Catalog:
podman login registry.redhat.io
$ podman login registry.redhat.io

Username: your-user-name
Password: your-password
Copy to Clipboard Copied! Toggle word wrap Toggle overflow Provide the credentials to your Red Hat Customer Portal account or your registry service account tokens.
By default, Podman saves the credentials only until you log out.
Optional: Save your credentials permanently. Use one of the following options:
Save the credentials for the current user:
cp $XDG_RUNTIME_DIR/containers/auth.json \
     $HOME/.config/flatpak/oci-auth.json
$ cp $XDG_RUNTIME_DIR/containers/auth.json \ $HOME/.config/flatpak/oci-auth.jsonCopy to Clipboard Copied! Toggle word wrap Toggle overflow Save the credentials system-wide:
cp $XDG_RUNTIME_DIR/containers/auth.json \
     /etc/flatpak/oci-auth.json
# cp $XDG_RUNTIME_DIR/containers/auth.json \ /etc/flatpak/oci-auth.jsonCopy to Clipboard Copied! Toggle word wrap Toggle overflow For best practices, Red Hat recommends that you log into the Red Hat Container Catalog using registry account tokens when installing credentials system-wide.
Verification
List the enabled Flatpak remotes:
flatpak remotes
$ flatpak remotes

Name    Options
rhel    system,oci,no-gpg-verify
Copy to Clipboard Copied! Toggle word wrap Toggle overflow
26.4. Searching for Flatpak applications
This procedure searches for an application in the enabled Flatpak remotes on the command line. The search uses the application name and description.
Prerequisites
- Flatpak is installed.
- The Red Hat Flatpak repository is enabled.
Procedure
Search for an application by name:
flatpak search application-name
$ flatpak search application-nameCopy to Clipboard Copied! Toggle word wrap Toggle overflow For example, to search for the Thunderbird application, use:
flatpak search Thunderbird
$ flatpak search ThunderbirdCopy to Clipboard Copied! Toggle word wrap Toggle overflow The search results include the ID of the application:
Application ID               Version  Branch  Remotes  Description

org.mozilla.Thunderbird           stable  rhel     Thunderbird is a free and open source email, newsfeed, chat, and calendaring client
Application ID               Version  Branch  Remotes  Description

org.mozilla.Thunderbird           stable  rhel     Thunderbird is a free and open source email, newsfeed, chat, and calendaring client
Copy to Clipboard Copied! Toggle word wrap Toggle overflow
26.5. Installing Flatpak applications
This procedure installs a selected application from the enabled Flatpak remotes on the command line.
Prerequisites
- Flatpak is installed.
- The Red Hat Flatpak remote is enabled.
Procedure
Install an application from the
rhelremote:flatpak install rhel application-id
$ flatpak install rhel application-idCopy to Clipboard Copied! Toggle word wrap Toggle overflow Replace application-id with the ID of the application. For example:
flatpak install rhel org.mozilla.Thunderbird
$ flatpak install rhel org.mozilla.ThunderbirdCopy to Clipboard Copied! Toggle word wrap Toggle overflow
26.6. Launching Flatpak applications
This procedure launches an installed Flatpak application from the command line.
Prerequisites
- Flatpak is installed.
- The selected Flatpak application is installed.
Procedure
Launch the application:
flatpak run application-id
$ flatpak run application-idCopy to Clipboard Copied! Toggle word wrap Toggle overflow Replace application-id with the ID of the application. For example:
flatpak run org.mozilla.Thunderbird
$ flatpak run org.mozilla.ThunderbirdCopy to Clipboard Copied! Toggle word wrap Toggle overflow
26.7. Updating Flatpak applications
This procedure updates one or more installed Flatpak applications to the most recent version in the corresponding Flatpak remote.
Prerequisites
- Flatpak is installed.
- A Flatpak remote is enabled.
Procedure
Update one or more Flatpak applications:
To update a specific Flatpak application, specify the application ID:
flatpak update application-id
$ flatpak update application-idCopy to Clipboard Copied! Toggle word wrap Toggle overflow To update all Flatpak applications, specify no application ID:
flatpak update
$ flatpak updateCopy to Clipboard Copied! Toggle word wrap Toggle overflow
26.8. Installing Flatpak applications in the graphical interface
This procedure searches for Flatpak applications using the Software application.
Prerequisites
- Flatpak is installed.
- The Red Hat Flatpak remote is enabled.
Procedure
- Open the Software application.
- Make sure that the tab is active.
- Click the search button in the upper-left corner of the window.
- In the input box, type the name of the application that you want to install, such as Thunderbird.
Select the correct application in the search results.
If the application is listed several times, select the version where the Source field in the Details section reports
flatpaks.redhat.io.- Click the button.
- If Software asks you to log in, enter your Customer Portal credentials or your registry service account tokens.
- Wait for the installation process to complete.
- Optional: Click the button to launch the application.
26.9. Updating Flatpak applications in the graphical interface
This procedure updates one or more installed Flatpak applications using the Software application.
Prerequisites
- Flatpak is installed.
- A Flatpak remote is enabled.
Procedure
- Open the Software application.
- Select the tab.
- In the Application Updates section, you can find all available updates to Flatpak applications.
Update one or more applications:
- To apply all available updates, click the button.
- To update only a specific application, click the button next to the application item.
Optional: Enable automatic application updates.
- Click the menu button in the upper-right corner of the window.
- Select Update Preferences.
Enable Automatic Updates.
Flatpak applications now update automatically.