Questo contenuto non è disponibile nella lingua selezionata.
Chapter 5. Managing remote systems in the web console
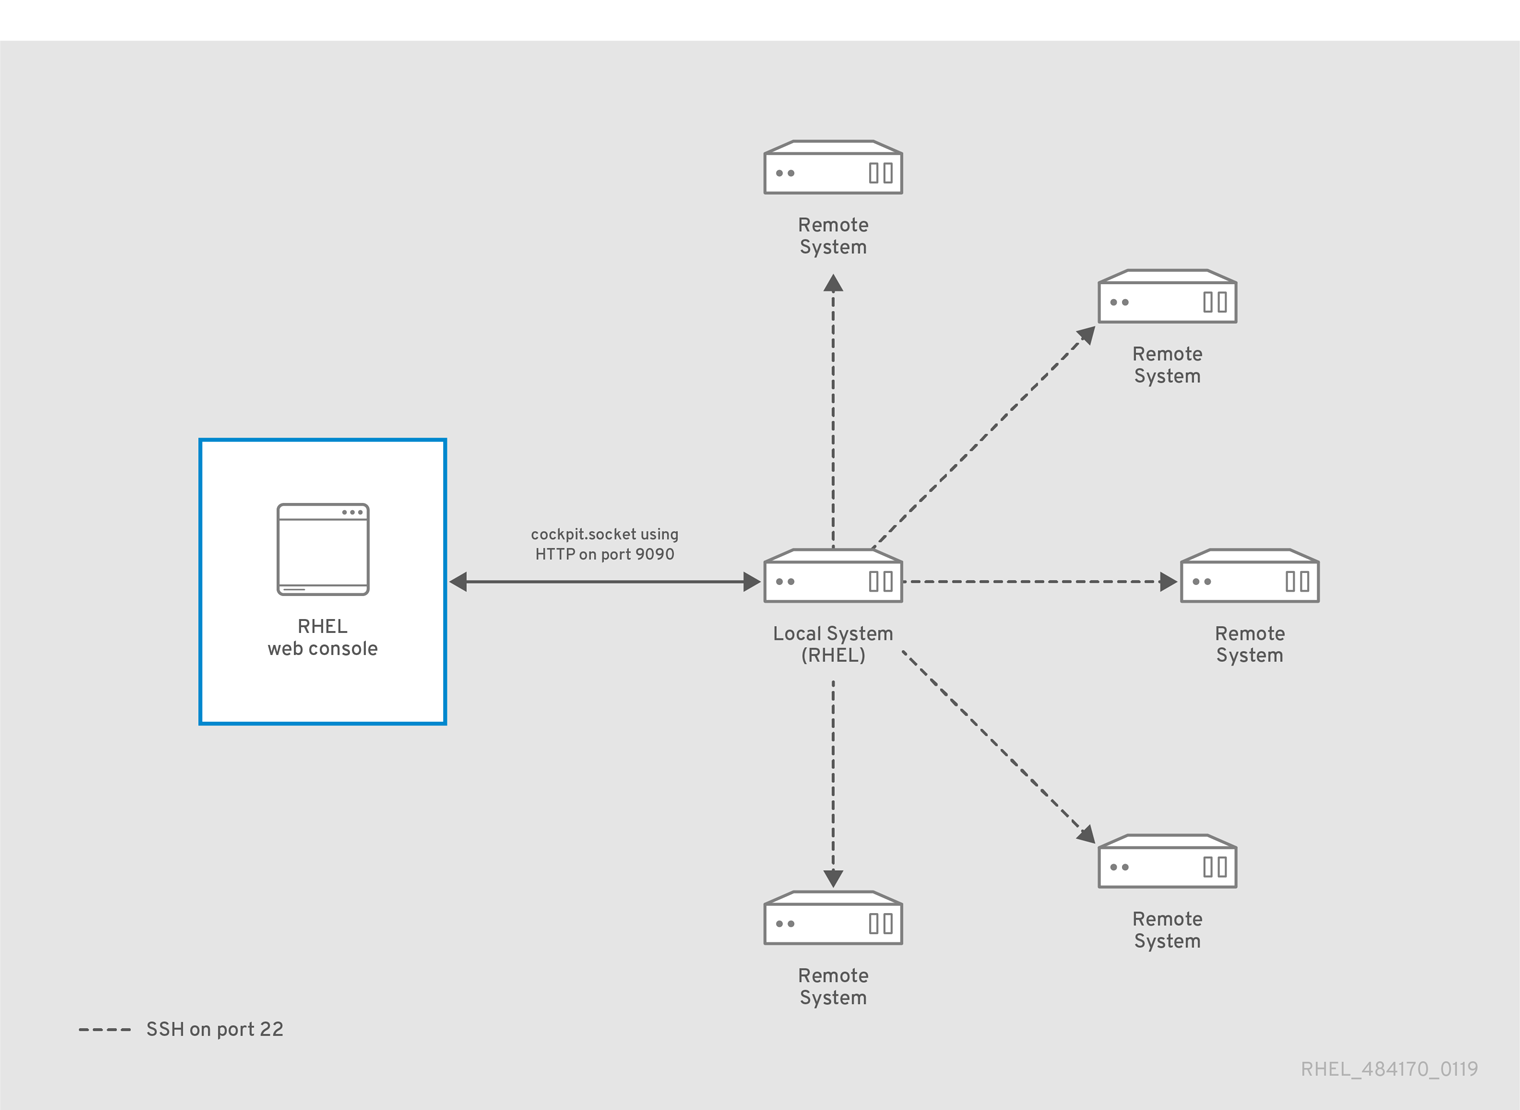
You can connect to remote systems and manage them in the RHEL 9 web console.
5.1. Remote system manager in the web console
For security reasons, use the following network setup of remote systems managed by the web console:
- Configure one system as a bastion host. The bastion host is a system with opened HTTPS port.
- All other systems communicate through SSH.
With the web interface running on the bastion host, you can reach all other systems through the SSH protocol.
5.2. Connecting to a remote host using SSH from the web console login page
You can connect to a remote system through the SSH protocol directly from the login page of the RHEL web console. After you log in remotely, you can manage the remote system in the graphical interface of the web console with encrypted connection traffic.
Prerequisites
You have installed the RHEL 9 web console.
For instructions, see Installing and enabling the web console.
-
The
cockpit-systempackage is installed on the remote system. -
The
sshdservice runs on the remote system, and the corresponding port is allowed in the firewall.
Procedure
- Open the web console login page.
- Enter the username on the remote host in the User name field.
- Click Other options to reveal the Connect to text field.
Specify the remote host you want to connect to using SSH in the Connect to text field. If you do not specify any port, the web console attempts to connect to port 22 on the specified remote host.

- Click Log in.
5.3. Adding remote hosts to the web console
When logged in to the RHEL web console, you can switch between the local system and multiple remote hosts through the host switcher in the upper-left corner of the Overview page. You can connect to and manage a remote system after you add its credentials to the host switcher.
Prerequisites
You have installed the RHEL 9 web console.
For instructions, see Installing and enabling the web console.
Procedure
Log in to the RHEL 9 web console.
For details, see Logging in to the web console.
In the RHEL web console, click
<username>@<hostname>in the upper-left corner of the Overview page.
- In the drop-down menu, click .
- In the Add new host dialog box, specify the host you want to add.
Optional: Add the username for the account you want to connect to.
You can use any user account of the remote system. However, if you use the credentials of a user account without administration privileges, you cannot perform administration tasks.
If you use the same credentials as on your local system, the web console authenticates remote systems automatically every time you log in.
ImportantThe web console does not save passwords used to log in to remote systems.
- Optional: Click the Color field to change the color of the system.
- Click .
Verification
-
The new host is listed in the
<username>@<hostname>drop-down menu
5.4. Enabling SSH login for a new host
When you add a new host to the web console, you can also log in to the host with an SSH key. If you already have an SSH key on your system, the web console uses the existing one; otherwise, the web console can create a key.
Prerequisites
You have installed the RHEL 9 web console.
For instructions, see Installing and enabling the web console.
Procedure
Log in to the RHEL 9 web console.
For details, see Logging in to the web console.
In the RHEL web console, click
<username>@<hostname>in the top left corner of the Overview page.
- In the drop-down menu, click .
- In the Add new host dialog box, specify the host you want to add. If you connect to the host for the first time, you must click in the following dialog box.
The password dialog box differs depending on the existence of an SSH key file on the host:
- If you already have the SSH key for the host, select the Authorize SSH key option.
- If you do not have the SSH key, select the Create a new SSH key and authorize it option. The web console creates the key.
- Add and confirm a password for the SSH key.
- Click .
Verification
- Log out.
- Log back in.
- Click in the Not connected to host screen.
- Select SSH key as your authentication option.
- Enter your key password.
- Click .
5.5. Configuring smart-card authentication for SSH logins in the web console
After logging in to a user account on the RHEL web console, you can connect to remote machines by using the SSH protocol. You can use the constrained delegation feature to use SSH without being asked to authenticate again.
In the example procedure, the web console session runs on the myhost.idm.example.com host, and you configure the console to access the remote.idm.example.com host by using SSH on behalf of the authenticated user.
Prerequisites
-
You have obtained an IdM
adminticket-granting ticket (TGT) onmyhost.idm.example.com. -
You have
rootaccess toremote.idm.example.com. - The host that runs the web console is a member of an IdM domain
Procedure
In the Terminal page, verify that the web console has created a Service for User to Proxy (S4U2proxy) Kerberos ticket in the user session:
$ klist
…
Valid starting     Expires            Service principal
05/20/25 09:19:06 05/21/25 09:19:06 HTTP/myhost.idm.example.com@IDM.EXAMPLE.COM
…
Create a list of the target hosts that the delegation rule can access:
Create a service delegation target:
$ ipa servicedelegationtarget-add cockpit-targetAdd the target host to the delegation target:
$ ipa servicedelegationtarget-add-member cockpit-target \
  --principals=host/remote.idm.example.com@IDM.EXAMPLE.COM
Allow
cockpitsessions to access the target host list by creating a service delegation rule and adding the HTTP service Kerberos principal to it:Create a service delegation rule:
$ ipa servicedelegationrule-add cockpit-delegationAdd the web console client to the delegation rule:
$ ipa servicedelegationrule-add-member cockpit-delegation \
  --principals=HTTP/myhost.idm.example.com@IDM.EXAMPLE.COM
Add the delegation target to the delegation rule:
$ ipa servicedelegationrule-add-target cockpit-delegation \
  --servicedelegationtargets=cockpit-target
Enable Kerberos authentication on the
remote.idm.example.comhost:-
Connect through SSH to
remote.idm.example.comasroot. -
Add the
GSSAPIAuthentication yessetting to the/etc/ssh/sshd_configfile.
-
Connect through SSH to
Restart the
sshdservice onremote.idm.example.comso that the changes take effect immediately:$ systemctl try-restart sshd.service
5.6. Using Ansible to configure smart-card authentication for SSH logins in the web console
After logging in to a user account on the RHEL web console, you can connect to remote machines by using the SSH protocol. You can use the servicedelegationrule and servicedelegationtarget Ansible modules to configure the web console for the constrained delegation feature, which enables SSH connections without being asked to authenticate again.
In the example procedure, the web console session runs on the myhost.idm.example.com host and you configure it to access the remote.idm.example.com host by using SSH on behalf of the authenticated user.
Prerequisites
-
You have obtained an IdM
adminticket-granting ticket (TGT) onmyhost.idm.example.com. -
You have
rootaccess toremote.idm.example.com. - The host that runs the web console is a member of an IdM domain
You have configured your Ansible control node to meet the following requirements:
-
You have installed the
ansible-freeipapackage. - You are using Ansible version 2.14 or later.
-
The example assumes you have created an Ansible inventory file with the fully-qualified domain name (FQDN) of the IdM server in the
~/MyPlaybooks/directory. -
The example assumes that the
secret.ymlAnsible vault stores the admin password in theipaadmin_passwordvariable.
-
You have installed the
-
The target node, that is the node on which the
ansible-freeipamodule runs, is part of the IdM domain as an IdM client, server, or replica.
Procedure
In the Terminal page, verify that the web console has created a Service for User to Proxy (S4U2proxy) Kerberos ticket in the user session:
$ klist
…
Valid starting     Expires            Service principal
05/20/25 09:19:06 05/21/25 09:19:06 HTTP/myhost.idm.example.com@IDM.EXAMPLE.COM
…
Navigate to your
~/MyPlaybooks/directory:$ cd ~/MyPlaybooks/Create a
web-console-smart-card-ssh.ymlplaybook with the following content:Create a task that ensures the presence of a delegation target:
---
- name: Playbook to create a constrained delegation target
  hosts: ipaserver

  vars_files:
  - /home/user_name/MyPlaybooks/secret.yml
  tasks:
  - name: Ensure servicedelegationtarget web-console-delegation-target is present
    ipaservicedelegationtarget:
      ipaadmin_password: "{{ ipaadmin_password }}"
      name: web-console-delegation-target
Add a task that adds the target host to the delegation target:
  - name: Ensure servicedelegationtarget web-console-delegation-target member principal host/remote.idm.example.com@IDM.EXAMPLE.COM is present
    ipaservicedelegationtarget:
      ipaadmin_password: "{{ ipaadmin_password }}"
      name: web-console-delegation-target
      principal: host/remote.idm.example.com@IDM.EXAMPLE.COM
      action: member
Add a task that ensures the presence of a delegation rule:
  - name: Ensure servicedelegationrule delegation-rule is present
    ipaservicedelegationrule:
      ipaadmin_password: "{{ ipaadmin_password }}"
      name: web-console-delegation-rule
Add a task that ensures that the Kerberos principal of the web console client service is a member of the constrained delegation rule:
  - name: Ensure the Kerberos principal of the web console client service is added to the servicedelegationrule web-console-delegation-rule
    ipaservicedelegationrule:
      ipaadmin_password: "{{ ipaadmin_password }}"
      name: web-console-delegation-rule
      principal: HTTP/myhost.idm.example.com
      action: member
Add a task that ensures that the constrained delegation rule is associated with the web-console-delegation-target delegation target:
  - name: Ensure a constrained delegation rule is associated with a specific delegation target
    ipaservicedelegationrule:
      ipaadmin_password: "{{ ipaadmin_password }}"
      name: web-console-delegation-rule
      target: web-console-delegation-target
      action: member
- Save the file.
Run the Ansible playbook. Specify the playbook file, the file storing the password protecting the
secret.ymlfile, and the inventory file:$ ansible-playbook --vault-password-file=password_file -v -i inventory web-console-smart-card-ssh.ymlEnable Kerberos authentication on
remote.idm.example.com:-
Connect through SSH to
remote.idm.example.comasroot. -
Add the
GSSAPIAuthentication yessetting to the/etc/ssh/sshd_configfile.
-
Connect through SSH to
Restart the
sshdservice onremote.idm.example.comso that the changes take effect immediately:$ systemctl try-restart sshd.service