Questo contenuto non è disponibile nella lingua selezionata.
Chapter 3. Installing CodeReady Studio
The following section describes how to install CodeReady Studio:
Note that you can have multiple versions of CodeReady Studio installed on your system with Installer or Eclipse, provided you have these versions located in different directories.
3.1. Installing CodeReady Studio in Eclipse
CodeReady Studio for Eclipse packages the CodeReady Studio plug-ins for your existing Eclipse instance. You can install CodeReady Studio from the Eclipse Marketplace when you are online. This installation method is referred to as Bring Your Own Eclipse (BYOE). Alternatively, you can use the Update Site Zip to install CodeReady Studio when you are offline.
The following section describes how to install CodeReady Studio when you are online and when you are offline.
3.1.1. Installing CodeReady Studio in Eclipse when online
The following section describes how to install CodeReady Studio BYOE from Eclipse Marketplace.
Procedure
- Start the Eclipse IDE.
Click
. The Eclipse Marketplace window appears.
Locate Red Hat CodeReady Studio 12.16 GA.
- Click .
Follow the on-screen instructions to complete the installation process.
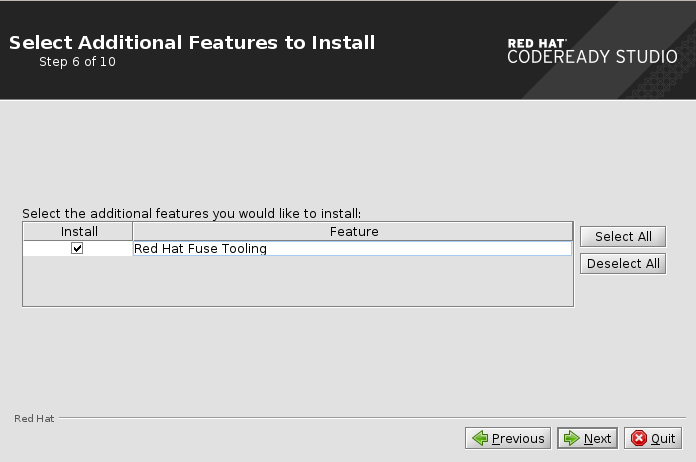
ImportantWhen prompted to select additional features to install, select the Fuse Tooling feature for creating, testing, and debugging integration applications.
If you receive warnings about installing unsigned content, review the details of the content and, if satisfied, click to continue with the installation.
Restart Eclipse.
When prompted to restart the Eclipse IDE, click . Note that the changes do not take effect until you restart Eclipse.


3.1.2. Installing CodeReady Studio in Eclipse when offline
The following section describes how to install CodeReady Studio with the Update Site Zip. Alternatively, you can also use an Installer downloaded on your system instead of the Update Site Zip.
Note that the Target Platform Zip contains the features on which CodeReady Studio depends. It also contains the sources of all the included plug-ins.
Prerequisites
- Download the Red Hat CodeReady Studio 12.16 Update Site Zip from the Red Hat Developer Portal.
Procedure
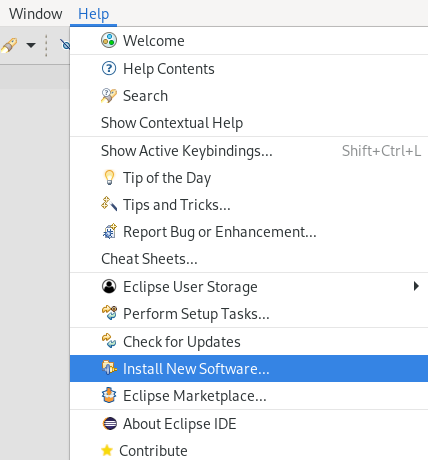
- Start the Eclipse IDE.
Click
. The Available Software window appears.
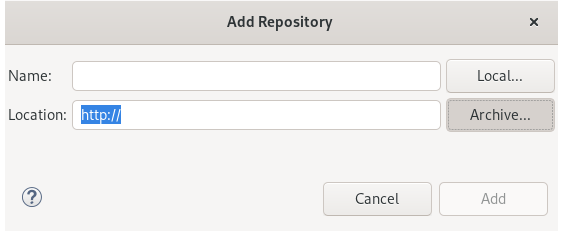
Click .
The Add Repository window appears.
-
Click and locate the
Update Site Zipfile. - Click .
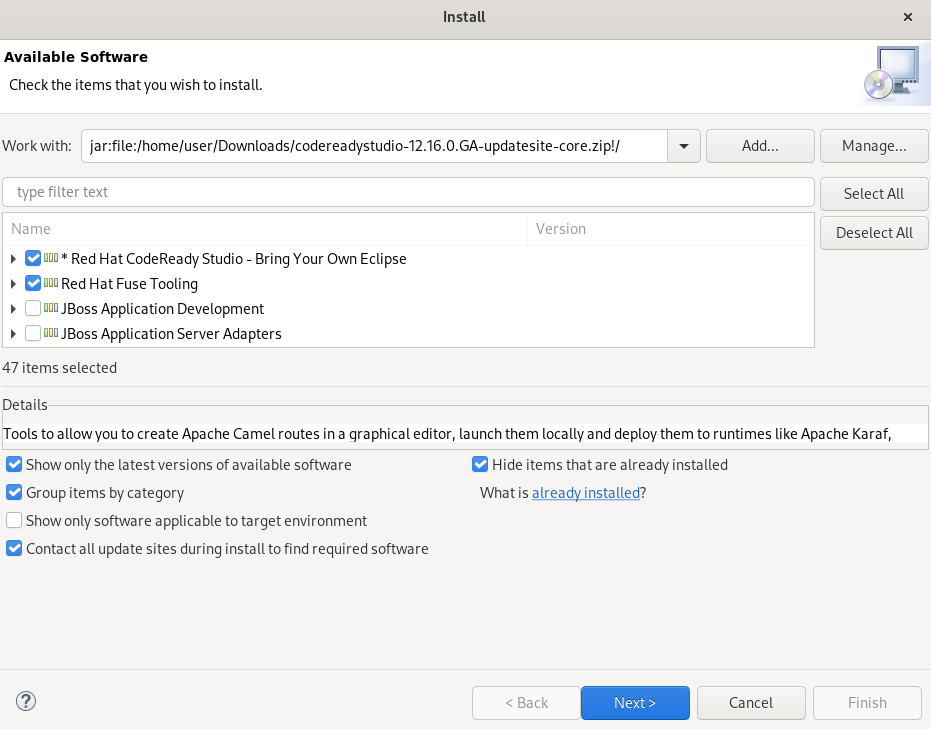
Select the Red Hat CodeReady Studio - Bring Your Own Eclipse and Red Hat Fuse Tooling check boxes.
- Click .
Follow the on-screen instructions to complete the installation process.
If you receive warnings about installing unsigned content, review the details of the content and, if satisfied, click to continue with the installation.
Restart Eclipse.
When prompted to restart the Eclipse IDE, click . Note that the changes do not take effect until you restart Eclipse.
3.2. Installing CodeReady Studio stand-alone using the Installer
The Installer contains CodeReady Studio stand-alone that packages the CodeReady Studio plug-ins with Eclipse and dependent third-party plug-ins. The Installer is compatible with all operating systems and is available from a variety of sources, including the Red Hat Customer Portal.
The following section describes how to install CodeReady Studio using the Installer.
Procedure
- Download the Red Hat CodeReady Studio 12.16 Installer from the Red Hat Developer Portal.
-
Go to the directory that contains the downloaded
codereadystudio-12.16.0.GA-installer-standalone.jarfile. Start the Installer:
java -jar codereadystudio-12.16.0.GA-installer-standalone.jar
$ java -jar codereadystudio-12.16.0.GA-installer-standalone.jarCopy to Clipboard Copied! Toggle word wrap Toggle overflow Follow the on-screen instructions to complete the installation process.
ImportantWhen prompted to select additional features to install, select the Fuse Tooling feature for creating, testing, and debugging integration applications.
3.3. Performing advanced installation tasks
The following section describes how to:
- Install CodeReady Studio using a script.
- Build the Red Hat CodeReady Studio Installer from the source code.
3.3.1. Installing CodeReady Studio using a script
The following section describes how to install CodeReady Studio using a script.
Procedure
- Download the Red Hat CodeReady Studio 12.16 Installer from the Red Hat Developer Portal.
-
Go to the directory that contains the downloaded
codereadystudio-12.16.0.GA-installer-standalone.jarfile. Start the installer:
java -jar codereadystudio-12.16.0.GA-installer-standalone.jar
$ java -jar codereadystudio-12.16.0.GA-installer-standalone.jarCopy to Clipboard Copied! Toggle word wrap Toggle overflow Follow the on-screen instructions to complete the installation process.
ImportantWhen prompted to select additional features to install, select the Fuse Tooling feature for creating, testing and debugging integration applications.
After the installation is complete, an
InstallConfigRecord.xmlfile is generated in the CodeReady Studio installation directory.Run the following command:
java -jar codereadystudio-12.16.0.GA-installer-standalone.jar \
  /path-to/InstallConfigRecord.xml
$ java -jar codereadystudio-12.16.0.GA-installer-standalone.jar \
  /path-to/InstallConfigRecord.xml
Copy to Clipboard Copied! Toggle word wrap Toggle overflow Replace path-to with the path to the
InstallConfigRecord.xmlfile.
The generated InstallConfigRecord.xml file is machine-specific and uses the Java Development Kit (JDK) and installation paths of your system. To use the InstallConfigRecord.xml file for other operating systems, JDKs, or paths, you must manually modify the file.
3.3.2. Building the CodeReady Studio stand-alone Installer from source
The following section describes how to build the CodeReady Studio stand-alone Installer from source.
Prerequisites
- Maven 3.3 or later with Java 8 must be installed. To obtain and configure Maven, see the Apache Maven Project.
Procedure
Clone the Git repository:
git clone https://github.com/jbdevstudio/jbdevstudio-product.git
$ git clone https://github.com/jbdevstudio/jbdevstudio-product.gitCopy to Clipboard Copied! Toggle word wrap Toggle overflow Navigate to the
jbdevstudio-productdirectory:cd jbdevstudio-product
$ cd jbdevstudio-productCopy to Clipboard Copied! Toggle word wrap Toggle overflow Checkout into
master:git checkout master
$ git checkout masterCopy to Clipboard Copied! Toggle word wrap Toggle overflow - Follow the instructions in the README.adoc file.
When the build is complete, the .jar file for the CodeReady Studio stand-alone Installer is located in the /jbdevstudio-product/installer/target directory.