Questo contenuto non è disponibile nella lingua selezionata.
Chapter 2. Deploying an application workshop
2.1. Workshop overview
After successfully provisioning your cluster, follow this workshop to deploy an application on it to understand the concepts of deploying and operating container-based applications.
2.1.1. Workshop objectives
The following details the purpose of this cluster creation workshop.
- Deploy a Node.js-based application by using Source-to-Image (S2I) and Kubernetes deployment objects
- Set up a continuous delivery (CD) pipeline to automatically push source code changes
- Experience self-healing applications
- Explore configuration management through ConfigMaps, secrets, and environment variables
- Use persistent storage to share data across pod restarts
- Explore networking in Kubernetes and applications
- Familiarize yourself with Red Hat OpenShift Service on AWS and Kubernetes functionality
- Automatically scale pods based on loads from the Horizontal Pod Autoscaler (HPA)
2.1.1.1. Prerequisites
- A provisioned Red Hat OpenShift Service on AWS cluster
- The OpenShift command-line interface (CLI)
- A GitHub account
2.1.2. About the OSToy application
OSToy is a Node.js application that deploys to a Red Hat OpenShift Service on AWS cluster to help explore the functionality of Kubernetes.
This application has a user interface where you can:
- Write messages to the log (stdout / stderr)
- Intentionally crash the application to view self-healing
- Toggle a liveness probe and monitor OpenShift behavior
- Read ConfigMaps, secrets, and environment variables
- Read and write files when connected to shared storage
- Check network connectivity, intra-cluster DNS, and intra-communication with the included microservice
- Increase the load to view automatic scaling of the pods by using the HPA
2.1.2.1. Understanding the OSToy UI
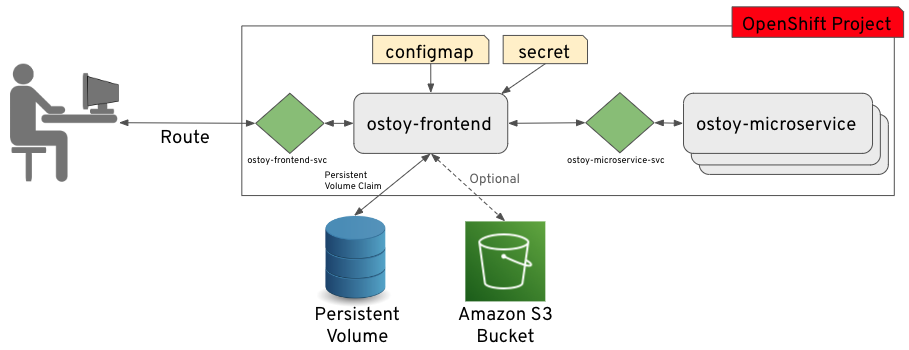
You can explore the different components of the OSToy application by reviewing its architectural breakdown. Understanding this structure prepares you to successfully deploy and manage its microservices.

- Pod name
- Home: Application home page
- Persistent Storage: Writes data to the persistent volume bound to the application
- Config Maps: Shows ConfigMaps available to the application and the key:value pairs
- Secrets: Shows secrets available to the application and the key:value pairs
- ENV Variables: Shows environment variables available to the application
- Networking: Networking tools
- Pod Auto Scaling: Increase the load of the pods and test the Horizontal Pod Autoscaler (HPA)
- ACK S3: Integrate with AWS S3 to read and write objects to a bucket
- About: Application information
2.1.2.2. Lab resources
To successfully complete the lab tutorial, review the provided reference materials. These supporting materials guide you through the required configurations and core concepts.
- OSToy application source code
- OSToy front-end container image
- OSToy microservice container image
Deployment definition YAML files:
ostoy-frontend-deployment.yaml:apiVersion: v1 kind: PersistentVolumeClaim metadata: name: ostoy-pvc spec: accessModes: - ReadWriteOnce resources: requests: storage: 1Gi --- apiVersion: apps/v1 kind: Deployment metadata: name: ostoy-frontend labels: app: ostoy spec: selector: matchLabels: app: ostoy-frontend strategy: type: Recreate replicas: 1 template: metadata: labels: app: ostoy-frontend spec: # Uncomment to use with ACK portion of the workshop # If you chose a different service account name please replace it. # serviceAccount: ostoy-sa containers: - name: ostoy-frontend securityContext: allowPrivilegeEscalation: false runAsNonRoot: true seccompProfile: type: RuntimeDefault capabilities: drop: - ALL image: quay.io/ostoylab/ostoy-frontend:1.6.0 imagePullPolicy: IfNotPresent ports: - name: ostoy-port containerPort: 8080 resources: requests: memory: "256Mi" cpu: "100m" limits: memory: "512Mi" cpu: "200m" volumeMounts: - name: configvol mountPath: /var/config - name: secretvol mountPath: /var/secret - name: datavol mountPath: /var/demo_files livenessProbe: httpGet: path: /health port: 8080 initialDelaySeconds: 10 periodSeconds: 5 env: - name: ENV_TOY_SECRET valueFrom: secretKeyRef: name: ostoy-secret-env key: ENV_TOY_SECRET - name: MICROSERVICE_NAME value: OSTOY_MICROSERVICE_SVC - name: NAMESPACE valueFrom: fieldRef: fieldPath: metadata.namespace volumes: - name: configvol configMap: name: ostoy-configmap-files - name: secretvol secret: defaultMode: 420 secretName: ostoy-secret - name: datavol persistentVolumeClaim: claimName: ostoy-pvc --- apiVersion: v1 kind: Service metadata: name: ostoy-frontend-svc labels: app: ostoy-frontend spec: type: ClusterIP ports: - port: 8080 targetPort: ostoy-port protocol: TCP name: ostoy selector: app: ostoy-frontend --- apiVersion: route.openshift.io/v1 kind: Route metadata: name: ostoy-route spec: to: kind: Service name: ostoy-frontend-svc --- apiVersion: v1 kind: Secret metadata: name: ostoy-secret-env type: Opaque data: ENV_TOY_SECRET: VGhpcyBpcyBhIHRlc3Q= --- kind: ConfigMap apiVersion: v1 metadata: name: ostoy-configmap-files data: config.json: '{ "default": "123" }' --- apiVersion: v1 kind: Secret metadata: name: ostoy-secret data: secret.txt: VVNFUk5BTUU9bXlfdXNlcgpQQVNTV09SRD1AT3RCbCVYQXAhIzYzMlk1RndDQE1UUWsKU01UUD1sb2NhbGhvc3QKU01UUF9QT1JUPTI1 type: Opaqueostoy-microservice-deployment.yaml:apiVersion: apps/v1 kind: Deployment metadata: name: ostoy-microservice labels: app: ostoy spec: selector: matchLabels: app: ostoy-microservice replicas: 1 template: metadata: labels: app: ostoy-microservice spec: containers: - name: ostoy-microservice securityContext: allowPrivilegeEscalation: false runAsNonRoot: true seccompProfile: type: RuntimeDefault capabilities: drop: - ALL image: quay.io/ostoylab/ostoy-microservice:1.5.0 imagePullPolicy: IfNotPresent ports: - containerPort: 8080 protocol: TCP resources: requests: memory: "128Mi" cpu: "50m" limits: memory: "256Mi" cpu: "100m" --- apiVersion: v1 kind: Service metadata: name: ostoy-microservice-svc labels: app: ostoy-microservice spec: type: ClusterIP ports: - port: 8080 targetPort: 8080 protocol: TCP selector: app: ostoy-microserviceS3 bucket manifest for ACK S3
s3-bucket.yaml:apiVersion: s3.services.k8s.aws/v1alpha1 kind: Bucket metadata: name: ostoy-bucket namespace: ostoy spec: name: ostoy-bucket
To simplify deployment of the OSToy application, all of the objects required in the above deployment manifests are grouped together. For a typical enterprise deployment, a separate manifest file for each Kubernetes object is recommended.
2.2. Deploying the OSToy application with Kubernetes
Deploying an application involves creating a container image, storing it in an image repository, and defining Deployment object that uses that image.
Deploying an application involves the following steps:
- Create the images for the front-end and back-end microservice containers
- Store the container images in an image repository
- Create the Kubernetes Deployment object for the application
- Deploy the application
This workshop focuses on application deployment and has users run a remote file which uses an existing image.
2.2.1. Retrieving the login command
Before creating a cluster, you must log in to the ROSA command-line interface (CLI) (rosa). Install the ROSA CLI by completing the workshop on creating a cluster.
Procedure
Confirm you are logged in to the ROSA CLI by running the following command:
rosa whoamiIf you are logged in to the command-line interface, skip to "Creating a new project". If you are not logged in to the command-line interface, continue this procedure.
- Access your cluster with the web console.
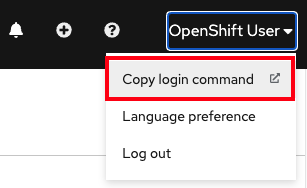
Click the dropdown arrow next to your login name in the upper right corner, and select Copy Login Command.
A new tab opens.
- Select your authentication method.
- Click Display Token.
- Copy the command under Log in with this token.
From your terminal, paste and run the copied command. If the login is successful, you will see the following confirmation message:
$ oc login --token=<your_token> --server=https://api.osd4-demo.abc1.p1.openshiftapps.com:6443
Logged into "https://api.myrosacluster.abcd.p1.openshiftapps.com:6443" as "rosa-user" using the token provided.

You don't have any projects. You can try to create a new project, by running

oc new-project <project name>
2.2.2. Creating a new project using the CLI
You can use OpenShift CLI (oc) to create a new project.
Procedure
Create a new project named
ostoyin your cluster by running following command:$ oc new-project ostoyFor example:
Now using project "ostoy" on server "https://api.myrosacluster.abcd.p1.openshiftapps.com:6443".Optional: Create a unique project name by running the following command:
$ oc new-project ostoy-$(uuidgen | cut -d - -f 2 | tr '[:upper:]' '[:lower:]')
2.2.3. Creating a new project using the web console
You can use OpenShift Cluster Manager to create a new project.
Procedure
-
From the web console, click Home
Projects. On the Projects page, click create Create Project.
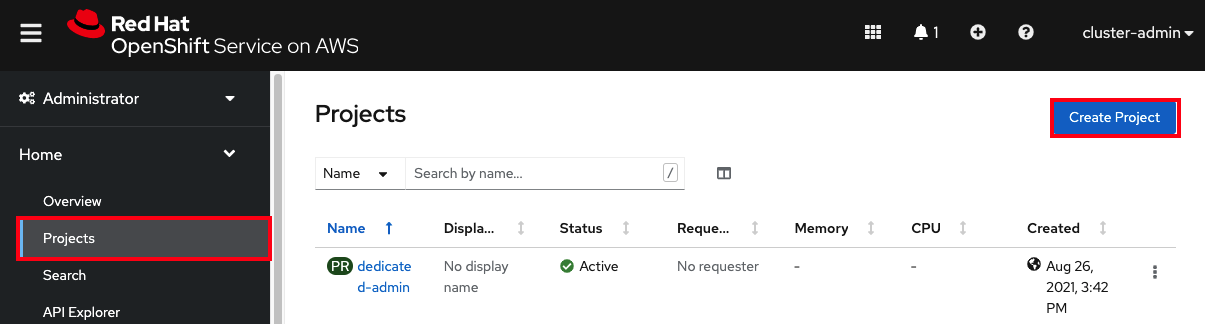
- In the Create Project box, enter a project name in the Name field.
- Click Create.
2.2.4. Deploying the back-end microservice
You can deploy a microservice to start the OSToy backend processes. The microservice serves internal web requests and returns a JSON object containing the current hostname and a randomly generated color string.
Procedure
Deploy the microservice by running the following command:
$ oc apply -f https://raw.githubusercontent.com/openshift-cs/rosaworkshop/master/rosa-workshop/ostoy/yaml/ostoy-microservice-deployment.yamlFor example:
$ oc apply -f https://raw.githubusercontent.com/openshift-cs/rosaworkshop/master/rosa-workshop/ostoy/yaml/ostoy-microservice-deployment.yaml
deployment.apps/ostoy-microservice created
service/ostoy-microservice-svc created
2.2.5. Deploying the front-end microservice
The front-end deployment uses the Node.js front-end for the application and additional Kubernetes objects. Front-end deployment defines the following features:
- Persistent volume claim
- Deployment object
- Service
- Route
- ConfigMaps
- Secrets
Procedure
Deploy the application front-end and create the objects by running the following command:
$ oc apply -f https://raw.githubusercontent.com/openshift-cs/rosaworkshop/master/rosa-workshop/ostoy/yaml/ostoy-frontend-deployment.yamlFor example:
persistentvolumeclaim/ostoy-pvc created
deployment.apps/ostoy-frontend created
service/ostoy-frontend-svc created
route.route.openshift.io/ostoy-route created
configmap/ostoy-configmap-env created
secret/ostoy-secret-env created
configmap/ostoy-configmap-files created
secret/ostoy-secret created
All objects should create successfully.
2.2.6. Obtain the route to your application
To access the OSToy application, obtain the route by using the OpenShift CLI (oc).
Procedure
Get the route to your application by running the following command:
$ oc get routeFor example:
NAME          HOST/PORT                                                 PATH   SERVICES             PORT    TERMINATION   WILDCARD
ostoy-route   ostoy-route-ostoy.apps.<your-rosa-cluster>.abcd.p1.openshiftapps.com          ostoy-frontend-svc   <all>                 None
2.2.7. Viewing the application
After you deploy OSToy, you can view the application by accessing its URL.
Procedure
-
Copy the
ostoy-route-ostoy.apps.<your-rosa-cluster>.abcd.p1.openshiftapps.comURL output from the previous step. Paste the copied URL into your web browser and press enter. You should see the homepage of your application. If the page does not load, make sure you used
httpand nothttps.
2.3. Health check
You can see how Kubernetes responds to pod failure by purposely crashing your pod and making it unresponsive to Kubernetes liveness probes. Observing this failure allows you to verify how the cluster automatically handles recovery.
2.3.1. Preparing your desktop
To prepare your desktop for the health check procedures, access your OSToy application from OpenShift Cluster Manager.
Procedure
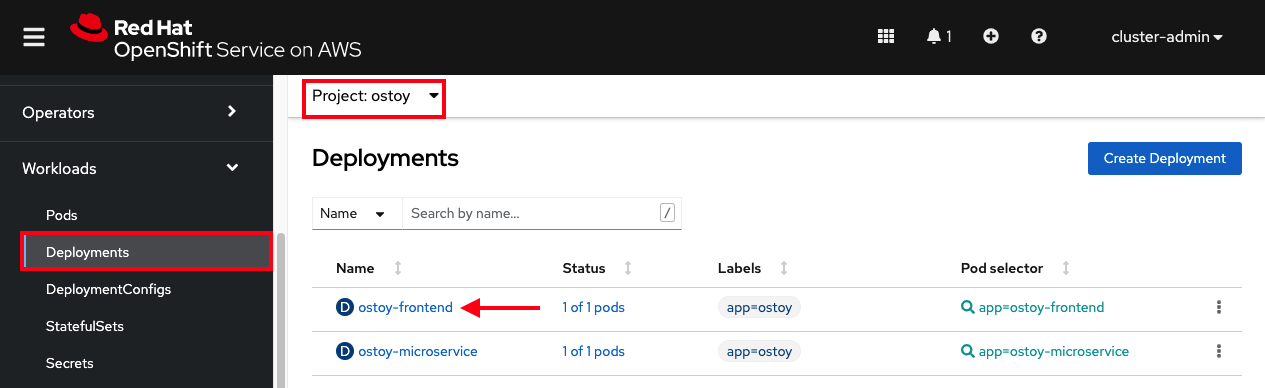
From the OpenShift web console, select Workloads > Deployments > ostoy-frontend to view the OSToy deployment.
2.3.2. Crashing the pod
To test the failure states for your application, you can force the pod to crash. Observing this crash demonstrates how the system handles unexpected terminations and initiates recovery.
Procedure
-
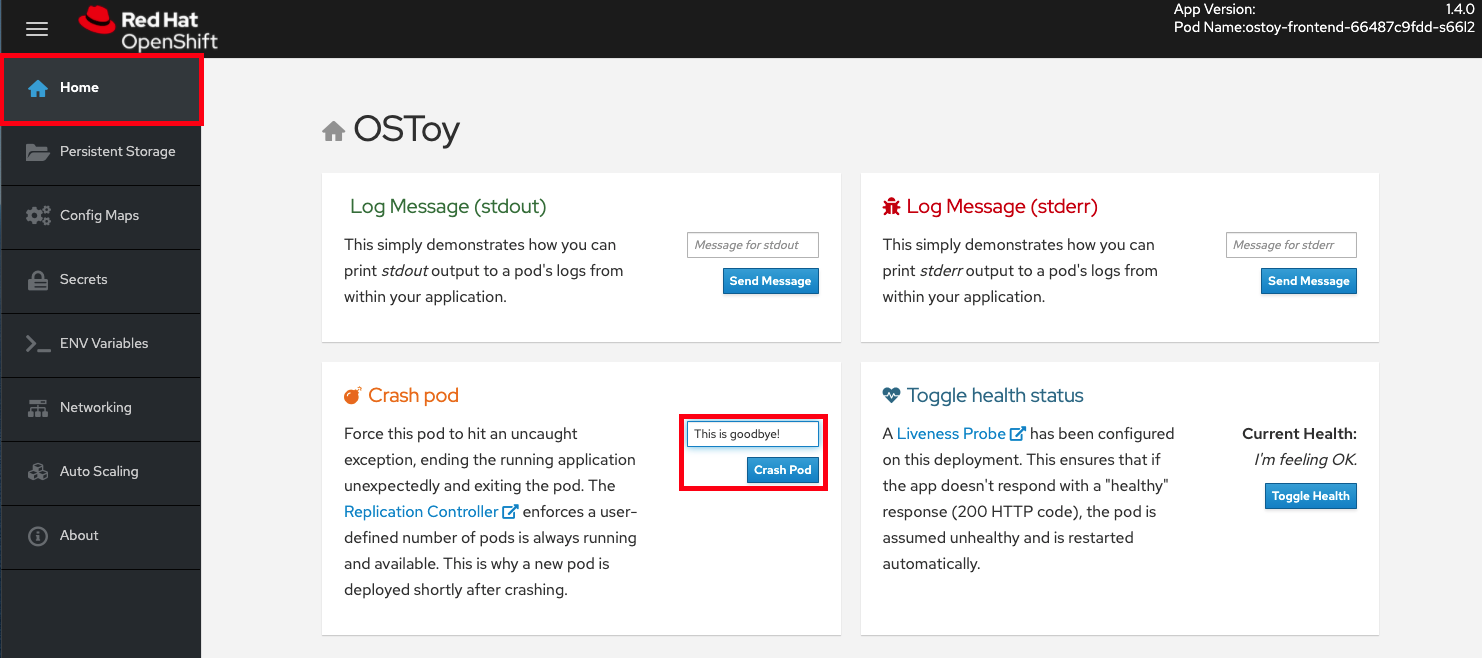
From the OSToy application web console, click Home in the left menu, and enter a message in the Crash Pod box, for example,
This is goodbye!. Click Crash Pod.
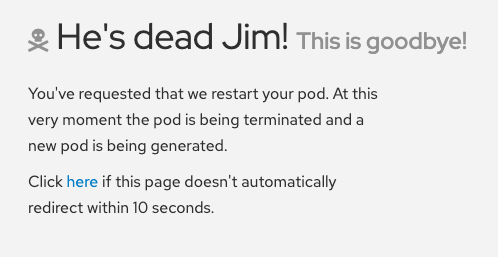
The pod crashes and Kubernetes restarts the pod.
2.3.3. Viewing the revived pod
You can check the status of your revived pod within OpenShift Cluster Manager. Check the status to see how quickly the system revives the pod and recovers from unexpected failures.
Procedure
From the OpenShift web console, quickly switch to the Deployments screen. You will see that the pod turns yellow, which means it is down. It should quickly revive and turn blue. The revival process happens quickly.

Verification
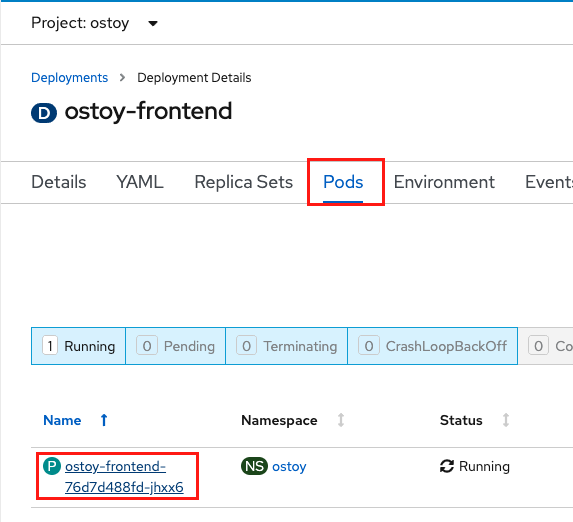
From the web console, click Pods > ostoy-frontend-xxxxxxx-xxxx to change to the pods screen.
Click the Events subtab, and verify that the container crashed and restarted.

2.3.4. Making the application malfunction
You can test your application’s failure responses by purposefully causing the application to malfunction. By causing this failure, you can observe how your system handles unexpected errors and verify that it recovers correctly.
Procedure
From the OSToy application, click Toggle Health in the Toggle Health Status tile. Watch Current Health switch to I’m not feeling all that well.

Verification
After you make the application malfunction, the application stops responding with a 200 HTTP code. After 3 consecutive failures, Kubernetes stops the pod and restarts it.
- From the web console, switch back to the pod events page to see that the liveness probe failed and the pod restarted.
The following image shows an example of what you will see on your pod events page.

A. The pod has three consecutive failures.
B. Kubernetes stops the pod.
C. Kubernetes restarts the pod.
2.4. Persistent volumes for cluster storage
Configure persistent volumes for your Red Hat OpenShift Service on AWS clusters by using Amazon Web Services (AWS) Elastic Block Store (EBS) or AWS Elastic File System (EFS). Utilizing these storage options allows you to safely retain and manage your containerized application data.
2.4.1. Using persistent volumes
Test your cluster’s persistent volume by creating a file, storing it, then purposefully causing a pod failure. Confirming that the file still exists after the pod is re-created demonstrates how your data is protected during unexpected outages.
2.4.1.1. Viewing a persistent volume claim
To verify your storage configuration, view your application’s persistent volume claim from Red Hat OpenShift Cluster Manager.
Procedure
- Navigate to the cluster’s OpenShift web console.
- Click Storage in the left menu, then click PersistentVolumeClaims to see a list of all the persistent volume claims.
Click a persistent volume claim to see the size, access mode, storage class, and other additional claim details.
NoteThe access mode is
ReadWriteOnce(RWO). This means that the volume can only be mounted to one node and the pod or pods can read and write to the volume.
2.4.1.2. Storing your file
To demonstrate the persistent storage capabilities of the cluster, store files within your application by using the OSToy console.
Procedure
- In the OSToy app console, click Persistent Storage in the left menu.
-
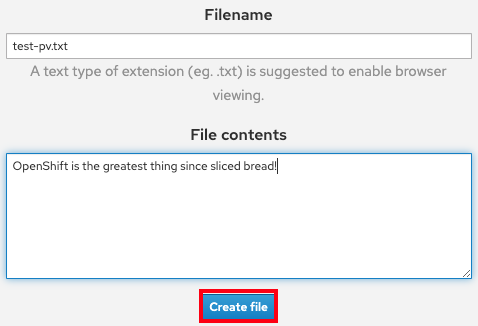
In the Filename box, enter a file name with a
.txtextension, for exampletest-pv.txt. -
In the File contents box, enter a sentence of text, for example
OpenShift is the greatest thing since sliced bread!. Click Create file.
- Scroll to Existing files on the OSToy app console.
Click the file you created to see the file name and contents.

2.4.1.3. Crashing the pod
To demonstrate the persistent storage of your cluster, cause the pod of your application to crash from the OSToy application console.
Procedure
- On the OSToy application console, click Home in the left menu.
- Click Crash pod.
2.4.1.4. Confirming persistent storage
To ensure your data is retained after a pod shuts down, you can verify the persistent storage configuration for your OSToy application.
Procedure
- Wait for the pod to re-create.
- On the OSToy application console, click Persistent Storage in the left menu.
Find the file you created, and open it to view and confirm the contents.

Verification
The deployment YAML file shows that we mounted the directory /var/demo_files to our persistent volume claim.
Retrieve the name of your front-end pod by running the following command:
$ oc get podsStart a secure shell (SSH) session in your container by running the following command:
$ oc rsh <pod_name>Go to the directory by running the following command:
$ cd /var/demo_filesOptional: See all the files you created by running the following command:
$ lsOpen the file to view the contents by running the following command:
$ cat test-pv.txtVerify that the output is the text you entered in the OSToy application console.
For example:
$ oc get pods
NAME                                  READY     STATUS    RESTARTS   AGE
ostoy-frontend-5fc8d486dc-wsw24       1/1       Running   0          18m
ostoy-microservice-6cf764974f-hx4qm   1/1       Running   0          18m

$ oc rsh ostoy-frontend-5fc8d486dc-wsw24

$ cd /var/demo_files/

$ ls
lost+found   test-pv.txt

$ cat test-pv.txt
OpenShift is the greatest thing since sliced bread!
2.4.1.5. Ending the session
To securely close your workspace and free up system resources, end your session from the terminal.
Procedure
-
Type
exitin your terminal to quit the session and return to the CLI.
2.5. ConfigMaps, secrets, and environment variables
To securely manage sensitive information and decouple configurations from your container image, configure your OSToy application by using config maps, secrets, and environment variables.
2.5.1. Configuration using ConfigMaps
To keep your containerized applications portable, decouple your configuration artifacts from the container image content by using config maps. Managing these configurations separately ensures that your images remain completely environment-agnostic.
Procedure
In the OSToy application, in the left menu, click Config Maps, displaying the contents of the config map available to the OSToy application. The code snippet shows an example of a config map configuration:
For example:
kind: ConfigMap
apiVersion: v1
metadata:
  name: ostoy-configmap-files
data:
  config.json:  '{ "default": "123" }'
2.5.2. Configuration using secrets
To securely store and manage sensitive information like passwords and SSH keys, use Kubernetes Secret objects. Configuring a secret is safer and more flexible than embedding plain text directly into your pod definitions or container images.
Procedure
In the OSToy application, in the left menu, click Secrets, displaying the contents of the secrets available to the OSToy application. The code snippet shows an example of a secret configuration:
For example:
USERNAME=my_user
PASSWORD=VVNFUk5BTUU9bXlfdXNlcgpQQVNTV09SRD1AT3RCbCVYQXAhIzYzMlk1RndDQE1UUWsKU01UUD1sb2NhbGhvc3QKU01UUF9QT1JUPTI1
SMTP=localhost
SMTP_PORT=25
2.5.3. Configuration using environment variables
You can change application behavior without requiring code changes by configuring environment variables. Setting, viewing, and updating these variables in Red Hat OpenShift Service on AWS allows you to easily customize how different deployments behave.
Procedure
In the OSToy application, in the left menu, click ENV Variables, displaying the environment variables available to the OSToy application. The code snippet shows an example of an environmental variable configuration:
For example:
{
  "npm_config_local_prefix": "/opt/app-root/src",
  "STI_SCRIPTS_PATH": "/usr/libexec/s2i",
  "npm_package_version": "1.7.0",
  "APP_ROOT": "/opt/app-root",
  "NPM_CONFIG_PREFIX": "/opt/app-root/src/.npm-global",
  "OSTOY_MICROSERVICE_PORT_8080_TCP_PORT": "8080",
  "NODE": "/usr/bin/node",
  "LD_PRELOAD": "libnss_wrapper.so",
  "KUBERNETES_SERVICE_HOST": "172.30.0.1",
  "OSTOY_MICROSERVICE_PORT": "tcp://172.30.60.255:8080",
  "OSTOY_PORT": "tcp://172.30.152.25:8080",
  "npm_package_name": "ostoy",
  "OSTOY_SERVICE_PORT_8080_TCP": "8080",
  "_": "/usr/bin/node"
  "ENV_TOY_CONFIGMAP": "ostoy-configmap -env"
}
2.6. Networking
The OSToy application uses intra-cluster networking to separate functions by using microservices.

In this workshop, there are at least two separate pods, each with its own service. One pod functions as the front end web application with a service and a publicly accessible route. The other pod functions as the backend microservice with a service object so that the front end pod can communicate with the microservice.
Communication occurs across the pods if there is more than one pod. The microservice is not accessible from outside the cluster and other namespaces or projects. The purpose of the microservice is to serve internal web requests and return a JSON object containing the current hostname (the pod’s name) and a randomly generated color string. This color string displays a box with that color on the OSToy application web console.
For more information about the networking limitations, see About network policy.
2.6.1. Configuring intra-cluster networking
You can view your networking configurations such as internal ClusterIP addresses and microservices in your OSToy application. These isolated processes help improve application stability and demonstrate how internal web requests are handled.
Procedure
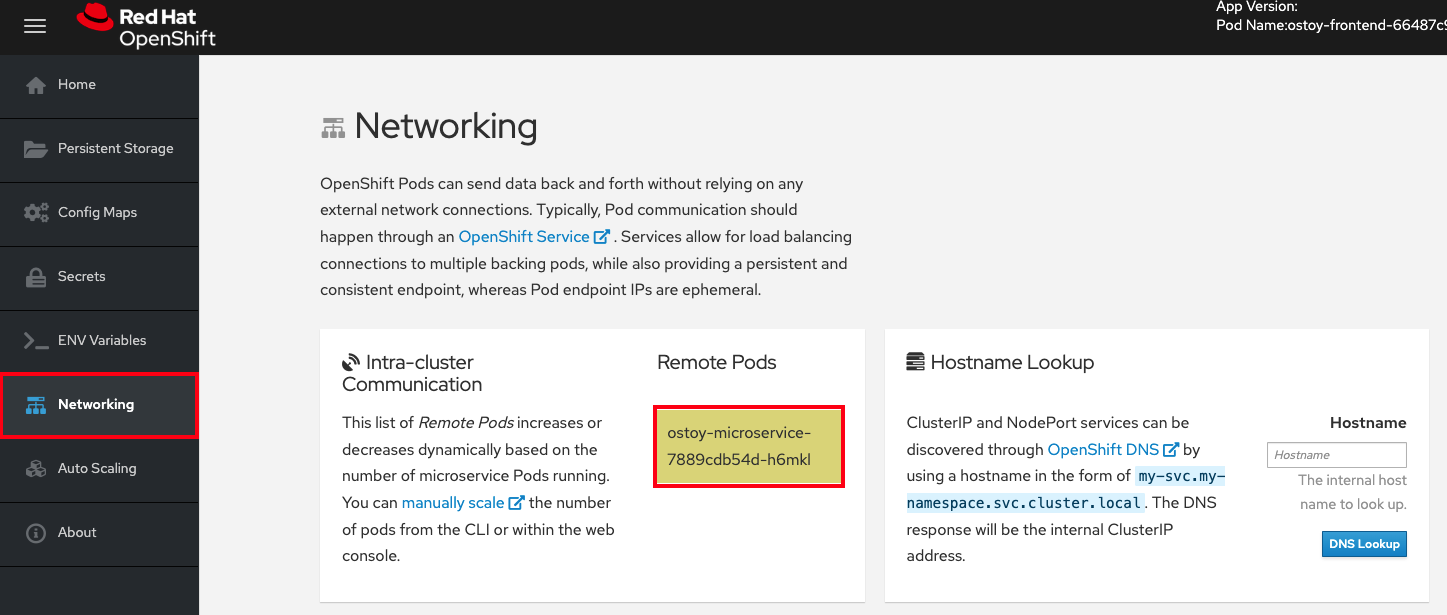
- In the OSToy application web console, click Networking in the left menu.
Review the networking configuration. The tile "Hostname Lookup" illustrates how the service name created for a pod translates into an internal ClusterIP address.

Enter the name of the microservice created in the "Hostname Lookup" tile following the format:
<service_name>.<namespace>.svc.cluster.local. You can find the microservice name in the service definition ofostoy-microservice.yamlby running the following command:$ oc get service <name_of_service> -o yamlFor example:
apiVersion: v1
kind: Service
metadata:
  name: ostoy-microservice-svc
  labels:
    app: ostoy-microservice
spec:
  type: ClusterIP
  ports:
    - port: 8080
      targetPort: 8080
      protocol: TCP
  selector:
    app: ostoy-microservice
In this example, the full hostname is
ostoy-microservice-svc.ostoy.svc.cluster.local.An IP address is returned. In this example it is
172.30.165.246. This is the intra-cluster IP address, which is only accessible from within the cluster.
2.7. Scaling an application
To optimize your cluster’s resource capacity, manually or automatically scale your pods with the Horizontal Pod Autoscaler (HPA). Additionally, scaling your cluster nodes helps you ensure your environment can seamlessly handle varying workload demands.
2.7.1. Manual pod scaling
You can manually scale your application’s pods by using one of the following methods:
- Changing your ReplicaSet or deployment definition
- Using the command line
- Using the web console
This workshop starts by using only one pod for the microservice. By defining a replica of 1 in your deployment definition, the Kubernetes Replication Controller strives to keep one pod alive. You then learn how to define pod autoscaling by using the Horizontal Pod Autoscaler(HPA) which is based on the load and will scale out more pods when necessary.
Prerequisites
- An active Red Hat OpenShift Service on AWS cluster
- A deployed OSToy application
Procedure
- In the OSToy app, click the Networking tab in the navigational menu.
In the "Intra-cluster Communication" section, locate the box that randomly changes colors. Inside the box, you see the microservice’s pod name. There is only one box in this example because there is only one microservice pod.
Confirm that there is only one pod running for the microservice by running the following command:
$ oc get podsFor example:
NAME READY STATUS RESTARTS AGE ostoy-frontend-679cb85695-5cn7x 1/1 Running 0 1h ostoy-microservice-86b4c6f559-p594d 1/1 Running 0 1h- Download the ostoy-microservice-deployment.yaml and save it to your local machine.
Change the deployment definition to three pods instead of one by using the following example:
spec:
    selector:
      matchLabels:
        app: ostoy-microservice
    replicas: 3
Apply the replica changes by running the following command:
$ oc apply -f ostoy-microservice-deployment.yamlNoteYou can also edit the
ostoy-microservice-deployment.yamlfile in the OpenShift Web Console by going to the Workloads > Deployments > ostoy-microservice > YAML tab.Confirm that there are now 3 pods by running the following command:
$ oc get podsThe output shows that there are now 3 pods for the microservice instead of only one.
For example:
NAME                                  READY   STATUS    RESTARTS   AGE
ostoy-frontend-5fbcc7d9-rzlgz         1/1     Running   0          26m
ostoy-microservice-6666dcf455-2lcv4   1/1     Running   0          81s
ostoy-microservice-6666dcf455-5z56w   1/1     Running   0          81s
ostoy-microservice-6666dcf455-tqzmn   1/1     Running   0          26m
Scale the application by using the command-line interface (CLI) or by using the web user interface (UI):
In the CLI, decrease the number of pods from
3to2by running the following command:$ oc scale deployment ostoy-microservice --replicas=2- From the navigational menu of the OpenShift web console UI, click Workloads > Deployments > ostoy-microservice.
- Locate the blue circle with a "3 Pod" label in the middle.
Selecting the arrows next to the circle scales the number of pods. Select the down arrow to
2.
Verification
Check your pod counts by using the CLI, the web UI, or the OSToy application:
From the ROSA CLI, confirm that you are using two pods for the microservice by running the following command:
$ oc get podsFor example:
NAME                                  READY   STATUS    RESTARTS   AGE
ostoy-frontend-5fbcc7d9-rzlgz         1/1     Running   0          75m
ostoy-microservice-6666dcf455-2lcv4   1/1     Running   0          50m
ostoy-microservice-6666dcf455-tqzmn   1/1     Running   0          75m
In the web UI, select Workloads > Deployments > ostoy-microservice.

You can also confirm that there are two pods by selecting Networking in the navigation menu of the OSToy application. There should be two colored boxes for the two pods.

2.7.2. Pod autoscaling
Red Hat OpenShift Service on AWS offers a Horizontal Pod Autoscaler (HPA). The HPA uses metrics to increase or decrease the number of pods when necessary.
Prerequisites
- An active Red Hat OpenShift Service on AWS cluster
- A deployed OSToy application
Procedure
From the navigational menu of the web UI, select Pod Auto Scaling.

Create the HPA by running the following command:
$ oc autoscale deployment/ostoy-microservice --cpu-percent=80 --min=1 --max=10This command creates an HPA that maintains between 1 and 10 replicas of the pods controlled by the ostoy-microservice deployment. During deployment, HPA increases and decreases the number of replicas to keep the average CPU use across all pods at 80% and 40 millicores.
On the Pod Auto Scaling > Horizontal Pod Autoscaling page, select Increase the load.
ImportantBecause increasing the load generates CPU intensive calculations, the page can become unresponsive. This is an expected response. Only click Increase the Load once. For more information about the process, see the microservice’s GitHub repository.
After a few minutes, the new pods display on the page represented by colored boxes.
NoteThe page can experience lag.
Verification
Check your pod counts with one of the following methods:
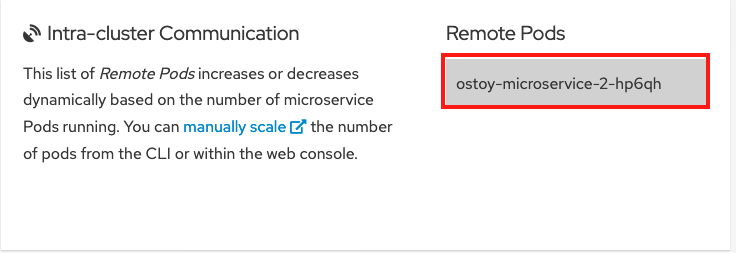
In the OSToy application’s web UI, see the remote pods box:

Because there is only one pod, increasing the workload should trigger an increase of pods.
In the CLI, run the following command:
oc get pods --field-selector=status.phase=Running | grep microserviceFor example:
ostoy-microservice-79894f6945-cdmbd   1/1     Running   0          3m14s
ostoy-microservice-79894f6945-mgwk7   1/1     Running   0          4h24m
ostoy-microservice-79894f6945-q925d   1/1     Running   0          3m14s
You can also verify autoscaling from the OpenShift Cluster Manager
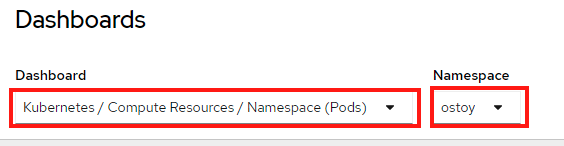
- In the OpenShift web console navigational menu, click Observe > Dashboards.
In the dashboard, select Kubernetes / Compute Resources / Namespace (Pods) and your namespace ostoy.
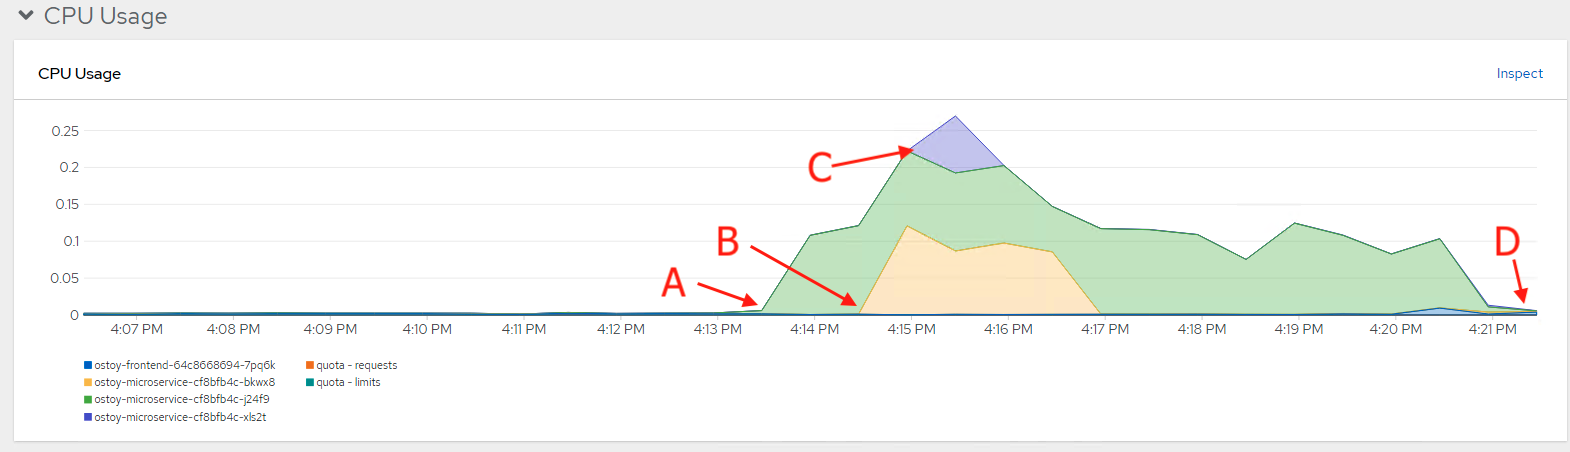
A graph appears showing your resource usage across CPU and memory. The top graph shows recent CPU consumption per pod and the lower graph indicates memory usage. The following lists the callouts in the graph:
- The load increased (A).
- Two new pods were created (B and C).
- The thickness of each graph represents the CPU consumption and indicates which pods handled more load.
The load decreased (D), and the pods were deleted.
2.7.3. Node autoscaling
Red Hat OpenShift Service on AWS allows you to use node autoscaling. In this scenario, you will create a new project with a job that has a large workload that the cluster cannot handle. With autoscaling enabled, when the load is larger than your current capacity, the cluster will automatically create new nodes to handle the load.
Prerequisites
- An active Red Hat OpenShift Service on AWS cluster
- A deployed OSToy application
- Autoscaling is enabled on your machine pools.
Procedure
Create a new project called
autoscale-exby running the following command:$ oc new-project autoscale-exCreate the job by running the following command:
$ oc create -f https://raw.githubusercontent.com/openshift-cs/rosaworkshop/master/rosa-workshop/ostoy/yaml/job-work-queue.yamlAfter a few minutes, run the following command to see the pods:
$ oc get podsFor example:
NAME READY STATUS RESTARTS AGE work-queue-5x2nq-24xxn 0/1 Pending 0 10s work-queue-5x2nq-57zpt 0/1 Pending 0 10s work-queue-5x2nq-58bvs 0/1 Pending 0 10s work-queue-5x2nq-6c5tl 1/1 Running 0 10s work-queue-5x2nq-7b84p 0/1 Pending 0 10s work-queue-5x2nq-7hktm 0/1 Pending 0 10s work-queue-5x2nq-7md52 0/1 Pending 0 10s work-queue-5x2nq-7qgmp 0/1 Pending 0 10s work-queue-5x2nq-8279r 0/1 Pending 0 10s work-queue-5x2nq-8rkj2 0/1 Pending 0 10s work-queue-5x2nq-96cdl 0/1 Pending 0 10s work-queue-5x2nq-96tfr 0/1 Pending 0 10s-
Because there are many pods in a
Pendingstate, this status triggers the autoscaler to create more nodes in your machine pool. Allow time to create these worker nodes. After a few minutes, use the following command to see how many worker nodes you now have:
$ oc get nodesFor example:
NAME                                         STATUS   ROLES          AGE     VERSION
ip-10-0-138-106.us-west-2.compute.internal   Ready    infra,worker   22h     v1.23.5+3afdacb
ip-10-0-153-68.us-west-2.compute.internal    Ready    worker         2m12s   v1.23.5+3afdacb
ip-10-0-165-183.us-west-2.compute.internal   Ready    worker         2m8s    v1.23.5+3afdacb
ip-10-0-176-123.us-west-2.compute.internal   Ready    infra,worker   22h     v1.23.5+3afdacb
ip-10-0-195-210.us-west-2.compute.internal   Ready    master         23h     v1.23.5+3afdacb
ip-10-0-196-84.us-west-2.compute.internal    Ready    master         23h     v1.23.5+3afdacb
ip-10-0-203-104.us-west-2.compute.internal   Ready    worker         2m6s    v1.23.5+3afdacb
ip-10-0-217-202.us-west-2.compute.internal   Ready    master         23h     v1.23.5+3afdacb
ip-10-0-225-141.us-west-2.compute.internal   Ready    worker         23h     v1.23.5+3afdacb
ip-10-0-231-245.us-west-2.compute.internal   Ready    worker         2m11s   v1.23.5+3afdacb
ip-10-0-245-27.us-west-2.compute.internal    Ready    worker         2m8s    v1.23.5+3afdacb
ip-10-0-245-7.us-west-2.compute.internal     Ready    worker         23h     v1.23.5+3afdacb
You can see the worker nodes were automatically created to handle the workload.
Return to the OSToy application by entering the following command:
$ oc project ostoy
2.8. S2I deployments
You can deploy applications in Red Hat OpenShift Service on AWS by using the integrated Source-to-Image (S2I) builder. Compiling your source code with S2I helps you efficiently build reproducible, Docker-formatted container images.
2.8.1. Retrieving your login command
To create your cluster, log in to the ROSA command-line interface (CLI) (rosa). If you need to authenticate, use a token from Red Hat OpenShift Cluster Manager.
Procedure
Confirm you are logged in to the ROSA CLI by running the following command:
rosa whoamiIf you are logged in to the command-line interface, skip to "Creating a new project". If you are not logged in to the command-line interface, continue this procedure.
If you are not logged in to the ROSA CLI, in OpenShift Cluster Manager, click the dropdown arrow next to your name in the upper-right and select Copy login command.

- A new tab opens. Enter your username and password, and select the authentication method.
- Click Display Token
- Copy the command under "Log in with this token".
Log in to the CLI by running the copied command in your terminal.
For example:
$ oc login --token=RYhFlXXXXXXXXXXXX --server=https://api.osd4-demo.abc1.p1.openshiftapps.com:6443Example output:
Logged into "https://api.myrosacluster.abcd.p1.openshiftapps.com:6443" as "rosa-user" using the token provided.

You don't have any projects. You can try to create a new project, by running

oc new-project <project name>
2.8.2. Creating a new project
You can use the OpenShift CLI (oc) to create a new project within your cluster. To get started with the integrated Source-to-Image (S2I) deployment process, create a new project within your cluster by using the OpenShift CLI (oc).
Procedure
Create a new project from the CLI by running the following command:
$ oc new-project ostoy-s2i
2.8.3. Fork the OSToy repository
To trigger automated builds based on changes to the source code, you must fork the OSToy repository and set up a GitHub webhook. The webhook triggers S2I builds when you push code into your GitHub repository.
Procedure
To set up the webhook, you must first Create a new fork.
ImportantReplace
<UserName>with your own GitHub username for the following URLs in this guide.
2.8.4. Using S2i to deploy OSToy on your cluster
To simplify your deployment process, you can deploy OSToy on your cluster by using the Source-to-Image (S2I) builder. This tool saves you time by automatically building a reproducible container image directly from the source binaries.
Procedure
Add a secret to OpenShift.
This example emulates a
.envfile. Files are easily moved directly into an OpenShift environment and can even be renamed in the secret.Run the following command, replacing
<UserName>with your GitHub username:$ oc create -f https://raw.githubusercontent.com/<UserName>/ostoy/master/deployment/yaml/secret.yaml
Add a ConfigMap to OpenShift.
This example emulates an HAProxy config file, which is typically used for overriding default configurations in an OpenShift application. Files can be renamed in the ConfigMap.
Run the following command, replacing
<UserName>with your GitHub username:$ oc create -f https://raw.githubusercontent.com/<UserName>/ostoy/master/deployment/yaml/configmap.yaml
Deploy the microservice.
You must deploy the microservice to ensure that the service environment variables are available from the UI application.
--context-dirbuilds the application defined in themicroservicedirectory in the Git repository. Theapplabel ensures the user interface (UI) application and microservice are both grouped in the OpenShift UI.Run the following command to create the microservice, replacing
<UserName>with your GitHub username:$ oc new-app https://github.com/<UserName>/ostoy \ --context-dir=microservice \ --name=ostoy-microservice \ --labels=app=ostoyExample output:
--> Creating resources with label app=ostoy ...
    imagestream.image.openshift.io "ostoy-microservice" created
    buildconfig.build.openshift.io "ostoy-microservice" created
    deployment.apps "ostoy-microservice" created
    service "ostoy-microservice" created
--> Success
    Build scheduled, use 'oc logs -f buildconfig/ostoy-microservice' to track its progress.
    Application is not exposed. You can expose services to the outside world by executing one or more of the commands below:
     'oc expose service/ostoy-microservice'
    Run 'oc status' to view your app.
Check the status of the microservice.
Check that the microservice was created and is running correctly by running the following command:
$ oc statusFor example:
In project ostoy-s2i on server https://api.myrosacluster.g14t.p1.openshiftapps.com:6443

svc/ostoy-microservice - 172.30.47.74:8080
  dc/ostoy-microservice deploys istag/ostoy-microservice:latest <-
    bc/ostoy-microservice source builds https://github.com/UserName/ostoy on openshift/nodejs:14-ubi8
    deployment #1 deployed 34 seconds ago - 1 pod
Wait until you see that the microservice was successfully deployed. You can also check this through the web UI.
Deploy the front end UI.
The application relies on several environment variables to define external settings.
Attach the secret and ConfigMap and create a PersistentVolume by running the following command:
$ oc new-app https://github.com/<UserName>/ostoy \
    --env=MICROSERVICE_NAME=OSTOY_MICROSERVICE
For example:
--> Creating resources ...
    imagestream.image.openshift.io "ostoy" created
    buildconfig.build.openshift.io "ostoy" created
    deployment.apps "ostoy" created
    service "ostoy" created
--> Success
    Build scheduled, use 'oc logs -f buildconfig/ostoy' to track its progress.
    Application is not exposed. You can expose services to the outside world by executing one or more of the commands below:
     'oc expose service/ostoy'
    Run 'oc status' to view your app.
Update the deployment by running the following command:
$ oc patch deployment ostoy --type=json -p \
    '[{"op": "replace", "path": "/spec/strategy/type", "value": "Recreate"}, {"op": "remove", "path": "/spec/strategy/rollingUpdate"}]'
Set a liveness probe.
Create a liveness probe to ensure the pod restarts if something is wrong in the application.
Run the following command:
$ oc set probe deployment ostoy --liveness --get-url=http://:8080/health
Attach the secret, ConfigMap, and persistent volume to the deployment.
Run the following command to attach your secret:
$ oc set volume deployment ostoy --add \
    --secret-name=ostoy-secret \
    --mount-path=/var/secret
Run the following command to attach your ConfigMap:
$ oc set volume deployment ostoy --add \
    --configmap-name=ostoy-config \
    -m /var/config
Run the following command to create and attach your persistent volume:
$ oc set volume deployment ostoy --add \
    --type=pvc \
    --claim-size=1G \
    -m /var/demo_files
Expose the UI application as an OpenShift Route.
Run the following command to deploy the application as an HTTPS application that uses the included TLS wildcard certificates:
$ oc create route edge --service=ostoy --insecure-policy=Redirect
Browse to your application with the following methods:
Run the following command to open a web browser with your OSToy application:
$ python -m webbrowser "$(oc get route ostoy -o template --template='https://{{.spec.host}}')"Run the following command to get the route for the application and copy and paste the route into your browser:
$ oc get route
2.9. Using Source-to-Image (S2I) webhooks for automated deployment
Automatically trigger a build and deploy any time you change the source code by using a webhook. For more information about this process, see Triggering Builds.
2.9.1. Configuring your automated deployment
Configure a GitHub webhook to set up automated deployments for your OSToy application. Using this webhook saves you time by automatically triggering a new build every time you update your source code.
Procedure
Obtain the GitHub webhook trigger secret by running the following command:
$ oc get bc/ostoy-microservice -o=jsonpath='{.spec.triggers..github.secret}'For example:
`o_3x9M1qoI2Wj_cz1WiK`ImportantYou need to use this secret in a later step in this process.
Obtain the GitHub webhook trigger URL from the OSToy’s buildconfig by running the following command:
$ oc describe bc/ostoy-microserviceFor example:
[...]
Webhook GitHub:
	URL:	https://api.demo1234.openshift.com:443/apis/build.openshift.io/v1/namespaces/ostoy-s2i/buildconfigs/ostoy/webhooks/<secret>/github
[...]
In the GitHub webhook URL, replace the
<secret>text with the secret you retrieved. Your URL will resemble the following example output:For example:
https://api.demo1234.openshift.com:443/apis/build.openshift.io/v1/namespaces/ostoy-s2i/buildconfigs/ostoy-microservice/webhooks/o_3x9M1qoI2Wj_czR1WiK/githubSet up the webhook URL in GitHub repository.
In your repository, click Settings > Webhooks > Add webhook.
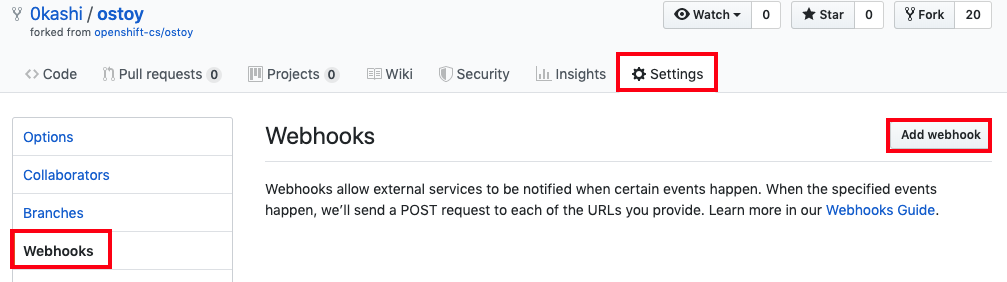
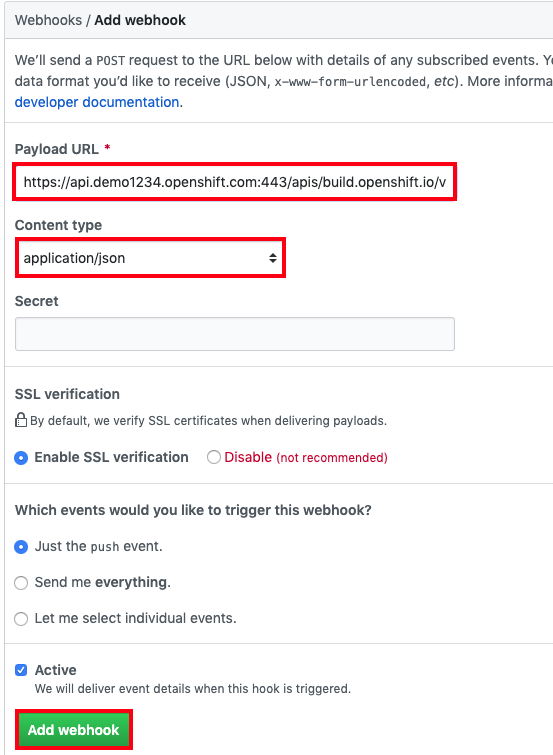
-
Paste the GitHub webhook URL with the
Secretincluded in the "Payload URL" field. -
Change the "Content type" to
application/json. Click the Add webhook button.
You should see a message from GitHub stating that your webhook was successfully configured. Now, whenever you push a change to your GitHub repository, a new build automatically starts, and upon a successful build, a new deployment starts.
Make a change in the source code. Any changes automatically trigger a build and deployment. In this example, the colors that denote the status of your OSToy app are randomly selected. To test the configuration, change the box to display grayscale.
- Go to the source code in your repository https://github.com/<username>/ostoy/blob/master/microservice/app.js.
- Edit the file.
-
Comment out line 8 (containing
let randomColor = getRandomColor();). Uncomment line 9 (containing
let randomColor = getRandomGrayScaleColor();).7 app.get('/', function(request, response) { 8 //let randomColor = getRandomColor(); // <-- comment this 9 let randomColor = getRandomGrayScaleColor(); // <-- uncomment this 10 11 response.writeHead(200, {'Content-Type': 'application/json'});- Enter a message for the update, such as "changed box to grayscale colors".
- Click Commit at the bottom to commit the changes to the main branch.
In your cluster’s web UI, click Builds > Builds to determine the status of the build. After this build is completed, the deployment begins. You can also check the status by running
oc statusin your terminal.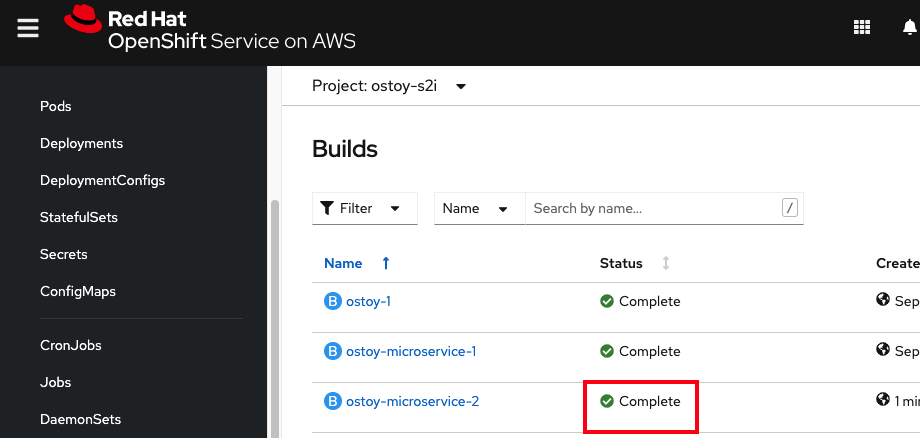
After the deployment has finished, return to the OSToy application in your browser. Access the Networking menu item on the left. The box color is now limited to grayscale colors only.