このコンテンツは選択した言語では利用できません。
Chapter 26. Creating a Fabric in the Cloud
To create a fabric on a cloud, you need to
- Have established an account with a cloud provider
- Provide the developer tools the account details for connecting to the cloud
- Specify the details required for creating the fabric and the machine image on which it will run
26.1. Adding cloud details
リンクのコピーリンクがクリップボードにコピーされました!
Overview
リンクのコピーリンクがクリップボードにコピーされました!
To connect to a cloud, the developer tools need the relevant access and authorization information. This information was provided to you or a system administrator by the cloud provider, when the account was set up.
Procedure
リンクのコピーリンクがクリップボードにコピーされました!
To add a cloud's access details:
- In Fabric Navigator, right-click Clouds to open the context menu, and then select .
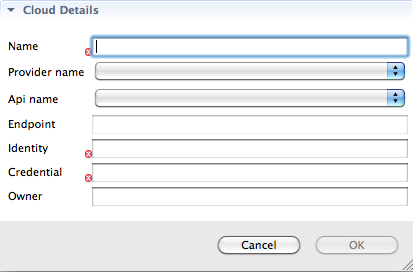
Figure 26.1. Cloud Details wizard
 NoteAn error icon (
 ) marks required fields that lack a valid value, and the dialog banner displays the number of errors detected.
- In Name, enter a name for the cloud.ImportantThe next three fields provide two methods for specifying the provider's information. You select either a provider's name, or you select both an API and its endpoint.
- In Provider name, select the name of the cloud provider from the drop-down list.If you select a provider name, the developer tools autofill Api name and Endpoint with the selected provider's information, so you can skip to Step 6.
- In Api name, select from the drop-down list the name of the API you want to use.This list displays only APIs that have been installed on your local machine or environment.
- In Endpoint, enter the uri of the web service that exposes the API you selected in Step 4.If you have an on-premises, private cloud installed, you need to get this uri from the cloud administrator.
- In Identity, enter the account identifier supplied by the cloud provider.For example, for Amazon Elastic Compute Cloud (EC2) accounts, you'd enter the Access Key ID.
- In Credential, enter the account password supplied by the cloud provider.For example, for Amazon Elastic Compute Cloud (EC2) accounts, you'd enter the Secret Access Key.
- In Owner, for EC2 only, enter the id assigned to a custom image.This option is EC2-specific and applies only to custom images. To query or use a custom image, you must enter the owner id assigned to it by EC2; otherwise, the image will not appear in the list of instances.
If you entered valid access details, the developer tools connect to the cloud whose access details you specified and load the provider's images. Once that's done, the name you entered in Step 2 appears as a node under Clouds in Fabric Navigator.
Related topics
リンクのコピーリンクがクリップボードにコピーされました!
| Section 23.3, “Creating a new container on a cloud” |