このコンテンツは選択した言語では利用できません。
Transaction Guide
Using transactions to make your routes roll back ready
Copyright © 2011-2020 Red Hat, Inc. and/or its affiliates.
Abstract
Chapter 1. Introduction to Transactions
Abstract
1.1. Basic Transaction Concepts
What is a transaction?
ACID properties of a transaction
- Atomic—a transaction is an all or nothing procedure; individual updates are assembled and either committed or aborted (rolled back) simultaneously when the transaction completes.
- Consistent—a transaction is a unit of work that takes a system from one consistent state to another.
- Isolated—while a transaction is executing, its partial results are hidden from other entities accessing the transaction.
- Durable—the results of a transaction are persistent.
Transaction clients
PlatformTransactionManager exposes a transaction client API.
Transaction demarcation
Resources
Transaction manager
Managing single or multiple resources
- 1-phase commit—suitable for single-resource systems, this protocol commits a transaction in a single step.
- 2-phase commit—suitable for multiple-resource systems, this protocol commits a transaction in two steps. Including multiple resources in a transaction introduces an extra element of risk: there is the danger that a system failure might occur after some, but not all, of the resources have been committed. This would leave the system in an inconsistent state. The 2-phase commit protocol is designed to eliminate this risk, ensuring that the system can always be restored to a consistent state after it is restarted.
Transactions and threading
- An application can process multiple transactions simultaneously—as long as each of the transactions are created in separate threads.
- Beware of creating subthreads within a transaction—if you are in the middle of a transaction and you create a new pool of threads (for example, by calling the
threads()DSL command), the new threads are not in the scope of the original transaction. - Beware of processing steps that implicitly create new threads—for the same reason given in the preceding point.
- Transaction scopes do not usually extend across route segments—that is, if one route segment ends with
to(JoinEndpoint)and another route segment starts withfrom(JoinEndpoint), these route segments typically do not belong to the same transaction. There are exceptions, however (see the section called “Breaking a route into fragments”).
Transaction context
Distributed transactions
X/Open XA standard
1.2. Transaction Qualities of Service
Overview
Qualities of service provided by resources
Transaction isolation levels
SERIALIZABLE- Transactions are perfectly isolated from each other. That is, nothing that one transaction does can affect any other transaction until the transaction is committed. This isolation level is described as serializable, because the effect is as if all transactions were executed one after the other (although in practice, the resource can often optimize the algorithm, so that some transactions are allowed to proceed simultaneously).
REPEATABLE_READ- Every time a transaction reads or updates the database, a read or write lock is obtained and held until the end of the transaction. This provides almost perfect isolation. But there is one case where isolation is not perfect. Consider a SQL
SELECTstatement that reads a range of rows using aWHEREclause. If another transaction adds a row to this range while the first transaction is running, the first transaction can see this new row, if it repeats theSELECTcall (a phantom read). READ_COMMITTED- Read locks are not held until the end of a transaction. So, repeated reads can give different answers (updates committed by other transactions are visible to an ongoing transaction).
READ_UNCOMMITTED- Neither read locks nor write locks are held until the end of a transaction. Hence, dirty reads are possible (that is, a transaction can see uncommitted updates made by other transactions).
READ_UNCOMMITTED. Also, some databases implement transaction isolation levels in ways that are subtly different from the ANSI standard. Isolation is a complicated issue, which involves trade offs with database performance (for example, see Isolation in Wikipedia).
Support for the XA standard
Qualities of service provided by transaction managers
Support for multiple resources
Support for suspend/resume and attach/detach
- Suspend/resume current transaction—enables you to suspend temporarily the current transaction context, while the application does some non-transactional work in the current thread.
- Attach/detach transaction context—enables you to move a transaction context from one thread to another or to extend a transaction scope to include multiple threads.
Distributed transactions
Transaction monitoring
Recovery from failure
1.3. Getting Started with Transactions
1.3.1. Prerequisites
Overview
- Internet connection (required by Maven)
Java Runtime
JAVA_HOME environment variable to point to the root directory of your JDK, and set your PATH environment variable to include the Java bin directory.
Apache Maven 3
- Set your
M2_HOMEenvironment variable to point to the Maven root directory. - Set your
MAVEN_OPTSenvironment variable to-Xmx512Mto increase the memory available for Maven builds. - Set your
PATHenvironment variable to include the Mavenbindirectory:Expand Platform Path Windows %M2_HOME%\binUNIX $M2_HOME/bin
1.3.2. Generate a New Project
Overview
karaf-camel-cbr-archetype, to generate a sample Java application which you can then use as a starting point for your application.
Steps
- Open a new command window and change to the directory where you want to store the new Maven project.
- Enter the following command to generate the new Maven project:
Copy to Clipboard Copied! Toggle word wrap Toggle overflow Each time you are prompted for input, press Enter to accept the default.This command generates a basic router application under thetx-jms-routerdirectory. You will customize this basic application to demonstrate transactions in Apache Camel.NoteMaven accesses the Internet to download JARs and stores them in its local repository. - Add dependencies on the artifacts that implement Spring transactions. Look for the
dependencieselement in the POM file and add the followingdependencyelements:Copy to Clipboard Copied! Toggle word wrap Toggle overflow NoteIt is not necessary to specify the versions of these artifacts, because this POM is configured to use the Fabric8 BOM, which configures default artifact versions through Maven's dependency management mechanism. - Add the JMS and ActiveMQ dependencies. Look for the
dependencieselement in the POM file and add the followingdependencyelements:Copy to Clipboard Copied! Toggle word wrap Toggle overflow
1.3.3. Configure a Transaction Manager and a Camel Route
Overview
transacted() Java DSL command (see Section 5.1, “Demarcation by Marking the Route”).
Steps
- Customize the Blueprint XML configuration. Using your favourite text editor, open the
tx-jms-router/src/main/resources/OSGI-INF/blueprint/cbr.xmlfile and replace the contents of the file with the following XML code:Copy to Clipboard Copied! Toggle word wrap Toggle overflow - In the
jmsConnectionFactorybean from the preceding Spring XML code, customize the values of theuserNameandpasswordproperty settings with one of the user credentials from the JBoss Fuse container. By default, the container's user credentials are normally defined in theetc/users.propertiesfile.
1.3.4. Create the MyTransform Bean
Overview
MyTransform bean class is to force a rollback of the current transaction, by throwing an exception. The bean gets called at the end of the second transactional route. This enables you to verify the behaviour of a rolled back transaction.
Steps
MyTransform bean class. Using your favourite text editor, create the tx-jms-router/src/main/java/tutorial/MyTransform.java file and add the following Java code to the file:
1.3.5. Build and Run the Example
Overview
Steps
- To build the example, open a command prompt, change directory to
tx-jms-router, and enter the following Maven command:mvn install
mvn installCopy to Clipboard Copied! Toggle word wrap Toggle overflow If the build is successful, you should see the file,tx-jms-router.jar, appear under thetx-jms-router/targetdirectory. - Create a sample message for the routes to consume when they are running in the container. Create the following directory path in the container's installation directory (where you installed JBoss Fuse):
InstallDir/work/data
InstallDir/work/dataCopy to Clipboard Copied! Toggle word wrap Toggle overflow In thedatadirectory create the file,message.txt, with the following contents:Test message.
Test message.Copy to Clipboard Copied! Toggle word wrap Toggle overflow - Start up the JBoss Fuse container. Open a new command prompt and enter the following commands:
cd InstallDir/bin
./fuse
cd InstallDir/bin
./fuse
Copy to Clipboard Copied! Toggle word wrap Toggle overflow - To install and start the example in the container, enter the following console command:
JBossFuse:karaf@root> install -s mvn:tutorial/tx-jms-router/1.0-SNAPSHOT
JBossFuse:karaf@root> install -s mvn:tutorial/tx-jms-router/1.0-SNAPSHOTCopy to Clipboard Copied! Toggle word wrap Toggle overflow - To see the result of running the routes, open the container log using the
log:displaycommand, as follows:JBossFuse:karaf@root> log:display
JBossFuse:karaf@root> log:displayCopy to Clipboard Copied! Toggle word wrap Toggle overflow If all goes well, you should see about a dozen occurrences ofjava.lang.Exception: testin the log. This is the expected behaviour. - What happened? The series of runtime exceptions thrown by the application is exactly what we expect to happen, because the route is programmed to throw an exception every time an exchange is processed by the route. The purpose of throwing the exception is to trigger a transaction rollback, causing the current exchange to be un-enqueued from the
queue:creditandqueue:debitqueues. - To gain a better insight into what occurred, user your browser to connect to the Fuse Management Console. Navigate to the following URL in your browser:
http://localhost:8181/hawtio
http://localhost:8181/hawtioCopy to Clipboard Copied! Toggle word wrap Toggle overflow You will be prompted to log in. Use one of the credentials configured for your container (usually defined in theInstallDir/etc/users.propertiesfile). - Click on the ActiveMQ tab to explore the JMS queues that are accessed by the example routes.
- Drill down to the
giroqueue. Notice that theEnqueueCountandDequeueCountforgiroare all equal to 1, which indicates that one message entered the queue and one message was pulled off the queue. - Click on the
debitsqueue. Notice that theEnqueueCount,DispatchCount, andDequeueCountfordebitsare all equal to 0. This is because thetestexception caused the enqueued message to be rolled back each time an exchange passed through the route. The same thing happened to thecreditsqueue. - Click on the
ActiveMQ.DLQqueue. TheDLQpart of this name stands for Dead Letter Queue and it is an integral part of the way ActiveMQ deals with failed message dispatches. In summary, the default behavior of ActiveMQ when it fails to dispatch a message (that is, when an exception reaches the JMS consumer endpoint,jmstx:queue:giro), is as follows:- The consumer endpoint attempts to redeliver the message. Redelivery attempts can be repeated up to a configurable maximum number of times.
- If the redeliveries limit is exceeded, the consumer endpoint gives up trying to deliver the message and enqueues it on the dead letter queue instead (by default,
ActiveMQ.DLQ).
You can see from the status of theActiveMQ.DLQqueue that the number of enqueued messages,EnqueueCount, is equal to 1. This is where the failed message has ended up.
Chapter 2. Selecting a Transaction Manager
Abstract
2.1. What is a Transaction Manager?
Transaction managers in Spring
- Demarcation—starting and ending transactions using begin, commit, and rollback methods.
- Managing the transaction context—a transaction context contains the information that a transaction manager needs to keep track of a transaction. The transaction manager is responsible for creating transaction contexts and attaching them to the current thread.
- Coordinating the transaction across multiple resources—enterprise-level transaction managers typically have the capability to coordinate a transaction across multiple resources. This feature requires the 2-phase commit protocol and resources must be registered and managed using the XA protocol (see the section called “X/Open XA standard”).This is an advanced feature, not supported by all transaction managers.
- Recovery from failure—transaction managers are responsible for ensuring that resources are not left in an inconsistent state, if there is a system failure and the application crashes. In some cases, manual intervention might be required to restore the system to a consistent state.
Local transaction managers
BEGIN, COMMIT, ROLLBACK, or using a native Oracle API) and various levels of transaction isolation. Control over the Oracle transaction manager can be exported through JDBC, which is how Spring is able to wrap this transaction manager.
Global transaction managers
- Global transaction manager or TP monitor—an external transaction system that implements the 2-phase commit protocol for coordinating multiple XA resources.
- Resources that support the XA standard—in order to participate in a 2-phase commit, resources must support the X/Open XA standard. In practice, this means that the resource is capable of exporting an XA switch object, which gives complete control of transactions to the external TP monitor.
JtaTransactionManager class). Hence, if you deploy your application into an OSGi container with full transaction support, you can use multiple transactional resources in Spring.
Distributed transaction managers
2.2. Spring Transaction Architecture
Overview
Figure 2.1. Spring Transaction Architecture
Standalone Spring container
Data source
SimpleDriverDataSource class to represent the database instance and the JdbcTemplate class to provide access to the database using SQL. Wrappers are also provided for other kinds of persistent resource, such as JMS, Hibernate, and so on. The Spring data sources are designed to be compatible with the local transaction manager classes.
Local transaction manager
DataSourceTransactionManager for JDBC, a JmsTransactionManager for JMS, a HibernateTransactionManager for Hibernate, and so on.
2.3. OSGi Transaction Architecture
Overview
Figure 2.2. OSGi Transaction Architecture
OSGi mandated transaction architecture
javax.transaction.UserTransactionjavax.transaction.TransactionManagerjavax.transaction.TransactionSynchronizationRegistry
Spring transaction integration
org.springframework.transaction.PlatformTransactionManagerorg.apache.geronimo.transaction.manager.RecoverableTransactionManager
PlatformTransactionManager OSGi service, it is possible to integrate application bundles written using the Spring transaction API into the Red Hat JBoss Fuse transaction architecture.
Reference
2.4. PlatformTransactionManager Interface
Overview
PlatformTransactionManager interface is the key abstraction in the Spring transaction API, providing the classic transaction client operations: begin, commit and rollback. This interface thus provides the essential methods for controlling transactions at run time.
PlatformTransactionManager interface
org.springframework.transaction.PlatformTransactionManager interface.
Example 2.1. The PlatformTransactionManager Interface
TransactionDefinition interface
TransactionDefinition interface is used to specify the characteristics of a newly created transaction. It is used to specify the isolation level and the propagation policy of the new transaction. For more details, see Section 5.3, “Propagation Policies”.
TransactionStatus interface
TransactionStatus interface can be used to check the status of the current transaction (that is, the transaction associated with the current thread) and to mark the current transaction for rollback. It is defined as follows:
Using the PlatformTransactionManager interface
PlatformTransactionManager interface defines the following methods:
-
getTransaction() - Create a new transaction and associate it with the current thread, passing in a
TransactionDefinitionobject to define the characteristics of the new transaction. This is analogous to the begin() method of many other transaction client APIs. -
commit() - Commit the current transaction, making permanent all of the pending changes to the registered resources.
-
rollback() - Roll back the current transaction, undoing all of the pending changes to the registered resources.
PlatformTransactionManager interface directly. In Apache Camel, you typically use a transaction manager as follows:
- Create an instance of a transaction manager (there are several different implementations available in Spring—see Section 2.5, “Transaction Manager Implementations”).
- Pass the transaction manager instance either to a Apache Camel component or to the
transacted()DSL command in a route. The transactional component or thetransacted()command is then responsible for demarcating transactions (see Chapter 5, Transaction Demarcation).
2.5. Transaction Manager Implementations
Overview
Local transaction managers
| Transaction Manager | Description |
|---|---|
JmsTransactionManager |
A transaction manager implementation that is capable of managing a single JMS resource. That is, you can connect to any number of queues or topics, but only if they belong to the same underlying JMS messaging product instance. Moreover, you cannot enlist any other types of resource in a transaction.
For example, using this transaction manager, it would not be possible to enlist both a SonicMQ resource and an Apache ActiveMQ resource in the same transaction. But see Table 2.2, “Global Transaction Managers”.
|
DataSourceTransactionManager | A transaction manager implementation that is capable of managing a single JDBC database resource. That is, you can update any number of different database tables, but only if they belong to the same underlying database instance. |
HibernateTransactionManager |
A transaction manager implementation that is capable of managing a Hibernate resource. It is not possible, however, to simultaneously enlist any other kind of resource in a transaction.
|
JdoTransactionManager | A transaction manager implementation that is capable of managing a Java Data Objects (JDO) resource. It is not possible, however, to simultaneously enlist any other kind of resource in a transaction. |
JpaTransactionManager | A transaction manager implementation that is capable of managing a Java Persistence API (JPA) resource. It is not possible, however, to simultaneously enlist any other kind of resource in a transaction. |
CciLocalTransactionManager |
A transaction manager implementation that is capable of managing a Java Connection Architecture (JCA) resource. It is not possible, however, to simultaneously enlist any other kind of resource in a transaction.
|
Global transaction managers
| Transaction Manager | Description |
|---|---|
JtaTransactionManager | If you require a transaction manager that is capable of enlisting more than one resource in a transaction, use the JTA transaction manager, which is capable of supporting the XA transaction API. You must deploy your application inside either an OSGi container or a J2EE server to use this transaction manager. |
OC4JJtaTransactionManagner | A specialization of the JtaTransactionManager to work with Oracle's OC4J. The advantage of this implementation is that it makes Spring-driven transactions visible in OC4J's transaction monitor |
WebLogicJtaTransactionManager | A specialization of the JtaTransactionManager to work with the BEA WebLogic container. Makes certain advanced transaction features available: transaction names, per-transaction isolation levels, and proper suspension/resumption of transactions. |
WebSphereUowTransactionManager | A specialization of the JtaTransactionManager to work with the IBM WebSphere container. Enables proper suspension/resumption of transactions. |
2.6. Sample Configurations
2.6.1. JDBC Data Source
Overview
DataSourceTransactionManager and create a transaction scope using the transacted() DSL command.
Sample JDBC configuration
DataSourceTransactionManager type, which is required if you want to integrate a JDBC connection with Spring transactions. The JDBC transaction manager requires a reference to data source bean (created here with the ID, dataSource).
Example 2.2. Data Source Transaction Manager Configuration
JDBC data source transaction manager bean
txManager bean is a local JDBC transaction manager instance, of DataSourceTransactionManager type. There is just one property you need to provide to the JDBC transaction manager: a reference to a JDBC data source.
JDBC data source bean
dataSource bean is an instance of a JDBC data source, of javax.sql.DataSource type. The JDBC data source is a standard feature of the Java DataBase Connectivity (JDBC) specification and it represents a single JDBC connection, which encapsulating the information required to connect to a specific database.
SimpleDriverDataSource bean (which implements the javax.sql.DataSource interface). The simple driver data source bean creates a new data source using a JDBC driver class (which is effectively a data source factory). The properties that you supply to the driver manager data source bean are specific to the database you want to connect to. In general, you need to supply the following properties:
- driverClass
- An instance of
java.sql.Driver, which is the JDBC driver implemented by the database you want to connect to. Consult the third-party database documentation for the name of this driver class (some examples are given in Table 2.6, “Connection Details for Various Databases”). - url
- The JDBC URL that is used to open a connection to the database. Consult the third-party database documentation for details of the URL format (some examples are given in Table 2.6, “Connection Details for Various Databases”).For example, the URL provided to the
dataSourcebean in Example 2.2, “Data Source Transaction Manager Configuration” is in a format prescribed by the HSQLDB database. The URL,jdbc:hsqldb:mem:camel, can be parsed as follows:- The prefix,
jdbc:hsqldb:, is common to all HSQLDB JDBC connection URLs; - The prefix,
mem:, signifies an in-memory (non-persistent) database; - The final identifier,
camel, is an arbitrary name that identifies the in-memory database instance.
- username
- The username that is used to log on to the database.For example, when a new HSQLDB database instance is created, the
sauser is created by default (with administrator privileges). - password
- The password that matches the specified username.
Standalone data sources
| Data Source Class | Description |
|---|---|
SimpleDriverDataSource |
This data source should always be used in standalone mode. You configure this data source by providing it with details of a third-party JDBC driver class. This implementation has the following features:
|
DriverManagerDataSource | (Deprecated) Incompatible with OSGi containers. This class is superseded by the SimpleDriverDataSource. |
SingleConnectionDataSource | A data source that opens only one database connection (that is, every call to getConnection() returns a reference to the same connection instance). It follows that this data source is incompatible with multi-threading and is therefore not recommended for general use. |
J2EE data source adapters
java:comp/env/jdbc/myds, and then wrap the data source with a UserCredentialsDataSourceAdapter.
JndiObjectFactoryBean exploits the Spring bean factory pattern to look up an object in JNDI. When this bean's ID, myTargetDataSource, is referenced elsewhere in Spring using the ref attribute, instead of getting a reference to the JndiObjectFactoryBean bean, you actually get a reference to the bean that was looked up in JNDI (a javax.sql.DataSource instance).
javax.sql.DataSource interface exposes two methods for creating connections: getConnection() and getConnection(String username, String password). If (as is normally the case) the referenced database requires credentials in order to open a connection, the UserCredentialsDataSourceAdapter class provides a convenient way of ensuring that these user credentials are available. You can use this adapter class for wrapping JNDI-provided data sources that do not have their own credentials cache.
UserCredentialsDataSourceAdapter, there are a number of other adapter classes that you can use to wrap data sources obtained from JNDI lookups. These J2EE data source adapters are summarized in Table 2.4, “J2EE Data Source Adapters”.
| Data Source Adapter | Description |
|---|---|
UserCredentialsDataSourceAdapter |
Data source wrapper class that caches username/password credentials, for cases where the wrapped data source does not have its own credentials cache. This class can be used to wrap a data source obtained by JNDI lookup (typically, in a J2EE container).
The username/password credentials are bound to a specific thread. Hence, you can store different connection credentials for different threads.
|
IsolationLevelDataSourceAdapter | Subclass of UserCredentialsDataSourceAdapter which, in addition to caching user credentials, also applies the current Spring transaction's level of isolation to all of the connections it creates. |
WebSphereDataSourceAdapter | Same functionality as IsolationLevelDataSourceAdapter, except that the implementation is customized to work with IBM-specific APIs. |
Data source proxies for special features
| Data Source Proxy | Description |
|---|---|
LazyConnectionDataSourceProxy |
This proxy uses lazy semantics to avoid unnecessary database operations. That is, a connection will not actually be opened until the application code attempts to write (or read) to the database.
For example, if some application code opens a connection, begins a transaction, and then commits a transaction, but never actually accesses the database, the lazy connection proxy would optimize these database operations away.
|
TransactionAwareDataSourceProxy |
Provides support for legacy database code that is not implemented using the Spring persistence API.
Do not use this proxy for normal transaction support. The other Spring data sources are already compatible with the Spring persistence and transaction APIs. For example, if your application code uses Spring's
JdbcTemplate class to access JDBC resources, do not use this proxy class.
|
Third-party JDBC driver managers
| Database | JDBC Driver Manager Properties |
|---|---|
| HSQLDB |
The JDBC driver class for HSQLDB is as follows:
org.hsqldb.jdbcDriver
To connect to a HSQLDB database, you can use one of the following JDBC URL formats:
jdbc:hsqldb:hsql[s]://host[:port][/DBName][KeyValuePairs]
jdbc:hsqldb:http[s]://host[:port][/DBName][KeyValuePairs]
jdbc:hsqldb:mem:DBName[KeyValuePairs]
Where the
hsqls and https protocols use TLS security and the mem protocol references an in-process, transient database instance (useful for testing). For more details, see http://www.hsqldb.org/doc/src/.
|
| MySQL |
The JDBC driver class for MySQL is as follows:
com.mysql.jdbc.Driver
To connect to a MySQL database, use the following JDBC URL format:
jdbc:mysql://[host][,failoverhost...][:port]/[DBName][Options]
Where the Options coincidentally have the same format as Camel component options—for example,
?Option1=Value1&Option2=Value2. For more details, see http://dev.mysql.com/doc/connector-j/en/connector-j-reference-configuration-properties.html.
|
| Oracle |
Depending on which version of Oracle you are using choose one of the following JDBC driver classes:
oracle.jdbc.OracleDriver (Oracle 9i, 10)
oracle.jdbc.driver.OracleDriver (Oracle 8i)
To connect to an Oracle database, use the following JDBC URL format:
jdbc:oracle:thin:[user/password]@[host][:port]:SID
Where the Oracle System ID (SID) identifies an Oracle database instance. For more details, see http://download.oracle.com/docs/cd/B10501_01/java.920/a96654/basic.htm.
|
| DB2 |
The JDBC driver class for DB2 is as follows:
com.ibm.db2.jcc.DB2Driver
To connect to a DB2 database, use the following JDBC URL format:
jdbc:db2://host[:port]/DBName |
| SQL Server |
The JDBC driver class for SQL Server is as follows:
com.microsoft.jdbc.sqlserver.SQLServerDriver
To connect to a SQL Server database, use the following JDBC URL format:
jdbc:microsoft:sqlserver://host[:port];DatabaseName=DBName |
| Sybase |
The JDBC driver class for Sybase is as follows:
com.sybase.jdbc3.jdbc.SybDriver
To connect to a Sybase database, use the following JDBC URL format:
jdbc:sybase:Tds:host:port/DBName |
| Informix |
The JDBC driver class for Informix is as follows:
com.informix.jdbc.IfxDriver
To connect to an Informix database, use the following JDBC URL format:
jdbc:informix-sqli://host:port/DBName:informixserver=DBServerName |
| PostgreSQL |
The JDBC driver class for PostgreSQL is as follows:
org.postgresql.Driver
To connect to a PostgreSQL database, use the following JDBC URL format:
jdbc:postgresql://host[:port]/DBName |
| MaxDB |
The JDBC driver class for the SAP database is as follows:
com.sap.dbtech.jdbc.DriverSapDB
To connect to a MaxDB database, use the following JDBC URL format:
jdbc:sapdb://host[:port]/DBName |
| FrontBase |
The JDBC driver class for FrontBase is as follows:
com.frontbase.jdbc.FBJDriver
To connect to a FrontBase database, use the following JDBC URL format:
jdbc:FrontBase://host[:port]/DBName |
2.6.2. Hibernate
Overview
HibernateTransactionManager type, as described here. You can then use the transacted() DSL command to create a transaction scope in a route.
Sample Hibernate configuration
HibernateTransactionManager type, which is required if you want to integrate Hibernate object-oriented persistence with Spring transactions. The Hibernate transaction manager requires a reference to a Hibernate session factory, and the Hibernate session factory takes a reference to a JDBC data source.
Example 2.3. Hibernate Transaction Manager Configuration
Hibernate transaction manager bean
hibernateTxManager bean is a local Hibernate transaction manager instance, of HibernateTransactionManager type. There is just one property you need to provide to the Hibernate transaction manager: a reference to a Hibernate session factory.
Hibernate session factory bean
mySessionFactory bean is a Hibernate session factory of org.springframework.orm.hibernate3.LocalSessionFactory type. This session factory bean is needed by the Hibernate transaction manager.
LocalSessionFactory bean instance:
- dataSource
- An instance of
javax.sql.DataSource, which is the JDBC data source of the database that Hibernate is layered over. For details of how to configure a JDBC data source, see Section 2.6.1, “JDBC Data Source”. - mappingResources
- Specifies a list of one or more mapping association files on the class path. A Hibernate mapping association defines how Java objects map to database tables.
- hibernateProperties
- Allows you to set any Hibernate property, by supplying a list of property settings. The most commonly needed property is
hibernate.dialect, which indicates to Hibernate what sort of database it is layered over, enabling Hibernate to optimize its interaction with the underlying database. The dialect is specified as a class name, which can have one of the following values:Copy to Clipboard Copied! Toggle word wrap Toggle overflow
2.6.3. JPA
Overview
JpaTransactionManager type. The Java Persistence API is a generic wrapper API for object-relational persistence and it can be layered over a variety of different object-relational mapping technologies.
Sample JPA configuration
Example 2.4. JPA Transaction Manager Configuration
JPA transaction manager bean
jpaTxManager bean is a local JPA transaction manager instance, of JpaTransactionManager type. The JPA transaction manager requires a reference to an entity manager factory bean (in this example, the entityManagerFactory bean).
JtaTransactionManager instead. See Table 2.2, “Global Transaction Managers”.
Entity manager factory bean
LocalEntityManagerFactoryBean class is just a wrapper around the standard javax.persistence.EntityManagerFactory class. The entity manager factory is used to create a javax.persistence.EntityManager instance, where the entity manager is associated with a unique persistence context. A persistence context represents a consistent set of entity objects that are instantiated from the underlying database (analogous to a Hibernate session).
LocalEntityManagerFactoryBean class is a relatively simple JPA wrapper class that is suitable for simple demonstrations and testing purposes. This class reads its required configuration information from the persistence.xml file, which is found at the standard location, META-INF/persistence.xml, on the class path (see ???). The persistenceUnitName property references a section of the persistence.xml file.
JPA entity manager factories
LocalEntityManagerFactoryBean bean, there are other ways of obtaining a JPA entity manager factory, as summarized in Table 2.7, “Obtaining JPA Entity Manager Factory”.
| Entity Manager Factory | Description |
|---|---|
| Obtain from JNDI | If your application is deployed in a J2EE container, the recommended approach is to let the container take care of instantiating the entity manager factory. You can then obtain a reference to the entity manager factory using JNDI. See Obtaining an EntityManagerFactory from JNDI in the Spring documentation. |
LocalEntityManagerFactoryBean | For simple standalone applications and for testing, the simplest option is to create a bean of this type. The JPA runtime is configured using the standard META-INF/persistence.xml file. |
LocalContainerEntityManagerFactoryBean | Use this class, if you need to configure special bootstrap options for the JPA runtime. In spite of the name, this class is not restricted to containers; you can also use it in standalone mode. See LocalContainerEntityManagerFactoryBean in the Spring documentation. |
JPA bootstrap contract
- To make a JPA implementation available to your application, put the JAR file containing the relevant JPA provider class (of
javax.persistence.spi.PersistenceProvidertype) on your class path. In fact, it is possible to add multiple JPA providers to your class path: you can optionally specify which JPA provider to use in thepersistence.xmlfile. - The JPA persistence layer is configured by the standard
persistence.xmlfile, which is normally located inMETA-INF/persistence.xmlon the class path.
Sample persistence.xml file
persistence.xml file for configuring an OpenJPA JPA provider layered over a Derby database.
Example 2.5. Sample persistence.xml File
- 1
- The
providerelement can be used to specify the OpenJPA provider implementation class. If theproviderelement is omitted, the JPA layer simply uses the first JPA provider it can find. Hence, it is recommended to specify theproviderelement, if there are multiple JPA providers on your class path.To make a JPA provider available to an application, simply add the provider's JAR file to the class path and the JPA layer will auto-detect the JPA provider. - 2
- Use the
classelements to list all of the Java types that you want to persist using the JPA framework. - 3
- Use the
propertieselement to configure the underlying JPA provider. In particular, you should at least provide enough information here to configure the connection to the underlying database.
Sample annotated class
org.apache.camel.examples.SendEmail class referenced in Example 2.5, “Sample persistence.xml File” should be annotated to turn it into a persistent entity bean (so that it is persistible by JPA):
-
@javax.persistence.Entity - Specifies that the following class is persistible by the JPA.
-
@javax.persistence.Id - The following bean property must be used as the primary key (for locating objects of this type in the database).
-
@javax.persistence.GeneratedValue - Specifies that the primary key values should be automatically generated by the JPA runtime (you can optionally set attributes on this annotation to configure the ID generation algorithm as well).
javax.persistence package.
Chapter 3. JMS Transactions
Abstract
3.1. Configuring the JMS Component
Overview
- set the transacted property
- provide the JMS component with a reference to a suitable transaction manager
Camel JMS component configuration
- Create a
beanelement that has itsclassattribute set toorg.apache.camel.component.jms.JmsComponent.This bean creates an instance of the JMS component. - Set the bean's
idattribute to a unique, short, string.The id will be used to create route endpoint's that use this JMS component. - Add an empty
propertychild to the bean. - Add a
nameattribute with the value ofconfigurationto thepropertyelement. - Add a
refattribute whose value is the id of aJmsConfigurationbean to thepropertyelement.TheJmsConfigurationbean is used to configure the JMS component. - Create a
beanelement that has itsclassattribute set toorg.apache.camel.component.jms.JmsConfiguration.This bean creates an instance of the JMS component configuration. - Add a
propertychild to the bean to configure the JMS connection factory.- Set the
nameattribute toconnectionFactory. - Set the
refattribute to the id of a bean that configures a JMS connection factory.
- Add an empty
propertychild to the bean that specifies the transaction manager the component will use.- Set the
nameattribute totransactionManager. - Set the
refattribute to the id of a bean that configures transaction manager the endpoint will use.
- Add an empty
propertychild to the bean that configures the component to participate in transactions.- Set the
nameattribute totransacted. - Set the
valueattribute totrue.The transacted property determines if the endpoint can participate in transactions.
- Optionally add an empty
propertychild to the bean to change the default cache level.- Set the
nameattribute tocacheLevelName. - Set the
valueattribute to to a valid cache level. For details, see the section called “Cache levels and performance”.
JmsComponent bean's id specifies the URI prefix used by JMS endpoints that will use the transactional JMS component. For example, in Example 3.1, “JMS Transaction Manager Configuration” the JmsComponent bean's id equals jmstx, so endpoint that use the configured JMS component use the jmstx: prefix.
JmsConfiguration class supports a large number of other properties, which are essentially identical to the JMS URI options described in chapter "JMS" in "Apache Camel Component Reference".
Cache levels and performance
CACHE_AUTO. This default auto detects if an external transaction manager is in use and sets the cache level as follows:
CACHE_CONSUMERif only local JMS resources are in useCACHE_NONEif an external transaction manager is in use
Caching with ActiveMQ endpoints
CACHE_CONNECTION or CACHE_CONSUMER for local JMS transactions.
CACHE_CONSUMER improves performance significantly, but to avoid losing messages on failover:
- Do not set a transaction manager, and
- Set the lazyCreateTransactionManager property to
falsein your JMS configuration.
CACHE_CONNECTION, see the section called “Example using CACHE_CONNECTION”. For an example route definition using CACHE_CONSUMER, see the section called “Example using CACHE_CONSUMER”.
CACHE_NONE).
Example using CACHE_CONSUMER
Example using CACHE_CONNECTION
jmstx that supports Spring transactions. The JMS component is layered over an embedded instance of Apache ActiveMQ and the transaction manager is an instance of JmsTransactionManager.
Example 3.1. JMS Transaction Manager Configuration
Example 3.2. URI for Using Transacted JMS Endpoint
from("jmstx:queue:rawStockQuotes")
    .process(myFormatter)
    .to("jmstx:queue:formattedStockQuotes");
from("jmstx:queue:rawStockQuotes")
    .process(myFormatter)
.to("jmstx:queue:formattedStockQuotes");3.2. InOnly Message Exchange Pattern
Overview
JMSReplyTo header in the incoming message. If the JMSReplyTo header is absent from the incoming message, the consumer endpoint produces exchanges with the InOnly message exchange pattern (MEP). For example, consider the following route that receives a stream of stock quotes from the queue, queue:rawStockQuotes, reformats the incoming messages, and then forwards them to another queue, queue:formattedStockQuotes.
from("jmstx:queue:rawStockQuotes")
    .process(myFormatter)
    .to("jmstx:queue:formattedStockQuotes");
from("jmstx:queue:rawStockQuotes")
    .process(myFormatter)
.to("jmstx:queue:formattedStockQuotes");jmstx (see Section 3.1, “Configuring the JMS Component”). The transaction initiated by the consumer endpoint, jmstx:queue:rawStockQuotes, ensures that each incoming message is reliably transmitted to the producer endpoint, jmstx:queue:formattedStockQuotes.
Enforcing the InOnly message exchange pattern
JMSReplyTo header, the JMS consumer endpoint will create an InOut exchange, which could lead to errors in a route that is designed for InOnly exchanges.
disableReplyTo option in the JMS consumer to enforce the InOnly MEP. For example, the following route is guaranteed to process all incoming messages as InOnly exchanges:
from("jmstx:queue:rawStockQuotes?disableReplyTo=true")
    .process(myFormatter)
    .to("jmstx:queue:formattedStockQuotes");
from("jmstx:queue:rawStockQuotes?disableReplyTo=true")
    .process(myFormatter)
.to("jmstx:queue:formattedStockQuotes");InOnly scenario
Figure 3.1. Transactional JMS Route that Processes InOnly Exchanges

Description of InOnly scenario
- When a oneway message (
JMSReplyToheader is absent) is polled by the JMS consumer endpoint, the endpoint starts a transaction, provisionally takes the message off the incoming queue, and creates an InOnly exchange object to hold the message. - After propagating through the route, the InOnly exchange arrives at the JMS producer endpoint, which provisionally writes the exchange to the outgoing queue.
- At this point, we have arrived at the end of the transaction scope. If there were no errors (and the transaction is not marked for rollback), the transaction is automatically committed. Upon committing, both of the JMS endpoints send acknowledgement messages to the queues, turning the provisional read and the provisional write into a committed read and a committed write.
3.3. InOut Message Exchange Pattern
Overview
Enabling InOut mode in JMS
JMSReplyTo header in an incoming JMS message. In this case, the endpoint creates an InOut exchange to hold the incoming message and it will use the JMSReplyTo queue to send the reply message.
Problems combining InOut mode with transactions
from("jmstx:queue:rawPayments")
    .process(inputReformatter)
    .to("jmstx:queue:formattedPayments")
    .process(outputReformatter);
from("jmstx:queue:rawPayments")
    .process(inputReformatter)
    .to("jmstx:queue:formattedPayments")
.process(outputReformatter);jmstx:queue:rawPayments, polls for messages, which are expected to have a JMSReplyTo header (for InOut mode). For each incoming message, a new transaction is started and an InOut exchange is created. After reformatting by the inputReformatter processor, the InOut exchange proceeds to the JMS producer endpoint, jmstx:queue:formattedPayments, which sends the message and expects to receive a reply on a temporary queue. This scenario is illustrated by Figure 3.2, “Transactional JMS Route that Processes InOut Exchanges”
Figure 3.2. Transactional JMS Route that Processes InOut Exchanges
Refactoring routes to avoid InOut mode
queue:rawPayments, which uses the queue from JMSReplyTo for replies, we now have a pair of queues: queue:rawPaymentsIn, for receiving incoming requests, and queue:formattedPaymentsOut, for sending outgoing replies. Instead of a single outgoing queue, queue:formattedPayments, which implicitly uses a temporary queue for replies, we now have a pair of queues: queue:formattedPaymentsOut, for forwarding outgoing requests, and queue:formattedPaymentsIn, for receiving incoming replies. This scenario is illustrated by Figure 3.3, “Pair of Transactional JMS Routes that Support Request/Reply Semantics”.
Figure 3.3. Pair of Transactional JMS Routes that Support Request/Reply Semantics
A special case
queue:log, you could define a route like the following:
from("jmstx:queue:inOutSource")
    .to(ExchangePattern.InOnly, "jmstx:queue:log")
    .process(myProcessor);
from("jmstx:queue:inOutSource")
    .to(ExchangePattern.InOnly, "jmstx:queue:log")
.process(myProcessor);jmstx:queue:inOutSource, and the producer endpoint, jmstx:queue:log, are transactional. The key to avoiding deadlock in this case is to force the producer endpoint to operate in oneway mode, by passing the ExchangePattern.InOnly parameter to the to() command,
Chapter 4. Data Access with Spring
Abstract
4.1. Programming Data Access with Spring Templates
Overview
JmsTemplate class
JmsTemplate, you need to supply a reference to a javax.jms.ConnectionFactory object.
JdbcTemplate class
JdbcTemplate, you need to supply a reference to a javax.sql.DataSource object (for example, see Section 2.6.1, “JDBC Data Source”).
JdbcTemplate class, see Section 4.2, “Spring JDBC Template”.
SimpleJdbcTemplate class
JdbcTemplate class. This class has been pared down so that it includes only the most commonly used template methods and it has been optimized to exploit Java 5 features.
NamedParameterJdbcTemplate class
JdbcTemplate class, which enables you to use named parameters instead of the usual ? placeholders embedded in a SQL statement.
SqlMapClientTemplate class
SqlMapClient class. iBATIS is an Object Relational Mapper (ORM) that is capable of automatically instantiating Java objects based on a given SQL database schema.
HibernateTemplate class
SessionFactory.getCurrentSession()).
HibernateTemplate class, because transactional Hibernate access code can now be coded using the native Hibernate API.
JdoTemplate class
JpaTemplate class
EntityManager API..
JpaTemplate class. Considering that the JPA programming interface is itself a thin wrapper layer, there is little advantage to be had by adding another wrapper layer on top of it.
4.2. Spring JDBC Template
Overview
JdbcTemplate class and provides a code example that shows how to use the JdbcTemplate class in practice.
JdbcTemplate class
JdbcTemplate:
- Querying (
SELECToperations). - Other SQL operations (all other SQL operations).
Querying
SELECT queries to the database. A variety of different query methods are supported, depending on how complicated the return values are.
accounts table, you could use the following code:
// Java
int origAmount = jdbc.queryForInt(
    "select amount from accounts where name = ?",
    new Object[]{name}
);
// Java
int origAmount = jdbc.queryForInt(
    "select amount from accounts where name = ?",
    new Object[]{name}
);Object[]{name}. In this example, the name string is bound to the question mark, ?, in the SQL query string. If there are multiple arguments to the query string (where each argument in the SQL string is represented by a question mark, ?), you would provide an object array with multiple arguments—for example, Object[]{arg1,arg2,arg3,...}.
queryForMap() methods to retrieve the contents of a single row. For example, to retrieve the complete account details from a single customer:
// Java
Map<String,Object> rowMap = jdbc.queryForMap(
    "select * from accounts where name = ?",
    new Object[]{name}
);
// Java
Map<String,Object> rowMap = jdbc.queryForMap(
    "select * from accounts where name = ?",
    new Object[]{name}
);rowMap, contains one entry for each column, using the column name as the key.
queryForList() methods to return the contents of multiple rows. For example, to return all of the rows from the accounts table:
// Java
List<Map<String,Object> > rows = jdbc.queryForList(
    "select * from accounts"
);
// Java
List<Map<String,Object> > rows = jdbc.queryForList(
    "select * from accounts"
);RowMapper, which automatically converts each row to a Java object. The return value of a query call would then be a list of Java objects. For example, the contents of the accounts table could be returned as follows:
Account object in the returned list encapsulates the contents of a single row.
Updating
INSERT, UPDATE, or DELETE operations on the database. The update methods modify the database contents, but do not return any data from the database (apart from an integer return value, which counts the number of rows affected by the operation).
amount field in a customer's account:
// Java
jdbc.update(
    "update accounts set amount = ? where name = ?",
    new Object[] {newAmount, name}
);
// Java
jdbc.update(
    "update accounts set amount = ? where name = ?",
    new Object[] {newAmount, name}
);Other SQL operations
execute() method. For example, you would use this method to execute a create table statement, as follows:
// Java
jdbc.execute("create table accounts (name varchar(50), amount int)");
// Java
jdbc.execute("create table accounts (name varchar(50), amount int)");Example application
JdbcTemplate class, consider the account service, which provides access to bank account data stored in a database. It is assumed that the database is accessible through a JDBC data source and the account service is implemented by an AccountService class that exposes the following methods:
credit()—add a specific amount of money to a named account.debit()—subtract a specific amount of money from a named account.
Format of money transfer orders
amount element is debited from the sender account and credited to the receiver account.
CreateTable class
accounts table and populate it with some initial values. Example 4.1, “The CreateTable Class” shows the definition of the CreateTable class, which is responsible for intializing the accounts table.
Example 4.1. The CreateTable Class
accounts table consists of two columns: name, a string value that records the account holder's name, and amount, a long integer that records the amount of money in the account. Because this example uses an ephemeral database, which exists only temporarily in memory, it is necessary to re-initialize the database every time the example runs. A convenient way to initialize the table is by instantiating a CreateTable bean in the Spring XML configuration, as follows:
createTable bean is instantiated, the accounts table is ready for use. Note that a reference to the JDBC data source, dataSource, is passed to the CreateTable() constructor, because the data source is needed to create a JdbcTemplate instance.
AccountService class
AccountService class, not including the service methods that access the database. The class expects to receive a data source reference through dependency injection, which it then uses to create a JdbcTemplate instance.
Example 4.2. The AccountService class
AccountService bean in Spring XML, using dependency injection to pass the data source reference, as follows:
AccountService.credit() method
credit() method adds the specified amount of money, amount, to the specified account, name in the accounts database table, as follows:
- 1
- For methods invoked using the
beanRef()(orbean()) DSL command, Apache Camel provides a powerful set of annotations for binding the exchange to the method parameters. In this example, the parameters are annotated using the@XPathannotation, so that the result of the XPath expression is injected into the corresponding parameter.For example, the first XPath expression,/transaction/transfer/receiver/text(), selects the contents of thereceiverXML element from the body of the exchange's In message and injects them into thenameparameter. Likewise, the contents of theamountelement are injected into theamountparameter. - 2
- The
JdbcTemplate.queryForInt()method returns the current balance of thenameaccount. For details about usingJdbcTemplateto make database queries, see the section called “Querying”. - 3
- The
JdbcTemplate.update()method updates the balance of thenameaccount, adding the specified amount of money. For details about usingJdbcTemplateto make database updates, see the section called “Updating”.
AccountService.debit() method
debit() method subtracts the specified amount of money, amount, from the specified account, name in the accounts database table, as follows:
- 1
- The parameters of the
debit()method are also bound to the exchange using annotations. In this case, however, thenameof the account is bound to thesenderXML element in the In message. - 2
- There is a fixed debit limit of 100. Amounts greater than this will trigger an
IllegalArgumentexception. This feature is useful, if you want to trigger a rollback to test a transaction example. - 3
- If the balance of the account would go below zero after debiting, abort the transaction by calling the
IllegalArgumentExceptionexception.
AccountService.dumpTable() method
dumpTable() method is convenient for testing. It simply returns the entire contents of the accounts table as a string. It is implemented as follows:
    public void dumpTable(Exchange ex) {
        log.info("dump() called");
        List<?> dump = jdbc.queryForList("select * from accounts");
        ex.getIn().setBody(dump.toString());
    }
    public void dumpTable(Exchange ex) {
        log.info("dump() called");
        List<?> dump = jdbc.queryForList("select * from accounts");
        ex.getIn().setBody(dump.toString());
}Chapter 5. Transaction Demarcation
Abstract
5.1. Demarcation by Marking the Route
Overview
transacted() command in the Java DSL or by inserting the <transacted/> tag in the XML DSL.
Sample route with JDBC resource
transacted() DSL command to the route. All of the route nodes following the transacted() node are included in the transaction scope. In this example, the two following nodes access a JDBC resource.
Figure 5.1. Demarcation by Marking the Route
transacted processor demarcates transactions as follows: when an exchange enters the transacted processor, the transacted processor invokes the default transaction manager to begin a transaction (attaching it to the current thread); when the exchange reaches the end of the remaining route, the transacted processor invokes the transaction manager to commit the current transaction.
Route definition in Java DSL
transacted() DSL command:
file endpoint reads some files in XML format that describe a transfer of funds from one account to another. The first beanRef() invocation credits the specified sum of money to the beneficiary's account and then the second beanRef() invocation subtracts the specified sum of money from the sender's account. Both of the beanRef() invocations cause updates to be made to a database resource, which we are assuming is bound to the transaction through the transaction manager (for example, see Section 2.6.1, “JDBC Data Source”). For a sample implementation of the accountService bean, see Section 4.2, “Spring JDBC Template”.
Using SpringRouteBuilder
beanRef() Java DSL command is available only in the SpringRouteBuilder class. It enables you to reference a bean by specifying the bean's Spring registry ID (for example, accountService). If you do not use the beanRef() command, you could inherit from the org.apache.camel.builder.RouteBuilder class instead.
Route definition in Spring XML
<transacted/> tag is used to mark the route as transactional, as follows:
Default transaction manager and transacted policy
transacted processor must be associated with a particular transaction manager instance. To save you having to specify the transaction manager every time you invoke transacted(), the transacted processor automatically picks a sensible default. For example, if there is only one instance of a transaction manager in your Spring configuration, the transacted processor implicitly picks this transaction manager and uses it to demarcate transactions.
transacted processor can also be configured with a transacted policy, of TransactedPolicy type, which encapsulates a propagation policy and a transaction manager (see Section 5.3, “Propagation Policies” for details). The following rules are used to pick the default transaction manager or transaction policy:
- If there is only one bean of
org.apache.camel.spi.TransactedPolicytype, use this bean.NoteTheTransactedPolicytype is a base type of theSpringTransactionPolicytype that is described in Section 5.3, “Propagation Policies”. Hence, the bean referred to here could be aSpringTransactionPolicybean. - If there is a bean of type,
org.apache.camel.spi.TransactedPolicy, which has the ID,PROPAGATION_REQUIRED, use this bean. - If there is only one bean of
org.springframework.transaction.PlatformTransactionManagertype, use this bean.
transacted()—see the section called “Sample route with PROPAGATION_NEVER policy in Java DSL”.
Transaction scope
transacted processor into a route, a new transaction is created each time an exchange passes through this node and the transaction's scope is defined as follows:
- The transaction is associated with the current thread only.
- The transaction scope encompasses all of the route nodes following the
transactedprocessor.
transacted processor are not included in the transaction (but the situation is different, if the route begins with a transactional endpoint—see Section 5.2, “Demarcation by Transactional Endpoints”). For example, the following route is incorrect, because the transacted() DSL command mistakenly appears after the first beanRef() call (which accesses the database resource):
No thread pools in a transactional route
threads() DSL command is incompatible with transacted routes. Even if the threads() call precedes the transacted() call, the route will not behave as expected.
Breaking a route into fragments
direct: endpoints. For example, to send exchanges to separate route fragments, depending on whether the transfer amount is big (greater than 100) or small (less than or equal to 100), you can use the choice() DSL command and direct endpoints, as follows:
direct:txbig and the fragment beginning with direct:txsmall participate in the current transaction, because the direct endpoints are synchronous. This means that the fragments execute in the same thread as the first route fragment and, therefore, they are included in the same transaction scope.
seda endpoints to join the route fragments, because seda consumer endpoints create a new thread (or threads) to execute the route fragment (asynchronous processing). Hence, the fragments would not participate in the original transaction.
Resource endpoints
to() DSL command). That is, these endpoints can access a transactional resource, such as a database or a persistent queue. The resource endpoints can participate in the current transaction, as long as they are associated with the same transaction manager as the transacted processor that initiated the current transaction. If you need to access multiple resources, you must deploy your application in a J2EE container, which gives you access to a global transaction manager.
Sample route with resource endpoints
credits queue processes the order to credit the receiver's account; and the debits queue processes the order to debit the sender's account. Since there must only be a credit, if there is a corresponding debit, it makes sense to enclose the enqueueing operations in a single transaction. If the transaction succeeds, both the credit order and the debit order will be enqueued, but if an error occurs, neither order will be enqueued.
from("file:src/data?noop=true")
    .transacted()
    .to("jmstx:queue:credits")
    .to("jmstx:queue:debits");
from("file:src/data?noop=true")
    .transacted()
    .to("jmstx:queue:credits")
.to("jmstx:queue:debits");5.2. Demarcation by Transactional Endpoints
Overview
transacted() command is of no use, because it initiates the transaction after an exchange is polled. In other words, the transaction starts too late to include the consumer endpoint within the transaction scope. The correct approach in this case is to make the endpoint itself responsible for initiating the transaction. An endpoint that is capable of managing transactions is known as a transactional endpoint.
Sample route with JMS endpoint
from() command). All of the route nodes are included in the transaction scope. In this example, all of the endpoints in the route access a JMS resource.
Figure 5.2. Demarcation by Transactional Endpoints
- General case—normally, a transactional endpoint demarcates transactions as follows: when an exchange arrives at the endpoint (or when the endpoint successfully polls for an exchange), the endpoint invokes its associated transaction manager to begin a transaction (attaching it to the current thread); and when the exchange reaches the end of the route, the transactional endpoint invokes the transaction manager to commit the current transaction.
- JMS endpoint with InOut exchange—when a JMS consumer endpoint receives an InOut exchange and this exchange is routed to another JMS endpoint, this must be treated as a special case. The problem is that the route can deadlock, if you try to enclose the entire request/reply exchange in a single transaction. For details of how to resolve this problem, see Section 3.3, “InOut Message Exchange Pattern”.
Route definition in Java DSL
from("jmstx:queue:giro")
    .to("jmstx:queue:credits")
    .to("jmstx:queue:debits");
from("jmstx:queue:giro")
    .to("jmstx:queue:credits")
.to("jmstx:queue:debits");jmstx:queue:giro, jmstx:queue:credits, and jmstx:queue:debits. If the transaction succeeds, the exchange is permanently removed from the giro queue and pushed on to the credits queue and the debits queue; if the transaction fails, the exchange does not get put on to the credits and debits queues and the exchange is pushed back on to the giro queue (by default, JMS will automatically attempt to redeliver the message).
jmstx, must be explicitly configured to use transactions, as follows:
jmsTransactionManager, is associated with the JMS component and the transacted property is set to true to enable transaction demarcation for InOnly exchanges. For the complete Spring XML configuration of this component, see Example 3.1, “JMS Transaction Manager Configuration”.
Route definition in Spring XML
transacted() not required
transacted() DSL command is not required in a route that starts with a transactional endpoint. Nevertheless, assuming that the default transaction policy is PROPAGATION_REQUIRED (see Section 5.3, “Propagation Policies”), it is usually harmless to include the transacted() command, as in this example:
from("jmstx:queue:giro")
    .transacted()
    .to("jmstx:queue:credits")
    .to("jmstx:queue:debits");
from("jmstx:queue:giro")
    .transacted()
    .to("jmstx:queue:credits")
.to("jmstx:queue:debits");TransactedPolicy bean having a non-default propagation policy is created in Spring XML (see the section called “Default transaction manager and transacted policy”)—so it is generally better not to include the transacted() DSL command in routes that start with a transactional endpoint.
Transactional endpoints
from() DSL command). That is, these endpoints can be configured to behave as a transactional client and they can also access a transactional resource.
5.3. Propagation Policies
Overview
transacted() DSL command. For example, if you want to initiate transactions subject to the behavior, PROPAGATION_REQUIRES_NEW, you could use the following route:
from("file:src/data?noop=true")
    .transacted("PROPAGATION_REQUIRES_NEW")
    .beanRef("accountService","credit")
    .beanRef("accountService","debit")
    .to("file:target/messages");
from("file:src/data?noop=true")
    .transacted("PROPAGATION_REQUIRES_NEW")
    .beanRef("accountService","credit")
    .beanRef("accountService","debit")
.to("file:target/messages");PROPAGATION_REQUIRES_NEW argument specifies the bean ID of a transaction policy bean that is configured with the PROPAGATION_REQUIRES_NEW behavior (see Example 5.1, “Transaction Policy Beans”).
Spring transaction policies
org.apache.camel.spring.spi.SpringTransactionPolicy class (which is essentially a wrapper around a native Spring class). The SpringTransactionPolicy class encapsulates two pieces of data:
- A reference to a transaction manager (of
PlatformTransactionManagertype). - A propagation behavior.
PROPAGATION_MANDATORY behavior, as follows:
Propagation behaviors
PROPAGATION_MANDATORY- Support a current transaction; throw an exception if no current transaction exists.
PROPAGATION_NESTED- Execute within a nested transaction if a current transaction exists, else behave like
PROPAGATION_REQUIRED.NoteNested transactions are not supported by all transaction managers. PROPAGATION_NEVER- Do not support a current transaction; throw an exception if a current transaction exists.
PROPAGATION_NOT_SUPPORTED- Do not support a current transaction; rather always execute non-transactionally.NoteThis policy requires the current transaction to be suspended, a feature which is not supported by all transaction managers.
PROPAGATION_REQUIRED- (Default) Support a current transaction; create a new one if none exists.
PROPAGATION_REQUIRES_NEW- Create a new transaction, suspending the current transaction if one exists.NoteSuspending transactions is not supported by all transaction managers.
PROPAGATION_SUPPORTS- Support a current transaction; execute non-transactionally if none exists.
Defining policy beans in Spring XML
Example 5.1. Transaction Policy Beans
txManager with the actual ID of your transaction manager bean.
Sample route with PROPAGATION_NEVER policy in Java DSL
PROPAGATION_NEVER policy into the middle of an existing transaction, as shown in the following route:
from("file:src/data?noop=true")
    .transacted()
    .beanRef("accountService","credit")
    .transacted("PROPAGATION_NEVER")
    .beanRef("accountService","debit");
from("file:src/data?noop=true")
    .transacted()
    .beanRef("accountService","credit")
    .transacted("PROPAGATION_NEVER")
.beanRef("accountService","debit");PROPAGATION_NEVER policy inevitably aborts every transaction, leading to a transaction rollback. You should easily be able to see the effect of this on your application.
transacted() is a bean ID, not a propagation behavior name. In this example, the bean ID is chosen to be the same as a propagation behavior name, but this need not always be the case. For example, if your application uses more than one transaction manager, you might end up with more than one policy bean having a particular propagation behavior. In this case, you could not simply name the beans after the propagation behavior.
Sample route with PROPAGATION_NEVER policy in Spring XML
5.4. Error Handling and Rollbacks
Overview
How to roll back a transaction
Runtime exceptions as rollbacks
java.lang.RuntimeException. Java errors, of java.lang.Error type, also trigger transaction rollback. Checked exceptions, on the other hand, do not trigger rollback. Figure 5.3, “Errors and Exceptions that Trigger Rollback” summarises how Java errors and exceptions affect transactions, where the classes that trigger rollback are shaded gray.
Figure 5.3. Errors and Exceptions that Trigger Rollback
The rollback() DSL command
rollback() DSL command, which throws an org.apache.camel.RollbackExchangeException exception. In other words, the rollback() command uses the standard approach of throwing a runtime exception to trigger the rollback.
Example 5.2. Rolling Back an Exception with rollback()
RollbackExchangeException exception thrown by rollback() propagates back to the file endpoint at the start of the route. The File component has a built-in reliability feature that causes it to resend any exchange for which an exception has been thrown. Upon resending, of course, the exchange just triggers another rollback, leading to an infinite loop.
The markRollbackOnly() DSL command
markRollbackOnly() DSL command enables you to force the current transaction to roll back, without throwing an exception. This can be useful in cases where (as in Example 5.2, “Rolling Back an Exception with rollback()”) throwing an exception has unwanted side effects.
rollback() with markRollbackOnly(). This version of the route solves the problem of the infinite loop. In this case, when the amount of the money transfer exceeds 100, the current transaction is rolled back, but no exception is thrown. Because the file endpoint does not receive an exception, it does not retry the exchange, and the failed transactions is quietly discarded.
Example 5.3. Rolling Back an Exception with markRollbackOnly()
How to define a dead letter queue
onException() clause, which enables you to divert the relevant exchange object to a dead-letter queue. When used in the context of transactions, however, you need to be careful about how you define the onException() clause, because of potential interactions between exception handling and transaction handling. Example 5.4, “How to Define a Dead Letter Queue” shows the correct way to define an onException() clause, assuming that you need to suppress the rethrown exception.
Example 5.4. How to Define a Dead Letter Queue
onException() is configured to catch the IllegalArgumentException exception and send the offending exchange to a dead letter file, deadLetters.xml (of course, you can change this definition to catch whatever kind of exception arises in your application). The exception rethrow behavior and the transaction rollback behavior are controlled by the following special settings in the onException() clause:
handled(true)—suppress the rethrown exception. In this particular example, the rethrown exception is undesirable because it triggers an infinite loop when it propagates back to the file endpoint (see the section called “The markRollbackOnly() DSL command”). In some cases, however, it might be acceptable to rethrow the exception (for example, if the endpoint at the start of the route does not implement a retry feature).markRollbackOnly()—marks the current transaction for rollback without throwing an exception. Note that it is essential to insert this DSL command after theto()command that routes the exchange to the dead letter queue. Otherwise, the exchange would never reach the dead letter queue, becausemarkRollbackOnly()interrupts the chain of processing.
Catching exceptions around a transaction
onException(), a simple approach to handling exceptions in a transactional route is to use the doTry() and doCatch() clauses around the route. For example, Example 5.5, “Catching Exceptions with doTry() and doCatch()” shows how you can catch and handle the IllegalArgumentException in a transactional route, without the risk of getting trapped in an infinite loop.
Example 5.5. Catching Exceptions with doTry() and doCatch()
file:src/data endpoint) receives the incoming exchanges and performs the exception handling using doTry() and doCatch(). The second segment (from the direct:split endpoint) does all of the transactional work. If an exception occurs within this transactional segment, it propagates first of all to the transacted() command, causing the current transaction to be rolled back, and it is then caught by the doCatch() clause in the first route segment. The doCatch() clause does not rethrow the exception, so the file endpoint does not do any retries and infinite looping is avoided.
Chapter 6. XA Transactions in Red Hat JBoss Fuse
Abstract
6.1. Transaction Architecture
Overview
Figure 6.1. OSGi Transaction Architecture

OSGi mandated transaction architecture
javax.transaction.UserTransactionjavax.transaction.TransactionManagerjavax.transaction.TransactionSynchronizationRegistry
Spring transaction integration
org.springframework.transaction.PlatformTransactionManager
PlatformTransactionManager OSGi service, it is possible to integrate application bundles written using the Spring transaction API into the JBoss Fuse transaction architecture.
Red Hat JBoss Fuse transaction implementation
transaction feature, which consists mainly of the following bundles:
org.apache.aries.transaction.manager
org.apache.aries.transaction.wrappers
org.apache.aries.transaction.blueprint
org.apache.aries.transaction.manager
org.apache.aries.transaction.wrappers
org.apache.aries.transaction.blueprint- JTA interfaces—the JTA
UserTransaction,TransactionManager, andTransactionSynchronizationRegistryinterfaces are exported, as required by the OSGi transaction specification. - Spring transaction interface—the Spring
PlatformTransactionManagerinterface is exported, in order to facilitate bundles that are written using the Spring transaction APIs.
PlatformTransactionManager OSGi service and the JTA services access the same underlying transaction manager.
Installing the transaction feature
JBossFuse:karaf@root> features:install transaction
JBossFuse:karaf@root> features:install transactiontransaction feature to your application's profile.
Geronimo transaction manager
- Support for enlisting multiple XA resources.
- Support for 1-phase and 2-phase commit protocols.
- Support for suspending and resuming transactions.
- Support for automatic transaction recovery upon startup.
Accessing Geronimo directly
org.apache.geronimo.transaction.manager.RecoverableTransactionManager
HOWL transaction log
JTA-based application bundles
Spring-based application bundles
PlatformTransactionManager Java interface). This means that you are able to deploy the same source code either in a pure Spring container or in an OSGi container, by changing only the configuration snippet that obtains a reference to the transaction service.
References
- OSGi transaction specification—in section 123 JTA Transaction Services Specification v1.0 from the OSGi Service Platform Enterprise Specification v4.2
- Spring transactions API—see the Transaction Management chapter from the current Spring Reference Manual.
6.2. Configuring the Transaction Manager
Overview
aries.transaction.recoverable property explicitly to true, if you want to enable the transaction recovery mechanism.
Configuration file
EsbInstallDir/etc/org.apache.aries.transaction.cfg
EsbInstallDir/etc/org.apache.aries.transaction.cfgTransaction manager properties
org.apache.aries.transaction.cfg file include the following:
- aries.transaction.recoverable
- A boolean variable that specifies whether or not the transaction manager is recoverable. If not set, it defaults to
false. - aries.transaction.timeout
- Specifies the transaction timeout in seconds. Default is 600 (that is, 10 minutes).
- aries.transaction.tmid
- Specifies the transaction manager identification string that gets appended to all transaction XIDs. This identification string allows transactions from different transaction managers to be disambiguated during transaction recovery, and should be different for each JBoss Fuse container that performs global transactions on a particular set of transactional resources. The string can be up to 64 characters in length. If not specified, a default identification string would be used, but this default value is the same for all JBoss Fuse containers.
- aries.transaction.howl.bufferSize
- Specifies the HOWL log buffer size in units of KiB, where the value must be an integer in the range
[1,32]. Default is4. For optimum performance, it is best to set this value to the block size of the given operating system. On Linux operating systems, a typical block size is 4 KiB.NoteLarger buffers might provide improved performance for applications with transaction rates that exceed 5K transactions per second and a large number of threads. - aries.transaction.howl.logFileDir
- (Required) Specifies the log directory location, which must be an absolute path. No default value.
- aries.transaction.howl.logFileName
- Specifies the name of the HOWL log file. Default is
transaction. - aries.transaction.howl.logFileExt
- Specifies the file extention for the HOWL log file. Default is
log. - aries.transaction.howl.maxLogFiles
- Specifies the maximum number of log files. Default is 2.
- aries.transaction.howl.maxBlocksPerFile
- Specifies the maximum size of a transaction log file in blocks, where the block size is defined by the
aries.transaction.howl.bufferSizeproperty. After the maximum size is reached, the log rolls over to a new log file. Default is-1(that is,0x7fffffffblocks).
Sample settings
org.apache.aries.transaction.cfg configuration file:
aries.transaction.timeout=600
aries.transaction.howl.logFileDir=${karaf.data}/txlog/
aries.transaction.timeout=600
aries.transaction.howl.logFileDir=${karaf.data}/txlog/6.3. Accessing the Transaction Manager
Overview
PlatformTransactionManager. These two services access the same underlying transaction manager, but use alternative wrapper layers (see Figure 6.1, “OSGi Transaction Architecture”).
Blueprint XML
PlatformTransactionManager instance using the following sample code:
6.4. Java Transaction API
Overview
javax.transaction.UserTransaction and javax.transaction.TransactionManager). In practice, it is rarely necessary to access the these JTA interfaces directly, because Red Hat JBoss Fuse provides alternative ways of accessing and managing transactions.
UserTransaction interface
UserTransaction interface has the following definition:
UserTransaction methods
UserTransaction interface defines the following methods:
-
begin() - Start a new transaction, associating it with the current thread. If any XA resources get associated with this transaction, it implicitly becomes an XA transaction.
-
commit() - Complete the current transaction normally, so that all pending changes become permanent. After the commit, there is no longer a transaction associated with the current thread.NoteIf the current transaction is marked as rollback only, however, the transaction would actually be rolled back when
commit()is called. -
rollback() - Abort the transaction immediately, so that all pending changes are discarded. After the rollback, there is no longer a transaction associated with the current thread.
-
setRollbackOnly() - Modify the state of the current transaction, so that a rollback is the only possible outcome, but do not perform the rollback yet.
-
getStatus() - Returns the status of the current transaction, which can be one of the following integer values defined in the
javax.transaction.Statusinterface:STATUS_ACTIVESTATUS_COMMITTEDSTATUS_COMMITTINGSTATUS_MARKED_ROLLBACKSTATUS_NO_TRANSACTIONSTATUS_PREPAREDSTATUS_PREPARINGSTATUS_ROLLEDBACKSTATUS_ROLLING_BACKSTATUS_UNKNOWN
-
setTransactionTimeout() - Customize the timeout of the current transaction, specified in units of seconds. If the transaction does not get resolved within the specified timeout, the transaction manager will automatically roll it back.
When to use UserTransaction?
UserTransaction interface is used for transaction demarcation: that is, for beginning, committing, or rolling back transactions. This is the JTA interface that you are most likely to use directly in your application code. But the UserTransaction interface is just one of the ways to demarcate transactions. For a complete discussion of the different ways to demarcate transactions, see XA Transaction Demarcation.
TransactionManager interface
TransactionManager interface has the following definition:
TransactionManager methods
TransactionManager interface supports all of the methods found in the UserTransaction interface (so you can also use it for transaction demarcation) and, in addition, supports the following methods:
-
getTransaction() - Get a reference to the current transaction (that is, the transaction associated with the current thread), if any. If there is no current transaction, this method returns
null. -
suspend() - Detach the current transaction from the current thread, returning a reference to the transaction. After calling this method, the current thread no longer has a transaction context, so that any work that you do after this point is no longer done in the context of a transaction.NoteNot all transaction managers support suspending transactions. This feature is supported by Apache Geronimo, however.
-
resume() - Re-attach a suspended transaction to the current thread context. After calling this method, the transaction context is restored and any work that you do after this point is done in the context of a transaction.
When to use TransactionManager?
TransactionManager object is simply to pass it to a framework API (for example, to the Camel JMS component), enabling the framework to look after transaction demarcation for you. Occasionally, you might want to use the TransactionManager object directly, if you need to access advanced transaction APIs (such as suspend() and resume()).
Transaction interface
Transaction interface has the following definition:
Transaction methods
commit(), rollback(), setRollbackOnly(), and getStatus() methods have just the same effect as the corresponding methods from the UserTransaction interface (in fact, the UserTransaction object is really just a convenient wrapper that retrieves the current transaction and then invokes the corresponding methods on the Transaction object).
Transaction interface defines the following methods that have no counterpart in the UserTransaction interface:
-
enlistResource() - Associate an XA resource with the current transaction.NoteThis method is of key importance in the context of XA transactions. It is precisely the capability to enlist multiple XA resources with the current transaction that characterizes XA transactions. On the other hand, enlisting resources explicitly is a nuisance and you would normally expect your framework or container to do this for you. For example, see Section 6.5, “The XA Enlistment Problem”.
-
delistResource() - Disassociates the specified resource from the transaction. The
flagargument can take one of the following integer values defined in thejavax.transaction.Transactioninterface:TMSUCCESSTMFAILTMSUSPEND
-
registerSynchronization() - Register a
javax.transaction.Synchronizationobject with the current transaction. TheSynchronizationobject is an object that receives a callback just before the prepare phase of a commit and a callback just after the transaction completes.
When to use Transaction?
Transaction object directly, if you are suspending/resuming transactions or if you need to enlist a resource explicitly. As discussed in Section 6.5, “The XA Enlistment Problem”, a framework or container would usually take care of enlisting resources automatically for you.
Reference
6.5. The XA Enlistment Problem
The problem of XA enlistment
javax.transaction.Transaction object (representing the current transaction). In other words, you must explicitly enlist an XA resource every time a new transaction starts.
How to enlist an XA resource
enlistResource() method on the Transaction interface. For example, given a TransactionManager object and an XAResource object, you could enlist the XAResource object as follows:
Auto-enlistment
enlistResource() calls. Moreover, sometimes it can be difficult to call enlistResource() in the right place (for example, if you are using a framework that hides some of the transaction details).
JMS XA wrapper
javax.jms.ConnectionFactory. You can then implement this class, so that every time a new connection is created, the JMS XA resource is enlisted with the current transaction.
XaPooledConnectionFactory- A generic XA pooled connection factory that automatically enlists the XA resource for each transaction and pools JMS connections, sessions and message producers.
JcaPooledConnectionFactory- An XA pooled connection factory that works with the Geronimo transaction manager (Aries) and provides for proper recovery after a system or application failure.
JcaPooledConnectionFactory wrapper class, create an instance that takes a reference to an XA connection factory instance (for example, ActiveMQXAConnectionFactory), provide a reference to the transaction manager (which is used to enlist the resource), and specify a unique name for this XA resource (needed to support XA recovery).
jmsXaPoolConnectionFactory):
6.6. Generic XA-Aware Connection Pool Library
Overview
org.apache.activemq.jms.pool component. The library enables third-party JMS providers to participate in XA transactions managed by any JTA transaction manager—Apache Geronimo in particular—and to recover properly from system and application failures.
org.apache.activemq.pool extends org.apache.activemq.jms.pool.
PooledConnectionFactoryPooledConnectionFactoryis a simple generic connection factory that pools connection, session, and message producer instances, so they can be used with tools, such as Apache Camel and Spring's JMSTemplate and MessageListenerContainer. Connections, sessions, and producers are returned to the pool for later reuse by the application.XaPooledConnectionFactoryXaPooledConnectionFactoryis a generic XA pooled connection factory that automatically enlists the XA resource for each transaction and pools JMS connections, sessions and message producers.JcaPooledConnectionFactoryJcaPooledConnectionFactoryis a generic XA pooled connection factory that works with the Geronimo transaction manager (Aries) and provides for proper recovery after a system or application failure using theGenericResourceManager. It also automatically enlists the XA resource for each transaction and pools JMS connections, sessions and message producers.
Dependencies
activemq-jms-pool to their pom.xml file as shown here:
<dependency>
   <groupId>org.apache.activemq</groupId>
   <artifactId>activemq-jms-pool</artifactId>
   <version>x.x.x</version>  <!-- Use same version as your activemq core  -->
<dependency>
<dependency>
   <groupId>org.apache.activemq</groupId>
   <artifactId>activemq-jms-pool</artifactId>
   <version>x.x.x</version>  <!-- Use same version as your activemq core  -->
<dependency>PooledConnectionFactory
PooledConnectionFactory has one required and nine optional parameters:
| Parameter | Required | Description |
|---|---|---|
connectionFactory | Yes | Specifies the underlying JMS connectionFactory. |
blockIfSessionPoolIsFull | No |
Controls the behavior of the internal session pool when it is full.
Note:
maximumActiveSessionPerConnection controls the size of the session pool.
|
createConnectionOnStartup |
Specifies whether a connection will be created immediately on a call to start(). This is useful for warming up the pool on startup.
Note: Any exception that occurs during startup is logged at
WARN level and ignored.
Defaults to true.
| |
expiryTimeout | No |
Specifies the time, in milliseconds, at which connections are allowed to expire, regardless of load or
idleTimeout.
Provides a simple way to achieve load balancing when used with the failover protocol (see Failover in the Transport Reference). Since failover works only when a connection is initially made, a pooled connection doesn't get another chance to load balance, unless expiry is forced on the pool.
If your application has no need to load balance frequently—for example, when a destination's producers and consumers are colocated on the same broker—set this parameter to a large number.
Defaults to 0 (disabled).
|
idleTimeout | No |
Specifies the time, in milliseconds, newly created connections can remain idle before they are allowed to expire. On expiring, a connection is closed and removed from the pool.
Note: Connections are normally tested on each attempt to borrow one from the pool. So if connections are infrequently requested, a connection instance could remain in the pool much longer than its configured setting.
Defaults to 30*1000 .
|
maxConnections | No |
Specifies the maximum number of connections to use. Each call to createConnection creates a new connection, up to
maxConnections.
Defaults to 1.
|
maximumActiveSessionPerConnection | No |
Specifies the maximum number of active sessions allowed per connection. Once this maximum has been reached and a new session is requested, the connection either throws an exception or blocks until a session becomes available, according to
blockIfSessionPoolIsFull.
Defaults to 500.
|
numConnections | No |
Specifies the number of connections currently in the pool.
|
timeBetweenExpirationCheckMillis | No |
Specifies the number of milliseconds to sleep between each run of the idle connection eviction thread.
Defaults to -1, so no eviction thread will ever run.
|
useAnonymousProducers | No |
Specifies whether sessions will use one anonymous MessageProducer for all producer requests or create a new MessageProducer for each producer request.
|
XaPooledConnectionFactory
XaPooledConnectionFactory extends the PooledConnectionFactory, implementing three additional optional parameters:
| Parameter | Required | Description |
|---|---|---|
transactionManager | No | Specifies the JTA transaction manager to use. |
tmFromJndi | No | Resolves a transaction manager from JNDI using the specified tmJndiName. |
tmJndiName | No |
Specifies the name of the transaction manager to use when resolving one from JNDI.
Defaults to
java:/TransactionManager.
|
XaConnecionPool class reverts to behaving as a non XA-based connection.
JcaPooledConnectionFactory
JcaPooledConnectionFactory pool extends theXaPooledConnectionFactory, implementing one additional required parameter:
| Parameter | Required | Description |
|---|---|---|
name | Yes |
Specifies the name of the resource manager that the JTA transaction manager will use to detect whether two-phase commits must be employed.
The resource manager name must uniquely identify the broker.
Note: To start the recovery process, the
GenericResourceManager must also be configured.
|
Examples
- PooledConnectionFactoryThis example (Example 6.1) shows a simple pool that configures some connection parameters for a standalone ActiveMQ broker. In this scenario, you can use either the activemq-specific pool
org.apache.activemq.poolor the generic poolorg.apache.activemq.jms.pool.Example 6.1. Simple pooled connection factory configured using Blueprint
Copy to Clipboard Copied! Toggle word wrap Toggle overflow - XaPooledConnectionFactoryThis example (Example 6.2) uses two data sources, one standalone ActiveMQ broker and one standalone HornetMQ broker, to perform XA transactions, in which data is consumed from the HornetMQ broker and produced to the ActiveMQ broker. The HornetMQ broker is configured to use the generic pool
org.apache.activemq.jms.pool, while the ActiveMQ broker is configured to use the activemq-specific poolorg.apache.activemq.pool. This example uses the default settings for the optional parameters.Example 6.2. XA pooled connection factory configured programmatically
Copy to Clipboard Copied! Toggle word wrap Toggle overflow - JcaPooledConnectionFactoryThis example (Example 6.3) shows the configuration of an XA application that uses the
JcaPooledConnectionFactory, allowing a remote third-party JMS broker to participate in XA transactions with an ActiveMQ broker deployed in JBoss Fuse.A class specific to the Apache Geronimo transaction manager is used to register the pool with the transaction as required to enable recovery via theGenericResourceManager. Both thetransactionManagerand XAConnectionFactory (ActiveMQXAConnectionFactory) are defined and passed as properties toJcaPooledConnectionFactory, and theGenericResourceManageris configured to recover transactions upon a system or application failure.Example 6.3. JCA pooled connection factory configured using Blueprint
Copy to Clipboard Copied! Toggle word wrap Toggle overflow
Chapter 7. JMS XA Transaction Integration
Abstract
javax.jms.XAConnectionFactory interface and Apache ActiveMQ also provides a wrapper class, which supports auto-enlistment of the JMS XA resource and connection pooling. In particular, this chapter describes in detail how to configure a Camel JMS component to use XA transactions in the context of an OSGi container.
7.1. Enabling XA on the Camel JMS Component
Overview
Figure 7.1. Camel JMS Component Integrated with XA Transactions
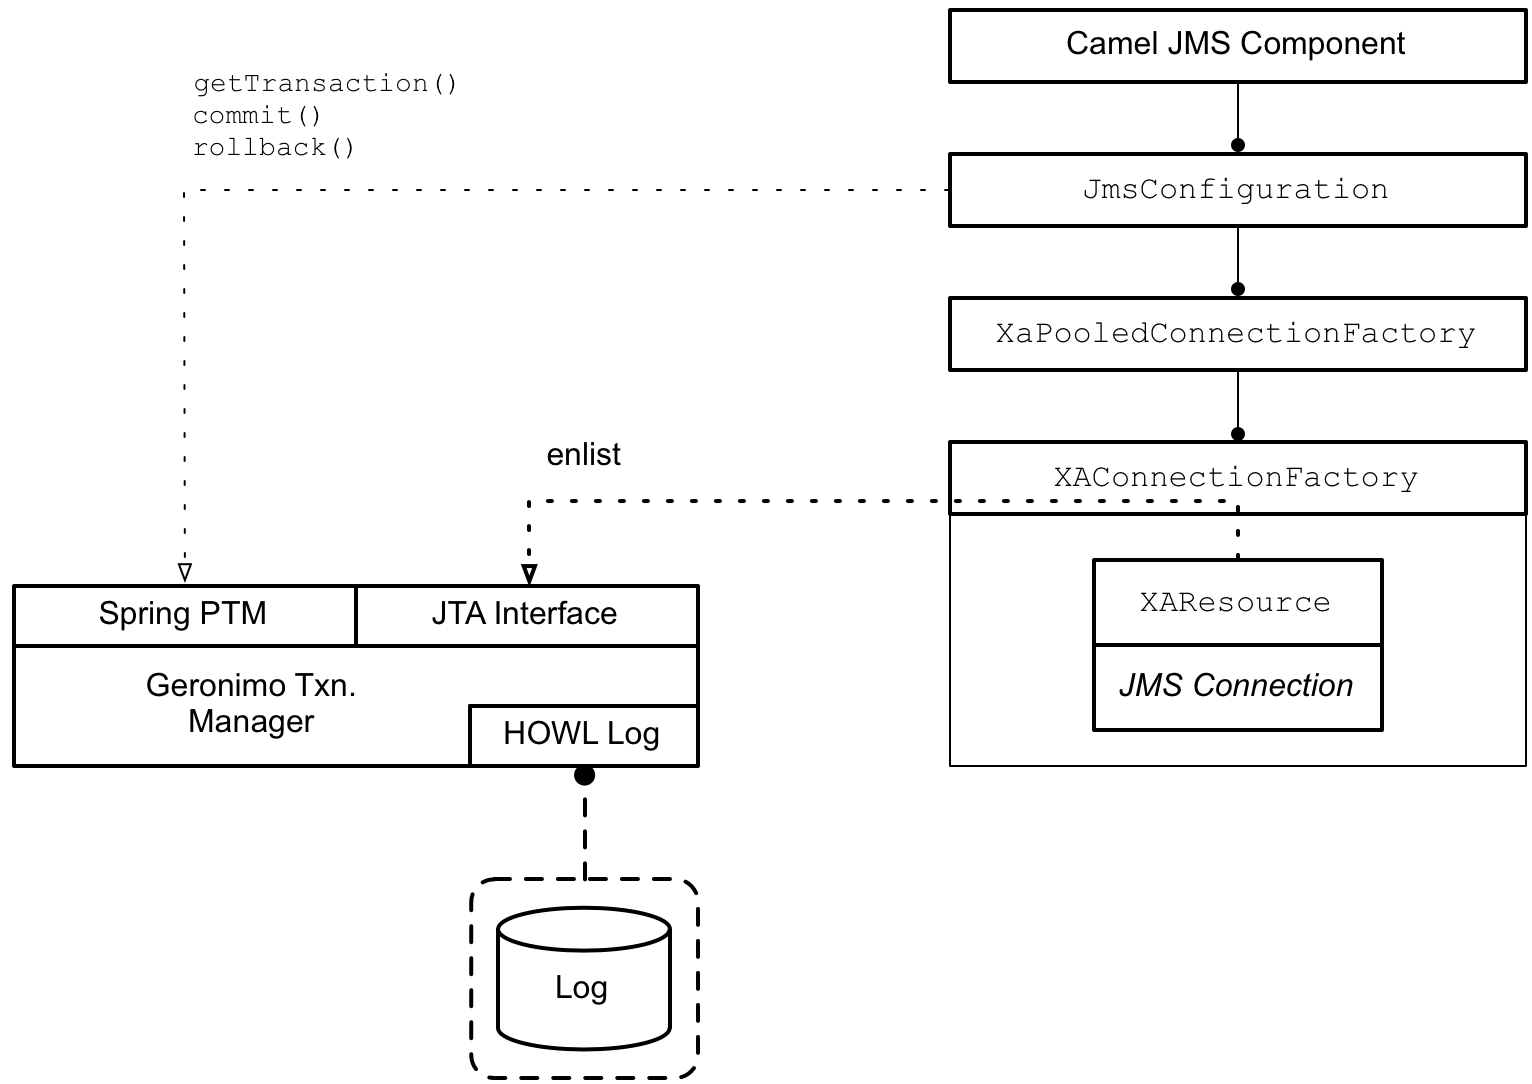
Accessing the XA transaction manager
org.springframework.transaction.PlatformTransactionManager- The
PlatformTransactionManagerinterface is needed by the Camel JMS component (which is layered over the Spring transaction API). For more details, see PlatformTransactionManager Interface. javax.transaction.TransactionManager- The
TransactionManagerinterface is needed by the XA pooled connection factory, which uses it to enlist the ActiveMQ XA resource. org.apache.geronimo.transaction.manager.RecoverableTransactionManager- The
RecoverableTransactionManagerinterface is inherited fromjavax.transaction.TransactionManagerand is needed to define a recoverable resource. For more details, see Sample JMS XA Configuration.
XA connection factory bean
ActiveMQXAConnectionFactory, which exposes the javax.jms.XAConnectionFactory interface. Through the JTA XAConnectionFactory interface, it is possible to obtain a reference to an XAResource object, but the basic connection factory bean does not have the capability to auto-enlist the XA resource.
XA pooled connection factory bean
JcaPooledConnectionFactory type or XaPooledConnectionFactory type, is a connection factory wrapper class that adds the following capabilities to the basic connection factory:
- JMS connection pooling—enables the re-use of JMS connection instances. When a transaction is completed, the corresponding JMS connection can be returned to a pool and then re-used by another transaction.
- Auto-enlistment of XA resources—the pooled connection factory bean also has the ability to enlist an XA resource automatically, each time a transaction is started.
JcaPooledConnectionFactory bean exposes the standard javax.jms.ConnectionFactory interface (but not the XAConnectionFactory interface).
Camel JMS component and JMS configuration bean
PlatformTransactionManager type) and a reference to the XA pooled connection factory (of JcaPooledConnectionFactory type).
org.apache.camel.component.jms.JmsConfiguration class supports the following bean properties, which are particularly relevant to transactions:
transacted- Must be set to
falsefor XA transactions. The name of this property is misleading. What it really indicates is whether or not the Camel JMS component supports local transactions. For XA transactions, on the other hand, you must set this property tofalseand initialize thetransactionManagerproperty with a reference to an XA transaction manager.This property gets its name from thesessionTransactedproperty in the underlying Spring transaction layer. Thetransactedproperty ultimately gets injected into thesessionTransactedproperty in the Spring transaction layer, so it is the Spring transaction layer that determines the semantics. For more details, see the Javadoc for Spring's AbstractMessageListenerContainer. transactionManager- Must be initialized with a reference to the
PlatformTransactionManagerinterface of the built-in OSGi transaction manager. transactionName- Sets the transaction name. Default is
JmsConsumer[destinationName]. cacheLevelName- Try setting this initially to
CACHE_CONNECTION, because this will give you the best performance. If this setting turns out to be incompatible with your transaction system, you can revert toCACHE_NONE, whcih switches off all caching in the Spring transaction layer. For more details, see the Spring documentation. transactionTimeout- Do not set this property in the context of XA transactions. To customize the transaction timeout in the context of XA transactions, you need to configure the timeout directly in the OSGi transaction manager instead (see Configuring the Transaction Manager for details).
lazyCreateTransactionManager- Do not set this boolean property in the context of XA transactions. (In the context of a local transaction, setting this property to
truewould direct the Spring transaction layer to create its own local transaction manager instance, whenever it is needed.)
7.2. JMS XA Resource
Overview
Client host and the corresponding Apache ActiveMQ broker is deployed on the Remote host, so that this transaction branch is effectively a distributed transaction.
Figure 7.2. JMS XA Resource Connected to Remote Broker
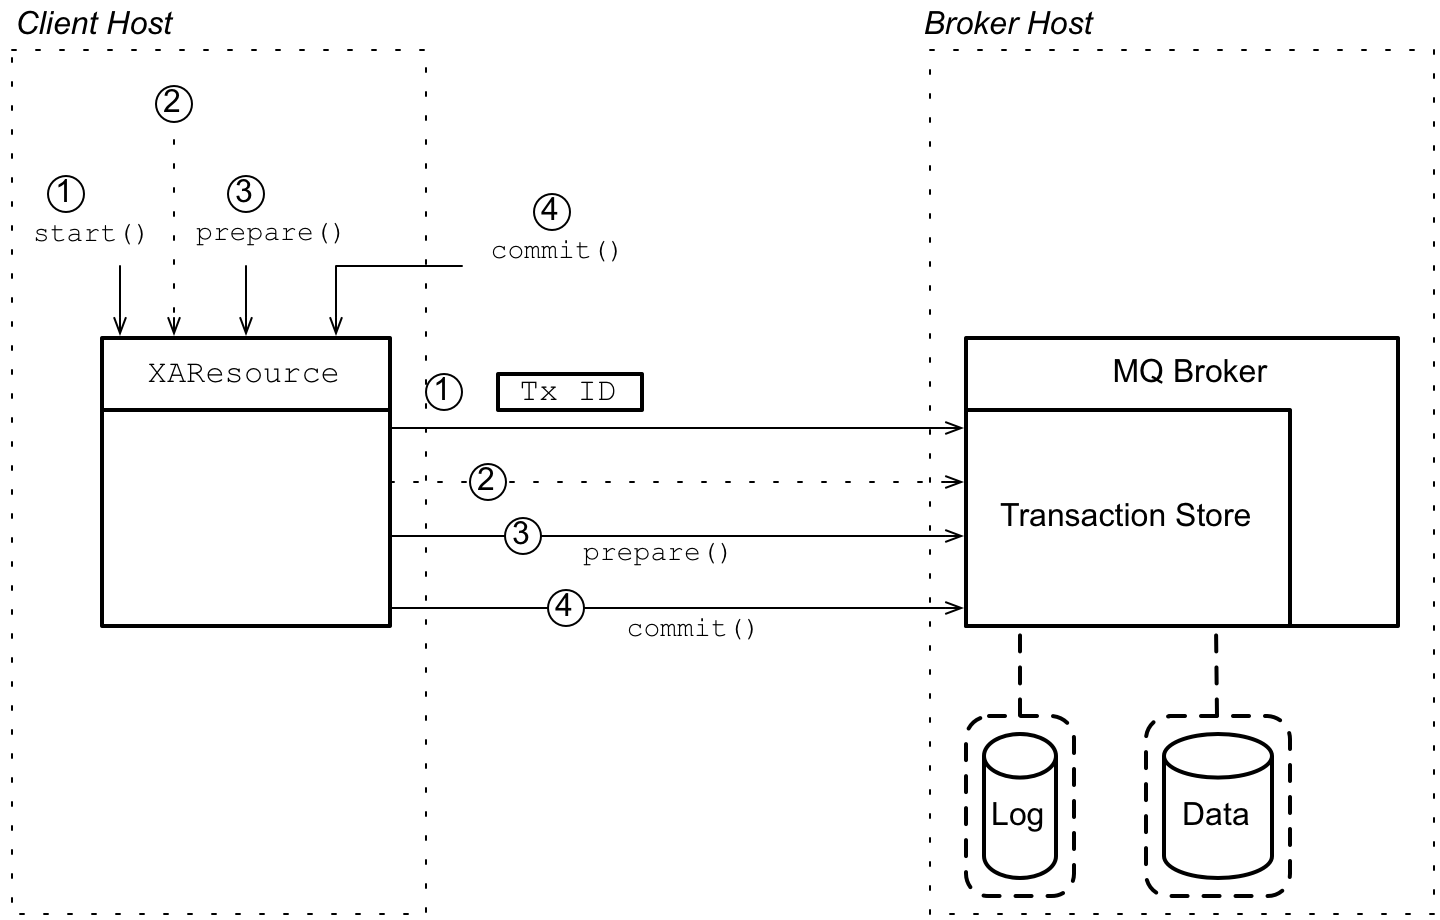
XA two-phase commit process
- Immediately after the transaction begins, the transaction manager invokes
start()on the JMS XA resource, which indicates that the resource should initialize a new transaction. The JMS XA resource now generates a new transaction ID and sends it over the network to the remote broker. - The JMS XA resource now forwards all of the operations that arise during a JMS session (for example, messages, acknowledgments, and so on) to the remote broker.On the broker side, the received operations are not performed immediately. Because the operations are happening in a transaction context and the transaction is not yet committed, the broker buffers all of the operations in a transaction store (held in memory, initially). Messages held in the transaction store are not forwarded to JMS consumers.
- In a two-phase commit process, the first phase of completing the transaction is where the transaction manager invokes
prepare()on all of the participating XA resources. At this stage, the JMS XA resource sends theprepare()operation to the remote broker.On the broker side, when the transaction store receives theprepare()operation, it writes all of the buffered operations to disk. Hence, after the prepare phase, there is no longer any risk of losing data associated with this transaction branch. - The second phase of completing the transaction is where the transaction manager invokes
commit()on all of the participating XA resources. The JMS XA resource sends thecommit()operation to the remote broker.On the broker side, the transaction store marks this transaction as complete. The pending operations are now executed and any pending messages can now be forwarded to JMS consumers.
Embedded MQ broker
Client host, as shown in Figure 7.3, “JMS XA Resource Connected to Embedded Broker”. In this scenario, an additional broker is deployed on the Client host, preferably running in the same JVM as the JMS XA resource (that is, in embedded mode). Now all of the resource-to-broker communication is localized and runs much faster. It still might be necessary to forward messages to a remote broker, but this communication has no effect on the XA transactions.
Figure 7.3. JMS XA Resource Connected to Embedded Broker
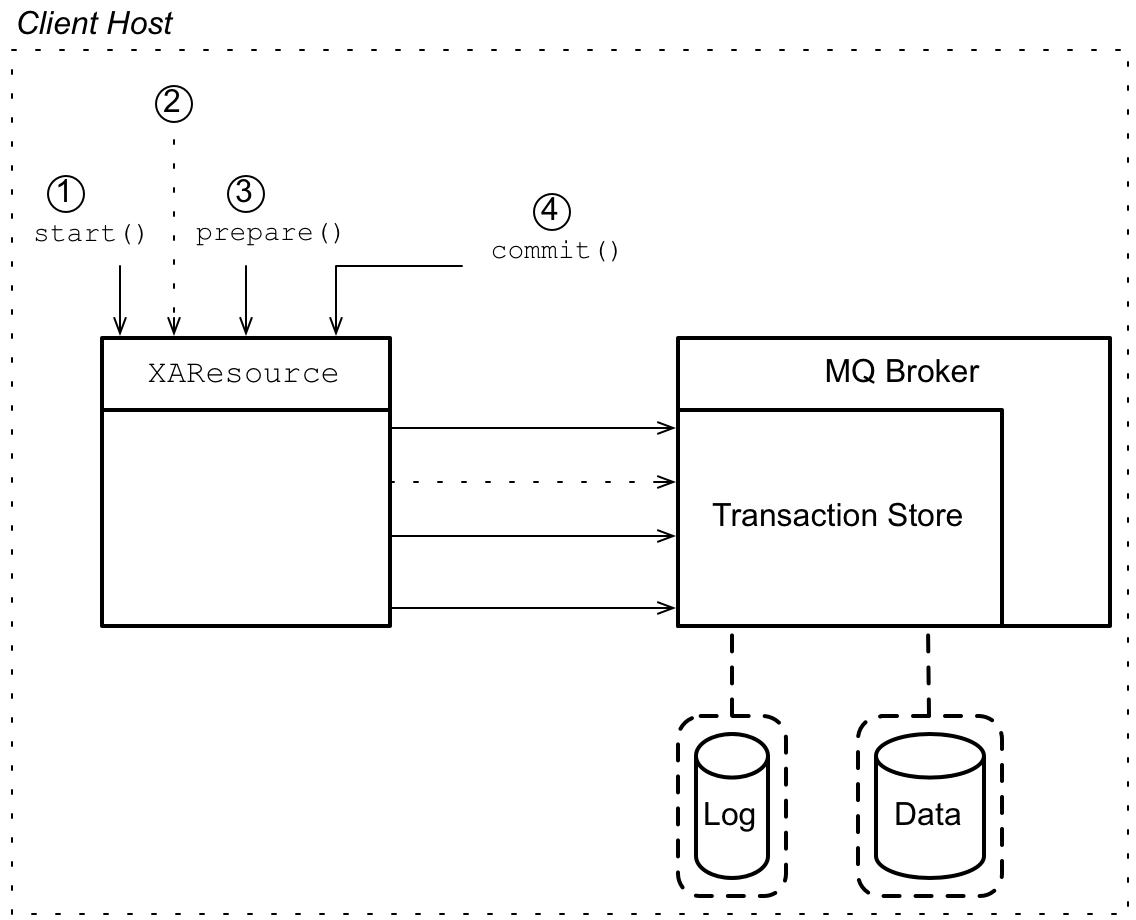
Default MQ broker
vm:amq.
7.3. Sample JMS XA Configuration
Spring XML configuration
jmstx Camel JMS component with XA transactions. After setting up the Camel JMS component with this code, you can create a transactional JMS endpoint in a route using a URL like jmstx:queue:QueueName.
Example 7.1. Camel JMS Component with XA Enabled
Listing notes
- 1
- Define a reference to the OSGi service that exposes the
PlatformTransactionManagerinterface of the OSGi container's built-in XA transaction manager. This service can then be accessed through the bean ID,osgiPlatformTransactionManager. - 2
- Define a reference to the OSGi service that exposes the recoverable
TransactionManagerinterface of the OSGi container's built-in XA transaction manager. This service can then be accessed through the bean ID,recoverableTxManager. - 3
- The bean identified by the ID,
jmstx, is the ActiveMQ implementation of the Camel JMS component. You can use this component to define transactional JMS endpoints in your routes. The only property that you need to set on this bean is a reference to theJmsConfigurationbean with the ID,jmsTxConfig. - 4
- The
JmsConfigurationbean with the ID,jmsTxConfig, is configured as described in Section 7.1, “Enabling XA on the Camel JMS Component”. In particular, the configuration bean gets a reference to the XA pooled connection factory and a reference to theosgiPlatformTransactionManagerbean. The transacted property must be set tofalse. - 5
- The
JcaPooledConnectionFactoryis a wrapper class that adds extra capabilities to the basic connection factory bean (that is, it adds the capabilities to auto-enlist XA resources and to pool JMS connections). - 6
- The
maxConnectionsproperty should be set to 1. - 7
- The bean with the ID,
jmsXaConnectionFactory, is the basic connection factory, which encapsulates the code for connecting to the JMS broker. In this case, the bean is an instance ofActiveMQXAConnectionFactorytype, which is a special connection factory class that you must use when you want to connect to the ActiveMQ broker with support for XA transactions. - 8
- The
brokerURLproperty defines the protocol for connecting to the broker. In this case, thevm:localURL connects to the broker that is embedded in the current JVM and is identified by the namelocal(the configuration of the embedded broker is not shown in this example).There are many different protocols supported by Apache ActiveMQ that you could use here. For example, to connect to a remote broker through the OpenWire TCP protocol listening on TCP port61616on hostMyHost, you would use the broker URL,tcp://MyHost:61616. - 9
- In this example, the redelivery policy is disabled by setting
maximumRedeliveriesto0. Typically, you would not use a redelivery policy together with transactions. An alternative approach would be to define an exception handler that routes failed exchanges to a dead letter queue. - 10
- The
resourceNameproperty is the key entry that maps from the transaction manager log to a real-worldXAResourceobject. It must be unique for eachXAResourceobject.
7.4. XA Client with Two Connections to a Broker
Overview
XAResource.isSameRM), however, many Transaction Managers treat these XA resource objects in a special way: when the current transaction finishes (committed or rolled back), the Transaction Manager calls XAResource.end only on the first enlisted XAResource instance. This creates a problem for Apache ActiveMQ, which expects XAResource.end to be called on every enlisted XAResource instance. To avoid this problem, Apache ActiveMQ provides an option which forces the Transaction Manager to call XAResource.end on every XA resource instance.
jms.rmIdFromConnectionId option
jms.rmIdFromConnectionId option to true. The effect of setting this option to true is that XA resource names are then based on the connection ID, instead of being based on the broker ID. This ensures that all connections have distinct XA resource names, even if they are connected to the same broker instance (note that every connection is associated with its own XA resource object). A side effect of setting this option is that the Transaction Manager is guaranteed to call XAResource.end on each of the XA resource objects.
jms.rmIdFromConnectionId option to true, the transaction manager adopts the 2-phase commit protocol (2-PC). Hence, there is a significant overhead associated with sending messages on one connection and receiving messages on another, when transactions are enabled.
Setting rmIdFromConnectionId option on an endpoint URI
rmIdFromConnectionId option by setting jms.rmIdFromConnectionId to true on an Apache ActiveMQ endpoint URI. For example, to enable this option on an OpenWire URI:
tcp://brokerhost:61616?jms.rmIdFromConnectionId=true
tcp://brokerhost:61616?jms.rmIdFromConnectionId=trueSetting rmIdFromConnectionId option directly on ActiveMQXAConnectionFactory
rmIdFromConnectionId option directly on the ActiveMQXAConnectionFactory class, by invoking the setRmIdFromConnectionId method. For example, you can set the rmIdFromConnectionId option in Java, as follows:
// Java
ActiveMQXAConnectionFactory cf = new ActiveMQXAConnectionFactory( ... );
cf.setRmIdFromConnectionId(true);
// Java
ActiveMQXAConnectionFactory cf = new ActiveMQXAConnectionFactory( ... );
cf.setRmIdFromConnectionId(true);rmIdFromConnectionId option in XML, as follows:
Example using rmIdFromConnectionId
rmIdFromConnectionId option in the context of an XA aware JMS client written in Java:
- Because this is an XA example, it does not show any explicit transaction demarcation (for example,
beginorcommitinvocations). In this case, the XA Transaction Manager (TM) is responsible for transaction demarcation. For example, if you were deploying this code into a container that supports transactions, the container would normally be responsible for transaction demarcation. - When you create the first
XAConnectionobject,connection1, it automatically creates the associatedXAResourceobject for this connection,resource1. The TM automatically enlistsresource1into the current transaction by calling XAResource.start(). - When you create the second
XAConnectionobject,connection2, it automatically creates the associatedXAResourceobject for this connection,resource2. The TM automatically joinsresource2to the current transaction: the TM does this by calling XAResource.start() with the TMJOIN flag. - Because you have set
rmIdFromConnectionIdtotruein this example,resource1andresource2have different XA resource names, which means that the TM treats them as two different resources. - You can now do some work in the current transaction by sending messages on
connection1and onconnection2. All of these message sends belong to the current transaction. - When the current transaction is finished (committed or rolled back), the TM will call XAResource.end() on both
resource1andresource2. This behaviour is guaranteed, because the TM perceivesresource1andresource2to be different resources (due to different XA resource names).NoteIf you have not set thermIdFromConnectionIdoption, the typical behaviour of the TM at this point would be to callXAResource.endonly on the first resource,resource1. This creates problems in the context of Apache ActiveMQ, because the second connection,connection2, can send messages asynchronously and these asynchronous messages will not be synchronized with the transaction unless the TM callsXAResource.endonresource2as well.
Chapter 8. JDBC XA Transaction Integration
Abstract
8.1. Configuring an XA Data Source
Overview
javax.sql.XADataSource interface, or indirectly, through a proxy object that implements the javax.sql.DataSource interface. In the context of OSGi, the usual way to integrate an XA data source is to instantiate the data source implementation provided by the underlying database and then to export that data source as an OSGi service.
javax.sql.DataSource interface
javax.sql.DataSource interface is the preferred way to expose a JDBC interface. It is a highly abstracted interface, exposing only two methods, getConnection and setConnection, to the JDBC client.
DataSource object available to a JDBC client is through the JNDI registry.
javax.sql.XADataSource interface
javax.sql.XADataSource object. The main difference between an XADataSource object and a plain DataSource object is that the XADataSource object returns a javax.sql.XAConnection object, which you can use to access and enlist an XAResource object.
XAResource object is a manual procedure. That is, when using an XADataSource directly, a JDBC client must explicitly write the code to obtain the XAResource and enlist it with the current transaction. An alternative approach is to wrap the XA data source in a proxy data source that performs enlistment automatically (for example, see Section 8.2, “Apache Aries Auto-Enlisting XA Wrapper”).
Standard JDBC data source properties
javax.sql.DataSource interface and need not all be implemented. The only required property is description.
| Property | Type | Description |
|---|---|---|
databaseName | String | (Optional) Name of the database instance. |
dataSourceName | String | (Optional) For an XA data source or a pooled data source, names the underlying data source object. |
description | String | (Required) Description of the data source. |
networkProtocol | String | (Optional) Network protocol used to communicate with the database server. |
password | String | (Optional) If required, the user and password properties can be provided to open a secure connection to the database server. |
portNumber | int | (Optional) TCP port number where the database server is listening. |
roleName | String | (Optional) The initial SQL role name. |
serverName | String | (Optional) The database server name. |
user | String | (Optional) If required, the user and password properties can be provided to open a secure connection to the database server. |
Apache Derby
Derby data sources
org.apache.derby.jdbc package):
-
EmbeddedDataSource - A non-XA data source, which connects to the embedded Derby database instance identified by the
databaseNameproperty. If the embedded database instance is not yet running, it is automatically started in the current JVM. -
EmbeddedXADataSource - An XA data source, which connects to the embedded Derby database instance identified by the
databaseNameproperty. If the embedded database instance is not yet running, it is automatically started in the current JVM. -
EmbeddedConnectionPoolDataSource - A non-XA data source with connection pooling logic, which connects to the embedded Derby database instance identified by the
databaseNameproperty. If the embedded database instance is not yet running, it is automatically started in the current JVM. -
ClientDataSource - A non-XA data source, which connects to the remote Derby database instance identified by the
databaseNameproperty. -
ClientXADataSource - An XA data source, which connects to the remote Derby database instance identified by the
databaseNameproperty. -
ClientConnectionPoolDataSource - A non-XA data source with connection pooling logic, which connects to the remote Derby database instance identified by the
databaseNameproperty.
isWrapperFor), use the variants of these data source classes with 40 appended. For example, EmbeddedDataSource40, EmbeddedXADataSource40, and so on.
Derby data source properties
databaseName property (which specifies the database instance name) is the most important one.
| Property | Type | Description |
|---|---|---|
connectionAttributes | String | (Optional) Used to specify Derby-specific connection attributes. |
createDatabase | String | (Optional) When specified with the value, create, the database instance specified by databaseName is automatically created (if it does not already exist) the next time the getConnection method of the data source is called |
databaseName | String | (Optional) Name of the Derby database instance. |
dataSourceName | String | (Optional) For an XA data source or a pooled data source, names the underlying data source object. Not used by the Derby data source implementation. |
description | String | (Required) Description of the data source. |
shutdownDatabase | String | (Optional) When specified with the value, shutdown, shuts down the database instance the next time the getConnection method of the data source is called. |
Data sources as OSGi services
Blueprint
Example 8.1. Exposing XA DataSource as an OSGi Service in Blueprint XML
References
8.2. Apache Aries Auto-Enlisting XA Wrapper
Overview
Figure 8.1. Creating the Auto-Enlisting XA Wrapper
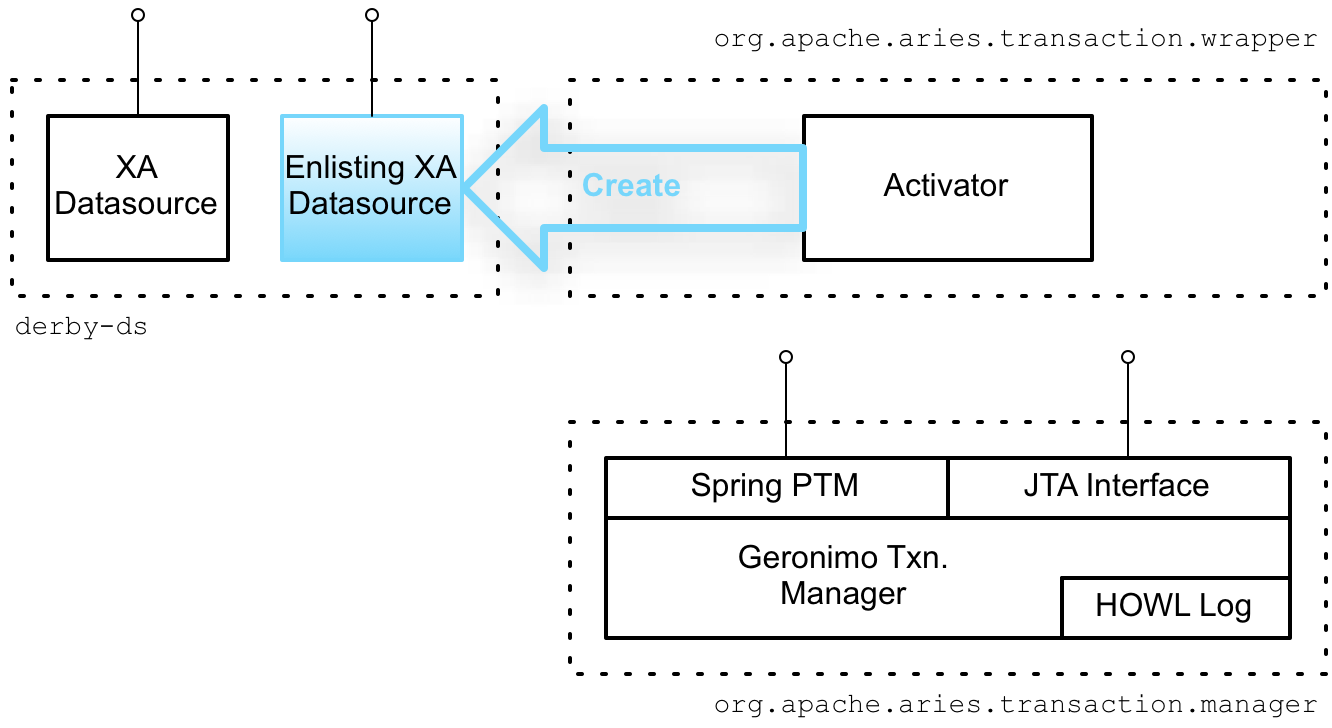
derby-ds bundle
derby-ds bundle shown in Figure 8.1, “Creating the Auto-Enlisting XA Wrapper” encapsulates the code from Example 8.1, “Exposing XA DataSource as an OSGi Service in Blueprint XML”, which defines a Derby XA data source and exports it as an OSGi service.
derby-ds bundle is the auto-enlisting data source proxy. But this data source proxy is not created by the code in the derby-ds bundle and is initially not part of the bundle.
Automatic wrapper instantiation
org.apache.aries.transaction.wrappers). This bundle defines an activator, which installs hooks into the OSGi runtime, so that it is notified whenever an OSGi bundle exports a service supporting the javax.sql.XADataSource interface.
connector feature.
JBossFuse:karaf@root> features:install connector
JBossFuse:karaf@root> features:install connectorconnector feature to the profile that is deployed to the container on which the JDBC driver will enlist with the Aries transaction manager.
jboss-fuse-full profile, using this command:
JBossFuse:karaf@root> profile-edit --feature connector jboss-fuse-full
JBossFuse:karaf@root> profile-edit --feature connector jboss-fuse-fullJBossFuse:karaf@root> profile-edit --feature connector <custom-profile-name>
JBossFuse:karaf@root> profile-edit --feature connector <custom-profile-name>XADataSourceEnlistingWrapper
javax.sql.XADataSource interface, the activator automatically creates a new XADataSourceEnlistingWrapper object, which wraps the original XA data source, effectively acting as a data source proxy. The XADataSourceEnlistingWrapper object also obtains a reference to the JTA transaction manager service (from the org.apache.aries.transaction.manager bundle). Finally, the activator exports the XADataSourceEnlistingWrapper object with the javax.sql.DataSource interface.
getConnection method), the proxy automatically gets a reference to the underlying XA resource and enlists the XA resource with the JTA transaction manager. This means that the required XA coding steps are automatically performed and the JDBC client does not need to be XA transaction aware.
XADataSourceEnlistingWrapper class is not exported from the Aries transaction wrapper bundle, so it is not possible to create the data source proxy explicitly. Instances of this class can only be created automatically by the activator in the transaction wrapper bundle.
Accessing the enlisting wrapper
derby-ds bundle, you can see how the wrapper proxy is automatically created. For example, after following the instructions in Section 10.3, “Define a Derby Datasource” and Section 10.5, “Deploy and Run the Transactional Route” to build and deploy the derby-ds bundle, you can list the OSGi services exported by the derby-ds bundle using the osgi:ls console command. Assuming that derby-ds has the bundle ID, 229, you would then enter:
JBossFuse:karaf@root> osgi:ls 229
JBossFuse:karaf@root> osgi:ls 229- An OSGi service with interface
javax.sql.XADataSourceanddatasource.nameequal toderbyXADB—this is the XA data source explicitly exported as an OSGi service in Example 8.1, “Exposing XA DataSource as an OSGi Service in Blueprint XML”. - An OSGi service with interface
javax.sql.DataSourceanddatasource.nameequal toderbyXADB—this is the auto-enlisting data source proxy implicitly created by the Aries wrapper service. The data source proxy copies the user-defined service properties from the original OSGi service and adds the settingaries.xa.aware = true. Thearies.xa.awareproperty enables you to distinguish between the generated proxy and the original data source.
Blueprint
reference element as shown in Example 8.2, “Importing XA DataSource as an OSGi Service Reference in Blueprint XML”.
Example 8.2. Importing XA DataSource as an OSGi Service Reference in Blueprint XML
JDBC connection pool options
datasource.xml, these options are specified as key/value pairs under the service definition's service-properties element.
datasource.xml example, several of the connection pool configuration options are specified:
| Property | Description |
|---|---|
aries.xa.name | Specifies the name of the managed resource that the transaction manager uses to uniquely identify and recover the resource. |
aries.xa.exceptionSorter |
(Optional) Determines whether an exception will cause the connection to be discarded and rollback of the transaction eventually attempted. Valid values are:
|
aries.xa.username | (Optional) Specifies the name of the user to use. This property is usually set on the inner ConnectionFactory. However, setting it in the service definition overrides the value set in the inner ConnectionFactory. |
aries.xa.password | (Optional) Specifies the password to use. This property is usually set on the inner ConnectionFactory. However, setting it also in the service definition overrides the value set in the inner ConnectionFactory. |
aries.xa.pooling | (Optional) Enables/disables support for pooling. Default is true (enabled). |
aries.xa.poolMaxSize | (Optional) Specifies the maximum pool size in number of connections. Default is 10. |
aries.xa.poolMinSize | (Optional) Specifies the minimum pool size in number of connections. Default is 0. |
aries.xa.transaction |
(Optional) Specifies the type of transactions to use. Valid values are:
|
aries.xa.partitionStrategy |
(Optional) Specifies the pool partitioning strategy to use. Valid values are:
|
aries.xa.connectionMadIdleMinutes[a] | (Optional) Specifies the maximum time, in minutes, that a connection can remain idling before it’s released from the pool. Default is 15. |
aries.xa.connectionMaxWaitMilliseconds | (Optional) Specifies the maximum time, in milliseconds, to wait to retrieve a connection from the pool. Default is 5000. |
aries.xa.allConnectionsEquals |
(Optional) Specifies to assume that all connections are equal— use the same user credentials—when retrieving one from the pool. Default is
true.
Note: If you're using different kinds of connections to accommodate different users, do not enable this option unless you use a partition strategy that pools matching connections. Otherwise, attempts to retrieve connections from the pool will fail.
|
aries.xa.validateOnMatch | Specifies whether to check the validity of a connection at the time it is checked out of the connection pool. Defaults to true. Note that it is usually unnecessary to enable both the validateOnMatch option and the backgroundValidation option simultaneously. |
aries.xa.backgroundValidation | Enables background validation of connections in the pool. When this option is enabled, a separate thread runs in the background to check the validity of the connections in the pool. This is typically more efficient than the validateOnMatch option (and it is recommended that you set the validateOnMatch option to false when this option is enabled). Defaults to false. |
aries.xa.backgroundValidationMilliseconds | Used in combination with the backgroundValidation option. Specifies the interval between background validation checks in units of milliseconds. Defaults to 600000 (10 minutes). |
[a]
Though the spelling of this property appears incorrect, it is not. Do not replace the d in connectionMadMinutes with an x.
| |
Chapter 9. XA Transaction Demarcation
Abstract
9.1. Demarcation by Transactional Endpoints
Overview
from(...)). This has the advantage that the transaction scope spans the whole route, including the endpoint that starts the route. Not all endpoint types are transactional, however.
Auto-demarcation by JMS consumer endpoints
- The endpoint automatically starts a transaction (by invoking
begin()on the XA transaction manager), before pulling a message off the specified JMS queue. - The endpoint automatically commits the transaction (by invoking
commit()on the XA transaction manager), after the exchange has reached the end of the route.
jmstx (see Sample JMX XA Configuration), you can define a transactional route as follows:
JMS producer endpoints
Transactional and non-transactional JMS endpoints
- A transactional Camel JMS component—to access JMS destinations transactionally.
- A non-transactional Camel JMS component—to access JMS destinations without a transaction context.
9.2. Demarcation by Marking the Route
Overview
transacted() command into your route.
Demarcation using transacted()
transacted() command uses the first transaction manager of type PlatformTransactionManager that it finds in the bean registry (which could either be an OSGi service, a bean defined in Spring XML, or a bean defined in blueprint). Because the PlatformTransactionManager interface is, by default, exported as an OSGi service, the transacted() command will automatically find the XA transaction manager.
transacted() command to mark a route as transacted, all of the processors following transacted() participate in the transaction; all of the processors preceding transacted() do not participate in the transaction. For example, you could use transacted() to make a route transactional, as follows:
PlatformTransactionManager type or if you register multiple TransactedPolicy objects in the bean registry (for example, by defining beans in Spring XML), you cannot be certain which transaction manager would be picked up by the transacted() command (see Default transaction manager and transacted policy). In such cases, it is recommended that you specify the transaction policy explicitly.
Specifying the transaction policy explicitly
transacted() command. First of all, you need to define the transaction policy (of type, org.apache.camel.spring.spi.SpringTransactionPolicy), which encapsulates a reference to the transaction manager you want to use—for example:
XA_TX_REQUIRED, as a string argument to the transacted() command—for example:
XML syntax
transacted command in Spring XML or blueprint files. For example, to demarcate an XA transaction in Spring XML:
9.3. Demarcation by UserTransaction
Overview
UserTransaction service directly and calling its begin(), commit() and rollback() methods. But you should be careful to call these methods only when it is really necessary. Usually, in a Apache Camel application, a transaction would be started either by a transactional endpoint or by the transacted() marker in a route, so that explicit invocations of UserTransaction methods are not required.
Accessing UserTransaction from Apache Camel
UserTransaction OSGi service by looking it up in the CamelContext registry. For example, given the CamelContext instance, camelContext, you could obtain a UserTransaction reference as follows:
// Java
import javax.transaction.UserTransaction;
...
UserTransaction ut =
    (UserTransaction) camelContext.getRegistry().lookup(UserTransaction.class.getName());
// Java
import javax.transaction.UserTransaction;
...
UserTransaction ut =
(UserTransaction) camelContext.getRegistry().lookup(UserTransaction.class.getName());Example with UserTransaction
UserTransaction object and use it to demarcate a transaction, where it is assumed that this code is part of a Apache Camel application deployed inside an OSGi container.
9.4. Demarcation by Declarative Transactions
Overview
Required policy), you can ensure that a transaction is started whenever that particular bean or bean method is invoked. At the end of the bean method, the transaction will be committed. (This approach is analogous to the way that transactions are dealt with in Enterprise Java Beans).
Bean-level declaration
tx:transaction element as a child of the bean element, as follows:
Required transaction policy is applied to all methods of the accountFoo bean and the accountBar bean (where the method attribute specifies the wildcard, *, to match all bean methods).
Top-level declaration
tx:transaction element as a child of the blueprint element, as follows:
Required transaction policy is applied to all methods of every bean whose ID matches the pattern, account*.
tx:transaction attributes
tx:transaction element supports the following attributes:
bean- (Top-level only) Specifies a list of bean IDs (comma or space separated) to which the transaction policy applies. For example:
<blueprint ...>
    <tx:transaction bean="accountFoo,accountBar" value="..."/>
</blueprint>
<blueprint ...> <tx:transaction bean="accountFoo,accountBar" value="..."/> </blueprint>Copy to Clipboard Copied! Toggle word wrap Toggle overflow You can also use the wildcard character, *, which may appear at most once in each list entry. For example:<blueprint ...> <tx:transaction bean="account*,jms*" value="..."/> </blueprint><blueprint ...> <tx:transaction bean="account*,jms*" value="..."/> </blueprint>Copy to Clipboard Copied! Toggle word wrap Toggle overflow If thebeanattribute is omitted, it defaults to*(matching all non-synthetic beans in the blueprint file). method- (Top-level and bean-level) Specifies a list of method names (comma or space separated) to which the transaction policy applies. For example:
<bean id="accountFoo" class="org.fusesource.example.Account">
    <tx:transaction method="debit,credit,transfer" value="Required"/>
    <property name="accountName" value="Foo"/>
</bean>
<bean id="accountFoo" class="org.fusesource.example.Account"> <tx:transaction method="debit,credit,transfer" value="Required"/> <property name="accountName" value="Foo"/> </bean>Copy to Clipboard Copied! Toggle word wrap Toggle overflow You can also use the wildcard character, *, which may appear at most once in each list entry.If themethodattribute is omitted, it defaults to*(matching all methods in the applicable beans). value- (Top-level and bean-level) Specifies the transaction policy. The policy values have the same semantics as the policies defined in the EJB 3.0 specification, as follows:
Required—support a current transaction; create a new one if none exists.Mandatory—support a current transaction; throw an exception if no current transaction exists.RequiresNew—create a new transaction, suspending the current transaction if one exists.Supports—support a current transaction; execute non-transactionally if none exists.NotSupported—do not support a current transaction; rather always execute non-transactionally.Never—do not support a current transaction; throw an exception if a current transaction exists.
Chapter 10. XA Tutorial
Abstract
10.1. Install Apache Derby
Overview
ij command-line utility later in the tutorial to create a database schema.
Downloading
db-derby-Version-bin.zip, from the Apache Derby download page:
http://db.apache.org/derby/derby_downloads.html
http://db.apache.org/derby/derby_downloads.htmlInstalling
C:\Program Files on Windows, or /usr/local on *NIX).
Environment variables
bin directory to your PATH variable.
REM Set Apache Derby environment on Windows
SET DERBY_HOME=DerbyInstallDir

SET PATH=%DERBY_HOME%\bin;%PATH%
REM Set Apache Derby environment on Windows
SET DERBY_HOME=DerbyInstallDir

SET PATH=%DERBY_HOME%\bin;%PATH%Set Apache Derby environment on *NIX
# Set Apache Derby environment on *NIX
DERBY_HOME=DerbyInstallDir

export PATH=$DERBY_HOME/bin:$PATH10.2. Integrate Derby with JBoss Fuse
Overview
Derby system
derby.system.home Java system property
derby.system.home Java system property, which specifies the location of the Derby system directory.
Setting derby.system.home in the OSGi container
derby.system.home property in the OSGi container. Under the JBoss Fuse install directory, open the etc/system.properties file using a text editor and add the following line:
derby.system.home=DerbySystemDirectory
derby.system.home=DerbySystemDirectoryderby.system.home property, any Derby database instances created in the OSGi container will share the same Derby system (that is, the database instances will store their data under the specified Derby system directory).
10.3. Define a Derby Datasource
Overview
Derby data source implementations
EmbeddedXADataSource (where the database instance runs in the same JVM) and ClientXADataSource (where the application connects to a remote database instance). The current example uses EmbeddedXADataSource.
Auto-enlisting an XA data source
Prerequisites
Steps to define a Derby datasource
- Use the quickstart archetype to create a basic Maven project. Maven provides archetypes, which serve as templates for creating new projects. The Maven quickstart archetype is a basic archetype, providing the bare outline of a new Maven project.To create a new project for the Derby datasource bundle, invoke the Maven archetype plug-in as follows. Open a new command prompt, change directory to a convenient location (that is, to the directory where you will store your Maven projects), and enter the following command:
mvn archetype:generate
  -DarchetypeArtifactId=maven-archetype-quickstart
  -DgroupId=org.fusesource.example
  -DartifactId=derby-ds
mvn archetype:generate
  -DarchetypeArtifactId=maven-archetype-quickstart
  -DgroupId=org.fusesource.example
  -DartifactId=derby-ds
Copy to Clipboard Copied! Toggle word wrap Toggle overflow NoteThe preceding command parameters are shown on separate lines for ease of reading. You must enter the entire command on a single line, however.After downloading the requisite dependencies to run the quickstart archetype, the command creates a new Maven project for theorg.fusesource.example/derby-dsartifact under thederby-dsdirectory. - Change the project packaging type to
bundle. Under thederby-dsdirectory, open thepom.xmlfile with a text editor and change the contents of thepackagingelement fromjartobundle, as shown in the following highlighted line:Copy to Clipboard Copied! Toggle word wrap Toggle overflow - Add the bundle configuration to the POM. In the
pom.xmlfile, add the followingbuildelement as a child of theprojectelement:Copy to Clipboard Copied! Toggle word wrap Toggle overflow - Customize the Maven compiler plug-in to enforce JDK 1.7 coding syntax. In the
pom.xmlfile, add the followingpluginelement as a child of thepluginselement, to configure the Maven compiler plug-in:Copy to Clipboard Copied! Toggle word wrap Toggle overflow - Add the Derby dependency to the POM and add the
derby-versionproperty to specify the version of Derby you are using. In thepom.xmlfile, add thederby-versionelement and thedependencyelement as shown:Copy to Clipboard Copied! Toggle word wrap Toggle overflow ImportantRemember to customize thederby-versionproperty to the version of Derby you are using. - Instantiate the Derby database instance and export the datasource as an OSGi service. In fact, this example exports two datasources: an XA datasource and a non-transactional datasource. The Derby datasources are exported using a blueprint XML file, which must be stored in the standard location,
OSGI-INF/blueprint/. Under thederby-dsproject directory, create thedataSource.xmlblueprint file in the following location:src/main/resources/OSGI-INF/blueprint/dataSource.xml
src/main/resources/OSGI-INF/blueprint/dataSource.xmlCopy to Clipboard Copied! Toggle word wrap Toggle overflow Using your favorite text editor, add the following contents to thedataSource.xmlfile:Copy to Clipboard Copied! Toggle word wrap Toggle overflow In the definition of thederbyXADataSourcebean, thedatabaseNameproperty identifies the database instance that is created (in this case,txXaTutorial).The firstserviceelement exports the XA datasource as an OSGi service with the interface,javax.sql.XADataSource. The following service properties are defined:datasource.name- Identifies this datasource unambiguously when it is referenced from other OSGi bundles.
aries.xa.name- Defines a unique XA resource name, which is used by the Aries transaction manager to identify this JDBC resource. This property must be defined in order to support XA recovery.
The secondserviceelement defines a non-transactional datasource as an OSGi service with the interfacejavax.sql.DataSource. - To build the
derby-dsbundle and install it in the local Maven repository, enter the following Maven command from thederby-dsdirectory:mvn install
mvn installCopy to Clipboard Copied! Toggle word wrap Toggle overflow
10.4. Define a Transactional Route
Overview
AccountService class (see Appendix A), implementing a transfer of funds from one account to another, where the account data is stored in an Apache Derby database instance.
Database schema
name column (identifying the account holder) and the amount column (specifying the amount of money left in the account). Formally, the schema is defined by the following SQL command:
CREATE TABLE accounts (name VARCHAR(50), amount INT);
CREATE TABLE accounts (name VARCHAR(50), amount INT);Sample incoming message
Major Clanger account and 90 units should be added to the Tiny Clanger account.
The transactional route
AccountService.credit and AccountService.debit bean methods (which access the Derby database). The AccountService.dumpTable method then dumps the complete contents of the database table into the current exchange and the route sends this to the statusLog queue.
Provoking a transaction rollback
AccountService.debit method imposes a limit of 100 on the amount that can be withdrawn from any account and throws an exception if this limit is exceeded. This provides a simple means of provoking a transaction rollback, by sending a message containing a transfer request that exceeds 100.
Steps to define a transactional route
- Use the quickstart archetype to create a basic Maven project for the route bundle. Open a new command prompt, change directory to a convenient location, and enter the following command:
mvn archetype:generate -DarchetypeArtifactId=maven-archetype-quickstart -DgroupId=org.fusesource.example -DartifactId=tx-xa
mvn archetype:generate -DarchetypeArtifactId=maven-archetype-quickstart -DgroupId=org.fusesource.example -DartifactId=tx-xaCopy to Clipboard Copied! Toggle word wrap Toggle overflow The preceding command creates a new Maven project for theorg.fusesource.example/tx-xaartifact under thetx-xadirectory. - Change the project packaging type to
bundle. Under thetx-xadirectory, open thepom.xmlfile with a text editor and change the contents of thepackagingelement fromjartobundle, as shown in the following highlighted line:Copy to Clipboard Copied! Toggle word wrap Toggle overflow - Add the bundle configuration to the POM. In the
pom.xmlfile, add the followingbuildelement as a child of theprojectelement:Copy to Clipboard Copied! Toggle word wrap Toggle overflow - Customize the Maven compiler plug-in to enforce JDK 1.7 coding syntax. In the
pom.xmlfile, add the followingpluginelement as a child of thepluginselement, to configure the Maven compiler plug-in:Copy to Clipboard Copied! Toggle word wrap Toggle overflow - Add the JBoss Fuse Bill of Materials (BOM) as the parent POM. The JBoss Fuse BOM defines version properties (for example,
camel-version,spring-version, and so on) for all of the JBoss Fuse components, which makes it easy to specify the correct versions for the Maven dependencies. Add the followingparentelement near the top of your POM and (if necessary) customize the version of the BOM:Copy to Clipboard Copied! Toggle word wrap Toggle overflow - Add the required Maven dependencies to the POM and specify the
derby-versionproperty. In thepom.xmlfile, add the following elements as children of theprojectelement:Copy to Clipboard Copied! Toggle word wrap Toggle overflow ImportantRemember to customize thederby-versionproperty to the version of Derby you are using. - Define the
AccountServiceclass. Under thetx-xaproject directory, create the following directory:src/main/java/org/fusesource/example/tx/xa
src/main/java/org/fusesource/example/tx/xaCopy to Clipboard Copied! Toggle word wrap Toggle overflow Create the file,AccountService.java, in this directory and add the contents of the listing from Example B.1, “The AccountService Class” to this file. - Define the beans and resources needed by the route in a Blueprint XML file. Under the
tx-xaproject directory, create the following directory:src/main/resources/OSGI-INF/blueprint
src/main/resources/OSGI-INF/blueprintCopy to Clipboard Copied! Toggle word wrap Toggle overflow Using a text editor, create the file,beans.xml, in this directory and add the following contents to the file:Copy to Clipboard Copied! Toggle word wrap Toggle overflow ImportantIn thejmsConnectionFactorybean and in thejmsXaConnectionFactorybean, you must customize the JAAS user credentials,UserNameandPassword, that are used to log into the broker. You can use any JAAS user with theadminrole (usually defined in theetc/users.propertiesfile of your JBoss Fuse installation). - Define the transactional route. In the
src/main/resources/OSGI-INF/blueprintdirectory, create the new file,camelContext.xml, and add the following contents:Copy to Clipboard Copied! Toggle word wrap Toggle overflow ImportantReplace PathNameToMsgDir with the absolute path name of a temporary directory. When the application is running, you will use this directory as a convenient way of feeding XML messages into the route. - To build the
tx-xabundle and install it in the local Maven repository, enter the following Maven command from thetx-xadirectory:mvn install
mvn installCopy to Clipboard Copied! Toggle word wrap Toggle overflow
10.5. Deploy and Run the Transactional Route
Overview
Steps to deploy and run the transactional route
- Create the Derby database instance for the tutorial and create the
accountstable, as follows:- Open a command prompt and change directory to the Derby system directory that you specified earlier (that is, the value of the
derby.system.homesystem property). - Start the Derby database client utility,
ij, by entering the following command:ij
ijCopy to Clipboard Copied! Toggle word wrap Toggle overflow NoteBy default,ijtakes the current working directory to be the Derby system directory. - Create the
txXaTutorialdatabase instance, by entering the followingijcommand:ij> CONNECT 'jdbc:derby:txXaTutorial;create=true';
ij> CONNECT 'jdbc:derby:txXaTutorial;create=true';Copy to Clipboard Copied! Toggle word wrap Toggle overflow - Create the
accountstable and create two sample row entries, by entering the following sequence ofijcommands:ij> CREATE TABLE accounts (name VARCHAR(50), amount INT); ij> INSERT INTO accounts (name,amount) VALUES ('Major Clanger',2000); ij> INSERT INTO accounts (name,amount) VALUES ('Tiny Clanger',100);ij> CREATE TABLE accounts (name VARCHAR(50), amount INT); ij> INSERT INTO accounts (name,amount) VALUES ('Major Clanger',2000); ij> INSERT INTO accounts (name,amount) VALUES ('Tiny Clanger',100);Copy to Clipboard Copied! Toggle word wrap Toggle overflow - Exit
ij, by entering the following command (don't forget the semicolon):ij> EXIT;
ij> EXIT;Copy to Clipboard Copied! Toggle word wrap Toggle overflow
- Open a new command prompt and start the JBoss Fuse OSGi container by entering the following command:
./fuse
./fuseCopy to Clipboard Copied! Toggle word wrap Toggle overflow - Install the
transactionfeature into the OSGi container. Enter the following console command:JBossFuse:karaf@root> features:install transaction
JBossFuse:karaf@root> features:install transactionCopy to Clipboard Copied! Toggle word wrap Toggle overflow - Install the
connectorfeature, which provides automatic XA datasource enlisting (Aries datasource wrapper). Enter the following console command:JBossFuse:karaf@root> features:install connector
JBossFuse:karaf@root> features:install connectorCopy to Clipboard Copied! Toggle word wrap Toggle overflow - Install the
spring-jdbcfeature into the OSGi container. Enter the following console command:JBossFuse:karaf@root> features:install spring-jdbc
JBossFuse:karaf@root> features:install spring-jdbcCopy to Clipboard Copied! Toggle word wrap Toggle overflow - Install the
derbybundle into the OSGi container. Enter the following console command, replacing the bundle version with whatever version of Derby you are using:JBossFuse:karaf@root> install mvn:org.apache.derby/derby/10.10.1.1
JBossFuse:karaf@root> install mvn:org.apache.derby/derby/10.10.1.1Copy to Clipboard Copied! Toggle word wrap Toggle overflow - Install and start the
derby-dsbundle (assuming that you have already built the bundle, as described in Section 10.3, “Define a Derby Datasource”) by entering the following console command:JBossFuse:karaf@root> install -s mvn:org.fusesource.example/derby-ds/1.0-SNAPSHOT
JBossFuse:karaf@root> install -s mvn:org.fusesource.example/derby-ds/1.0-SNAPSHOTCopy to Clipboard Copied! Toggle word wrap Toggle overflow - To check that the datasources have been successfully exported from the
derby-dsbundle, list thederby-dsservices using theosgi:lscommand. For example, given that BundleID is the bundle ID for thederby-dsbundle, you would enter the following console command:JBossFuse:karaf@root> osgi:ls BundleID
JBossFuse:karaf@root> osgi:ls BundleIDCopy to Clipboard Copied! Toggle word wrap Toggle overflow Amongst the exported services, you should see an entry like the following:Copy to Clipboard Copied! Toggle word wrap Toggle overflow This is the wrapped XA datasource (recognizable from thearies.xa.aware = truesetting), which is automatically created by the Aries wrapper feature (see Apache Aries Auto-Enlisting XA Wrapper). - Install and start the
tx-xabundle, by entering the following console command:JBossFuse:karaf@root> install -s mvn:org.fusesource.example/tx-xa
JBossFuse:karaf@root> install -s mvn:org.fusesource.example/tx-xaCopy to Clipboard Copied! Toggle word wrap Toggle overflow - Create a file called
giro1.xmlin any convenient directory and use a text editor to add the following message contents to it:Copy to Clipboard Copied! Toggle word wrap Toggle overflow Now copygiro1.xmlinto the PathNameToMsgDir directory you created earlier (see Section 10.4, “Define a Transactional Route”). Thegiro1.xmlfile should disappear immediately after it is copied, because the PathNameToMsgDir is being monitored by the feeder route. - Use the Fuse Management Console to see what has happened to the message from
giro1.xml. User your browser to navigate to the following URL: http://localhost:8181/hawtio. Login to the console using any valid JAAS username/password credentials (which are normally defined in theetc/users.propertiesfile). - On the main menu bar, click on the ActiveMQ tab. In the left-hand pane of this view, drill down to the
statusLogqueue, as shown.Figure 10.1. View of the statusLog Queue in Hawtio
- On the menu bar above the right-hand pane, click Browse to browse the messages in the
statusLogqueue and click on the first message to view its contents. The body contains the most recent result of calling theAccountService.dumpTable()method (which is called in the last step of the transactional route).Figure 10.2. Browsing Message Contents in the statusLog Queue
- You can also force a transaction rollback by sending a message that exceeds the
AccountService.debit()limit (withdrawal limit) of 100. For example, create the filegiro2.xmland add the following message contents to it:Copy to Clipboard Copied! Toggle word wrap Toggle overflow When you copy this file into the PathNameToMsgDir directory, the message never propagates through to thestatusLogqueue, because the transaction gets rolled back.

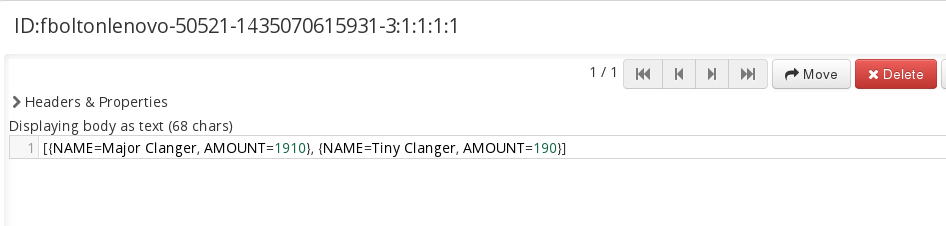
Appendix A. Optimizing Performance of JMS Single- and Multiple-Resource Transactions
Abstract
Optimization tips for all JMS transactions
- When working with Spring JMS/
camel-jms, use a pooling-enabled Connection Factory, such as ActiveMQ’sPooledConnectionFactory, to prevent clients from reopening JMS connections to the broker for each message consumed. - When using
camel-jmsto do local transactions through an external transaction manager, configure the transaction manager to use a pooling-enabled Connection Factory. - ActiveMQ’s
PooledConnectionFactoryeagerly fills the internal connection pool, the size of which is bound by the maxConnections property setting.Each call toPooledConnectionFactory.createConnection()creates and adds a new connection to the pool until maxConnections is reached, regardless of the number of connections in use. Once maxConnections is reached, the pool hands out only connections it recycles. So different JMS sessions (in different threads) can potentially share the same JMS connection, which the JMS specification specifically allows.NoteThePooledConnectionFactoryalso pools JMS sessions, but the session pool behaves differently than the connection pool. The session pool creates new sessions only when there are no free sessions in it. - A
camel-jmsconsumer configuration needs only one JMS connection from the connection pool, regardless of the setting of the concurrentConsumers property. As multiple camel routes can share the samePooledConnectionFactory, you can configure the pool’s maxConnections property equal to the number of Camel routes sharing it. - For local (transacted="true") JMS transaction using the
activemqcomponent, duplicate messages can occur on failover from master to slave. To prevent this from happening, set the lazyCreateTransactionManager property tofalse. NOTE: Do not set this property tofalsefor XA transactions
Optimization tips for JMS XA transactions
- With XA transactions, you must use CACHE_NONE or CACHE_CONNECTION in
camel-jmsor plain Spring JMS configurations. As CACHE_CONSUMER is not supported in these configurations, you need to use a pooling-enabled JMS Connection Factory to avoid opening a new connection for every message consumed. - Configure a
prefetchof1on the ActiveMQ ConnectionFactory when not caching JMS consumers to eliminate any overhead generated by eager dispatch of messages to consumers. For example,failover:(tcp://localhost:61616)?jms.prefetchPolicy.all=1
failover:(tcp://localhost:61616)?jms.prefetchPolicy.all=1Copy to Clipboard Copied! Toggle word wrap Toggle overflow - When working with JMS providers other than ActiveMQ, wrap the 3rd-party JMS drivers in the generic XA-aware JcaPooledConnectionFactory (for details, see Section 6.6, “Generic XA-Aware Connection Pool Library”). For example, to wrap a WebSphereMQ endpoint:
Copy to Clipboard Copied! Toggle word wrap Toggle overflow The wrapper provides the means for the Aries/Geronimo transaction manager to access and write the name of the participating WebSphereMQ resource to its HOWL recovery log file. This and other information stored in its recovery log file enables Aries to recover any pending transactions after a crash occurs. - Always declare a resource manager for each resource involved in an XA transaction. Without a resource manager, pending XA transactions cannot be recovered after a JBoss Fuse crash, resulting in lost messages.
Appendix B. AccountService Example
Abstract
AccountService example class illustrates how you can use Spring JdbcTemplate class to access a JDBC data source.
B.1. AccountService Example Code
Overview
AccountService class provides a simple example of accessing a data source through JDBC. The methods in this class can be used inside a local transaction or inside a global (XA) transaction.
Database schema
AccountService example requires a single database table, accounts, which has two columns: a name column (containing the account name), and an amount column (containing the dollar balance of the account). The required database schema can be created by the following SQL statement:
CREATE TABLE accounts (name VARCHAR(50), amount INT);
CREATE TABLE accounts (name VARCHAR(50), amount INT);AccountService class
AccountService class, which uses the Spring JdbcTemplate class to access a JDBC data source.
Example B.1. The AccountService Class
Index
C
- caching
J
- JMS
- cacheLevelName, Cache levels and performance
- transacted, Camel JMS component configuration
- transaction manager, Camel JMS component configuration
- transactionManager, Camel JMS component configuration
- JmsComponent, Camel JMS component configuration
- JmsConfiguration, Camel JMS component configuration
Legal Notice
Trademark Disclaimer