このコンテンツは選択した言語では利用できません。

Chapter 1. Red Hat Quay permissions model


Red Hat Quay’s permission model provides fine-grained access control over repositories and the content of those repositories, helping ensure secure collaboration and automation. Red Hat Quay administrators can grant users and robot accounts one of the following levels of access:

  • Read: Allows users, robots, and teams to pull images.
  • Write: Allows users, robots, and teams to push images.
  • Admin: Provides users, robots, and teams administrative privileges.
Note

Administrative users can delegate new permissions for existing users and teams, change existing permissions, and revoke permissions when necessary

Collectively, these levels of access provide users or robot accounts the ability to perform specific tasks, like pulling images, pushing new versions of an image into the registry, or managing the settings of a repository. These permissions can be delegated across the entire organization and on specific repositories. For example, Read permissions can be set to a specific team within the organization, while Admin permissions can be given to all users across all repositories within the organization.

1.1. Red Hat Quay teams overview

In Red Hat Quay a team is a group of users with shared permissions, allowing for efficient management and collaboration on projects. Teams can help streamline access control and project management within organizations and repositories. They can be assigned designated permissions and help ensure that members have the appropriate level of access to their repositories based on their roles and responsibilities.

1.1.1. Setting a team role by using the UI

After you have created a team, you can set the role of that team within the Organization.

Prerequisites

  • You have created a team.

Procedure

  1. On the Red Hat Quay landing page, click the name of your Organization.
  2. In the navigation pane, click Teams and Membership.
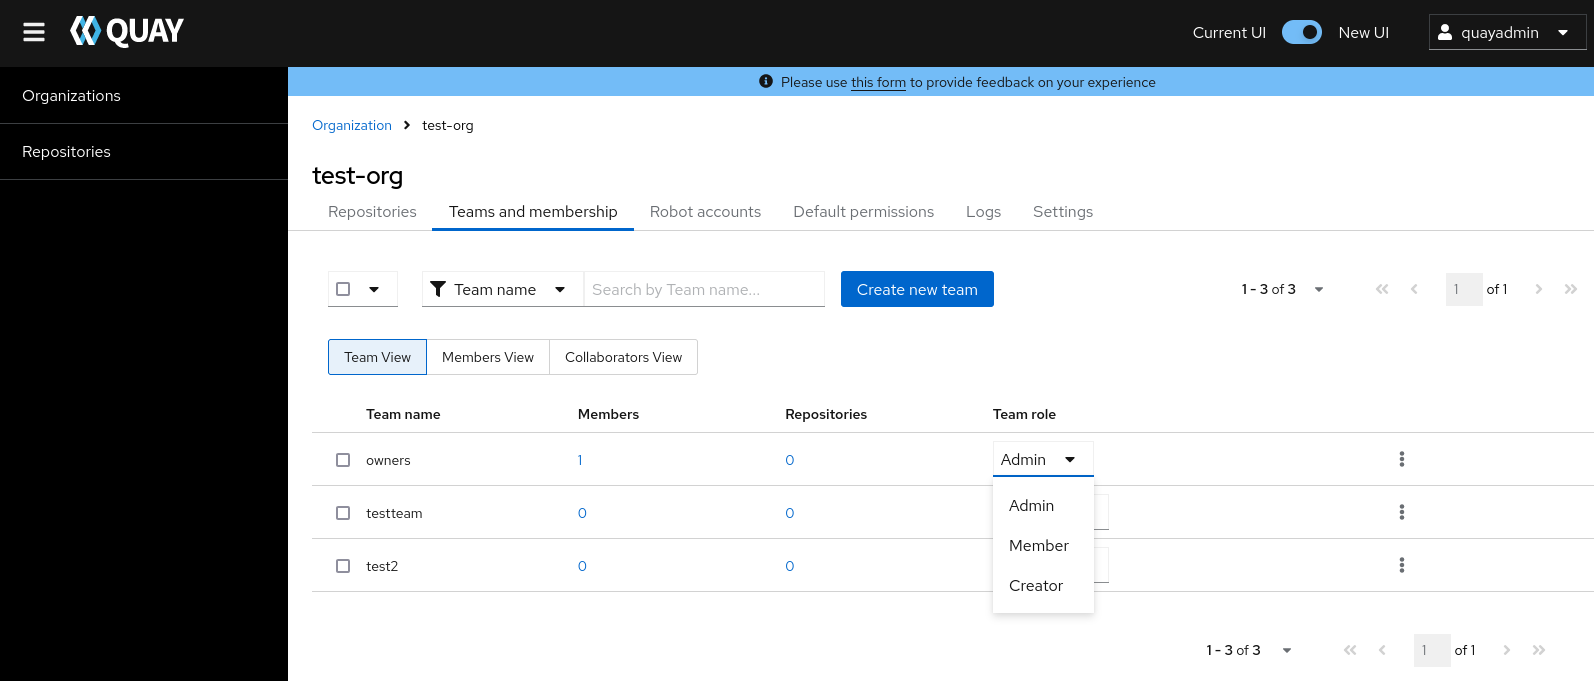
  3. Select the TEAM ROLE drop-down menu, as shown in the following figure:

    Set the role that a team has within an organization

  4. For the selected team, choose one of the following roles:

    • Admin. Full administrative access to the organization, including the ability to create teams, add members, and set permissions.
    • Member. Inherits all permissions set for the team.
    • Creator. All member permissions, plus the ability to create new repositories.

1.1.1.1. Managing team members and repository permissions

Use the following procedure to manage team members and set repository permissions.

  • On the Teams and membership page of your organization, you can also manage team members and set repository permissions.

    • Click the kebab menu, and select one of the following options:
    • Manage Team Members. On this page, you can view all members, team members, robot accounts, or users who have been invited. You can also add a new team member by clicking Add new member.
    • Set repository permissions. On this page, you can set the repository permissions to one of the following:

      • None. Team members have no permission to the repository.
      • Read. Team members can view and pull from the repository.
      • Write. Team members can read (pull) from and write (push) to the repository.
      • Admin. Full access to pull from, and push to, the repository, plus the ability to do administrative tasks associated with the repository.
    • Delete. This popup windows allows you to delete the team by clicking Delete.

1.1.2. Setting the role of a team within an organization by using the API

Use the following procedure to view and set the role a team within an organization using the API.

Prerequisites

Procedure

  1. Enter the following GET /api/v1/organization/{orgname}/team/{teamname}/permissions command to return a list of repository permissions for the organization’s team. Note that your team must have been added to a repository for this command to return information.

    $ curl -X GET \
      -H "Authorization: Bearer <your_access_token>" \
      "<quay-server.example.com>/api/v1/organization/<organization_name>/team/<team_name>/permissions"

    Example output

    {"permissions": [{"repository": {"name": "api-repo", "is_public": true}, "role": "admin"}]}

  2. You can create or update a team within an organization to have a specified role of admin, member, or creator using the PUT /api/v1/organization/{orgname}/team/{teamname} command. For example:

    $ curl -X PUT \
      -H "Authorization: Bearer <your_access_token>" \
      -H "Content-Type: application/json" \
      -d '{
        "role": "<role>"
      }' \
      "<quay-server.example.com>/api/v1/organization/<organization_name>/team/<team_name>"

    Example output

    {"name": "testteam", "description": "", "can_view": true, "role": "creator", "avatar": {"name": "testteam", "hash": "827f8c5762148d7e85402495b126e0a18b9b168170416ed04b49aae551099dc8", "color": "#ff7f0e", "kind": "team"}, "new_team": false}

1.2. Creating and managing default permissions by using the UI

Default permissions define permissions that should be granted automatically to a repository when it is created, in addition to the default of the repository’s creator. Permissions are assigned based on the user who created the repository.

Use the following procedure to create default permissions using the Red Hat Quay v2 UI.

Procedure

  1. Click the name of an organization.
  2. Click Default permissions.
  3. Click Create default permissions. A toggle drawer appears.
  4. Select either Anyone or Specific user to create a default permission when a repository is created.

    1. If selecting Anyone, the following information must be provided:

      • Applied to. Search, invite, or add a user/robot/team.
      • Permission. Set the permission to one of Read, Write, or Admin.
    2. If selecting Specific user, the following information must be provided:

      • Repository creator. Provide either a user or robot account.
      • Applied to. Provide a username, robot account, or team name.
      • Permission. Set the permission to one of Read, Write, or Admin.
  5. Click Create default permission. A confirmation box appears, returning the following alert: Successfully created default permission for creator.

1.3. Creating and managing default permissions by using the API

Use the following procedures to manage default permissions using the Red Hat Quay API.

Prerequisites

Procedure

  1. Enter the following command to create a default permission with the POST /api/v1/organization/{orgname}/prototypes endpoint:

    $ curl -X POST   -H "Authorization: Bearer <bearer_token>"   -H "Content-Type: application/json"   --data '{
        "role": "<admin_read_or_write>",
        "delegate": {
          "name": "<username>",
          "kind": "user"
        },
        "activating_user": {
          "name": "<robot_name>"
        }
      }'   https://<quay-server.example.com>/api/v1/organization/<organization_name>/prototypes

    Example output

    {"activating_user": {"name": "test-org+test", "is_robot": true, "kind": "user", "is_org_member": true, "avatar": {"name": "test-org+test", "hash": "aa85264436fe9839e7160bf349100a9b71403a5e9ec684d5b5e9571f6c821370", "color": "#8c564b", "kind": "robot"}}, "delegate": {"name": "testuser", "is_robot": false, "kind": "user", "is_org_member": false, "avatar": {"name": "testuser", "hash": "f660ab912ec121d1b1e928a0bb4bc61b15f5ad44d5efdc4e1c92a25e99b8e44a", "color": "#6b6ecf", "kind": "user"}}, "role": "admin", "id": "977dc2bc-bc75-411d-82b3-604e5b79a493"}

  2. Enter the following command to update a default permission using the PUT /api/v1/organization/{orgname}/prototypes/{prototypeid} endpoint, for example, if you want to change the permission type. You must include the ID that was returned when you created the policy.

    $ curl -X PUT \
      -H "Authorization: Bearer <bearer_token>" \
      -H "Content-Type: application/json" \
      --data '{
        "role": "write"
      }' \
      https://<quay-server.example.com>/api/v1/organization/<organization_name>/prototypes/<prototypeid>

    Example output

    {"activating_user": {"name": "test-org+test", "is_robot": true, "kind": "user", "is_org_member": true, "avatar": {"name": "test-org+test", "hash": "aa85264436fe9839e7160bf349100a9b71403a5e9ec684d5b5e9571f6c821370", "color": "#8c564b", "kind": "robot"}}, "delegate": {"name": "testuser", "is_robot": false, "kind": "user", "is_org_member": false, "avatar": {"name": "testuser", "hash": "f660ab912ec121d1b1e928a0bb4bc61b15f5ad44d5efdc4e1c92a25e99b8e44a", "color": "#6b6ecf", "kind": "user"}}, "role": "write", "id": "977dc2bc-bc75-411d-82b3-604e5b79a493"}

  3. You can delete the permission by entering the DELETE /api/v1/organization/{orgname}/prototypes/{prototypeid} command:

    curl -X DELETE \
      -H "Authorization: Bearer <bearer_token>" \
      -H "Accept: application/json" \
      https://<quay-server.example.com>/api/v1/organization/<organization_name>/prototypes/<prototype_id>

    This command does not return an output. Instead, you can obtain a list of all permissions by entering the GET /api/v1/organization/{orgname}/prototypes command:

    $ curl -X GET \
      -H "Authorization: Bearer <bearer_token>" \
      -H "Accept: application/json" \
      https://<quay-server.example.com>/api/v1/organization/<organization_name>/prototypes

    Example output

    {"prototypes": []}

1.4. Adjusting access settings for a repository by using the UI

Use the following procedure to adjust access settings for a user or robot account for a repository using the v2 UI.

Prerequisites

  • You have created a user account or robot account.

Procedure

  1. Log into Red Hat Quay.
  2. On the v2 UI, click Repositories.
  3. Click the name of a repository, for example, quayadmin/busybox.
  4. Click the Settings tab.
  5. Optional. Click User and robot permissions. You can adjust the settings for a user or robot account by clicking the dropdown menu option under Permissions. You can change the settings to Read, Write, or Admin.

    • Read. The User or Robot Account can view and pull from the repository.
    • Write. The User or Robot Account can read (pull) from and write (push) to the repository.
    • Admin. The User or Robot account has access to pull from, and push to, the repository, plus the ability to do administrative tasks associated with the repository.

1.5. Adjusting access settings for a repository by using the API

Use the following procedure to adjust access settings for a user or robot account for a repository by using the API.

Prerequisites

  • You have created a user account or robot account.
  • You have Created an OAuth access token.
  • You have set BROWSER_API_CALLS_XHR_ONLY: false in your config.yaml file.

Procedure

  1. Enter the following PUT /api/v1/repository/{repository}/permissions/user/{username} command to change the permissions of a user:

    $ curl -X PUT \
      -H "Authorization: Bearer <bearer_token>" \
      -H "Content-Type: application/json" \
      -d '{"role": "admin"}' \
      https://<quay-server.example.com>/api/v1/repository/<namespace>/<repository>/permissions/user/<username>

    Example output

    {"role": "admin", "name": "quayadmin+test", "is_robot": true, "avatar": {"name": "quayadmin+test", "hash": "ca9afae0a9d3ca322fc8a7a866e8476dd6c98de543decd186ae090e420a88feb", "color": "#8c564b", "kind": "robot"}}

  2. To delete the current permission, you can enter the DELETE /api/v1/repository/{repository}/permissions/user/{username} command:

    $ curl -X DELETE \
      -H "Authorization: Bearer <bearer_token>" \
      -H "Accept: application/json" \
      https://<quay-server.example.com>/api/v1/repository/<namespace>/<repository>/permissions/user/<username>

    This command does not return any output in the CLI. Instead, you can check that the permissions were deleted by entering the GET /api/v1/repository/{repository}/permissions/user/ command:

    $ curl -X GET \
      -H "Authorization: Bearer <bearer_token>" \
      -H "Accept: application/json" \
      https://<quay-server.example.com>/api/v1/repository/<namespace>/<repository>/permissions/user/<username>/

    Example output

    {"message":"User does not have permission for repo."}

Red Hat logoGithubRedditYoutubeTwitter

詳細情報

試用、購入および販売

コミュニティー

Red Hat ドキュメントについて

Red Hat をお使いのお客様が、信頼できるコンテンツが含まれている製品やサービスを活用することで、イノベーションを行い、目標を達成できるようにします。

多様性を受け入れるオープンソースの強化

Red Hat では、コード、ドキュメント、Web プロパティーにおける配慮に欠ける用語の置き換えに取り組んでいます。このような変更は、段階的に実施される予定です。詳細情報: Red Hat ブログ.

会社概要

Red Hat は、企業がコアとなるデータセンターからネットワークエッジに至るまで、各種プラットフォームや環境全体で作業を簡素化できるように、強化されたソリューションを提供しています。

© 2024 Red Hat, Inc.