このコンテンツは選択した言語では利用できません。
Chapter 5. Managing Policies
As mentioned previously, policies define the conditions that must be satisfied before granting access to an object.
You can view all policies associated with a resource server by clicking the Policy tab when editing a resource server.
Policies

On this tab, you can view the list of previously created policies as well as create and edit a policy.
To create a new policy, in the upper right corner of the policy list, select a policy type from the Create policy dropdown list. Details about each policy type are described in this section.
5.1. User-Based Policy
You can use this type of policy to define conditions for your permissions where a set of one or more users is permitted to access an object.
To create a new user-based policy, select User in the dropdown list in the upper right corner of the policy listing.
Add a User-Based Policy

5.1.1. Configuration
Name
A human-readable and unique string identifying the policy. A best practice is to use names that are closely related to your business and security requirements, so you can identify them more easily.
Description
A string containing details about this policy.
Users
Specifies which users are given access by this policy.
Logic
The Logic of this policy to apply after the other conditions have been evaluated.
5.2. Role-Based Policy
You can use this type of policy to define conditions for your permissions where a set of one or more roles is permitted to access an object.
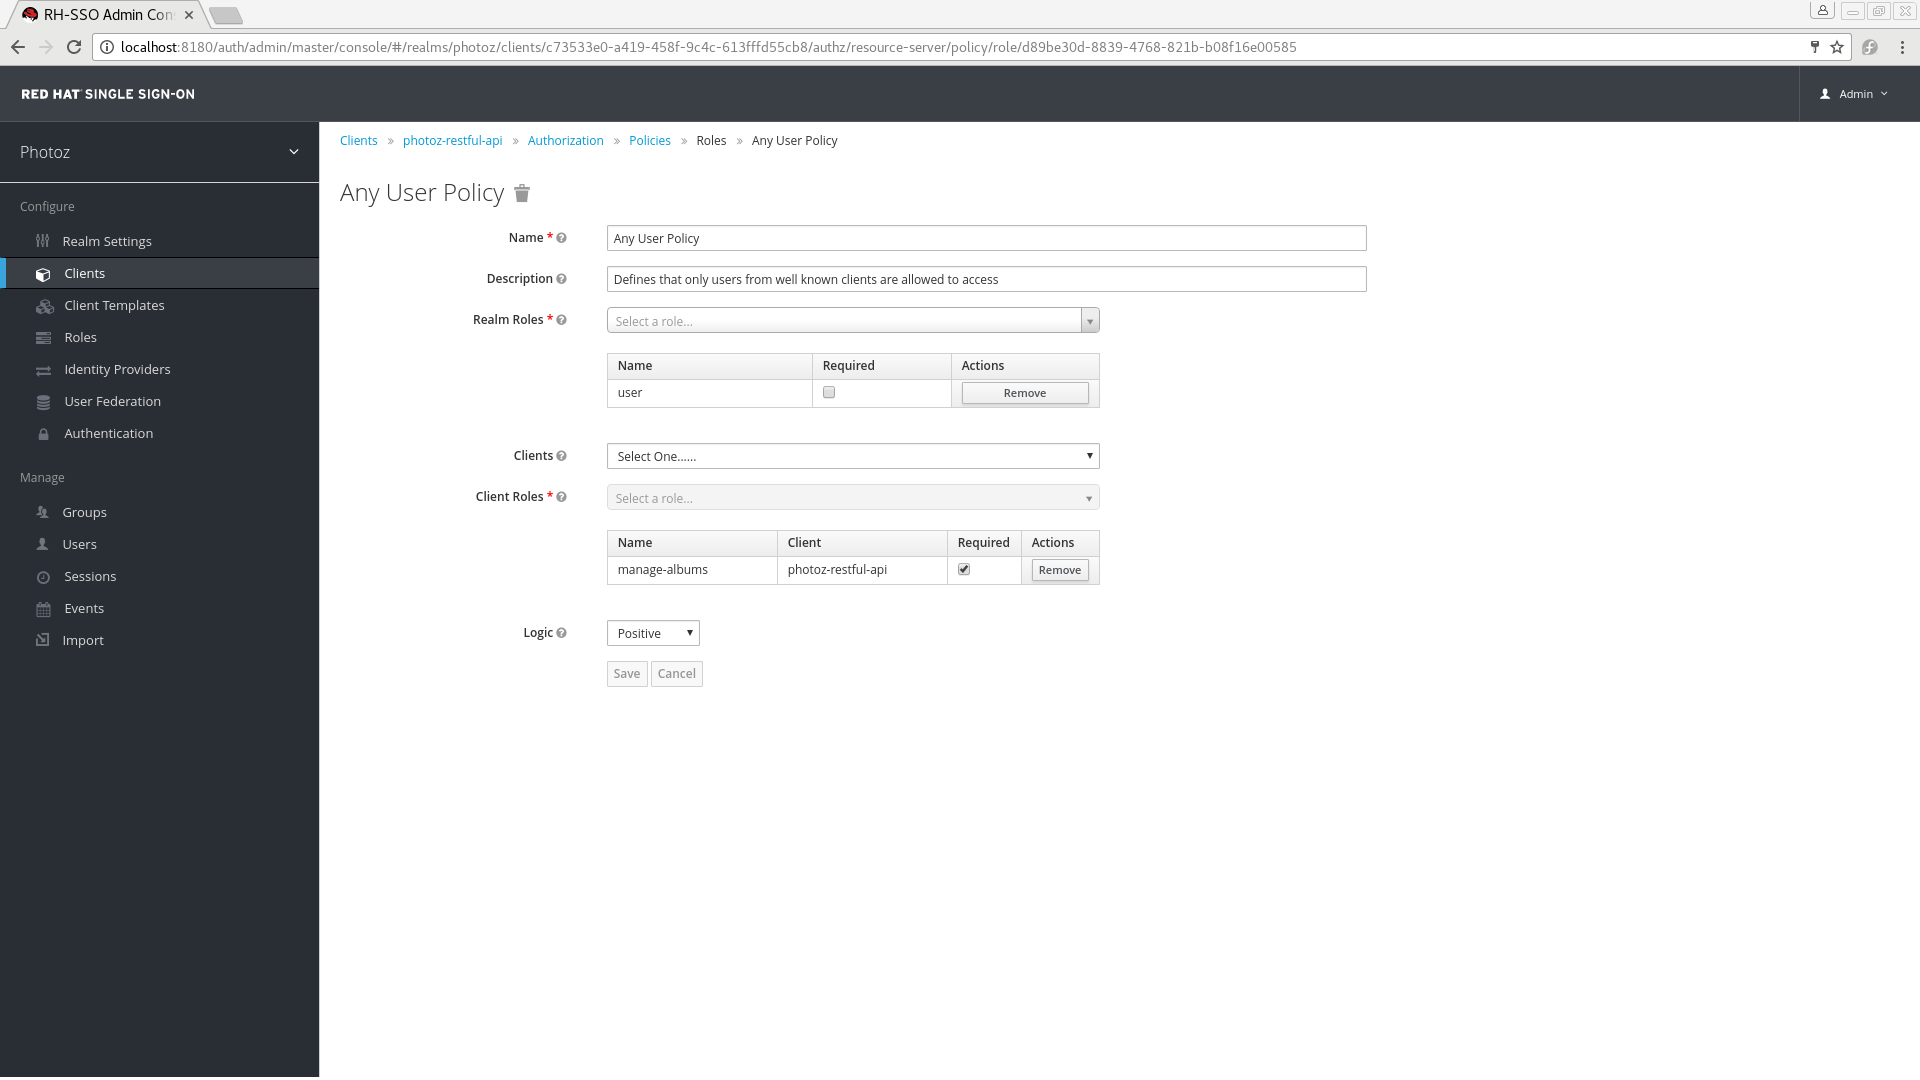
By default, roles added to this policy are not specified as required and the policy will grant access if the user requesting access has been granted any of these roles. However, you can specify a specific role as required if you want to enforce a specific role. You can also combine required and non-required roles, regardless of whether they are realm or client roles.
Role policies can be useful when you need more restricted role-based access control (RBAC), where specific roles must be enforced to grant access to an object. For instance, you can enforce that a user must consent to allowing a client application (which is acting on the user’s behalf) to access the user’s resources. You can use Red Hat Single Sign-On Client Scope Mapping to enable consent pages or even enforce clients to explicitly provide a scope when obtaining access tokens from a Red Hat Single Sign-On server.
To create a new role-based policy, select Role in the dropdown list in the upper right corner of the policy listing.
Add Role-Based Policy
5.2.1. Configuration
Name
A human-readable and unique string describing the policy. A best practice is to use names that are closely related to your business and security requirements, so you can identify them more easily.
Description
A string containing details about this policy.
Realm Roles
Specifies which realm roles are permitted by this policy.
Client Roles
Specifies which client roles are permitted by this policy. To enable this field must first select a
Client.Logic
The Logic of this policy to apply after the other conditions have been evaluated.
5.2.2. Defining a Role as Required
When creating a role-based policy, you can specify a specific role as Required. When you do that, the policy will grant access only if the user requesting access has been granted all the required roles. Both realm and client roles can be configured as such.
Example of Required Role

To specify a role as required, select the Required checkbox for the role you want to configure as required.
Required roles can be useful when your policy defines multiple roles but only a subset of them are mandatory. In this case, you can combine realm and client roles to enable an even more fine-grained role-based access control (RBAC) model for your application. For example, you can have policies specific for a client and require a specific client role associated with that client. Or you can enforce that access is granted only in the presence of a specific realm role. You can also combine both approaches within the same policy.
5.3. JavaScript-Based Policy
You can use this type of policy to define conditions for your permissions using JavaScript. It is one of the rule-based policy types supported by Red Hat Single Sign-On, and provides flexibility to write any policy based on the Evaluation API.
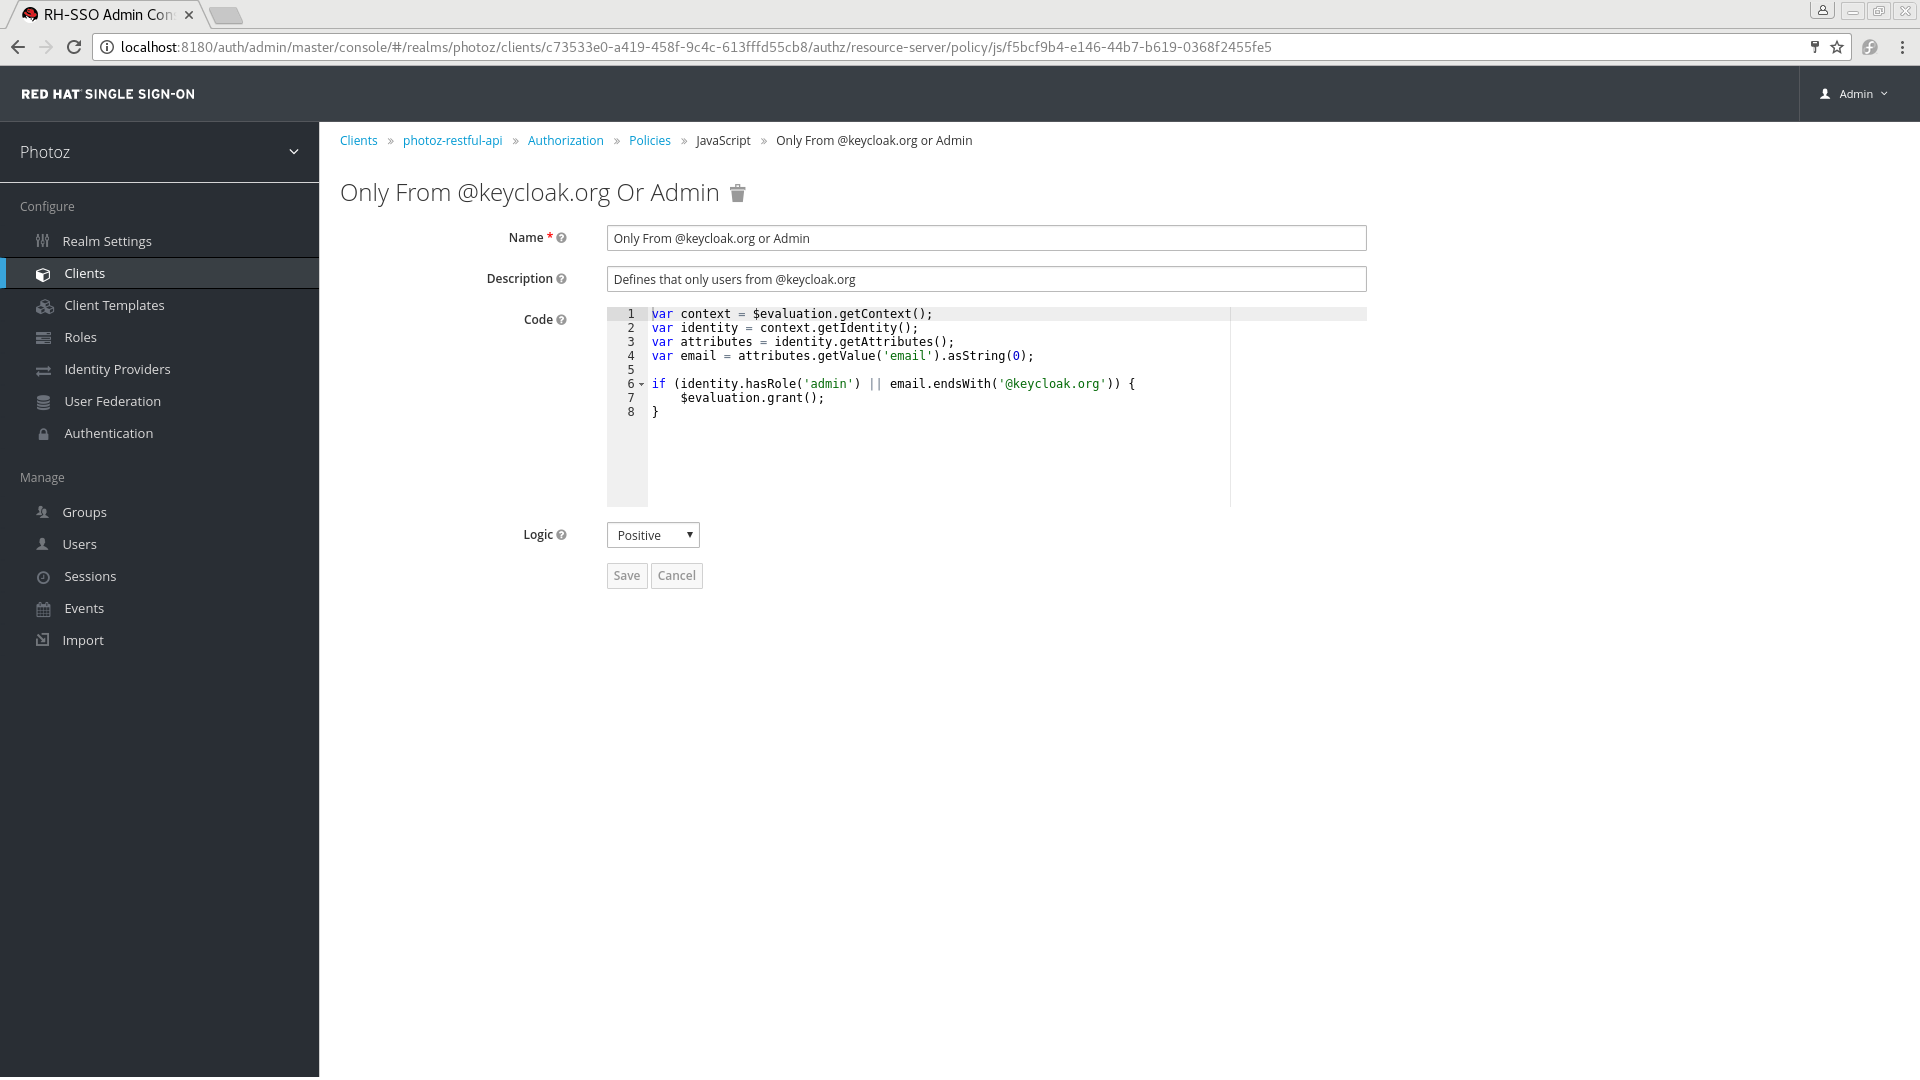
To create a new JavaScript-based policy, select JavaScript in the dropdown list in the upper right corner of the policy listing.
By default, JavaScript Policies can not be uploaded to the server. You should prefer deploying your JS Policies directly to the server as described in JavaScript Providers. If you still want to use the Red Hat Single Sign-On Administration Console to manage your JS policies you should enable the Upload Scripts feature.
Add JavaScript Policy
5.3.1. Configuration
Name
A human-readable and unique string describing the policy. A best practice is to use names that are closely related to your business and security requirements, so you can identify them more easily.
Description
A string containing details about this policy.
Code
The JavaScript code providing the conditions for this policy.
Logic
The Logic of this policy to apply after the other conditions have been evaluated.
5.3.2. Creating a JS Policy from a Deployed JAR File
Red Hat Single Sign-On allows you to deploy a JAR file in order to deploy scripts to the server. Please, take a look at JavaScript Providers for more details.
Once you have your scripts deployed, you should be able to select the scripts you deployed from the list of available policy providers.
5.3.3. Examples
5.3.3.1. Checking for attributes from the evaluation context
Here is a simple example of a JavaScript-based policy that uses attribute-based access control (ABAC) to define a condition based on an attribute obtained from the execution context:
5.3.3.2. Checking for attributes from the current identity
Here is a simple example of a JavaScript-based policy that uses attribute-based access control (ABAC) to define a condition based on an attribute obtained associated with the current identity:
Where these attributes are mapped from whatever claim is defined in the token that was used in the authorization request.
5.3.3.3. Checking for roles granted to the current identity
You can also use Role-Based Access Control (RBAC) in your policies. In the example below, we check if a user is granted with a keycloak_user realm role:
Or you can check if a user is granted with a my-client-role client role, where my-client is the client id of the client application:
5.3.3.4. Checking for roles granted to an user
To check for realm roles granted to an user:
var realm = $evaluation.getRealm();

if (realm.isUserInRealmRole('marta', 'role-a')) {
    $evaluation.grant();
}
var realm = $evaluation.getRealm();

if (realm.isUserInRealmRole('marta', 'role-a')) {
    $evaluation.grant();
}Or for client roles granted to an user:
var realm = $evaluation.getRealm();

if (realm.isUserInClientRole('marta', 'my-client', 'some-client-role')) {
    $evaluation.grant();
}
var realm = $evaluation.getRealm();

if (realm.isUserInClientRole('marta', 'my-client', 'some-client-role')) {
    $evaluation.grant();
}5.3.3.5. Checking for roles granted to a group
To check for realm roles granted to a group:
var realm = $evaluation.getRealm();

if (realm.isGroupInRole('/Group A/Group D', 'role-a')) {
    $evaluation.grant();
}
var realm = $evaluation.getRealm();

if (realm.isGroupInRole('/Group A/Group D', 'role-a')) {
    $evaluation.grant();
}5.3.3.6. Pushing arbitrary claims to the resource server
To push arbitrary claims to the resource server in order to provide additional information on how permissions should be enforced:
5.3.3.7. Checking for group membership
var realm = $evaluation.getRealm();

if (realm.isUserInGroup('marta', '/Group A/Group B')) {
    $evaluation.grant();
}
var realm = $evaluation.getRealm();

if (realm.isUserInGroup('marta', '/Group A/Group B')) {
    $evaluation.grant();
}5.3.3.8. Mixing different access control mechanisms
You can also use a combination of several access control mechanisms. The example below shows how roles(RBAC) and claims/attributes(ABAC) checks can be used within the same policy. In this case we check if user is granted with admin role or has an e-mail from keycloak.org domain:
When writing your own rules, keep in mind that the $evaluation object is an object implementing org.keycloak.authorization.policy.evaluation.Evaluation. For more information about what you can access from this interface, see the Evaluation API.
5.4. Rule-Based Policy
Drools Policy is Technology Preview and is not fully supported. This feature is disabled by default.
To enable start the server with -Dkeycloak.profile=preview or -Dkeycloak.profile.feature.authz_drools_policy=enabled . For more details see Profiles.
With this type of policy you can define conditions for your permissions using Drools, which is a rule evaluation environment. It is one of the Rule-Based policy types supported by Red Hat Single Sign-On, and provides flexibility to write any policy based on the Evaluation API.
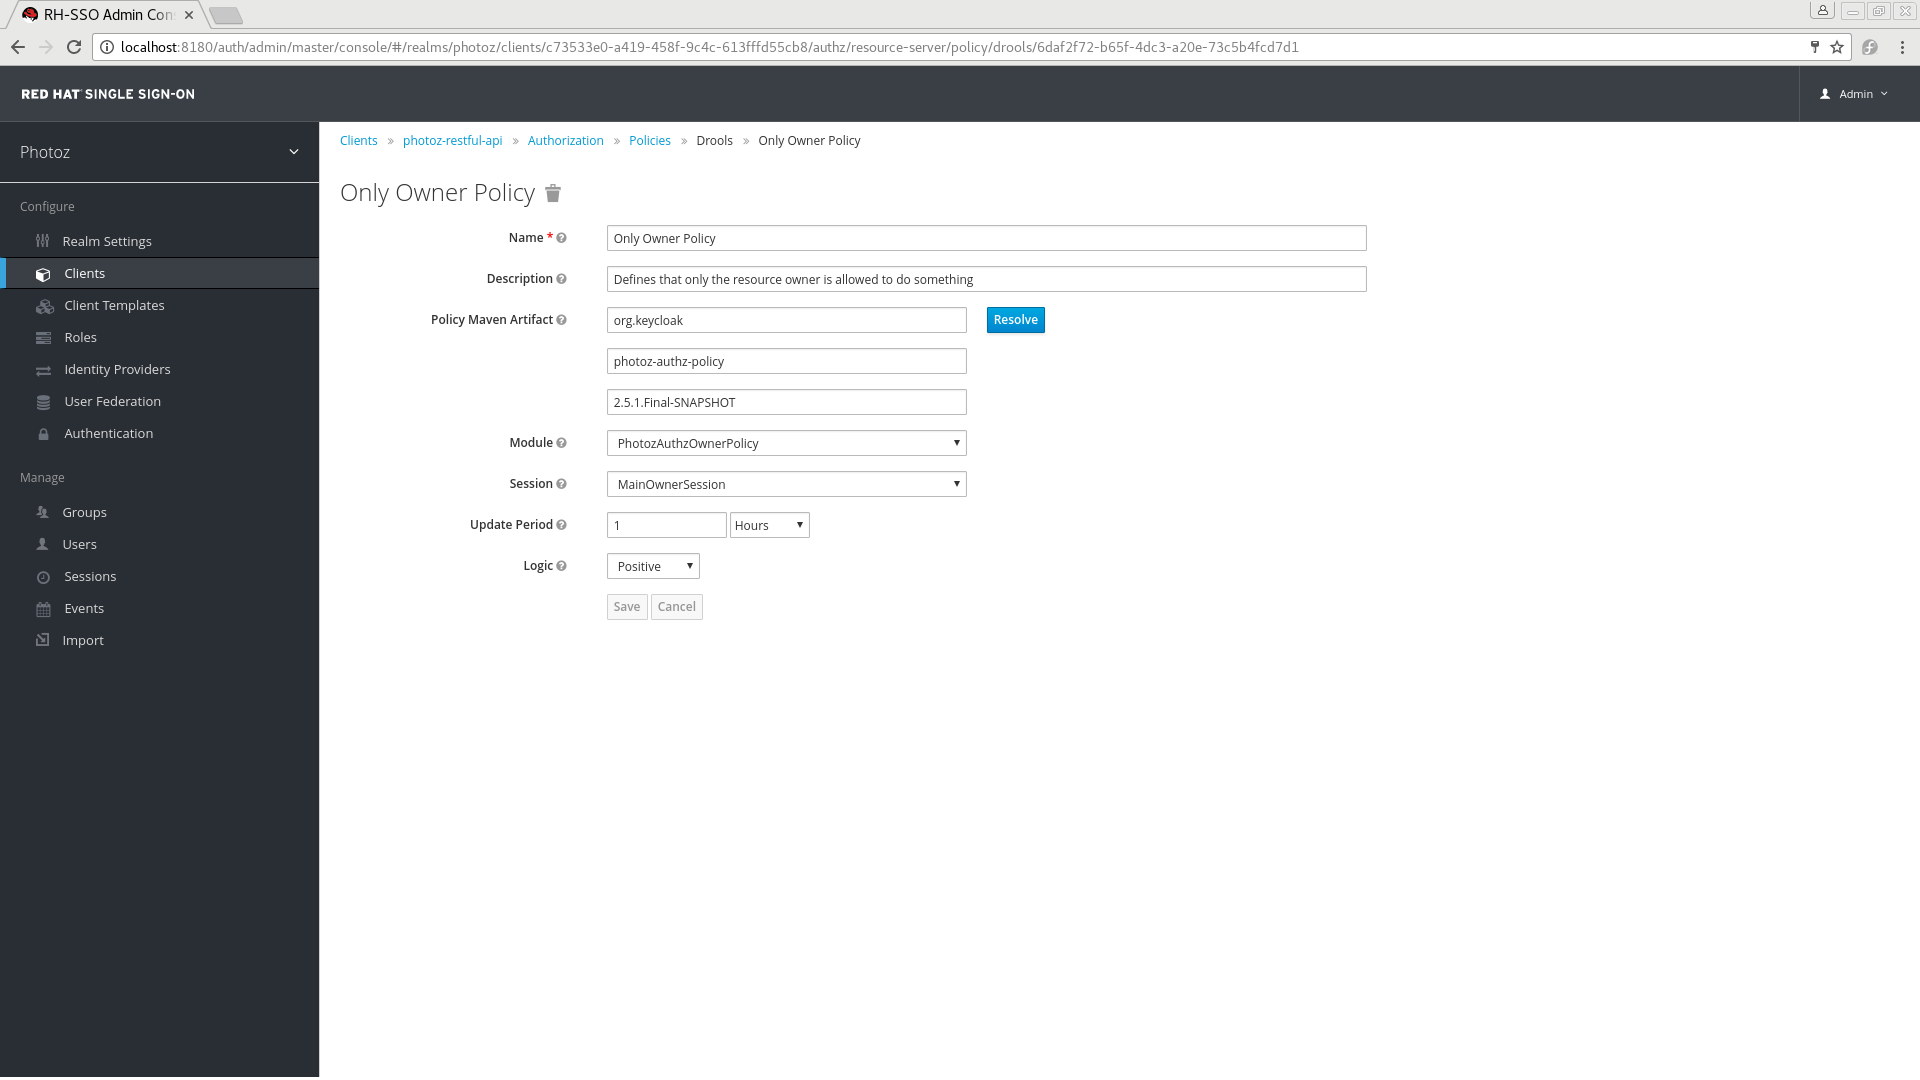
To create a new Rule-based policy, in the dropdown list in the right upper corner of the policy listing, select Rule.
Add Rule Policy
5.4.1. Configuration
Name
A human-readable and unique string describing the policy. We strongly suggest that you use names that are closely related with your business and security requirements, so you can identify them more easily and also know what they actually mean.
Description
A string with more details about this policy.
Policy Maven Artifact
A Maven groupId-artifactId-version (GAV) pointing to an artifact where the rules are defined. Once you have provided the GAV, you can click Resolve to load both Module and Session fields.
Group Id
The groupId of the artifact.
Artifact Id
The artifactId of the artifact.
Version
The version of the artifact.
Module
The module used by this policy. You must provide a module to select a specific session from which rules will be loaded.
Session
The session used by this policy. The session provides all the rules to evaluate when processing the policy.
Update Period
Specifies an interval for scanning for artifact updates.
Logic
The Logic of this policy to apply after the other conditions have been evaluated.
5.4.2. Examples
Here is a simple example of a Drools-based policy that uses attribute-based access control (ABAC) to define a condition that evaluates to a GRANT only if the authenticated user is the owner of the requested resource:
You can even use another variant of ABAC to obtain attributes from the identity and define a condition accordingly:
For more information about what you can access from the org.keycloak.authorization.policy.evaluation.Evaluation interface, see Evaluation API.
5.5. Time-Based Policy
You can use this type of policy to define time conditions for your permissions.
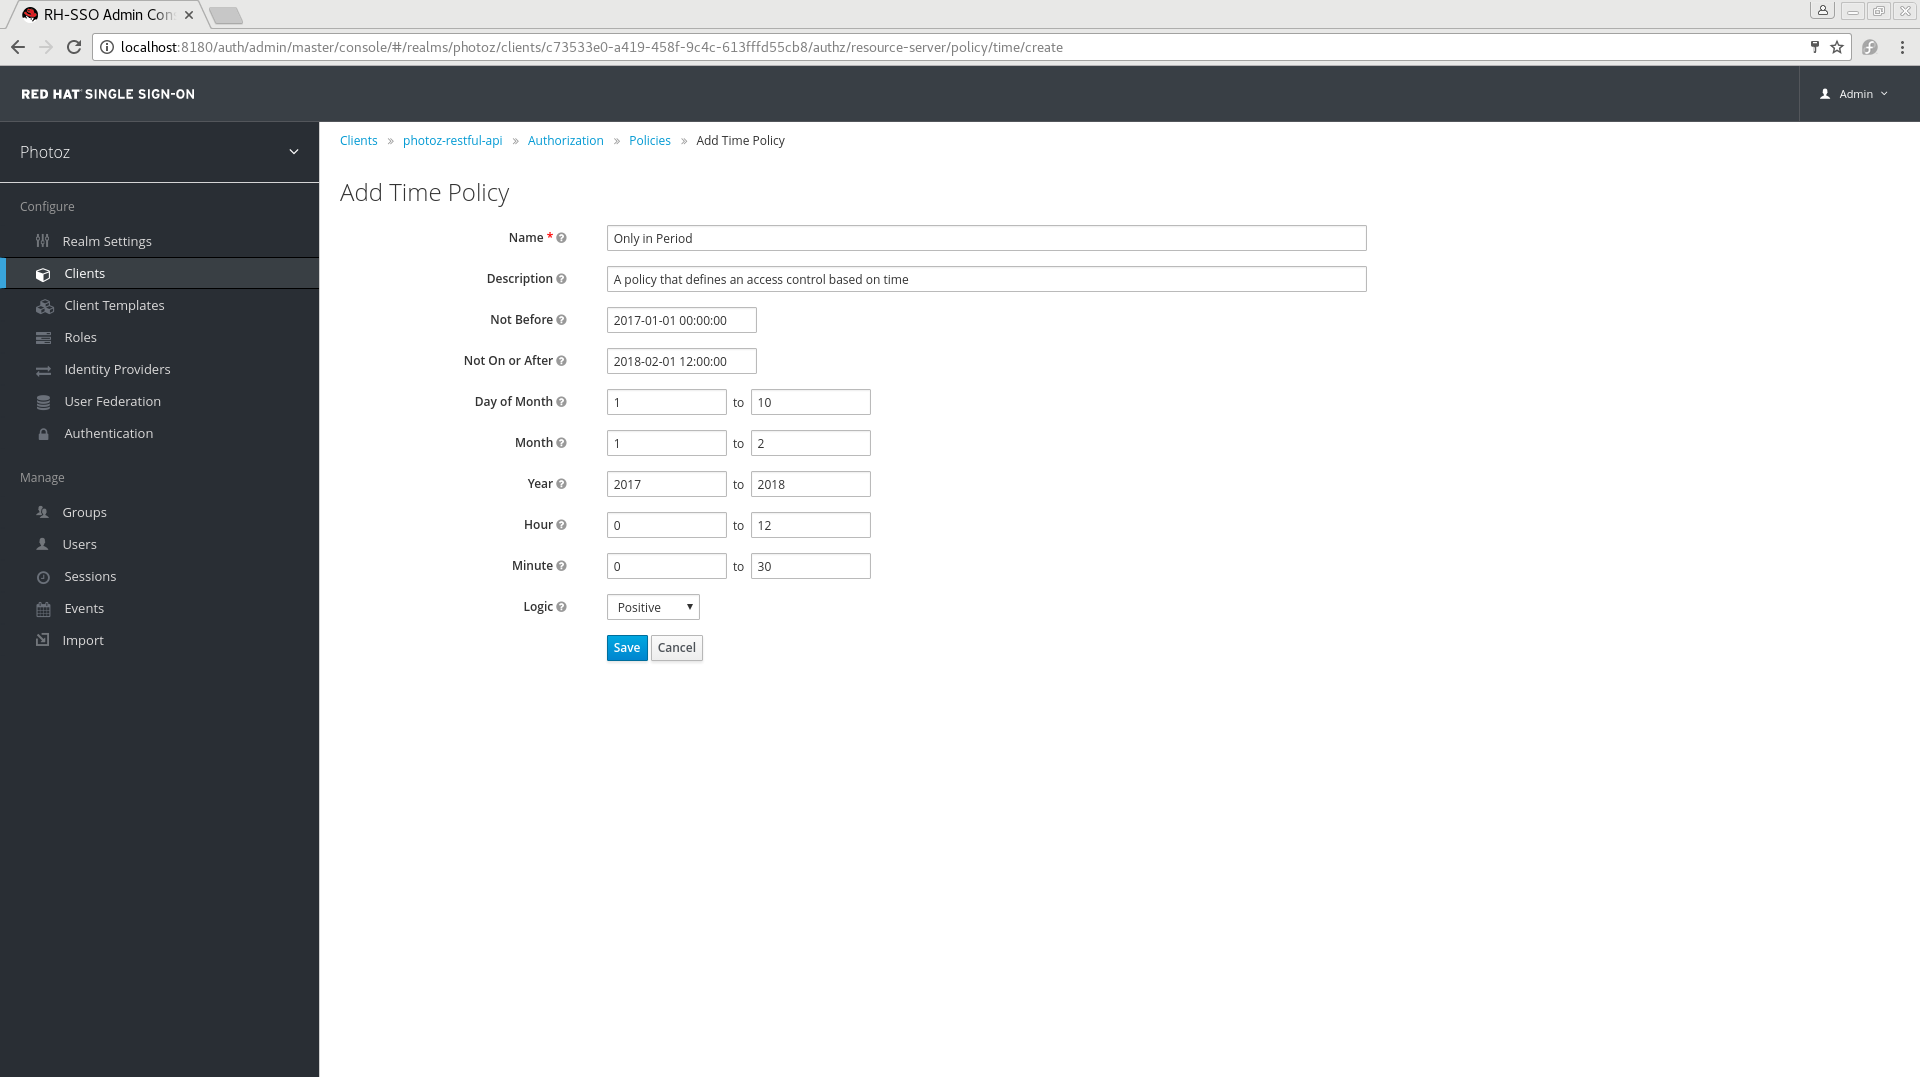
To create a new time-based policy, select Time in the dropdown list in the upper right corner of the policy listing.
Add Time Policy
5.5.1. Configuration
Name
A human-readable and unique string describing the policy. A best practice is to use names that are closely related to your business and security requirements, so you can identify them more easily.
Description
A string containing details about this policy.
Not Before
Defines the time before which access must not be granted. Permission is granted only if the current date/time is later than or equal to this value.
Not On or After
Defines the time after which access must not be granted. Permission is granted only if the current date/time is earlier than or equal to this value.
Day of Month
Defines the day of month that access must be granted. You can also specify a range of dates. In this case, permission is granted only if the current day of the month is between or equal to the two values specified.
Month
Defines the month that access must be granted. You can also specify a range of months. In this case, permission is granted only if the current month is between or equal to the two values specified.
Year
Defines the year that access must be granted. You can also specify a range of years. In this case, permission is granted only if the current year is between or equal to the two values specified.
Hour
Defines the hour that access must be granted. You can also specify a range of hours. In this case, permission is granted only if current hour is between or equal to the two values specified.
Minute
Defines the minute that access must be granted. You can also specify a range of minutes. In this case, permission is granted only if the current minute is between or equal to the two values specified.
Logic
The Logic of this policy to apply after the other conditions have been evaluated.
Access is only granted if all conditions are satisfied. Red Hat Single Sign-On will perform an AND based on the outcome of each condition.
5.6. Aggregated Policy
As mentioned previously, Red Hat Single Sign-On allows you to build a policy of policies, a concept referred to as policy aggregation. You can use policy aggregation to reuse existing policies to build more complex ones and keep your permissions even more decoupled from the policies that are evaluated during the processing of authorization requests.
To create a new aggregated policy, select Aggregated in the dropdown list located in the right upper corner of the policy listing.
Add an Aggregated Policy
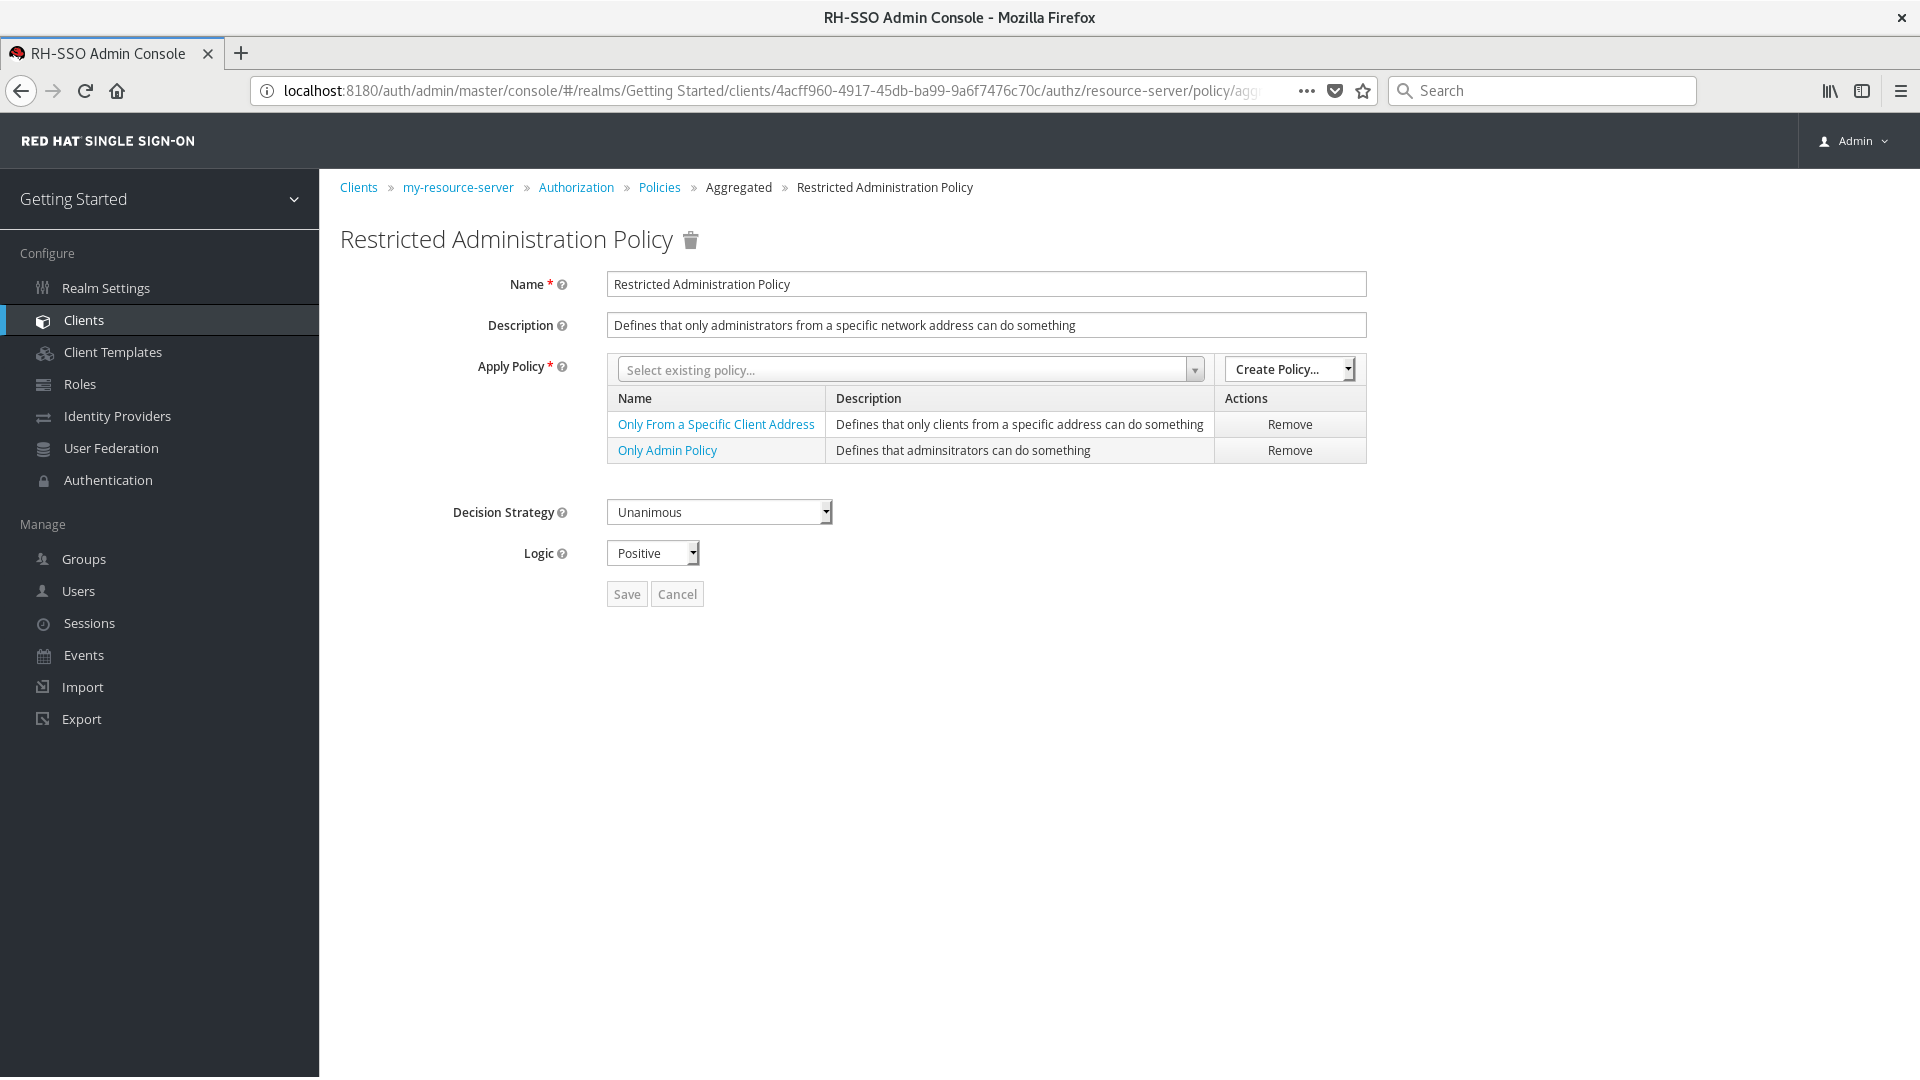
Let’s suppose you have a resource called Confidential Resource that can be accessed only by users from the keycloak.org domain and from a certain range of IP addresses. You can create a single policy with both conditions. However, you want to reuse the domain part of this policy to apply to permissions that operates regardless of the originating network.
You can create separate policies for both domain and network conditions and create a third policy based on the combination of these two policies. With an aggregated policy, you can freely combine other policies and then apply the new aggregated policy to any permission you want.
When creating aggregated policies, be mindful that you are not introducing a circular reference or dependency between policies. If a circular dependency is detected, you cannot create or update the policy.
5.6.1. Configuration
Name
A human-readable and unique string describing the policy. We strongly suggest that you use names that are closely related with your business and security requirements, so you can identify them more easily and also know what they mean.
Description
A string with more details about this policy.
Apply Policy
Defines a set of one or more policies to associate with the aggregated policy. To associate a policy you can either select an existing policy or create a new one by selecting the type of the policy you want to create.
Decision Strategy
The decision strategy for this permission.
Logic
The Logic of this policy to apply after the other conditions have been evaluated.
5.6.2. Decision Strategy for Aggregated Policies
When creating aggregated policies, you can also define the decision strategy that will be used to determine the final decision based on the outcome from each policy.
Unanimous
The default strategy if none is provided. In this case, all policies must evaluate to a positive decision for the final decision to be also positive.
Affirmative
In this case, at least one policy must evaluate to a positive decision in order for the final decision to be also positive.
Consensus
In this case, the number of positive decisions must be greater than the number of negative decisions. If the number of positive and negative decisions is the same, the final decision will be negative.
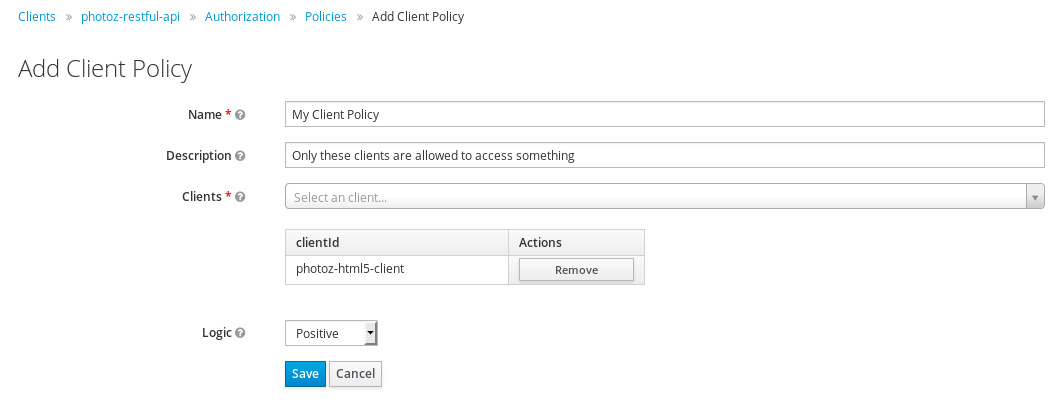
5.7. Client-Based Policy
You can use this type of policy to define conditions for your permissions where a set of one or more clients is permitted to access an object.
To create a new client-based policy, select Client in the dropdown list in the upper right corner of the policy listing.
Add a Client-Based Policy
5.7.1. Configuration
Name
A human-readable and unique string identifying the policy. A best practice is to use names that are closely related to your business and security requirements, so you can identify them more easily.
Description
A string containing details about this policy.
Clients
Specifies which clients are given access by this policy.
Logic
The Logic of this policy to apply after the other conditions have been evaluated.
5.8. Group-Based Policy
You can use this type of policy to define conditions for your permissions where a set of one or more groups (and their hierarchies) is permitted to access an object.
To create a new group-based policy, select Group in the dropdown list in the upper right corner of the policy listing.
Add Group-Based Policy

5.8.1. Configuration
Name
A human-readable and unique string describing the policy. A best practice is to use names that are closely related to your business and security requirements, so you can identify them more easily.
Description
A string containing details about this policy.
Groups Claim
Specifies the name of the claim in the token holding the group names and/or paths. Usually, authorization requests are processed based on an ID Token or Access Token previously issued to a client acting on behalf of some user. If defined, the token must include a claim from where this policy is going to obtain the groups the user is a member of. If not defined, user’s groups are obtained from your realm configuration.
Groups
Allows you to select the groups that should be enforced by this policy when evaluating permissions. After adding a group, you can extend access to children of the group by marking the checkbox Extend to Children. If left unmarked, access restrictions only applies to the selected group.
Logic
The Logic of this policy to apply after the other conditions have been evaluated.
5.8.2. Extending Access to Child Groups
By default, when you add a group to this policy, access restrictions will only apply to members of the selected group.
Under some circumstances, it might be necessary to allow access not only to the group itself but to any child group in the hierarchy. For any group added you can mark a checkbox Extend to Children in order to extend access to child groups.
Extending Access to Child Groups
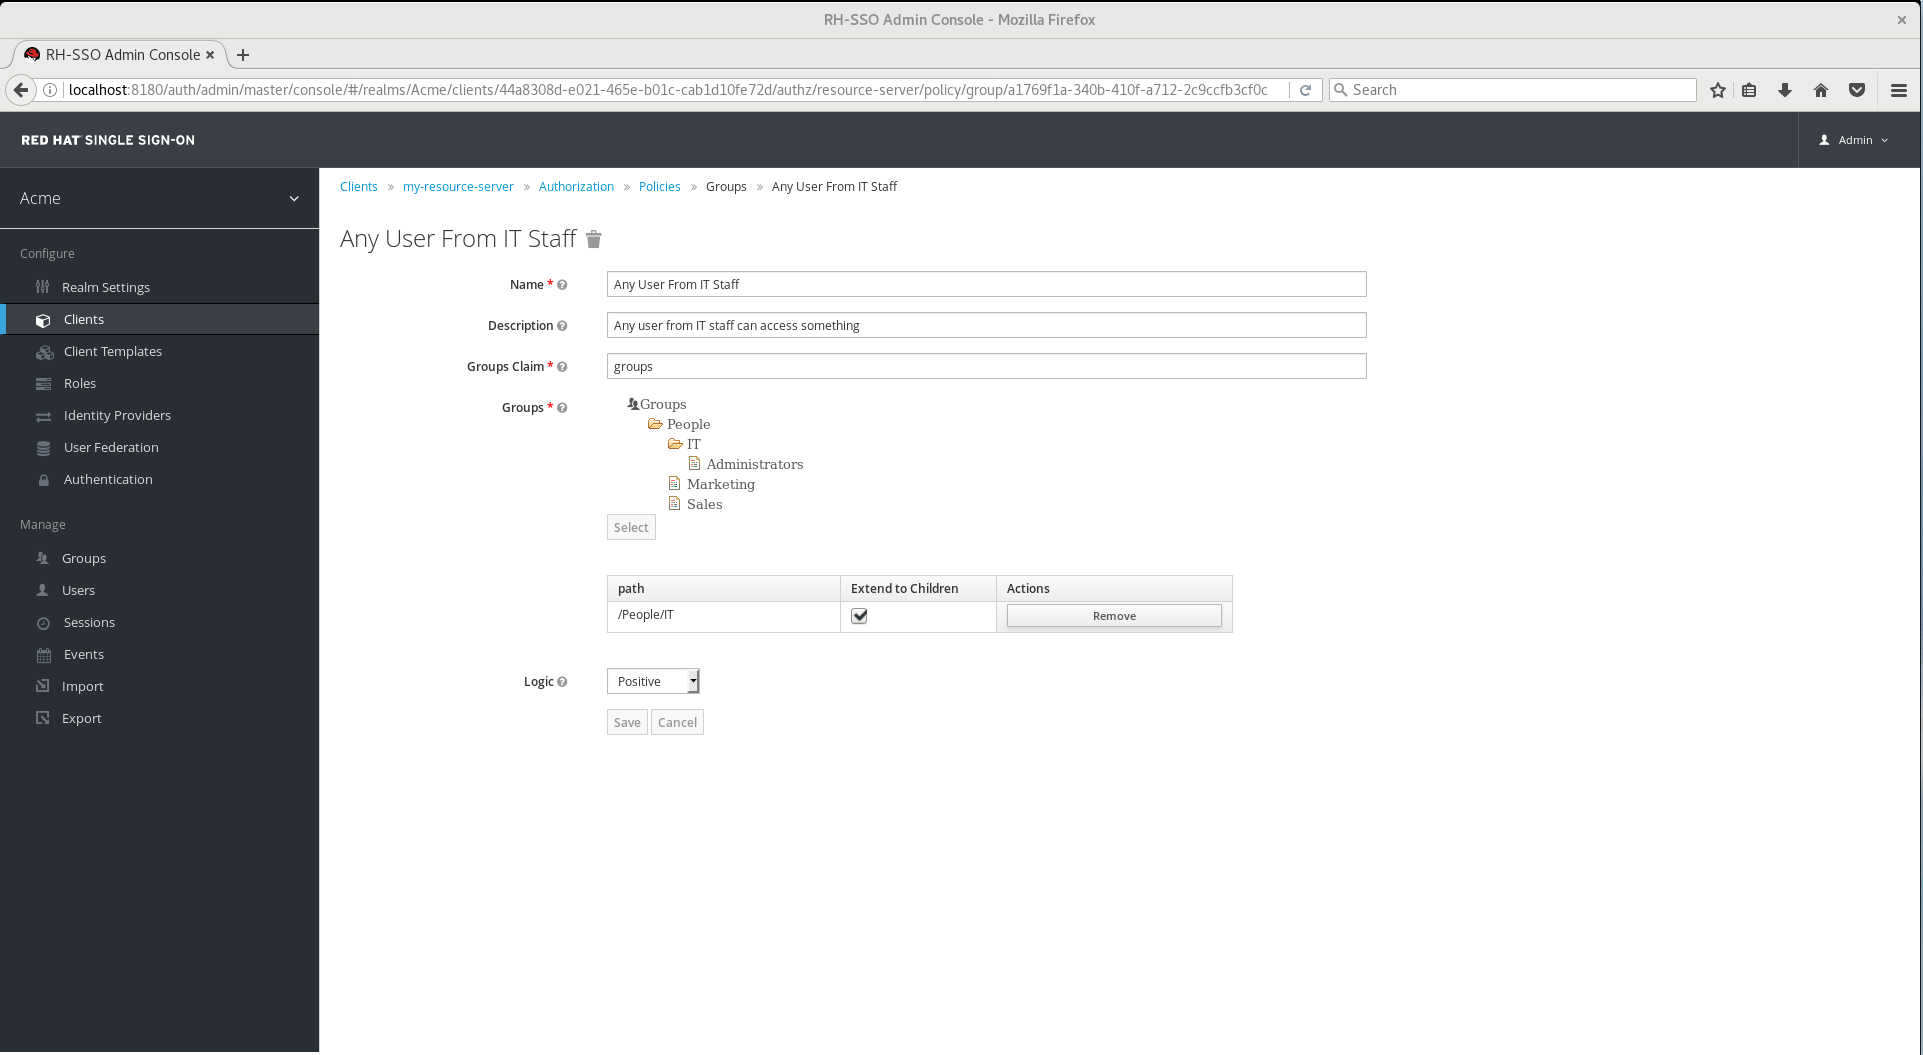
In the example above, the policy is granting access for any user member of IT or any of its children.
5.9. Positive and Negative Logic
Policies can be configured with positive or negative logic. Briefly, you can use this option to define whether the policy result should be kept as it is or be negated.
For example, suppose you want to create a policy where only users not granted with a specific role should be given access. In this case, you can create a role-based policy using that role and set its Logic field to Negative. If you keep Positive, which is the default behavior, the policy result will be kept as it is.
5.10. Policy Evaluation API
When writing rule-based policies using JavaScript or JBoss Drools, Red Hat Single Sign-On provides an Evaluation API that provides useful information to help determine whether a permission should be granted.
This API consists of a few interfaces that provide you access to information, such as
- The permission being evaluated, representing both the resource and scopes being requested.
- The attributes associated with the resource being requested
- Runtime environment and any other attribute associated with the execution context
- Information about users such as group membership and roles
The main interface is org.keycloak.authorization.policy.evaluation.Evaluation, which defines the following contract:
When processing an authorization request, Red Hat Single Sign-On creates an Evaluation instance before evaluating any policy. This instance is then passed to each policy to determine whether access is GRANT or DENY.
Policies determine this by invoking the grant() or deny() methods on an Evaluation instance. By default, the state of the Evaluation instance is denied, which means that your policies must explicitly invoke the grant() method to indicate to the policy evaluation engine that permission should be granted.
For more information about the Evaluation API see the JavaDocs.
5.10.1. The Evaluation Context
The evaluation context provides useful information to policies during their evaluation.
From this interface, policies can obtain:
-
The authenticated
Identity - Information about the execution context and runtime environment
The Identity is built based on the OAuth2 Access Token that was sent along with the authorization request, and this construct has access to all claims extracted from the original token. For example, if you are using a Protocol Mapper to include a custom claim in an OAuth2 Access Token you can also access this claim from a policy and use it to build your conditions.
The EvaluationContext also gives you access to attributes related to both the execution and runtime environments. For now, there only a few built-in attributes.
| Name | Description | Type |
|---|---|---|
| kc.time.date_time | Current date and time |
String. Format |
| kc.client.network.ip_address | IPv4 address of the client | String |
| kc.client.network.host | Client’s host name | String |
| kc.client.id | The client id | String |
| kc.client.user_agent | The value of the 'User-Agent' HTTP header | String[] |
| kc.realm.name | The name of the realm | String |