このコンテンツは選択した言語では利用できません。
Chapter 8. Managing Clients
Clients are entities that can request authentication of a user. Clients come in two forms. The first type of client is an application that wants to participate in single-sign-on. These clients just want Red Hat Single Sign-On to provide security for them. The other type of client is one that is requesting an access token so that it can invoke other services on behalf of the authenticated user. This section discusses various aspects around configuring clients and various ways to do it.
8.1. OIDC Clients
OpenID Connect is the preferred protocol to secure applications. It was designed from the ground up to be web friendly and work best with HTML5/JavaScript applications.
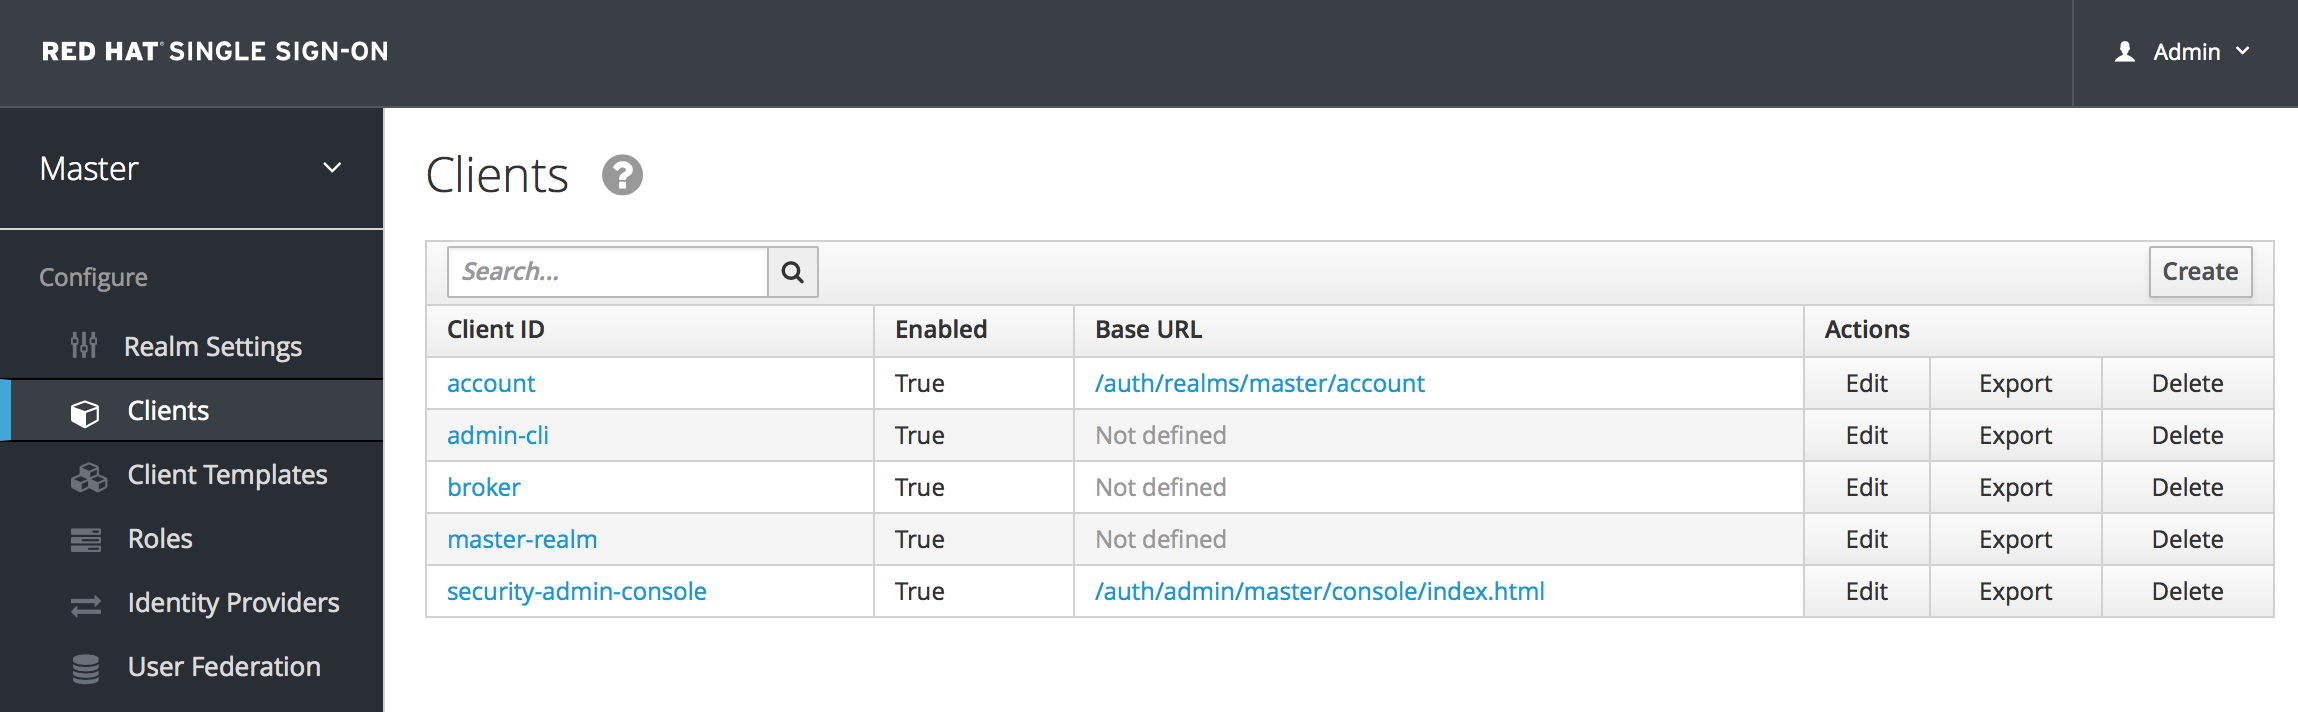
To create an OIDC client go to the Clients left menu item. On this page you’ll see a Create button on the right.
Clients
This will bring you to the Add Client page.
Add Client
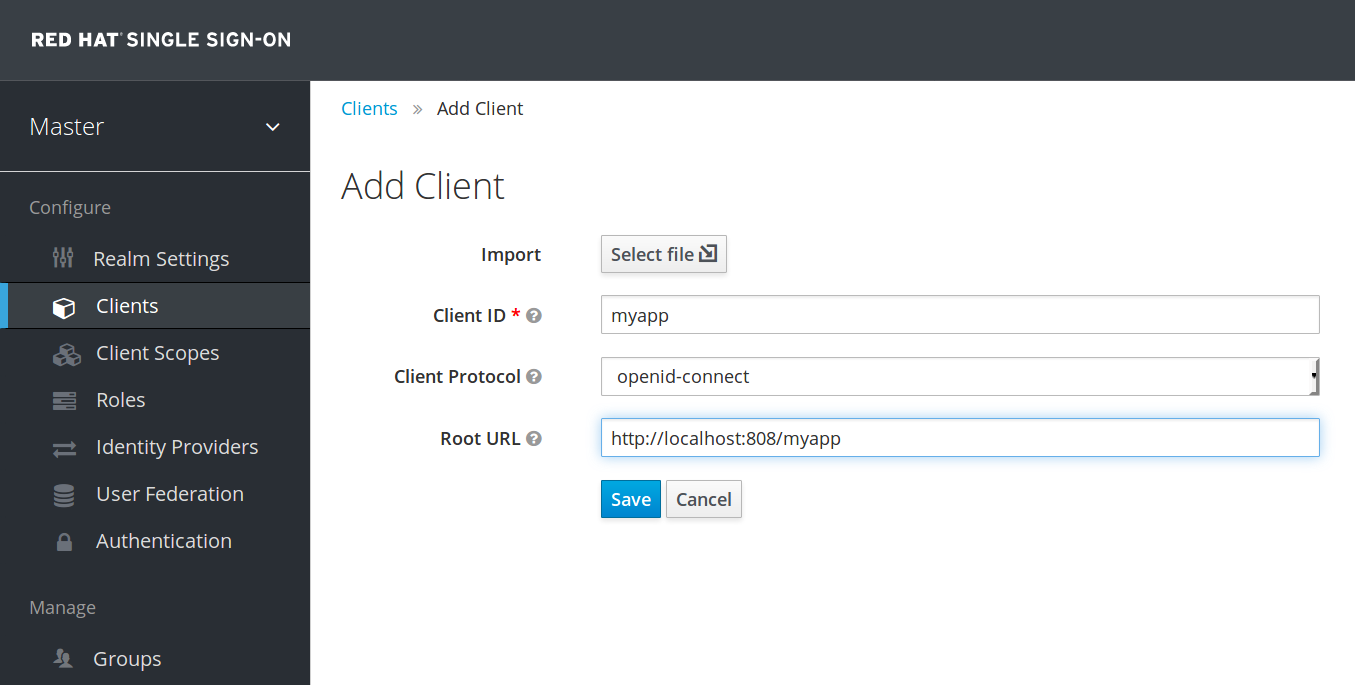
Enter in the Client ID of the client. This should be a simple alpha-numeric string that will be used in requests and in the Red Hat Single Sign-On database to identify the client. Next select openid-connect in the Client Protocol drop down box. Finally enter in the base URL of your application in the Root URL field and click Save. This will create the client and bring you to the client Settings tab.
Client Settings

Let’s walk through each configuration item on this page.
Client ID
This specifies an alpha-numeric string that will be used as the client identifier for OIDC requests.
Name
This is the display name for the client whenever it is displayed in a Red Hat Single Sign-On UI screen. You can localize the value of this field by setting up a replacement string value i.e. ${myapp}. See the Server Developer Guide for more information.
Description
This specifies the description of the client. This can also be localized.
Enabled
If this is turned off, the client will not be allowed to request authentication.
Consent Required
If this is on, then users will get a consent page which asks the user if they grant access to that application. It will also display the metadata that the client is interested in so that the user knows exactly what information the client is getting access to. If you’ve ever done a social login to Google, you’ll often see a similar page. Red Hat Single Sign-On provides the same functionality.
Access Type
This defines the type of the OIDC client.
- confidential
- Confidential access type is for server-side clients that need to perform a browser login and require a client secret when they turn an access code into an access token, (see Access Token Request in the OAuth 2.0 spec for more details). This type should be used for server-side applications.
- public
- Public access type is for client-side clients that need to perform a browser login. With a client-side application there is no way to keep a secret safe. Instead it is very important to restrict access by configuring correct redirect URIs for the client.
- bearer-only
- Bearer-only access type means that the application only allows bearer token requests. If this is turned on, this application cannot participate in browser logins.
Root URL
If Red Hat Single Sign-On uses any configured relative URLs, this value is prepended to them.
Valid Redirect URIs
This is a required field. Enter in a URL pattern and click the + sign to add. Click the - sign next to URLs you want to remove. Remember that you still have to click the Save button! Wildcards (\*) are only allowed at the end of a URI, i.e. http://host.com/*
You should take extra precautions when registering valid redirect URI patterns. If you make them too general you are vulnerable to attacks. See Threat Model Mitigation chapter for more information.
Base URL
If Red Hat Single Sign-On needs to link to the client, this URL is used.
Standard Flow Enabled
If this is on, clients are allowed to use the OIDC Authorization Code Flow.
Implicit Flow Enabled
If this is on, clients are allowed to use the OIDC Implicit Flow.
Direct Grants Enabled
If this is on, clients are allowed to use the OIDC Direct Grants.
Admin URL
For Red Hat Single Sign-On specific client adapters, this is the callback endpoint for the client. The Red Hat Single Sign-On server will use this URI to make callbacks like pushing revocation policies, performing backchannel logout, and other administrative operations. For Red Hat Single Sign-On servlet adapters, this can be the root URL of the servlet application. For more information see Securing Applications and Services Guide.
Web Origins
This option centers around CORS which stands for Cross-Origin Resource Sharing. If browser JavaScript tries to make an AJAX HTTP request to a server whose domain is different from the one the JavaScript code came from, then the request must use CORS. The server must handle CORS requests in a special way, otherwise the browser will not display or allow the request to be processed. This protocol exists to protect against XSS, CSRF and other JavaScript-based attacks.
Red Hat Single Sign-On has support for validated CORS requests. The way it works is that the domains listed in the Web Origins setting for the client are embedded within the access token sent to the client application. The client application can then use this information to decide whether or not to allow a CORS request to be invoked on it. This is an extension to the OIDC protocol so only Red Hat Single Sign-On client adapters support this feature. See Securing Applications and Services Guide for more information.
To fill in the Web Origins data, enter in a base URL and click the + sign to add. Click the - sign next to URLs you want to remove. Remember that you still have to click the Save button!
8.1.1. Advanced Settings
OAuth 2.0 Mutual TLS Client Certificate Bound Access Token
Mutual TLS binds an access token and a refresh token with a client certificate exchanged during TLS handshake. This prevents an attacker who finds a way to steal these tokens from exercising the tokens. The type of token is called a holder-of-key token. Unlike bearer tokens, the recipient of a holder-of-key token can verify whether the sender of the token is legitimate.
If the following conditions are satisfied on a token request, Red Hat Single Sign-On will bind an access token and a refresh token with a client certificate and issue them as holder-of-key tokens. If all conditions are not met, Red Hat Single Sign-On rejects the token request.
- The feature is turned on
- A token request is sent to the token endpoint in an authorization code flow or a hybrid flow
- On TLS handshake, Red Hat Single Sign-On requests a client certificate and a client send its client certificate
- On TLS handshake, Red Hat Single Sign-On successfully verifies the client certificate
To enable mutual TLS in Red Hat Single Sign-On, see Enable mutual SSL in WildFly.
In the following cases, Red Hat Single Sign-On will verify the client sending the access token or the refresh token; if verification fails, Red Hat Single Sign-On rejects the token.
- A token refresh request is sent to the token endpoint with a holder-of-key refresh token
- A UserInfo request is sent to UserInfo endpoint with a holder-of-key access token
- A logout request is sent to Logout endpoint with a holder-of-key refresh token
Please see Mutual TLS Client Certificate Bound Access Tokens in the OAuth 2.0 Mutual TLS Client Authentication and Certificate Bound Access Tokens for more details.
WARNING: None of the keycloak client adapters currently support holder-of-key token verification. Instead, keycloak adapters currently treat access and refresh tokens as bearer tokens.
8.1.2. Confidential Client Credentials
If you’ve set the client’s access type to confidential in the client’s Settings tab, a new Credentials tab will show up. As part of dealing with this type of client you have to configure the client’s credentials.
Credentials Tab
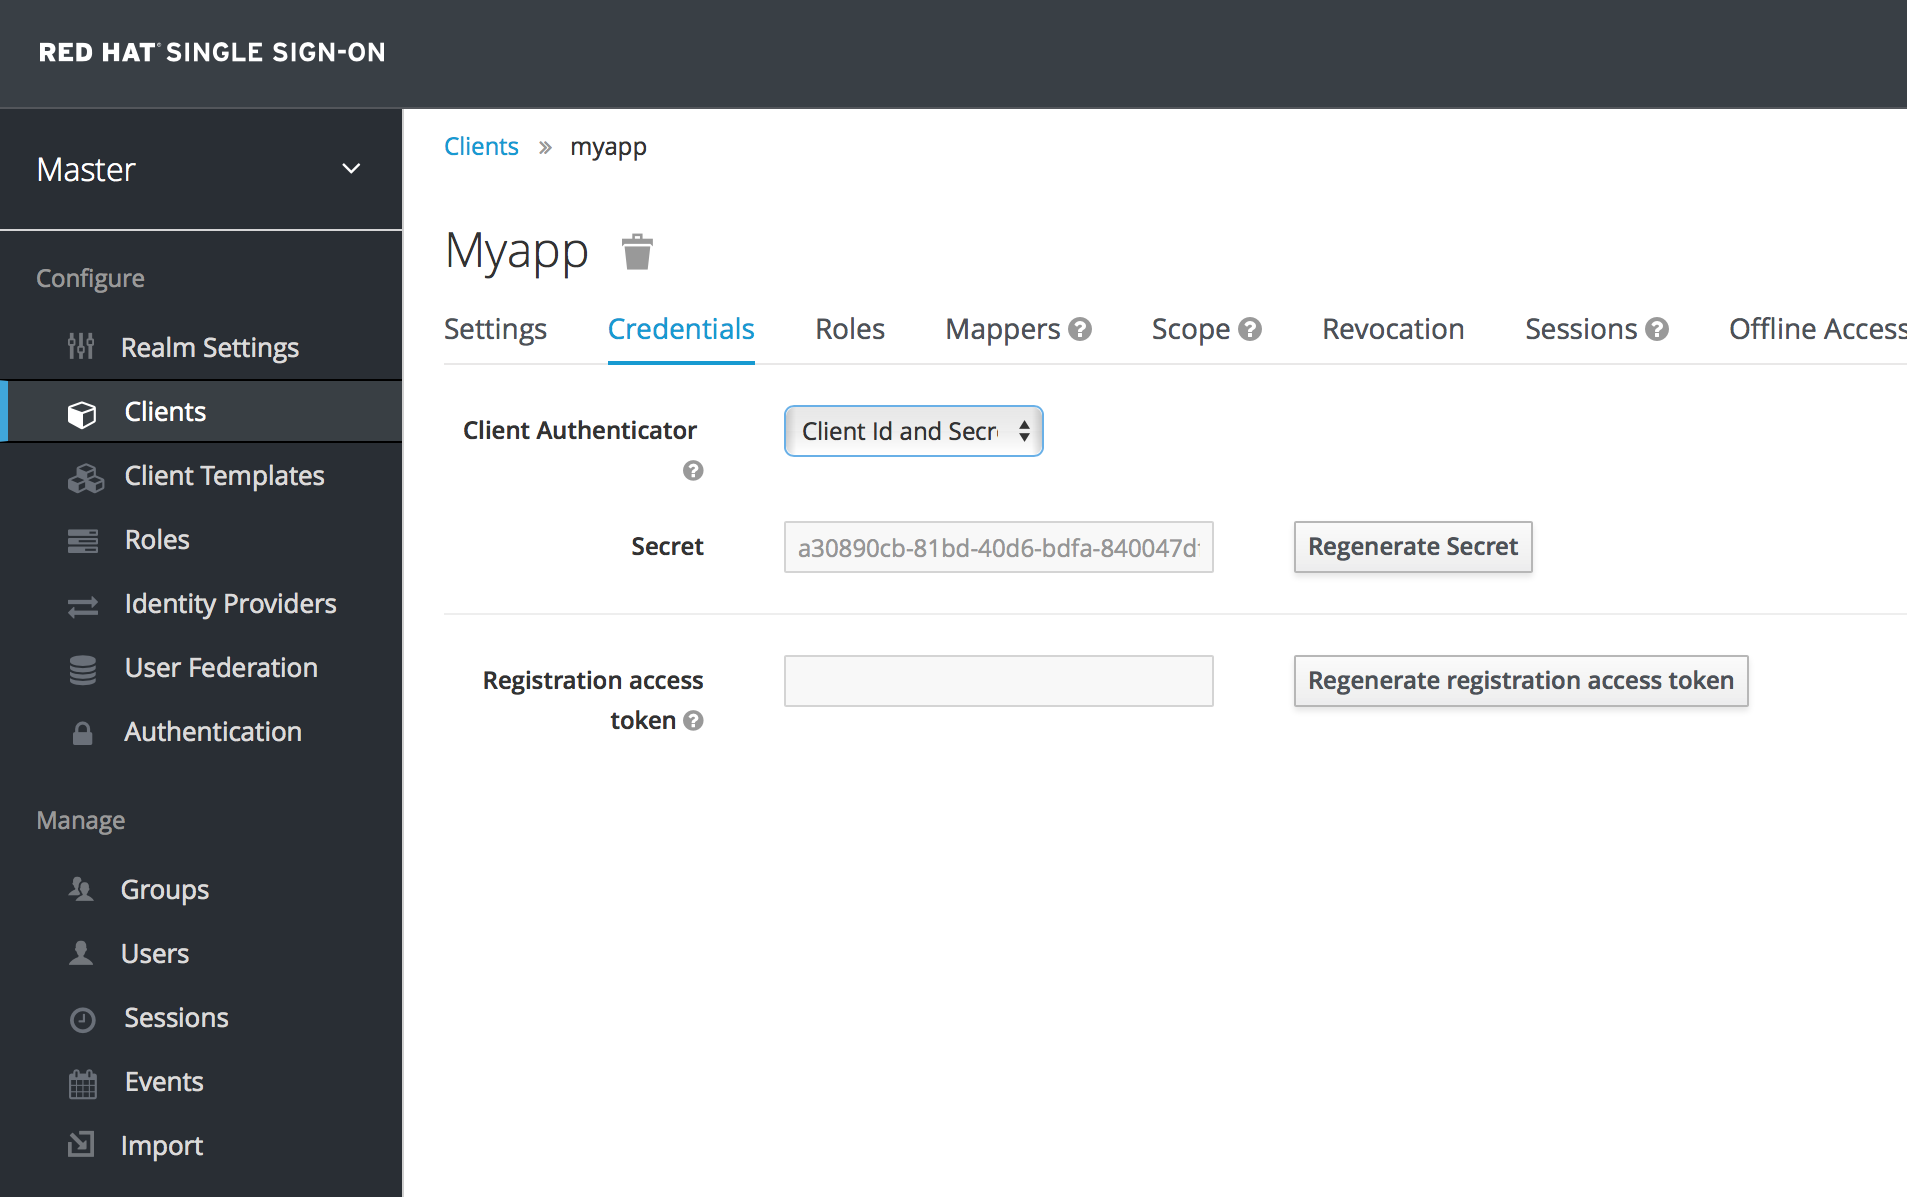
The Client Authenticator list box specifies the type of credential you are going to use for your confidential client. It defaults to client ID and secret. The secret is automatically generated for you and the Regenerate Secret button allows you to recreate this secret if you want or need to.
Alternatively, you can opt to use a signed Json Web Token (JWT) instead of a secret.
Signed JWT

When choosing this credential type you will have to also generate a private key and certificate for the client. The private key will be used to sign the JWT, while the certificate is used by the server to verify the signature. Click on the Generate new keys and certificate button to start this process.
Generate Keys

When you generate these keys, Red Hat Single Sign-On will store the certificate, and you’ll need to download the private key and certificate for your client to use. Pick the archive format you want and specify the password for the private key and store.
You can also opt to generate these via an external tool and just import the client’s certificate.
Import Certificate

There are multiple formats you can import from, just choose the archive format you have the certificate stored in, select the file, and click the Import button.
Finally note that you don’t even need to import certificate if you choose to Use JWKS URL . In that case, you can provide the URL where client publishes it’s public key in JWK format. This is flexible because when client changes it’s keys, Red Hat Single Sign-On will automatically download them without need to re-import anything on Red Hat Single Sign-On side.
If you use client secured by Red Hat Single Sign-On adapter, you can configure the JWKS URL like https://myhost.com/myapp/k_jwks assuming that https://myhost.com/myapp is the root URL of your client application. See Server Developer Guide for additional details.
For the performance purposes, Red Hat Single Sign-On caches the public keys of the OIDC clients. If you think that private key of your client was compromised, it is obviously good to update your keys, but it’s also good to clear the keys cache. See Clearing the cache section for more details.
Signed JWT with Client Secret
If you select this option in the Client Authenticator list box, you can use a JWT signed by client secret instead of the private key.
This client secret will be used to sign the JWT by the client.
8.2. Service Accounts
Each OIDC client has a built-in service account which allows it to obtain an access token. This is covered in the OAuth 2.0 specifiation under Client Credentials Grant. To use this feature you must set the Access Type of your client to confidential. When you do this, the Service Accounts Enabled switch will appear. You need to turn on this switch. Also make sure that you have configured your client credentials.
To use it you must have registered a valid confidential Client and you need to check the switch Service Accounts Enabled in Red Hat Single Sign-On admin console for this client. In tab Service Account Roles you can configure the roles available to the service account retrieved on behalf of this client. Remember that you must have the roles available in Role Scope Mappings (tab Scope) of this client as well, unless you have Full Scope Allowed on. As in a normal login, roles from access token are the intersection of:
- Role scope mappings of particular client combined with the role scope mappings inherited from linked client scopes
- Service account roles
The REST URL to invoke on is /auth/realms/{realm-name}/protocol/openid-connect/token. Invoking on this URL is a POST request and requires you to post the client credentials. By default, client credentials are represented by clientId and clientSecret of the client in Authorization: Basic header, but you can also authenticate the client with a signed JWT assertion or any other custom mechanism for client authentication. You also need to use the parameter grant_type=client_credentials as per the OAuth2 specification.
For example the POST invocation to retrieve a service account can look like this:
    POST /auth/realms/demo/protocol/openid-connect/token
    Authorization: Basic cHJvZHVjdC1zYS1jbGllbnQ6cGFzc3dvcmQ=
    Content-Type: application/x-www-form-urlencoded

    grant_type=client_credentials
The response would be this standard JSON document from the OAuth 2.0 specification.
HTTP/1.1 200 OK
Content-Type: application/json;charset=UTF-8
Cache-Control: no-store
Pragma: no-cache

{
    "access_token":"2YotnFZFEjr1zCsicMWpAA",
    "token_type":"bearer",
    "expires_in":60,
    "refresh_token":"tGzv3JOkF0XG5Qx2TlKWIA",
    "refresh_expires_in":600,
    "id_token":"tGzv3JOkF0XG5Qx2TlKWIA",
    "not-before-policy":0,
    "session_state":"234234-234234-234234"
}
The retrieved access token can be refreshed or logged out by an out-of-bound request.
8.3. SAML Clients
Red Hat Single Sign-On supports SAML 2.0 for registered applications. Both POST and Redirect bindings are supported. You can choose to require client signature validation and can have the server sign and/or encrypt responses as well.
To create a SAML client go to the Clients left menu item. On this page you’ll see a Create button on the right.
Clients
This will bring you to the Add Client page.
Add Client
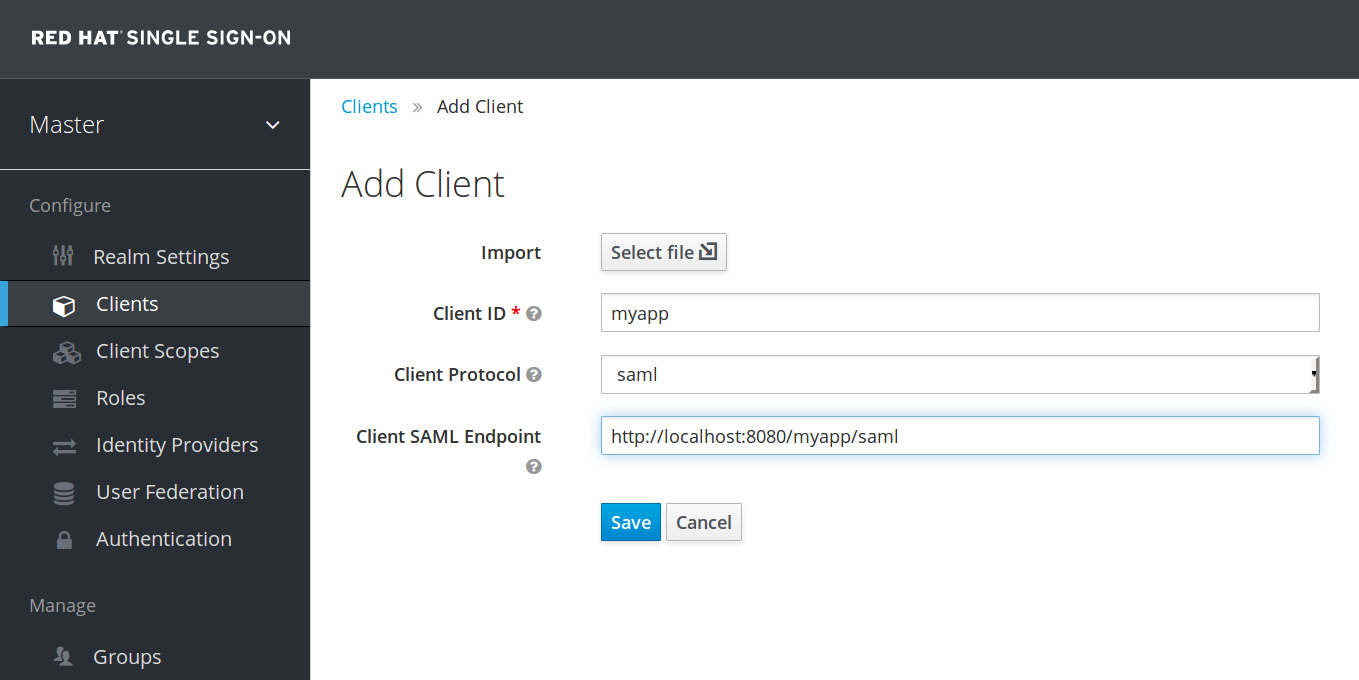
Enter in the Client ID of the client. This is often a URL and will be the expected issuer value in SAML requests sent by the application. Next select saml in the Client Protocol drop down box. Finally enter in the Client SAML Endpoint URL. Enter the URL you want the Red Hat Single Sign-On server to send SAML requests and responses to. Usually applications have only one URL for processing SAML requests. If your application has different URLs for its bindings, don’t worry, you can fix this in the Settings tab of the client. Click Save. This will create the client and bring you to the client Settings tab.
Client Settings
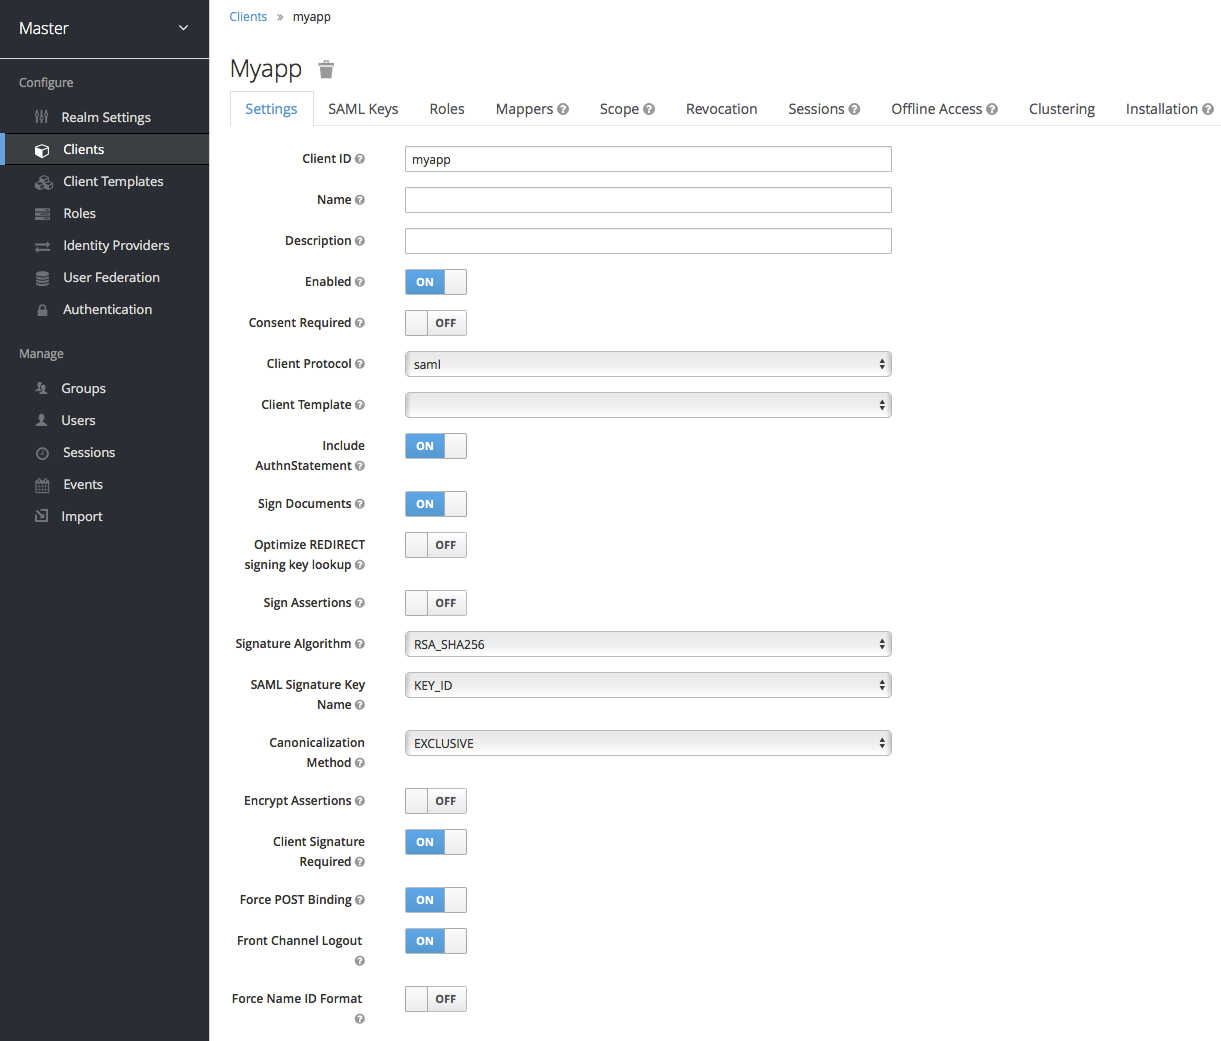
- Client ID
- This value must match the issuer value sent with AuthNRequests. Red Hat Single Sign-On will pull the issuer from the Authn SAML request and match it to a client by this value.
- Name
- This is the display name for the client whenever it is displayed in a Red Hat Single Sign-On UI screen. You can localize the value of this field by setting up a replacement string value i.e. ${myapp}. See the Server Developer Guide for more information.
- Description
- This specifies the description of the client. This can also be localized.
- Enabled
- If this is turned off, the client will not be allowed to request authentication.
- Consent Required
- If this is on, then users will get a consent page which asks the user if they grant access to that application. It will also display the metadata that the client is interested in so that the user knows exactly what information the client is getting access to. If you’ve ever done a social login to Google, you’ll often see a similar page. Red Hat Single Sign-On provides the same functionality.
- Include AuthnStatement
- SAML login responses may specify the authentication method used (password, etc.) as well as a timestamp of the login. Setting this to on will include that statement in the response document.
- Sign Documents
- When turned on, Red Hat Single Sign-On will sign the document using the realm’s private key.
- Optimize REDIRECT signing key lookup
-
When turned on, the SAML protocol messages will include Red Hat Single Sign-On native extension that contains a hint with signing key ID. When the SP understands this extension, it can use it for signature validation instead of attempting to validate signature with all known keys. This option only applies to REDIRECT bindings where the signature is transferred in query parameters where there is no place with this information in the signature information (contrary to POST binding messages where key ID is always included in document signature). Currently this is relevant to situations where both IDP and SP are provided by Red Hat Single Sign-On server and adapter. This option is only relevant when
Sign Documentsis switched on. - Sign Assertions
-
The
Sign Documentsswitch signs the whole document. With this setting the assertion is also signed and embedded within the SAML XML Auth response. - Signature Algorithm
- Choose between a variety of algorithms for signing SAML documents.
- SAML Signature Key Name
-
Signed SAML documents sent via POST binding contain identification of signing key in
KeyNameelement. This by default contains Red Hat Single Sign-On key ID. However various vendors might expect a different key name or no key name at all. This switch controls whetherKeyNamecontains key ID (optionKEY_ID), subject from certificate corresponding to the realm key (optionCERT_SUBJECT- expected for instance by Microsoft Active Directory Federation Services), or that the key name hint is completely omitted from the SAML message (optionNONE). - Canonicalization Method
- Canonicalization method for XML signatures.
- Encrypt Assertions
- Encrypt assertions in SAML documents with the realm’s private key. The AES algorithm is used with a key size of 128 bits.
- Client Signature Required
-
Expect that documents coming from a client are signed. Red Hat Single Sign-On will validate this signature using the client public key or cert set up in the
SAML Keystab. - Force POST Binding
- By default, Red Hat Single Sign-On will respond using the initial SAML binding of the original request. By turning on this switch, you will force Red Hat Single Sign-On to always respond using the SAML POST Binding even if the original request was the Redirect binding.
- Front Channel Logout
- If true, this application requires a browser redirect to be able to perform a logout. For example, the application may require a cookie to be reset which could only be done via a redirect. If this switch is false, then Red Hat Single Sign-On will invoke a background SAML request to logout the application.
- Force Name ID Format
- If the request has a name ID policy, ignore it and used the value configured in the admin console under Name ID Format
- Name ID Format
- Name ID Format for the subject. If no name ID policy is specified in the request or if the Force Name ID Format attribute is true, this value is used. Properties used for each of the respective formats are defined below.
- Root URL
- If Red Hat Single Sign-On uses any configured relative URLs, this value is prepended to them.
- Valid Redirect URIs
-
This is an optional field. Enter in a URL pattern and click the + sign to add. Click the - sign next to URLs you want to remove. Remember that you still have to click the
Savebutton! Wildcards (\*) are only allowed at the end of of a URI, i.e. http://host.com/*. This field is used when the exact SAML endpoints are not registered and Red Hat Single Sign-On is pull the Assertion Consumer URL from the request. - Base URL
- If Red Hat Single Sign-On needs to link to the client, this URL would be used.
- Master SAML Processing URL
- This URL will be used for all SAML requests and the response will be directed to the SP. It will be used as the Assertion Consumer Service URL and the Single Logout Service URL. If a login request contains the Assertion Consumer Service URL, that will take precedence, but this URL must be valided by a registered Valid Redirect URI pattern
- Assertion Consumer Service POST Binding URL
- POST Binding URL for the Assertion Consumer Service.
- Assertion Consumer Service Redirect Binding URL
- Redirect Binding URL for the Assertion Consumer Service.
- Logout Service POST Binding URL
- POST Binding URL for the Logout Service.
- Logout Service Redirect Binding URL
- Redirect Binding URL for the Logout Service.
8.3.1. IDP Initiated Login
IDP Initiated Login is a feature that allows you to set up an endpoint on the Red Hat Single Sign-On server that will log you into a specific application/client. In the Settings tab for your client, you need to specify the IDP Initiated SSO URL Name. This is a simple string with no whitespace in it. After this you can reference your client at the following URL: root/auth/realms/{realm}/protocol/saml/clients/{url-name}
If your client requires a special relay state, you can also configure this on the Settings tab in the IDP Initiated SSO Relay State field. Alternatively, browsers can specify the relay state in a RelayState query parameter, i.e. root/auth/realms/{realm}/protocol/saml/clients/{url-name}?RelayState=thestate.
When using identity brokering, it is possible to set up an IDP Initiated Login for a client from an external IDP. The actual client is set up for IDP Initiated Login at broker IDP as described above. The external IDP has to set up the client for application IDP Initiated Login that will point to a special URL pointing to the broker and representing IDP Initiated Login endpoint for a selected client at the brokering IDP. This means that in client settings at the external IDP:
-
IDP Initiated SSO URL Nameis set to a name that will be published as IDP Initiated Login initial point, Assertion Consumer Service POST Binding URLin theFine Grain SAML Endpoint Configurationsection has to be set to the following URL:broker-root/auth/realms/{broker-realm}/broker/{idp-name}/endpoint/clients/{client-id}, where:- broker-root is base broker URL
- broker-realm is name of the realm at broker where external IDP is declared
- idp-name is name of the external IDP at broker
-
client-id is the value of
IDP Initiated SSO URL Nameattribute of the SAML client defined at broker. It is this client, which will be made available for IDP Initiated Login from the external IDP.
Please note that you can import basic client settings from the brokering IDP into client settings of the external IDP - just use SP Descriptor available from the settings of the identity provider in the brokering IDP, and add clients/client-id to the endpoint URL.
8.3.2. SAML Entity Descriptors
Instead of manually registering a SAML 2.0 client, you can import it via a standard SAML Entity Descriptor XML file. There is an Import option on the Add Client page.
Add Client
Click the Select File button and load your entity descriptor file. You should review all the information there to make sure everything is set up correctly.
Some SAML client adapters like mod-auth-mellon need the XML Entity Descriptor for the IDP. You can obtain this by going to this public URL: root/auth/realms/{realm}/protocol/saml/descriptor
8.4. Client Links
For scenarios where one wants to link from one client to another, Red Hat Single Sign-On provides a special redirect endpoint: /realms/realm_name/clients/{client-id}/redirect.
If a client accesses this endpoint via an HTTP GET request, Red Hat Single Sign-On returns the configured base URL for the provided Client and Realm in the form of an HTTP 307 (Temporary Redirect) via the response’s Location header.
Thus, a client only needs to know the Realm name and the Client ID in order to link to them. This indirection helps avoid hard-coding client base URLs.
As an example, given the realm master and the client-id account:
http://host:port/auth/realms/master/clients/account/redirectWould temporarily redirect to: http://host:port/auth/realms/master/account
8.5. OIDC Token and SAML Assertion Mappings
Applications that receive ID Tokens, Access Tokens, or SAML assertions may need or want different user metadata and roles. Red Hat Single Sign-On allows you to define what exactly is transferred. You can hardcode roles, claims and custom attributes. You can pull user metadata into a token or assertion. You can rename roles. Basically you have a lot of control of what exactly goes back to the client.
Within the Admin Console, if you go to an application you’ve registered, you’ll see a Mappers tab. Here’s one for an OIDC based client.
Mappers Tab
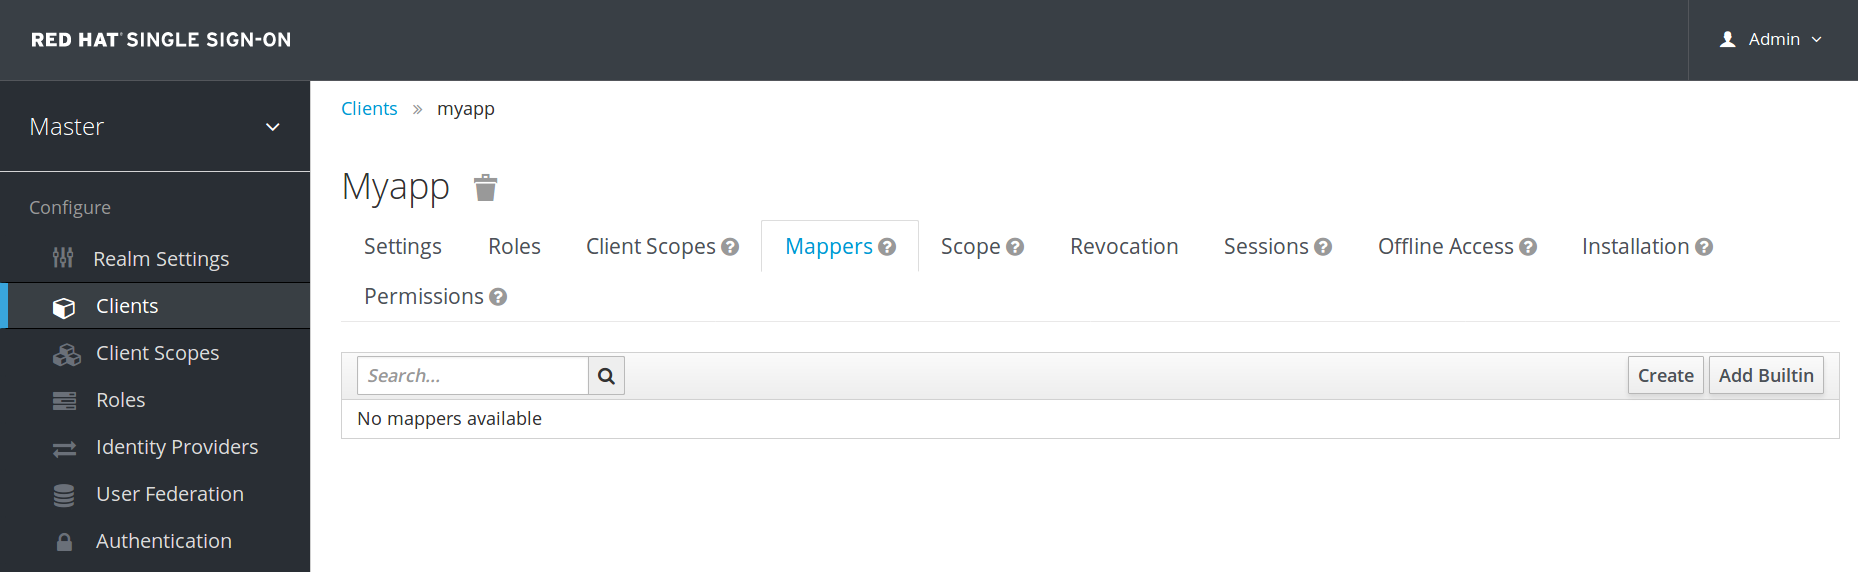
The new client does not have any built-in mappers, however it usually inherits some mappers from the client scopes as described in the client scopes section. Protocol mappers map things like, for example, email address to a specific claim in the identity and access token. Their function should each be self explanatory from their name. There are additional pre-configured mappers that are not attached to the client that you can add by clicking the Add Builtin button.
Each mapper has common settings as well as additional ones depending on which type of mapper you are adding. Click the Edit button next to one of the mappers in the list to get to the config screen.
Mapper Config
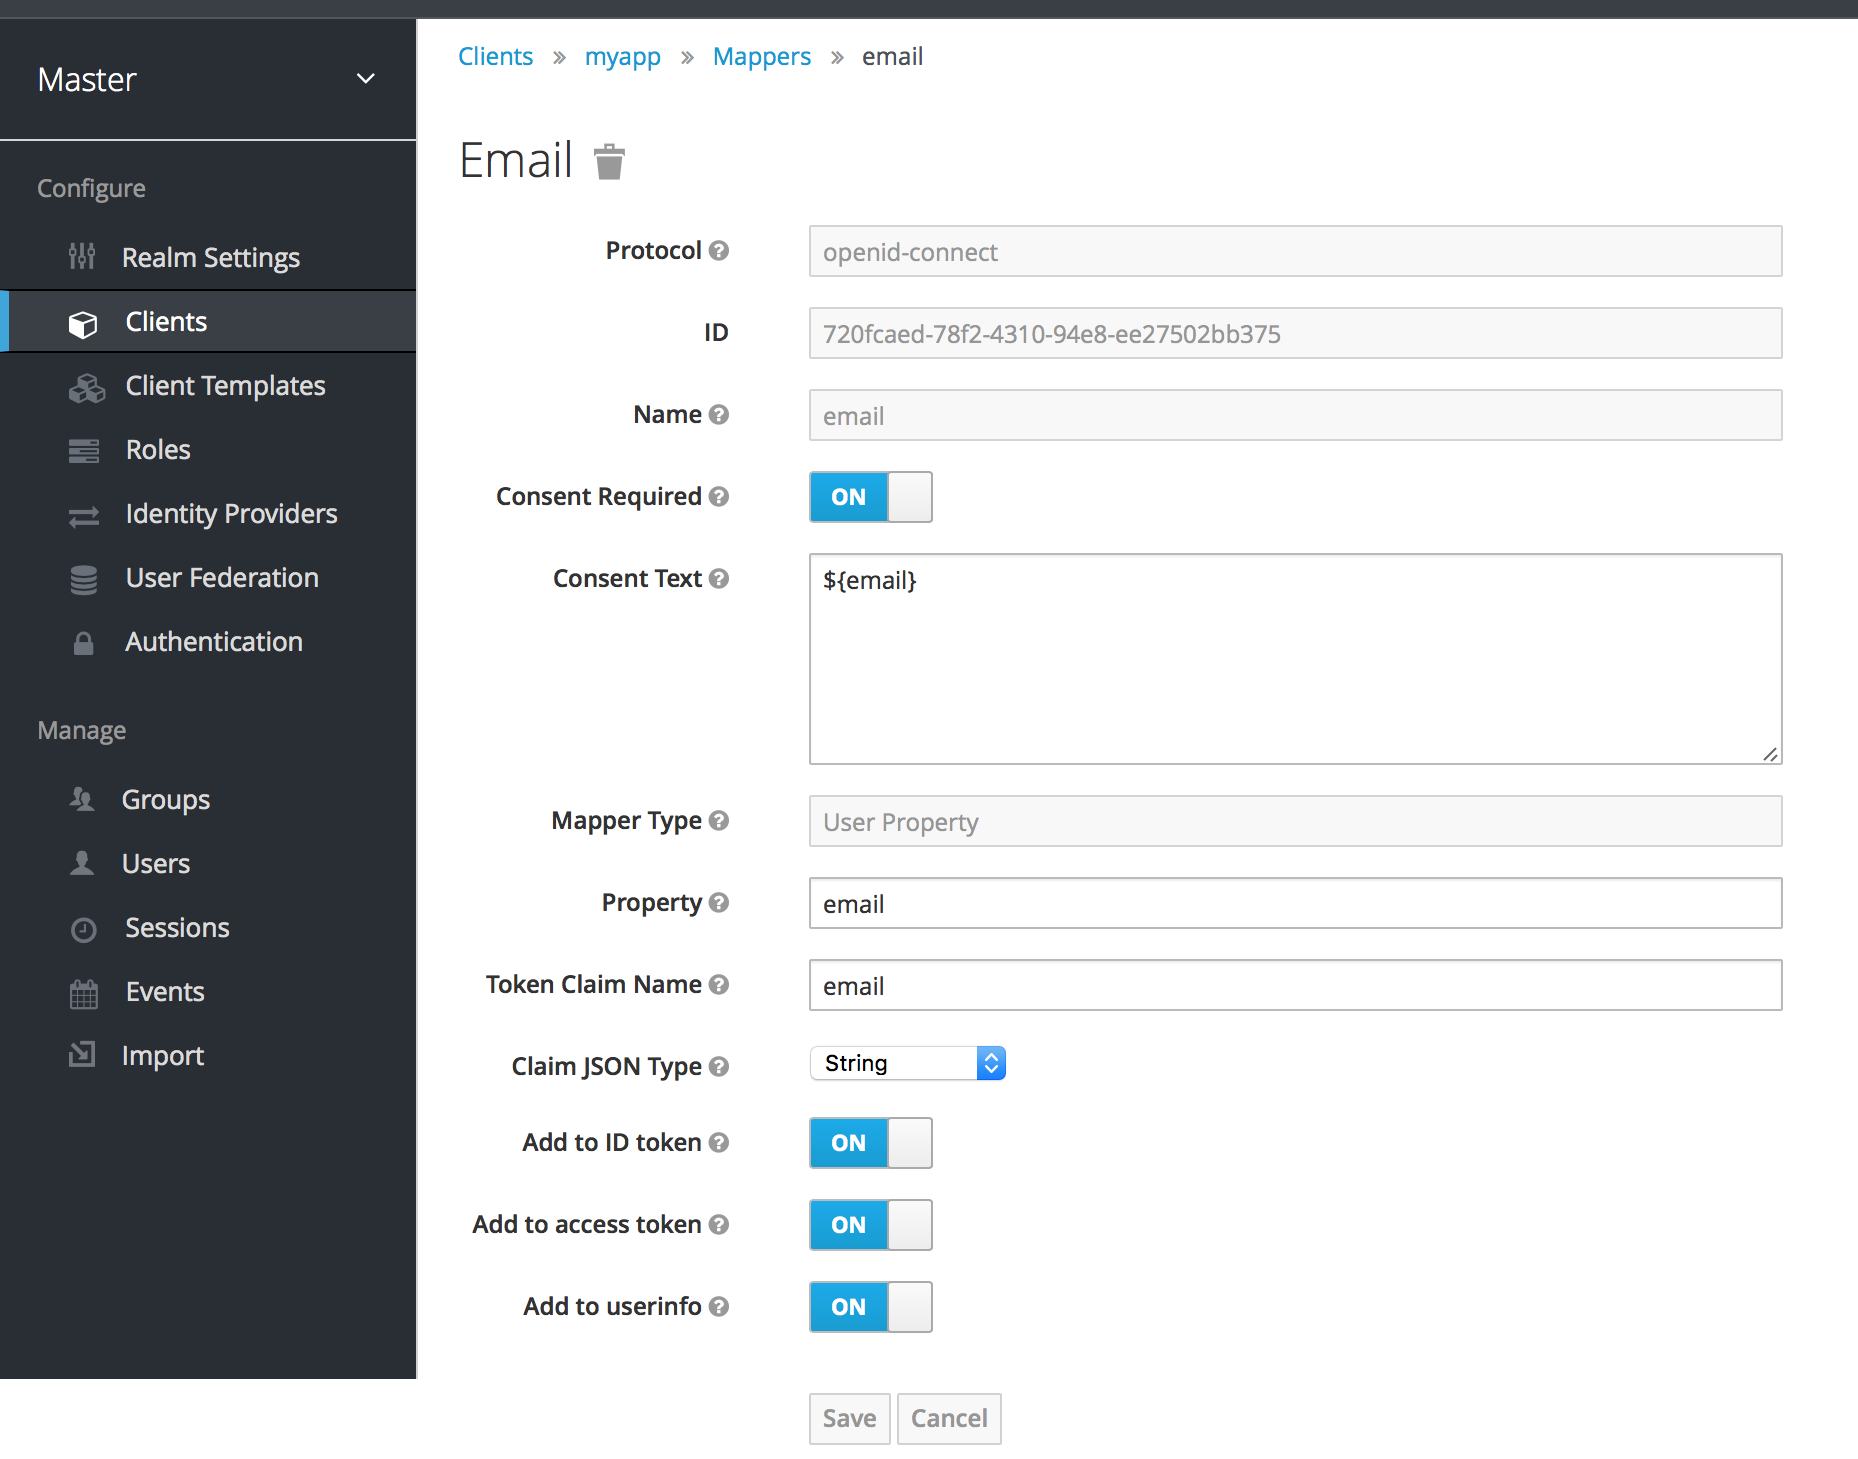
The best way to learn about a config option is to hover over its tooltip.
Most OIDC mappers also allow you to control where the claim gets put. You can opt to include or exclude the claim from both the id and access tokens by fiddling with the Add to ID token and Add to access token switches.
Finally, you can also add other mapper types. If you go back to the Mappers tab, click the Create button.
Add Mapper
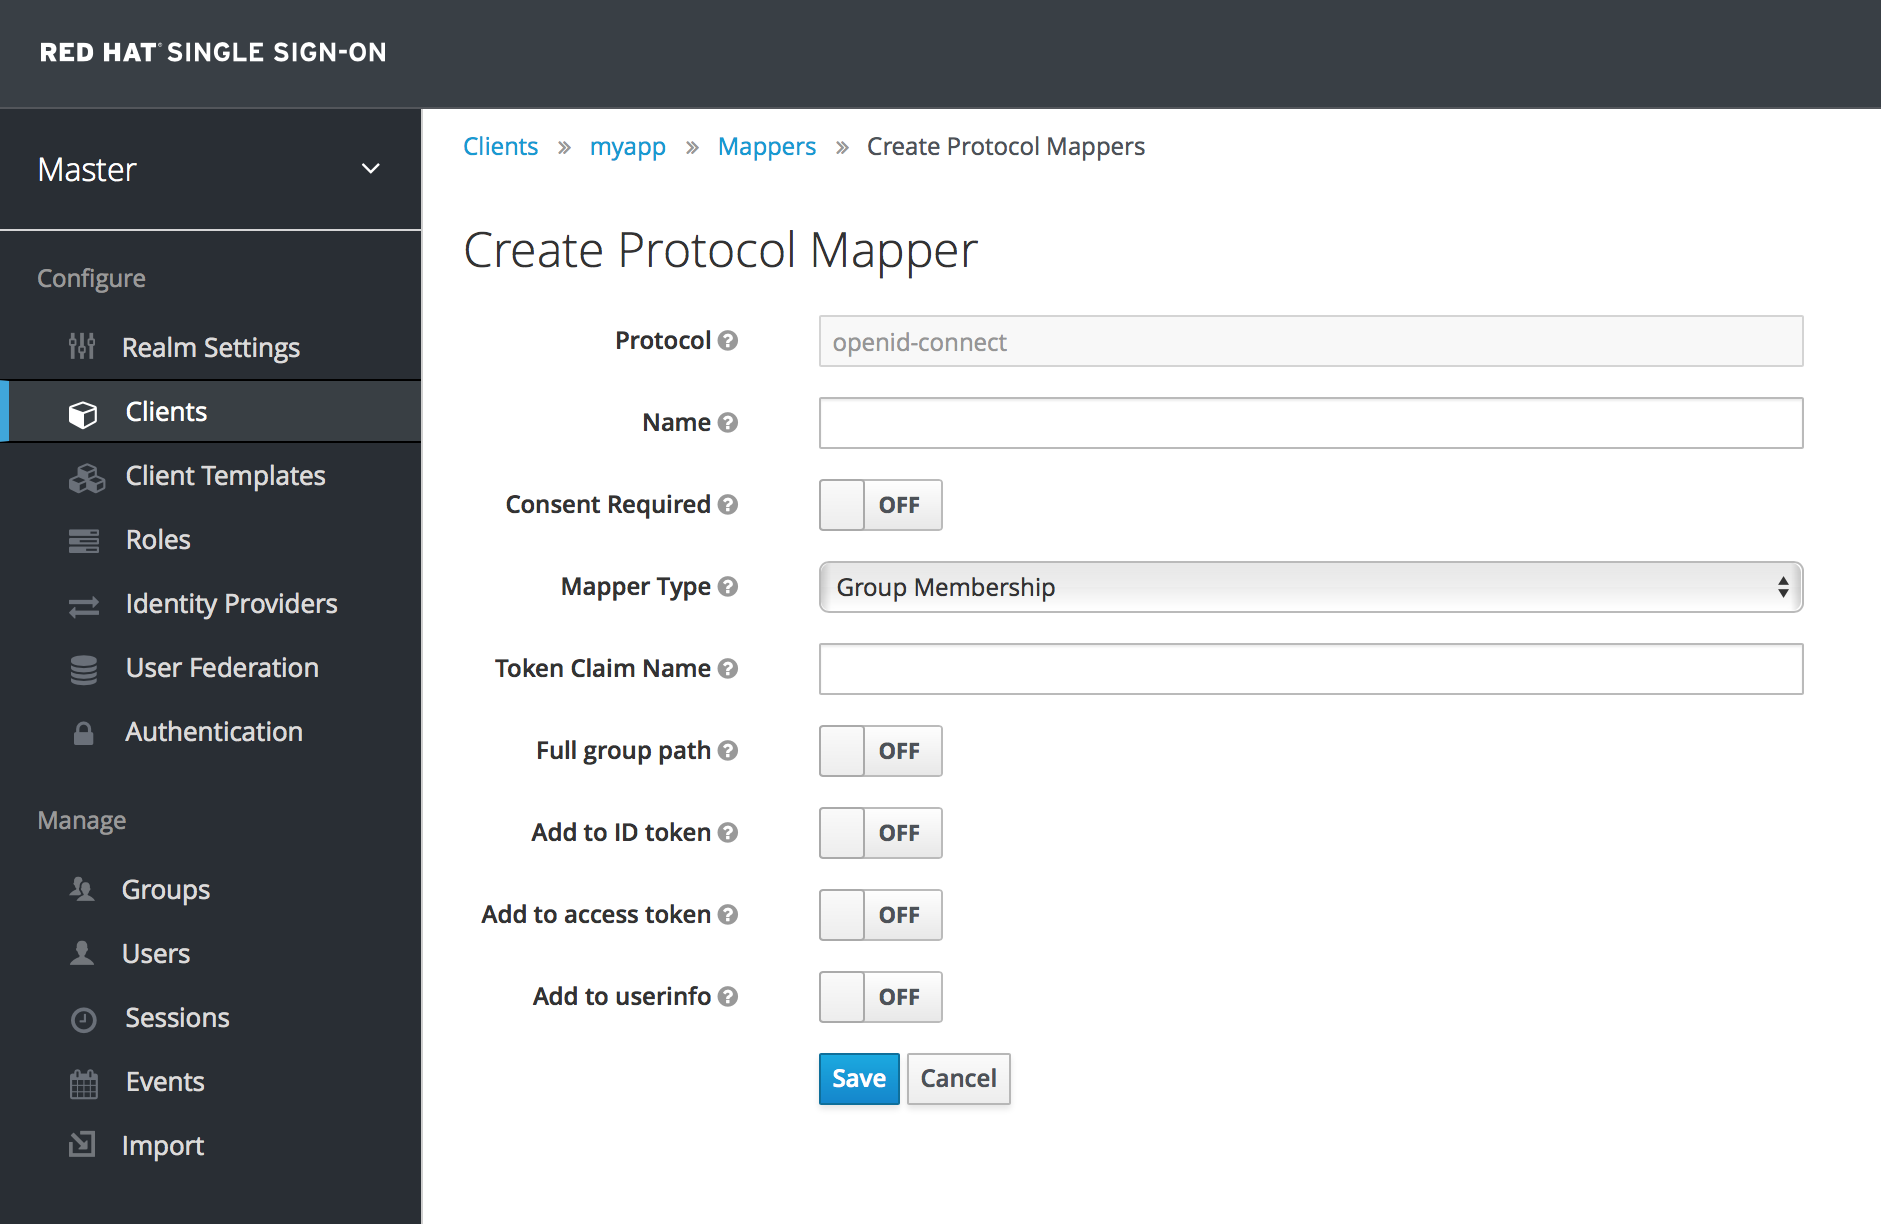
Pick a Mapper Type from the list box. If you hover over the tooltip, you’ll see a description of what that mapper type does. Different config parameters will appear for different mapper types.
8.6. Generating Client Adapter Config
The Red Hat Single Sign-On can pre-generate configuration files that you can use to install a client adapter for in your application’s deployment environment. A number of adapter types are supported for both OIDC and SAML. Go to the Installation tab of the client you want to generate configuration for.

Select the Format Option you want configuration generated for. All Red Hat Single Sign-On client adapters for OIDC and SAML are supported. The mod-auth-mellon Apache HTTPD adapter for SAML is supported as well as standard SAML entity descriptor files.
8.7. Client Scopes
If you have many applications you need to secure and register within your organization, it can become tedious to configure the protocol mappers and role scope mappings for each of these clients. Red Hat Single Sign-On allows you to define a shared client configuration in an entity called a client scope.
Client scopes also provide support for the OAuth 2 scope parameter, which allows a client application to request more or fewer claims or roles in the access token, according to the application needs.
To create a client scope, follow these steps:
-
Go to the
Client Scopesleft menu item. This initial screen shows you a list of currently defined client scopes.
Client Scopes List

-
Click the
Createbutton. Name the client scope and save. A client scope will have similar tabs to a regular clients. You can define protocol mappers and role scope mappings, which can be inherited by other clients, and which are configured to inherit from this client scope.
8.7.1. Protocol
When you are creating the client scope, you must choose the Protocol. Only the clients which use same protocol can then be linked with this client scope.
Once you have created new realm, you can see that there is a list of pre-defined (builtin) client scopes in the menu.
-
For the SAML protocol, there is one builtin client scope,
roles_list, which contains one protocol mapper for showing the roles list in the SAML assertion. -
For the OpenID Connect protocol, there are client scopes
profile,email,address,phoneandoffline_access.
The client scope, offline_access, is useful when client wants to obtain offline tokens. Learn about offline tokens in the Offline Access section or in the OpenID Connect specification, where scope parameter is defined with the value offline_access.
The client scopes profile, email, address and phone are also defined in the OpenID Connect specification. These client scopes do not have any role scope mappings defined, but they have some protocol mappers defined, and these mappers correspond to the claims defined in the OpenID Connect specification.
For example, when you click to open the phone client scope and open the Mappers tab, you will see the protocol mappers, which correspond to the claims defined in the specification for the scope phone.
Client Scope Mappers
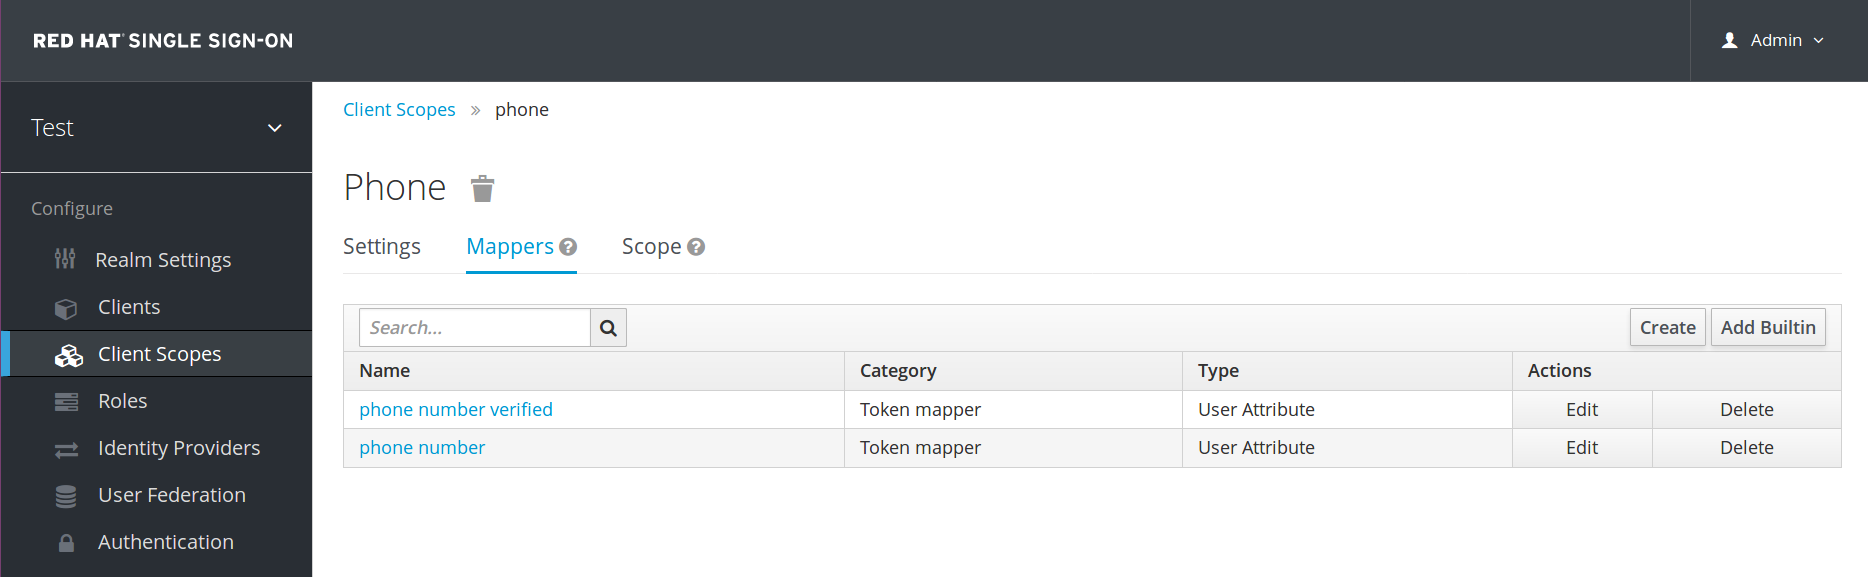
When the phone client scope is linked to a client, that client automatically inherits all the protocol mappers defined in the phone client scope. Access tokens issued for this client will contain the phone number information about the user, assuming that the user has a defined phone number.
Builtin client scopes contain exactly the protocol mappers as defined per the specification, however you are free to edit client scopes and create/update/remove any protocol mappers (or role scope mappings).
8.7.3. Link Client Scope with the Client
Linking between client scope and client is configured in the Client Scopes tab of the particular client. There are 2 ways of linking between client scope and client.
- Default Client Scopes
- This is applicable for both OpenID Connect and SAML clients. Default client scopes are always applied when issuing OpenID Connect tokens or SAML assertions for this client. The client will inherit Protocol mappers and Role Scope Mappings defined on the client scope. For the OpenID Connect Protocol, the Mappers and Role Scope Mappings are always applied, regardless of value of used for the scope parameter in the OpenID Connect authorization request.
- Optional Client Scopes
-
This is applicable only for OpenID Connect clients. Optional client scopes are applied when issuing tokens for this client, but only when they are requested by the
scopeparameter in the OpenID Connect authorization request.
8.7.3.1. Example
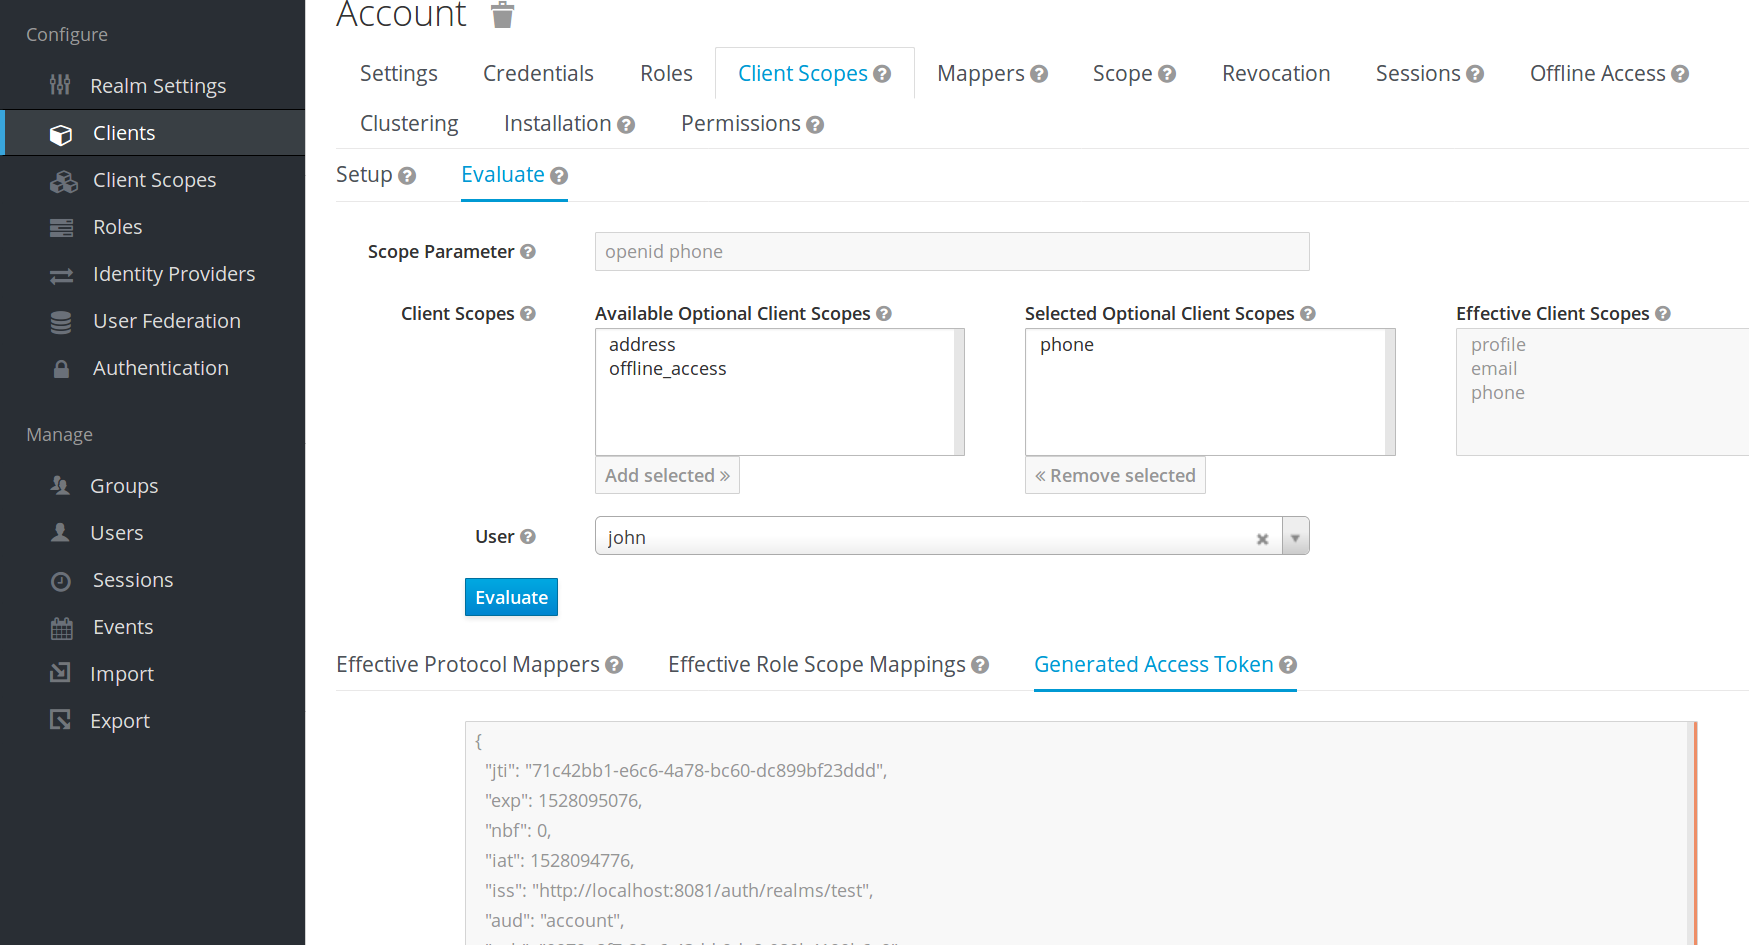
For this example, we assume that the client has profile and email linked as default client scopes, and phone and address are linked as optional client scopes. The client will use the value of the scope parameter when sending a request to the OpenID Connect authorization endpoint:
scope=openid phone
The scope parameter contains the string, with the scope values divided by space (which is also the reason why a client scope name cannot contain a space character in it). The value openid is the meta-value used for all OpenID Connect requests, so we will ignore it for this example. The token will contain mappers and role scope mappings from the client scopes profile, email (which are default scopes) and phone (an optional client scope requested by the scope parameter).
8.7.4. Evaluating Client Scopes
The tabs Mappers and Scope of the client contain the protocol mappers and role scope mappings declared solely for this client. They do not contain the mappers and scope mappings inherited from client scopes. However, it may be useful to see what the effective protocol mappers will be (protocol mappers defined on the client itself as well as inherited from the linked client scopes) and the effective role scope mappings used when you generate the token for the particular client.
You can see all of these when you click the Client Scopes tab for the client and then open the sub-tab Evaluate. From here you can select the optional client scopes that you want to apply. This will also show you the value of the scope parameter, which needs to be sent from the application to the Red Hat Single Sign-On OpenID Connect authorization endpoint.
Evaluating Client Scopes
If you want to see how you can send a custom value for a scope parameter from your application, see the parameters forwarding section, if your application uses the servlet adapter, or the javascript adapter section, if your application uses the javascript adapter.
8.7.4.1. Generating Example Tokens
To see an example of a real access token, generated for the particular user and issued for the particular client, with the specified value of scope parameter, select the user from the Evaluate screen. This will generate an example token that includes all of the claims and role mappings used.
8.7.5. Realm Default Client Scopes
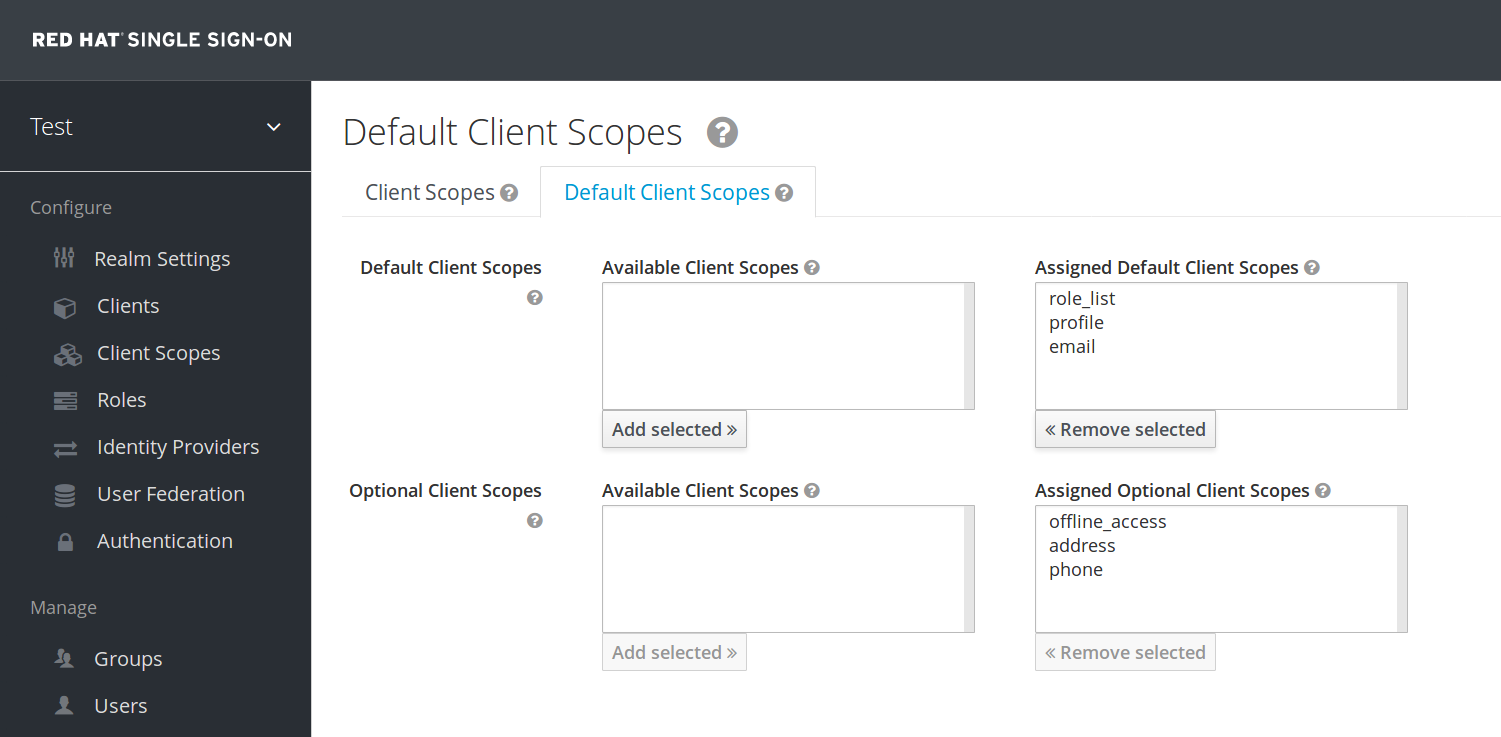
The Realm Default Client Scopes allow you to define set of client scopes, which will be automatically linked to newly created clients.
Open the left menu item Client Scopes and then select Default Client Scopes.
From here, select the client scopes that you want to add as Default Client Scopes to newly created clients and Optional Client Scopes to newly created clients.
Default Client Scopes
Once the client is created, you can unlink the default client scopes, if needed. This is similar to how you remove Default Roles.
8.7.6. Scopes explained
The term scope is used in Red Hat Single Sign-On on few places. Various occurences of scopes are related to each other, but may have a different context and meaning. To clarify, here we explain the various scopes used in Red Hat Single Sign-On.
- Client scope
-
Referenced in this chapter. Client scopes are entities in Red Hat Single Sign-On, which are configured at the realm level and they can be linked to clients. The client scopes are referenced by their name when a request is sent to the Red Hat Single Sign-On authorization endpoint with a corresponding value of the
scopeparameter. The details are described in the section about client scopes linking. - Role scope mapping
-
This can be seen when you open tab
Scopeof a client or client scope. Role scope mapping allows you to limit the roles which can be used in the access tokens. The details are described in the Role Scope Mappings section.