이 콘텐츠는 선택한 언어로 제공되지 않습니다.
Chapter 9. Telemetry overview
Telemetry is the transparent and ethical collection of usage data. By default, telemetry is not available in Red Hat CodeReady Workspaces, but there is an abstract API that allows enabling telemetry using the plug-in mechanism. This approach is used in the Hosted Che service where telemetry is enabled for every workspace.
This documentation includes a guide describing how to make your own telemetry client for Red Hat CodeReady Workspaces, followed by an overview of the Red Hat CodeReady Workspaces Woopra Telemetry Plugin.
9.1. Use cases
Red Hat CodeReady Workspaces telemetry API allows tracking:
- Duration of workspace usage
- User-driven actions like file editing, committing, and pushing to remote repositories
- The list of plug-ins enabled in a workspace
- Programming languages and Section 3.1.1, “What is a devfile” used in workspaces
9.2. How it works
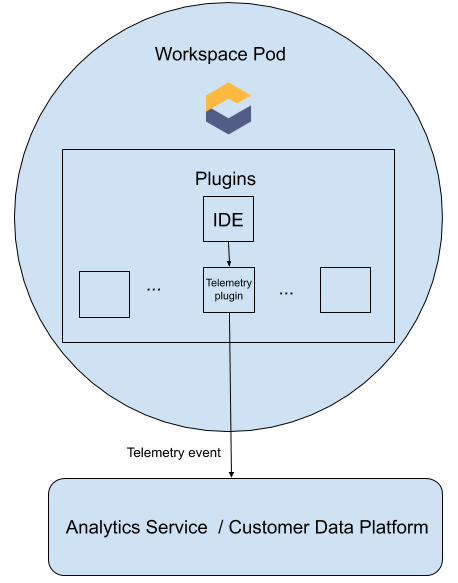
When a CodeReady Workspaces workspace starts, the che-theia container starts the telemetry plug-in, which is responsible for sending telemetry events to a back-end. If the $CHE_WORKSPACE_TELEMETRY_BACKEND_PORT environment variable was set in the workspace Pod, the telemetry plug-in will send events to a back-end listening at that port.
If the CodeReady Workspaces workspace has a telemetry back-end container running, and it is listening on $CHE_WORKSPACE_TELEMETRY_BACKEND_PORT, it takes the events sent from the telemetry plug-in, turns them into the back-end-specific representation of events, and sends them to the configured analytics back-end (for example, Segment or Woopra).
9.3. Creating A Telemetry Plugin
This section shows how to create an AnalyticsManager class that extends AbstractAnalyticsManager and implements the following methods:
-
isEnabled()- determines whether or not the telemetry back-end is functioning correctly. This could mean always returningtrue, or have more complex checks, for example, returningfalsewhen a connection property is missing. -
destroy()- cleanup method that is run before shutting down the telemetry back-end. This method sends theWORKSPACE_STOPPEDevent. -
onActivity()- notifies that some activity is still happening for a given user. This is mainly used to sendWORKSPACE_INACTIVEevents. -
onEvent()- submits telemetry events to the telemetry server, such asWORKSPACE_USEDorWORKSPACE_STARTED. -
increaseDuration()- increases the duration of a current event rather than sending multiple events in a small frame of time.
9.3.1. Getting Started
This document describes the steps required to extend the CodeReady Workspaces telemetry system to connect to a custom back-end:
- Creating a server process that receives events
- Extending CodeReady Workspaces libraries to create a back-end that send events to the server
- Packaging the telemetry back-end in a container and deploying it to an image registry
- Adding a plug-in for your back-end and instructing CodeReady Workspaces to load the plug-in in your workspaces
Optional: creating a server that receives events
This example shows how to create a server that receives events from CodeReady Workspaces and writes them to standard output.
For production use cases, consider integrating with a third-party telemetry system (for example, Segment, Woopra) rather than creating your own telemetry server. In this case, use your provider’s APIs to send events from your custom back-end to their system.
The following Go code starts a server on port 8080 and writes events to standard output:
main.go
Create a container image based on this code and expose it as a deployment in OpenShift in the che project. The code for the example telemetry server is available at che-workspace-telemetry-example. To deploy the telemetry server, clone the repository and build the container:
git clone https://github.com/che-incubator/che-workspace-telemetry-example
cd che-workspace-telemetry-example
docker build -t registry/organization/che-workspace-telemetry-example:latest
docker push registry/organization/che-workspace-telemetry-example:latest
$ git clone https://github.com/che-incubator/che-workspace-telemetry-example
$ cd che-workspace-telemetry-example
$ docker build -t registry/organization/che-workspace-telemetry-example:latest
$ docker push registry/organization/che-workspace-telemetry-example:latest
In manifest.yaml, replace the image and host fields to match the image you pushed, and the public hostname of your OpenShift cluster. Then run:
oc apply -f manifest.yaml -n <namespace to deploy>
$ oc apply -f manifest.yaml -n <namespace to deploy>9.3.2. Creating a new Maven project
For fast feedback when developing, it is recommended to do development inside a CodeReady Workspaces workspace. This way, you can run the application in a cluster and connect to the workspaces front-end telemetry plug-in to send events to your custom back-end.
Create a new Maven Quarkus project scaffolding:
mvn io.quarkus:quarkus-maven-plugin:1.2.1.Final:create \
  -DprojectGroupId=mygroup -DprojectArtifactId=telemetryback-end \
  -DprojectVersion=my-version -DclassName="org.my.group.MyResource"
$ mvn io.quarkus:quarkus-maven-plugin:1.2.1.Final:create \
  -DprojectGroupId=mygroup -DprojectArtifactId=telemetryback-end \
  -DprojectVersion=my-version -DclassName="org.my.group.MyResource"
Copy to Clipboard Copied! Toggle word wrap Toggle overflow Add a dependency to
org.eclipse.che.incubator.workspace-telemetry.back-end-basein yourpom.xml:pom.xml
Copy to Clipboard Copied! Toggle word wrap Toggle overflow - Add the Apache HTTP components library to send HTTP requests.
-
Consult the GitHub packages for the latest version and Maven coordinates of
back-end-base. GitHub packages require a personal access token withread:packagespermissions to download the CodeReady Workspaces telemetry libraries. Create a personal access token and copy the token value. Create a
settings.xmlfile in the repository root and add the coordinates and token to theche-incubatorpackages:settings.xml
Copy to Clipboard Copied! Toggle word wrap Toggle overflow This file is used when packaging the application in a container. When running locally, add the information to your personal
settings.xmlfile.
9.3.3. Running the application
Run and test the application is in a CodeReady Workspaces workspace:
mvn quarkus:dev -Dquarkus.http.port=${CHE_WORKSPACE_TELEMETRY_BACKEND_PORT}
$ mvn quarkus:dev -Dquarkus.http.port=${CHE_WORKSPACE_TELEMETRY_BACKEND_PORT}
If CodeReady Workspaces is secured using a self-signed certificate, add the certificate to a trust store and mount it into the workspace. Also add the Java system property, -Djavax.net.ssl.trustStore=/path/to/trustStore, to the mvn command. For example, assuming the trust store is located in $JAVA_HOME/jre/lib/security/cacerts:
keytool -import -alias self-signed-certificate \
  -file <path/to/self-signed-certificate> -keystore $JAVA_HOME/jre/lib/security/cacerts
$ keytool -import -alias self-signed-certificate \
-file <path/to/self-signed-certificate> -keystore $JAVA_HOME/jre/lib/security/cacertsFollowed by:
mvn quarkus:dev -Dquarkus.http.port=${CHE_WORKSPACE_TELEMETRY_BACKEND_PORT} \
  -Djavax.net.ssl.trustStore=$JAVA_HOME/jre/lib/security/cacerts
$ mvn quarkus:dev -Dquarkus.http.port=${CHE_WORKSPACE_TELEMETRY_BACKEND_PORT} \
-Djavax.net.ssl.trustStore=$JAVA_HOME/jre/lib/security/cacerts9.3.4. Creating a concrete implementation of AnalyticsManager and adding specialized logic
Create two new files in your project:
-
AnalyticsManager.javacontains the logic specific to our telemetry system. -
MainConfiguration.javais the main entrypoint that creates an instance ofAnalyticsManagerand starts listening for events.
AnalyticsManager.java
MainConfiguration.java
9.3.5. Implementing isEnabled()
For the purposes of the example, this method just returns true whenever it is called. Whenever the server is running, it is enabled and operational.
AnalyticsManager.java
@Override
public boolean isEnabled() {
    return true;
}
@Override
public boolean isEnabled() {
    return true;
}
It is possible to put more a complex login in isEnabled(). For example, the service should not be considered operational in certain cases. The hosted CodeReady Workspaces woopra back-end checks that a configuration property exists before determining if the back-end is enabled.
9.3.6. Implementing onEvent()
onEvent() sends the event passed to the back-end to the telemetry system. For the example application, it sends an HTTP POST payload to our server. The example telemetry server application is deployed to OpenShift at the following URL: http://little-telemetry-back-end-che.apps-crc.testing.
AnalyticsManager.java
This sends an HTTP request to the telemetry server and automatically debounces identical events in a small time period (the default is 1500 milliseconds, and it can be changed by subclasses.
9.3.7. Implementing increaseDuration()
Many telemetry systems recognize event duration. The AbstractAnalyticsManager merges similar events that happen in the same frame of time into one event, so that you do not get several identical events sent to the server in a small frame of time. This implementation of increaseDuration() is a no-op. This method uses the APIs of your telemetry provider to alter the event or event properties to reflect an increased duration of the event.
AnalyticsManager.java
@Override
public void increaseDuration(AnalyticsEvent event, Map<String, Object> properties) {}
@Override
public void increaseDuration(AnalyticsEvent event, Map<String, Object> properties) {}9.3.8. Implementing onActivity()
Set an inactive timeout limit, and use onActivity() to send a WORKSPACE_INACTIVE event if the last event time is longer than the inactivity timeout.
AnalyticsManager.java
9.3.9. Implementing destroy()
When destroy() is called, send a WORKSPACE_STOPPED event and shutdown any resources, such as connection pools.
AnalyticsManager.java
@Override
public void destroy() {
    onEvent(WORKSPACE_STOPPED, lastOwnerId, lastIp, lastUserAgent, lastResolution, commonProperties);
}
@Override
public void destroy() {
    onEvent(WORKSPACE_STOPPED, lastOwnerId, lastIp, lastUserAgent, lastResolution, commonProperties);
}
Now when you run mvn quarkus:dev as described in Section 9.3.3, “Running the application”, you should see a WORKSPACE_STOPPED event sent to the server when you kill the Quarkus application.
9.3.10. Packaging the Quarkus application
See the quarkus documentation for the best instructions to package the application in a container. Build and push the container to a container registry of your choice.
9.3.11. Creating a meta.yaml for your plug-in.
Create a meta.yaml definition representing a CodeReady Workspaces plug-in that runs your custom back-end in a workspace Pod. For more information on meta.yaml, see Section 4.1, “What is a Che-Theia plug-in”.
meta.yaml
Ordinarily, you would deploy this file to a corporate web server. For this guide, we create an Apache web server on OpenShift and host the plug-in there. Create a configMap referencing your new meta.yaml file.
oc create configmap --from-file=meta.yaml -n che telemetry-plugin-meta
$ oc create configmap --from-file=meta.yaml -n che telemetry-plugin-meta
Then create a deployment, a service, and a route to expose the web server. The deployment references this configMap and places it in the /var/www/html directory.
manifests.yaml
oc apply -f manifests.yaml
$ oc apply -f manifests.yaml
Wait a few minutes for the image to pull and the deployment to start, and then confirm that meta.yaml is available in the web server:
curl apache-che.apps-crc.testing/meta.yaml
$ curl apache-che.apps-crc.testing/meta.yaml
This command should return the meta.yaml file.
9.3.12. Updating CodeReady Workspaces to reference your telemetry plug-in
Update the CheCluster Custom Resource, and add the CHE_WORKSPACE_DEVFILE_DEFAULT__EDITOR_PLUGINS environment variable to spec.server.customCheProperties. The value of the environment variable should be the URL of the location of the meta.yaml file on your web server. This can be accomplished by running oc edit checluster -n che and typing in the change at the terminal, or by editing the CR in the OpenShift console (Installed Operators
Wait for the CodeReady Workspaces server to restart, and create a new workspace. You should see a new message saying that your plug-in is being installed into the workspace.

Perform a some operations in the workspace you started. You should see those events in the logs of the example telemetry server.
9.3.13. Summary
In this guide, you:
- Created a telemetry server to echo events to standard out.
- Extended the CodeReady Workspaces telemetry client and implemented your own custom back-end.
-
Created a
meta.yamlfile to represent a CodeReady Workspaces workspace plug-in for your custom back-end. -
Told CodeReady Workspaces where to find your custom plug-in by changing the
CHE_WORKSPACE_DEVFILE_DEFAULT__EDITOR_PLUGINSenvironment variable.
9.4. The Woopra Telemetry Plugin
The Woopra Telemetry Plugin is a plugin built to send telemetry from a Red Hat CodeReady Workspaces installation to Segment and Woopra. This plugin is used by Hosted Che, but any Red Hat CodeReady Workspaces deployment can take advantage of this plugin. There are no dependencies other than a valid Woopra domain and Segment Write key. The link:https://raw.githubusercontent.com/che-incubator/che-workspace-telemetry-woopra-plugin/master/meta.yaml [plugin’s meta.yaml] file has 5 environment variables that can be passed to the plugin:
-
WOOPRA_DOMAIN- The Woopra domain to send events to. -
SEGMENT_WRITE_KEY- The write key to send events to Segment and Woopra. -
WOOPRA_DOMAIN_ENDPOINT- If you prefer not to pass in the Woopra domain directly, the plugin will get it from a supplied HTTP endpoint that returns the Woopra Domain. -
SEGMENT_WRITE_KEY_ENDPOINT- If you prefer not to pass in the Segment write key directly, the plugin will get it from a supplied HTTP endpoint that returns the Segment write key.
To enable the Woopra plugin on your Red Hat CodeReady Workspaces installation, deploy the meta.yaml file to an HTTP server with the environment variables set correctly. Then, edit the CheCluster Custom Resource, and set the spec.server.customCheProperties.CHE_WORKSPACE_DEVFILE_DEFAULT__EDITOR_PLUGINS field:
spec:
  server:
    customCheProperties:
      CHE_WORKSPACE_DEVFILE_DEFAULT__EDITOR_PLUGINS: 'eclipse/che-machine-exec-plugin/7.20.0,https://your-web-server/meta.yaml'
spec:
  server:
    customCheProperties:
      CHE_WORKSPACE_DEVFILE_DEFAULT__EDITOR_PLUGINS: 'eclipse/che-machine-exec-plugin/7.20.0,https://your-web-server/meta.yaml'