이 콘텐츠는 선택한 언어로 제공되지 않습니다.
Chapter 3. Security management
Security management is the process of managing users, groups, and permissions. You can control access to Business Central resources and features from the Business Central Security management page.
Business Central defines three types of entities for security management: users, groups, and roles. You can assign permissions to both roles and groups. A user inherits permissions from the groups and roles that the user is a member of.
3.1. Security management providers
In the context of security management, a realm restricts access to different application resources. Realms contain information about users, groups, roles, and permissions. A concrete user and group management service implementation for a specific realm is called a security management provider.
If the built-in security management providers do not meet the requirements of your application security realm, then you can build and register your own security management provider.
If the security management provider is not installed, the user interface for managing the security realm is not available. After you install and configure a security management provider, the user and group management features are automatically enabled in the security management user interface.
Business Central includes the Red Hat JBoss EAP security management provider which supports realm types based on the contents of the application-users.properties or application-roles.properties property file.
You can build and register your own Red Hat JBoss EAP security management provider. To use the Red Hat JBoss EAP security management provider based on property files, complete the steps in this procedure.
Prerequisites
- Red Hat JBoss EAP is installed.
Procedure
To use an existing users or roles property file from the Red Hat JBoss EAP instance, include the following system properties in the
EAP_HOME/standalone/configuration/application-users.propertiesandEAP_HOME/standalone/configuration/application-roles.propertiesfiles, as shown in the following example:<property name="org.uberfire.ext.security.management.wildfly.properties.realm" value="ApplicationRealm"/> <property name="org.uberfire.ext.security.management.wildfly.properties.users-file-path" value="/standalone/configuration/application-users.properties"/> <property name="org.uberfire.ext.security.management.wildfly.properties.groups-file-path" value="/standalone/configuration/application-roles.properties"/>
<property name="org.uberfire.ext.security.management.wildfly.properties.realm" value="ApplicationRealm"/> <property name="org.uberfire.ext.security.management.wildfly.properties.users-file-path" value="/standalone/configuration/application-users.properties"/> <property name="org.uberfire.ext.security.management.wildfly.properties.groups-file-path" value="/standalone/configuration/application-roles.properties"/>Copy to Clipboard Copied! Toggle word wrap Toggle overflow The following table provides a description and default value for these properties:
Expand Table 3.1. Red Hat JBoss EAP security management provider based on property files Property Description Default value org.uberfire.ext.security.management.wildfly.properties.realmThe name of the realm. This property is not mandatory.
ApplicationRealmorg.uberfire.ext.security.management.wildfly.properties.users-file-pathThe absolute file path for the users property file. This property is mandatory.
./standalone/configuration/application-users.propertiesorg.uberfire.ext.security.management.wildfly.properties.groups-file-pathThe absolute file path for the groups property file. This property is mandatory.
./standalone/configuration/application-roles.propertiesCreate the
security-management.propertiesfile in the root directory of your application. For example, create the following file:src/main/resources/security-management.properties
src/main/resources/security-management.propertiesCopy to Clipboard Copied! Toggle word wrap Toggle overflow Enter the following system property and security provider name as a value in the
security-management.propertiesfile:<property name="org.uberfire.ext.security.management.api.userManagementServices" value="WildflyUserManagementService"/>
<property name="org.uberfire.ext.security.management.api.userManagementServices" value="WildflyUserManagementService"/>Copy to Clipboard Copied! Toggle word wrap Toggle overflow
To use the Red Hat JBoss EAP security management provider based on property files and CLI mode, complete the steps in this procedure.
Prerequisites
- Red Hat JBoss EAP is installed.
Procedure
To use an existing users or roles property file from the Red Hat JBoss EAP instance, include the following system properties in the
EAP_HOME/standalone/configuration/application-users.propertiesandEAP_HOME/standalone/configuration/application-roles.propertiesfiles, as shown in the following example:<property name="org.uberfire.ext.security.management.wildfly.cli.host" value="localhost"/> <property name="org.uberfire.ext.security.management.wildfly.cli.port" value="9990"/> <property name="org.uberfire.ext.security.management.wildfly.cli.user" value="<USERNAME>"/> <property name="org.uberfire.ext.security.management.wildfly.cli.password" value="<USER_PWD>"/> <property name="org.uberfire.ext.security.management.wildfly.cli.realm" value="ApplicationRealm"/>
<property name="org.uberfire.ext.security.management.wildfly.cli.host" value="localhost"/> <property name="org.uberfire.ext.security.management.wildfly.cli.port" value="9990"/> <property name="org.uberfire.ext.security.management.wildfly.cli.user" value="<USERNAME>"/> <property name="org.uberfire.ext.security.management.wildfly.cli.password" value="<USER_PWD>"/> <property name="org.uberfire.ext.security.management.wildfly.cli.realm" value="ApplicationRealm"/>Copy to Clipboard Copied! Toggle word wrap Toggle overflow The following table provides a description and default value for these properties:
Expand Table 3.2. Red Hat JBoss EAP security management provider based on property files and CLI mode Property Description Default value org.uberfire.ext.security.management.wildfly.cli.hostThe native administration interface host.
localhostorg.uberfire.ext.security.management.wildfly.cli.portThe native administration interface port.
9990org.uberfire.ext.security.management.wildfly.cli.userThe native administration interface username.
NA
org.uberfire.ext.security.management.wildfly.cli.passwordThe native administration interface user’s password.
NA
org.uberfire.ext.security.management.wildfly.cli.realmThe realm used by the application’s security context.
ApplicationRealmCreate the
security-management.propertiesfile in the root directory of your application. For example, create the following file:src/main/resources/security-management.properties
src/main/resources/security-management.propertiesCopy to Clipboard Copied! Toggle word wrap Toggle overflow Enter the following system property and security provider name as a value in the
security-management.propertiesfile:<property name="org.uberfire.ext.security.management.api.userManagementServices" value="WildflyCLIUserManagementService"/>
<property name="org.uberfire.ext.security.management.api.userManagementServices" value="WildflyCLIUserManagementService"/>Copy to Clipboard Copied! Toggle word wrap Toggle overflow
3.2. Permissions and settings
A permission is an authorization granted to a user to perform actions related to a specific resource within the application. For example, a user can have following permissions:
- View a page.
- Save the project.
- View a repository.
- Delete a dashboard.
You can grant or deny a permission and a permission can be global or resource specific. You can use permissions to protect access to resources and customize features within the application.
3.2.1. Changing permissions for groups and roles in Business Central
In Business Central, you cannot change permissions for an individual user. However, you can change permissions for groups and roles. The changed permissions apply to users with the role or that belong to a group that you changed.
Any changes that you make to roles or groups affect all of the users associated with that role or group.
Prerequisites
-
You are logged in to Business Central with the
adminuser role.
Procedure
- To access the Security management page in Business Central, select the Admin icon in the top-right corner of the screen.
Click Roles, Groups, or Users on the Business Central Settings page.
The Security management page opens on the tab for the icon that you clicked.
- From the list, click the role or group you want to edit. All details are displayed in the right panel.
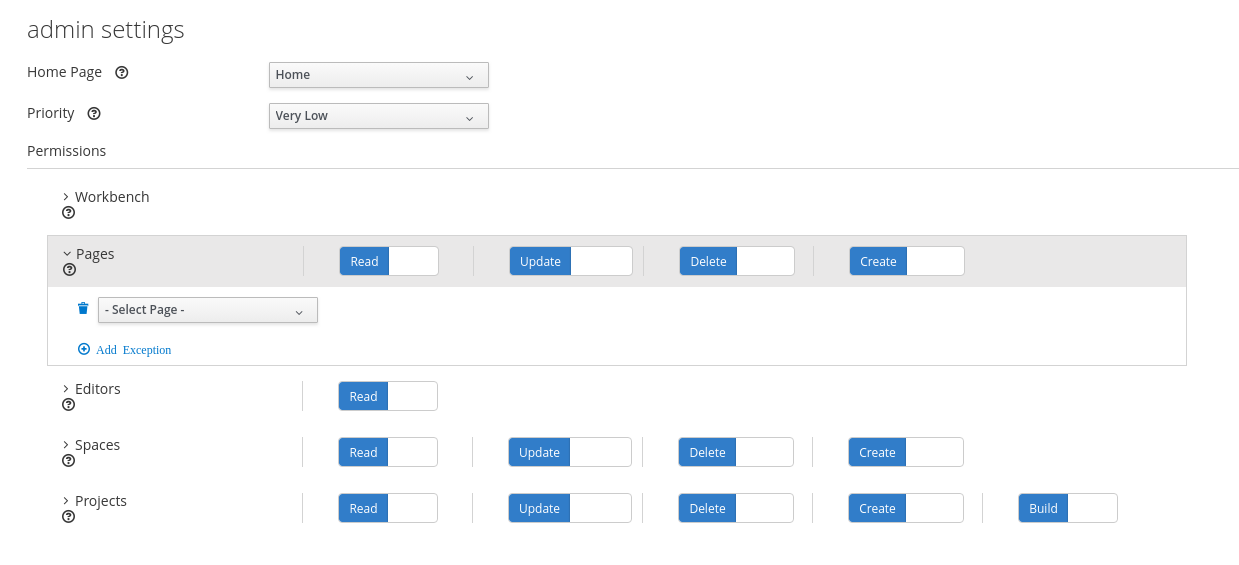
- Set the Home Page or Priority under the Settings section.
Set the Business Central, page, editor, space, and project permissions under the Permissions section.
Figure 3.1. Setting the permissions
- Click the arrow next to a resource type to expand the resource type whose permissions you want to change.
Optional: To add an exception for a resource type, click Add Exception and then set the permissions as required.
NoteYou cannot add an exception to the Business Central resource type.
- Click Save.
3.2.2. Changing the Business Central home page
The home page is the page that appears after you log in to Business Central. By default, the home page is set to Home. You can specify a different home page for each role and group.
Procedure
- In Business Central, select the Admin icon in the top-right corner of the screen and select Roles or Groups.
- Select a role or group.
- Select a page from the Home Page list.
Click Save.
NoteThe role or group must have read access to a page before you can make it the home page.
3.2.3. Setting priorities
A user can have multiple roles and belong to multiple groups. The Priority setting determines the order of precedence of a role or group.
Prerequisites
-
You are logged in to Business Central with the
adminuser role.
Procedure
- In Business Central, select the Admin icon in the top-right corner of the screen and select Roles or Groups.
- Select a role or group.
- Select a priority from the Priority menu, and then click Save.
If a user has a role or belongs to a group that has conflicting settings, the settings of the role or group with the highest priority applies.