이 콘텐츠는 선택한 언어로 제공되지 않습니다.
2.2. Creating a Cluster with the pcsd Web UI
From the page, you can create a new cluster, add an existing cluster to the Web UI, or remove a cluster from the Web UI.
- To create a cluster, click on Create New and enter the name of the cluster to create and the nodes that constitute the cluster. You can also configure advanced cluster options from this screen, including the transport mechanism for cluster communication, as described in Section 2.2.1, “Advanced Cluster Configuration Options”. After entering the cluster information, click .
- To add an existing cluster to the Web UI, click on Add Existing and enter the host name or IP address of a node in the cluster that you would like to manage with the Web UI.
Once you have created or added a cluster, the cluster name is displayed on the page. Selecting the cluster displays information about the cluster.
Note
When using the
pcsd Web UI to configure a cluster, you can move your mouse over the text describing many of the options to see longer descriptions of those options as a tooltip display.
2.2.1. Advanced Cluster Configuration Options
링크 복사링크가 클립보드에 복사되었습니다!
When creating a cluster, you can click on to configure additional cluster options, as shown in Figure 2.2, “Create Clusters page”. For information about the options displayed, move your mouse over the text for that option.
Note that you can configure a cluster with Redundant Ring Protocol by specifying the interfaces for each node. The Redundant Ring Protocol settings display will change if you select rather than the default value of as the transport mechanism for the cluster.
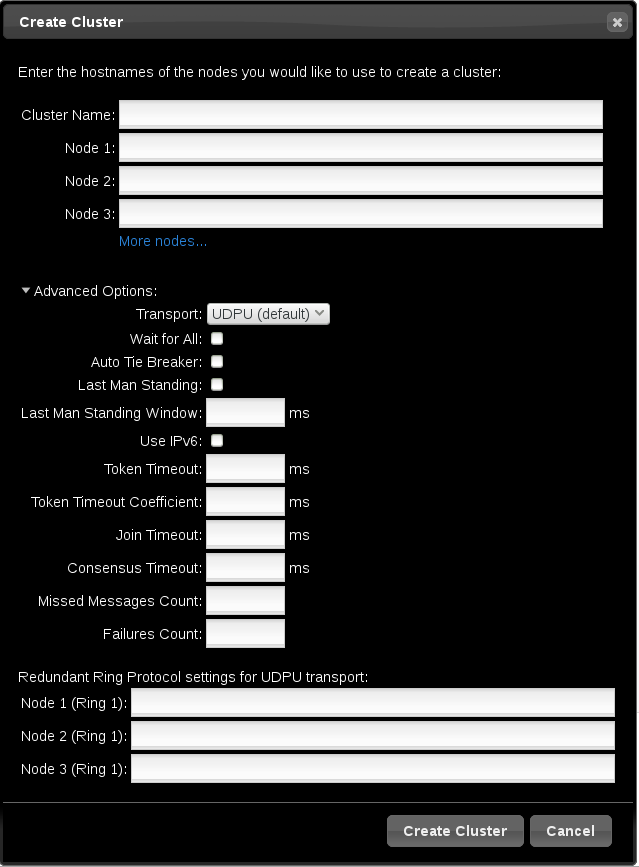
Figure 2.2. Create Clusters page
2.2.2. Setting Cluster Management Permissions
링크 복사링크가 클립보드에 복사되었습니다!
There are two sets of cluster permissions that you can grant to users:
- Permissions for managing the cluster with the Web UI, which also grants permissions to run
pcscommands that connect to nodes over a network. This section describes how to configure those permissions with the Web UI. - Permissions for local users to allow read-only or read-write access to the cluster configuration, using ACLs. Configuring ACLs with the Web UI is described in Section 2.3.4, “Configuring ACLs”.
For further information on user permissions, see Section 4.5, “Setting User Permissions”.
You can grant permission for specific users other than user
hacluster to manage the cluster through the Web UI and to run pcs commands that connect to nodes over a network by adding them to the group haclient. You can then configure the permissions set for an individual member of the group haclient by clicking the tab on the page and setting the permissions on the resulting screen. From this screen, you can also set permissions for groups.
You can grant the following permissions:
- Read permissions, to view the cluster settings
- Write permissions, to modify cluster settings (except for permissions and ACLs)
- Grant permissions, to modify cluster permissions and ACLs
- Full permissions, for unrestricted access to a cluster, including adding and removing nodes, with access to keys and certificates