2.8. OpenShift 3.x 서버에 Fuse 이미지 스트림 및 템플릿 설치
registry.redhat.io 에 대한 인증을 구성한 후 OpenShift 이미지 스트림 및 템플릿에서 Red Hat Fuse를 가져와서 사용합니다.
프로세스
- OpenShift Server를 시작합니다.
관리자로 OpenShift 서버에 로그인합니다.
oc login -u system:admin
oc login -u system:adminCopy to Clipboard Copied! Toggle word wrap Toggle overflow docker-registry 시크릿을 생성한 프로젝트를 사용하고 있는지 확인합니다.
oc project openshift
oc project openshiftCopy to Clipboard Copied! Toggle word wrap Toggle overflow OpenShift 이미지 스트림에 Fuse를 설치합니다.
BASEURL=https://raw.githubusercontent.com/jboss-fuse/application-templates/application-templates-2.1.0.fuse-7_13_0-00014-redhat-00001

oc create -n openshift -f ${BASEURL}/fis-image-streams.json
BASEURL=https://raw.githubusercontent.com/jboss-fuse/application-templates/application-templates-2.1.0.fuse-7_13_0-00014-redhat-00001 oc create -n openshift -f ${BASEURL}/fis-image-streams.jsonCopy to Clipboard Copied! Toggle word wrap Toggle overflow 빠른 시작 템플릿을 설치합니다.
Copy to Clipboard Copied! Toggle word wrap Toggle overflow Spring Boot 2 빠른 시작 템플릿을 설치합니다.
Copy to Clipboard Copied! Toggle word wrap Toggle overflow Fuse Console용 템플릿을 설치합니다.
oc create -n openshift -f ${BASEURL}/fis-console-cluster-template.json
oc create -n openshift -f ${BASEURL}/fis-console-namespace-template.json
oc create -n openshift -f ${BASEURL}/fis-console-cluster-template.json oc create -n openshift -f ${BASEURL}/fis-console-namespace-template.jsonCopy to Clipboard Copied! Toggle word wrap Toggle overflow 참고Fuse Console 배포에 대한 자세한 내용은 OpenShift에 Fuse Console 설정을 참조하십시오.
Apicurito 템플릿을 설치합니다.
oc create -n openshift -f ${BASEURL}/fuse-apicurito.ymloc create -n openshift -f ${BASEURL}/fuse-apicurito.ymlCopy to Clipboard Copied! Toggle word wrap Toggle overflow (선택 사항) OpenShift 이미지 및 템플릿에서 설치된 Fuse를 확인합니다.
oc get template -n openshift
oc get template -n openshiftCopy to Clipboard Copied! Toggle word wrap Toggle overflow
2.8.1. OpenShift 3.11에서 Fuse 콘솔 설정
OpenShift 3.11에서는 Fuse Console에 액세스할 수 있습니다.
- 프로젝트에서 실행 중인 모든 Fuse 컨테이너를 모니터링할 수 있도록 OpenShift 프로젝트에 Fuse Console을 추가하면 됩니다.
- 클러스터의 모든 프로젝트에서 실행 중인 모든 Fuse 컨테이너를 모니터링할 수 있도록 OpenShift 클러스터에 Fuse 콘솔을 추가하면 됩니다.
- 실행 중인 단일 Fuse 컨테이너를 모니터링할 수 있도록 특정 Fuse Pod에서 파일을 엽니다.
명령줄에서 Fuse Console 템플릿을 배포합니다.
Minishift 또는 CDK 기반 환경에 Fuse 콘솔을 설치하려면 아래 KCS 문서에 설명된 단계를 따르십시오.
- Minishift 또는 CDK 기반 환경에 Fuse Console을 설치하려면 KCS 4998441 을 참조하십시오.
- Jolokia 인증을 비활성화해야 하는 경우 KCS 3988671 에 설명된 해결방법을 참조하십시오.
사전 요구 사항
- OpenShift의 Fuse에 설명된 대로 OpenShift 이미지 스트림에 Fuse 및 Fuse 콘솔 템플릿을 설치합니다.
- Fuse Console의 사용자 관리는 OpenShift에서 처리합니다.
- 배포 후 Fuse Console에 액세스하는 사용자의 경우 OpenShift 3.11의 Fuse에서 역할 기반 액세스 제어를 사용할 수 없습니다.
2.8.1.1절. “OpenShift 3.11에 Fuse 콘솔 배포”
2.8.1.2절. “OpenShift 3.11의 Fuse Console에서 단일 Fuse Pod 모니터링”
2.8.1.1. OpenShift 3.11에 Fuse 콘솔 배포
표 2.7. “Fuse 콘솔 템플릿” Fuse 애플리케이션 배포 유형에 따라 명령줄에서 Fuse Console을 배포하는 데 사용할 수 있는 OpenShift 3.11 템플릿에 대해 설명합니다.
| 유형 | 설명 |
|---|---|
|
| Fuse Console은 여러 네임스페이스 또는 프로젝트에 배포된 Fuse 애플리케이션을 검색하고 연결할 수 있습니다. 이 템플릿을 배포하려면 OpenShift cluster-admin 역할이 있어야 합니다. |
|
| 이 템플릿은 현재 OpenShift 프로젝트(네임스페이스)에 대한 Fuse Console 액세스를 제한하므로 단일 테넌트 배포 역할을 합니다. 이 템플릿을 배포하려면 현재 OpenShift 프로젝트에 대한 admin 역할이 있어야 합니다. |
선택적으로 다음 명령을 실행하여 모든 템플릿에 대한 매개변수 목록을 볼 수 있습니다.
oc process --parameters -f https://raw.githubusercontent.com/jboss-fuse/application-templates/application-templates-2.1.0.fuse-7_13_0-00014-redhat-00001/fis-console-namespace-template.json
oc process --parameters -f https://raw.githubusercontent.com/jboss-fuse/application-templates/application-templates-2.1.0.fuse-7_13_0-00014-redhat-00001/fis-console-namespace-template.jsonFuse Console 템플릿은 브라우저에서 클러스터 내 서비스로의 보안 엔드 투 엔드 요청이 되도록 기본적으로 엔드 투 엔드 암호화를 구성합니다.
사전 요구 사항
OpenShift 3.11의 클러스터 모드의 경우 클러스터 관리자 역할 및 클러스터 모드 템플릿이 필요합니다. 다음 명령을 실행합니다.
oc adm policy add-cluster-role-to-user cluster-admin system:serviceaccount:openshift-infra:template-instance-controller
oc adm policy add-cluster-role-to-user cluster-admin system:serviceaccount:openshift-infra:template-instance-controllerCopy to Clipboard Copied! Toggle word wrap Toggle overflow
프로세스
명령줄에서 Fuse 콘솔을 배포하려면 다음을 수행합니다.
다음 명령 중 하나를 실행하여 Fuse Console 템플릿을 기반으로 새 애플리케이션을 생성합니다(여기서 myproject 는 프로젝트 이름임).
Fuse Console 클러스터 템플릿의 경우
myhost는 Fuse Console에 액세스할 수 있는 호스트 이름입니다.oc new-app -n myproject -f https://raw.githubusercontent.com/jboss-fuse/application-templates/application-templates-2.1.0.fuse-7_13_0-00014-redhat-00001/fis-console-cluster-template.json -p ROUTE_HOSTNAME=myhost
oc new-app -n myproject -f https://raw.githubusercontent.com/jboss-fuse/application-templates/application-templates-2.1.0.fuse-7_13_0-00014-redhat-00001/fis-console-cluster-template.json -p ROUTE_HOSTNAME=myhostCopy to Clipboard Copied! Toggle word wrap Toggle overflow Fuse Console 네임스페이스 템플릿의 경우:
oc new-app -n myproject -f https://raw.githubusercontent.com/jboss-fuse/application-templates/application-templates-2.1.0.fuse-7_13_0-00014-redhat-00001/fis-console-namespace-template.json
oc new-app -n myproject -f https://raw.githubusercontent.com/jboss-fuse/application-templates/application-templates-2.1.0.fuse-7_13_0-00014-redhat-00001/fis-console-namespace-template.jsonCopy to Clipboard Copied! Toggle word wrap Toggle overflow 참고OpenShift가 자동으로 생성되므로 네임스페이스 템플릿의 route_hostname 매개변수를 생략할 수 있습니다.
다음 명령을 실행하여 Fuse Console 배포의 상태 및 URL을 가져옵니다.
oc status
oc statusCopy to Clipboard Copied! Toggle word wrap Toggle overflow 브라우저에서 Fuse Console에 액세스하려면 제공된 URL을 사용합니다.
2.8.1.2. OpenShift 3.11의 Fuse Console에서 단일 Fuse Pod 모니터링
OpenShift 3.11에서 실행되는 Fuse Pod의 Fuse Console을 열 수 있습니다.
사전 요구 사항
포드 뷰에 Fuse Console에 대한 링크를 표시하도록 OpenShift를 구성하려면 OpenShift 이미지에서 Fuse를 실행하는 Pod에서
jolokia로 설정된 name 속성 내에서 TCP 포트를 선언해야 합니다.Copy to Clipboard Copied! Toggle word wrap Toggle overflow
프로세스
OpenShift 프로젝트의 애플리케이션
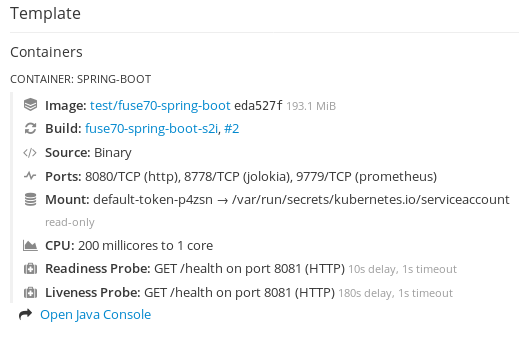
포드 보기에서 Pod 이름을 클릭하여 실행 중인 Fuse Pod의 세부 정보를 확인합니다. 이 페이지 오른쪽에는 컨테이너 템플릿에 대한 요약이 표시됩니다. 
이 보기에서 Open Java Console 링크를 클릭하여 Fuse 콘솔을 엽니다.
