이 콘텐츠는 선택한 언어로 제공되지 않습니다.
Chapter 3. Creating and managing remediation playbooks in Insights
The workflow to create playbooks is similar in each of the services in Insights for Red Hat Enterprise Linux. In general, you will fix one or more issues on a system or group of systems.
Playbooks focus on issues identified by Insights services. A recommended practice for playbooks is to include systems of the same RHEL major/minor versions because the resolutions will be compatible.
3.1. Creating a playbook to remediate a CVE vulnerability on RHEL systems
Create a remediation playbook in the Red Hat Insights vulnerability service. The workflow to create a playbook is similar for other services in Insights for Red Hat Enterprise Linux.
Prerequisites
- You are logged into the Red Hat Hybrid Cloud Console.
No enhanced User Access permissions are required to create remediation playbooks.
Procedure
- Navigate to the Security > Vulnerability > CVEs page.
- Set filters as needed and click on a CVE.
- Scroll down to view affected systems.
Select systems to include in a remediation playbook by clicking the box to the left of the system ID.
NoteInclude systems of the same RHEL major/minor version, which you can do by filtering the list of affected systems.
- Click the Remediate button.
Select whether to add the remediations to an existing or new playbook and take the following action:
- Click Add to existing playbook and select the desired playbook from the dropdown list, OR
- Click Create new playbook and add a playbook name.
- Click Next.
- Review the systems to include in the playbook, then click Next.
Review the information in the Remediation review summary.
- By default, autoreboot is enabled. You can disable this option by clicking Turn off autoreboot.
- Click Submit.
Verification step
- Navigate to Automation Toolkit > Remediations.
- Search for your playbook. You should see your playbook.
3.1.1. Creating playbooks to remediate CVEs with security rules when recommended and alternate resolution options exist
Most CVEs in Red Hat Insights for RHEL will have one remediation option for you to use to resolve an issue. Remediating a CVE with security rules might include more than one resolution a recommended and one or more alternate resolutions. The workflow to create playbooks for CVEs that have one or more resolution options is similar to the remediation steps in the advisor service.
For more information about security rules, see Security rules , and Filtering lists of systems exposed to security rules in Assessing and Monitoring Security Vulnerabilities on RHEL Systems .
Prerequisites
- You are logged into the Red Hat Hybrid Cloud Console.
You do not need enhanced User Access permissions to create remediation playbooks.
Procedure
- Navigate to Security > Vulnerability > CVEs.
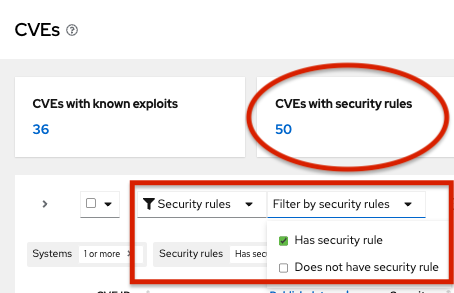
Set filters if needed (for example, filter to see CVEs with security rules to focus on issues that have elevated risk associated with them). Or, click the CVEs with security rules tile on the dashbar. Both options show in the example image.
-
Click a CVE in the list.

Scroll to view affected systems, and select systems you want to include in a remediation playbook by clicking the box to the left of the system ID on the Review systems page. (Selecting one or more systems activates the Remediate button.)
NoteRecommended: Include systems of the same RHEL major or minor version by filtering the list of affected systems.
- Click Remediate.
Decide whether to add the remediations to an existing or new playbook by taking one of the following actions:
- Choose Add to existing playbook and select the desired playbook from the dropdown list, OR
- Choose Create new playbook, and add a playbook name. For this example, HCCDOC-392.
- Click Next. A list of systems shows on the screen.
- Review the systems to include in the playbook (deselect any systems that you do not want to include).
Click Next to see the Review and edit actions page, which shows you options to remediate the CVE. The number of items to remediate can vary. You will also see additional information (that you can expand and collapse) about the CVE, such as:
- Action: Shows the CVE ID.
- Resolution: Displays the recommended resolution for the CVE. Shows if you have alternate resolution options.
- Reboot required: Shows whether you must reboot your systems.
- Systems: Shows the number of systems you are remediating.
On the Review and edit actions page, choose one of two options to finish creating your playbook:
Option 1: To review all of the recommended and alternative remediation options available (and choose one of those options):
- Select Review and/or change the resolution steps for this 1 action or similar based on your actual options.
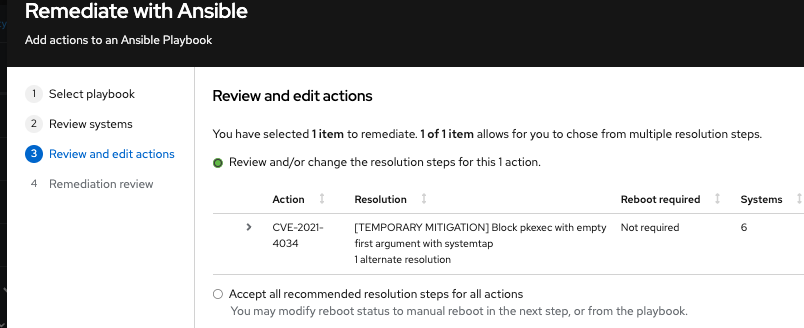
- Click Next.
On the Choose action: <CVE information> page, click a tile to select your preferred remediation option. The bottom edge of the tile highlights when you select it. The recommended solution is highlighted by default.
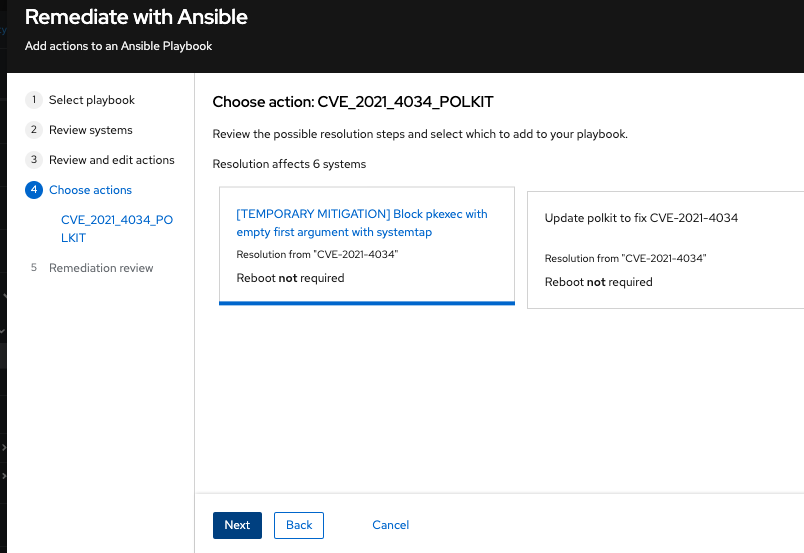
Click Next.
Option 2: To accept all recommended remediations:
- Choose Accept all recommended resolutions steps for all actions.
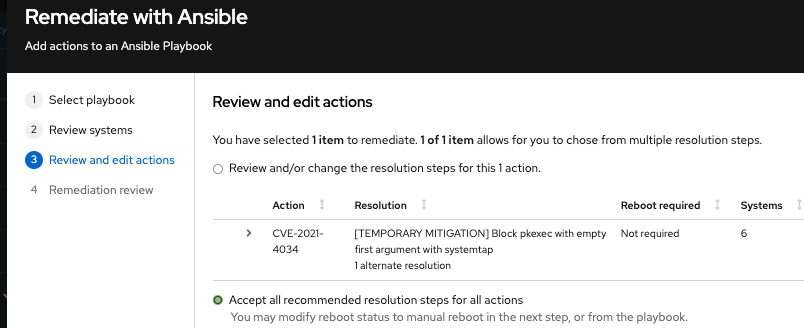
Review information about your selections and change options for autoreboot of systems on the Remediations review page. The page shows you the:
- Issues you are adding to your playbook.
- Options for changing system autoreboot requirements.
Summary about CVEs and resolution options to fix them.
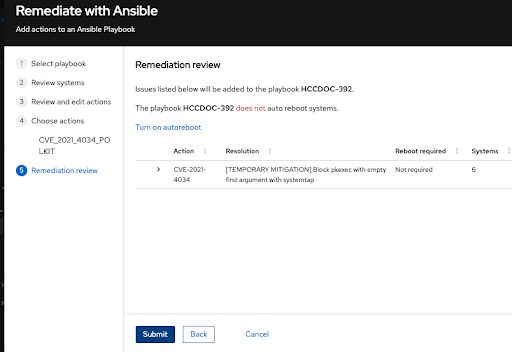
- Optional. Change autoreboot options on the Remediation review page, if needed. (Autoreboot is enabled by default, but your settings might vary based on your remediation options.)
- Click Submit. A notification displays that shows the number of remediation actions added to your playbook, and other information about your playbook.
Verification step
- Navigate to Automation Toolkit > Remediations.
- Search for your playbook.
- To run (execute) your playbook, see Executing remediation playbooks from Insights for Red Hat Enterprise Linux.
3.2. Managing remediation playbooks in Insights for Red Hat Enterprise Linux
You can download, archive, and delete existing remediation playbooks for your organization. The following procedures describe how to perform common playbook-management tasks.
Prerequisites
- You are logged into the Red Hat Hybrid Cloud Console.
No enhanced permissions are required to view, edit, or download information about existing playbooks.
3.2.1. Downloading a remediation playbook
Use the following procedure to download a remediation playbook from the Insights for Red Hat Enterprise Linux application.
Procedure
- Navigate to Automation Toolkit > Remediations.
- Locate the playbook you want to manage and click on the name of the playbook. The playbook details are visible.
- Click the Download playbook button to download the playbook YAML file to your local drive.
3.2.2. Archiving a remediation playbook
You can archive a remediation playbook that is no longer needed, but the details of which you want to preserve.
Procedure
- Navigate to Automation Toolkit > Remediations.
- Locate the playbook you want to archive.
- Click on the options icon (⋮) and select Archive playbook. The playbook is archived.
3.2.3. Viewing archived remediation playbooks
You can view archived remediation playbooks in Insights for Red Hat Enterprise Linux.
Procedure
- Navigate to Automation Toolkit > Remediations.
-
Click the More options icon
 that is to the right of the Download playbook button and select Show archived playbooks.
3.2.4. Deleting a remediation playbook
You can delete a playbooks that is no longer needed.
Procedure
- Navigate to Automation Toolkit > Remediations.
- Locate and click on the name of the playbook you want to delete.
-
On the playbook details page, click the More options icon
 and select Delete.
3.2.5. Monitoring remediation status
You can view the remediation status for each playbook that you execute from the Insights for Red Hat Enterprise Linux remediations service. The status information tells you the results of the latest activity and provides a summary of all activity for playbook execution. You can also view log information for playbook execution.
Prerequisites
- You are logged into the Red Hat Hybrid Cloud Console.
Procedure
- Navigate to Automation Toolkit > Remediations. The page displays a list of remediation playbooks.
- Click on the name of a playbook.
- From the Actions tab, click any item in the Status column to view a pop-up box with the status of the resolution.
To monitor the status of a playbook in the Satellite web UI, see Monitoring Remote Jobs in the Red Hat Satellite Managing Hosts guide.