이 콘텐츠는 선택한 언어로 제공되지 않습니다.
Chapter 3. Developing and running Camel K integrations
This chapter explains how to set up your development environment and how to develop and deploy simple Camel K integrations written in Java and YAML. It also shows how to use the kamel command line to manage Camel K integrations at runtime. For example, this includes running, describing, logging, and deleting integrations.
- Section 3.1, “Setting up your Camel K development environment”
- Section 3.2, “Developing Camel K integrations in Java”
- Section 3.3, “Developing Camel K integrations in YAML”
- Section 3.4, “Running Camel K integrations”
- Section 3.5, “Running Camel K integrations in development mode”
- Section 3.6, “Running Camel K integrations using modeline”
3.1. Setting up your Camel K development environment
You must set up your environment with the recommended development tooling before you can automatically deploy the Camel K quick start tutorials. This section explains how to install the recommended Visual Studio (VS) Code IDE and the extensions that it provides for Camel K.
- The Camel K VS Code extensions are community features.
- VS Code is recommended for ease of use and the best developer experience of Camel K. This includes automatic completion of Camel DSL code and Camel K traits, and automatic execution of tutorial commands. However, you can manually enter your code and tutorial commands using your chosen IDE instead of VS Code.
Prerequisites
You must have access to an OpenShift cluster on which the Camel K Operator and OpenShift Serverless Operator are installed:
Procedure
Install VS Code on your development platform. For example, on Red Hat Enterprise Linux:
Install the required key and repository:
sudo rpm --import https://packages.microsoft.com/keys/microsoft.asc
sudo sh -c 'echo -e "[code]\nname=Visual Studio Code\nbaseurl=https://packages.microsoft.com/yumrepos/vscode\nenabled=1\ngpgcheck=1\ngpgkey=https://packages.microsoft.com/keys/microsoft.asc" > /etc/yum.repos.d/vscode.repo'
$ sudo rpm --import https://packages.microsoft.com/keys/microsoft.asc
$ sudo sh -c 'echo -e "[code]\nname=Visual Studio Code\nbaseurl=https://packages.microsoft.com/yumrepos/vscode\nenabled=1\ngpgcheck=1\ngpgkey=https://packages.microsoft.com/keys/microsoft.asc" > /etc/yum.repos.d/vscode.repo'
Copy to Clipboard Copied! Toggle word wrap Toggle overflow Update the cache and install the VS Code package:
yum check-update
sudo yum install code
$ yum check-update
$ sudo yum install code
Copy to Clipboard Copied! Toggle word wrap Toggle overflow For details on installing on other platforms, see the VS Code installation documentation.
-
Enter the
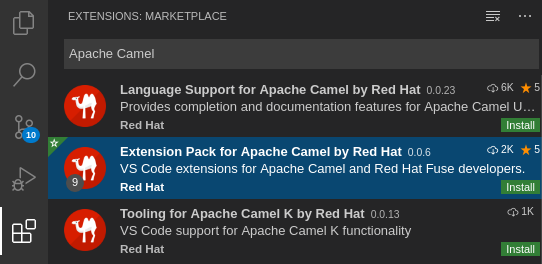
codecommand to launch the VS Code editor. For more details, see the VS Code command line documentation. Install the VS Code Camel Extension Pack, which includes the extensions required for Camel K. For example, in VS Code:
- In the left navigation bar, click Extensions.
- In the search box, enter Apache Camel.
Select the Extension Pack for Apache Camel by Red Hat, and click Install.
For more details, see the instructions for the Extension Pack for Apache Camel by Red Hat.
Install the VS Code Didact extension, which you can use to automatically run quick start tutorial commands by clicking links in the tutorial. For example, in VS Code:
- In the left navigation bar, click Extensions.
- In the search box, enter Didact.
Select the extension, and click Install.
For more details, see the instructions for the Didact extension.
3.2. Developing Camel K integrations in Java
This section shows how to develop a simple Camel K integration in Java DSL. Writing an integration in Java to be deployed using Camel K is the same as defining your routing rules in Camel. However, you do not need to build and package the integration as a JAR when using Camel K.
You can use any Camel component directly in your integration routes. Camel K automatically handles the dependency management and imports all the required libraries from the Camel catalog using code inspection.
Prerequisites
Procedure
Enter the
kamel initcommand to generate a simple Java integration file. For example:kamel init HelloCamelK.java
$ kamel init HelloCamelK.javaCopy to Clipboard Copied! Toggle word wrap Toggle overflow Open the generated integration file in your IDE and edit as appropriate. For example, the
HelloCamelK.javaintegration automatically includes the Cameltimerandlogcomponents to help you get started:Copy to Clipboard Copied! Toggle word wrap Toggle overflow
Next steps
3.3. Developing Camel K integrations in YAML
This section explains how to develop a simple Camel K integration in YAML DSL. Writing an integration in YAML to be deployed using Camel K is the same as defining your routing rules in Camel.
You can use any Camel component directly in your integration routes. Camel K automatically handles the dependency management and imports all the required libraries from the Camel catalog using code inspection.
Prerequisites
Procedure
Enter the
kamel initcommand to generate a simple YAML integration file. For example:kamel init hello.camelk.yaml
$ kamel init hello.camelk.yamlCopy to Clipboard Copied! Toggle word wrap Toggle overflow Open the generated integration file in your IDE and edit as appropriate. For example, the
hello.camelk.yamlintegration automatically includes the Cameltimerandlogcomponents to help you get started:Copy to Clipboard Copied! Toggle word wrap Toggle overflow
3.4. Running Camel K integrations
You can run Camel K integrations in the cloud on your OpenShift cluster from the command line using the kamel run command.
Prerequisites
- Setting up your Camel K development environment.
- You must already have a Camel integration written in Java or YAML DSL.
Procedure
Log into your OpenShift cluster using the
occlient tool, for example:oc login --token=my-token --server=https://my-cluster.example.com:6443
$ oc login --token=my-token --server=https://my-cluster.example.com:6443Copy to Clipboard Copied! Toggle word wrap Toggle overflow Ensure that the Camel K Operator is running, for example:
oc get pod
$ oc get pod
NAME                               READY   STATUS    RESTARTS   AGE
camel-k-operator-86b8d94b4-pk7d6   1/1     Running   0          6m28s
Copy to Clipboard Copied! Toggle word wrap Toggle overflow Enter the
kamel runcommand to run your integration in the cloud on OpenShift. For example:Java example
kamel run HelloCamelK.java
$ kamel run HelloCamelK.java
integration "hello-camel-k" created
Copy to Clipboard Copied! Toggle word wrap Toggle overflow YAML example
kamel run hello.camelk.yaml
$ kamel run hello.camelk.yaml
integration "hello" created
Copy to Clipboard Copied! Toggle word wrap Toggle overflow Enter the
kamel getcommand to check the status of the integration:kamel get
$ kamel get
NAME       PHASE           KIT
hello      Building Kit    myproject/kit-bq666mjej725sk8sn12g
Copy to Clipboard Copied! Toggle word wrap Toggle overflow When the integration runs for the first time, Camel K builds the integration kit for the container image, which downloads all the required Camel modules and adds them to the image classpath.
Enter
kamel getagain to verify that the integration is running:kamel get
$ kamel get
NAME       PHASE   KIT
hello      Running myproject/kit-bq666mjej725sk8sn12g
Copy to Clipboard Copied! Toggle word wrap Toggle overflow Enter the
kamel logcommand to print the log tostdout:Copy to Clipboard Copied! Toggle word wrap Toggle overflow -
Press
Ctrl-Cto terminate logging in the terminal.
Additional resources
-
For more details on the
kamel runcommand, enterkamel run --help - For faster deployment turnaround times, see Running Camel K integrations in development mode
- For details of development tools to run integrations, see VS Code Tooling for Apache Camel K by Red Hat
- See also Managing Camel K integrations
3.5. Running Camel K integrations in development mode
You can run Camel K integrations in development mode on your OpenShift cluster from the command line. Using development mode, you can iterate quickly on integrations in development and get fast feedback on your code.
When you specify the kamel run command with the --dev option, this deploys the integration in the cloud immediately and shows the integration logs in the terminal. You can then change the code and see the changes automatically applied instantly to the remote integration Pod on OpenShift. The terminal automatically displays all redeployments of the remote integration in the cloud.
The artifacts generated by Camel K in development mode are identical to those that you run in production. The purpose of development mode is faster development.
Prerequisites
- Setting up your Camel K development environment.
- You must already have a Camel integration written in Java or YAML DSL.
Procedure
Log into your OpenShift cluster using the
occlient tool, for example:oc login --token=my-token --server=https://my-cluster.example.com:6443
$ oc login --token=my-token --server=https://my-cluster.example.com:6443Copy to Clipboard Copied! Toggle word wrap Toggle overflow Ensure that the Camel K Operator is running, for example:
oc get pod
$ oc get pod
NAME                               READY   STATUS    RESTARTS   AGE
camel-k-operator-86b8d94b4-pk7d6   1/1     Running   0          6m28s
Copy to Clipboard Copied! Toggle word wrap Toggle overflow Enter the
kamel runcommand with--devto run your integration in development mode on OpenShift in the cloud. The following shows a simple Java example:Copy to Clipboard Copied! Toggle word wrap Toggle overflow Edit the content of your integration DSL file, save your changes, and see the changes displayed instantly in the terminal. For example:
Copy to Clipboard Copied! Toggle word wrap Toggle overflow -
Press
Ctrl-Cto terminate logging in the terminal.
Additional resources
-
For more details on the
kamel runcommand, enterkamel run --help - For details of development tools to run integrations, see VS Code Tooling for Apache Camel K by Red Hat
- Managing Camel K integrations
- Configuring Camel K integration dependencies
3.6. Running Camel K integrations using modeline
You can use the Camel K modeline to specify multiple configuration options in a Camel K integration source file, which are executed at runtime. This creates efficiencies by saving you the time of re-entering multiple command line options and helps to prevent input errors.
The following example shows a modeline entry from a Java integration file that enables 3scale and limits the integration container memory.
Prerequisites
- Setting up your Camel K development environment
- You must already have a Camel integration written in Java or YAML DSL.
Procedure
Add a Camel K modeline entry to your integration file. For example:
ThreeScaleRest.java
Copy to Clipboard Copied! Toggle word wrap Toggle overflow - 1
- Enables both the container and 3scale traits, to expose the route through 3scale and to limit the container memory.
Run the integration, for example:
kamel run ThreeScaleRest.java
kamel run ThreeScaleRest.javaCopy to Clipboard Copied! Toggle word wrap Toggle overflow The
kamel runcommand outputs any modeline options specified in the integration, for example:Modeline options have been loaded from source files Full command: kamel run ThreeScaleRest.java --trait=3scale.enabled=true --trait=container.limit-memory=256Mi
Modeline options have been loaded from source files Full command: kamel run ThreeScaleRest.java --trait=3scale.enabled=true --trait=container.limit-memory=256MiCopy to Clipboard Copied! Toggle word wrap Toggle overflow
Additional resources
- Camel K modeline options
- For details of development tools to run modeline integrations, see Introducing IDE support for Apache Camel K Modeline.