이 콘텐츠는 선택한 언어로 제공되지 않습니다.
Chapter 10. Set up GitHub build trigger tags
Red Hat Quay supports using GitHub or GitHub Enterprise as a trigger to building images. If you have not yet done so, go ahead and enable build support in Red Hat Quay.
10.1. Understanding tag naming for build triggers
Prior to Red Hat Quay 3.3, how images created from build triggers were named was limited. Images built by build triggers were named:
- With the branch or tag whose change invoked the trigger
-
With a
latesttag for images that used the default branch
As of Red Hat Quay 3.3 and later, you have more flexibility in how you set image tags. The first thing you can do is enter custom tags, to have any string of characters assigned as a tag for each built image. However, as an alternative, you could use the following tag templates to to tag images with information from each commit:
- ${commit_info.short_sha}: The commit’s short SHA
- ${commit_info.date}: The timestamp for the commit
- ${commit_info.author}: The author from the commit
- ${commit_info.committer}: The committer of the commit
- ${parsed_ref.branch}: The branch name
The following procedure describes how you set up tagging for build triggers.
10.2. Setting tag names for build triggers
Follow these steps to configure custom tags for build triggers:
- From the repository view, select the Builds icon from the left navigation.
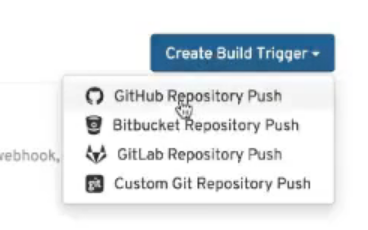
Select the Create Build Trigger menu, and select the type of repository push you want (GitHub, Bitbucket, GitLab, or Custom Git repository push). For this example, GitHub Repository Push is chosen, as illustrated in the following figure.
- When the Setup Build Trigger page appears, select the repository and namespace in which you want the trigger set up.
Under Configure Trigger, select either Trigger for all branches and tags or Trigger only on branches and tags matching a regular expression. Then select Continue. The Configure Tagging section appears, as shown in the following figure:

Scroll down to Configure Tagging and select from the following options:
- Tag manifest with the branch or tag name: Check this box to use the name of the branch or tag in which the commit occurred as the tag used on the image. This is enabled by default.
-
Add latest tag if on default branch: Check this box to use the
latesttag for the image if it is on the default branch for the repository. This is enabled by default. - Add custom tagging templates: Enter a custom tag or a template into the Enter a tag template box. There are multiple tag templates you can enter here, as described earlier in this section. They include ways of using short SHA, timestamps, author name, committer, and branch name from the commit as tags.
- Select Continue. You are prompted to select the directory build context for the Docker build. The build context directory identifies the location of the directory containing the Dockerfile, along with other files needed when the build is triggered. Enter "/" if the Dockerfile is in the root of the git repository.
- Select Continue. You are prompted to add an optional Robot Account. Do this if you want to pull a private base image during the build process. The robot account would need access to the build.
- Select Continue to complete the setup of the build trigger.
If you were to return to the Repository Builds page for the repository, the build triggers you set up will be listed under the Build Triggers heading.
