Este conteúdo não está disponível no idioma selecionado.
8.3. Configuring Publishing to an OCSP
The general process to configure publishing involves setting up a publisher to publish the certificates or CRLs to the specific location. There can be a single publisher or multiple publishers, depending on how many locations will be used. The locations can be split by certificates and CRLs or finer definitions, such as certificate type. Rules determine which type to publish and to what location by being associated with the publisher.
Publishing to an OCSP Manager is a way to publish CRLs to a specific location for client verification.
A publisher must be created and configured for each publishing location; publishers are not automatically created for publishing to the OCSP responder. Create a single publisher to publish everything to s single location, or create a publisher for every location to which CRLs will be published. Each location can contain a different kind of CRL.
8.3.1. Enabling Publishing to an OCSP with Client Authentication
Copiar o linkLink copiado para a área de transferência!
- Log into the Certificate Manager Console.
pkiconsole https://server.example.com:8443/ca
pkiconsole https://server.example.com:8443/caCopy to Clipboard Copied! Toggle word wrap Toggle overflow - In the Configuration tab, select Certificate Manager from the navigation tree on the left. Select Publishing, and then Publishers.
- Click to open the Select Publisher Plug-in Implementation window, which lists registered publisher modules.
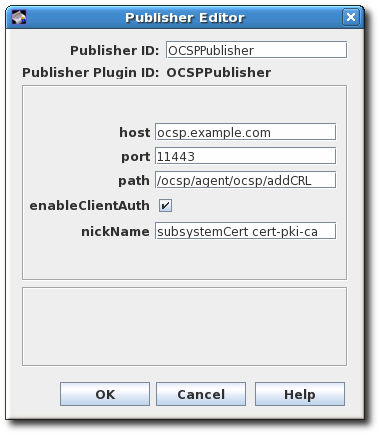
- Select the
OCSPPublishermodule, then open the editor window. This is the publisher module that enables the Certificate Manager to publish CRLs to the Online Certificate Status Manager.- The publisher ID must be an alphanumeric string with no spaces, like
PublishCertsToOCSP. - The host can be the fully-qualified domain name, such as
ocspResponder.example.com, or an IPv4 or IPv6 address. - The default path is the directory to send the CRL to, like
/ocsp/agent/ocsp/addCRL. - If client authentication is used (enableClientAuth is checked), then the nickname field gives the nickname of the certificate to use for authentication. This certificate must already exist in the OCSP security database; this will usually be the CA subsystem certificate.
- Create a user entry for the CA on the OCSP Manager. The user is used to authenticate to the OCSP when sending a new CRL. There are two things required:
- Name the OCSP user entry after the CA server, like
CA-hostname-EEport. - Use whatever certificate was specified in the publisher configuration as the user certificate in the OCSP user account. This is usually the CA's subsystem certificate.
Setting up subsystem users is covered in Section 14.3.2.1, “Creating Users”.


After configuring the publisher, configure the rules for the published certificates and CRLs, as described in Section 8.5, “Creating Rules”.