Este conteúdo não está disponível no idioma selecionado.
Chapter 1. Deploying OpenShift Container Storage on Red Hat OpenStack Platform in internal mode
Deploying OpenShift Container Storage on OpenShift Container Platform in internal mode using dynamic storage devices provided by Red Hat OpenStack Platform installer-provisioned infrastructure (IPI) enables you to create internal cluster resources. This results in internal provisioning of the base services, which helps to make additional storage classes available to applications.
1.1. Installing Red Hat OpenShift Container Storage Operator
You can install Red Hat OpenShift Container Storage Operator using the Red Hat OpenShift Container Platform Operator Hub. For information about the hardware and software requirements, see Planning your deployment.
Prerequisites
- You must be logged into the OpenShift Container Platform (RHOCP) cluster.
- You must have at least three worker nodes in the RHOCP cluster.
When you need to override the cluster-wide default node selector for OpenShift Container Storage, you can use the following command in command line interface to specify a blank node selector for the
openshift-storagenamespace:oc annotate namespace openshift-storage openshift.io/node-selector=
$ oc annotate namespace openshift-storage openshift.io/node-selector=Copy to Clipboard Copied! Toggle word wrap Toggle overflow -
Taint a node as
infrato ensure only Red Hat OpenShift Container Storage resources are scheduled on that node. This helps you save on subscription costs. For more information, see How to use dedicated worker nodes for Red Hat OpenShift Container Storage chapter in Managing and Allocating Storage Resources guide.
Procedure
-
Click Operators
OperatorHub in the left pane of the OpenShift Web Console. - Use Filter by keyword text box or the filter list to search for OpenShift Container Storage from the list of operators.
- Click OpenShift Container Storage.
- On the OpenShift Container Storage operator page, click Install.
On the Install Operator page, ensure the following options are selected by default::
- Update Channel as stable-4.6
- Installation Mode as A specific namespace on the cluster
-
Installed Namespace as Operator recommended namespace openshift-storage. If Namespace
openshift-storagedoes not exist, it will be created during the operator installation. - Select Enable operator recommended cluster monitoring on this namespace checkbox as this is required for cluster monitoring.
Select Approval Strategy as Automatic or Manual. Approval Strategy is set to Automatic by default.
Approval Strategy as Automatic.
NoteWhen you select the Approval Strategy as Automatic, approval is not required either during fresh installation or when updating to the latest version of OpenShift Container Storage.
- Click Install
- Wait for the install to initiate. This may take up to 20 minutes.
-
Click Operators
Installed Operators -
Ensure the Project is
openshift-storage. By default, the Project isopenshift-storage. - Wait for the Status of OpenShift Container Storage to change to Succeeded.
Approval Strategy as Manual.
NoteWhen you select the Approval Strategy as Manual, approval is required during fresh installation or when updating to the latest version of OpenShift Container Storage.
- Click Install
On the Manual approval required page, you can either click Approve or View Installed Operators in namespace openshift-storage to install the operator.
ImportantBefore you click either of the options, wait for a few minutes on the Manual approval required page until the install plan gets loaded in the window.
ImportantIf you choose to click Approve, you must review the install plan before you proceed.
If you click Approve.
- Wait for a few minutes while the OpenShift Container Storage Operator is getting installed.
- On the Installed operator - ready for use page, click View Operator.
-
Ensure the Project is
openshift-storage. By default, the Project isopenshift-storage. -
Click Operators
Installed Operators - Wait for the Status of OpenShift Container Storage to change to Succeeded.
If you click View Installed Operators in namespace openshift-storage .
- On the Installed Operators page, click ocs-operator.
- On the Subscription Details page, click the Install Plan link.
- On the InstallPlan Details page, click Preview Install Plan.
- Review the install plan and click Approve.
- Wait for the Status of the Components to change from Unknown to either Created or Present.
-
Click Operators
Installed Operators -
Ensure the Project is
openshift-storage. By default, the Project isopenshift-storage. - Wait for the Status of OpenShift Container Storage to change to Succeeded.
Verification steps
- Verify that OpenShift Container Storage Operator shows a green tick indicating successful installation.
-
Click View Installed Operators in namespace openshift-storage link to verify that OpenShift Container Storage Operator shows the Status as
Succeededon the Installed Operators dashboard.
1.2. Creating an OpenShift Container Storage Cluster Service in internal mode
Use this procedure to create an OpenShift Container Storage Cluster Service after you install the OpenShift Container Storage operator.
Prerequisites
- The OpenShift Container Storage operator must be installed from the Operator Hub. For more information, see Installing OpenShift Container Storage Operator using the Operator Hub.
Procedure
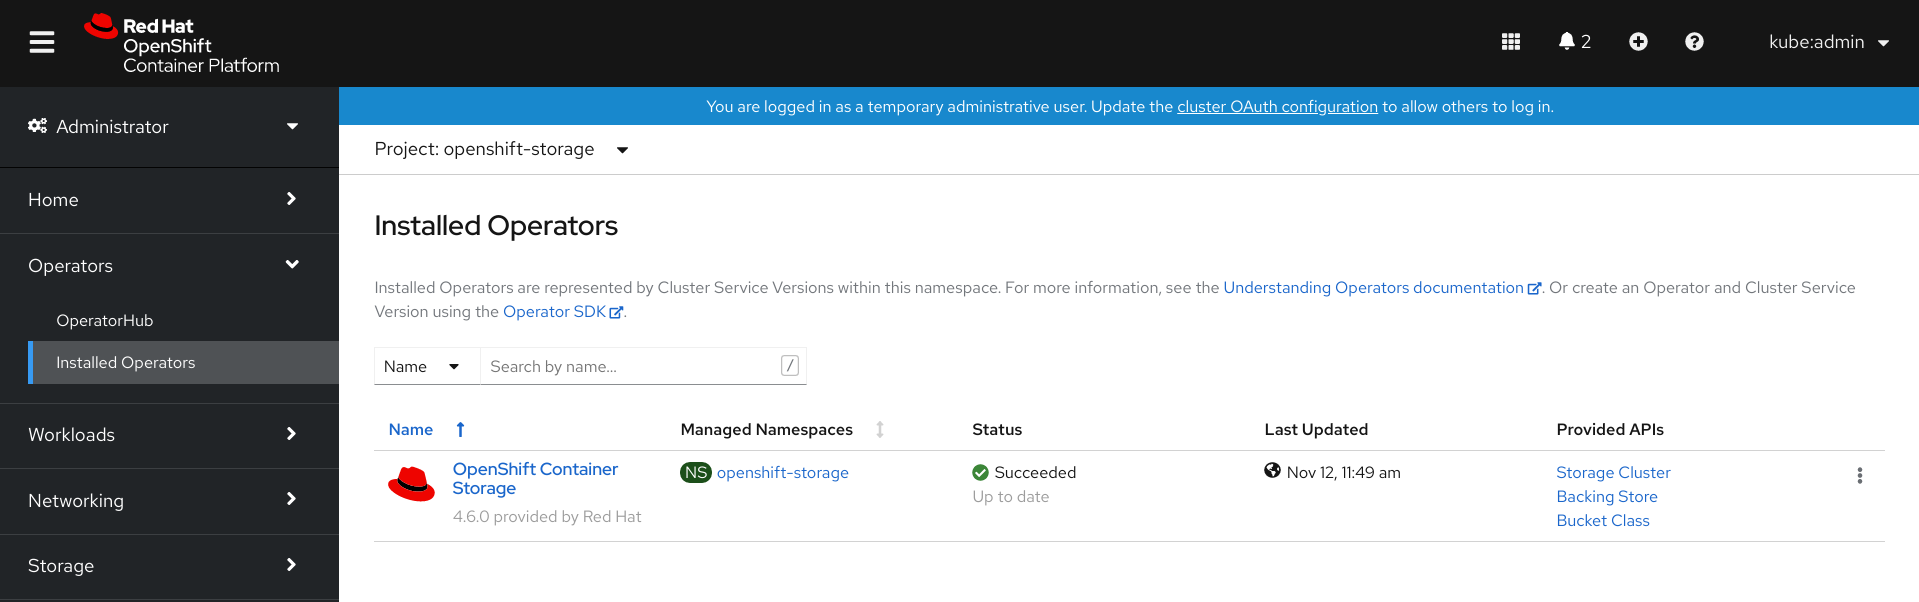
Click Operators
Installed Operators to view all the installed operators. Ensure that the Project selected is openshift-storage.
Figure 1.1. OpenShift Container Storage Operator page
Click OpenShift Container Storage.
Figure 1.2. Details tab of OpenShift Container Storage
Click Create Instance link of Storage Cluster.
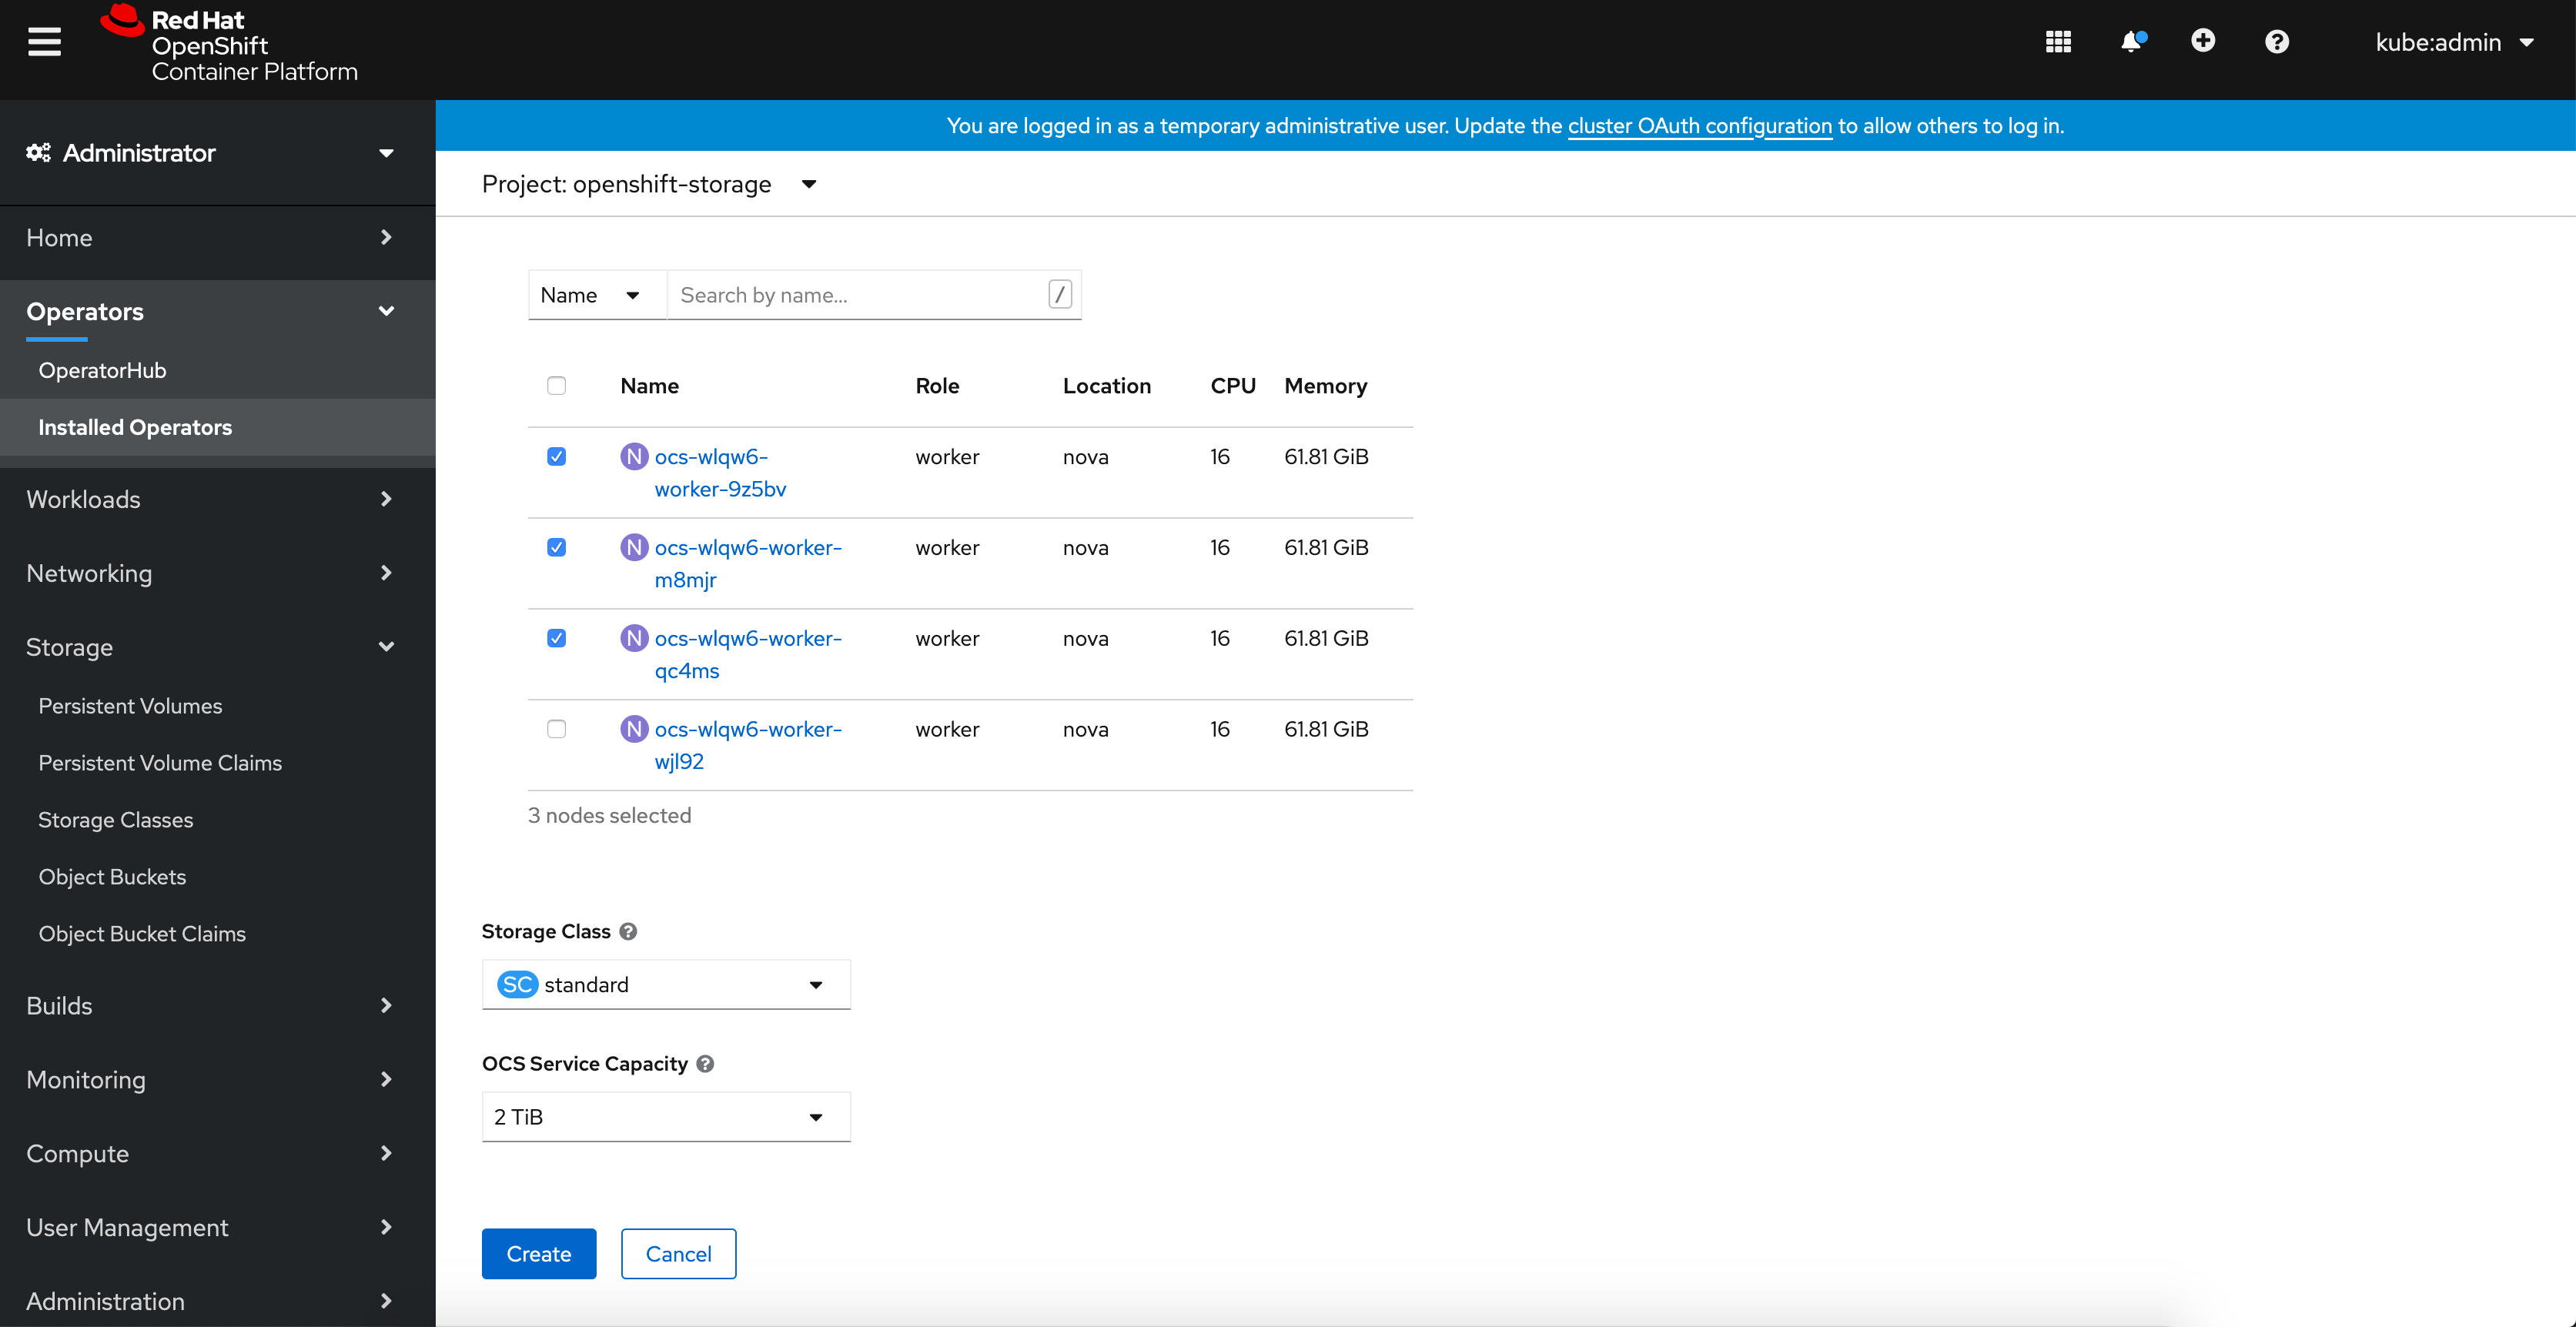
Figure 1.3. Create Storage Cluster page
On the Create Storage Cluster page, ensure that the following options are selected:
-
In the Select Mode section,
Internalmode is selected by default. -
Storage Class is set by default to
standard. Select OpenShift Container Storage Service Capacity from drop down list.
NoteOnce you select the initial storage capacity, cluster expansion will only be performed using the selected usable capacity (times 3 of raw storage).
-
(Optional) In the Encryption section, set the toggle to
Enabledto enable data encryption on the cluster. In the Nodes section, select at least three worker nodes from the available list for the use of OpenShift Container Storage service.
For cloud platforms with multiple availability zones, ensure that the Nodes are spread across different Locations/availability zones.
NoteTo find specific worker nodes in the cluster, you can filter nodes on the basis of Name or Label.
- Name allows you to search by name of the node
- Label allows you to search by selecting the predefined label
If the nodes selected do not match the OpenShift Container Storage cluster requirement of an aggregated 30 CPUs and 72 GiB of RAM, a minimal cluster will be deployed. For minimum starting node requirements, see Resource requirements section in Planning guide.
-
In the Select Mode section,
Click Create.
The Create button is enabled only after you select three nodes. A new storage cluster with three storage devices will be created, one per selected node. The default configuration uses a replication factor of 3.

Verification steps
Verify that the final Status of the installed storage cluster shows as
Phase: Readywith a green tick mark.-
Click Operators
Installed Operators Storage Cluster link to view the storage cluster installation status. - Alternatively, when you are on the Operator Details tab, you can click on the Storage Cluster tab to view the status.
- To verify that OpenShift Container Storage is successfully installed, see Verifying your OpenShift Container Storage installation.
-
Click Operators
1.3. Verifying OpenShift Container Storage deployment
Use this section to verify that OpenShift Container Storage is deployed correctly.
1.3.1. Verifying the state of the pods
To determine if OpenShift Container storage is deployed successfully, you can verify that the pods are in Running state.
Procedure
-
Click Workloads
Pods from the left pane of the OpenShift Web Console. Select openshift-storage from the Project drop down list.
For more information on the expected number of pods for each component and how it varies depending on the number of nodes, see Table 1.1, “Pods corresponding to OpenShift Container storage cluster”.
Verify that the following pods are in running and completed state by clicking on the Running and the Completed tabs:
Expand Table 1.1. Pods corresponding to OpenShift Container storage cluster Component Corresponding pods OpenShift Container Storage Operator
-
ocs-operator-*(1 pod on any worker node) -
ocs-metrics-exporter-*
Rook-ceph Operator
rook-ceph-operator-*(1 pod on any worker node)
Multicloud Object Gateway
-
noobaa-operator-*(1 pod on any worker node) -
noobaa-core-*(1 pod on any storage node) -
noobaa-db-*(1 pod on any storage node) -
noobaa-endpoint-*(1 pod on any storage node)
MON
rook-ceph-mon-*(3 pods distributed across storage nodes)
MGR
rook-ceph-mgr-*(1 pod on any storage node)
MDS
rook-ceph-mds-ocs-storagecluster-cephfilesystem-*(2 pods distributed across storage nodes)
CSI
cephfs-
csi-cephfsplugin-*(1 pod on each worker node) -
csi-cephfsplugin-provisioner-*(2 pods distributed across worker nodes)
-
rbd-
csi-rbdplugin-*(1 pod on each worker node) -
csi-rbdplugin-provisioner-*(2 pods distributed across worker nodes)
-
rook-ceph-crashcollector
rook-ceph-crashcollector-*(1 pod on each storage node)
OSD
-
rook-ceph-osd-*(1 pod for each device) -
rook-ceph-osd-prepare-ocs-deviceset-*(1 pod for each device)
-
1.3.2. Verifying the OpenShift Container Storage cluster is healthy
-
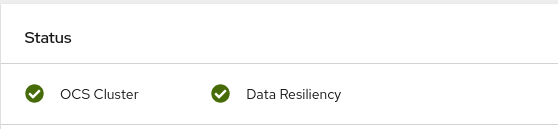
Click Home
Overview from the left pane of the OpenShift Web Console and click Persistent Storage tab. In the Status card, verify that OCS Cluster and Data Resiliency has a green tick mark as shown in the following image:
Figure 1.4. Health status card in Persistent Storage Overview Dashboard
In the Details card, verify that the cluster information is displayed as follows:
- Service Name
- OpenShift Container Storage
- Cluster Name
- ocs-storagecluster
- Provider
- OpenStack
- Mode
- Internal
- Version
- ocs-operator-4.6.0
For more information on the health of OpenShift Container Storage cluster using the persistent storage dashboard, see Monitoring OpenShift Container Storage.
1.3.3. Verifying the Multicloud Object Gateway is healthy
-
Click Home
Overview from the left pane of the OpenShift Web Console and click the Object Service tab. In the Status card, verify that both Object Service and Data Resiliency are in
Readystate (green tick).Figure 1.5. Health status card in Object Service Overview Dashboard
In the Details card, verify that the MCG information is displayed as follows:
- Service Name
- OpenShift Container Storage
- System Name
- Multicloud Object Gateway
- Provider
- OpenStack
- Version
- ocs-operator-4.6.0

For more information on the health of the OpenShift Container Storage cluster using the object service dashboard, see Monitoring OpenShift Container Storage.
1.3.4. Verifying that the OpenShift Container Storage specific storage classes exist
To verify the storage classes exists in the cluster:
-
Click Storage
Storage Classes from the left pane of the OpenShift Web Console. Verify that the following storage classes are created with the OpenShift Container Storage cluster creation:
-
ocs-storagecluster-ceph-rbd -
ocs-storagecluster-cephfs -
openshift-storage.noobaa.io
-
1.4. Uninstalling OpenShift Container Storage in internal mode
1.4.1. Uninstalling OpenShift Container Storage in Internal mode
Use the steps in this section to uninstall OpenShift Container Storage.
Uninstall Annotations
Annotations on the Storage Cluster are used to change the behavior of the uninstall process. To define the uninstall behavior, the following two annotations have been introduced in the storage cluster:
-
uninstall.ocs.openshift.io/cleanup-policy: delete -
uninstall.ocs.openshift.io/mode: graceful
The below table provides information on the different values that can used with these annotations:
| Annotation | Value | Default | Behavior |
|---|---|---|---|
| cleanup-policy | delete | Yes |
Rook cleans up the physical drives and the |
| cleanup-policy | retain | No |
Rook does not clean up the physical drives and the |
| mode | graceful | Yes | Rook and NooBaa pauses the uninstall process until the PVCs and the OBCs are removed by the administrator/user |
| mode | forced | No | Rook and NooBaa proceeds with uninstall even if PVCs/OBCs provisioned using Rook and NooBaa exist respectively. |
You can change the cleanup policy or the uninstall mode by editing the value of the annotation by using the following commands:
oc annotate storagecluster -n openshift-storage ocs-storagecluster uninstall.ocs.openshift.io/cleanup-policy="retain" --overwrite
$ oc annotate storagecluster -n openshift-storage ocs-storagecluster uninstall.ocs.openshift.io/cleanup-policy="retain" --overwrite
storagecluster.ocs.openshift.io/ocs-storagecluster annotatedoc annotate storagecluster -n openshift-storage ocs-storagecluster uninstall.ocs.openshift.io/mode="forced" --overwrite
$ oc annotate storagecluster -n openshift-storage ocs-storagecluster uninstall.ocs.openshift.io/mode="forced" --overwrite
storagecluster.ocs.openshift.io/ocs-storagecluster annotatedPrerequisites
- Ensure that the OpenShift Container Storage cluster is in a healthy state. The uninstall process can fail when some of the pods are not terminated successfully due to insufficient resources or nodes. In case the cluster is in an unhealthy state, contact Red Hat Customer Support before uninstalling OpenShift Container Storage.
- Ensure that applications are not consuming persistent volume claims (PVCs) or object bucket claims (OBCs) using the storage classes provided by OpenShift Container Storage.
- If any custom resources (such as custom storage classes, cephblockpools) were created by the admin, they must be deleted by the admin after removing the resources which consumed them.
Procedure
Delete the volume snapshots that are using OpenShift Container Storage.
List the volume snapshots from all the namespaces.
oc get volumesnapshot --all-namespaces
$ oc get volumesnapshot --all-namespacesCopy to Clipboard Copied! Toggle word wrap Toggle overflow From the output of the previous command, identify and delete the volume snapshots that are using OpenShift Container Storage.
oc delete volumesnapshot <VOLUME-SNAPSHOT-NAME> -n <NAMESPACE>
$ oc delete volumesnapshot <VOLUME-SNAPSHOT-NAME> -n <NAMESPACE>Copy to Clipboard Copied! Toggle word wrap Toggle overflow
Delete PVCs and OBCs that are using OpenShift Container Storage.
In the default uninstall mode (graceful), the uninstaller waits till all the PVCs and OBCs that use OpenShift Container Storage are deleted.
If you wish to delete the Storage Cluster without deleting the PVCs beforehand, you may set the uninstall mode annotation to "forced" and skip this step. Doing so will result in orphan PVCs and OBCs in the system.
Delete OpenShift Container Platform monitoring stack PVCs using OpenShift Container Storage.
See Section 1.4.1.1, “Removing monitoring stack from OpenShift Container Storage”
Delete OpenShift Container Platform Registry PVCs using OpenShift Container Storage.
See Section 1.4.1.2, “Removing OpenShift Container Platform registry from OpenShift Container Storage”
Delete OpenShift Container Platform logging PVCs using OpenShift Container Storage.
See Section 1.4.1.3, “Removing the cluster logging operator from OpenShift Container Storage”
Delete other PVCs and OBCs provisioned using OpenShift Container Storage.
Given below is a sample script to identify the PVCs and OBCs provisioned using OpenShift Container Storage. The script ignores the PVCs that are used internally by Openshift Container Storage.
Copy to Clipboard Copied! Toggle word wrap Toggle overflow NoteOmit
RGW_PROVISIONERfor cloud platforms.Delete the OBCs.
oc delete obc <obc name> -n <project name>
$ oc delete obc <obc name> -n <project name>Copy to Clipboard Copied! Toggle word wrap Toggle overflow Delete the PVCs.
oc delete pvc <pvc name> -n <project-name>
$ oc delete pvc <pvc name> -n <project-name>Copy to Clipboard Copied! Toggle word wrap Toggle overflow NoteEnsure that you have removed any custom backing stores, bucket classes, etc., created in the cluster.
Delete the Storage Cluster object and wait for the removal of the associated resources.
oc delete -n openshift-storage storagecluster --all --wait=true
$ oc delete -n openshift-storage storagecluster --all --wait=trueCopy to Clipboard Copied! Toggle word wrap Toggle overflow Check for cleanup pods if the
uninstall.ocs.openshift.io/cleanup-policywas set todelete(default) and ensure that their status isCompleted.oc get pods -n openshift-storage | grep -i cleanup
$ oc get pods -n openshift-storage | grep -i cleanup
NAME                                READY   STATUS      RESTARTS   AGE
cluster-cleanup-job-<xx>        	0/1     Completed   0          8m35s
cluster-cleanup-job-<yy>     		0/1     Completed   0          8m35s
cluster-cleanup-job-<zz>     		0/1     Completed   0          8m35s
Copy to Clipboard Copied! Toggle word wrap Toggle overflow Confirm that the directory
/var/lib/rookis now empty. This directory will be empty only if theuninstall.ocs.openshift.io/cleanup-policyannotation was set todelete(default).for i in $(oc get node -l cluster.ocs.openshift.io/openshift-storage= -o jsonpath='{ .items[*].metadata.name }'); do oc debug node/${i} -- chroot /host ls -l /var/lib/rook; done$ for i in $(oc get node -l cluster.ocs.openshift.io/openshift-storage= -o jsonpath='{ .items[*].metadata.name }'); do oc debug node/${i} -- chroot /host ls -l /var/lib/rook; doneCopy to Clipboard Copied! Toggle word wrap Toggle overflow If encryption was enabled at the time of install, remove
dm-cryptmanageddevice-mappermapping from OSD devices on all the OpenShift Container Storage nodes.Create a
debugpod andchrootto the host on the storage node.oc debug node/<node name> chroot /host
$ oc debug node/<node name>
$ chroot /host
Copy to Clipboard Copied! Toggle word wrap Toggle overflow Get Device names and make note of the OpenShift Container Storage devices.
dmsetup ls
$ dmsetup ls
ocs-deviceset-0-data-0-57snx-block-dmcrypt (253:1)
Copy to Clipboard Copied! Toggle word wrap Toggle overflow Remove the mapped device.
cryptsetup luksClose --debug --verbose ocs-deviceset-0-data-0-57snx-block-dmcrypt
$ cryptsetup luksClose --debug --verbose ocs-deviceset-0-data-0-57snx-block-dmcryptCopy to Clipboard Copied! Toggle word wrap Toggle overflow If the above command gets stuck due to insufficient privileges, run the following commands:
-
Press
CTRL+Zto exit the above command. Find PID of the
cryptsetupprocess which was stuck.ps
$ psCopy to Clipboard Copied! Toggle word wrap Toggle overflow Example output:
PID     TTY    TIME     CMD
778825   ?     00:00:00 cryptsetup
PID     TTY    TIME     CMD
778825   ?     00:00:00 cryptsetup
Copy to Clipboard Copied! Toggle word wrap Toggle overflow Take a note of the
PIDnumber to kill. In this example,PIDis778825.Terminate the process using
killcommand.kill -9 <PID>
$ kill -9 <PID>Copy to Clipboard Copied! Toggle word wrap Toggle overflow Verify that the device name is removed.
dmsetup ls
$ dmsetup lsCopy to Clipboard Copied! Toggle word wrap Toggle overflow
-
Press
Delete the namespace and wait till the deletion is complete. You will need to switch to another project if
openshift-storageis the active project.For example:
oc project default
oc delete project openshift-storage --wait=true --timeout=5m
$ oc project default
$ oc delete project openshift-storage --wait=true --timeout=5m
Copy to Clipboard Copied! Toggle word wrap Toggle overflow The project is deleted if the following command returns a
NotFounderror.oc get project openshift-storage
$ oc get project openshift-storageCopy to Clipboard Copied! Toggle word wrap Toggle overflow NoteWhile uninstalling OpenShift Container Storage, if namespace is not deleted completely and remains in
Terminatingstate, perform the steps in Troubleshooting and deleting remaining resources during Uninstall to identify objects that are blocking the namespace from being terminated.Unlabel the storage nodes.
oc label nodes  --all cluster.ocs.openshift.io/openshift-storage-
oc label nodes  --all topology.rook.io/rack-
$ oc label nodes  --all cluster.ocs.openshift.io/openshift-storage-
$ oc label nodes  --all topology.rook.io/rack-
Copy to Clipboard Copied! Toggle word wrap Toggle overflow Remove the OpenShift Container Storage taint if the nodes were tainted.
oc adm taint nodes --all node.ocs.openshift.io/storage-
$ oc adm taint nodes --all node.ocs.openshift.io/storage-Copy to Clipboard Copied! Toggle word wrap Toggle overflow Confirm all PVs provisioned using OpenShift Container Storage are deleted. If there is any PV left in the
Releasedstate, delete it.oc get pv oc delete pv <pv name>
$ oc get pv
$ oc delete pv <pv name>
Copy to Clipboard Copied! Toggle word wrap Toggle overflow Delete the Multicloud Object Gateway storageclass.
oc delete storageclass openshift-storage.noobaa.io --wait=true --timeout=5m
$ oc delete storageclass openshift-storage.noobaa.io --wait=true --timeout=5mCopy to Clipboard Copied! Toggle word wrap Toggle overflow Remove
CustomResourceDefinitions.oc delete crd backingstores.noobaa.io bucketclasses.noobaa.io cephblockpools.ceph.rook.io cephclusters.ceph.rook.io cephfilesystems.ceph.rook.io cephnfses.ceph.rook.io cephobjectstores.ceph.rook.io cephobjectstoreusers.ceph.rook.io noobaas.noobaa.io ocsinitializations.ocs.openshift.io storageclusters.ocs.openshift.io cephclients.ceph.rook.io cephobjectrealms.ceph.rook.io cephobjectzonegroups.ceph.rook.io cephobjectzones.ceph.rook.io cephrbdmirrors.ceph.rook.io --wait=true --timeout=5m
$ oc delete crd backingstores.noobaa.io bucketclasses.noobaa.io cephblockpools.ceph.rook.io cephclusters.ceph.rook.io cephfilesystems.ceph.rook.io cephnfses.ceph.rook.io cephobjectstores.ceph.rook.io cephobjectstoreusers.ceph.rook.io noobaas.noobaa.io ocsinitializations.ocs.openshift.io storageclusters.ocs.openshift.io cephclients.ceph.rook.io cephobjectrealms.ceph.rook.io cephobjectzonegroups.ceph.rook.io cephobjectzones.ceph.rook.io cephrbdmirrors.ceph.rook.io --wait=true --timeout=5mCopy to Clipboard Copied! Toggle word wrap Toggle overflow To ensure that OpenShift Container Storage is uninstalled completely, on the OpenShift Container Platform Web Console,
-
Click Home
Overview to access the dashboard. - Verify that the Persistent Storage and Object Service tabs no longer appear next to the Cluster tab.
-
Click Home
1.4.1.1. Removing monitoring stack from OpenShift Container Storage
Use this section to clean up the monitoring stack from OpenShift Container Storage.
The PVCs that are created as a part of configuring the monitoring stack are in the openshift-monitoring namespace.
Prerequisites
PVCs are configured to use OpenShift Container Platform monitoring stack.
For information, see configuring monitoring stack.
Procedure
List the pods and PVCs that are currently running in the
openshift-monitoringnamespace.Copy to Clipboard Copied! Toggle word wrap Toggle overflow Edit the monitoring
configmap.oc -n openshift-monitoring edit configmap cluster-monitoring-config
$ oc -n openshift-monitoring edit configmap cluster-monitoring-configCopy to Clipboard Copied! Toggle word wrap Toggle overflow Remove any
configsections that reference the OpenShift Container Storage storage classes as shown in the following example and save it.Before editing
Expand Copy to Clipboard Copied! Toggle word wrap Toggle overflow After editing
Expand Copy to Clipboard Copied! Toggle word wrap Toggle overflow In this example,
alertmanagerMainandprometheusK8smonitoring components are using the OpenShift Container Storage PVCs.Delete relevant PVCs. Make sure you delete all the PVCs that are consuming the storage classes.
oc delete -n openshift-monitoring pvc <pvc-name> --wait=true --timeout=5m
$ oc delete -n openshift-monitoring pvc <pvc-name> --wait=true --timeout=5mCopy to Clipboard Copied! Toggle word wrap Toggle overflow
1.4.1.2. Removing OpenShift Container Platform registry from OpenShift Container Storage
Use this section to clean up OpenShift Container Platform registry from OpenShift Container Storage. If you want to configure an alternative storage, see image registry
The PVCs that are created as a part of configuring OpenShift Container Platform registry are in the openshift-image-registry namespace.
Prerequisites
- The image registry should have been configured to use an OpenShift Container Storage PVC.
Procedure
Edit the
configs.imageregistry.operator.openshift.ioobject and remove the content in the storage section.oc edit configs.imageregistry.operator.openshift.io
$ oc edit configs.imageregistry.operator.openshift.ioCopy to Clipboard Copied! Toggle word wrap Toggle overflow Expand Before editing
Copy to Clipboard Copied! Toggle word wrap Toggle overflow After editing
Copy to Clipboard Copied! Toggle word wrap Toggle overflow In this example, the PVC is called
registry-cephfs-rwx-pvc, which is now safe to delete.Delete the PVC.
oc delete pvc <pvc-name> -n openshift-image-registry --wait=true --timeout=5m
$ oc delete pvc <pvc-name> -n openshift-image-registry --wait=true --timeout=5mCopy to Clipboard Copied! Toggle word wrap Toggle overflow
1.4.1.3. Removing the cluster logging operator from OpenShift Container Storage
Use this section to clean up the cluster logging operator from OpenShift Container Storage.
The PVCs that are created as a part of configuring cluster logging operator are in the openshift-logging namespace.
Prerequisites
- The cluster logging instance should have been configured to use OpenShift Container Storage PVCs.
Procedure
Remove the
ClusterLogginginstance in the namespace.oc delete clusterlogging instance -n openshift-logging --wait=true --timeout=5m
$ oc delete clusterlogging instance -n openshift-logging --wait=true --timeout=5mCopy to Clipboard Copied! Toggle word wrap Toggle overflow The PVCs in the
openshift-loggingnamespace are now safe to delete.Delete PVCs.
oc delete pvc <pvc-name> -n openshift-logging --wait=true --timeout=5m
$ oc delete pvc <pvc-name> -n openshift-logging --wait=true --timeout=5mCopy to Clipboard Copied! Toggle word wrap Toggle overflow