Este conteúdo não está disponível no idioma selecionado.
Administration Guide
This guide is for corporate system administrators.
Edition 5.3.1
Abstract
Preface
Part I. The Basics
Chapter 1. Preface
1.1. Business Integration
1.2. What is a Service-Oriented Architecture?
A Service Oriented Architecture (SOA) is not a single program or technology. Think of it, rather, as a software design paradigm.
Note
1.3. Key Points of a Service-Oriented Architecture
- the messages being exchanged
- the agents that act as service requesters and providers
- the shared transport mechanisms that allow the messages to flow back and forth.
1.4. What is the JBoss Enterprise SOA Platform?
1.5. The Service-Oriented Architecture Paradigm
- Service Provider
- A service provider allows access to services, creates a description of a service and publishes it to the service broker.
- Service Requester
- A service requester is responsible for discovering a service by searching through the service descriptions given by the service broker. A requester is also responsible for binding to services provided by the service provider.
- Service Broker
- A service broker hosts a registry of service descriptions. It is responsible for linking a requester to a service provider.
1.6. Core and Components
1.7. Components of the JBoss Enterprise SOA Platform
- A full Java EE-compliant application server (the JBoss Enterprise Application Platform)
- an enterprise service bus (JBoss ESB)
- a business process management system (jBPM)
- a business rules engine (JBoss Rules)
- support for the optional JBoss Enterprise Data Services (EDS) product.
1.8. JBoss Enterprise SOA Platform Features
- The JBoss Enterprise Service Bus (ESB)
- The ESB sends messages between services and transforms them so that they can be processed by different types of systems.
- Business Process Execution Language (BPEL)
- You can use web services to orchestrate business rules using this language. It is included with SOA for the simple execution of business process instructions.
- Java Universal Description, Discovery and Integration (jUDDI)
- This is the default service registry in SOA. It is where all the information pertaining to services on the ESB are stored.
- Smooks
- This transformation engine can be used in conjunction with SOA to process messages. It can also be used to split messages and send them to the correct destination.
- JBoss Rules
- This is the rules engine that is packaged with SOA. It can infer data from the messages it receives to determine which actions need to be performed.
1.9. Features of the JBoss Enterprise SOA Platform's JBossESB Component
- Multiple transports and protocols
- A listener-action model (so that you can loosely-couple services together)
- Content-based routing (through the JBoss Rules engine, XPath, Regex and Smooks)
- Integration with the JBoss Business Process Manager (jBPM) in order to provide service orchestration functionality
- Integration with JBoss Rules in order to provide business rules development functionality.
- Integration with a BPEL engine.
- Be configured to work with a wide variety of transport mechanisms (such as e-mail and JMS),
- Be used as a general-purpose object repository,
- Allow you to implement pluggable data transformation mechanisms,
- Support logging of interactions.
Important
org.jboss.internal.soa.esb and org.jboss.soa.esb. Use the contents of the org.jboss.internal.soa.esb package sparingly because they are subject to change without notice. By contrast, everything within the org.jboss.soa.esb package is covered by Red Hat's deprecation policy.
1.10. Task Management
1.11. Integration Use Case
1.12. Utilising the JBoss Enterprise SOA Platform in a Business Environment
Chapter 2. Introducing the JBoss Enterprise SOA Platform
2.1. Intended Audience
2.2. Aim of This Book
2.3. Back Up Your Data
Warning
2.4. Red Hat Documentation Site
2.5. Variable Name: SOA_ROOT Directory
jboss-soa-p-5 directory. In the Standalone edition, though, it is the jboss-soa-p-standalone-5 directory.
SOA_ROOT. Substitute either jboss-soa-p-5 or jboss-soa-p-standalone-5 as appropriate whenever you see this name.
2.6. Variable Name: PROFILE
Chapter 3. Running the JBoss Enterprise SOA Platform in a Testing Environment
3.1. Start the JBoss Enterprise SOA Platform
The following software must be installed:
- JBoss Enterprise SOA Platform
Procedure 3.1. Start the JBoss Enterprise SOA Platform
Start the SOA server in a server window
Red Hat Enterprise Linux
- Open a terminal and navigate to the
bindirectory by entering the commandcd SOA_ROOT/jboss-as/bin. - Enter
./run.shto start the SOA server. (Because you are not specifying a server profile, "default" will be used.)
Microsoft Windows
- Open a terminal and navigate to the
bindirectory by entering the commandchdir SOA_ROOT\jboss-as\bin. - Enter
run.batto start the SOA server. (Because you are not specifying a server profile, "default" will be used.)
The server starts. Note that this will take approximately two minutes, depending on the speed of your hardware.
Note
less SOA_ROOT/jboss-as/server/PROFILE/log/server.log. As another check, open a web browser and go to http://localhost:8080. Make sure you can login to the admin console with the user name and password you have set.
3.2. Deploy the "Hello World" Quickstart on Your Test Server
Prerequisites
- Check that the setting in
SOA_ROOT/jboss-as/samples/quickstarts/conf/quickstarts.properties-examplematches the server configuration (defaultin a testing environment).
Procedure 3.2. Deploy the "Hello World" Quickstart
- Check that the server has fully launched.
- Open a second terminal window and navigate to the directory containing the quick start:
cd SOA_ROOT/jboss-as/samples/quickstarts/helloworld(orchdir SOA_ROOT\jboss-as\samples\quickstarts\helloworldin Microsoft Windows). - Run
ant deployto deploy the quickstart. Look for messages such as this to confirm if the deployment was successful:Copy to Clipboard Copied! Toggle word wrap Toggle overflow Also, check for this in theSOA_ROOT/jboss-as/server/default/log/server.log:Copy to Clipboard Copied! Toggle word wrap Toggle overflow - Run the quickstart by issuing this command:
ant runtest. When the quickstart is run, messages such as this are written to theSOA_ROOT/jboss-as/server/default/log/server.log:Copy to Clipboard Copied! Toggle word wrap Toggle overflow
The words "Hello World" will appear on the server terminal. This message will also be appended to the SOA_ROOT/jboss-as/server/default/log/server.log file.
3.3. Undeploy the "Hello World" Quickstart
Procedure 3.3. Task
- Navigate to the quickstart's directory:
cd SOA_ROOT/jboss-as/samples/quickstarts/helloworld(orchdir SOA_ROOT\jboss-as\samples\quickstarts\helloworldif you are running Microsoft Windows). - Run the
ant undeploycommand. You should see messages such as this displayed:Copy to Clipboard Copied! Toggle word wrap Toggle overflow And messages such as this written to the server.log:11:10:08,205 INFO [EsbDeployment] Stopping 'Quickstart_helloworld.esb' 11:10:08,577 INFO [EsbDeployment] Destroying 'Quickstart_helloworld.esb'
11:10:08,205 INFO [EsbDeployment] Stopping 'Quickstart_helloworld.esb' 11:10:08,577 INFO [EsbDeployment] Destroying 'Quickstart_helloworld.esb'Copy to Clipboard Copied! Toggle word wrap Toggle overflow
3.4. Stop the JBoss Enterprise SOA Platform Server
Procedure 3.4. Stop the JBoss Enterprise SOA Platform Server
Stop the SOA server
Press ctrl-c in the server window (the terminal window where the SOA server was started).
The server will shut down. Note that this process will take a few minutes. Look for this line in the server.log file to confirm that the server has shut down successfully:
12:17:02,786 INFO [ServerImpl] Shutdown complete
12:17:02,786 INFO [ServerImpl] Shutdown complete
Chapter 4. Quickstarts
4.1. Quickstart
SOA_ROOT/jboss-as/samples/quickstarts/ directory. Build and deploy every quickstart by using Apache Ant.
4.2. Important Notes About Quickstarts
- Each quickstart needs to be built and deployed using Apache Ant.
- Each quickstart uses the
samples/quickstarts/conf/quickstarts.propertiesfile to store environment-specific configuration options such as the directory where the server was installed. You must create aquickstarts.propertiesfile that matches your server installation. An example properties file (quickstarts.properties-example) is included. - Each quickstart has different requirements. These are documented in their individual
readme.txtfiles. - Not every quickstart can run under every server profile.
- The jBPM quickstarts require a valid jBPM Console user name and password. Supply these by adding them as properties in the
SOA_ROOT/jboss-as/samples/quickstarts/conf/quickstarts.propertiesfile:jBPM console security credentials jbpm.console.username=admin jbpm.console.password=adminpassword
# jBPM console security credentials
jbpm.console.username=admin
jbpm.console.password=adminpassword
Copy to Clipboard Copied! Toggle word wrap Toggle overflow The quickstarts that are affected by this requirement arebpm_orchestration1,bpm_orchestration2,bpm_orchestration3andbpm_orchestration4. - You can only execute some of the quickstarts (such as groovy_gateway) if the server is not running in headless mode. (The JBoss Enterprise SOA Platform is configured to launch in headless mode by default.)
Important
Red Hat recommends that you run production servers in headless mode only.
4.3. Learn More About a Quickstart
Procedure 4.1. Task
- Study the quickstart's
readme.txtfile. - Run the
ant helpcommand in the quickstart's directory.
4.4. Overview of How the "Hello World" Quickstart Works
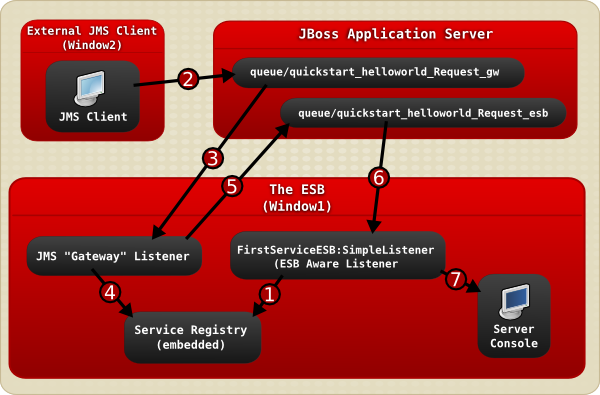
Figure 4.1. Image
- The JBoss Enterprise SOA Platform server is launched in
Window1and then theFirstServiceESB:SimpleListenerservice is added to the Service Registry service when the helloworld quickstart is deployed. - A JMS client sends an ESB-unaware "Hello World" message, (it is a plain
Stringobject), to the JMS Queue (queue/quickstart_helloworld_Request_gw). - The JMS Gateway Listener receives the ESB-unaware message and creates from it an ESB-aware message for use by ESB-aware end-points.
- The
JMS Gateway Listeneruses theservice registryto find theFirstServiceESB:SimpleListenerservice's end-point reference (EPR). In this case, the EPR is thequeue/quickstart_helloworld_Request_esbJMS queue. - The
JMS Gateway Listenertakes the new ESB-aware message and sends it to thequeue/quickstart_helloworld_Request_esbJMS queue. - The
FirstServiceESB:SimpleListenerservice receives the message. - The
FirstServiceESB:SimpleListenerservice extracts the payload from the message and outputs it to the console.
Chapter 5. Running the JBoss Enterprise SOA Platform in a Production Environment
5.1. Server Profiles
| Profile | Description |
|---|---|
| default | Use this profile for development and testing. This profile uses less memory than the production profile but clustering is not enabled in this mode. In addition, this profile provides more verbose logging than the "all" and "production" profiles. This verbose logging provides you with additional information, but adversely affects server performance. Unless you explicitly specify a different profile, this profile is used when the server is started. |
| production | Use this profile on production servers. This profile provides clustering and maximizes performance by using more memory and providing less verbose logging and screen console output than the "all" or "default" profiles. Note that output (such as the message from the "Hello World" quick start) does not appear on the console screen in this mode. It is written to the log only. |
| minimal | Enables the minimum features needed for a functioning system. No archives are deployed. No ESB or SOA features are enabled. The BPEL Engine is not available. |
| standard | This provides standard functionality for testing. No web, ESB, or SOA features are enabled. The BPEL Engine is not available. |
| web | The jbossweb.sar archives are deployed when this profile is run. No ESB, or SOA features are enabled. The BPEL Engine is not available. |
| all | All of the pre-packaged ESB archives are deployed when this profile is run. This profile offers less performance and scalability than the "production" profile, but requires less memory to run. |
5.2. run.sh Optional Switches
| Switch | Purpose | Example of Use |
|---|---|---|
| -c | Make the server use a specific profile. If none is specified, "default" is used. | ./run.sh -c production |
| -b | Bind the server to a specific IP address. If none is specified, the default (127.0.0.1) is used. | ./run.sh -b 10.34.5.2 |
5.3. Start the JBoss Enterprise SOA Platform in a Production Environment
Procedure 5.1. Start the JBoss Enterprise SOA Platform in a Production Environment
Navigate to the bin Directory
Open a terminal and input this command:cd SOA_ROOT/jboss-as/bin(orchdir SOA_Root\jboss-as\binin Microsoft Windows).Note
It is required that you have set up an administration username and password before proceeding.Launch the JBoss Enterprise SOA Server on Red Hat Enterprise Linux
To start the product, run this command:./run.sh -c productionLaunch the JBoss Enterprise SOA Server on Microsoft Windows
To start the product, run this command:run.bat -c production
The server starts. Note that this may up to around two minutes, depending on the speed of your hardware.
Note
less SOA_ROOT/jboss-as/server/PROFILE/log/server.log. As another check, open a web browser and go to http://localhost:8080. Make sure you can log into the admin console with the username and password you have set.
5.4. Server Installation
5.5. Configure the JBoss Enterprise SOA Platform to Run as a Red Hat Enterprise Linux Daemon
Procedure 5.2. Task
- To make the JBoss Enterprise SOA Platform run as a background daemon (service), you will have to create your own shell script. Red Hat does not supply any scripts to do this.
5.6. Start a Server Installation
Prerequisites
- The JBoss Enterprise SOA Platform must be pre-configured to run as a service.
Note
Procedure 5.3. Task
- To start the JBoss Enterprise SOA Platform as a service, issue this command:
service jboss_soa startNote
If the JBoss user was created as a system account (using the-Rswitch) then a warning message is displayed. You can safely ignore this.
5.7. Stop a Server Installation
Procedure 5.4. Task
- To stop the JBoss Enterprise SOA Platform when it is running as a service, issue this command:
service jboss_soa stop
Part II. Security
Chapter 6. Managing User Accounts
6.1. User Accounts
soa-users.properties and soa-roles.properties) to check a user's password and determine their level of access. SOA uses the Java Authentication and Authorization Service (JAAS) to authenticate user accounts.
Warning
6.2. Create User Accounts
Procedure 6.1. Add a New User
- Open the
soa-users.propertiesfile in a text editor:vi SOA_ROOT/jboss-as/server/PROFILE/conf/props/soa-users.properties. Add the user's name and password on a new line, using this syntax:username=password.Here is an example for a user with the login name "Harold":harold=@dm1nU53r
harold=@dm1nU53rCopy to Clipboard Copied! Toggle word wrap Toggle overflow Note
Any line in this file that begins with a hash (#) is ignored. (You can use this convention to temporarily disable a user account.) - Save the changes to the file and exit the text editor.
- Open the
soa-roles.propertiesfile in a text editor:vi SOA_ROOT/jboss-as/server/PROFILE/conf/props/soa-roles.properties. Add the user and the roles you wish to assign to them on a new line, using this syntax:username=role1,role2,role3.harold=JBossAdmin,HttpInvoker,user,admin
harold=JBossAdmin,HttpInvoker,user,adminCopy to Clipboard Copied! Toggle word wrap Toggle overflow Note
You can assign any number of roles. Note that a user must be assigned theJBossAdmin,HttpInvoker,userandadminroles in order to be able to log into the server consoles.Any line in this file that begins with a hash (#) is ignored. You can use this convention to temporarily disable user roles. - Save the changes to the file and exit the text editor.
The user will now be able to log in to the server console at http://localhost:8080. You do not have to restart the server.
6.3. soa-users.properties
soa-users.properties file is where the user accounts and passwords for accessing the SOA Web consoles are stored. Administrators control access to the system by editing this file. Note that the passwords are saved in clear text so for production systems, password encryption should be used instead.
6.4. soa-roles.properties
soa-roles.properties file is where user access privileges are defined. This file uses the following syntax: username=role1,role2,role3. You can assign any number of roles. Note that a user must be assigned the JBossAdmin, HttpInvoker, user, and admin roles in order to be able to log into the server consoles.
6.5. Security Roles
| Role | Description |
|---|---|
| JBossAdmin | The JBossAdmin role is required to log into the various management components of SOA. It is the primary role so all system administrators should be assigned this role. |
| HttpInvoker | The HttpInvoker role is used by the Http Invoker to access JNDIs and EJBs from remote locations. |
| user | This is used to grant user access to services deployed in SOA if they are configured to utilize the JAAS security domains. The jBPM Console relies on this one role only. |
| admin | This is used to grant administrative access to services deployed in SOA if they are configured to utilize the JAAS security domains. |
6.6. Disable a User's Account
Procedure 6.2. Disable a User's Account
- Open the
soa-users.propertiesfile in a text editor:vi SOA_ROOT/jboss-as/server/PROFILE/conf/props/soa-users.properties. Either delete the entire line containing the user's name and password or simply put a hash (#) in front of it to "comment it out."Here is an example for a user with the login name "Harold":#harold=@dm1nU53r
#harold=@dm1nU53rCopy to Clipboard Copied! Toggle word wrap Toggle overflow - Save the changes to the file and exit the text editor.
The user will no longer be able to log in to the server console. You do not have to restart the server.
6.7. Security Assertion Markup Language (SAML)
6.8. Issuing a SAML Security Token
Procedure 6.3. Task
- Obtain the Login Module (LM) located in org.picketlink.identity.federation.core.wstrust.auth.STSIssuingLoginModule
- Open the LM's configuration file.
- Enter the following code, inserting the names of the services you wish to use:
Copy to Clipboard Copied! Toggle word wrap Toggle overflow This configuration uses a stacked LM. The security token from the first LM is later used by the second LM which will validate the security token. Having two separate LMs for this can be useful as there can be situations where you only need to validate a security token. - Specify the picketlink-sts-client properties:
Copy to Clipboard Copied! Toggle word wrap Toggle overflow Note
The username and password in this file are only used by the STSValidatingLoginModule. The username and password may also be stacked or provided by a callback. - To use this LM in JBossESB you need to update your server's login-config.xml with the above application-policy. You must also point the ESB service to where you want this LM to be used.For example, this is how you could configure it in jboss-esb.xml:
Copy to Clipboard Copied! Toggle word wrap Toggle overflow The callbackHandler that is is specified is specific to the ESB. This is because it requires access to the authentication request in the ESB for retreiving the username and password of the user for whom a security token should be issued.
6.9. Validating a SAML Security Token
Procedure 6.4. Task
- Open the Login Module (LM) from org.picketlink.identity.federation.core.wstrust.auth.STSIssuingLoginModule.
- Configure the properties file as shown in the example below:
Copy to Clipboard Copied! Toggle word wrap Toggle overflow Note
The callbackHandler that is specified is specific to the ESB. This is because it requires access to the authentication request in the ESB for retreiving the SAML Token which is to be validated.Note
An example of SAML support in JBossESB can be found in the security_saml quickstart. More information about the Login Modules provied by PicketLink can be found at http://www.jboss.org/community/wiki/STSLoginModules
6.10. PicketLink
6.11. Integration Between SAML and PicketLink
- The client must first obtain the SAML assertion from PicketLink STS by sending a WS-Trust request to the token service. This process usually involves authentication of the client.
- After obtaining the SAML assertion from the STS, the client includes the assertion in the security context of the EJB request before invoking an operation on the bean.
- Upon receiving the invocation, the EJB container extracts the assertion and validates it by sending a WS-Trust message to the STS. If the assertion is deemed valid by the STS (and the proof of possession token has been verified if needed), the client is authenticated.
- In JBoss, the SAML assertion validation process is handled by the SAML2STSLoginModule. It reads properties from a configurable file (specified by the configFile option) and establishes communication with the STS based on these properties.
- If the assertion is valid, a Principal is created using the assertion subject name. If the assertion contains roles, these roles are also extracted and associated with the caller's Subject.
Chapter 7. Securing Your System
7.1. Securing Your JBoss Enterprise SOA Platform Installation
The JBoss Enterprise SOA Platform can be made secure, in the sense that you can configure the product so that services will only be executed if caller authentication succeeds and said caller possesses the correct permissions. The default security implementation is based on JAAS.
- through a gateway
- directly via the ServiceInvoker.
UsernameToken or the BinarySecurityToken from the SOAP header's security element.
7.2. Java Authentication and Authorization Service (JAAS)
7.3. JaasSecurityService
7.4. Secure Your System
Procedure 7.1. Task
vi SOA_ROOT/jboss-as/server/PROFILE/deployers/esb.deployer/jbossesb-properties.xml.
- Scroll down to the section that contains properties name="security" and edit the settings to suit your system:
Copy to Clipboard Copied! Toggle word wrap Toggle overflow - Save the file and exit.
- Open the log-in configuration file in your text editor:
vi SOA_ROOT/server/PROFILE/conf/login-config.xml - Configure the JAAS log-in modules by editing the settings in this file. (You can use either a pre-configured option or create your own custom solution.)
- Save the file and exit.
7.5. Create an Encrypted Password File
Procedure 7.2. Task
- Go to the
confdirectory:cd SOA_ROOT/jboss-as/server/PROFILE/conf - Execute this command:
java -cp ../../../lib/jbosssx.jar org.jboss.security.plugins.FilePassword welcometojboss 13 testpass esb.password
An encrypted password file is created.
7.6. Encryption Options
| Option | Description |
|---|---|
| Salt |
This is the "salt" used to encrypt the password file. (In the example above, it is the
welcometojboss string .)
|
| Iteration |
This is the number of iterations. (In the example above, it is the number
13.)
|
| Password File Name |
This is the name of the file where the encrypted password will be saved. In the example above, it is the
esb.password string.
|
| testpass |
This is the test password.
|
7.7. Clear-Text Password
7.8. Password Mask
7.9. Masking Passwords
Passwords are secret authentication tokens that are used to limit access to resources to authorized parties only. For a JBoss services to access password-protected resources, the password must obviously be made available to it.
Important
7.10. Mask a Clear-Text Password
Important
jboss-keystore_pass.dat file and repeat the procedure. Be aware that if you change the key store any masked passwords that were previously generated will no longer function.
Procedure 7.3. Task
- Generate a key pair using this command:
keytool -genkey -alias jboss -keyalg RSA -keysize 1024 -keystore password.keystoreand follow the prompts:Copy to Clipboard Copied! Toggle word wrap Toggle overflow Note
You must specify the same password for the key store and key pair. - Run
chownto change ownership to the JBoss Application Server process owner, andchmod 600 password.keystoreto make sure only the file's owner can read it.Note
The process owner should not have console log-in access. In that case you will be performing these operations as another user. Creating masked passwords requires read access to the key store, so you may wish to complete configuration of masked passwords before restricting the key store file permissions. - Navigate to the
jboss-as/bindirectory:cd SOA_ROOT/jboss-as/bin - Run the password tool, using the command
./password_tool.shon Red Hat Enterprise Linux systems, (orpassword_tool.baton Microsoft Windows-based systems.) - Select
0: Encrypt Keystore Passwordby pressing 0, then Enter. - Enter the key store password you specified above.
- Enter a random string of characters to aid with encryption strength. This is the salt.
- Enter a whole number for the iterator count to aid with encryption strength.
- Select
5: Exitto exit.Note
The password tool will exit with the message:Keystore is null. Cannot store.This is normal. - Use the
chowncommand to change ownership of thepassword/jboss_keystore_pass.datfile to the process owner, andchmod 600 jboss-keystore_pass.datto ensure that only that owner can read the file. - Navigate to the
jboss-as/bindirectory:cd SOA_ROOT/jboss-as/bin - Run the password tool, using the command
./password_tool.shon Red Hat Enterprise Linux systems (orpassword_tool.baton Microsoft Windows systems). - Select
1: Specify KeyStoreby pressing 1 then Enter. - Enter the path to the key store you created above. (You can specify an absolute path, or the path relative to
SOA_ROOT/jboss-as/bin. This should beSOA_ROOT/jboss-as/bin/password.keystore, unless you have changed the defaults.) - Enter the key alias. This should be "jboss" (unless you have performed an advanced installation and changed the defaults).
- Select
2: Create Passwordby pressing 2, then Enter. You will be prompted for the security domain. Follow the prompts on screen.Copy to Clipboard Copied! Toggle word wrap Toggle overflow - Enter a name for the password mask. This is an arbitrary unique name that you will use to identify the password mask in configuration files.
- Enter the password that you wish to mask.
- Repeat the password mask creation process to create masks for all passwords you wish to mask.
- Exit the program by choosing
5: Exit - Navigate to the
passworddirectory:cd SOA_ROOT/jboss-as/bin/password
7.11. Replace a Clear Text Password with its Password Mask
Prerequisites
- Pre-existing password masks
Procedure 7.4. Task
- Launch a text editor and replace each occurrence of a clear text password in the configuration files with an annotation referencing its mask.This is the general form of the annotation:
<annotation>
@org.jboss.security.integration.password.Password(securityDomain=MASK_NAME, methodName=setPROPERTY_NAME)
</annotation>
<annotation>
@org.jboss.security.integration.password.Password(securityDomain=MASK_NAME, methodName=setPROPERTY_NAME)
</annotation>
Copy to Clipboard Copied! Toggle word wrap Toggle overflow As a concrete example, the JBoss Messaging password is stored in the server profile'sdeploy/messaging/messaging-jboss-beans.xmlfile. If you create a password mask named "messaging", then the before and after snippet of the configuration file will looks like this:<property name="suckerPassword"> CHANGE ME!! </property>
<property name="suckerPassword"> CHANGE ME!! </property>Copy to Clipboard Copied! Toggle word wrap Toggle overflow <annotation> @org.jboss.security.integration.password.Password(securityDomain=messaging, methodName=setSuckerPassword) </annotation>
<annotation> @org.jboss.security.integration.password.Password(securityDomain=messaging, methodName=setSuckerPassword) </annotation>Copy to Clipboard Copied! Toggle word wrap Toggle overflow
7.12. Change the Default Password Mask Settings
SOA_ROOT/jboss-as/bin/password/password.keystore, and the key alias "jboss". If you store the key pair used for password masking elsewhere, or under a different alias, you will need to update the server profiles with the new location or key alias.
Procedure 7.5. Task
- Open the security configuration file in a text editor:
vi SOA_ROOT/jboss-as/server/PROFILE/deploy/security/security-jboss-beans.xml. - Edit the key store location and key alias. Here are some example settings:
Copy to Clipboard Copied! Toggle word wrap Toggle overflow - Save the file and exit.
7.13. Global Configuration File Security Settings
| Property | Description | Required? |
|---|---|---|
org.jboss.soa.esb.services.security.implementationClass |
This is the "concrete"SecurityService implementation that should be used. The default setting is
JaasSecurityService.
|
Yes
|
org.jboss.soa.esb.services.security.callbackHandler |
This is a default
CallbackHandler implementation, utilized when a JAAS-based SecurityService is employed. See “Customizing Security” for more information about the CallbackHandler property.
|
No
|
org.jboss.soa.esb.services.security.sealAlgorithm |
This is the algorithm to use when "sealing" the
SecurityContext.
|
No
|
org.jboss.soa.esb.services.security.sealKeySize |
This is the size of the secret/symmetric key used to encrypt/decrypt the
SecurityContext.
|
No
|
org.jboss.soa.esb.services.security.contextTimeout |
This is the amount of time (in milliseconds) for which a security context is valid. A global setting, this may be over-ridden on a per-service basis. To do so, specify the property of the same name that exists on the security element in the
jboss-esb.xml file.
|
No
|
org.jboss.soa.esb.services.security.contextPropagatorImplementationClass |
Use this to configure a global
SecurityContextPropagator. (For more details on the SecurityContextPropagator, please refer to the section on “Advanced Security Options”.)
|
No
|
org.jboss.soa.esb.services.security.publicKeystore |
This is the Keystore which holds the keys used to encrypt and decrypt that data which is external to the Enterprise Service Bus. The Keystore is used to encrypt the
AuthenticationRequest.
|
No
|
org.jboss.soa.esb.services.security.publicKeystorePassword |
This is the password for the public keystore.
|
No
|
org.jboss.soa.esb.services.security.publicKeyAlias |
This is the alias to use for the public key.
|
No
|
org.jboss.soa.esb.services.security.publicKeyPassword |
This is the password for the alias if one was specified upon creation.
|
No
|
org.jboss.soa.esb.services.security.publicKeyPassword |
This is a cipher transformation. It is in this format:
algorithm/mode/padding. If this is not specified, the "keys" algorithm will be used by default.
|
No
|
7.14. Key Pair
7.15. Keystore
SOA_ROOT/jboss-as/samples/quickstarts/security_cert/keystore. Do not use this in a production environment. It is provided as an example only.
7.16. JBoss Rules and Security
Important
7.17. Enable Serialization on the Server
Procedure 7.6. Task
- Navigate to the SOA_ROOT directory:
cd SOA_ROOT. - Run the
keytoolcommand and follow the prompts on screen:Copy to Clipboard Copied! Toggle word wrap Toggle overflow After answering all of the questions, a password-protected file namedMyDroolsPrivateKeyStore.keystoreis created. This keystore file has a private key called droolsKey with the password "drools". Store this file in a safe location in your environment, which will hereafter be referred to as thekeystoredir.Important
The passwords above are examples only and should not be used in production. - Open the configuration file:
vi jboss-as/server/default/deploy/properties-service.xml - Configure the JBoss Enterprise SOA Platform to use the JBoss Rules serialization feature by adding this snippet to
properties-service.xml:Copy to Clipboard Copied! Toggle word wrap Toggle overflow - Set the drools.serialization.sign property to "true":
drools.serialization.sign=true
drools.serialization.sign=trueCopy to Clipboard Copied! Toggle word wrap Toggle overflow - drools.serialization.private.keyStoreURL=<RL> is the URL of the private keystore location.
- In the example above, replace
keystoredirandMyDroolsKeyStore.keystorewith your keystore directory and the name of the keystore you created with the keytool - drools.serialization.private.keyStorePwd=<password> is the password to access the private keystore.
- drools.serialization.private.keyAlias=<key> is the key alias (identifier) of the private key.
- drools.serialization.private.keyPwd=<password> is the private key password.
- Save the file and exit.
- Restart the server instance.
Warning
If the system properties were not configured properly, you will see this error when you try to build a rules package:Copy to Clipboard Copied! Toggle word wrap Toggle overflow
7.18. Enable Serialization on the Client
Prerequisites
- Server serialization must already be enabled.
Procedure 7.7. Task
- Create a public key certificate from the private keystore. (You can access the keytool by running
keytool -genkey -alias droolsKey -keyalg RSA -keystore.):keytool -export -alias droolsKey -file droolsKey.crt -keystore
keytool -export -alias droolsKey -file droolsKey.crt -keystoreCopy to Clipboard Copied! Toggle word wrap Toggle overflow MyDroolsPrivateKeyStore.keystore Enter keystore password: Certificate stored in file <droolsKey.crtU>
MyDroolsPrivateKeyStore.keystore Enter keystore password: Certificate stored in file <droolsKey.crtU>Copy to Clipboard Copied! Toggle word wrap Toggle overflow - Import the public key certificate into a public keystore. (This is where it will be used by your client applications):
keytool -import -alias droolsKey -file droolsKey.crt -keystore
keytool -import -alias droolsKey -file droolsKey.crt -keystoreCopy to Clipboard Copied! Toggle word wrap Toggle overflow Copy to Clipboard Copied! Toggle word wrap Toggle overflow - Open the server configuration file:
vi grep drools jboss-as/server/default/deploy/properties-service.xml - Replace keystoredir and MyPublicDroolsKeyStore.keystore with your keystore directory, and the name of the public keystore you created previously:
# Drools Client Properties for Security Serialization
drools.serialization.public.keyStoreURL=file://$keystoredir/MyPublicDroolsKeyStore.keystore
drools.serialization.public.keyStorePwd=drools
# Drools Client Properties for Security Serialization
drools.serialization.public.keyStoreURL=file://$keystoredir/MyPublicDroolsKeyStore.keystore
drools.serialization.public.keyStorePwd=drools
Copy to Clipboard Copied! Toggle word wrap Toggle overflow - Save the file and exit.
- Restart the JBoss Enterprise SOA Platform server.
- For Java client applications, set the system properties in your code like this:
Copy to Clipboard Copied! Toggle word wrap Toggle overflow Alternatively, open therun.shshell script (vi SOA_ROOT/jboss-as/bin/run.sh) script and edit the JAVA_OPTS section:Copy to Clipboard Copied! Toggle word wrap Toggle overflow Replace the values shown above with ones specific to your environment, and then restart the server instance.
7.19. Disable Serialization Signing
- Open the configuration file:
vi SOA_ROOT/jboss-as/server/PROFILE/deploy/properties-service.xml. - Remove the drools.serialization.sign property's value.
- Save the file and exit.An alternative way to do this task is to open the
run.shshell script (vi SOA_ROOT/jboss-as/bin/run.sh) and edit it as follows:JAVA_OPTS="-Ddrools.serialization.sign=false $JAVA_OPTS"
JAVA_OPTS="-Ddrools.serialization.sign=false $JAVA_OPTS"Copy to Clipboard Copied! Toggle word wrap Toggle overflow - Restart the server instance.
- To turn signing off for Java client applications, remove the drools.serialization.sign property or add the following snippet to each application's code:
System.setProperty( KeyStoreHelper.PROP_SIGN, "false" );
System.setProperty( KeyStoreHelper.PROP_SIGN, "false" );Copy to Clipboard Copied! Toggle word wrap Toggle overflow
7.20. Configure Security on a Per-Service Basis
- Open the global configuration file in a text editor:
vi SOA_ROOT/jboss-as/server/PROFILE/deployers/esb.deployer/jboss-esb.xml. - Scroll down to the service you want to configure.
- Add a security element. This setting shows you how to do so:
Copy to Clipboard Copied! Toggle word wrap Toggle overflow - Save the file and exit.
7.21. Per-Service Security Properties
| Property | Description | Required? |
|---|---|---|
| moduleName |
This is a module that exists in the
SOA_ROOT/jboss-as/server/PROFILE/conf/login-config.xml file.
| No |
| runAs |
This is the runAs role.
| No |
| rolesAllowed |
This is an comma-separated list of those roles that have been granted the ability to execute the service. This is used as a check that is performed after a caller has been authenticated, in order to verify that they are indeed belonging to one of the roles specified. The roles will have been assigned after a successful authentication by the underlying security mechanism.
| No |
| callbackHandler |
This is the
CallbackHandler that will override that which was defined in the jbossesb-properties.xml file.
| No |
| property |
These are optional properties that, once defined, will be made available to the
CallbackHandler implementation.
| No |
7.22. Override Global Security Settings
Procedure 7.8. Task
- Open the global configuration file in a text editor:
vi SOA_ROOT/jboss-as/server/PROFILE/deployers/esb.deployer/jbossesb-properties.xml. - Configure the setting in question. Here is an example:
Copy to Clipboard Copied! Toggle word wrap Toggle overflow - Save the file and exit.
7.23. Security Property Overrides
| Property | Description | Required? |
|---|---|---|
| org.jboss.soa.esb.services.security.contextTimeout |
This property lets the service override the global security context time-out (milliseconds) that is specified in the
jbossesb-properties.xml file.
| No |
| org.jboss.soa.esb.services.security.contextPropagatorImplementationClass |
This property lets the service to override the "global security context propagator" class implementation, that is specified in the
jbossesb-properties.xml file.
| No |
7.24. Security Context
7.25. Authentication Request
7.26. SecurityConfig
SecurityConfig class grants access to the security configuration specified in the jboss-esb.xml file. This class is made available to the Callback Handler.
7.27. Add an Authentication Class to a Message Object
Procedure 7.9. Task
- Execute this code:
byte[] encrypted = PublicCryptoUtil.INSTANCE.encrypt((Serializable)
 authRequest);
message.getContext.setContext(SecurityService.AUTH_REQUEST, encrypted);
byte[] encrypted = PublicCryptoUtil.INSTANCE.encrypt((Serializable)
 authRequest);
message.getContext.setContext(SecurityService.AUTH_REQUEST, encrypted);
Copy to Clipboard Copied! Toggle word wrap Toggle overflow
The authentication context is encrypted and then set within the message context. (It is later decrypted by the Enterprise Service Bus so that it can authenticate the request.)
7.28. security_basic Quick Start
SOA_ROOT/jboss-as/samples/quickstarts/security_basic quick start demonstrates how to prepare the security on a message before you use the SecurityInvoker. The quick start also demonstrates how to configure the jbossesb-properties.xml global configuration file for use by client services.
7.29. Set a Time Limit for the Security Context Globally
Procedure 7.10. Task
- Open the global configuration file in a text editor:
vi SOA_ROOT/jboss-as/server/PROFILE/deployers/esb.deployer/jbossesb-properties.xml. - Scroll down to the section that contains security.contextTimeout. Set the time-out value (in milliseconds).
- Save the file and exit.
7.30. Set a Time Limit for the Security Context on a Per-Service Basis
Procedure 7.11. Task
- Open the service's configuration file in a text editor:
vi jboss-esb.xml. - Scroll down to the section that contains Security Context. Set the time-out value (in milliseconds).
- Save the file and exit.
Chapter 8. Advanced Security Options
8.1. Security Propagation
8.2. SecurityContextPropagator
8.3. SecurityContextPropagator Implementations
| Class | Description |
|---|---|
|
Package: org.jboss.internal.soa.esb.services.security
Class: JBossASContextPropagator
|
This propagator will send security credentials to the ESB. If you need to write your own implementation you only have to write a class that implements
org.jboss.internal.soa.esb.services.security.SecurityContextPropagator and then either specify that implementation in jbossesb-properties.xml or jboss-esb.xml.
|
8.4. Add a Custom Log-In Module
Procedure 8.1. Task
- Open the log-in configuration file in a text editor:
vi SOA_ROOT/jboss-as/server/PROFILE/conf/login-config.xml - Add the details of your custom log-in module.
- Save the file and exit.
- Since different log-in modules require different information, you must specify the CallbackHandler attribute to be used. Open the specific security configuration for that service.
- Make sure that the
CallbackHandlerspecifies a fully-qualified classname for the class which implements theEsbCallbackHandlerinterface. This code shows you how to do so:Copy to Clipboard Copied! Toggle word wrap Toggle overflow - Add both the "principle" and the credentials needed to authenticate a caller to the
AuthenticationRequestclass.
JaasSecurityService is replaced with your custom security implementation.
8.5. Certificate Log-In Module
8.6. Certificate Log-In Module Properties
| Property | Description |
|---|---|
|
moduleName
|
This identifies the JAAS Login module to use. This module will be specified in JBossAS login-config.xml.
|
|
rolesAllow
|
This is a comma-separated list of the roles that are allowed to execute this service.
|
|
alias
|
This is the alias which is used to look up the local key-store and which will be used to verify the caller's certificate.
|
8.7. Certificate Log-In Module Configuration File Properties
| Property | Description |
|---|---|
|
keyStoreURL
|
This is the path to the key-store used to verify the certificates. It can be a file on the local file system or on the class-path.
|
|
keyStorePassword
|
This is the password for the key-store above.
|
|
rolesPropertiesFile
|
This is optional. It is the path to a file containing role mappings. Refer to the “Role Mapping” section of the Getting Started Guide for more details about this.
|
8.8. Callback Handler
8.9. Role Mapping
8.10. Enable Role Mapping
Procedure 8.2. Task
- Open the log-in configuration file in a text editor:
vi SOA_ROOT/jboss-as/server/PROFILE/conf/login-config.xml - Set the rolesPropertiesFile property. (This property can point to a file located on either the local file system or the class-path).
- Map users to roles. This example code shows how to do so:
Copy to Clipboard Copied! Toggle word wrap Toggle overflow - Save the file and exit.
8.11. security_cert Quickstart
8.12. Security Service
SecurityService interface is the Enterprise Service Bus' central security component.
8.13. Customize the Security Service Interface
Procedure 8.3. Task
- Implement the
SecurityServiceinterface:Copy to Clipboard Copied! Toggle word wrap Toggle overflow - Open the global configuration file in a text editor:
vi SOA_ROOT/jboss-as/server/PROFILE/deployers/esb.deployer/jbossesb-properties.xml. - Configure the file to use the customized
SecurityService - Save the file and exit.
8.14. Remote Invocation Class
8.15. Secure Non-Remote Method Invocation Classes on Port 8083
port 8083. However, you can also configure the system's Remote Method Invocation settings to allow client applications to download any deployed resources you desire.
Procedure 8.4. Task
Edit the Settings in the jboss-service.xml File
Open the file in a text editor:vi SOA_ROOT/server/PROFILE/conf/jboss-service.xmlConfigure the Settings in the File
Here is an example:<attribute name="DownloadServerClasses">false</attribute>
<attribute name="DownloadServerClasses">false</attribute>Copy to Clipboard Copied! Toggle word wrap Toggle overflow Set this value to false to ensure that client applications can only download Enterprise Java Bean classes.Important
By default, this value is set to false in the SOA Platform's 'production' profile. The value is set to true in all other cases, including the SOA Standalone version's default profile. Note that this is not a secure configuration and should only be used in development environments.
Chapter 9. Securing the Service Registry
9.1. jUDDI and the JBoss Enterprise SOA Platform
The JBoss Enterprise SOA Platform product includes a pre-configured installation of a jUDDI registry. You can use a specific API to access this registry through your custom client. However, any custom client that you build will not covered by your SOA Platform support agreement. You can access the full set of jUDDI examples, documentation and APIs from: http://juddi.apache.org/.
9.2. Service Registry Authentication
Here is a theoretical understanding of how the authentication process works.
Authenticator interface.
GetAuthToken request is made. The goal of this phase is to turn a user id and credentials into a valid publisher id. The publisher id (referred to as the authorized name in UDDI terminology) is the value that assigns ownership within UDDI. Whenever a new entity is created, it must be tagged with ownership by the authorized name of the publisher.
GetAuthToken request, an authentication token is issued to the caller.
GetAuthToken request. This leads to the identify phase.
UddiEntityPublisher object. This object contains all the properties necessary to handle ownership of UDDI entities. Thus, the token (or publisher id) is used to identify the publisher.
Publisher entity, which is a sub-class of UddiEntityPublisher. This sub-class makes publisher properties persist within the jUDDI Registry.
9.3. authToken
9.4. authToken and the Service Registry
authToken.
Important
9.5. Obtain an authToken
Procedure 9.1. Task
- Make a
GetAuthToken()request. - A
GetAuthTokenobject is returned. Set a userid and credential (password) on this object:Copy to Clipboard Copied! Toggle word wrap Toggle overflow - Locate the
juddi.propertiesconfiguration file inSOA_ROOT/jboss-as/server/PROFILE/deploy/juddi-service.sar/juddi.war/WEB-INF. Open it in a text editor. - Configure the juddi.authenticator property to how the Service Registry will check the credentials passed to it by the
GetAuthTokenrequest. (By default it uses thejUDDIAuthenticatorimplementation.) - Save the file and exit.
9.6. Security Authentication Implementations Available for the Service Registry
- jUDDI Authentication
Warning
Do not use this authentication method in a production environment. It accepts any credentials provided, and effectively removes the need for clients to authenticate when accessing the registry.The default authentication mechanism provided by the Service Registry is thejUDDIAuthenticator.jUDDIAuthenticator's authenticate phase checks to see if the, user ID submitted matches against a record in thePublishertable. No credentials checks are made. If, during the authentication process, the Publisher record is found to be non-existent, it is added "on-the-fly".In the identify phase, the publisher ID is used to retrieve the Publisher record and return it. The Publisher inherits every property it needs fromUddiEntityPublisher:juddi.authenticator = org.apache.juddi.auth.JUDDIAuthentication
juddi.authenticator = org.apache.juddi.auth.JUDDIAuthenticationCopy to Clipboard Copied! Toggle word wrap Toggle overflow - XMLDocAuthentication
- The authenticate phase checks that the user id and password match a value in the XML file. The identify phase uses the user ID to populate a new
UddiEntityPublisher. - CryptedXMLDocAuthentication
- The
CryptedXMLDocAuthenticationimplementation is similar to theXMLDocAuthenticationimplementation, but the passwords are encrypted:juddi.authenticator = org.apache.juddi.auth.CryptedXMLDocAuthentication juddi.usersfile = juddi-users-encrypted.xml juddi.cryptor = org.apache.juddi.cryptor.DefaultCryptor
juddi.authenticator = org.apache.juddi.auth.CryptedXMLDocAuthentication juddi.usersfile = juddi-users-encrypted.xml juddi.cryptor = org.apache.juddi.cryptor.DefaultCryptorCopy to Clipboard Copied! Toggle word wrap Toggle overflow Here, the user credential file isjuddi-users-encrypted.xml, and the content of the file will be similar to this:Copy to Clipboard Copied! Toggle word wrap Toggle overflow TheDefaultCryptorimplementation usesBEWithMD5AndDESandBase64to encrypt the passwords.Note
You can use the code in theAuthenticatorTestto learn more about how to use this Authenticator implementation. You can plug in your own encryption algorithm by implementing theorg.apache.juddi.cryptor.Cryptorinterface and referencing your implementation class in the juddi.cryptor property.The authenticate phase checks that the user ID and password match values in the XML file. The identify phase uses the user ID to populate a newUddiEntityPublisher. - LDAP Authentication
- Use
LdapSimpleAuthenticatorto authenticate users via LDAP's simple authentication functionality. This class allows you to authenticate a user based on an LDAP principle, provided that the principle and the jUDDI publisher ID are identical. - JBoss Authentication
- A final alternative is to interface with third-party credential stores. You can link it to the JBoss Application Server's authentication component.You will find the
JBossAuthenticatorclass provided in thedocs/examples/authdirectory. This class enables jUDDI deployments on JBoss to use a server security domain to authenticate users.
9.7. Configure XMLDocAuthentication
Procedure 9.2. Task
- Create a text file called
juddi-users.xmland save it injbossesb-registry.sar.Copy to Clipboard Copied! Toggle word wrap Toggle overflow - Save the file and exit.
- Add the file to the class-path.
- Open the
juddi.propertiesfile in your text editor (located inSOA_ROOT/jboss-as/server/PROFILE/deploy/juddi-service.sar/juddi.war/WEB-INF). - Modify the file so that it looks like this:
juddi.authenticator = org.apache.juddi.auth.XMLDocAuthentication
juddi.usersfile = juddi-users.xml
juddi.authenticator = org.apache.juddi.auth.XMLDocAuthentication
juddi.usersfile = juddi-users.xml
Copy to Clipboard Copied! Toggle word wrap Toggle overflow - Save the file and exit.
9.8. Lightweight Directory Access Protocol (LDAP)
9.9. Configure LDAP Authentication
Procedure 9.3. Task
- Locate the
juddi.propertiesfile inSOA_ROOT/jboss-as/server/PROFILE/deploy/juddi-service.sar/juddi.war/WEB-INF. Open it in your text editor. - Add the following configuration settings:
juddi.authenticator=org.apache.juddi.auth.LdapSimpleAuthenticator
juddi.authenticator.url=ldap://localhost:389
juddi.authenticator=org.apache.juddi.auth.LdapSimpleAuthenticator
juddi.authenticator.url=ldap://localhost:389
Copy to Clipboard Copied! Toggle word wrap Toggle overflow The juddi.authenticator.url property tells theLdapSimpleAuthenticatorclass where the LDAP server resides. - Save the file and exit.
9.10. Configure JBoss Authentication
Procedure 9.4. Task
- Locate the
juddi.propertiesfile inSOA_ROOT/jboss-as/server/PROFILE/deploy/juddi-service.sar/juddi.war/WEB-INF. Open it in your text editor. - Add the following lines to the file:
uddi.auth=org.apache.juddi.auth.JBossAuthenticator
juddi.securityDomain=java:/jaas/other
uddi.auth=org.apache.juddi.auth.JBossAuthenticator
juddi.securityDomain=java:/jaas/other
Copy to Clipboard Copied! Toggle word wrap Toggle overflow The juddi.authenticator property connects theJbossAuthenticatorclass to the jUDDI Registry's Authenticator framework. Thejuddi.security.domaintellsJBossAuthenticatorwhere it can find the Application Server's security domain. It uses this domain to perform the authentications.Note that JBoss creates one security domain for each application policy element in theSOA_ROOT/jboss-as/server/PROFILE/conf/login-config.xmlfile. These domains are bound to the server JNDI tree with this name:java:/jaas/<application-policy-name>. (If a look-up refers to a non-existent application policy, a policy namedotherwill be used by default.) - Save the file and exit.
Part III. Web Consoles
Chapter 10. Monitoring Your System with the Admin Web Console
10.1. Admin Console
10.2. Running the Admin Console
Prerequisites
- JBoss Enterprise SOA Platform must be installed and running.
- Your user details must be correctly configured in:
SOA_ROOT/jboss-as/server/PROFILE/conf/props/soa-users.propertiesandSOA_ROOT/jboss-as/server/PROFILE/conf/props/soa-roles.properties.
Procedure 10.1. Running the Admin Console
Launch the Console in a Web Browser
Open http://localhost:8080/admin-console in a web browser.Authenticate to the Console
Enter your Username and Password as set inSOA_ROOT/jboss-as/server/PROFILE/conf/props/soa-users.properties.
10.3. View a Queue in the Admin Console
Procedure 10.2. Task
- Launch a web browser and go to localhost:8080/admin-console.
- Input
adminas the username and password. - To view the queue, click on Resources, JBoss Messaging and then Queues.
A list of the JMS queues deployed on the server appears.
Chapter 11. Monitoring Your System with the Service List Console
11.1. Service List Console
11.2. Service List Console Functionality
- processing times
- numbers of failed messages
- bytes transferred
- the date-time stamps of the last successful and failed messages
- processing time per action
- processed count per action
- failed count per action
- overall message count (per service)
- The Console also keeps count of the number of messages that have passed through the Enterprise Service Bus via a message counter. (This counter also tracks the numbers of successfully-processed and failed messages and records the number of bytes processed and the time-stamp for each message.)
- You can also monitor Dead Letter Service which handles undeliverable messages.
Note
The Dead Letter Service will not, however, be used if the underlying transport has native support. (This is the case for the Java Messaging Service.) In these situations, you must inspect both the Dead Letter Service and any transport-specific equivalent. - The Console also keeps track of the events performed on the Action Pipeline, including Smooks transformations (and the amount of time taken to perform them).
Chapter 12. Monitoring Your System with the JMX Console
12.1. JMX Console
12.2. M-Bean
12.3. Monitoring and Management M-Beans
- deployment=<ESB package name>
- Use the Deployments M-Bean to see the status of every deployed ESB package and its associated XML configuration.
- listener-name=<Listener name>
- This M-Bean lists all of the deployed listeners. It shows information about their XML configurations, their start times, their maxThreads and their states.If your listener has an explicitly-managed thread pool , its current minimum and maximum thread pool counts will also be exposed through this MBean.The number of active threads in the thread pool will change dynamically between this minimum (which is initially set to one) and the defined maximum as the service load dictates. The administrator has the option of changing these values while the system is running although they will revert to their original values should the server, or ESB artifact, be restarted.From here, you can also initialize, start, stop and destroy them.
- category=MessageCounter
- The message counters display all of the services deployed for a given listener, the actions for each of these services, the number of messages processed and the time taken to process each one.
- service-name=<Service name>
- This M-Bean displays a variety of statistics for each service, including message counts, state, average size and processing time. You can reset message counts and start and stop services from here as well.
Note
Chapter 13. Monitoring Your System with the JON for SOA Web Console
13.1. JBoss Operations Network (JON)
13.2. JON for SOA
13.3. Analyse JBoss Enterprise SOA Platform Enterprise Service Bus Statistics
Procedure 13.1. Task
- Click on (above the Resources menu) to "drill down" through various levels of statistics.On the first level, the figures displayed are a summary for the overall ESB instance.
- Click on the JBoss ESB Deployment item to view a list of all of the Enterprise Service Bus packages deployed on the server. One will not see any statistics at this level but, from here, one can select a deployment and drill down into it to view them.
- Drill down further still to view details for that deployment's constituent services and actions.
13.4. Metrics Available Through JON for SOA
Statistics Available at the ESB Level:
- Message Count (Successful)
- Message Count (Total)
- Message Counts (Failed)
- Processed Bytes
- Last Failed Message Date
- Last Successful Message Date
Statistics Available at the Service Level:
- Message Count
- Message Count (avg) per Minute
- Overall Bytes
- Overall Bytes Failed
- Overall Bytes Processed
- Overall Service Time Processed
Statistics Available at the Action Level:
- Message Count
- Message Count (avg) per Minute
- Messages Failed
- Messages Failed (avg) per Minute
- Messages Successfully Processed
- Messages Successfully Processed (avg) per Minute
- Overall Bytes
- Overall Bytes Failed
- Overall Bytes Processed
- Processing Time
Statistics Available at the Listener Level:
- Life-cycle State
- Maximum number of threads
- MEP
- Service Category
- Service Description
- Service Name
- Start Date
13.5. Use JON for SOA to Deploy an Archive
Procedure 13.2. Task
- Open a web browser and log into the JON for SOA Console.
- Go to the JBoss ESB Statistics screen.
- Click on the INVENTORY tab
- Go to Child Resources.
Note
You can view historical deploy requests here as well. - Go to the Create New menu and select .
- On the Create New Resource page, choose the archive to deploy and select where it should be sent (which, under normal circumstance, will be your
deploydirectory).Note
Remember that only compressed files can be uploaded: use the Deploy Zipped option to determine whether it should be deployed as a compressed or an exploded archive.
13.6. Use JON for SOA to Delete an Archive
Procedure 13.3. Task
- Open a web browser and log into the JON for SOA Console.
- Go to the JBoss ESB Statistics screen.
- Click on the INVENTORY tab
- Go to Child Resources list.
- Tick the entry to be deleted.
- Click DELETE
Note
You can view historical delete requests here as well.
The archive is deleted.
13.7. Automatic Service Discovery
13.8. Change the Automatic Service Discovery Feature's Polling Rate
Procedure 13.4. Task
- Open the configuration file installed with the JON Agent in a text editor:
vi rhq-agent/conf/agent-configuration.xmlEdit the file as per this example code:<entry key="rhq.agent.plugins.service-discovery.period-secs" value="86400"/>
<entry key="rhq.agent.plugins.service-discovery.period-secs" value="86400"/>Copy to Clipboard Copied! Toggle word wrap Toggle overflow - Save the file and exit.
- Restart the JBoss Enterprise SOA Platform.In contrast to the JBoss Enterprise SOA Platform consoles, there is no way to force the JON web console to collect new data on demand. Clicking on buttons such as Get Current Values (found under the Metric Data tab) only updates the display to reflect the most recently collected data. If you want an an update immediately, reset the collection period to a very low value, such as thirty seconds. (Remember to set the interval back to the previous figure afterwards.)
Important
If you set the value to too low a figure, performance will suffer.
13.9. Change the Automatic Service Discovery Feature's Polling Rate (Alternative Method)
Procedure 13.5. Task
- Open a web browser and log into the JON for SOA console.
- Add a JON agent to the server's inventory of resources.
- Click on CONFIGURE.
- Change the value for Service Discovery Period.
Note
You do not need to restart the agent for the change to take effect.
Chapter 14. Administering Your Service Registry with the jUDDI Web Console
14.1. Service Registry
14.2. How the Registry Works
- The JBoss Enterprise Service Bus funnels all interaction with the Registry through the registry interface.
- It then calls a JAXR implementation of this interface.
- The JAXR API needs to utilize a JAXR implementation. (By default, this is Apache Scout.)
- Apache Scout, in turn, calls the Registry.
14.3. jUDDI Console
14.4. Grant Access to the jUDDI Console
Prerequisites
- A user with the name "root" who has been assigned the security roles of "user" and "admin".
Procedure 14.1. Task
- Open a web browser session and go to the jUDDI Console at http://localhost:8080/uddi-console/. Log in as root.
- Click "Publisher".
- From the Publisher ID list, click on the username.
- Select the "Is Admin" checkbox.
The user you selected now has administrative rights.
14.5. jUDDI M-Beans
- org.apache.juddi.api.impl.UDDIServiceCounter
- org.apache.juddi.api.impl.UDDICustodyTransferCounter
- org.apache.juddi.api.impl.UDDIInquiryCounter
- org.apache.juddi.api.impl.UDDIPublicationCounter
- org.apache.juddi.api.impl.UDDISecurityCounter
- org.apache.juddi.api.impl.UDDISubscriptionCounter
- successful queries
- failed queries
- total queries
- processing time
- an aggregate count of total/successful/failed per API
Chapter 15. Administering Your System with the jBPM Web Console
15.1. jBPM
15.2. jBPM Web Console
Chapter 16. Administering Your System with the BPEL Web Console
16.1. BPEL Web Console
- any process definitions you have deployed to the BPEL engine
- the process instances executing in the BPEL engine
- a process' execution history
- the query pertaining to the execution history
Important
16.2. Business Process Execution Language (BPEL)
16.3. Business Rule Orchestration
16.4. Process Definition
16.5. Process Instance
16.6. View Deployed Processes with the BPEL Web Console
Procedure 16.1. Task
- Launch a web browser and go to http://localhost:8080/bpel-console.
- Input your user name and password.
- Click on the Manage Instances tab to see which BPEL processes are currently deployed. You will also see version information for each of these processes.
- Select a process definition to open it. In the bottom panel you will see a list of process instances that are active for that particular definition.
Note
Only one version of a process can be active at a time. When you open a process definition, the active version is automatically selected. - Sometimes you will find that you need to manage a "retired" version (for example, in order to terminate running instances). In these cases, click - and then select the version you want.
Note
If there is no version for a particular process archive, (such asQuickstart_bpel_simple_invoke.jar), it is treated as version zero. (In this case,Quickstart_bpel_simple_invoke-1.jar,will be the next version deployed.)
16.7. Business Process Analytics Format (BPAF)
16.8. View BPAF Data with the BPEL Web Console
Procedure 16.2. Task
- Launch a web browser and go to http://localhost:8080/bpel-console.
- Input your user name and password.
- Click on the Manage Instances tab to see which BPEL processes are currently deployed. You will also see version information for each of these processes.
- Select a process definition to open it. In the bottom panel you will see a list of process instances that are active for that particular definition.
- Use the Execution History to produce a chart. Here you can specify a particular period of time to review and choose whether or not to include failed and terminated instances in the chart.
16.10. Activate the BPEL Web Console's Logging Functionality
Procedure 16.3. Task
- Open the
deploy.xmlfile in a text editor (for the bpel_helloworld quick start, this would bevi SOA_ROOT/jboss-as/samples/quickstarts/bpel_hello_world/bpelContent/deploy.xml - Edit the file as follows:
Copy to Clipboard Copied! Toggle word wrap Toggle overflow - Save the file and exit.
- Open the
bpel.propertiesfile in the text editor:vi SOA_ROOT/jboss-as/server/PROFILE/deploy/riftsaw.sar/bpel.properties - Switch on the process-events option for the particular process you want to log and make sure that org.jboss.soa.bpel.console.bpaf.BPAFLogAdapter is enabled.
- Save the file and exit.
16.11. View Instance Data with the BPEL Web Console
Procedure 16.4. Task
- Launch a web browser and go to http://localhost:8080/bpel-console.
- Input your user name and password.
- Click on the Manage Instances tab to see which BPEL processes are currently deployed. You will also see version information for each of these processes.
- Select a process definition to open it. In the bottom panel you will see a list of process instances that are active for that particular definition.
Note
Only one version of a process can be active at a time. When you open a process definition, the active version is automatically selected. - Click the button.
- The View tab shows the instance execution graph, while the Source tab below it shows all of the "activity" events.
16.12. Instance Execution Graph
16.13. View the Instance Execution Graph with the BPEL Web Console
Procedure 16.5. Task
- Launch a web browser and go to http://localhost:8080/bpel-console.
- Input your user name and password.
- Click on the Manage Instances tab to see which BPEL processes are currently deployed. You will also see version information for each of these processes.
- Select a process definition to open it. In the bottom panel you will see a list of process instances that are active for that particular definition.
Note
Only one version of a process can be active at a time. When you open a process definition, the active version is automatically selected. - Click on the button to see an instance execution graph for the process.
16.14. View a History Instance Query
Prerequisites
- History logging must be enabled.
Procedure 16.6. Task
- Log into the BPEL Web Console.
- Choose a process definition and a process status from the list box.You can also optionally choose to input the correlation key, the start time and the end time as search criteria.
- Go to the History Instances List and double-click on a row. A window will pop up showing you all of the execution events that happened when that process ran.
16.15. Active Process Definition
16.16. Retired Process Definition
16.17. Manually Retire an Active Process Definition
Procedure 16.7. Task
- Launch a web browser and go to http://localhost:8080/bpel-console.
- Input your user name and password.
- Click on the Runtime tab.
- Select the Deployments option.You will now be able to see the version information and current status (active or retired) of each process definition.
- Select the particular version of the process definition you want to retire and then press the button.
Note
If you undeploy a process, its end-points will only deactivate if no previous versions of that process have ever existed.
16.18. End-Point Reference
16.19. Manually Re-Activate a Retired Process Definition
Procedure 16.8. Task
- Launch a web browser and go to http://localhost:8080/bpel-console.
- Input your user name and password.
- Click on the Runtime tab.
- Select the Deployments option.You will now be able to see the version information and current status (active or retired) of each process definition.
- Select the retired version you want to reactivate and press the button (found on the bottom-right of screen.)
16.20. Enable UTF-8 Support for Processes or External Web Services
Procedure 16.9. Task
- Check your database to make sure UTF-8 encoding is being used by default.
- Launch a text editor and open the database's configuration file.
- Add these settings to the file:
hibernate.connection.useUnicode=true
hibernate.connection.characterEncoding=UTF-8
hibernate.connection.useUnicode=true
hibernate.connection.characterEncoding=UTF-8
Copy to Clipboard Copied! Toggle word wrap Toggle overflow - Save the file and exit.
Part IV. Managing Multiple Server Configurations
Chapter 17. Running Multiple JBoss Enterprise SOA Platform Instances Side-by-Side
17.1. Running Application Servers Side-by-Side
The JBoss Enterprise SOA Platform can be made to run alongside another JBoss product such as the JBoss Enterprise Application Platform. There are two ways of achieving this:
- by using multi-homing
- by using the Service Bindings Manager
Warning
17.2. Run Application Servers Side-by-Side Using Multi-Homing
Procedure 17.1. Task
- Configure your operating system's network interface so it is assigned multiple IP addresses. (Refer to your operating system's documentation for instructions on doing this).
- Launch each server instance using the
-bswitch to bind all of them to a single IP address. Here is an example:SOA_ROOT/jboss-as/bin/./run.sh -b 10.34.5.2
Chapter 18. Managing Your Cluster
18.1. Cluster
18.2. Stateless Service Failover
18.3. ServiceInvoker
org.jboss.soa.esb.client.ServiceInvoker) manages the delivery of messages to the specified Services. It also manages the loading of end-point references and the selection of couriers, thereby providing a unified interface for message delivery.
18.4. Load Balancing
18.5. Configure a Load-Balancing Policy
Procedure 18.1. Task
- Open the global configuration file in a text editor:
vi SOA_ROOT/jboss-as/server/PROFILE/deployers/esb.deployers/jbossesb-properties.xml. - Scroll down to the org.jboss.soa.esb.loadbalancer.policy property. Set it with the policy you wish to use.
- Save the file and exit.
18.6. Load Balancing Policies
| Policy Name | Description |
|---|---|
| first available | If a healthy service binding is found it will be used until it dies. The next end-point reference in the list will then be used. There is no load balancing between the two service instances with this policy. |
| round robin | A standard load-balancing policy whereby each end-point reference is utilised in list order. |
| random robin | This is like the round robin, but the selection is randomized. |
Note
18.7. Change the Registry's Cache's Lifespan
Procedure 18.2. Task
- Open the global configuration file in a text editor:
vi SOA_ROOT/jboss-as/server/PROFILE/deployers/esb.deployers/jbossesb-properties.xml. - Scroll down to the section that contains property name="org.jboss.soa.esb.registry.cache.validityPeriod. Set this property (which is the time-out value) to what you require (the default is sixty seconds):
<properties name="core">
<property name="org.jboss.soa.esb.registry.cache.life" value="60000"/>
<!-- 60 seconds is the default -->
</properties>
<properties name="core">
<property name="org.jboss.soa.esb.registry.cache.life" value="60000"/>
<!-- 60 seconds is the default -->
</properties>
Copy to Clipboard Copied! Toggle word wrap Toggle overflow - Save the file and exit.
The ServiceInvoker will obtain a fresh list of end-point references from the registry when this time value is exceeded.
18.8. Run the Same Service on More than One Node in a Cluster
Procedure 18.3. Task
- To run the same service on more than one node in a cluster, wait until the Registry's cache revalidates.
18.9. Remove Failed End-Point References from the Registry
Procedure 18.4. Task
- Open the
jbossesb-properties.xmlin a text editor:vi SOA_ROOT/jboss-as/server/PROFILE/deployers/esb.deployers/jbossesb-properties.xml. - Scroll down to the section that contains org.jboss.soa.esb.failure.detect.removeDeadEPR. Set this property to true.
- Save the file and exit.
Warning
Note that the default setting is false because this feature should be used with extreme care. If it is employed, the end-point reference for a service that is simply overloaded and, therefore, slow to respond may, inadvertently, be removed by mistake. There will be no further interactions with these "orphaned" services you may have to restart them.
18.10. Support for Clustering in the BPEL Engine
18.11. Configure BPEL Clustering
Procedure 18.5. Task
- Open the
jboss-beans.xmlexample file in your text editor. - Set the @database@ property to one of the following:
- mysql
- postgre
- db2
- sqlserver
- oracle
- sybase
- Save the file and exit.
- Copy the
jboss-beans.xmlfile toSOA_ROOT/jboss-as/server/PROFILE/deploy/riftsaw.sar/META-INF/. - Replace
SOA_ROOT/jboss-as/server/PROFILE/deploy/cluster/jboss-cache-manager.sar/META-INF/jboss-cache-manager-jboss-beans.xmlwithriftsaw-cache-manager-jboss-beans.xml.Warning
Attempting to install another BPEL Engine deployment can break the integration.Note
If you want to use the service that you have deployed onto the cluster, specify the load balancer's URL instead of the SOAP address in the WSDL file.
18.12. Deploy a BPEL Process on a Cluster
Procedure 18.6. Task
- Copy your BPEL artifact into the farm directory:
cp FILENAME.jar SOA_ROOT/jboss-as/server/PROFILE/farm.Note
Remember that clustering is only available for the "production" and "all" profiles.Note
When you invoke your BPEL service, specify the load balancer's URL (instead of the SOAP address specified in the WSDL). The load balancer will then decide which of the cluster's servers to use.
Part V. Managing Services
Chapter 19. Publishing Contracts
19.1. Service List Application
Important
19.2. End-Point Contract
19.3. How the JBoss Enterprise SOA Platform Discovers End-Point Contracts
Unavailable on Contract
Unavailable on Contract19.4. Publish a Contract
Procedure 19.1. Task
- In order to publish contract information, you must give an action the following
org.jboss.internal.soa.esb.publish.Publishannotation. (This example uses the SOAPProcessor for demonstrative purposes):@Publish(JBossWSWebserviceContractPublisher.class) public class SOAPProcessor extends AbstractActionPipelineProcessor { //TODO: implement }@Publish(JBossWSWebserviceContractPublisher.class) public class SOAPProcessor extends AbstractActionPipelineProcessor { //TODO: implement }Copy to Clipboard Copied! Toggle word wrap Toggle overflow - Implement the
org.jboss.soa.esb.actions.soap.ContractPublisherinterface (You only need to implement one method):public ContractInfo getContractInfo(EPR epr);
public ContractInfo getContractInfo(EPR epr);Copy to Clipboard Copied! Toggle word wrap Toggle overflow
Chapter 20. Deploy Archive Files
20.1. Hot Deployment
Note
20.2. Hot Deployment and jbossesb.sar
- its time-stamp changes, (if the archive is compressed.)
- the timestamp of the
META-INF/jboss-service.xmlfile changes, (if the archive is in exploded form.)
20.3. Hot Deployment and ESB Archives
*.esb archive will automatically redeploy when:
- the time-stamp of the archive changes, (if the archive is compressed.)
- the
META-INF/jboss-esb.xmlfile's time-stamp changes, (if the archive is in exploded form.)
20.4. Redeploy a Rules File
Procedure 20.1. Task
- To redeploy a .DRL or .DSL file, redeploy the jbrules.esb directory by copying it back into
SOA_ROOT/jboss-as/server/PROFILE/deploy. - Alternatively, you can activate the Action Configuration's ruleReload feature. After activating this functionality, if a rule file changes, it is re-loaded automatically.
20.5. Redeploy a Transformation File
Procedure 20.2. Task
- Redeploy the .ESB archive in which it resides by copying it back into the
SOA_ROOT/jboss-as/server/PROFILE/deploydirectory. - Alternatively, launch a web browser and log into the Monitoring and Management Console at http://localhost:8080/admin-console.
- Send out a notification message over the Java Message Service. Smooks will process this event causing it to reload automatically.
20.6. Redeploy a Business Process Definition
Prerequisites
- JBoss Developer Studio
Procedure 20.3. Task
- Use the jBPM Eclipse plug-in to deploy a new version of a business process definition to the jBPM database.
Note
Please be aware that only a fresh process instance will use this new version. Existing process life-cycles will still use the previous definition.Note
Note that this procedure works in standalone mode, too.
20.7. Reload Rules Whilst Running in Standalone Mode
Procedure 20.4. Task
- Run
ruleReload.
Chapter 21. Integrating External Web Services with the JBoss Enterprise SOA Platform
21.1. Web Service
21.2. Web Service End-Point
21.3. Web Services Description Language (WSDL)
- location of the service
- the operations that the service supports
- the protocol bindings the service supports (SOAP, HTTP, etc)
- access procedure
21.4. REST
21.5. SOAPProcessor
21.6. SOAPProxy
- it facilitates loose coupling between the client and service (since they are both completely unaware of each other.)
- it means the client no longer has a direct connection to the remote service's hostname/IP address.
- the client will see modified WSDL that changes the inbound/outbound parameters. At a minimum, the WSDL must be tweaked so that the client is pointed to the ESB's exposed end-point instead of the original, now proxied endpoint.
- it allows you to introduce a transformation of the SOAP envelope/body via the action pipeline both for the inbound request and outbound response.
- it makes service versioning possible since clients can connect to two or more proxy end-points on the enterprise service bus, each with its own WSDL and/or transformations and routing requirements, and the ESB will send the appropriate message to the appropriate endpoint and provide an ultimate response.
- it allows for complex context-based routing via ContentBasedRouter.
21.7. Advantages of Integrating Web Services with the Enterprise Service Bus
- the client and the service can be coupled loosely since they will be completely unaware of each other's existence.
- the client is no longer connected directly to the remote service's hostname or IP address.
- the client can see a modified WSDL, changing the inbound/outbound parameters. (Note that, at a minimum, one must modify the WSDL so that the client is pointing to the end-point exposed by the Enterprise Service Bus, rather than the original end-point.)
- you can introduce a SOAP envelope/body transformation via the action pipeline that will apply to both the inbound request and the outbound response.
- you can implement service versioning since clients can connect to two or more proxy end-points, each with its own WSDL and/or transformations and routing requirements. The Enterprise Service Bus will send the appropriate message to the correct end-point and then return a response.
- the
ContentBasedRouterclass can be used to introduce advanced routing functionality.
21.8. Configure Web Service Integration
Procedure 21.1. Task
- QE/SME to provide information.
21.9. Republish a Web Service Using the SOAPProxy Action
Procedure 21.2. Task
- QE/SME to provide information.
21.10. Content-Based Router
21.11. Static-Based Router
21.12. Routing Key
Part VI. Auditing and Troubleshooting Your System
Chapter 22. System Auditing
22.1. Message Store
Note
22.2. Service Route Filter
org.jboss.internal.soa.esb.message.filter.ServiceRouteFilter) is an auditing mechanism that allows you to track a message's path through different services. Like any other filter, you need to enable it from within the jbossesb-properties.xml file.
22.3. Audit the Data in the Message Store
Procedure 22.1. Task
- Open
jbossesb-properties.xmlin a text editor:vi jbossesb-properties.xml - Go to the section called filters and edit it as per the following code sample:
Copy to Clipboard Copied! Toggle word wrap Toggle overflow - Save the file and exit.it will now check messages and services for whether or not service route information should be recorded. On either a per-service or a per-message level, you can tell the filter to add the route information into the context.
- To configure it on a service level, add recordRoute="true" in your service definition.
        <service
                category="FirstServiceESB"
                name="SimpleListener"
                description="Hello World"
                recordRoute="true">
<service category="FirstServiceESB" name="SimpleListener" description="Hello World" recordRoute="true">Copy to Clipboard Copied! Toggle word wrap Toggle overflow - To configure it on a message level, add a service-record-route property to the message properties and set it to
true.
22.4. TraceFilter
org.jboss.internal.soa.esb.message.filter.TraceFilter) is the JBoss Enterprise SOA Platform's meta-data filter. Its role is to record entries in the log whenever a message interacts with a component. It enables you to trace an event and have information on it returned to you. For example, you can set it to trace certain kinds of messages and display their movements to make it easier to monitor them.
22.5. Log Message
22.6. Identify a Log Message
Procedure 22.2. Task
Determining if a Message is a Log Messages
To identify a log message, open it up and see if it adheres to the following format:header: [ To: EPR: PortReference < <wsa:Address ftp://foo.bar/> >, From: null, ReplyTo: EPR: PortReference < <wsa:Address http://bar. foo/> >, FaultTo: null, Action: urn:dowork, MessageID: urn:foo/bar /1234, RelatesTo: null ]
header: [ To: EPR: PortReference < <wsa:Address ftp://foo.bar/> >, From: null, ReplyTo: EPR: PortReference < <wsa:Address http://bar. foo/> >, FaultTo: null, Action: urn:dowork, MessageID: urn:foo/bar /1234, RelatesTo: null ]Copy to Clipboard Copied! Toggle word wrap Toggle overflow
22.7. Filter for Log Messages
Procedure 22.3. Task
Open the jbossesb-properties.xml File
Open thejbossesb-properties.xmlin a text editor:vi SOA_ROOT/jboss-as/server/PROFILE/deployers/esb.deployers/jbossesb-properties.xml.- Scroll down to the "Filter" section of the file.
- Set the org.jboss.soa.esb.messagetrace property to on. Now that it is enabled, every message that passes through it is logged.
- To gain more precise control over which messages are logged and which are ignored, set the org.jboss.soa.esb.permessagetrace property to on as well. This causes the filter to ignore those messages for which the org.jboss.soa.esb.message.unloggable property is set to yes.
Save
Save the file and exit.
The TraceFilter is switched on. Whenever a message passes through this filter, you will see the following at the information level:
Note
Chapter 23. Troubleshooting
23.1. Troubleshooting Your JBoss Enterprise SOA Platform Installation
- JBOSS_HOME set incorrectly
- If the optional environmental variable, JBOSS_HOME, is set then it must point to the correct directory. If you have multiple installations, check that it is pointing to the one that you are trying to run.
Warning
Do not set this variable unless you have a specific need to do so. - Java installed incorrectly
- If the Java environment has been installed or configured incorrectly, then the JBoss Enterprise SOA Platform will not function.
- VM Cannot Allocate Sufficient Memory
- This error occurs when there is not enough free memory available to the system to satisfy the JBoss Enterprise SOA Platform';s requirements. You can increase the amount available in one of three ways: by exiting applications, allocating more virtual memory, or physically increasing the amount of RAM installed on the system.
23.2. Troubleshooting the Boot Process
- "Address already in use" - There is already a server running on port 8080.
- "Java not found" - The Java JRE may not be installed, or if it is, your PATH environment variable is not set to locate the java runtime.
- "Class not found" - The CLASSPATH environment variable is not set properly. You really don't need to set this variable as the server startup script sets it for you.
- If you see any of these errors, examine the server.log messages that come before and after the error message for additional information regarding the root cause of the error.
23.3. End-Point Reference
23.4. Troubleshooting Registry Services
Important
23.5. Remove an End-Point Reference from the Registry
Prerequisites
- Ensure the system is in an inactive state
Procedure 23.1. Task
- Open the end-point reference file in your text editor.
- Set the end-point reference's remove-old-service tag value to true:
<jms-listener name="JMS-ESBListener"  busidref="quickstartEsbChannel">
        <property name="remove-old-service" value="true"/>
</jms-listener>
<jms-listener name="JMS-ESBListener" busidref="quickstartEsbChannel"> <property name="remove-old-service" value="true"/> </jms-listener>Copy to Clipboard Copied! Toggle word wrap Toggle overflow Warning
Always use this option with caution, because the entire service, including every one of its end-point references, will be removed. - Save the file and exit.
23.6. Apache Scout
org.jboss.soa.esb.scout.proxy.transportClass class, one each for SOAP, SAAJ, RMI and Embedded Java (Local).
23.7. Service Registry and Apache Scout Troubleshooting Checklist
- If you decide to use remote method invocation, be sure to obtain the
juddi-client.jarfile, (SOA_ROOT/jboss-as./server/PROFILE/deployers/esb.deployer/lib/juddi-client-VERSION.jar) - Ensure that the
jbossesb-properties.xmlfile is on the class-path and that it is being read correctly. If not, the Registry try to use "null" as the name with which to instantiate classes. - Make sure that
META-INF/esb.juddi.client.xmlfile specifies a valid transport. - Make sure that the
persistence.xmlfile's settings are valid and that the Hibernate dialect you have chosen matches that used by the database. - Ensure that the
esb.juddi.xmlfile is on the class-path. This contains some of the Registry's configuration settings. - Sometimes, if a service fails or does not shut down cleanly, old entries may linger on in the Registry. Remove these manually.
23.8. Further Service Registry Troubleshooting Resources
- The JBoss jUDDI Wiki: http://www.jboss.org/community/docs/DOC-11217
- The JBoss ESB User Forum: http://community.jboss.org/en/jbossesb?view=discussions.
23.9. Java Message Service
23.10. IBM Websphere MQ Java Message Service Provider Diagnostic Tracing Functionality
23.11. Diagnostic Trace
23.12. Enable Diagnostic Tracing for the IBM Websphere MQ JCA Adapter
./run.sh shell script, you should use the following approach:
Procedure 23.2. Task
Open the run.conf File
Open the file in a text editor:vi SOA_ROOT/jboss-as/bin/run.conf.Edit the run.conf File
Appending the following lines onto the end of the file:# Settings to enable WebSphere MQ resource adapter trace JAVA_OPTS="$JAVA_OPTS -DtraceEnabled=true -DtraceDestination=wmq_jca.trc -DtraceLevel=10 -DlogWriterEnabled=false"
# Settings to enable WebSphere MQ resource adapter trace JAVA_OPTS="$JAVA_OPTS -DtraceEnabled=true -DtraceDestination=wmq_jca.trc -DtraceLevel=10 -DlogWriterEnabled=false"Copy to Clipboard Copied! Toggle word wrap Toggle overflow Enable Client Logging
Still in the text editor, set the MQJMS_TRACE_LEVEL property:# Settings to enable WebSphere MQ resource adapter and client trace JAVA_OPTS="$JAVA_OPTS -DtraceEnabled=true -DtraceDestination=wmq_jca.trc -DtraceLevel=10 -DlogWriterEnabled=false -DMQJMS_TRACE_LEVEL=base"
# Settings to enable WebSphere MQ resource adapter and client trace JAVA_OPTS="$JAVA_OPTS -DtraceEnabled=true -DtraceDestination=wmq_jca.trc -DtraceLevel=10 -DlogWriterEnabled=false -DMQJMS_TRACE_LEVEL=base"Copy to Clipboard Copied! Toggle word wrap Toggle overflow Save
Save the file and exit.
23.13. Enable Diagnostic Tracing for the IBM Websphere MQ Java Client
Procedure 23.3. Task
Call the enableTrace Static Method
Call thecom.ibm.mq.MQEnvironment's enableTrace static method.
Part VII. Performance Tuning
Chapter 24. Performance Tuning
24.1. Performance Tuning
24.2. Tune the JBoss Enterprise SOA Platform for High Performance
Procedure 24.1. Task
Learn How to Tune the Product
To learn about performance tuning, go to this website: http://community.jboss.org/wiki/JBossESBPerformanceTuning.
24.3. Registry Performance
24.4. JMS Message Prioritization
24.5. Configure the Priority of JMS Messages
Procedure 24.2. Task
- Open the gateway's configuration file in a text editor.
- Add the following code to either the listener, bus or provider area of the file:
<property name="messageFlowPriority" value="X"/><property name="messageFlowPriority" value="X"/>Copy to Clipboard Copied! Toggle word wrap Toggle overflow The value of x can be a number from0to9inclusive, where0is the lowest priority and9is the highest. - Save the file and exit.
24.6. Gateways on Which Prioritization Can be Set
- Scheduled (including file and so forth)
- Groovy
- JMS (If this transport is invoked through the JMS Courier, then the priority will also be used to configure the MessageProducer.)
- SQL
- JCA inflow
- Camel
- Hibernate
- Http
- JBoss Remoting
- UDP
- EBWS (For EBWS the property must be specified within the configuration file's "service" element.)
24.7. Dynamic Configuration of the MessageAwareListener Thread Pool
Appendix A. Some Useful Definitions
A.1. Service
jboss-esb.xml configuration file.
A.2. Boot-Strapper Mode
A.3. Message Re-delivery Service
A.4. Action Pipeline
A.5. run.sh
run.sh is the shell script the user runs to launch the JBoss Enterprise SOA Platform. The Microsoft Windows equivalent is run.bat. The script contains the commands needed to start the server with the profile and port binding which the user has specified in the shell. The script is found in the SOA_ROOT/jboss-as/bin directory.
A.6. Class-path
A.7. Business Process Definition
A.8. Server Profiles
SOA_ROOT/jboss-as/server/ directory. The user specifies which profile to run when launching the software by using the -c switch. If none is specified, the "Default" profile is used.
A.9. Datasource Name
A.10. Decision Table
A.11. Stateless Service
A.12. Service Binding
A.13. Enterprise Java Bean
A.14. Loose Coupling
A.15. Persistence Mechanism
A.16. Resource Adapter
A.17. Shell Script
A.18. Web Container
A.19. Initial Context Factory
A.20. UsernameToken
A.21. Schema Validation
A.22. Byte Array
A.23. Extended Transactional Client
A.24. Connection Pooling
A.25. Pooled Database Manager
A.26. Cipher Transformation
A.27. Concurrency Control
A.28. Uniform Resource Identifier
A.29. Provider Adapter
A.30. Implementation Class
A.31. Interceptor Class
A.32. Transacted Flag
A.33. Java Connector Architecture (JCA) Transport
A.34. JCA Bridge
A.35. JCA Adapter
A.36. End-point Class
A.37. Service Provider
A.38. Service Broker
A.39. Service Requester
A.40. Messaging Queues
A.41. Message Listeners
org.jboss.soa.esb.message.Message format. Each gateway listener must have a corresponding ESB listener defined.
A.42. ESB-Awareness
A.43. Gateway Listener
org.jboss.soa.esb.message.Message format. This conversion happens in a variety of different ways, depending on the gateway type. Once the conversion has occurred, the gateway listener routes the data to its correct destination.
A.44. Senders
send method is called by its QueueSession's ObjectMessage when ant runtest is executed. When this happens, the client sends a message to the queue.
A.45. JBoss Rules
A.46. Rule Base
A.47. Serialize
A.48. Deserialize
Appendix B. Global Configuration File
B.1. jbossesb-properties.xml
jbossesb-properties.xml file is the JBoss Enterprise SOA Platform's global configuration file. Many tasks will require you to edit this file. The location of this file varies depending on how the system has been installed. If you have installed a server deployment, this file will be located at SOA_ROOT/jboss-as/server/PROFILE/deployers/esb.deployer/jbossesb-properties.xml, while standalone clients can access it directly through the class-path.
B.2. Global Configuration File Reference
SOA_ROOT/jboss-as/server/PROFILE/deployers/esb.deployer/jbossesb-properties.xml) is split into sections, each concerned with a specific area of configuration. A named property section contains one or more properties which are used to configure the behavior of the ESB, and one property section can "depend" on another section - the dependency specifies which sections are loaded by the PropertyManager first.
core
- org.jboss.soa.esb.jndi.server.context.factory : The JNDI Server initial context factory.
- org.jboss.soa.esb.jndi.server.url : The JNDI Server URL.
- org.jboss.soa.esb.loadbalancer.policy : The ESB load balancer policy.
- org.jboss.soa.esb.mime.text.types : A semicolon-separated list of MIME types that are used to decide whether the payload can be decoded or whether it will remain as a byte array.
- jboss.esb.invm.scope.default : The default InVM scope for an ESB deployment.
- org.jboss.soa.esb.deployment.schema.validation : A true/false flag to enable JBoss ESB schema validation upon deployment.
Important
security
- org.jboss.soa.esb.services.security.implementationClass : The concrete SecurityService implementation to be used.
- org.jboss.soa.esb.services.security.callbackHandler : The default callback handler implementation.
- org.jboss.soa.esb.services.security.sealAlgorithm : The algorithm to be used when sealing the SecurityContext.
- org.jboss.soa.esb.services.security.sealKeySize : The size of the key to be used to encrypt/decrypt the SecurityContext.
- org.jboss.soa.esb.services.security.contextTimeout : The amount of time for which SecurityContext is valid.
- org.jboss.soa.esb.services.security.contextPropagatorImplementationClass : Used to configure a global SecurityContextPropagator.
- org.jboss.soa.esb.services.security.publicKeystore : Keystore to encrypt and decrypt data external to the ESB.
- org.jboss.soa.esb.services.security.publicKeystorePassword : The keystore password.
- org.jboss.soa.esb.services.security.publicKeyAlias : The public key alias to use.
- org.jboss.soa.esb.services.security.publicKeyPassword : The public key password to use.
- org.jboss.soa.esb.services.security.publicKeyTransformation : The cipher transformation to use.
registry
- org.jboss.soa.esb.registry.queryManagerURI : The registry query manager URI, which is used to obtain information on services and bindings.
- org.jboss.soa.esb.registry.lifeCycleManagerURI : The registry lifecycle manager URI, which is used to publish information on services and bindings.
- org.jboss.soa.esb.registry.securityManagerURI : The registry security manager URI, which is used to authenticate queries to the registry.
- org.jboss.soa.esb.registry.implementationClass : The JBoss ESB registry implementation class. The JAXR registry implementation is used here.
- org.jboss.soa.esb.registry.factoryClass : The registry factory class, which specifies which JAXR implementation should be used.
- org.jboss.soa.esb.registry.user : The registry user.
- org.jboss.soa.esb.registry.password : The registry password.
- org.jboss.soa.esb.scout.proxy.transportClass The Scout transport class which defines which transport should be used to communicate with the UDDI registry.
- org.jboss.soa.esb.scout.proxy.uddiVersion : The Scout UDDI Version. This is an Apache Scout-specific setting.
- org.jboss.soa.esb.scout.proxy.uddiNameSpace : The Scout UDDI namespace. This is an Apache Scout-specific setting.
- org.jboss.soa.esb.registry.interceptors : The registry interceptor class names.
- org.jboss.soa.esb.registry.cache.maxSize : The maximum cache size for the caching registry.
- org.jboss.soa.esb.registry.cache.validityPeriod : The validity period for the caching registry.
- org.jboss.soa.esb.registry.orgCategory : The UDDI organization value to use - note that this is a UDDI-specific value.
transports
- org.jboss.soa.esb.mail.smtp.host : The host name of the SMTP server.
- org.jboss.soa.esb.mail.smtp.user : The username to use for the SMTP server.
- org.jboss.soa.esb.mail.smtp.password : The password for the user specified on the SMTP server.
- org.jboss.soa.esb.mail.smtp.port : The port number of the SMTP server.
- org.jboss.soa.esb.mail.smtp.auth : Flag which specifies whether to authenticate the user against the SMTP server using the AUTH command.
- org.jboss.soa.esb.ftp.localdir : FTP local directory.
- org.jboss.soa.esb.ftp.remotedir : FTP remote directory.
- org.jboss.soa.esb.ftp.timeout : FTP timeout in milliseconds for opening a socket.
- org.jboss.soa.esb.ftp.timeout.data : FTP timeout in milliseconds for the data connection.
- org.jboss.soa.esb.ftp.timeout.so : FTP timeout in milliseconds used for currently open sockets.
- org.jboss.soa.esb.ftp.timeout.default : FTP timeout in milliseconds which sets the default timeout.
- org.jboss.soa.esb.jms.connectionPool : Size of the ESB JMS connection pool.
- org.jboss.soa.esb.jms.sessionSleep : If a JMS session cannot be obtained, the ESB will keep trying to obtain one. The sessionSleep property decides how long the ESB will try for.
- org.jboss.soa.esb.invm.expiryTime : The expiry time for messages in the InVM temporary transport.
- org.jboss.soa.esb.invm.retry.limit : Maximum number of times to retry redelivery. The default is 5.
- org.jboss.soa.esb.ws.returnStackTrace : True/false flag that determines whether to return stack traces upon fault of SOAP messages.
- org.jboss.soa.esb.ws.timeout : Service invoker timeout for delivering SOAP messages within RequestResponseBaseWebService.
- org.jboss.soa.esb.aggregator.setOnProperties : Aggregate on properties of the message rather than on Context.
jca
- org.jboss.soa.esb.jca.activation.mapper.jms-ra.rar : Specifies the ActivationMapper globally.
- org.jboss.soa.esb.jca.activation.mapper.wmq.jmsra.rar : Specifies the ActivationMapper globally.
dbstore
- org.jboss.soa.esb.persistence.db.conn.manager : Connection Manager implementation class name.
- org.jboss.soa.esb.persistence.db.datasource.name : Datasource name, only used if using the J2EE connection manager.
- org.jboss.soa.esb.persistence.db.connection.url : The JDBC connection URL.
- org.jboss.soa.esb.persistence.db.jdbc.driver : The JDBC driver class.
- org.jboss.soa.esb.persistence.db.user : The database user.
- org.jboss.soa.esb.persistence.db.pwd : The database password.
- org.jboss.soa.esb.persistence.db.pool.initial.size : The initial number of database connections.
- org.jboss.soa.esb.persistence.db.min.size : The minimum number of database connections.
- org.jboss.soa.esb.persistence.db.max.size : The maximum number of database connections.
- org.jboss.soa.esb.persistence.db.pool.test.table : A table name to query for validity of the database connection.
- org.jboss.soa.esb.persistence.db.pool.timeout.millis : Timeout in milliseconds of the database connections.
filters
- org.jboss.soa.esb.filter.1, org.jboss.soa.esb.filter.2, org.jboss.soa.esb.filter.3, etc.
rules
- org.jboss.soa.esb.services.rules.resource.scanner.interval : Defines the polling interval for DRL changes globally across all KnowledgeAgents.
- org.jboss.soa.esb.services.rules.continueState : Setting this property will enable legacy behaviour and not dispose of working memories during stateful rule execution.
Important
Appendix C. ESB Archives
C.1. Types of Java Archives
| Archive Type | Extension | Purpose | Directory structure requirements |
|---|---|---|---|
| Java Archive | .jar | Contains Java class libraries. | META-INF/MANIFEST.MF file (optional), which specifies information such as which class is the main class.
|
| Web Archive | .war |
Contains Java Server Pages (JSP) files, servlets, and XML files, in addition to Java classes and libraries. The Web Archive's contents are also referred to as a Web Application.
| WEB-INF/web.xml file, which contains information about the structure of the web application. Other files may also be present in WEB-INF/.
|
| Resource Adapter Archive | .rar |
The directory structure is specified by the JCA specification.
|
Contains a Java Connector Architecture (JCA) resource adapter. Also called a connector.
|
| Enterprise Archive | .ear |
Used by Java Enterprise Edition (EE) to package one or more modules into a single archive, so that the modules can be deployed onto the application server simultaneously. Maven and Ant are the most common tools used to build EAR archives.
| META-INF/ directory, which contains one or more XML deployment descriptor files.
|
|
Any of the following types of modules.
| |||
| Service Archive | .sar |
Similar to an Enterprise Archive, but specific to the JBoss Enterprise Application Platform.
| META-INF/ directory containing jboss-service.xml or jboss-beans.xml file.
|
C.2. ESB Archive
C.3. Deploy an Archive
Procedure C.1. Task
- To deploy an archive to your server, copy it to the
deploydirectory:cp FILENAME.esb SOA_ROOT/jboss-as/server/PROFILE/deploy.
The directory is being polled by the server, so it will find the archive immediately. Note you can also deploy *.war files in archived or uncompressed form.
C.4. Structure of an ESB Archive
- *-ds.xml (for example, message-store-ds.xml or quickstart-ds.xml)
- These are database scripts.
- *-service.xml (for example, jbm-queue-service.xml)
- Services, including the Admin objects for queues, and one that initializes the database using above script
- hsqldb
- For a database example. Below it resides a
create.sqlfile that makes the database.
META_INF directory, there are these files:
- deployment.xml
- This lists the dependencies required by the .esb
- jboss-esb.xml
- This is the deployment descriptor for this .esb
- MANIFEST.MF
- The manifest file.
Appendix D. Revision History
| Revision History | |||
|---|---|---|---|
| Revision 5.3.1-69.400 | 2013-10-31 | ||
| |||
| Revision 5.3.1-69 | Tue Feb 05 2013 | ||
| |||