Este conteúdo não está disponível no idioma selecionado.
Chapter 10. Event workflows
10.1. Event delivery workflows using brokers and triggers
Brokers can be used in combination with triggers to deliver events from an event source to an event sink.
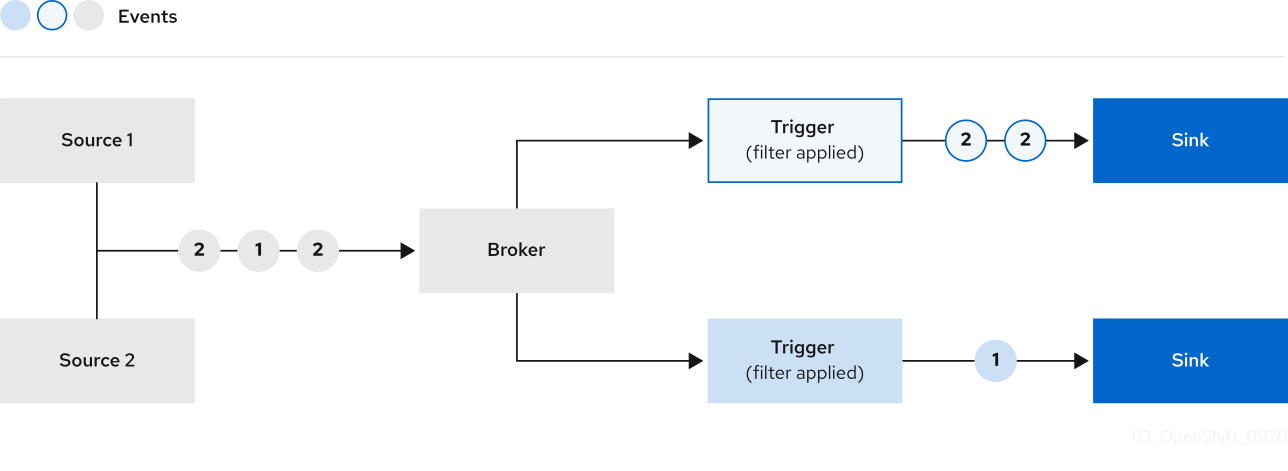
Events can be sent from an event source to a broker as an HTTP POST request.
After events have entered the broker, they can be filtered by CloudEvent attributes using triggers, and sent as an HTTP POST request to an event sink.
10.1.1. Creating a broker
OpenShift Serverless provides a default Knative broker that can be created by using the Knative CLI. You can also create the default broker by adding the eventing.knative.dev/injection=enabled label to a namespace if you are a cluster administrator, or by adding the eventing.knative.dev/injection: enabled annotation to a trigger if you are a developer.
Although both developers and cluster administrators can add a broker by injection, only cluster administrators can permanently delete brokers that were created using this method.
10.1.1.1. Creating a broker using the Knative CLI
Prerequisites
- The OpenShift Serverless Operator and Knative Eventing are installed on your OpenShift Container Platform cluster.
-
You have installed the
knCLI.
Procedure
Create the
defaultbroker:$ kn broker create default
Verification
Use the
kncommand to list all existing brokers:$ kn broker listExample output
NAME      URL                                                                     AGE   CONDITIONS   READY   REASON
default   http://broker-ingress.knative-eventing.svc.cluster.local/test/default   45s   5 OK / 5     True
Optional: If you are using the OpenShift Container Platform web console, you can navigate to the Topology view in the Developer perspective, and observe that the broker exists:
10.1.1.2. Creating a broker by annotating a trigger
You can create a broker by adding the eventing.knative.dev/injection: enabled annotation to a Trigger object.
If you create a broker by using the eventing.knative.dev/injection: enabled annotation, you cannot delete this broker without cluster administrator permissions. If you delete the broker without having a cluster administrator remove this annotation first, the broker is created again after deletion.
Prerequisites
- The OpenShift Serverless Operator and Knative Eventing are installed on your OpenShift Container Platform cluster.
Procedure
Create a
Triggerobject as a.yamlfile that has theeventing.knative.dev/injection: enabledannotation:apiVersion: eventing.knative.dev/v1 kind: Trigger metadata: annotations: eventing.knative.dev/injection: enabled name: <trigger-name> spec: broker: default subscriber:1 ref: apiVersion: serving.knative.dev/v1 kind: Service name: <service-name>- 1
- Specify details about the event sink, or subscriber, that the trigger sends events to.
Apply the
.yamlfile:$ oc apply -f <filename>
Verification
You can verify that the broker has been created successfully by using the oc CLI, or by observing it in the Topology view in the web console.
Use the
occommand to get the broker:$ oc -n <namespace> get broker defaultExample output
NAME      READY     REASON    URL                                                                     AGE
default   True                http://broker-ingress.knative-eventing.svc.cluster.local/test/default   3m56s
Navigate to the Topology view in the web console, and observe that the broker exists:
10.1.1.3. Creating a broker by labeling a namespace
If you have cluster administrator permissions, you can create the default broker automatically by labeling a namespace.
Brokers created using this method will not be removed if you remove the label. You must manually delete them.
Prerequisites
- The OpenShift Serverless Operator and Knative Eventing are installed on your OpenShift Container Platform cluster.
- You have cluster administrator permissions for OpenShift Container Platform.
Procedure
Label a namespace with
eventing.knative.dev/injection=enabled:$ oc label namespace <namespace> eventing.knative.dev/injection=enabled
Verification
You can verify that the broker has been created successfully by using the oc CLI, or by observing it in the Topology view in the web console.
Use the
occommand to get the broker:$ oc -n <namespace> get broker <broker_name>Example command
$ oc -n default get broker defaultExample output
NAME      READY     REASON    URL                                                                     AGE
default   True                http://broker-ingress.knative-eventing.svc.cluster.local/test/default   3m56s
Navigate to the Topology view in the web console, and observe that the broker exists:
10.1.2. Managing brokers
The kn CLI provides commands that can be used to list, describe, update, and delete brokers. Cluster administrators can also permanently delete a broker that was created using injection.
10.1.2.1. Listing existing brokers using the Knative CLI
Prerequisites
- The OpenShift Serverless Operator, Knative Serving and Knative Eventing are installed on your OpenShift Container Platform cluster.
-
You have installed the
knCLI.
Procedure
List all existing brokers:
$ kn broker listExample output
NAME      URL                                                                     AGE   CONDITIONS   READY   REASON
default   http://broker-ingress.knative-eventing.svc.cluster.local/test/default   45s   5 OK / 5     True
10.1.2.2. Describing an existing broker using the Knative CLI
Prerequisites
- The OpenShift Serverless Operator, Knative Serving and Knative Eventing are installed on your OpenShift Container Platform cluster.
-
You have installed the
knCLI.
Procedure
Describe an existing broker:
$ kn broker describe <broker_name>Example command using default broker
$ kn broker describe defaultExample output
Name:         default
Namespace:    default
Annotations:  eventing.knative.dev/broker.class=MTChannelBasedBroker, eventing.knative.dev/creato ...
Age:          22s

Address:
  URL:    http://broker-ingress.knative-eventing.svc.cluster.local/default/default

Conditions:
  OK TYPE                   AGE REASON
  ++ Ready                  22s
  ++ Addressable            22s
  ++ FilterReady            22s
  ++ IngressReady           22s
  ++ TriggerChannelReady    22s
10.1.2.3. Deleting a broker that was created by injection
Brokers created by injection, by using a namespace label or trigger annotation, are not deleted permanently if a developer removes the label or annotation. A user with cluster administrator permissions must manually delete these brokers.
Procedure
Remove the
eventing.knative.dev/injection=enabledlabel from the namespace:$ oc label namespace <namespace> eventing.knative.dev/injection-Removing the annotation prevents Knative from recreating the broker after you delete it.
Delete the broker from the selected namespace:
$ oc -n <namespace> delete broker <broker_name>
Verification
Use the
occommand to get the broker:$ oc -n <namespace> get broker <broker_name>Example command
$ oc -n default get broker defaultExample output
No resources found.
Error from server (NotFound): brokers.eventing.knative.dev "default" not found
10.1.3. Filtering events using triggers
Using triggers enables you to filter events from the broker for delivery to event sinks.
Prerequisites
Before you can use triggers, you will need:
-
Knative Eventing and
kninstalled. An available broker, either the
defaultbroker or one that you have created.You can create the
defaultbroker either by following the instructions on Using brokers with Knative Eventing, or by using the--inject-brokerflag while creating a trigger. Use of this flag is described later in this section.- An available event consumer, such as a Knative service.
10.1.3.1. Creating a trigger using the Developer perspective
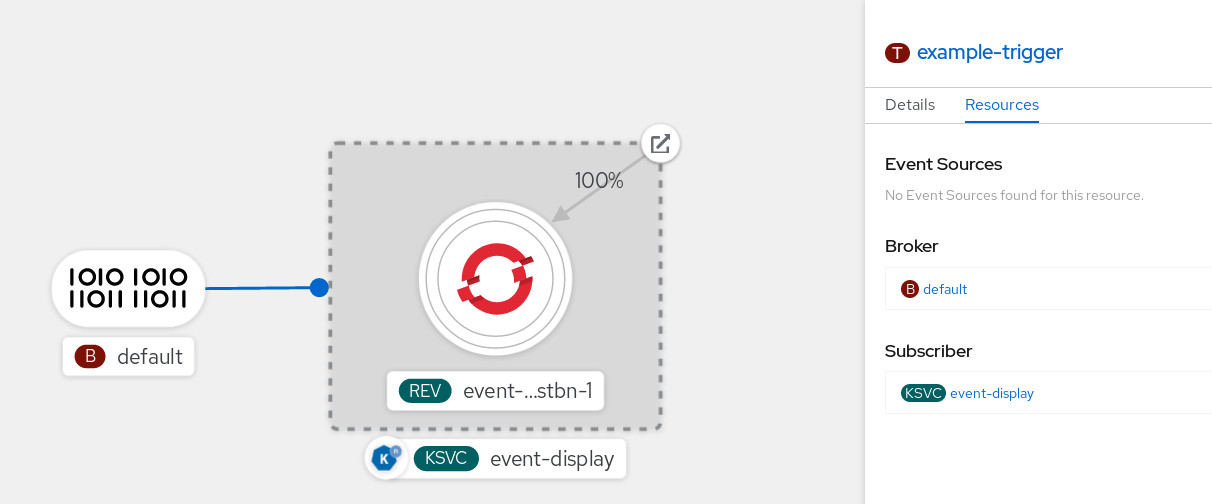
After you have created a broker, you can create a trigger in the web console Developer perspective.
Prerequisites
- The OpenShift Serverless Operator, Knative Serving, and Knative Eventing are installed on your OpenShift Container Platform cluster.
- You have logged in to the web console.
- You are in the Developer perspective.
- You have created a project or have access to a project with the appropriate roles and permissions to create applications and other workloads in OpenShift Container Platform.
- You have created a broker and a Knative service or other event sink to connect to the trigger.
Procedure
- In the Developer perspective, navigate to the Topology page.
Hover over the broker that you want to create a trigger for, and drag the arrow. The Add Trigger option is displayed.

- Click Add Trigger.
- Select your sink as a Subscriber from the drop-down list.
- Click Add.
Verification
After the subscription has been created, it is represented as a line that connects the broker to the service in the Topology view:
10.1.3.2. Deleting a trigger using the Developer perspective
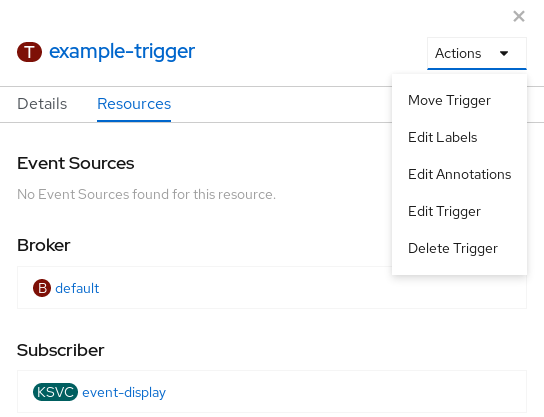
You can delete triggers in the web console Developer perspective.
Prerequisites
- To delete a trigger using the Developer perspective, ensure that you have logged in to the web console.
Procedure
- In the Developer perspective, navigate to the Topology page.
- Click on the trigger that you want to delete.
In the Actions context menu, select Delete Trigger.
10.1.3.3. Creating a trigger using kn
You can create a trigger by using the kn trigger create command.
Procedure
Create a trigger:
$ kn trigger create <trigger_name> --broker <broker_name> --filter <key=value> --sink <sink_name>Alternatively, you can create a trigger and simultaneously create the
defaultbroker using broker injection:$ kn trigger create <trigger_name> --inject-broker --filter <key=value> --sink <sink_name>By default, triggers forward all events sent to a broker to sinks that are subscribed to that broker. Using the
--filterattribute for triggers allows you to filter events from a broker, so that subscribers will only receive a subset of events based on your defined criteria.
10.1.3.4. Listing triggers using kn
The kn trigger list command prints a list of available triggers.
Procedure
To print a list of available triggers, enter the following command:
$ kn trigger listExample output:
NAME    BROKER    SINK           AGE   CONDITIONS   READY   REASON
email   default   ksvc:edisplay   4s    5 OK / 5     True
ping    default   ksvc:edisplay   32s   5 OK / 5     True
Optional: Print a list of triggers in JSON format:
$ kn trigger list -o json
10.1.3.4.1. Describing a trigger using kn
You can use the kn trigger describe command to print information about a trigger.
Procedure
To print information about a trigger, enter the following command:
$ kn trigger describe <trigger_name>Example output
Name:         ping
Namespace:    default
Labels:       eventing.knative.dev/broker=default
Annotations:  eventing.knative.dev/creator=kube:admin, eventing.knative.dev/lastModifier=kube:admin
Age:          2m
Broker:       default
Filter:
  type:       dev.knative.event

Sink:
  Name:       edisplay
  Namespace:  default
  Resource:   Service (serving.knative.dev/v1)

Conditions:
  OK TYPE                  AGE REASON
  ++ Ready                  2m
  ++ BrokerReady            2m
  ++ DependencyReady        2m
  ++ Subscribed             2m
  ++ SubscriberResolved     2m
10.1.3.4.2. Filtering events using triggers
In the following trigger example, only events with attribute type: dev.knative.samples.helloworld will reach the event consumer.
$ kn trigger create <trigger_name> --broker <broker_name> --filter type=dev.knative.samples.helloworld --sink ksvc:<service_name>You can also filter events using multiple attributes. The following example shows how to filter events using the type, source, and extension attributes.
$ kn trigger create <trigger_name> --broker <broker_name> --sink ksvc:<service_name> \
--filter type=dev.knative.samples.helloworld \
--filter source=dev.knative.samples/helloworldsource \
--filter myextension=my-extension-value
10.1.3.4.3. Updating a trigger using kn
You can use the kn trigger update command with certain flags to quickly update attributes of a trigger.
Procedure
Update a trigger:
$ kn trigger update <trigger_name> --filter <key=value> --sink <sink_name> [flags]You can update a trigger to filter exact event attributes that match incoming events. For example, using the
typeattribute:$ kn trigger update mytrigger --filter type=knative.dev.eventYou can remove a filter attribute from a trigger. For example, you can remove the filter attribute with key
type:$ kn trigger update mytrigger --filter type-You can use the
--sinkparameter to change the event sink of a trigger:$ kn trigger update <trigger_name> --sink ksvc:my-event-sink
10.1.3.4.4. Deleting a trigger using kn
Procedure
Delete a trigger:
$ kn trigger delete <trigger_name>
Verification
List existing triggers:
$ kn trigger listVerify that the trigger no longer exists:
Example output
No triggers found.
10.2. Event delivery workflows using channels
Events can be sent from a source to a sink by using channels and subscriptions for event delivery.
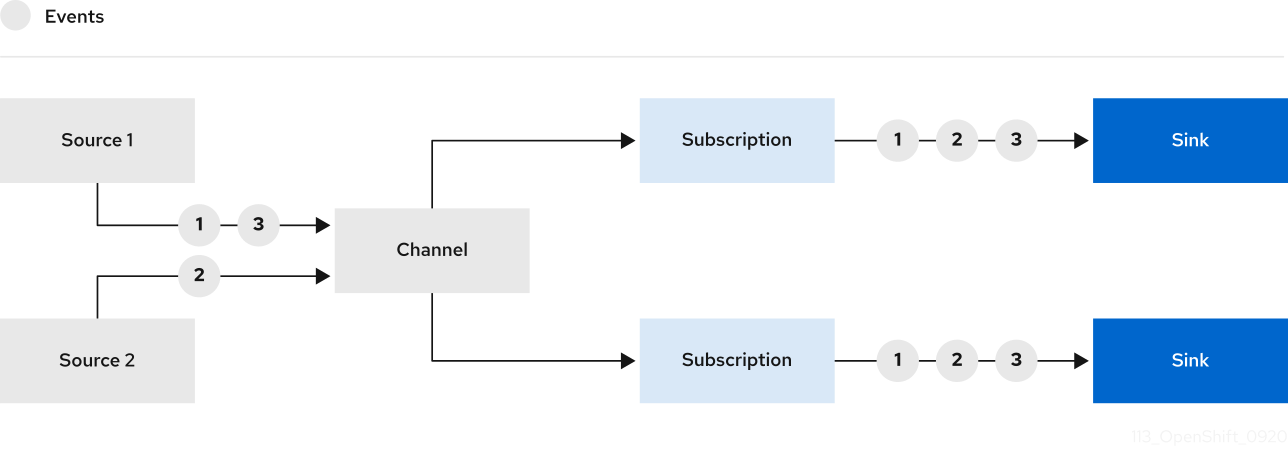
Channels are custom resources that define a single event-forwarding and persistence layer.
After events have been sent to a channel, these events can be sent to multiple Knative services, or other sinks, by using a subscription.
The default configuration for channel instances is defined in the default-ch-webhook config map. Developers can create their own channels directly by instantiating a supported Channel object.
10.2.1. Supported channel types
Currently, OpenShift Serverless only supports InMemoryChannel kind channels for development use, as part of the Knative Eventing Technology Preview.
The following are limitations of InMemoryChannel channels:
- No event persistence is available. If a pod goes down, events on that pod are lost.
-
InMemoryChannelchannels do not implement event ordering, so two events that are received in the channel at the same time can be delivered to a subscriber in any order. -
If a subscriber rejects an event, there are no re-delivery attempts. Instead, the rejected event is sent to a
deadLetterSinkobject if this exists, or is dropped.
10.2.1.1. Using the default development channel configuration
When you install Knative Eventing, the following default-ch-webhook config map is created automatically in the knative-eventing namespace:
apiVersion: v1
kind: ConfigMap
metadata:
  name: default-ch-webhook
  namespace: knative-eventing
data:
  default-ch-config: |
    clusterDefault:
      apiVersion: messaging.knative.dev/v1
      kind: InMemoryChannel
    namespaceDefaults:
      some-namespace:
        apiVersion: messaging.knative.dev/v1
        kind: InMemoryChannel
This config map can specify either a cluster-wide default channel implementation, or a namespace-specific default channel implementation. Configuring a namespace-specific default overrides any cluster-wide settings.
After you create a Channel object, a mutating admission webhook adds a set of spec.channelTemplate properties for the Channel object based on the default channel implementation.
Example Channel object with spec.channelTemplate properties
apiVersion: messaging.knative.dev/v1
kind: Channel
metadata:
  name: example-channel
  namespace: default
spec:
  channelTemplate:
    apiVersion: messaging.knative.dev/v1
    kind: InMemoryChannel
The channel controller then creates the backing channel instance based on the spec.channelTemplate configuration.
The spec.channelTemplate properties cannot be changed after creation, because they are set by the default channel mechanism rather than by the user.
When this mechanism is used, two objects are created: a generic channel, and an InMemoryChannel channel.
The generic channel acts as a proxy that copies its subscriptions to the InMemoryChannel channel, and sets its status to reflect the status of the backing InMemoryChannel channel.
Because the channel in this example is created in the default namespace, the channel uses the cluster default, which is InMemoryChannel.
10.2.2. Creating a development channel
Procedure
You can create a channel using the cluster default configuration by completing the following procedure.
Create a
Channelobject.Create a YAML file and copy the following sample code into it:
apiVersion: messaging.knative.dev/v1
kind: Channel
metadata:
  name: example-channel
  namespace: default
Apply the YAML file by entering:
$ oc apply -f <filename>
10.2.3. Creating a subscription
You can create a Subscription object to connect a channel to a sink. In the following procedure, the example sink is a Knative service named error-handler.
Procedure
Create a YAML file and copy the following sample code into it:
apiVersion: messaging.knative.dev/v1beta1
kind: Subscription
metadata:
  name: my-subscription
1 namespace: default spec: channel:2 apiVersion: messaging.knative.dev/v1beta1 kind: Channel name: example-channel delivery:3 deadLetterSink: ref: apiVersion: serving.knative.dev/v1 kind: Service name: error-handler subscriber:4 ref: apiVersion: serving.knative.dev/v1 kind: Service name: event-display- 1
- Name of the subscription.
- 2
- Configuration settings for the channel that the subscription connects to.
- 3
- Configuration settings for event delivery. This tells the subscription what happens to events that cannot be delivered to the subscriber. When this is configured, events that failed to be consumed are sent to the
deadLetterSink. The event is dropped, no re-delivery of the event is attempted, and an error is logged in the system. ThedeadLetterSinkvalue must be a Destination. - 4
- Configuration settings for the subscriber. This is the event sink that events are delivered to from the channel.
Apply the YAML file:
$ oc apply -f <FILENAME>