Este conteúdo não está disponível no idioma selecionado.
Chapter 7. Revoking certificates and issuing CRLs
The Certificate System provides methods for revoking certificates and for producing lists of revoked certificates, called certificate revocation lists (CRLs). This chapter describes the methods for revoking a certificate, describes CMC revocation, and provides details about CRLs and setting up CRLs.
7.1. About revoking certificates
Certificates can be revoked by an end user (the original owner of the certificate) or by a Certificate Manager agent. End users can revoke certificates by using the revocation form provided in the end-entities page. Agents can revoke end-entity certificates by using the appropriate form in the agent services interface. Certificate-based (SSL/TLS client authentication) is required in both cases.
An end user can revoke only certificates that contain the same subject name as the certificate presented for authentication. After successful authentication, the server lists the certificates belonging to the end user. The end user can then select the certificate to be revoked or can revoke all certificates in the list. The end user can also specify additional details, such as the date of revocation and revocation reason for each certificate or for the list as a whole.
Agents can revoke certificates based on a range of serial numbers or based on subject name components. When the revocation request is submitted, agents receive a list of certificates from which they can pick the ones to be revoked. For instructions on how agents revoke end-entity certificates, see the Red Hat Certificate System Planning, Installation, and Deployment Guide.
When revocation requests are approved, the Certificate Manager marks the corresponding certificate records in its internal database as revoked, and, if configured to do so, removes the revoked certificates from the publishing directory. These changes are reflected in the next CRL which the CA issues.
Server and client applications that use public-key certificates as ID tokens need access to information about the validity of a certificate. Because one of the factors that determines the validity of a certificate is its revocation status, these applications need to know whether the certificate being validated has been revoked. The CA has a responsibility to do the following:
- Revoke the certificate if a revocation request is received by the CA and approved.
- Make the revoked certificate status available to parties or applications that need to verify its validity status.
Whenever a certificate is revoked, the Certificate Manager automatically updates the status of the certificate in its internal database, it marks the copy of the certificate in its internal database as revoked and removes the revoked certificate from the publishing directory, if the Certificate Manager is configured to remove the certificate from the database.
One of the standard methods for conveying the revocation status of certificates is by publishing a list of revoked certificates, known a certificate revocation list (CRL). A CRL is a publicly available list of certificates that have been revoked.
The Certificate Manager can be configured to generate CRLs. These CRLs can be created to conform to X.509 standards by enabling extension-specific modules in the CRL configuration. The server supports standard CRL extensions through its CRL issuing points framework; see Section 7.3.3, “Setting CRL extensions” for more information on setting up CRL extensions for issuing points. The Certificate Manager can generate a CRL every time a certificate is revoked and at periodic intervals. If publishing is set up, the CRLs can be published to a file, an LDAP directory, or an OCSP responder.
A CRL is issued and digitally signed by the CA that issued the certificates listed in the CRL or by an entity that has been authorized by that CA to issue CRLs. The CA may use a single key pair to sign both the certificates and CRLs it issues or two separate key pairs, one for signing certificates and another one for signing CRLs.
By default, the Certificate Manager uses a single key pair for signing the certificates it issues and CRLs it generates. To create another key pair for the Certificate Manager and use it exclusively for signing CRLs, see Section 7.3.4, “Setting a CA to use a different certificate to sign CRLs”.
CRLs are generated when issuing points are defined and configured and when CRL generation is enabled.
When CRLs are enabled, the server collects revocation information as certificates are revoked. The server attempts to match the revoked certificate against all issuing points that are set up. A given certificate can match none of the issuing points, one of the issuing points, several of the issuing points, or all of the issuing points. When a certificate that has been revoked matches an issuing point, the server stores the information about the certificate in the cache for that issuing point.
The cache is copied to the internal directory at the intervals set for copying the cache. When the interval for creating a CRL is reached, a CRL is created from the cache. If a delta CRL has been set up for this issuing point, a delta CRL is also created at this time. The full CRL contains all revoked certificate information since the Certificate Manager began collecting this information. The delta CRL contains all revoked certificate information since the last update of the full CRL.
The full CRLs are numbered sequentially, as are delta CRLs. A full CRL and a delta CRL can have the same number; in that case, the delta CRL has the same number as the next full CRL. For example, if the full CRL is the first CRL, it is CRL 1. The delta CRL is Delta CRL 2. The data combined in CRL 1 and Delta CRL 2 is equivalent to the next full CRL, which is CRL 2.
When changes are made to the extensions for an issuing point, no delta CRL is created with the next full CRL for that issuing point. A delta CRL is created with the second full CRL that is created, and then all subsequent full CRLs.
The internal database stores only the latest CRL and delta CRL. As each new CRL is created, the old one is overwritten.
When CRLs are published, each update to the CRL and delta CRL is published to the locations specified in the publishing set up. The method of publishing determines how many CRLs are stored. For file publishing, each CRL that is published to a file using the number for the CRL, so no file is overwritten. For LDAP publishing, each CRL that is published replaces the old CRL in the attribute containing the CRL in the directory entry.
By default, CRLs do not contain information about revoked expired certificates. The server can include revoked expired certificates by enabling that option for the issuing point. If expired certificates are included, information about revoked certificates is not removed from the CRL when the certificate expires. If expired certificates are not included, information about revoked certificates is removed from the CRL when the certificate expires.
7.1.1. User-initiated revocation
When an end user submits a certificate revocation request, the first step in the revocation process is for the Certificate Manager to identify and authenticate the end user to verify that the user is attempting to revoke his own certificate, not a certificate belonging to someone else.
In SSL/TSL client authentication, the server expects the end user to present a certificate that has the same subject name as the one to be revoked and uses that for authentication purposes. The server verifies the authenticity of a revocation request by mapping the subject name in the certificate presented for client authentication to certificates in its internal database. The server revokes the certificate only if the certificate maps successfully to one or more valid or expired certificates in its internal database.
After successful authentication, the server lists the valid or expired certificates that match the subject name of the certificate presented for client authentication. The user can then either select the certificates to be revoked or revoke all certificates in the list.
7.1.2. Reasons for revoking a certificate
A Certificate Manager can revoke any certificate it has issued. There are generally accepted reason codes for revoking a certificate that are often included in the CRL, such as the following:
-
0. Unspecified; no particular reason is given. -
1. The private key associated with the certificate was compromised. -
2. The private key associated with the CA that issued the certificate was compromised. -
3. The owner of the certificate is no longer affiliated with the issuer of the certificate and either no longer has rights to the access gained with the certificate or no longer needs it. -
4. Another certificate replaces this one. -
5. The CA that issued the certificate has ceased to operate. -
6. The certificate is on hold pending further action. It is treated as revoked but may be taken off hold in the future so that the certificate is active and valid again. -
8. The certificate is going to be removed from the CRL because it was removed from hold. This only occurs in delta CRLs. -
9. The certificate is revoked because the privilege of the owner of the certificate has been withdrawn.
A certificate can be revoked by administrators, agents, and end entities. Agents and administrators with agent privileges can revoke certificates using the forms in the agent services page. End users can revoke certificates using the forms in the Revocation tab of the end-entity interface. End users can revoke only their own certificates, whereas agents and administrators can revoke any certificates issued by the server. End users are also required to authenticate to the server in order to revoke a certificate.
Whenever a certificate is revoked, the Certificate Manager updates the status of the certificate in its internal database. The server uses the entries in the internal database to track of all revoked certificates, and, when configured, it makes the CRLs public by publishing it to a central repository to notify other users that the certificates in the list are no longer valid.
7.1.3. CRL issuing points
Because CRLs can grow very large, there are several methods to minimize the overhead of retrieving and delivering large CRLs. One of these methods partitions the entire certificate space and associates a separate CRL with every partition. This partition is called a CRL issuing point, the location where a subset of all the revoked certificates is maintained. Partitioning can be based on whether the revoked certificate is a CA certificate, whether it was revoked for a specific reason, or whether it was issued using a specific profile. Each issuing point is identified by its name.
By default, the Certificate Manager generates and publishes a single CRL, the master CRL. An issuing point can generate CRLs for all certificates, for only CA signing certificates, or for all certificates including expired certificates.
Once the issuing points have been defined, they can be included in certificates so that an application that needs to check the revocation status of a certificate can access the CRL issuing points specified in the certificate instead of the master or main CRL. Since the CRL maintained at the issuing point is smaller than the master CRL, checking the revocation status is much faster.
CRL distribution points can be associated with certificates by setting the CRLDistributionPoint extension.
7.1.4. Delta CRLs
Delta CRLs can be issued for any defined issuing point. A delta CRL contains information about any certificates revoked since the last update to the full CRL. Delta CRLs for an issuing point are created by enabling the DeltaCRLIndicator extension.
7.1.5. Publishing CRLs
The Certificate Manager can publish the CRL to a file, an LDAP-compliant directory, or to an OCSP responder. Where and how frequently CRLs are published are configured in the Certificate Manager, as described in Chapter 10, Publishing certificates and CRLs.
Because CRLs can be very large, publishing CRLs can take a very long time, and it is possible for the process to be interrupted. Special publishers can be configured to publish CRLs to a file over HTTP1.1, and, if the process is interrupted, the CA subsystem’s web server can resume publishing at the point it was interrupted, instead of having to begin again. This is described in Section 10.7, “Setting up resumable CRL downloads”.
7.1.6. Certificate revocation pages
The end-entities page of the Certificate Manager includes default HTML forms for revocation authenticated by an SSL/TLS client. The forms are accessible from the Revocation tab. You can see the form for such a revocation by clicking the User Certificate link.
To change the form appearance to suit organization’s requirements, edit the UserRevocation.html, the form that allows the SSL/TSL client authenticated revocation of client or personal certificates. The file is in the /var/lib/ instance_name/webapps/subsystem_type/ee/subsystem_type directory.
7.2. Performing a CMC revocation
Similar to Certificate Management over CMS (CMC) enrollment, CMC revocation enables users to set up a revocation client, and sign the revocation request with either an agent certificate or a user certificate with a matching subjectDN attribute. Then the user can send the signed request to the Certificate Manager.
Alternatively, CMC revocation can also be authenticated using the Shared Secret Token mechanism. For details, see Enabling the CMC Shared Secret feature.
Regardless of whether a user or agent signs the request or if a Shared Secret Token is used, the Certificate Manager automatically revokes the certificate when it receives a valid revocation request.
Certificate System provides the following utilities for CMC revocation requests:
-
CMCRequest. For details, see Section 7.2.1, “Revoking a certificate usingCMCRequest”. -
CMCRevoke. For details, see Section 7.2.2, “Revoking a certificate usingCMCRevoke”.
Red Hat recommends using the CMCRequest utility to generate CMC revocation requests, because it provides more options than CMCRevoke.
7.2.1. Revoking a certificate using CMCRequest
To revoke a certificate using CMCRequest:
Create a configuration file for the CMC revocation request, such as
/home/user_name/cmc-request.cfg, with the following content:#numRequests: Total number of PKCS10 requests or CRMF requests. numRequests=1 #output: full path for the CMC request in binary format output=/home/user_name/cmc.revoke.userSigned.req #tokenname: name of token where user signing cert can be found #(default is internal) tokenname=internal #nickname: nickname for user signing certificate which will be used #to sign the CMC full request. nickname=signer_user_certificate #dbdir: directory for cert9.db, key4.db and pkcs11.txt dbdir=/home/user_name/.dogtag/nssdb/ #password: password for cert9.db which stores the user signing #certificate and keys password=myPass #format: request format, either pkcs10 or crmf. format=pkcs10 ## revocation parameters revRequest.enable=true revRequest.serial=45 revRequest.reason=unspecified revRequest.comment=user test revocation revRequest.issuer=issuer revRequest.sharedSecret=shared_secretCreate the CMC request:
# CMCRequest /home/user_name/cmc-request.cfgIf the command succeeds, the
CMCRequestutility stores the CMC request in the file specified in theoutputparameter in the request configuration file.Create a configuration file, such as
/home/user_name/cmc-submit.cfg, to use in a later step to submit the CMC revocation request to the CA. Add the following content to the created file:#host: host name for the http server host=>server.example.com #port: port number port=8443 #secure: true for secure connection, false for nonsecure connection secure=true #input: full path for the enrollment request, the content must be #in binary format input=/home/user_name/cmc.revoke.userSigned.req #output: full path for the response in binary format output=/home/user_name/cmc.revoke.userSigned.resp #tokenname: name of token where SSL client authentication certificate #can be found (default is internal) #This parameter will be ignored if secure=false tokenname=internal #dbdir: directory for cert9.db, key4.db and pkcs11.txt #This parameter will be ignored if secure=false dbdir=/home/user_name/.dogtag/nssdb/ #clientmode: true for client authentication, false for no client #authentication. This parameter will be ignored if secure=false clientmode=true #password: password for cert9.db #This parameter will be ignored if secure=false and clientauth=false password=password #nickname: nickname for client certificate #This parameter will be ignored if clientmode=false nickname=signer_user_certificateImportantIf the CMC revocation request is signed, set the
secureandclientmodeparameters totrueand, additionally, fill thenicknameparameter.Depending on who signed the request, the
servletparameter in the configuration file forHttpClientmust be set accordingly:If an agent signed the request, set:
servlet=/ca/ee/ca/profileSubmitCMCFullIf a user signed the request, set:
servlet=/ca/ee/ca/profileSubmitSelfSignedCMCFull
Submit the CMC request:
# HttpClient /home/user_name/cmc-submit.cfg
For further details about revoking a certificate using CMCRequest, see the CMCRequest(1) man page.
7.2.2. Revoking a certificate using CMCRevoke
The CMC revocation utility, CMCRevoke, is used to sign a revocation request with an agent’s certificate. This utility simply passes the required information - certificate serial number, issuer name, and revocation reason - to identify the certificate to revoke, and then the require information to identify the CA agent performing the revocation (certificate nickname and the database with the certificate).
For more information on enabling CMCRevoke, see Enabling CMCRevoke for the Web User Interface in the Planning, Installation and Deployment Guide.
The reason the certificate is being revoked can be any of the following (with the number being the value passed to the CMCRevoke utility):
-
0- unspecified -
1- the key was compromised -
2- the CA key was compromised -
3- the employee’s affiliation changed -
4- the certificate has been superseded -
5- cessation of operation -
6- the certificate is on hold
Testing CMCRevoke
Create a CMC revocation request for an existing certificate.
CMCRevoke -d /path/to/agent-cert-db -n nickname -i issuerName -s serialName -m reason -c commentFor example, if the directory containing the agent certificate is
~jsmith/.mozilla/firefox/, the nickname of the certificate isAgentCert, and the serial number of the certificate is22, the command is as shown:CMCRevoke -d "~jsmith/.mozilla/firefox/" -n "ManagerAgentCert" -i "cn=agentAuthMgr" -s 22 -m 0 -c "test comment"NOTESurround values that include spaces in quotation marks.
IMPORTANTDo not have a space between the argument and its value. For example, giving a serial number of 26 is -s26, not -s 26.
Open the end-entities page.
https://server.example.com:8443/ca/ee/ca- Select the Revocation tab.
- Select the CMC Revoke link on the menu.
-
Paste the output from the
CMCRevokeinto the text area. -
Remove
-----BEGIN NEW CERTIFICATE REQUEST-----and----END NEW CERTIFICATE REQUEST-----from the pasted content. - Click .
- The returned page should confirm that the correct certificate has been revoked.
7.3. Issuing CRLs
- The Certificate Manager uses its CA signing certificate key to sign CRLs. To use a separate signing key pair for CRLs, set up a CRL signing key and change the Certificate Manager configuration to use this key to sign CRLs. See Section 7.3.4, “Setting a CA to use a different certificate to sign CRLs” for more information.
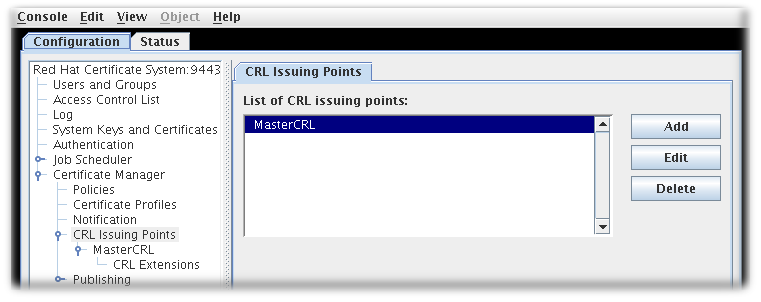
Set up CRL issuing points. An issuing point is already set up and enabled for a master CRL.
Figure 7.1. Default CRL issuing point
Additional issuing points for the CRLs can be created. See Section 7.3.1, “Configuring issuing points” for details.
There are five types of CRLs the issuing points can create, depending on the options set when configuring the issuing point to define what the CRL will list:
- Master CRL contains the list of revoked certificates from the entire CA.
- ARL is an Authority Revocation List containing only revoked CA certificates.
- CRL with expired certificates includes revoked certificates that have expired in the CRL.
- CRL from certificate profiles determines the revoked certificates to include based on the profiles used to create the certificates originally.
- CRLs by reason code determines the revoked certificates to include based on the revocation reason code.
- Configure the CRLs for each issuing point. See Section 7.3.2, “Configuring CRLs for each issuing point” for details.
- Set up the CRL extensions which are configured for the issuing point. See Section 7.3.3, “Setting CRL extensions” for details.
-
Set up the delta CRL for an issuing point by enabling extensions for that issuing point,
DeltaCRLIndicatororCRLNumber. -
Set up the
CRLDistributionPointextension to include information about the issuing point. - Set up publishing CRLs to files, an LDAP directory, or an OCSP responder. See Chapter 10, Publishing certificates and CRLs for details about setting up publishing.
7.3.1. Configuring issuing points
Issuing points define which certificates are included in a new CRL. A master CRL issuing point is created by default for a master CRL containing a list of all revoked certificates for the Certificate Manager.
To create a new issuing point, do the following:
Open the Certificate System Console.
pkiconsole https://server.example.com:8443/caNotepkiconsoleis being deprecated.- In the Configuration tab, expand Certificate Manager from the left navigation menu. Then select CRL Issuing Points.
To edit an issuing point, select the issuing point, and click . The only parameters which can be edited are the name of the issuing point and whether the issuing point is enabled or disabled.
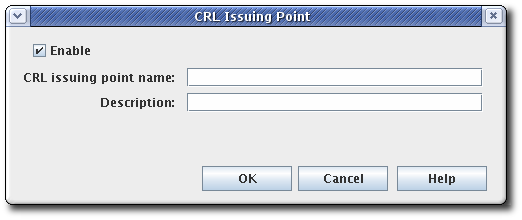
To add an issuing point, click . The CRL Issuing Point Editor window opens.
Figure 7.2. CRL issuing point editor
 Note
NoteIf some fields do not appear large enough to read the content, expand the window by dragging one of the corners.
Fill in the following fields:
- Enable. Enables the issuing point if selected; deselect to disable.
- CRL Issuing Point name. Gives the name for the issuing point; spaces are not allowed.
- Description. Describes the issuing point.
- Click .
To view and configure a new issuing point, close the CA Console, then open the Console again. The new issuing point is listed below the CRL Issuing Points entry in the navigation tree.
Configure CRLs for the new issuing point, and set up any CRL extensions that will be used with the CRL. See Section 7.3.2, “Configuring CRLs for each issuing point” for details on configuring an issuing point. See Section 7.3.3, “Setting CRL extensions” for details on setting up the CRL extensions. All the CRLs created appear on the Update Revocation List page of the agent services pages.
7.3.2. Configuring CRLs for each issuing point
Information, such as the generation interval, the CRL version, CRL extensions, and the signing algorithm, can all be configured for the CRLs for the issuing point. The CRLs must be configured for each issuing point.
Open the CA console.
pkiconsole https://server.example.com:8443/caNotepkiconsoleis being deprecated.- In the navigation tree, select Certificate Manager, and then select CRL Issuing Points.
- Select the issuing point name below the Issuing Points entry.
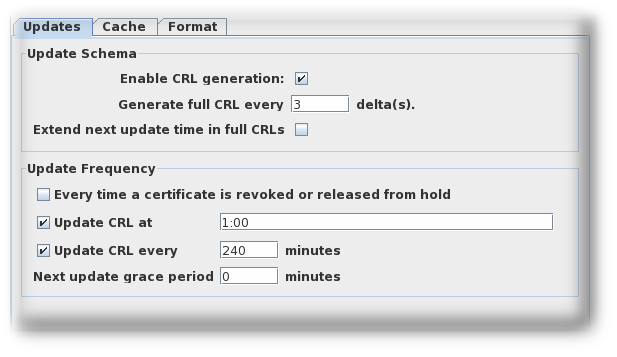
Configure how and how often the CRLs are updated by supplying information in the Update tab for the issuing point. This tab has two sections, Update Schema and Update Frequency.

The Update Schema section has the following options:
- Enable CRL generation. This checkbox sets whether CRLs are generated for that issuing point.
- Generate full CRL every # delta(s). This field sets how frequently CRLs are created in relation to the number of changes.
-
Extend next update time in full CRLs. This provides an option to set the
nextUpdatefield in the generated CRLs. ThenextUpdateparameter shows the date when the next CRL is issued, regardless of whether it is a full or delta CRL. When using a combination of full and delta CRLs, enablingExtend next update time in full CRLswill make thenextUpdateparameter in a full CRL show when the next full CRL will be issued. Otherwise, thenextUpdateparameter in the full CRL will show when the next delta CRL will be issued, since the delta will be the next CRL to be issued.
The Update Frequency section sets the different intervals when the CRLs are generated and issued to the directory.
Every time a certificate is revoked or released from hold. This sets the Certificate Manager to generate the CRL every time it revokes a certificate. The Certificate Manager attempts to issue the CRL to the configured directory whenever it is generated. Generating a CRL can be time consuming if the CRL is large. Configuring the Certificate Manager to generate CRLs every time a certificate is revoked may engage the server for a considerable amount of time; during this time, the server will not be able to update the directory with any changes it receives.
This setting is not recommended for a standard installation. This option should be selected to test revocation immediately, such as testing whether the server issues the CRL to a flat file.
Update the CRL at. This field sets a daily time when the CRL should be updated. To specify multiple times, enter a comma-separate list of times, such as
01:50,04:55,06:55. To enter a schedule for multiple days, enter a comma-separated list to set the times within the same day, and then a semicolon separated list to identify times for different days. For example, this sets revocation on Day 1 of the cycle at 1:50am, 4:55am, and 6:55am and then Day 2 at 2am, 5am, and 5pm:01:50,04:55,06:55;02:00,05:00,17:00-
Update the CRL every. This checkbox enables generating CRLs at the interval set in the field. For example, to issue CRLs every day, select the checkbox, and enter
1440in this field. - Next update grace period. If the Certificate Manager updates the CRL at a specific frequency, the server can be configured to have a grace period to the next update time to allow time to create the CRL and issue it. For example, if the server is configured to update the CRL every 20 minutes with a grace period of 2 minutes, and if the CRL is updated at 16:00, the CRL is updated again at 16:18.
ImportantDue to a known issue, when currently setting full and delta Certificate Revocation List schedules, the Update CRL every time a certificate is revoked or released from hold option also requires you to fill out the two grace period settings. Thus, in order to select this option you need to first select the Update CRL every option and enter a number for the Next update grace period # minutes box.
The Cache tab sets whether caching is enabled and the cache frequency.
Figure 7.3. CRL cache tab
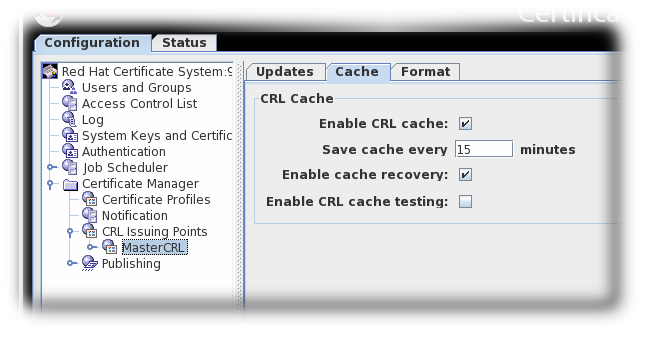
- Enable CRL cache. This checkbox enables the cache, which is used to create delta CRLs. If the cache is disabled, delta CRLs will not be created. For more information about the cache, see Section 7.1, “About revoking certificates”.
-
Update cache every. This field sets how frequently the cache is written to the internal database. Set to
0to have the cache written to the database every time a certificate is revoked. - Enable cache recovery. This checkbox allows the cache to be restored.
- Enable CRL cache testing. This checkbox enables CRL performance testing for specific CRL issuing points. CRLs generated with this option should not be used in deployed CAs, as CRLs issued for testing purposed contain data generated solely for the purpose of performance testing.
The Format tab sets the formatting and contents of the CRLs that are created. There are two sections, CRL Format and CRL Contents.
Figure 7.4. CRL format tab
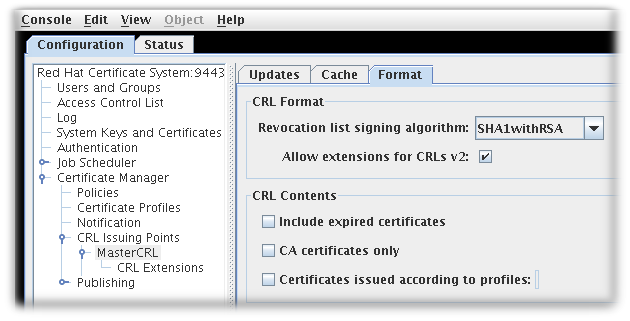
The CRL Format section has two options:
- Revocation list signing algorithm is a drop down list of allowed ciphers to encrypt the CRL.
- Allow extensions for CRL v2 is a checkbox which enabled CRL v2 extensions for the issuing point. If this is enabled, set the required CRL extensions described in Section 7.3.3, “Setting CRL extensions”.
Extensions must be turned on to create delta CRLs.
The CRL Contents section has three checkboxes which set what types of certificates to include in the CRL:
- Include expired certificates. This includes revoked certificates that have expired. If this is enabled, information about revoked certificates remains in the CRL after the certificate expires. If this is not enabled, information about revoked certificates is removed when the certificate expires.
- CA certificates only. This includes only CA certificates in the CRL. Selecting this option creates an Authority Revocation List (ARL), which lists only revoked CA certificates.
Certificates issued according to profiles. This only includes certificates that were issued according to the listed profiles; to specify multiple profiles, enter a comma-separated list.
- Click .
- Extensions are allowed for this issuing point and can be configured. See Section 7.3.3, “Setting CRL extensions” for details.
7.3.3. Setting CRL extensions
Extensions only need configured for an issuing point if the Allow extensions for CRLs v2 checkbox is selected for that issuing point.
When the issuing point is created, three extensions are automatically enabled: CRLReason, InvalidityDate, and CRLNumber. Other extensions are available but are disabled by default. These can be enabled and modified. For more information about the available CRL extensions, see Section B.4.2, “Standard X.509 v3 CRL extensions reference”.
To configure CRL extensions, do the following:
Open the CA console.
pkiconsole https://server.example.com:8443/caNotepkiconsoleis being deprecated.- In the navigation tree, select Certificate Manager, and then select CRL Issuing Points.
Select the issuing point name below the Issuing Points entry, and select the CRL Extension entry below the issuing point.
The right pane shows the CRL Extensions Management tab, which lists configured extensions.
Figure 7.5. CRL extensions

- To modify a rule, select it, and click .
- Most extensions have two options, enabling them and setting whether they are critical. Some require more information. Supply all required values. See Section B.4.2, “Standard X.509 v3 CRL extensions reference” for complete information about each extension and the parameters for those extensions.
- Click .
- Click to see the updated status of all the rules.
7.3.4. Setting a CA to use a different certificate to sign CRLs
For instruction on how to configure this feature by editing the CS.cfg file, see the Setting a CA to Use a Different Certificate to Sign CRLs section in the Red Hat Certificate System Planning, Installation, and Deployment Guide.
7.3.5. Generating CRLs from cache
By default, CRLs are generated from the CA’s internal database. However, revocation information can be collected as the certificates are revoked and kept in memory. This revocation information can then be used to update CRLs from memory. Bypassing the database searches that are required to generate the CRL from the internal database significantly improves performance.
Because of the performance enhancement from generating CRLs from cache, enable the enableCRLCache parameter in most environments. However, the Enable CRL cache testing parameter should not be enabled in a production environment.
Configuring CRL generation from cache in the console
Open the console.
pkiconsole https://server.example.com:8443/caNotepkiconsoleis being deprecated.- In the Configuration tab, expand the Certificate Manager folder and the CRL Issuing Points subfolder.
Select the MasterCRL node.

Select Enable CRL cache.
- Save the changes.
Configuring CRL generation from cache in CS.cfg
For instruction on how to configure this feature by editing the CS.cfg file, see the Configuring CRL Generation from Cache in CS.cfg section in the Red Hat Certificate System Planning, Installation, and Deployment Guide.
7.4. Setting full and delta CRL schedules
CRLs are generated periodically. Setting that period is touched on in the configuration in Section 7.3.2, “Configuring CRLs for each issuing point”.
CRLs are issued according to a time-based schedule. CRLs can be issued every single time a certificate is revoked, at a specific time of day, or once every so-many minutes.
Time-based CRL generation schedules apply to every CRL that is generated. There are two kinds of CRLs, full CRLs and delta CRLs. A full CRL has a record of every single revoked certificate, whereas delta CRLs contain only the certificates that have been revoked since the last CRL (delta or full) was generated.
By default, full CRLs are generated at every specified interval in the schedule. It is possible space out the time between generating full CRLs by generating interim delta CRLs. The generation interval is configured in the CRL schema, which sets the scheme for generating delta and full CRLs.
If the interval is set to 3, for example, then the first CRL generated will be both a full and delta CRL, then the next two generation updates are delta CRLs only, and then the fourth interval is both a full and delta CRL again. In other words, every third generation interval has both a full CRL and a delta CRL.
Interval   1, 2, 3, 4, 5, 6, 7 ...
Full CRL   1        4        7 ...
Delta CRL 1, 2, 3, 4, 5, 6, 7 ...For delta CRLs to be generated in addition to full CRLs, the CRL cache must be enabled.
7.4.1. Configuring CRL update intervals in the console
pkiconsole is being deprecated.
Open the console.
pkiconsole https://server.example.com:8443/ca- In the Configuration tab, expand the Certificate Manager folder and the CRL Issuing Points subfolder.
Select the MasterCRL node.
Enter the required interval in the Generate full CRL every # delta(s) field.

Set the update frequency, either by specifying the occasion of a certificate revocation, a cyclical interval or set times for the updates to occur:
- Select the Update CRL every time a certificate is revoked or released from hold checkbox. The Update CRL every time a certificate is revoked or released from hold option also requires you to fill out the two Grace period settings. This is a known issue, and the bug is being tracked in Red Hat Bugzilla.
- Select the Update CRL every time a certificate is revoked or released from hold checkbox.
Select the Update CRL at checkbox and enter specific times separated by commas, such as
01:50,04:55,06:55.
Select Update CRL every checkbox and enter the required interval, such as
240.
- Save the changes.
The Update CRL every time a certificate is revoked or released from hold option also requires you to fill out the two grace period settings. This is a known issue, and the bug is being tracked in Red Hat Bugzilla.
Schedule drift can occur when updating CRLs by interval. Typically, drift occurs as a result of manual updates and CA restarts.
To prevent schedule drift, select the Update CRL at checkbox and enter a value. The interval updates will resynchronize with the Update CRL at value every 24 hours.
Only one Update CRL at value will be accepted when updating CRLs by interval.
7.4.2. Configuring update intervals for CRLs in CS.cfg
For instruction on how to configure this feature by editing the CS.cfg file, see the Configuring Update Intervals for CRLs in CS.cfg section in the Red Hat Certificate System Planning, Installation, and Deployment Guide.
7.4.3. Configuring CRL generation schedules over multiple days
By default, CRL generation schedules cover 24 hours. Also, by default, when full and delta CRLs are enabled full CRLs occur at specific intervals in place of one or all delta CRLs, i.e., every third update.
To set CRL generation schedules across multiple days, the list of times uses commas to separate times within the same day and a semicolon to delimit days:
ca.crl.MasterCRL.dailyUpdates=01:00,03:00,18:00;02:00,05:00,17:00This example updates CRLs on day one of the schedule at 01:00, 03:00, and 18:00, and on day two of the schedule at 02:00, 05:00, and 17:00. On day three the cycle starts again.
The semicolon indicates a new day. Starting the list with a semicolon results in an initial day where no CRLs are generated. Likewise, ending the list with a semicolon adds a final day to the schedule where no CRLs are generated. Two semicolons together result in a day with no CRL generation.
To set full CRL updates independent of delta updates, the list of times accepts time values prepended with an asterisk to indicate when full CRL updates should occur:
ca.crl.MasterCRL.dailyUpdates=01:00,03:00,18:00,*23:00;02:00,05:00,21:00,*23:30This example generates delta CRL updates on day one at 01:00, 03:00, and 18:00, with a full and delta CRL update at 23:00. On day two, delta CRLs are updated at 02:00, 05:00, and 21:00, with a full and delta CRL update at 23:30. On day three, the cycle starts again.
The semicolon and asterisk syntax works in both the pkiconsole and when manually editing the CS.cfg file.
7.5. Enabling Revocation Checking
Revocation checking means that a Certificate System subsystem verifies that a certificate is both valid and not revoked when an agent or administrator attempts to access the instance’s secure interfaces. This leverages a local OCSP service (either a CA’s internal OCSP service or a separate OCSP responder) to check the revocation status of the certificate.
OCSP configuration is covered in Section 7.6, “Using the Online Certificate Status Protocol (OCSP) responder”.
See Enabling Automatic Revocation Checking on the CA in the Red Hat Certificate System Planning, Installation, and Deployment Guide.
See Enabling Certificate Revocation Checking for Subsystems in the Red Hat Certificate System Planning, Installation, and Deployment Guide.
7.6. Using the Online Certificate Status Protocol (OCSP) responder
7.6.1. Setting up the OCSP responder
If a CA within the security domain is selected when the Online Certificate Status Manager is configured, there is no extra step required to configure the OCSP service. The CA’s CRL publishing is set up automatically, and its signing certificate is automatically added and trusted in the Online Certificate Status Manager’s certificate database. However, if a non-security domain CA is selected, then the OCSP service must be manually configured after the Online Certificate Status Manager is configured.
Not every CA within the security domain to which the OCSP Manager belongs is automatically trusted by the OCSP Manager when it is configured. Every CA in the certificate chain of the CA configured in the CA panel is trusted automatically by the OCSP Manager. Other CAs within the security domain but not in the certificate chain must be trusted manually.
To set up the Online Certificate Status Manager for a Certificate Manager outside the security domain:
- Configure the CRLs for every CA that will publish to an OCSP responder.
- Enable publishing, set up a publisher, and set publishing rules in every CA that the OCSP service will handle (Chapter 10, Publishing certificates and CRLs). This is not necessary if the Certificate Managers publish to an LDAP directory and the Online Certificated Status Manager is set up to read from that directory.
- The certificate profiles must be configured to include the Authority Information Access extension, pointing to the location at which the Certificate Manager listens for OCSP service requests (Section 7.6.4, “Enabling the Certificate Manager’s internal OCSP service”).
Configure the OCSP Responder.
- Configure the Revocation Info store (Section 7.6.2.2, “Configure the Revocation Info Stores: internal database” and Section 7.6.2.3, “Configure the Revocation Info Stores: LDAP directory”).
- Identify every publishing Certificate Manager to the OCSP responder (Section 7.6.2, “Identifying the CA to the OCSP Responder”).
- If necessary, configure the trust settings for the CA which signed the OCSP signing certificate (Section 18.7, “Changing the trust settings of a CA certificate”).
- Restart both subsystems after configuring them.
- Verify that the CA is properly connected to the OCSP responder (Section 7.6.2.1, “Verify Certificate Manager and Online Certificate Status Manager connection”).
7.6.2. Identifying the CA to the OCSP Responder
Before a CA is configured to publish CRLs to the Online Certificate Status Manager, the CA must be identified to the Online Certificate Status Manager by storing the CA signing certificate in the internal database of the Online Certificate Status Manager. The Certificate Manager signs CRLs with the key pair associated with this certificate; the Online Certificate Status Manager verifies the signature against the stored certificate.
If a CA within the security domain is selected when the Online Certificate Status Manager is configured, there is no extra step required to configure the Online Certificate Status Manager to recognize the CA; the CA signing certificate is automatically added and trusted in the Online Certificate Status Manager’s certificate database. However, if a non-security domain CA is selected, then the CA signing certificate must be manually added to the certificate database after the Online Certificate Status Manager is configured.
It is not necessary to import the certificate chain for a CA which will publish its CRL to the Online Certificate Status Manager. The only time a certificate chain is needed for the OCSP service is if the CA connects to the Online Certificate Status Manager through SSL/TLS authentication when it publishes its CRL. Otherwise, the Online Certificate Status Manager does not need to have the complete certificate chain.
However, the Online Certificate Status Manager must have the certificate which signed the CRL, either a CA signing certificate or a separate CRL signing certificate, in its certificate database. The OCSP service verifies the CRL by comparing the certificate which signed the CRL against the certificates in its database, not against a certificate chain. If both a root CA and one of its subordinate CAs publish CRLs to the Online Certificate Status Manager, the Online Certificate Status Manager needs the CA signing certificate of both CAs.
To import the CA or CRL signing certificate which is used to sign the certificates the CA is publishing to the Online Certificate Status Manager, do the following:
- Get the Certificate Manager’s base-64 CA signing certificate from the end-entities page of the CA.
-
Open the Online Certificate Status Manager agent page. The URL has the format
https://hostname:SSLport/ocsp/agent/ocsp. - In the left frame, click .
- In the form, paste the encoded CA signing certificate inside the text area labeled Base 64 encoded certificate (including the header and footer).
- To verify that the certificate is added successfully, in the left frame, click List Certificate Authorities.
The resulting form should show information about the new CA. The This Update, Next Update, and Requests Served Since Startup fields should show a value of zero (0).
7.6.2.1. Verify Certificate Manager and Online Certificate Status Manager connection
When the Certificate Manager is restarted, it tries to connect to the Online Certificate Status Manager’s SSL/TLS port. To verify that the Certificate Manager did indeed communicate with the Online Certificate Status Manager, check the This Update and Next Update fields, which should be updated with the appropriate timestamps of the CA’s last communication with the Online Certificate Status Manager. The Requests Served Since Startup field should still show a value of zero (0) since no client has tried to query the OCSP service for certificate revocation status.
7.6.2.2. Configure the Revocation Info Stores: internal database
The Online Certificate Status Manager stores each Certificate Manager’s CRL in its internal database and uses it as the CRL store for verifying the revocation status of certificates. To change the configuration that the Online Certificate Status Manager uses for storing the CRLs in its internal database:
Open the Online Certificate Status Manager Console.
pkiconsole https://server.example.com:8443/ocspNotepkiconsoleis being deprecated.In the Configuration tab, select Online Certificate Status Manager, and then select Revocation Info Stores.
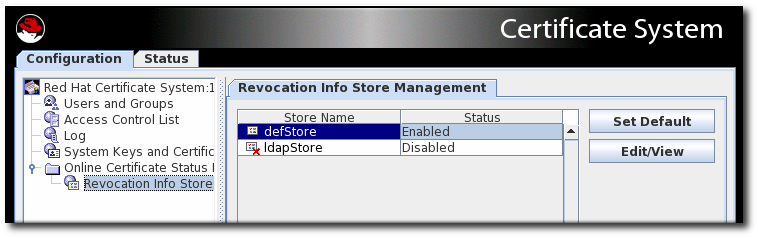
The right pane shows the two repositories the Online Certificate Status Manager can use; by default, it uses the CRL in its internal database.
-
Select the
defStore, and click . Edit the
defStorevalues.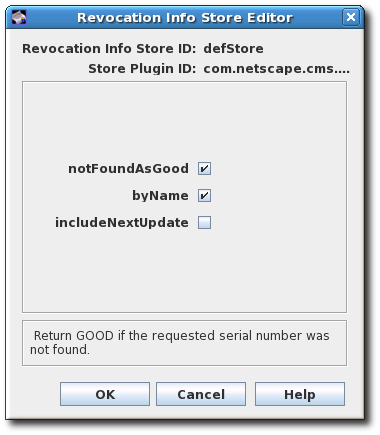
- notFoundAsGood. Sets the OCSP service to return an OCSP response of GOOD if the certificate in question cannot be found in any of the CRLs. If this is not selected, the response is UNKNOWN, which, when encountered by a client, results in an error message.
-
byName. The OCSP Responder only supports the basic response type, which includes the ID of the OCSP Responder making the response. The ResponderID field within the basic response type is determined by the value of the
ocsp.store.defStore.byNameparameter. IfbyNameparameter is true or is missing, the OCSP authority signing certificate subject name is used as the ResponderID field of the OCSP response. IfbyNameparameter is false, the OCSP authority signing certificate key hash will be the ResponderID field of the OCSP response. - includeNextUpdate. Includes the timestamp of the next CRL update time.
7.6.2.3. Configure the Revocation Info Stores: LDAP directory
Although the OCSP Manager stores the CA CRLs in its internal database by default, it can be configured to use a CRL published to an LDAP directory instead.
If the ldapStore method is enabled, the OCSP user interface does not check the certificate status.
To configure the Online Certificate Status Manager to use an LDAP directory:
Open the Online Certificate Status Manager Console.
pkiconsole https://server.example.com:8443/ocspNotepkiconsoleis being deprecated.In the Configuration tab, select Online Certificate Status Manager, and then select Revocation Info Stores.
The right pane shows the two repositories the Online Certificate Status Manager can use; by default, it uses the CRL in its internal database.
-
To use the CRLs in LDAP directories, click to enable the
ldapStoreoption. -
Select
ldapStore, and click . Set the
ldapStoreparameters.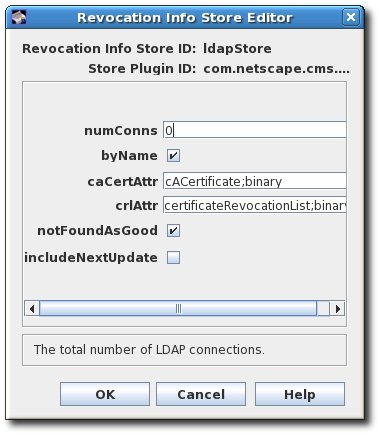
- numConns. The total number of LDAP directories the OCSP service should check. By default, this is set to 0. Setting this value shows the corresponding number of host, port, baseDN, and refreshInSec fields.
- host. The fully-qualified DNS hostname of the LDAP directory.
- port. The non-SSL/TLS port of the LDAP directory.
-
baseDN. The DN to start searching for the CRL. For example,
O=example.com. - refreshInSec. How often the connection is refreshed. The default is 86400 seconds (daily).
-
caCertAttr. Leave the default value,
cACertificate;binary, as it is. It is the attribute to which the Certificate Manager publishes its CA signing certificate. -
crlAttr. Leave the default value,
certificateRevocationList;binary, as it is. It is the attribute to which the Certificate Manager publishes CRLs. - notFoundAsGood. Sets the OCSP service to return an OCSP response of GOOD if the certificate in question cannot be found in any of the CRLs. If this is not selected, the response is UNKNOWN, which, when encountered by a client, results in an error message.
-
byName. The OCSP Responder only supports the basic response type, which includes the ID of the OCSP Responder making the response. The ResponderID field within the basic response type is determined by the value of the
ocsp.store.defStore.byNameparameter. IfbyNameparameter is true or is missing, the OCSP authority signing certificate subject name is used as the ResponderID field of the OCSP response. IfbyNameparameter is false, the OCSP authority signing certificate key hash will be the ResponderID field of the OCSP response. - includeNextUpdate. The Online Certificate Status Manager can include the timestamp of the next CRL update time.
7.6.2.4. Testing the OCSP service setup
Test whether the Certificate Manager can service OCSP requests properly by doing the following:
- Turn on revocation checking in the browser or client.
- Request a certificate from the CA that has been enabled for OCSP services.
- Approve the request.
- Download the certificate to the browser or client.
- Make sure the CA is trusted by the browser or client.
Check the status of Certificate Manager’s internal OCSP service.
Open the CA agent services page, and select the OCSP Services link.
Test the independent Online Certificate Status Manager subsystem.
Open the Online Certificate Status Manager agent services page, and click the List Certificate Authorities link.
The page should show information about the Certificate Manager configured to publish CRLs to the Online Certificate Status Manager. The page also summarizes the Online Certificate Status Manager’s activity since it was last started.
- Revoke the certificate.
- Verify the certificate in the browser or client. The server should return that the certificate has been revoked.
Check the Certificate Manager’s OCSP-service status again to verify that these things happened:
- The browser sent an OCSP query to the Certificate Manager.
- The Certificate Manager sent an OCSP response to the browser.
- The browser used that response to validate the certificate and returned its status, that the certificate could not be verified.
Check the independent OCSP service subsystem again to verify that these things happened:
- The Certificate Manager published the CRL to the Online Certificate Status Manager.
- The browser sent an OCSP response to the Online Certificate Status Manager.
- The Online Certificate Status Manager sent an OCSP response to the browser.
- The browser used that response to validate the certificate and returned its status, that the certificate could not be verified.
7.6.3. Setting the response for bad serial numbers
OCSP responders check the revocation status and expiration date of a certificate before determining whether the certificate is valid; by default, the OCSP does not validate other information on the certificate.
The notFoundAsGood parameter sets how the OCSP handles a certificate with an invalid serial number. This parameter is enabled by default, which means that if a certificate is present with a bad serial number but the certificate is otherwise valid, the OCSP returns a status of GOOD for the certificate.
To have the OCSP check and reject certificates based on bad serial numbers as well as revocation status, change the notFoundAsGood setting. In that case, the OCSP returns a status of UNKNOWN with a certificate with a bad serial number. The client interprets that as an error and can respond accordingly.
Open the Online Certificate Status Manager Console.
pkiconsole https://server.example.com:8443/ocspNotepkiconsoleis being deprecated.In the Configuration tab, select Online Certificate Status Manager, and then select Revocation Info Stores.
-
Select the
defStore, and click . Edit the
notFoundAsGoodvalue. Selecting the checkbox means that the OCSP returns a value ofGOODeven if the serial number on the certificate is bad. Unselecting the checkbox means that the OCSP sends a value ofUNKNOWN, which the client can intrepret as an error.
Restart the OCSP Manager.
# pki-server restart instance-name
7.6.4. Enabling the Certificate Manager’s internal OCSP service
The Certificate Manager has a built-in OCSP service, which can be used by OCSP-compliant clients to query the Certificate Manager directly about the revocation status of the certificate. When the Certificate Manager is installed, an OCSP signing certificate is issued and the OCSP service is turned on by default. This OCSP signing certificate is used to sign all responses to OCSP service requests. Since the internal OCSP service checks the status of certificates stored in the Certificate Manager’s internal database, publishing does not have to be configured to use this service.
Clients can query the OCSP service through the non-SSL/TLS end-entity port of the Certificate Manager. When queried for the revocation status of a certificate, the Certificate Manager searches its internal database for the certificate, checks its status, and responds to the client. Since the Certificate Manager has real-time status of all certificates it has issued, this method of revocation checking is the most accurate.
Every CA’s built-in OCSP service is turned on at installation. However, to use this service, the CA needs to issue certificates with the Authority Information Access extension.
Go to the CA’s end-entities page. For example:
https://server.example.com:8443/ca/ee/ca- Find the CA signing certificate.
-
Look for the Authority Info Access extension in the certificate, and note the
Location URINamevalue, such asui`8443/ca/ocsp`. -
Update the enrollment profiles to enable the Authority Information Access extension, and set the
Locationparameter to the Certificate Manager’s URI. For information on editing the certificate profiles, see Section 3.2, “Setting up certificate profiles”. Restart the CA instance.
# pki-server restart instance-name
To disable the Certificate Manager’s internal OCSP service, edit the CA’s CS.cfg file and change the value of the ca.ocsp parameter to false.
ca.ocsp=false7.6.5. Submitting OCSP requests using the OCSPClient program
The OCSPClient program can be used for performing OCSP requests. For example:
# OCSPClient -h server.example.com -p 8080 -d /etc/pki/pki-tomcat/alias -c "caSigningCert cert-pki-ca" --serial 2
CertID.serialNumber=2
CertStatus=Good
The OCSPClient command can be used with the following command-line options:
| Option | Description |
|---|---|
| -d database | Security database location (default: current directory) |
| -h hostname | OCSP server hostname (default: example.com) |
| -p port | OCSP server port number (default: 8080) |
| -t path | OCSP service path (default: /ocsp/ee/ocsp) |
| -c nickname | CA certificate nickname (defaut: CA Signing Certificate) |
| -n times | Number of submissions (default: 1) |
| --serial serial_number | Serial number of certificate to be checked |
| --input input_file | Input file containing DER-encoded OCSP request |
| --output output_file | Output file to store DER-encoded OCSP response |
| -v, --verbose | Run in verbose mode |
| --help | Show help message |
7.6.6. Submitting OCSP requests using the GET method
OCSP requests which are smaller than 255 bytes can be submitted to the Online Certificate Status Manager using a GET method, as described in RFC 6960. To submit OCSP requests over GET:
Generate an OCSP request for the certificate the status of which is being queried. For example:
# openssl ocsp -CAfile ca.pem -issuer issuer.pem -serial serial_number -reqout - | base64

MEIwQDA+MDwwOjAJBgUrDgMCGgUABBT4cyABkyiCIhU4JpmIBewdDnn8ZgQUbyBZ44kgy35o7xW5BMzM8FTvyTwCAQE=
Paste the URL in the address bar of a web browser to return the status information. The browser must be able to handle OCSP requests.
https://server.example.com:8443/ocsp/ee/ocsp/MEIwQDA+MDwwOjAJBgUrDgMCGgUABBT4cyABkyiCIhU4JpmIBewdDnn8ZgQUbyBZ44kgy35o7xW5BMzM8FTvyTwCAQE=- The OCSP Manager responds with the certificate status which the browser can interpret. The possible statuses are GOOD, REVOKED, and UNKNOWN.
Alternatively, run the OCSP from the command line by using a tool such as curl to send the request and openssl to parse the response. For example:
Generate an OCSP request for the certificate the status of which is being queried. For example:
# openssl ocsp -CAfile ca.pem -issuer issuer.pem -serial serial_number -reqout - | base64

MEIwQDA+MDwwOjAJBgUrDgMCGgUABBT4cyABkyiCIhU4JpmIBewdDnn8ZgQUbyBZ44kgy35o7xW5BMzM8FTvyTwCAQE=
Connect to the OCSP Manager using
curlto send the OCSP request.curl https://server.example.com:8443/ocsp/ee/ocsp/MEIwQDA+MDwwOjAJBgUrDgMCGgUABBT4cyABkyiCIhU4JpmIBewdDnn8ZgQUbyBZ44kgy35o7xW5BMzM8FTvyTwCAQE= > ocspresp.derParse the response using
openssl:openssl ocsp -respin ocspresp.der -resp_text
For certificates issued by a 7.1 CA with the Authority Information Access extension to be sent to the OCSP with the GET method, a redirect needs to be created to forward the requests to the appropriate URL, as described in Section 7.6.7, “Setting up a redirect for certificates issued in Certificate System 7.1 and earlier”. endif
7.6.7. Setting up a redirect for certificates issued in Certificate System 7.1 and earlier
The location for the OCSP user pages, specified in the URL with the file root /ocsp/ee/ocsp/, is different in current Certificate System versions compared to the location in Certificate System 7.1, which was simply /ocsp/. In order for certificates issued by a 7.1 or earlier CA with the Authority Information Access extension to be sent to the OCSP, create a redirect to forward the requests to the appropriate URL.
Setting the redirect is only required to manage certificates issued by a 7.1 or earlier CA with the Authority Information Access extension. If the certificates are issued by a later version Certificate Manager or do not contain the Authority Information Access extension, then this configuration is not necessary.
Stop the OCSP Responder.
# pki-server stop instance-nameChange to the OCSP’s end user web applications directory. For example:
# cd /var/lib/pki-ocsp/webapps/ocspChange to the
ROOT/WEB-INF/directory in theROOTfolder of the OCSP’s web applications directory. For example:# cd /var/lib/pki-ocsp/webapps/ocsp/ROOT/WEB-INF/Create and open the
lib/directory in theROOTfolder of the OCSP’s web applications directory.# mkdir lib # cd lib/Create a symlink that links back to the
/usr/share/java/pki/cms.jarJAR file. For example:# ln -s /usr/share/java/pki/cms.jar cms.jarMove up to the main web application directory. For example:
# cd /var/lib/pki-ocsp/webapps/ocsp/Rename the current instance (
ocsp) directory. For example:# mv /var/lib/pki-ocsp/webapps/ocsp/ocsp /var/lib/pki-ocsp/webapps/ocsp/ocsp2Change to the
WEB-INF/directory in the originalocsp/directory. For example:# cd /var/lib/pki-ocsp/webapps/ocsp/ocsp/WEB-INFIn the original
ocsp/WEB-INF/directory, edit theweb.xmlfile and add lines mapping between theeeocspAddCRLandcsadmin-wizardservlets.<servlet-mapping> <servlet-name> ocspOCSP </servlet-name> <url-pattern> /ee/ocsp/* </url-pattern> </servlet-mapping>Create and install the
web.xmlfile in theROOTdirectory. For example:<?xml version="1.0" encoding="ISO-8859-1"?> <web-app> <display-name>Welcome to Tomcat</display-name> <description> Welcome to Tomcat </description> <servlet> <servlet-name>ocspProxy</servlet-name> <servlet-class>com.netscape.cms.servlet.base.ProxyServlet</servlet-class> <init-param> <param-name>destContext</param-name> <param-value>/ocsp2</param-value> </init-param> <init-param> <param-name>destServlet</param-name> <param-value>/ee/ocsp</param-value> </init-param> </servlet> <servlet> <servlet-name>ocspOther</servlet-name> <servlet-class>com.netscape.cms.servlet.base.ProxyServlet</servlet-class> <init-param> <param-name>destContext</param-name> <param-value>/ocsp2</param-value> </init-param> <init-param> <param-name>srcContext</param-name> <param-value>/ocsp</param-value> </init-param> <init-param> <param-name>destServlet</param-name> <param-value></param-value> </init-param> <init-param> <param-name>matchURIStrings</param-name> <param-value>/ocsp/registry,/ocsp/acl,/ocsp/jobsScheduler,/ocsp/ug,/ocsp/server,/ocsp/log, /ocsp/auths,/ocsp/start,/ocsp/ocsp,/ocsp/services,/ocsp/agent,/ocsp/ee, /ocsp/admin</param-value> </init-param> <init-param> <param-name>destServletOnNoMatch</param-name> <param-value>/ee/ocsp</param-value> </init-param> <init-param> <param-name>appendPathInfoOnNoMatch</param-name> <param-value>/ocsp</param-value> </init-param> </servlet> <servlet-mapping> <servlet-name>ocspProxy</servlet-name> <url-pattern>/ocsp</url-pattern> </servlet-mapping> <servlet-mapping> <servlet-name>ocspOther</servlet-name> <url-pattern>/ocsp/*</url-pattern> </servlet-mapping> </web-app>Edit the
/var/lib/pki-ocsp/conf/context.xmlfile, changing the following line:<Context> to <Context crossContext="true" >Edit the
/var/lib/pki-ocsp/webapps/ocsp/ocsp2/services.templatefile and change the following line:result.recordSet[i].uri); to result.recordSet[i].uri + "/");Start the OCSP instance.
# pki-server start instance-name