Este conteúdo não está disponível no idioma selecionado.
5.4. Manually Configuring a Linux Client
The
ipa-client-install command automatically configures services like Kerberos, SSSD, PAM, and NSS. However, if the ipa-client-install command cannot be used on a system for some reason, then the IdM client entries and the services can be configured manually.
5.4.1. Setting up an IdM Client (Full Procedure)
Copiar o linkLink copiado para a área de transferência!
- Install SSSD, if it is not already installed.
- Optional. Install the IdM tools so that administrative tasks can be performed from the host.
yum install ipa-admintools
[root@client ~]# yum install ipa-admintoolsCopy to Clipboard Copied! Toggle word wrap Toggle overflow - On an IdM server. Create a host entry for the client.
kinit admin
ipa host-add --force --ip-address=192.168.166.31 ipaclient.example.com
[jsmith@client ~]$ kinit admin
[jsmith@client ~]$ ipa host-add --force --ip-address=192.168.166.31 ipaclient.example.com
Copy to Clipboard Copied! Toggle word wrap Toggle overflow Creating hosts manually is covered in Section 5.4.2, “Other Examples of Adding a Host Entry”. - On an IdM server. Create keytabs for the client.
- Log in as IdM administrator.
kinit admin
[jsmith@client ~]$ kinit adminCopy to Clipboard Copied! Toggle word wrap Toggle overflow - Set the client host to be managed by the server.
ipa host-add-managedby --hosts=server.example.com ipaclient.example.com
[jsmith@client ~]$ ipa host-add-managedby --hosts=server.example.com ipaclient.example.comCopy to Clipboard Copied! Toggle word wrap Toggle overflow - Generate the keytab for the client.
ipa-getkeytab -s server.example.com -p host/ipaclient.example.com -k /tmp/ipaclient.keytab
[jsmith@client ~]$ ipa-getkeytab -s server.example.com -p host/ipaclient.example.com -k /tmp/ipaclient.keytabCopy to Clipboard Copied! Toggle word wrap Toggle overflow
- Copy the keytab to the client machine and rename it
/etc/krb5.keytab.Note
If there is an existing/etc/krb5.keytabthat should be preserved, the two files can be combined usingktutil. - Set the correct user permissions for the
/etc/krb5.keytabfile.chown root:root /etc/krb5.keytab chmod 0600 /etc/krb5.keytab
[root@client ~]# chown root:root /etc/krb5.keytab
[root@client ~]# chmod 0600 /etc/krb5.keytab
Copy to Clipboard Copied! Toggle word wrap Toggle overflow - Set the SELinux contexts for the
/etc/krb5.keytabfile.chcon system_u:object_r:krb5_keytab_t:s0 /etc/krb5.keytab
[root@client ~]# chcon system_u:object_r:krb5_keytab_t:s0 /etc/krb5.keytabCopy to Clipboard Copied! Toggle word wrap Toggle overflow - Configure SSSD by editing the
/etc/sssd/sssd.conffile to point to the IdM domain.Copy to Clipboard Copied! Toggle word wrap Toggle overflow - Configure NSS to use SSSD for passwords, groups, users, and netgroups.
Copy to Clipboard Copied! Toggle word wrap Toggle overflow - Configure the
/etc/krb5.conffile to point to the IdM KDC.Copy to Clipboard Copied! Toggle word wrap Toggle overflow - Update the
/etc/pam.dconfiguration to use thepam_sss.somodules.- For
/etc/pam.d/fingerprint-auth:... account [default=bad success=ok user_unknown=ignore] pam_sss.so ... session optional pam_sss.so
... account [default=bad success=ok user_unknown=ignore] pam_sss.so ... session optional pam_sss.soCopy to Clipboard Copied! Toggle word wrap Toggle overflow - For
/etc/pam.d/system-auth:Copy to Clipboard Copied! Toggle word wrap Toggle overflow - For
/etc/pam.d/password-auth:Copy to Clipboard Copied! Toggle word wrap Toggle overflow - Enrollment_with_Separation_of_DutiesFor
/etc/pam.d/smartcard-auth:... account [default=bad success=ok user_unknown=ignore] pam_sss.so ... session optional pam_sss.so
...
account     [default=bad success=ok user_unknown=ignore] pam_sss.so
...
session     optional      pam_sss.so
Copy to Clipboard Copied! Toggle word wrap Toggle overflow
- Install the IdM server's CA certificate.
- Obtain the certificate from the server.
wget -O /etc/ipa/ca.crt http://ipa.example.com/ipa/config/ca.crt
[root@ipaclient ~]# wget -O /etc/ipa/ca.crt http://ipa.example.com/ipa/config/ca.crtCopy to Clipboard Copied! Toggle word wrap Toggle overflow - Install the certificate in the system's NSS database.
certutil -A -d /etc/pki/nssdb -n "IPA CA" -t CT,C,C -a -i /etc/ipa/ca.crt
[root@ipaclient ~]# certutil -A -d /etc/pki/nssdb -n "IPA CA" -t CT,C,C -a -i /etc/ipa/ca.crtCopy to Clipboard Copied! Toggle word wrap Toggle overflow
- Set up a host certificate for the host in IdM.
- Make sure
certmongeris running.service certmonger start
[root@ipaclient ~]# service certmonger startCopy to Clipboard Copied! Toggle word wrap Toggle overflow Note
Configurechkconfigso that thecertmongerservice starts by default.chkconfig certmonger on
[root@ipaclient ~]# chkconfig certmonger onCopy to Clipboard Copied! Toggle word wrap Toggle overflow - Use the
ipa-getcertcommand, which creates and manages the certificate throughcertmonger. The options are described more in Section B.1, “Requesting a Certificate with certmonger”.ipa-getcert request -d /etc/pki/nssdb -n Server-Cert -K HOST/ipaclient.example.com -N 'CN=ipaclient.example.com,O=EXAMPLE.COM'
[root@ipaclient ~]# ipa-getcert request -d /etc/pki/nssdb -n Server-Cert -K HOST/ipaclient.example.com -N 'CN=ipaclient.example.com,O=EXAMPLE.COM'Copy to Clipboard Copied! Toggle word wrap Toggle overflow
If administrative tools were not installed on the client, then the certificate can be generated on an IdM server, copied over to the host, and installed usingcertutil. - Set up NFS to work with Kerberos.
Note
To help troubleshoot potential NFS setup errors, enable debug information in the/etc/sysconfig/nfsfile.RPCGSSDARGS="-vvv" RPCSVCGSSDARGS="-vvv"
RPCGSSDARGS="-vvv" RPCSVCGSSDARGS="-vvv"Copy to Clipboard Copied! Toggle word wrap Toggle overflow - On an IdM server, add an NFS service principal for the NFS client.
ipa service-add nfs/ipaclient.example.com@EXAMPLE
[root@ipaclient ~]# ipa service-add nfs/ipaclient.example.com@EXAMPLECopy to Clipboard Copied! Toggle word wrap Toggle overflow Note
This must be run from a machine with the ipa-admintools package installed so that theipacommand is available. - On the IdM server, obtain a keytab for the NFS service principal.
ipa-getkeytab -s server.example.com -p nfs/ipaclient.example.com@EXAMPLE -k /tmp/krb5.keytab
[root@ipaclient ~]# ipa-getkeytab -s server.example.com -p nfs/ipaclient.example.com@EXAMPLE -k /tmp/krb5.keytabCopy to Clipboard Copied! Toggle word wrap Toggle overflow Note
Some versions of the Linux NFS implementation have limited encryption type support. If the NFS server is hosted on a version older than Red Hat Enterprise Linux 6, use the-e des-cbc-crcoption to theipa-getkeytabcommand for any nfs/<FQDN> service keytabs to set up, both on the server and on all clients. This instructs the KDC to generate only DES keys.When using DES keys, all clients and servers that rely on this encryption type need to have theallow_weak_cryptooption enabled in the[libdefaults]section of the/etc/krb5.conffile. Without these configuration changes, NFS clients and servers are unable to authenticate to each other, and attempts to mount NFS filesystems may fail. The client'srpc.gssdand the server'srpc.svcgssddaemons may log errors indicating that DES encryption types are not permitted. - Copy the keytab from the IdM server to the NFS server. For example, if the IdM and NFS servers are on different machines:
scp /tmp/krb5.keytab root@nfs.example.com:/etc/krb5.keytab
[root@ipaclient ~]# scp /tmp/krb5.keytab root@nfs.example.com:/etc/krb5.keytabCopy to Clipboard Copied! Toggle word wrap Toggle overflow - Copy the keytab from the IdM server to the IdM client. For example:
scp /tmp/krb5.keytab root@client.example.com:/etc/krb5.keytab
[root@ipaclient ~]# scp /tmp/krb5.keytab root@client.example.com:/etc/krb5.keytabCopy to Clipboard Copied! Toggle word wrap Toggle overflow - Configure the
/etc/exportsfile on the NFS server./ipashare gss/krb5p(rw,no_root_squash,subtree_check,fsid=0)
/ipashare gss/krb5p(rw,no_root_squash,subtree_check,fsid=0)Copy to Clipboard Copied! Toggle word wrap Toggle overflow - On the client, mount the NFS share.
- Always specify the share as nfs_server:/ /mountpoint.
- Use the same
-o secsetting as is used in the/etc/exportsfile for the NFS server.
mount -v -t nfs4 -o sec=krb5p nfs.example.com:/ /mnt/ipashare
[root@client ~]# mount -v -t nfs4 -o sec=krb5p nfs.example.com:/ /mnt/ipashareCopy to Clipboard Copied! Toggle word wrap Toggle overflow
5.4.2. Other Examples of Adding a Host Entry
Copiar o linkLink copiado para a área de transferência!
Section 5.4.1, “Setting up an IdM Client (Full Procedure)” covers the full procedure for configuring an IdM client manually. One of those steps is creating a host entry, and there are several different ways and options to perform that.
5.4.2.1. Adding Host Entries from the Web UI
Copiar o linkLink copiado para a área de transferência!
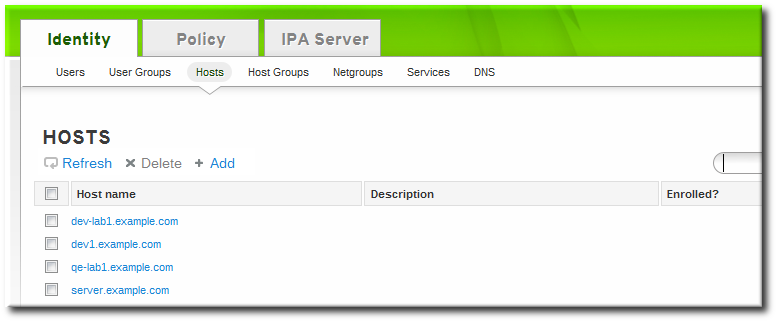
- Open the Identity tab, and select the Hosts subtab.
- Click the Add link at the top of the hosts list.
- Fill in the machine name and select the domain from the configured zones in the drop-down list. If the host has already been assigned a static IP address, then include that with the host entry so that the DNS entry is fully created.DNS zones can be created in IdM, which is described in Section 17.6.1, “Adding Forward DNS Zones”. If the IdM server does not manage the DNS server, the zone can be entered manually in the menu area, like a regular text field.
Note
Select the Force checkbox to add the host DNS record, even if the hostname cannot be resolved.This is useful for hosts which use DHCP and do not have a static IP address. This essentially creates a placeholder entry in the IdM DNS service. When the DNS service dynamically updates its records, the host's current IP address is detected and its DNS record is updated. - Click the Add and Edit button to go directly to the expanded entry page and fill in more attribute information. Information about the host hardware and physical location can be included with the host entry.


5.4.2.2. Adding Host Entries from the Command Line
Copiar o linkLink copiado para a área de transferência!
Host entries are created using the
host-add command. This commands adds the host entry to the IdM Directory Server. The full list of options with host-add are listed in the ipa host manpage. At its most basic, an add operation only requires the client hostname to add the client to the Kerberos realm and to create an entry in the IdM LDAP server:
ipa host-add client1.example.com
$ ipa host-add client1.example.com
If the IdM server is configured to manage DNS, then the host can also be added to the DNS resource records using the
--ip-address and --force options.
Example 5.6. Creating Host Entries with Static IP Addresses
ipa host-add --force --ip-address=192.168.166.31 client1.example.com
$ ipa host-add --force --ip-address=192.168.166.31 client1.example.com
Commonly, hosts may not have a static IP address or the IP address may not be known at the time the client is configured. For example, laptops may be preconfigured as Identity Management clients, but they do not have IP addresses at the time they're configured. Hosts which use DHCP can still be configured with a DNS entry by using
--force. This essentially creates a placeholder entry in the IdM DNS service. When the DNS service dynamically updates its records, the host's current IP address is detected and its DNS record is updated.
Example 5.7. Creating Host Entries with DHCP
ipa host-add --force client1.example.com
$ ipa host-add --force client1.example.com
Host records are deleted using the
Copy to Clipboard
Copied!
Toggle word wrap
Toggle overflow
host-del command. If the IdM domain uses DNS, then the --updatedns option also removes the associated records of any kind for the host from the DNS.
ipa host-del --updatedns client1.example.com
$ ipa host-del --updatedns client1.example.com