Este conteúdo não está disponível no idioma selecionado.
Chapter 2. Building and testing RHEL bootc images
You can build and test RHEL container images by using Podman and Containerfiles to create, customize, and share bootable RHEL system images across environments efficiently. You can also use other tools, for example, OpenShift Container Platform. For more examples of configuring RHEL systems by using containers, see the rhel-bootc-examples repository.
2.1. Building and configuring bootc-based images from a Containerfile
You can use a Containerfile to build and customize your own bootc-based image with the tools, configurations, and applications you need. While most standard instructions work, some are ignored when the image is installed on a system.
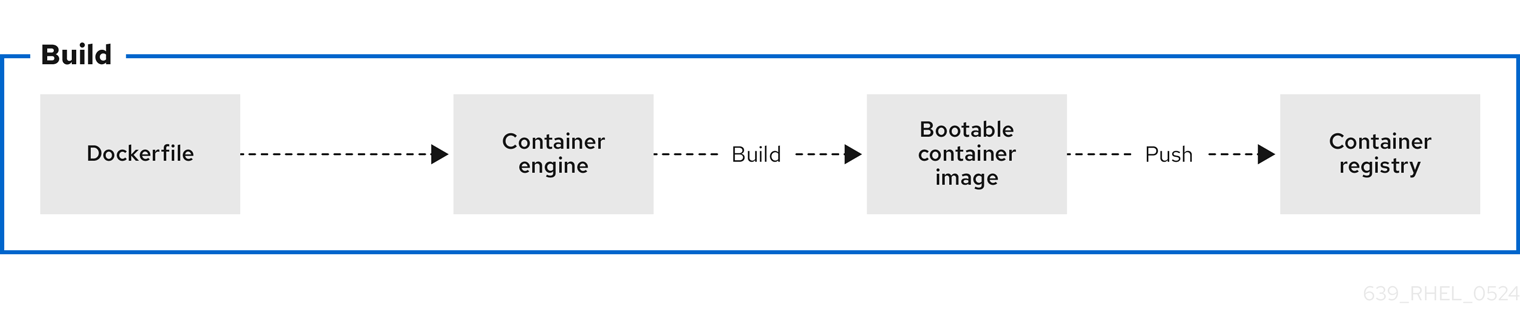
Figure 2.1. Building an image by using instructions from a Containerfile, testing the container, pushing an image to a registry, and sharing it with others
A general Containerfile structure is the following:
FROM registry.redhat.io/rhel9/rhel-bootc:latest

RUN dnf -y install [software] [dependencies] && dnf clean all

ADD [application]
ADD [configuration files]

RUN [config scripts]
The available commands that are usable inside a Containerfile and a Dockerfile are equivalent.
However, the following commands in a Containerfile are ignored when the rhel-9-bootc image is installed to a system:
-
ENTRYPOINTandCMD(OCI:Entrypoint/Cmd): you can setCMD /sbin/initinstead. -
ENV(OCI:Env): change thesystemdconfiguration to configure the global system environment. -
EXPOSE(OCI:exposedPorts): it is independent of how the system firewall and network function at runtime. -
USER(OCI:User): configure individual services inside the RHEL bootc to run as unprivileged users instead.
The rhel-9-bootc container image reuses the OCI image format.
-
The
rhel-9-bootccontainer image ignores the container config section (Config) when it is installed to a system. -
The
rhel-9-bootccontainer image does not ignore the container config section (Config) when you run this image by using container runtimes such aspodmanordocker.
2.2. Building reproducible container images with container tools
Red Hat Enterprise Linux (RHEL) now supports reproducible container builds using Podman and Buildah, reducing image changes with consistent inputs over time. This new feature decreases data pulled from registries when updating images, which is crucial for supply chain security, reliable software deployment, and effective debugging. Reproducible builds for RHEL containers reduce registry storage, create smaller update payloads, and enable faster downloads by ensuring image layers remain consistent. Previously, challenges with tarball creation and escalating container image sizes led to increased storage burdens and unnecessary layer pulls, even when underlying data remained unchanged, hindering faster updates in environments like rhel-bootc and RHEL AI.
2.3. Building a container image
To build an image by using instructions from a Containerfile, use the podman build command.
Prerequisites
-
The
container-toolsmeta-package is installed.
Procedure
Create a
Containerfile:$ cat Containerfile FROM registry.redhat.io/rhel9/rhel-bootc:latest RUN dnf -y install cloud-init && \ ln -s ../cloud-init.target /usr/lib/systemd/system/default.target.wants && \ dnf clean allThis
Containerfileexample adds thecloud-inittool, so it automatically fetches SSH keys and can run scripts from the infrastructure and also gather configuration and secrets from the instance metadata. For example, you can use this container image for pre-generated AWS or KVM guest systems.Build the
<image>image by usingContainerfilein the current directory:$ podman build -t quay.io/<namespace>/<image>:<tag> .
Verification
List all images:
$ podman images
REPOSITORY                                  TAG      IMAGE ID       CREATED              SIZE
localhost/<image>                           latest   b28cd00741b3   About a minute ago   2.1 GB
2.4. Benefits of custom bootable images with multi-stage builds
The deployment image must include only the application and its required runtime, without adding any build tools or unnecessary libraries. To achieve this, use a two-stage Containerfile: one stage for building the artifacts and another for hosting the application.
With multi-stage builds, you use multiple FROM instructions in your Containerfile. Each FROM instruction can use a different base, and each of them begins a new stage of the build. You can selectively copy artifacts from one stage to another and exclude everything you do not need in the final image.
Multi-stage builds offer several advantages:
- Smaller image size
- By separating the build environment from the runtime environment, only the necessary files and dependencies are included in the final image, significantly reducing its size.
- Improved security
- Since build tools and unnecessary libraries are excluded from the final image, the attack surface is reduced, leading to a more secure container.
- Optimized performance
- A smaller image size means faster download, deployment, and startup times, improving the overall efficiency of the containerized application.
- Simplified maintenance
- With the build and runtime environments separated, the final image is cleaner and easier to maintain, containing only what is needed to run the application.
- Cleaner builds
- Multi-stage builds help avoid clutter from intermediate files, which could accumulate during the build process, ensuring that only essential artifacts make it into the final image.
- Resource efficiency
- The ability to build in one stage and discard unnecessary parts minimizes the use of storage and bandwidth during deployment.
- Better layer caching
- With clearly defined stages, Podman can efficiently cache the results of previous stages, by accelerating up future builds.
The following Containerfile consists of two stages. The first stage is typically named builder and it compiles a golang binary. The second stage copies the binary from the first stage. The default working directory for the go-toolset builder is opt/ap-root/src.
FROM registry.access.redhat.com/ubi9/go-toolset:latest as builder
RUN echo 'package main; import "fmt"; func main() { fmt.Println("hello world") }' > helloworld.go
RUN go build helloworld.go

FROM registry.redhat.io/rhel9/rhel-bootc:latest
COPY --from=builder /opt/app-root/src/helloworld /
CMD ["/helloworld"]
As a result, the final container image includes the helloworld binary but no data from the previous stage.
You can also use multi-stage builds to perform the following scenarios:
- Stopping at a specific build stage
- When you build your image, you can stop at a specified build stage. For example:
$ podman build --target build -t hello .For example, you can use this approach to debugging a specific build stage.
- Using an external image as a stage
-
You can use the
COPY --frominstruction to copy from a separate image either using the local image name, a tag available locally or on a container registry, or a tag ID. For example:
COPY --from=<image> <source_path> <destination_path>- Using a previous stage as a new stage
-
You can continue where a previous stage ended by using the
FROMinstruction. For example:
FROM ubi9 AS stage1
[...]

FROM stage1 AS stage2
[...]

FROM ubi9 AS final-stage
[...]2.5. Running a container image
To run and test your container, use the podman run command.
Prerequisites
-
The
container-toolsmeta-package is installed.
Procedure
Run the container by using the
podman runcommand with the appropriate options. For example, to run the container namedmybootcbased on thequay.io/<namespace>/<image>:<tag>container image:$ podman run -it --rm --name mybootc quay.io/<namespace>/<image>:<tag> /bin/bash-
The
-ioption creates an interactive session. Without the-ioption, the shell open, and then exits. -
The
-toption opens a terminal session. Without the-ioption, stays open, but you cannot type anything to the shell. -
The
--rmoption removes thequay.io/<namespace>/<image>:<tag>container image after the container exits.
-
The
Verification
List all running containers:
$ podman ps
CONTAINER ID  IMAGE                                    COMMAND          CREATED        STATUS            PORTS   NAMES
7ccd6001166e  quay.io/<namespace>/<image>:<tag>  /sbin/init  6 seconds ago  Up 5 seconds ago          mybootc
2.6. Overriding the version of bootc images
Red Hat Enterprise Linux (RHEL) base images, Universal Base Images (UBI), and rhel-bootc use version numbers that track only the major operating system version. To define a specific version number for a derived image, you can override this value by adding the version label to your Containerfile.
Prerequisites
-
The
container-toolsmeta-package is installed.
Procedure
Create a Containerfile:
FROM registry.redhat.io/rhel9/rhel-bootc:latest
# In this example, the custom operating system has its own
# version scheme.
# The operating system major version is copied
# and a sub-version of it is added, which represents a point-in-time
# snapshot of the base OS content.
# This just changes the output of bootc status. A deeper level
# of customization is available by also changing the contents of /usr/lib/os-release.
# Define the custom version and release metadata
LABEL org.opencontainers.image.version=”10.1.1”
Build the
<image>image by usingContainerfilefrom the current directory:$ podman build -t quay.io/<namespace>/<image>:<tag> .
Verification
Verify that the override was applied:
$ podman inspect <image-name> --format '{{index .Labels "org.opencontainers.image.version"}}'
2.7. Pushing a container image to the registry
To push an image to your own registry, or a third-party registry, and share it with others, use the podman push command. The following procedure uses the Red Hat Quay registry as an example.
Prerequisites
-
The
container-toolsmeta-package is installed. - An image is built and available on the local system.
- You have created the Red Hat Quay registry. For more information, see Proof of Concept - Deploying Red Hat Quay.
Procedure
Push the
quay.io/<namespace>/<image>:<tag>container image from your local storage to the registry:$ podman push quay.io/<namespace>/<image>:<tag>