Este conteúdo não está disponível no idioma selecionado.
Chapter 5. To Add Another Route to the CBR Routing Context
Abstract
This tutorial walks you through adding a second route to the
camelContext.xml file in the CBRroute project. The second route:
- takes messages directly from the terminal end of the first route's otherwise branch
- sorts the messages according to customers' country
- sends each message to the corresponding
CBRroute/target/messages/<country>directory
Goals
In this tutorial you will:
- reconfigure the existing route for direct connection to a second route
- add a second route to your camelContext
- configure the new route to take messages directly from the otherwise branch of the first route
- add a content-based router to the new route
- add and configure a message header, logging, and target destination to each output branch of the new route's content-based router
Prerequisites
To complete this tutorial you will need the CBRroute project you modified in Chapter 4, To Add a Content-Based Router.
Note
If you skipped any tutorial after Chapter 2, To Create a New Route, you can use the prefabricated
camelContext5.xml file to work through this tutorial (for details, see Chapter 1, Using the Fuse Tooling Resource Files).
Reconfiguring the existing route for direct connection
To configure the existing route for direct connection with the new route:
- Open your
CBRroute/src/main/resources/OSGI-INF/blueprint/camelContext.xmlin the route editor. - Click the canvas to display the existing route's properties in the Properties editor.
- Enter
Route1in the Id field. - Select the terminal file: node file:target/messages/toValid to display its properties in the Properties editor.
- In the Uri field, delete the existing text, and then enter
direct:OrderFulfillment. - In the Id field, enter
toFulfill.
Adding the second route
Note
The route editor displays each route in a multiroute routing context on its own slice of canvas.
To add a route to the routing context:
- Select
. The tooling adds another route to your camelContext, and the route editor opens a clean canvas for you to construct the second route.Outline view, shown here, displays both routes and their components. Clicking on a route in Outline view displays it on the route editor's canvas. Or you can switch between routes by selecting
on the menu bar, where RouteName is the string you entered in the route's Id field in the Properties editor. - Click the canvas to display the new route's properties in the Properties editor.
- Enter
Route2in the Id field.
Building and configuring the USA branch of the second route
With
Route2 displayed on the route editor's canvas:
- Drag an Generic element (
 ) from the Palette's Components drawer onto the canvas.
- In the Properties editor, enter
direct:OrderFulfillmentin the Uri field. - Right-click the direct:OrderFulfi... node to open the context menu, and select
. - In the Properties editor, enter
choice2in the Id field. - Right-click the choice2 node to open the context menu, and select
. - In the Properties editor:

- Enter
/order/customer/country = 'USA'in the Expression field. - Select
xpathfrom the Language drop-down menu. - Enter
when/usain the Id field.
- Right-click the when/usa node to open the context menu, and select
. - In the Properties editor:

- Enter
Destinationin the Header Name field. - Enter
USAin the Expression field. - Select from the drop-down menu.
- Enter
setHead_usain the Id field,
- Right-click the setHead_usa node to open the context menu, and select
. - In the Properties editor:

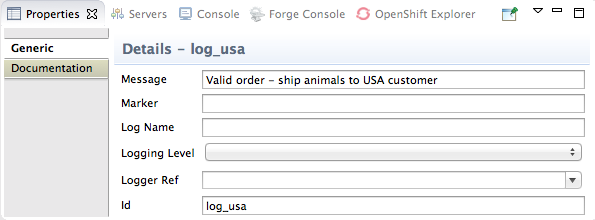
- Enter
Valid order - ship animals to USA customerin the Message field. - Enter
log_usain the Id field.
- Right-click the log_usa node to open the context menu, and select
. - In the Properties editor:

- Replace directoryName with
target/messages/USAin the Uri field. - Enter
toUSin the Id field.
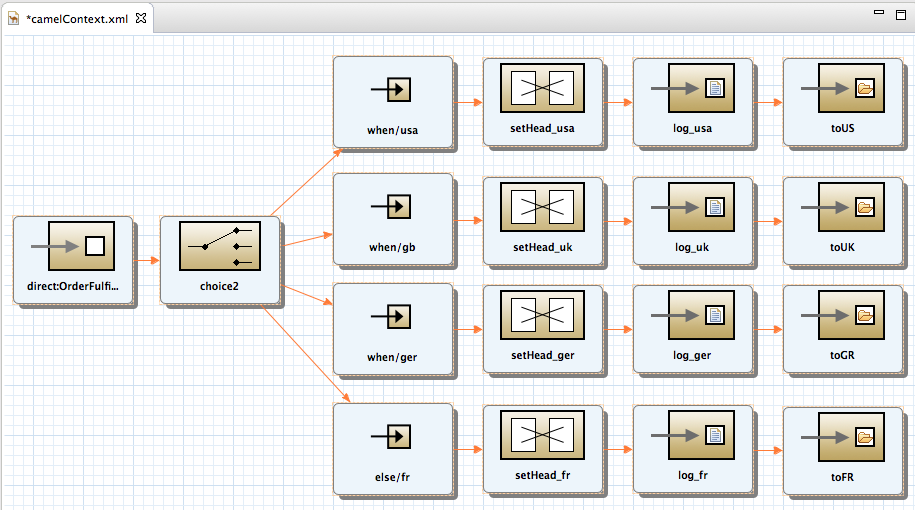
The USA branch of Route2 should look like this:

Building and configuring the Great Britain branch of the second route
With
Route2 displayed on the canvas:
- Right-click the choice2 node again to open the context menu, and select
. - In the Properties editor:
- Enter
/order/customer/country = 'Great Britain'in the Expression field. - Select
xpathfrom the Language drop-down menu. - Enter
when/gbin the Id field.
- Right-click the when/gb node to open the context menu, and select
. - In the Properties editor:
- Enter
Destinationin the Header Name field. - Enter
UKin the Expression field. - Select from the drop-down menu.
- Enter
setHead_ukin the Id field,
- Right-click the setHead_uk node to open the context menu, and select
. - In the Properties editor:
- Enter
Valid order - ship animals to UK customerin the Message field. - Enter
log_ukin the Id field.
- Right-click the log_uk node to open the context menu, and select
. - In the Properties editor:
- Replace directoryName with
target/messages/GreatBritainin the Uri field. - Enter
toUKin the Id field.
The Great Britain branch of Route2 should look like this:

Building and configuring the Germany branch of the second route
With
Route2 displayed on the canvas:
- Right-click the choice2 node again to open the context menu, and select
. - In the Properties editor:
- Enter
/order/customer/country = 'Germany'in the Expression field. - Select
xpathfrom the Language drop-down menu. - Enter
when/gerin the Id field.
- Right-click the when/ger node to open the context menu, and select
. - In the Properties editor:
- Enter
Destinationin the Header Name field. - Enter
Germanyin the Expression field. - Select from the drop-down menu.
- Enter
setHead_gerin the Id field,
- Right-click the setHead_ger node to open the context menu, and select
. - In the Properties editor:
- Enter
Valid order - ship animals to Germany customerin the Message field. - Enter
log_gerin the Id field.
- Right-click the log_ger node to open the context menu, and select
. - In the Properties editor:
- Replace directoryName with
target/messages/Germanyin the Uri field. - Enter
toGRin the Id field.
The Germany branch of Route2 should look like this:

Building and configuring the France branch of the second route
With
Route2 displayed on the canvas:
- Right-click the choice2 node again to open the context menu, and select
. - In the Properties editor:
 Enter
Enterelse/frin the Id field. - Right-click the else/fr node to open the context menu, and select
. - In the Properties editor:
- Enter
Destinationin the Header Name field. - Enter
Francein the Expression field. - Select from the drop-down menu.
- Enter
setHead_frin the Id field,
- Right-click the setHead_fr node to open the context menu, and select
. - In the Properties editor:
- Enter
Valid order - ship animals to France customerin the Message field. - Enter
log_frin the Id field.
- Right-click the log_fr node to open the context menu, and select
. - In the Properties editor:
- Replace directoryName with
target/messages/Francein the Uri field. - Enter
toFRin the Id field.
The France branch of Route2 should look like this:

Saving the new routing context
- On the toolbar, select
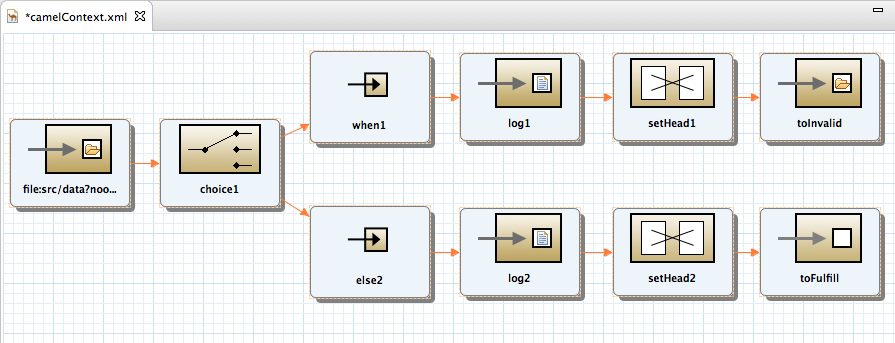
to save the routing context. The routes on the canvas should look like this:Figure 5.1. Completed route1

Figure 5.2. Completed route2

- Click the Source tab at the bottom, left of the canvas to display the XML for the route.The
camelContextelement should look like that shown in Example 5.1.Example 5.1. XML for dual-route content-based router
<?xml version="1.0" encoding="UTF-8"?>
<blueprint xmlns="http://www.osgi.org/xmlns/blueprint/v1.0.0"
       xmlns:camel="http://camel.apache.org/schema/blueprint"
       xmlns:xsi="http://www.w3.org/2001/XMLSchema-instance"
       xsi:schemaLocation="http://www.osgi.org/xmlns/blueprint/v1.0.0
         http://www.osgi.org/xmlns/blueprint/v1.0.0/blueprint.xsd
       http://camel.apache.org/schema/blueprint
         http://camel.apache.org/schema/blueprint/camel-blueprint.xsd">

  <camelContext trace="false" xmlns="http://camel.apache.org/schema/blueprint">
  <route id="Route1">
    <from uri="file:src/data?noop=true"/>
    <choice id="choice1">
      <when id="when1">
        <xpath>/order/orderline/quantity/text() > /order/orderline/maxAllowed/text()</xpath>
        <log message="quantity requested exceeds maximum allowed - contact customer" id="log1"/>
        <setHeader headerName="Destination" id="setHead1">
          <constant>InvalidOrders</constant>
        </setHeader>
        <to uri="file:target/messages/invalidOrders" id="toInvalid"/>
      </when>
      <otherwise id="else2">
        <log message="valid order - process" id="log2"/>
        <setHeader headerName="Destination" id="setHead2">
          <constant>Dispatcher</constant>
        </setHeader>
        <to uri="direct:OrderFulfillment" id="toFulfill"/>
      </otherwise>
    </choice>
  </route>
  <route id="Route2">
    <from uri="direct:OrderFulfillment"/>
    <choice id="choice2">
      <when id="when/usa">
        <xpath>/order/customer/country = 'USA'</xpath>
        <setHeader headerName="Destination" id="setHead_usa">
          <constant>USA</constant>
        </setHeader>
        <log message="Valid order - ship animals to USA customer" id="log_usa"/>
        <to uri="file:target/messages/USA" id="toUS"/>
      </when>
      <when id="when/gb">
        <xpath>/order/customer/country = 'Great Britain'</xpath>
        <setHeader headerName="Destination" id="setHead_uk">
          <constant>UK</constant>
        </setHeader>
        <log message="Valid order - ship animals to UK customer" id="log_uk"/>
        <to uri="file:target/messages/GreatBritain" id="toUK"/>
      </when>
      <when id="when/ger">
        <xpath>/order/customer/country = 'Germany'</xpath>
        <setHeader headerName="Destination" id="setHead_ger">
          <constant>Germany</constant>
        </setHeader>
        <log message="Valid order - ship animals to Germany customer" id="log_ger"/>
        <to uri="file:target/messages/Germany" id="toGR"/>
      </when>
      <otherwise id="else/fr">
        <setHeader headerName="Destination" id="setHead_fr">
          <constant>France</constant>
        </setHeader>
        <log message="Valid order - ship animals to France customer" id="log_fr"/>
        <to uri="file:target/messages/France" id="toFR"/>
      </otherwise>
    </choice>
  </route>
 </camelContext>
</blueprint>
Next steps
You can run the new route as described in the section called “Running the route”.
Check the end of the Console's output. You should see these lines:

Check the target destinations in Project Explorer to verify that the routes executed properly:
- Select
CBRroute. - Right-click it to open the context menu, then select .
- Expand the folder
target/messages/as shown in Figure 5.3. Themessage*.xmlfiles should be dispersed in your target destinations like this:Figure 5.3. Target message destinations in Project Explorer
 NoteTo view message content, double-click a message to open it in the route editor's xml editor.
Further reading
To learn more about the direct component see the Red Hat JBoss Fuse: Apache Camel Component Reference at Red Hat JBoss Fuse 6.x documentation