Este conteúdo não está disponível no idioma selecionado.
Chapter 9. Getting Started with Data Transformation
9.1. Fuse Transformation Tooling
One of the challenges that comes with system and data integration is that the component systems often work with different data formats. You cannot simply send messages from one system to another without translating it into a format (or language) recognized by the receiving system. Data transformation is the term given to this translation.
9.2. Data Transformation Tutorial
In this tutorial you will learn how to use the data transformation tooling to include data transformation in a predefined Camel route. The Camel route directs messages from a source endpoint that produces XML data to a target endpoint that consumes JSON data. You will add and define a data transformation component that maps the source’s XML data format to the target’s JSON data format.
Prerequisites
- Install Fuse tooling in Red Hat Developer Studio. See the Developer Studio documentation page, select the Developer Studio version and click the link for the installation guide.
- Install and configure Maven. See Deploying into Apache Karaf.
- Download and install the transformation quickstart applications.
Importing the starter quickstart application
- Right-click in the Project Explorer view to open the context menu.
-
Select Import
Import. - Expand the Maven folder, and select Existing Maven Projects.
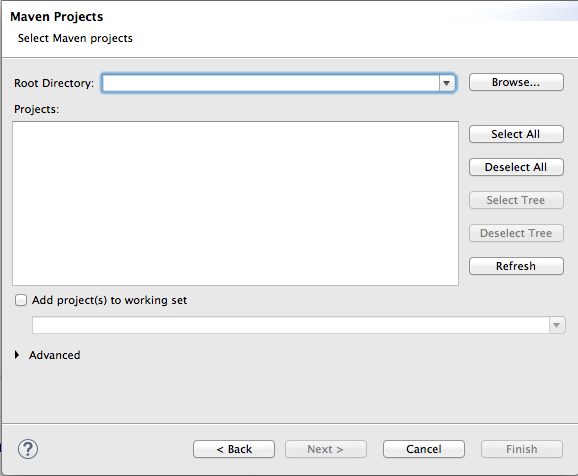
Click Next to open the Maven Projects wizard.
Click Browse to find and select the root directory of the
starterquickstart application.If the browse operation finds multiple projects, make sure you select the
starterquickstart application. The full path to thestarterquickstart application appears in the Projects pane.Click Finish.
After the import operation finishes, the
starterproject appears in the Project Explorer view.-
In the Project Explorer view, expand the
starterproject. Double-click
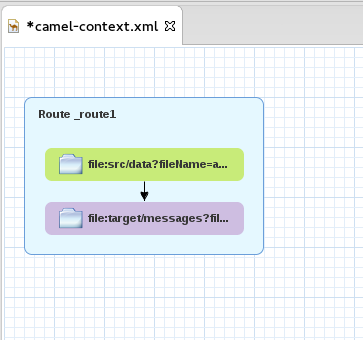
starter/src/main/resources/META-INF/spring/camel-context.xmlto open the route in the route editor’s Design tab.Click the Source tab to view the underlying XML.
You can see that an XML file is produced from a source endpoint and a JSON file is consumed by a target endpoint.
Copy to Clipboard Copied! Toggle word wrap Toggle overflow - Click the Design tab to return to the graphical display of the route.
- Remove the arrow that connects the source and target endpoints.
-
If the Console view is not already open, open it now by selecting Window
Show View Console.
Although the following mini tutorials are written to be run in consecutive order, you can run them in any order. If you change the order then the console output for a tutorial will differ from that shown here.
Adding a data transformation node to the Camel route
- In the Palette, expand the Transformationdrawer.
Drag a Data Transformation pattern over the canvas and drop it on the
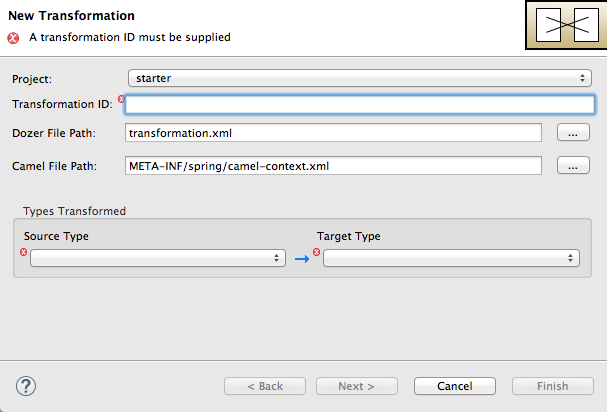
Route_route1container.The New Transformation wizard opens with the Project, Dozer File Path, and Camel File Path fields auto filled.
Fill in the remaining fields:
-
In the Transformation ID field, enter
xml2json. - For Source Type, select XML from the drop-down menu.
- For Target Type, select JSON from the drop-down menu.
-
In the Transformation ID field, enter
Click Next.
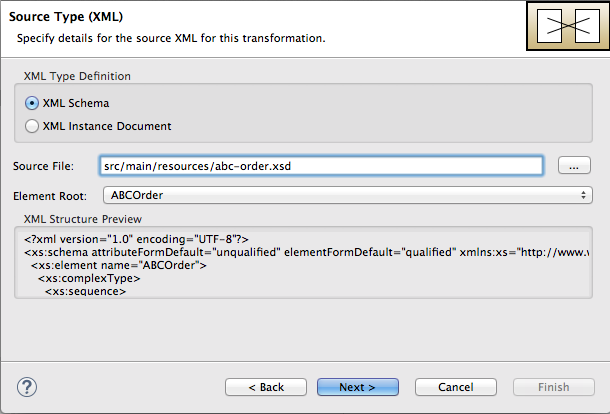
The Source Type (XML) definition page opens, where you specify either an XML Schema (default) or an example XML Instance Document to provide the type definition of the source data:
- Leave XML Schema enabled.
For Source file, browse to the location of the XML schema file or the XML instance file to use for the type definition of the source data, and select it (in this case,
abc-order.xsd).The XML Structure Preview pane displays a preview of the XML structure.
In the Element root field, enter
ABCOrder.The tooling uses this text to label the pane that displays the source data items to map.
The Source Type (XML) definition page should now look like this:
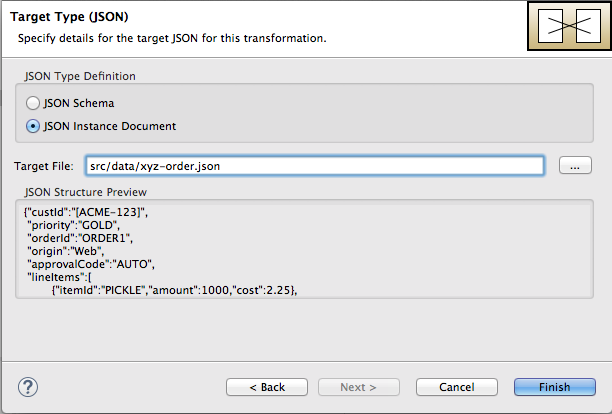
Click Next to open the Target Type (JSON) definition page. This is where you specify the type definition for the target data.
Click JSON Instance Document.
In the Target File field, enter the path to the
xyz-order.jsoninstance document, or browse to it. The JSON Structure Preview pane displays a preview of the JSON data structure:- Click Finish.


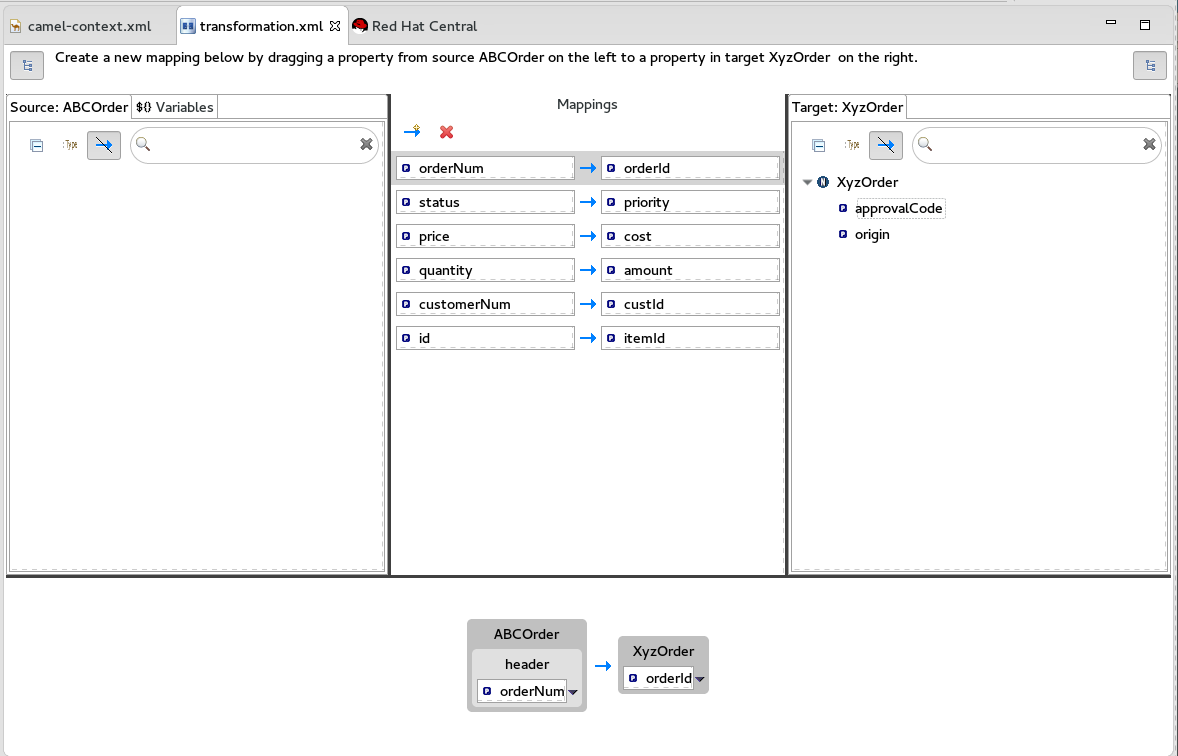
The transformation editor opens. This is where you can map data items in your XML source to data items in your JSON target.
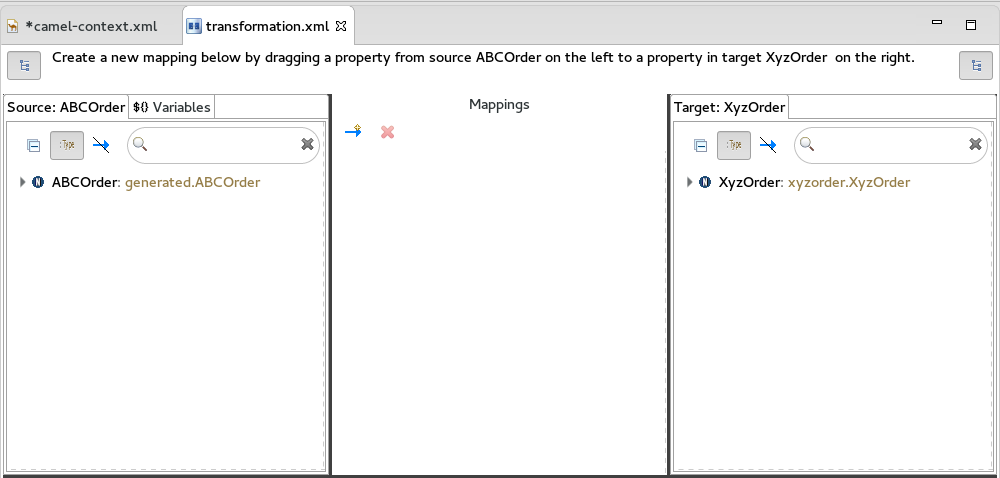
The transformation editor is composed of three panels:
- Source — lists the available data items of the source
- Mappings — displays the mappings between the source and target data items
- Target — lists the available data items of the target
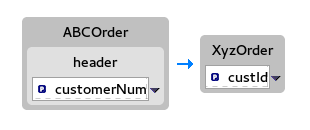
In addition, the editor’s details pane, located just below the editor’s three panels (once the first mapping has been made), graphically displays the hierarchical ancestors for both the mapped source and target data items currently selected. For example:
 custId" class="modal-img" loading="lazy">
custId" class="doc-image" loading="lazy">
custId" class="modal-img" loading="lazy">
custId" class="doc-image" loading="lazy">
Using the details pane, you can customize the mapping for the selected source and target data items:
- Set property — Modify an existing mapping or map a simple data item to one in a collection (see the section called “Mapping a simple data item to a data item in a collection”).
- Set variable — Specify a constant value for a data item (see the section called “Mapping a constant variable to a data item”).
- Set expression — Map a data item to the dynamic evaluation of a specified expression (see the section called “Mapping an expression to a data item”).
- Add transformation — Modify the value of a mapped data item using a built-in function (see the section called “Adding a built-in function to a mapped data item”).
- Add custom transformation — Modify the value of a mapped data item using the Java method you create or one you previously created (see the section called “Adding a custom transformation to a mapped data item”).
Mapping source data items to target data items
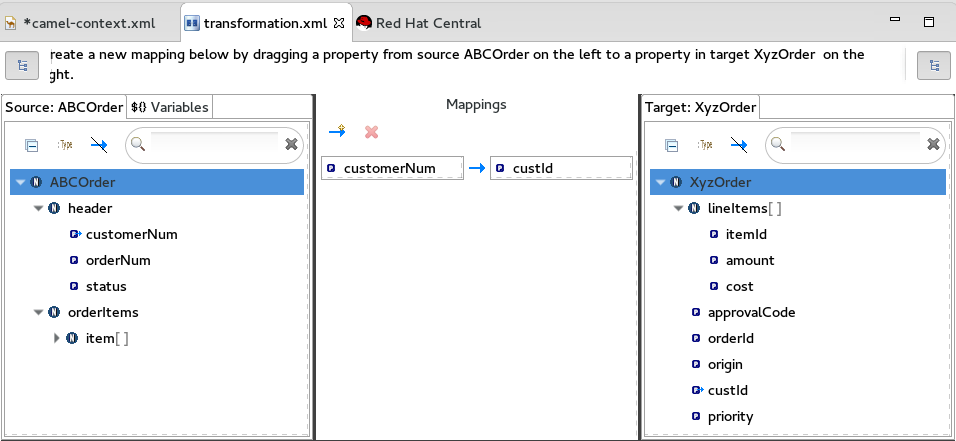
Expand all items in the Source and Target panels located on left and right sides of the Mappings panel.
Drag a data item from the Source panel and drop it on its corresponding data item in the Target panel.
For example, drag the
customerNumdata item from the Source panel and drop it on thecustIddata item in the Target panel.The mapping appears in the Mappings panel, and the details of both the Source and Target data items appear below in the details pane.
Continue dragging and dropping source data items onto their corresponding target data items until you have completed all basic mappings.
In the
starterexample, the remaining data items to map are:Expand Source Target + orderNumorderId+
statuspriority+
iditemId+
pricecost+
quantityamount+
NoteYou can map collections (data items containing lists or sets) to noncollection data items and vice versa, but you cannot map collections to other collections.
Click
 on both the Source and Target panels to quickly determine whether all data items have been mapped.
Only data items that have not been mapped are listed in the Source and Target panels.
In the
starterexample, the remaining unmapped Target attributes areapprovalCodeandorigin.- Click the camel-context.xml tab to return to the graphical display of the route.
Hover your cursor over each endpoint to reveal its connecter arrow.
Selecting the
file:src/data?fil…node, drag and drop its connector arrow onto theref:xml2jsonnode. Likewise drag and drop the connector arrow from theref:xml2jsonnode onto thefile:target/messa…node.Connecting the nodes on the canvas creates a valid Camel route, which you can now save.
-
Click File
Save.


You can run a JUnit test on your transformation file after you create the transformation test. For details, see the section called “Creating the transformation test file and running the JUnit test”. If you do so at this point, you will see this output in the Console view:
for the source XML data, and
{"custId":"ACME-123","priority":"GOLD","orderId":"ORDER1","lineItems":[{"itemId":"PICKLE",
"amount":1000,"cost":2.25},{"itemId":"BANANA","amount":400,"cost":1.25
{"custId":"ACME-123","priority":"GOLD","orderId":"ORDER1","lineItems":[{"itemId":"PICKLE",
"amount":1000,"cost":2.25},{"itemId":"BANANA","amount":400,"cost":1.25for the target JSON data.
Creating the transformation test file and running the JUnit test
-
Right-click the
starterproject in the Project Explorer view, and select NewOther Fuse Tooling Fuse Transformation Test. - Select Next to open the New Transformation Test wizard.
In the New Transformation Test wizard, set the following values:
Expand Field Value + Package
example+
Transformation ID
xml2json+
- Click Finish.
-
In the Project Explorer view, navigate to
starter/src/test/java/example, and open theTransformationTest.javafile. Add the following code to the
transformmethod:startEndpoint.sendBodyAndHeader(readFile("src/data/abc-order.xml"), "approvalID", "AUTO_OK");startEndpoint.sendBodyAndHeader(readFile("src/data/abc-order.xml"), "approvalID", "AUTO_OK");Copy to Clipboard Copied! Toggle word wrap Toggle overflow Click File
Save. You can now run a JUnit test on your transformation file at any point in these tutorials.
-
In the Project Explorer view, expand the
starterproject to expose the/src/test/java/example/TransformationTest.javafile. Right click it to open the context menu, and select Run as JUnit Test.
The JUnit Test pane opens to display the status of the test. To avoid cluttering your workspace, drag and drop the pane in the bottom panel near the Console view.
- Open the Console view to see the log output.

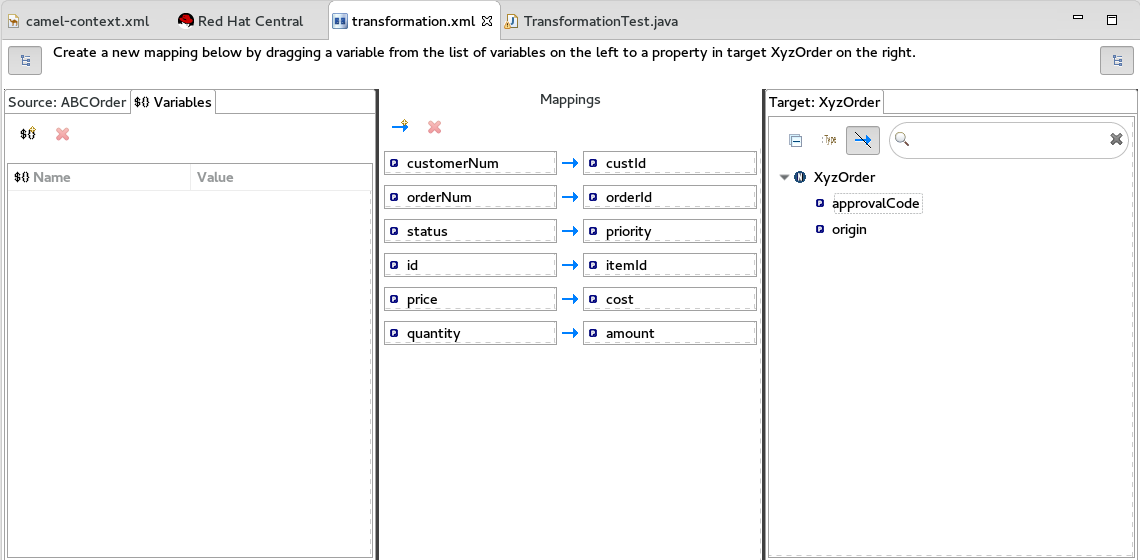
Mapping a constant variable to a data item
When a source/target data item has no corresponding target/source data item, you can map a constant variable to the existing data item.
In the starter example, the target data item origin does not have a corresponding source data item. To map the origin attribute to a constant variable:
In the Source panel, click the Variables view.
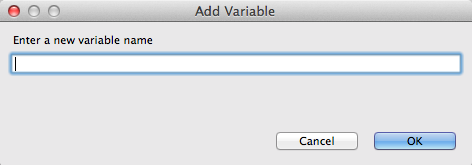
In the Variables view, click
 to open the Enter a new variable name dialog.
Enter a name for the variable you want to create.
For the
starterexample, enterORIGIN.Click OK.
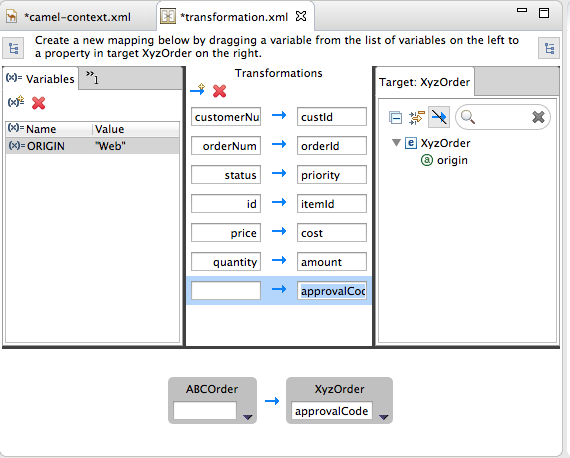
The newly created variable
ORIGINappears in the Variables view in the Name column and the default valueORIGINin the Value column.-
Click the default value to edit it, and change the value to
Web. - Press Enter.
Drag and drop the new variable
ORIGINonto theorigindata item in the Target panel.The new mapping of the variable
$(ORIGIN)appears in the Mappings panel and in the details pane.Run a JUnit test on your
TransformationTest.javafile. For details, see the section called “Creating the transformation test file and running the JUnit test”.The Console view displays the JSON-formatted output data:
{"custId":"ACME-123","priority":"GOLD","orderId":"ORDER1","origin":"Web", "approvalCode":"AUTO_OK","lineItems":[{"itemId":"PICKLE","amount":1000,"cost":2.25}, {"itemId":"BANANA","amount":400,"cost":1.25}]}{"custId":"ACME-123","priority":"GOLD","orderId":"ORDER1","origin":"Web", "approvalCode":"AUTO_OK","lineItems":[{"itemId":"PICKLE","amount":1000,"cost":2.25}, {"itemId":"BANANA","amount":400,"cost":1.25}]}Copy to Clipboard Copied! Toggle word wrap Toggle overflow

Mapping an expression to a data item
This feature enables you, for example, to map a target data item to the dynamic evaluation of a Camel language expression.
Use the target approvalCode data item, which lacks a corresponding source data item:
Click
 to add an empty transformation map to the Mappings panel.
From the Target panel, drag and drop the
approvalCodedata item to the target field of the newly created mapping in the Mappings panel.The
approvalCodedata item also appears in the details pane’s target box.In the details pane, click
 on the
 ABCOrdersource box to open the drop-down menu.Menu options depend on the selected data item’s data type. The available options are bolded.
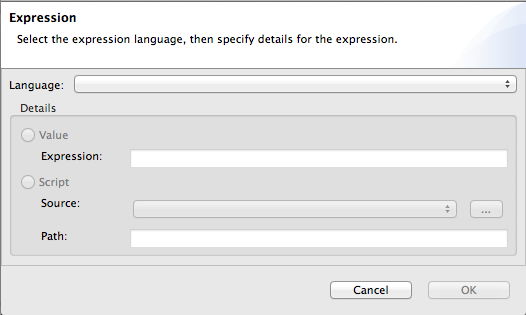
Select Set expression to open the Expression dialog.
In Language, select the expression language to use from the list of those available. Available options depend on the data item’s data type.
For the
starterexample, select Header.In the details pane, select the source of the expression to use.
The options are Value and Script.
For the
starterexample, click Value, and then enterApprovalID.Click OK.
Both the Mappings panel and the details pane display the new mapping for the target data item
approvalCode.Run a JUnit test on your
TransformationTest.javafile. For details, see the section called “Creating the transformation test file and running the JUnit test”.The Console view displays the JSON-formatted output data:
{"custId":"ACME-123","priority":"GOLD","orderId":"ORDER1","origin":"Web", "approvalCode":"AUTO_OK","lineItems":[{"itemId":"PICKLE","amount":1000,"cost":2.25}, {"itemId":"BANANA","amount":400,"cost":1.25}]}{"custId":"ACME-123","priority":"GOLD","orderId":"ORDER1","origin":"Web", "approvalCode":"AUTO_OK","lineItems":[{"itemId":"PICKLE","amount":1000,"cost":2.25}, {"itemId":"BANANA","amount":400,"cost":1.25}]}Copy to Clipboard Copied! Toggle word wrap Toggle overflow


Adding a custom transformation to a mapped data item
You may need to modify the formatting of source data items when they do not satisfy the requirements of the target system.
For example, to satisfy the target system’s requirement that all customer IDs be enclosed in brackets:
In the Mappings panel, select the
customerNummapping to populate the details pane.In the details pane, click
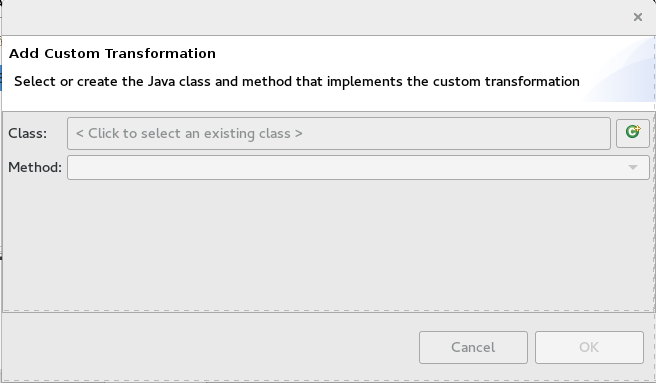
on the ABCOrdersource box to open the drop-down menu.Select Add custom transformation to open the Add Custom Transformation page.
Click
 next to the Class field to open the Create a New Java Class wizard.
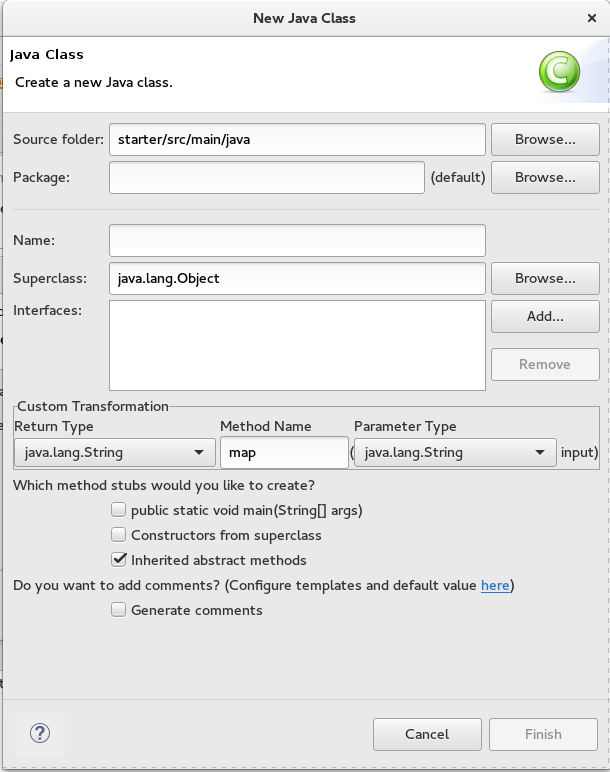
Modify the following fields:
-
Package — Enter
example. -
Name — Enter
MyCustomMapper. Method Name — Change
maptobrackets.Leave all other fields as is.
-
Package — Enter
Click Finish.
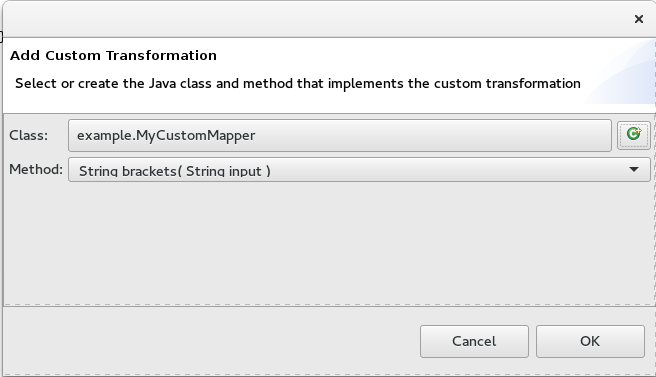
The Add Custom Transformation page opens with the Class and Method fields auto filled:
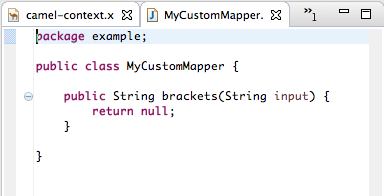
Click OK to open the
MyCustomMapper.javafile in the Java editor:Edit the
bracketsmethod to change the last linereturn null;to this:return "[" + input + "]";
return "[" + input + "]";Copy to Clipboard Copied! Toggle word wrap Toggle overflow Click the transformation.xml tab to switch back to the transformation editor.
The details pane shows that the
bracketsmethod has been associated with thecustomerNumdata item.The
bracketsmethod is executed on the source input before it is sent to the target system.Run a JUnit test on your
TransformationTest.javafile. For details, see the section called “Creating the transformation test file and running the JUnit test”.The Console view displays the JSON-formatted output data:
{"custId":"[ACME-123]","priority":"GOLD","orderId":"ORDER1","origin":"Web",
"approvalCode":"AUTO_OK","lineItems":[{"itemId":"PICKLE","amount":1000,"cost":2.25},
{"itemId":"BANANA","amount":400,"cost":1.25}]}
{"custId":"[ACME-123]","priority":"GOLD","orderId":"ORDER1","origin":"Web", "approvalCode":"AUTO_OK","lineItems":[{"itemId":"PICKLE","amount":1000,"cost":2.25}, {"itemId":"BANANA","amount":400,"cost":1.25}]}Copy to Clipboard Copied! Toggle word wrap Toggle overflow


Mapping a simple data item to a data item in a collection
In this tutorial, you will modify an existing mapping that maps all ids in the Source to the itemIds in the Target. The new mapping will map the customerNum data item in the Source to the itemId of the second item in the lineItems collection in the Target.
With this change, no ids in the Source will be mapped to itemIds in the Target.
In the Mappings panel, select the mapping
id— >itemIdto display the mapping in the details pane.On the Source box, click
to open the drop-down menu, and select Set property.
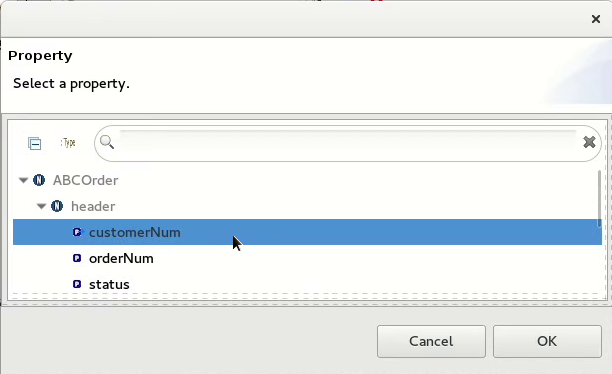
In the Select a property page, expand the
headernode and selectcustomerNum. Click OK to save the changes.The details pane now shows that
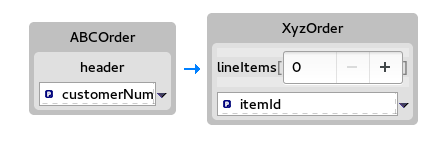
XyzOrderhas alineItemsfield. Click the toggle button next tolineItemsto increase its value to1.NoteIndexes are zero-based, so a value of
1selects the second instance ofitemIdin the collection.Notice that the details pane shows
customerNummapped to theitemIdof the second item in thelineItemscollection.Run a JUnit test on your
TransformationTest.javafile. For details, see the section called “Creating the transformation test file and running the JUnit test”.The Console view displays the JSON-formatted output data:
{"custId":"[ACME-123]","priority":"GOLD","orderId":"ORDER1","origin":"Web",
"approvalCode":"AUTO_OK","lineItems":[{"amount":1000,"cost":2.25},
{"itemId":"ACME-123","amount":400,"cost":1.25}]}
{"custId":"[ACME-123]","priority":"GOLD","orderId":"ORDER1","origin":"Web", "approvalCode":"AUTO_OK","lineItems":[{"amount":1000,"cost":2.25}, {"itemId":"ACME-123","amount":400,"cost":1.25}]}Copy to Clipboard Copied! Toggle word wrap Toggle overflow


Adding a built-in function to a mapped data item
You can use the built-in string-related functions to apply transformations to mapped data items.
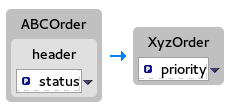
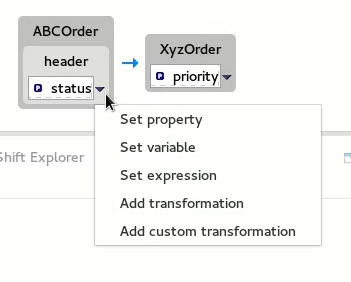
In the Transformations panel, select the
statustoprioritymapping to populate the details pane.In the Source box, click
to open the drop-down menu, and select Add transformation.
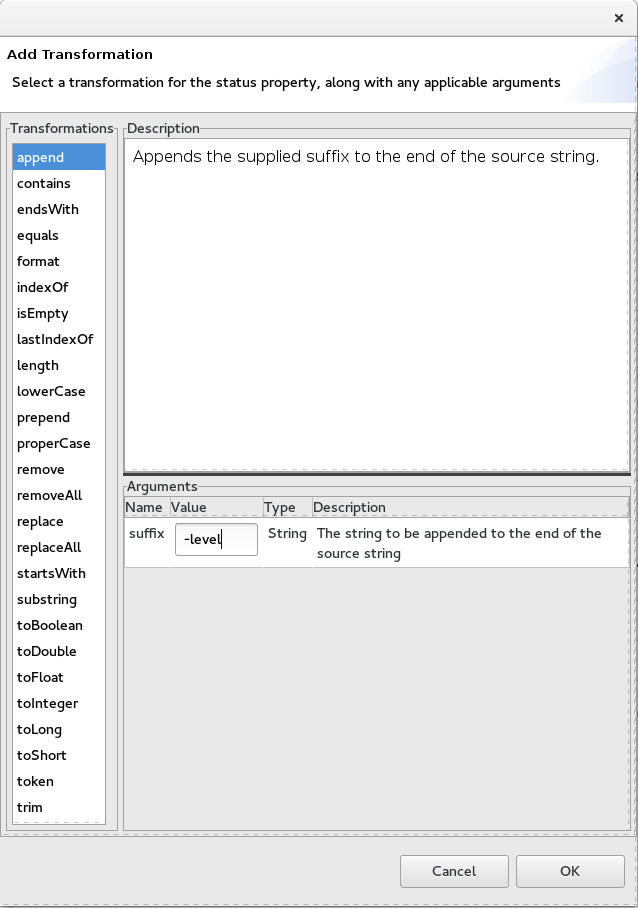
In the Transformations pane, select
append, and in the Arguments pane, enter-levelfor the value of suffix.This
appendfunction adds the specified suffix to the end of thestatusstring before mapping it to the targetprioritydata item.Click OK.
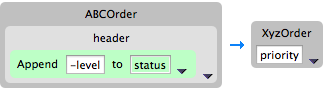
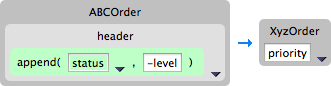
By default, the details pane displays the results of adding the
appendfunction to thestatusdata item in a user-friendly format. You can change this formatting by clicking the right-most
on the Source box, and selecting Show standard formatting.
Run a JUnit test on your
TransformationTest.javafile. For details, see the section called “Creating the transformation test file and running the JUnit test”.The Console view displays the JSON-formatted output data:
{"custId":"[ACME-123]","priority":"GOLD-level","orderId":"ORDER1","origin":"Web", "approvalCode":"AUTO_OK","lineItems":[{"amount":1000,"cost":2.25},{"itemId":"ACME-123", "amount":400,"cost":1.25}]}{"custId":"[ACME-123]","priority":"GOLD-level","orderId":"ORDER1","origin":"Web", "approvalCode":"AUTO_OK","lineItems":[{"amount":1000,"cost":2.25},{"itemId":"ACME-123", "amount":400,"cost":1.25}]}Copy to Clipboard Copied! Toggle word wrap Toggle overflow
Publishing a Fuse Integration project with data transformation to a Red Hat Fuse
server
serverBefore you publish your data transformation project to a Fuse server (see Chapter 29, Publishing Fuse Integration Projects to a Server), you need to install the following features in the Fuse runtime:
-
camel-dozer -
camel-jackson -
camel-jaxb
To install the required features on the Fuse runtime:
- If not already there, switch to the Fuse Integration perspective.
- If necessary, add the Fuse server to the Servers list (see Section 28.1, “Adding a Server”).
- Start the Fuse Server (see Section 28.2, “Starting a Server”), and wait for the JBoss Fuse shell to appear in the Terminal view.
For each of the required
camel-features, at theJBossFuse:admin@root>prompt type:features:install camel-<featureName>Where featureName is one of
dozer,jackson, orjaxb.To verify that each of the features was successfully installed, at the
JBossFuse:admin@root>prompt type:features:list --ordered --installedYou should see the camel features you just installed in the output listing:
