Este conteúdo não está disponível no idioma selecionado.
Chapter 3. Configuring HTTPS
Abstract
This chapter describes how to configure HTTPS endpoints.
3.1. Authentication Alternatives
3.1.1. Target-Only Authentication
Overview
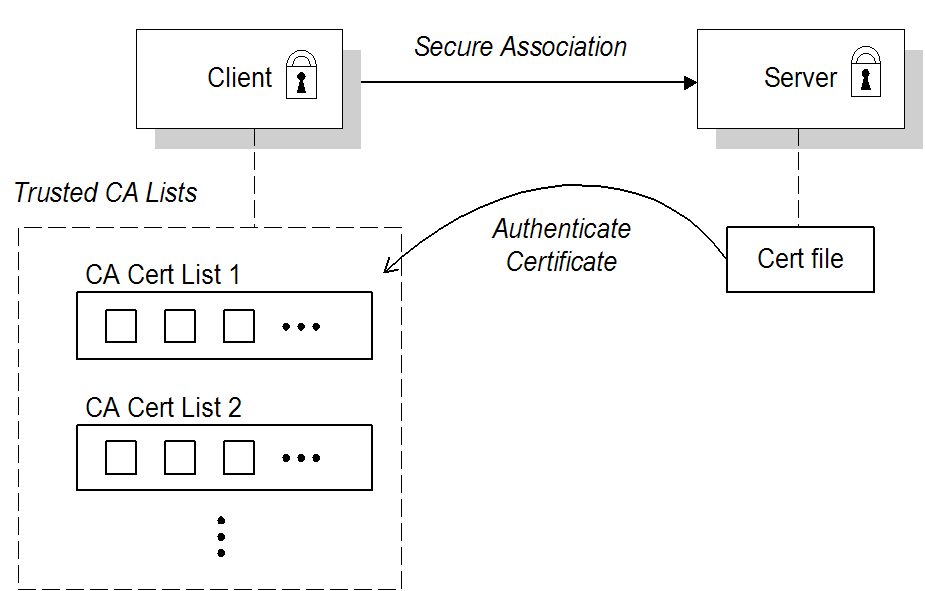
When an application is configured for target-only authentication, the target authenticates itself to the client but the client is not authentic to the target object, as shown in Figure 3.1, “Target Authentication Only”.
Figure 3.1. Target Authentication Only
Security handshake
Prior to running the application, the client and server should be set up as follows:
- A certificate chain is associated with the server. The certificate chain is provided in the form of a Java keystore (ee Section 3.3, “Specifying an Application’s Own Certificate”).
- One or more lists of trusted certification authorities (CA) are made available to the client. (see Section 3.2, “Specifying Trusted CA Certificates”).
During the security handshake, the server sends its certificate chain to the client (see Figure 3.1, “Target Authentication Only”). The client then searches its trusted CA lists to find a CA certificate that matches one of the CA certificates in the server’s certificate chain.
HTTPS example
On the client side, there are no policy settings required for target-only authentication. Simply configure your client without associating an X.509 certificate with the HTTPS port. You must provide the client with a list of trusted CA certificates, however (see Section 3.2, “Specifying Trusted CA Certificates”).
On the server side, in the server’s XML configuration file, make sure that the sec:clientAuthentication element does not require client authentication. This element can be omitted, in which case the default policy is to not require client authentication. However, if the sec:clientAuthentication element is present, it should be configured as follows:
You must set secureSocketProtocol to TLSv1 on the server side, in order to protect against the Poodle vulnerability (CVE-2014-3566)
Where the want attribute is set to false (the default), specifying that the server does not request an X.509 certificate from the client during a TLS handshake. The required attribute is also set to false (the default), specifying that the absence of a client certificate does not trigger an exception during the TLS handshake.
The want attribute can be set either to true or to false. If set to true, the want setting causes the server to request a client certificate during the TLS handshake, but no exception is raised for clients lacking a certificate, so long as the required attribute is set to false.
It is also necessary to associate an X.509 certificate with the server’s HTTPS port (see Section 3.3, “Specifying an Application’s Own Certificate” ) and to provide the server with a list of trusted CA certificates (see Section 3.2, “Specifying Trusted CA Certificates” ).
The choice of cipher suite can potentially affect whether or not target-only authentication is supported (see Chapter 4, Configuring HTTPS Cipher Suites).
3.1.2. Mutual Authentication
Overview
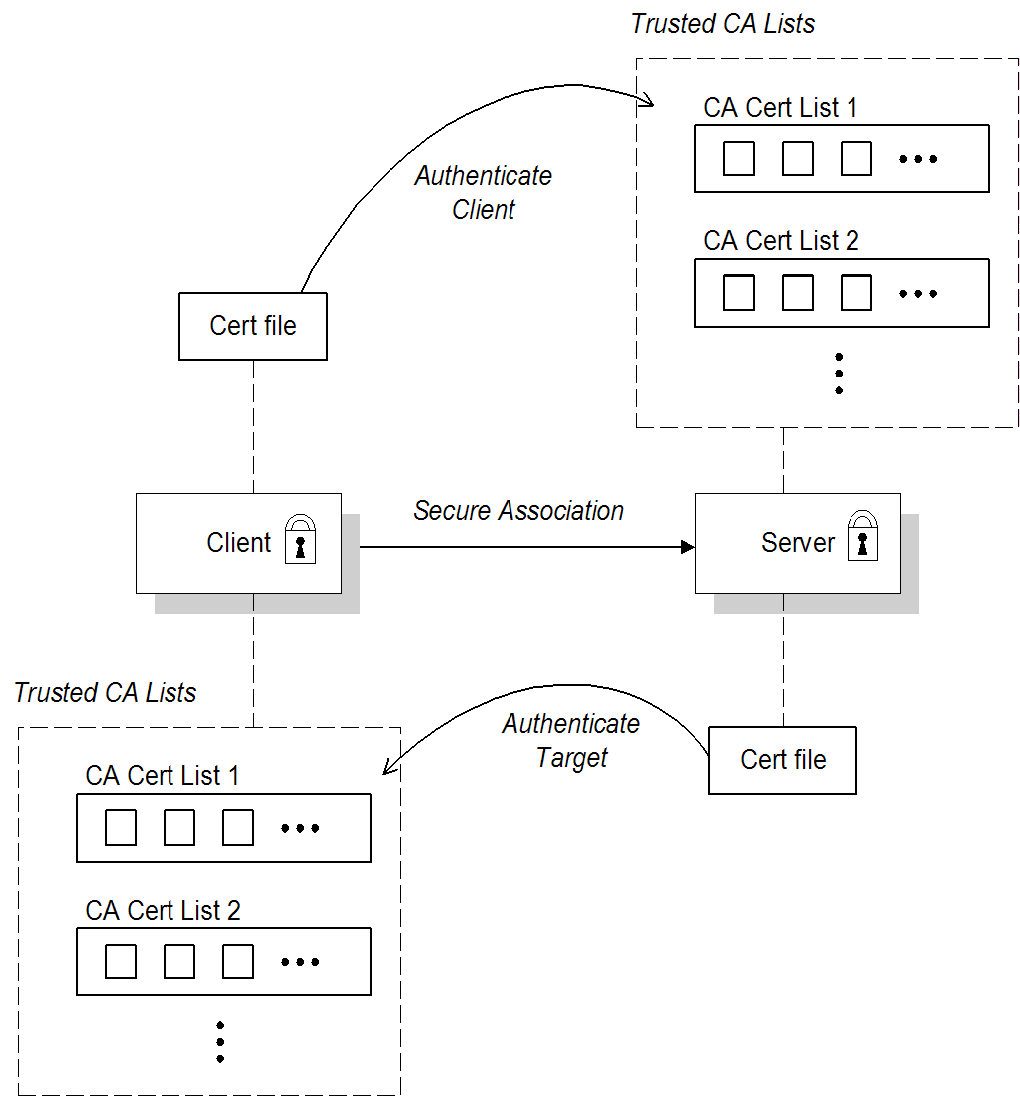
When an application is configured for mutual authentication, the target authenticates itself to the client and the client authenticates itself to the target. This scenario is illustrated in Figure 3.2, “Mutual Authentication” . In this case, the server and the client each require an X.509 certificate for the security handshake.
Figure 3.2. Mutual Authentication
Security handshake
Prior to running the application, the client and server must be set up as follows:
- Both client and server have an associated certificate chain (see Section 3.3, “Specifying an Application’s Own Certificate”).
- Both client and server are configured with lists of trusted certification authorities (CA) (see Section 3.2, “Specifying Trusted CA Certificates”).
During the TLS handshake, the server sends its certificate chain to the client, and the client sends its certificate chain to the server—see Figure 3.1, “Target Authentication Only” .
HTTPS example
On the client side, there are no policy settings required for mutual authentication. Simply associate an X.509 certificate with the client’s HTTPS port (see Section 3.3, “Specifying an Application’s Own Certificate”). You also need to provide the client with a list of trusted CA certificates (see Section 3.2, “Specifying Trusted CA Certificates”).
On the server side, in the server’s XML configuration file, make sure that the sec:clientAuthentication element is configured to require client authentication. For example:
You must set secureSocketProtocol to TLSv1 on the server side, in order to protect against the Poodle vulnerability (CVE-2014-3566)
Where the want attribute is set to true, specifying that the server requests an X.509 certificate from the client during a TLS handshake. The required attribute is also set to true, specifying that the absence of a client certificate triggers an exception during the TLS handshake.
It is also necessary to associate an X.509 certificate with the server’s HTTPS port (see Section 3.3, “Specifying an Application’s Own Certificate”) and to provide the server with a list of trusted CA certificates (see Section 3.2, “Specifying Trusted CA Certificates”).
The choice of cipher suite can potentially affect whether or not mutual authentication is supported (see Chapter 4, Configuring HTTPS Cipher Suites).
3.2. Specifying Trusted CA Certificates
3.2.1. When to Deploy Trusted CA Certificates
Overview
When an application receives an X.509 certificate during an SSL/TLS handshake, the application decides whether or not to trust the received certificate by checking whether the issuer CA is one of a pre-defined set of trusted CA certificates. If the received X.509 certificate is validly signed by one of the application’s trusted CA certificates, the certificate is deemed trustworthy; otherwise, it is rejected.
Which applications need to specify trusted CA certificates?
Any application that is likely to receive an X.509 certificate as part of an HTTPS handshake must specify a list of trusted CA certificates. For example, this includes the following types of application:
- All HTTPS clients.
- Any HTTPS servers that support mutual authentication.
3.2.2. Specifying Trusted CA Certificates for HTTPS
CA certificate format
CA certificates must be provided in Java keystore format.
CA certificate deployment in the Apache CXF configuration file
To deploy one or more trusted root CAs for the HTTPS transport, perform the following steps:
-
Assemble the collection of trusted CA certificates that you want to deploy. The trusted CA certificates can be obtained from public CAs or private CAs (for details of how to generate your own CA certificates, see Section 2.5, “Creating Your Own Certificates”). The trusted CA certificates can be in any format that is compatible with the Java
keystoreutility; for example, PEM format. All you need are the certificates themselves—the private keys and passwords are not required. Given a CA certificate,
cacert.pem, in PEM format, you can add the certificate to a JKS truststore (or create a new truststore) by entering the following command:keytool -import -file cacert.pem -alias CAAlias -keystore truststore.jks -storepass StorePass
keytool -import -file cacert.pem -alias CAAlias -keystore truststore.jks -storepass StorePassCopy to Clipboard Copied! Toggle word wrap Toggle overflow Where CAAlias is a convenient tag that enables you to access this particular CA certificate using the
keytoolutility. The file,truststore.jks, is a keystore file containing CA certificates—if this file does not already exist, thekeytoolutility creates one. The StorePass password provides access to the keystore file,truststore.jks.-
Repeat step 2 as necessary, to add all of the CA certificates to the truststore file,
truststore.jks. Edit the relevant XML configuration files to specify the location of the truststore file. You must include the
sec:trustManagerselement in the configuration of the relevant HTTPS ports.For example, you can configure a client port as follows:
Copy to Clipboard Copied! Toggle word wrap Toggle overflow Where the
typeattribute specifes that the truststore uses the JKS keystore implementation and StorePass is the password needed to access thetruststore.jkskeystore.Configure a server port as follows:
Copy to Clipboard Copied! Toggle word wrap Toggle overflow ImportantYou must set secureSocketProtocol to
TLSv1on the server side, in order to protect against the Poodle vulnerability (CVE-2014-3566)WarningThe directory containing the truststores (for example, X509Deploy
/truststores/) should be a secure directory (that is, writable only by the administrator).
3.3. Specifying an Application’s Own Certificate
3.3.1. Deploying Own Certificate for HTTPS
Overview
When working with the HTTPS transport the application’s certificate is deployed using the XML configuration file.
Procedure
To deploy an application’s own certificate for the HTTPS transport, perform the following steps:
Obtain an application certificate in Java keystore format, CertName
.jks. For instructions on how to create a certificate in Java keystore format, see Section 2.5.3, “Use the CA to Create Signed Certificates in a Java Keystore”.NoteSome HTTPS clients (for example, Web browsers) perform a URL integrity check, which requires a certificate’s identity to match the hostname on which the server is deployed. See Section 2.4, “Special Requirements on HTTPS Certificates” for details.
Copy the certificate’s keystore, CertName
.jks, to the certificates directory on the deployment host; for example, X509Deploy/certs.The certificates directory should be a secure directory that is writable only by administrators and other privileged users.
Edit the relevant XML configuration file to specify the location of the certificate keystore, CertName
.jks. You must include thesec:keyManagerselement in the configuration of the relevant HTTPS ports.For example, you can configure a client port as follows:
Copy to Clipboard Copied! Toggle word wrap Toggle overflow Where the
keyPasswordattribute specifies the password needed to decrypt the certificate’s private key (that is, CertPassword), thetypeattribute specifes that the truststore uses the JKS keystore implementation, and thepasswordattribute specifies the password required to access the CertName.jkskeystore (that is, KeystorePassword).Configure a server port as follows:
Copy to Clipboard Copied! Toggle word wrap Toggle overflow ImportantYou must set secureSocketProtocol to
TLSv1on the server side, in order to protect against the Poodle vulnerability (CVE-2014-3566)WarningThe directory containing the application certificates (for example, X509Deploy
/certs/) should be a secure directory (that is, readable and writable only by the administrator).WarningThe directory containing the XML configuration file should be a secure directory (that is, readable and writable only by the administrator), because the configuration file contains passwords in plain text.

