Este conteúdo não está disponível no idioma selecionado.
Chapter 1. Configuring SSL and TLS for Red Hat Quay
The Secure Sockets Layer (SSL) protocol was originally developed by Netscape Corporation to provide a mechanism for secure communication over the Internet. Subsequently, the protocol was adopted by the Internet Engineering Task Force (IETF) and renamed to Transport Layer Security (TLS).
TLS (Transport Layer Security) is a cryptographic protocol used to secure network communications. When hardening system security settings by configuring preferred key-exchange protocols, authentication methods, and encryption algorithms, it is necessary to bear in mind that the broader the range of supported clients, the lower the resulting security. Conversely, strict security settings lead to limited compatibility with clients, which can result in some users being locked out of the system. Be sure to target the strictest available configuration and only relax it when it is required for compatibility reasons.
Red Hat Quay can be configured to use SSL/TLS certificates to ensure secure communication between clients and the Red Hat Quay server. This configuration involves the use of valid SSL/TLS certificates, which can be obtained from a trusted Certificate Authority (CA) or generated as self-signed certificates for internal use.
1.1. Creating a Certificate Authority
Use the following procedure to set up your own CA and use it to issue a server certificate for your domain. This allows you to secure communications with SSL/TLS using your own certificates.
Procedure
Generate the root CA key by entering the following command:
openssl genrsa -out rootCA.key 2048
$ openssl genrsa -out rootCA.key 2048Copy to Clipboard Copied! Toggle word wrap Toggle overflow Generate the root CA certificate by entering the following command:
openssl req -x509 -new -nodes -key rootCA.key -sha256 -days 1024 -out rootCA.pem
$ openssl req -x509 -new -nodes -key rootCA.key -sha256 -days 1024 -out rootCA.pemCopy to Clipboard Copied! Toggle word wrap Toggle overflow Enter the information that will be incorporated into your certificate request, including the server hostname, for example:
Copy to Clipboard Copied! Toggle word wrap Toggle overflow Generate the server key by entering the following command:
openssl genrsa -out ssl.key 2048
$ openssl genrsa -out ssl.key 2048Copy to Clipboard Copied! Toggle word wrap Toggle overflow Generate a signing request by entering the following command:
openssl req -new -key ssl.key -out ssl.csr
$ openssl req -new -key ssl.key -out ssl.csrCopy to Clipboard Copied! Toggle word wrap Toggle overflow Enter the information that will be incorporated into your certificate request, including the server hostname, for example:
Copy to Clipboard Copied! Toggle word wrap Toggle overflow Create a configuration file
openssl.cnf, specifying the server hostname, for example:Example
openssl.cnffileCopy to Clipboard Copied! Toggle word wrap Toggle overflow Use the configuration file to generate the certificate
ssl.cert:openssl x509 -req -in ssl.csr -CA rootCA.pem -CAkey rootCA.key -CAcreateserial -out ssl.cert -days 356 -extensions v3_req -extfile openssl.cnf
$ openssl x509 -req -in ssl.csr -CA rootCA.pem -CAkey rootCA.key -CAcreateserial -out ssl.cert -days 356 -extensions v3_req -extfile openssl.cnfCopy to Clipboard Copied! Toggle word wrap Toggle overflow Confirm your created certificates and files by entering the following command:
ls /path/to/certificates
$ ls /path/to/certificatesCopy to Clipboard Copied! Toggle word wrap Toggle overflow Example output
rootCA.key ssl-bundle.cert ssl.key custom-ssl-config-bundle-secret.yaml rootCA.pem ssl.cert
openssl.cnf rootCA.srl  ssl.csr
rootCA.key ssl-bundle.cert ssl.key custom-ssl-config-bundle-secret.yaml rootCA.pem ssl.cert
openssl.cnf rootCA.srl  ssl.csr
Copy to Clipboard Copied! Toggle word wrap Toggle overflow
1.2. Configuring SSL/TLS for standalone Red Hat Quay deployments
For standalone Red Hat Quay deployments, SSL/TLS certificates must be configured by using the command-line interface and by updating your config.yaml file manually.
1.2.1. Configuring custom SSL/TLS certificates by using the command line interface
SSL/TLS must be configured by using the command-line interface (CLI) and updating your config.yaml file manually.
Prerequisites
- You have created a certificate authority and signed the certificate.
Procedure
Copy the certificate file and primary key file to your configuration directory, ensuring they are named
ssl.certandssl.keyrespectively:cp ~/ssl.cert ~/ssl.key /path/to/configuration_directory
cp ~/ssl.cert ~/ssl.key /path/to/configuration_directoryCopy to Clipboard Copied! Toggle word wrap Toggle overflow Navigate to the configuration directory by entering the following command:
cd /path/to/configuration_directory
$ cd /path/to/configuration_directoryCopy to Clipboard Copied! Toggle word wrap Toggle overflow Edit the
config.yamlfile and specify that you want Red Hat Quay to handle SSL/TLS:Example
config.yamlfile# ... SERVER_HOSTNAME: <quay-server.example.com> ... PREFERRED_URL_SCHEME: https # ...
# ... SERVER_HOSTNAME: <quay-server.example.com> ... PREFERRED_URL_SCHEME: https # ...Copy to Clipboard Copied! Toggle word wrap Toggle overflow Optional: Append the contents of the
rootCA.pemfile to the end of thessl.certfile by entering the following command:cat rootCA.pem >> ssl.cert
$ cat rootCA.pem >> ssl.certCopy to Clipboard Copied! Toggle word wrap Toggle overflow Stop the
Quaycontainer by entering the following command:sudo podman stop <quay_container_name>
$ sudo podman stop <quay_container_name>Copy to Clipboard Copied! Toggle word wrap Toggle overflow Restart the registry by entering the following command:
sudo podman run -d --rm -p 80:8080 -p 443:8443 \
  --name=quay \
  -v $QUAY/config:/conf/stack:Z \
  -v $QUAY/storage:/datastorage:Z \
  registry.redhat.io/quay/quay-rhel8:v3.16.0
$ sudo podman run -d --rm -p 80:8080 -p 443:8443 \
  --name=quay \
  -v $QUAY/config:/conf/stack:Z \
  -v $QUAY/storage:/datastorage:Z \
  registry.redhat.io/quay/quay-rhel8:v3.16.0
Copy to Clipboard Copied! Toggle word wrap Toggle overflow
1.2.2. Configuring Podman to trust the Certificate Authority
Podman uses two paths to locate the Certificate Authority (CA) file: /etc/containers/certs.d/ and /etc/docker/certs.d/. Use the following procedure to configure Podman to trust the CA.
Procedure
Copy the root CA file to one of
/etc/containers/certs.d/or/etc/docker/certs.d/. Use the exact path determined by the server hostname, and name the fileca.crt:sudo cp rootCA.pem /etc/containers/certs.d/quay-server.example.com/ca.crt
$ sudo cp rootCA.pem /etc/containers/certs.d/quay-server.example.com/ca.crtCopy to Clipboard Copied! Toggle word wrap Toggle overflow Verify that you no longer need to use the
--tls-verify=falseoption when logging in to your Red Hat Quay registry:sudo podman login quay-server.example.com
$ sudo podman login quay-server.example.comCopy to Clipboard Copied! Toggle word wrap Toggle overflow Example output
Login Succeeded!
Login Succeeded!Copy to Clipboard Copied! Toggle word wrap Toggle overflow
1.2.3. Configuring the system to trust the certificate authority
Use the following procedure to configure your system to trust the certificate authority.
Procedure
Enter the following command to copy the
rootCA.pemfile to the consolidated system-wide trust store:sudo cp rootCA.pem /etc/pki/ca-trust/source/anchors/
$ sudo cp rootCA.pem /etc/pki/ca-trust/source/anchors/Copy to Clipboard Copied! Toggle word wrap Toggle overflow Enter the following command to update the system-wide trust store configuration:
sudo update-ca-trust extract
$ sudo update-ca-trust extractCopy to Clipboard Copied! Toggle word wrap Toggle overflow Optional. You can use the
trust listcommand to ensure that theQuayserver has been configured:trust list | grep quay label: quay-server.example.com$ trust list | grep quay label: quay-server.example.comCopy to Clipboard Copied! Toggle word wrap Toggle overflow Now, when you browse to the registry at
https://quay-server.example.com, the lock icon shows that the connection is secure: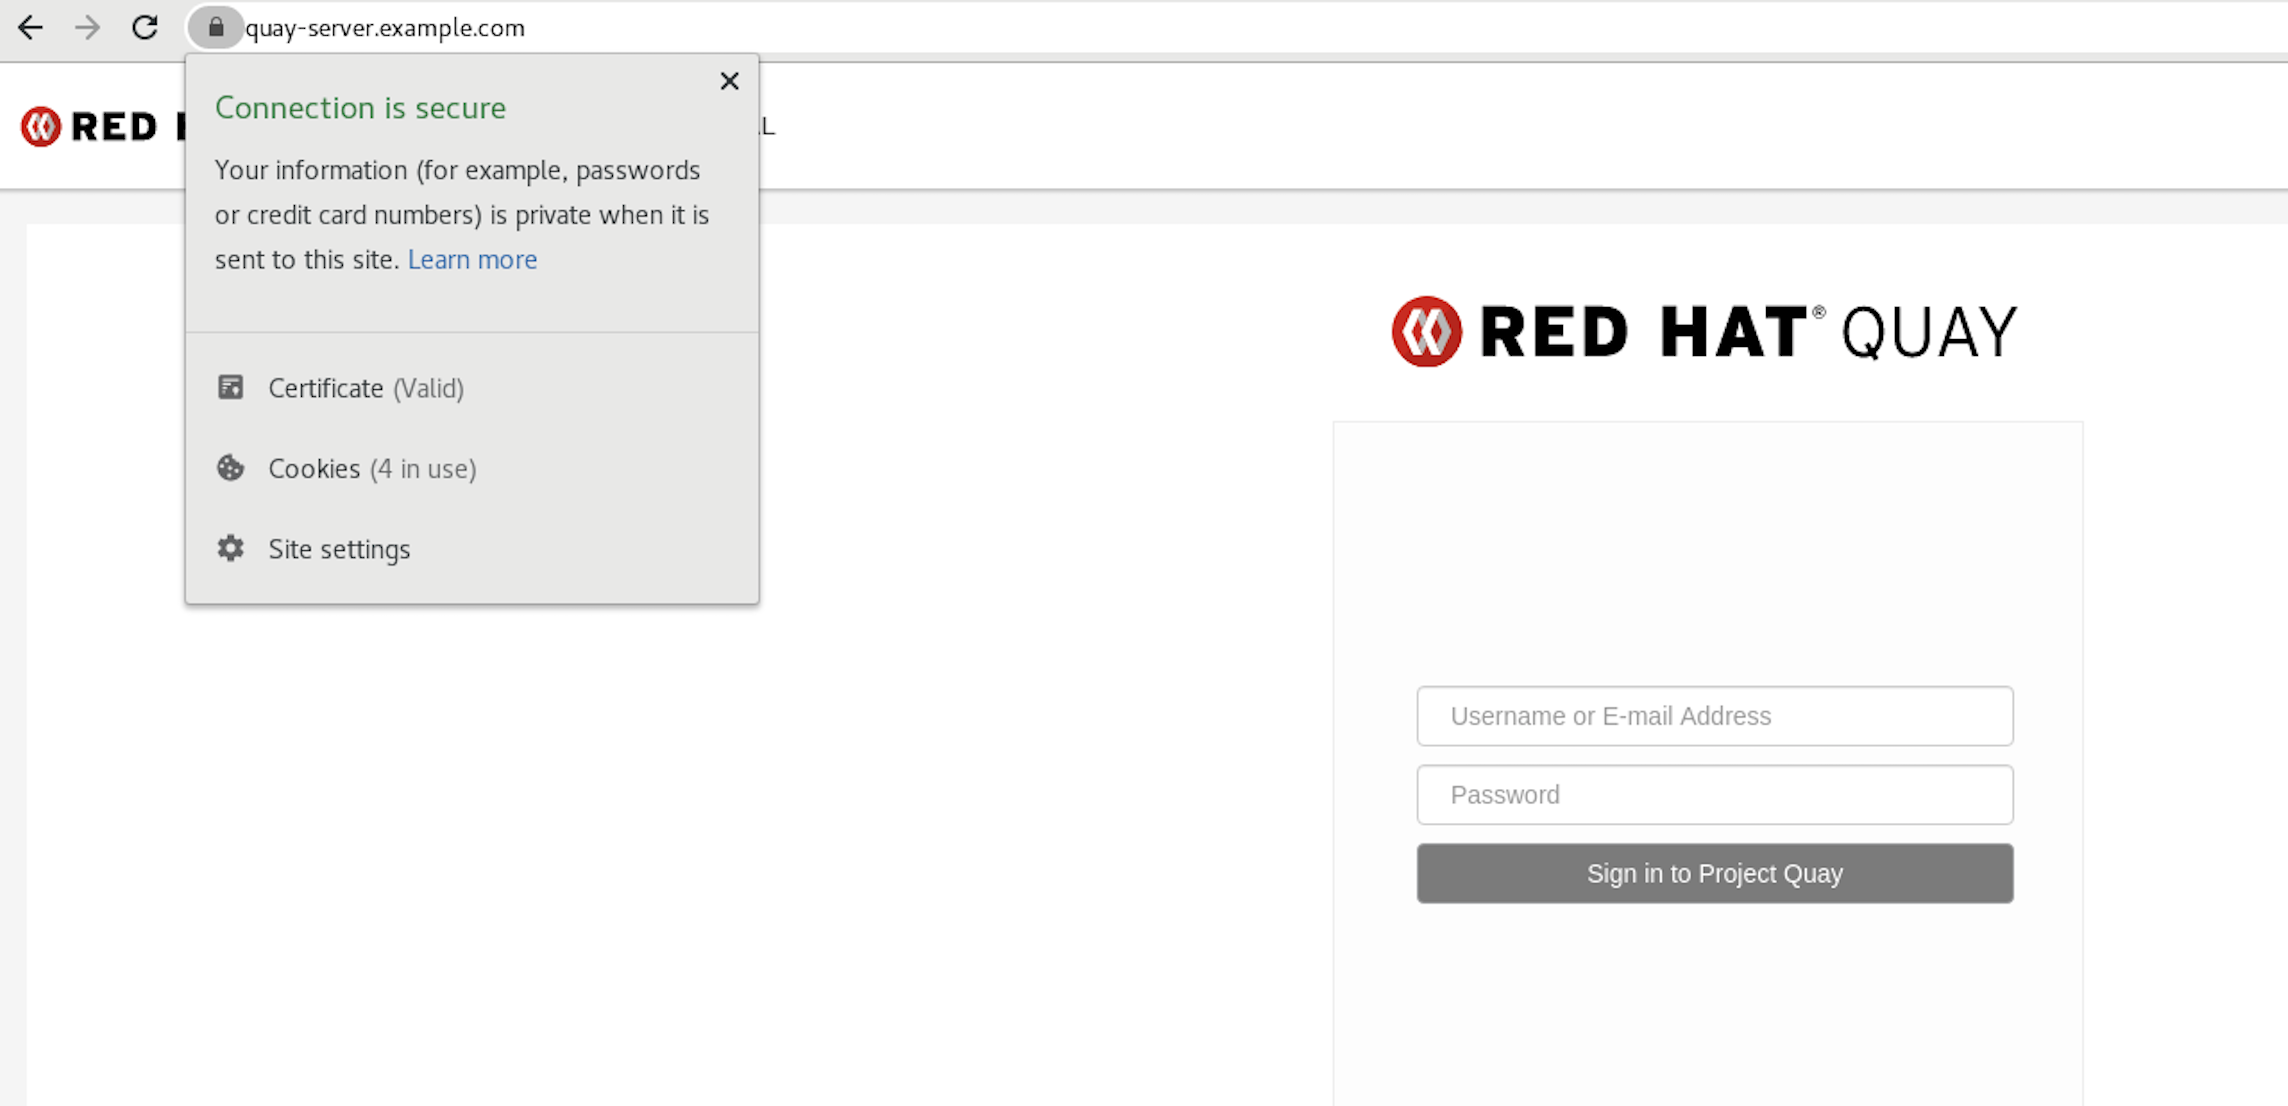
To remove the
rootCA.pemfile from system-wide trust, delete the file and update the configuration:sudo rm /etc/pki/ca-trust/source/anchors/rootCA.pem
$ sudo rm /etc/pki/ca-trust/source/anchors/rootCA.pemCopy to Clipboard Copied! Toggle word wrap Toggle overflow sudo update-ca-trust extract
$ sudo update-ca-trust extractCopy to Clipboard Copied! Toggle word wrap Toggle overflow trust list | grep quay
$ trust list | grep quayCopy to Clipboard Copied! Toggle word wrap Toggle overflow
More information can be found in the RHEL 9 documentation in the chapter Using shared system certificates.
1.3. Configuring custom SSL/TLS certificates for Red Hat Quay on OpenShift Container Platform
When Red Hat Quay is deployed on OpenShift Container Platform, the tls component of the QuayRegistry custom resource definition (CRD) is set to managed by default. As a result, OpenShift Container Platform’s Certificate Authority is used to create HTTPS endpoints and to rotate SSL/TLS certificates.
You can configure custom SSL/TLS certificates before or after the initial deployment of Red Hat Quay on OpenShift Container Platform. This process involves creating or updating the configBundleSecret resource within the QuayRegistry YAML file to integrate your custom certificates and setting the tls component to unmanaged.
When configuring custom SSL/TLS certificates for Red Hat Quay, administrators are responsible for certificate rotation.
The following procedures enable you to apply custom SSL/TLS certificates to ensure secure communication and meet specific security requirements for your Red Hat Quay on OpenShift Container Platform deployment. These steps assumed you have already created a Certificate Authority (CA) bundle or an ssl.key, and an ssl.cert. The procedure then shows you how to integrate those files into your Red Hat Quay on OpenShift Container Platform deployment, which ensures that your registry operates with the specified security settings and conforms to your organization’s SSL/TLS policies.
-
The following procedure is used for securing Red Hat Quay with an HTTPS certificate. Note that this differs from managing Certificate Authority Trust Bundles. CA Trust Bundles are used by system processes within the
Quaycontainer to verify certificates against trusted CAs, and ensure that services like LDAP, storage backend, and OIDC connections are trusted. -
If you are adding the certificates to an existing deployment, you must include the existing
config.yamlfile in the new config bundle secret, even if you are not making any configuration changes.
1.3.1. Creating a custom SSL/TLS configBundleSecret resource
After creating your custom SSL/TLS certificates, you can create a custom configBundleSecret resource for Red Hat Quay on OpenShift Container Platform, which allows you to upload ssl.cert and ssl.key files.
Prerequisites
-
You have base64 decoded the original config bundle into a
config.yamlfile. For more information, see Downloading the existing configuration. - You have generated custom SSL certificates and keys.
Procedure
Create a new YAML file, for example,
custom-ssl-config-bundle-secret.yaml:touch custom-ssl-config-bundle-secret.yaml
$ touch custom-ssl-config-bundle-secret.yamlCopy to Clipboard Copied! Toggle word wrap Toggle overflow Create the
custom-ssl-config-bundle-secretresource.Create the resource by entering the following command:
Copy to Clipboard Copied! Toggle word wrap Toggle overflow - 1
- Where
<config.yaml>is yourbase64 decodedconfig.yamlfile. - 2
- Where
<ssl.cert>is yourssl.certfile. - 3
- Optional. The
--from-file=extra_ca_cert_<name-of-certificate>.crt=ca-certificate-bundle.crtfield allows Red Hat Quay to recognize custom Certificate Authority (CA) files. If you are using LDAP, OIDC, or another service that uses custom CAs, you must add them via theextra_ca_certpath. For more information, see "Adding additional Certificate Authorities to Red Hat Quay on OpenShift Container Platform." - 4
- Where
<ssl.key>is yourssl.keyfile.
Optional. You can check the content of the
custom-ssl-config-bundle-secret.yamlfile by entering the following command:cat custom-ssl-config-bundle-secret.yaml
$ cat custom-ssl-config-bundle-secret.yamlCopy to Clipboard Copied! Toggle word wrap Toggle overflow Example output
Copy to Clipboard Copied! Toggle word wrap Toggle overflow Create the
configBundleSecretresource by entering the following command:oc create -n <namespace> -f custom-ssl-config-bundle-secret.yaml
$ oc create -n <namespace> -f custom-ssl-config-bundle-secret.yamlCopy to Clipboard Copied! Toggle word wrap Toggle overflow Example output
secret/custom-ssl-config-bundle-secret created
secret/custom-ssl-config-bundle-secret createdCopy to Clipboard Copied! Toggle word wrap Toggle overflow Update the
QuayRegistryYAML file to reference thecustom-ssl-config-bundle-secretobject by entering the following command:oc patch quayregistry <registry_name> -n <namespace> --type=merge -p '{"spec":{"configBundleSecret":"custom-ssl-config-bundle-secret"}}'$ oc patch quayregistry <registry_name> -n <namespace> --type=merge -p '{"spec":{"configBundleSecret":"custom-ssl-config-bundle-secret"}}'Copy to Clipboard Copied! Toggle word wrap Toggle overflow Example output
quayregistry.quay.redhat.com/example-registry patched
quayregistry.quay.redhat.com/example-registry patchedCopy to Clipboard Copied! Toggle word wrap Toggle overflow Set the
tlscomponent of theQuayRegistryYAML toFalseby entering the following command:oc patch quayregistry <registry_name> -n <namespace> --type=merge -p '{"spec":{"components":[{"kind":"tls","managed":false}]}}'$ oc patch quayregistry <registry_name> -n <namespace> --type=merge -p '{"spec":{"components":[{"kind":"tls","managed":false}]}}'Copy to Clipboard Copied! Toggle word wrap Toggle overflow Example output
quayregistry.quay.redhat.com/example-registry patched
quayregistry.quay.redhat.com/example-registry patchedCopy to Clipboard Copied! Toggle word wrap Toggle overflow Ensure that your
QuayRegistryYAML file has been updated to use the custom SSLconfigBundleSecretresource, and that your andtlsresource is set toFalseby entering the following command:oc get quayregistry <registry_name> -n <namespace> -o yaml
$ oc get quayregistry <registry_name> -n <namespace> -o yamlCopy to Clipboard Copied! Toggle word wrap Toggle overflow Example output
Copy to Clipboard Copied! Toggle word wrap Toggle overflow
Verification
Confirm a TLS connection to the server and port by entering the following command:
openssl s_client -connect <quay-server.example.com>:443
$ openssl s_client -connect <quay-server.example.com>:443Copy to Clipboard Copied! Toggle word wrap Toggle overflow Example output
Copy to Clipboard Copied! Toggle word wrap Toggle overflow