Este conteúdo não está disponível no idioma selecionado.
Chapter 3. Advanced Red Hat Quay deployment
Use the following sections to configure advanced Red Hat Quay settings.
3.1. Using SSL/TLS
To configure Red Hat Quay with a self-signed certificate, you must create a Certificate Authority (CA) and then generate the required key and certificate files.
The following examples assume you have configured the server hostname quay-server.example.com using DNS or another naming mechanism, such as adding an entry in your /etc/hosts file:
cat /etc/hosts
...
192.168.1.112   quay-server.example.com
$ cat /etc/hosts
...
192.168.1.112 quay-server.example.com3.1.1. Creating a certificate authority and signing a certificate
Use the following procedures to create a certificate file and a primary key file named ssl.cert and ssl.key.
3.1.1.1. Creating a certificate authority
Use the following procedure to create a certificate authority (CA)
Procedure
Generate the root CA key by entering the following command:
openssl genrsa -out rootCA.key 2048
$ openssl genrsa -out rootCA.key 2048Copy to Clipboard Copied! Toggle word wrap Toggle overflow Generate the root CA certificate by entering the following command:
openssl req -x509 -new -nodes -key rootCA.key -sha256 -days 1024 -out rootCA.pem
$ openssl req -x509 -new -nodes -key rootCA.key -sha256 -days 1024 -out rootCA.pemCopy to Clipboard Copied! Toggle word wrap Toggle overflow Enter the information that will be incorporated into your certificate request, including the server hostname, for example:
Copy to Clipboard Copied! Toggle word wrap Toggle overflow
3.1.1.2. Signing a certificate
Use the following procedure to sign a certificate.
Procedure
Generate the server key by entering the following command:
openssl genrsa -out ssl.key 2048
$ openssl genrsa -out ssl.key 2048Copy to Clipboard Copied! Toggle word wrap Toggle overflow Generate a signing request by entering the following command:
openssl req -new -key ssl.key -out ssl.csr
$ openssl req -new -key ssl.key -out ssl.csrCopy to Clipboard Copied! Toggle word wrap Toggle overflow Enter the information that will be incorporated into your certificate request, including the server hostname, for example:
Copy to Clipboard Copied! Toggle word wrap Toggle overflow Create a configuration file
openssl.cnf, specifying the server hostname, for example:openssl.cnf
Copy to Clipboard Copied! Toggle word wrap Toggle overflow Use the configuration file to generate the certificate
ssl.cert:openssl x509 -req -in ssl.csr -CA rootCA.pem -CAkey rootCA.key -CAcreateserial -out ssl.cert -days 356 -extensions v3_req -extfile openssl.cnf
$ openssl x509 -req -in ssl.csr -CA rootCA.pem -CAkey rootCA.key -CAcreateserial -out ssl.cert -days 356 -extensions v3_req -extfile openssl.cnfCopy to Clipboard Copied! Toggle word wrap Toggle overflow
3.1.2. Configuring SSL/TLS using the Red Hat Quay UI
Use the following procedure to configure SSL/TLS using the Red Hat Quay UI.
To configure SSL using the command line interface, see "Configuring SSL/TLS using the command line interface".
Prerequisites
- You have created a certificate authority and signed the certificate.
Procedure
Start the
Quaycontainer in configuration mode:sudo podman run --rm -it --name quay_config -p 80:8080 -p 443:8443 registry.redhat.io/quay/quay-rhel8:v3.8.15 config secret
$ sudo podman run --rm -it --name quay_config -p 80:8080 -p 443:8443 registry.redhat.io/quay/quay-rhel8:v3.8.15 config secretCopy to Clipboard Copied! Toggle word wrap Toggle overflow - In the Server Configuration section, select Red Hat Quay handles TLS for SSL/TLS. Upload the certificate file and private key file created earlier, ensuring that the Server Hostname matches the value used when the certificates were created.
- Validate and download the updated configuration.
Stop the
Quaycontainer and then restart the registry by entering the following command:Copy to Clipboard Copied! Toggle word wrap Toggle overflow
3.1.3. Configuring SSL using the command line interface
Use the following procedure to configure SSL/TLS using the command line interface.
Prerequisites
- You have created a certificate authority and signed the certificate.
Procedure
Copy the certificate file and primary key file to your configuration directory, ensuring they are named
ssl.certandssl.keyrespectively:cp ~/ssl.cert ~/ssl.key $QUAY/config
cp ~/ssl.cert ~/ssl.key $QUAY/configCopy to Clipboard Copied! Toggle word wrap Toggle overflow Change into the
$QUAY/configdirectory by entering the following command:cd $QUAY/config
$ cd $QUAY/configCopy to Clipboard Copied! Toggle word wrap Toggle overflow Edit the
config.yamlfile and specify that you want Red Hat Quay to handle TLS/SSL:config.yaml
...
SERVER_HOSTNAME: quay-server.example.com
...
PREFERRED_URL_SCHEME: https
...
...
SERVER_HOSTNAME: quay-server.example.com
...
PREFERRED_URL_SCHEME: https
...
Copy to Clipboard Copied! Toggle word wrap Toggle overflow Optional: Append the contents of the rootCA.pem file to the end of the ssl.cert file by entering the following command:
cat rootCA.pem >> ssl.cert
$ cat rootCA.pem >> ssl.certCopy to Clipboard Copied! Toggle word wrap Toggle overflow Stop the
Quaycontainer by entering the following command:sudo podman stop quay
$ sudo podman stop quayCopy to Clipboard Copied! Toggle word wrap Toggle overflow Restart the registry by entering the following command:
sudo podman run -d --rm -p 80:8080 -p 443:8443 \
  --name=quay \
  -v $QUAY/config:/conf/stack:Z \
  -v $QUAY/storage:/datastorage:Z \
  registry.redhat.io/quay/quay-rhel8:v3.8.15
$ sudo podman run -d --rm -p 80:8080 -p 443:8443 \
  --name=quay \
  -v $QUAY/config:/conf/stack:Z \
  -v $QUAY/storage:/datastorage:Z \
  registry.redhat.io/quay/quay-rhel8:v3.8.15
Copy to Clipboard Copied! Toggle word wrap Toggle overflow
3.1.4. Testing SSL configuration using the command line
Use the
podman logincommand to attempt to log in to the Quay registry with SSL enabled:sudo podman login quay-server.example.com
$ sudo podman login quay-server.example.com
Username: quayadmin
Password:

Error: error authenticating creds for "quay-server.example.com": error pinging docker registry quay-server.example.com: Get "https://quay-server.example.com/v2/": x509: certificate signed by unknown authority
Copy to Clipboard Copied! Toggle word wrap Toggle overflow Podman does not trust self-signed certificates. As a workaround, use the
--tls-verifyoption:sudo podman login --tls-verify=false quay-server.example.com
$ sudo podman login --tls-verify=false quay-server.example.com
Username: quayadmin
Password:

Login Succeeded!
Copy to Clipboard Copied! Toggle word wrap Toggle overflow
Configuring Podman to trust the root Certificate Authority (CA) is covered in a subsequent section.
3.1.5. Testing SSL configuration using the browser
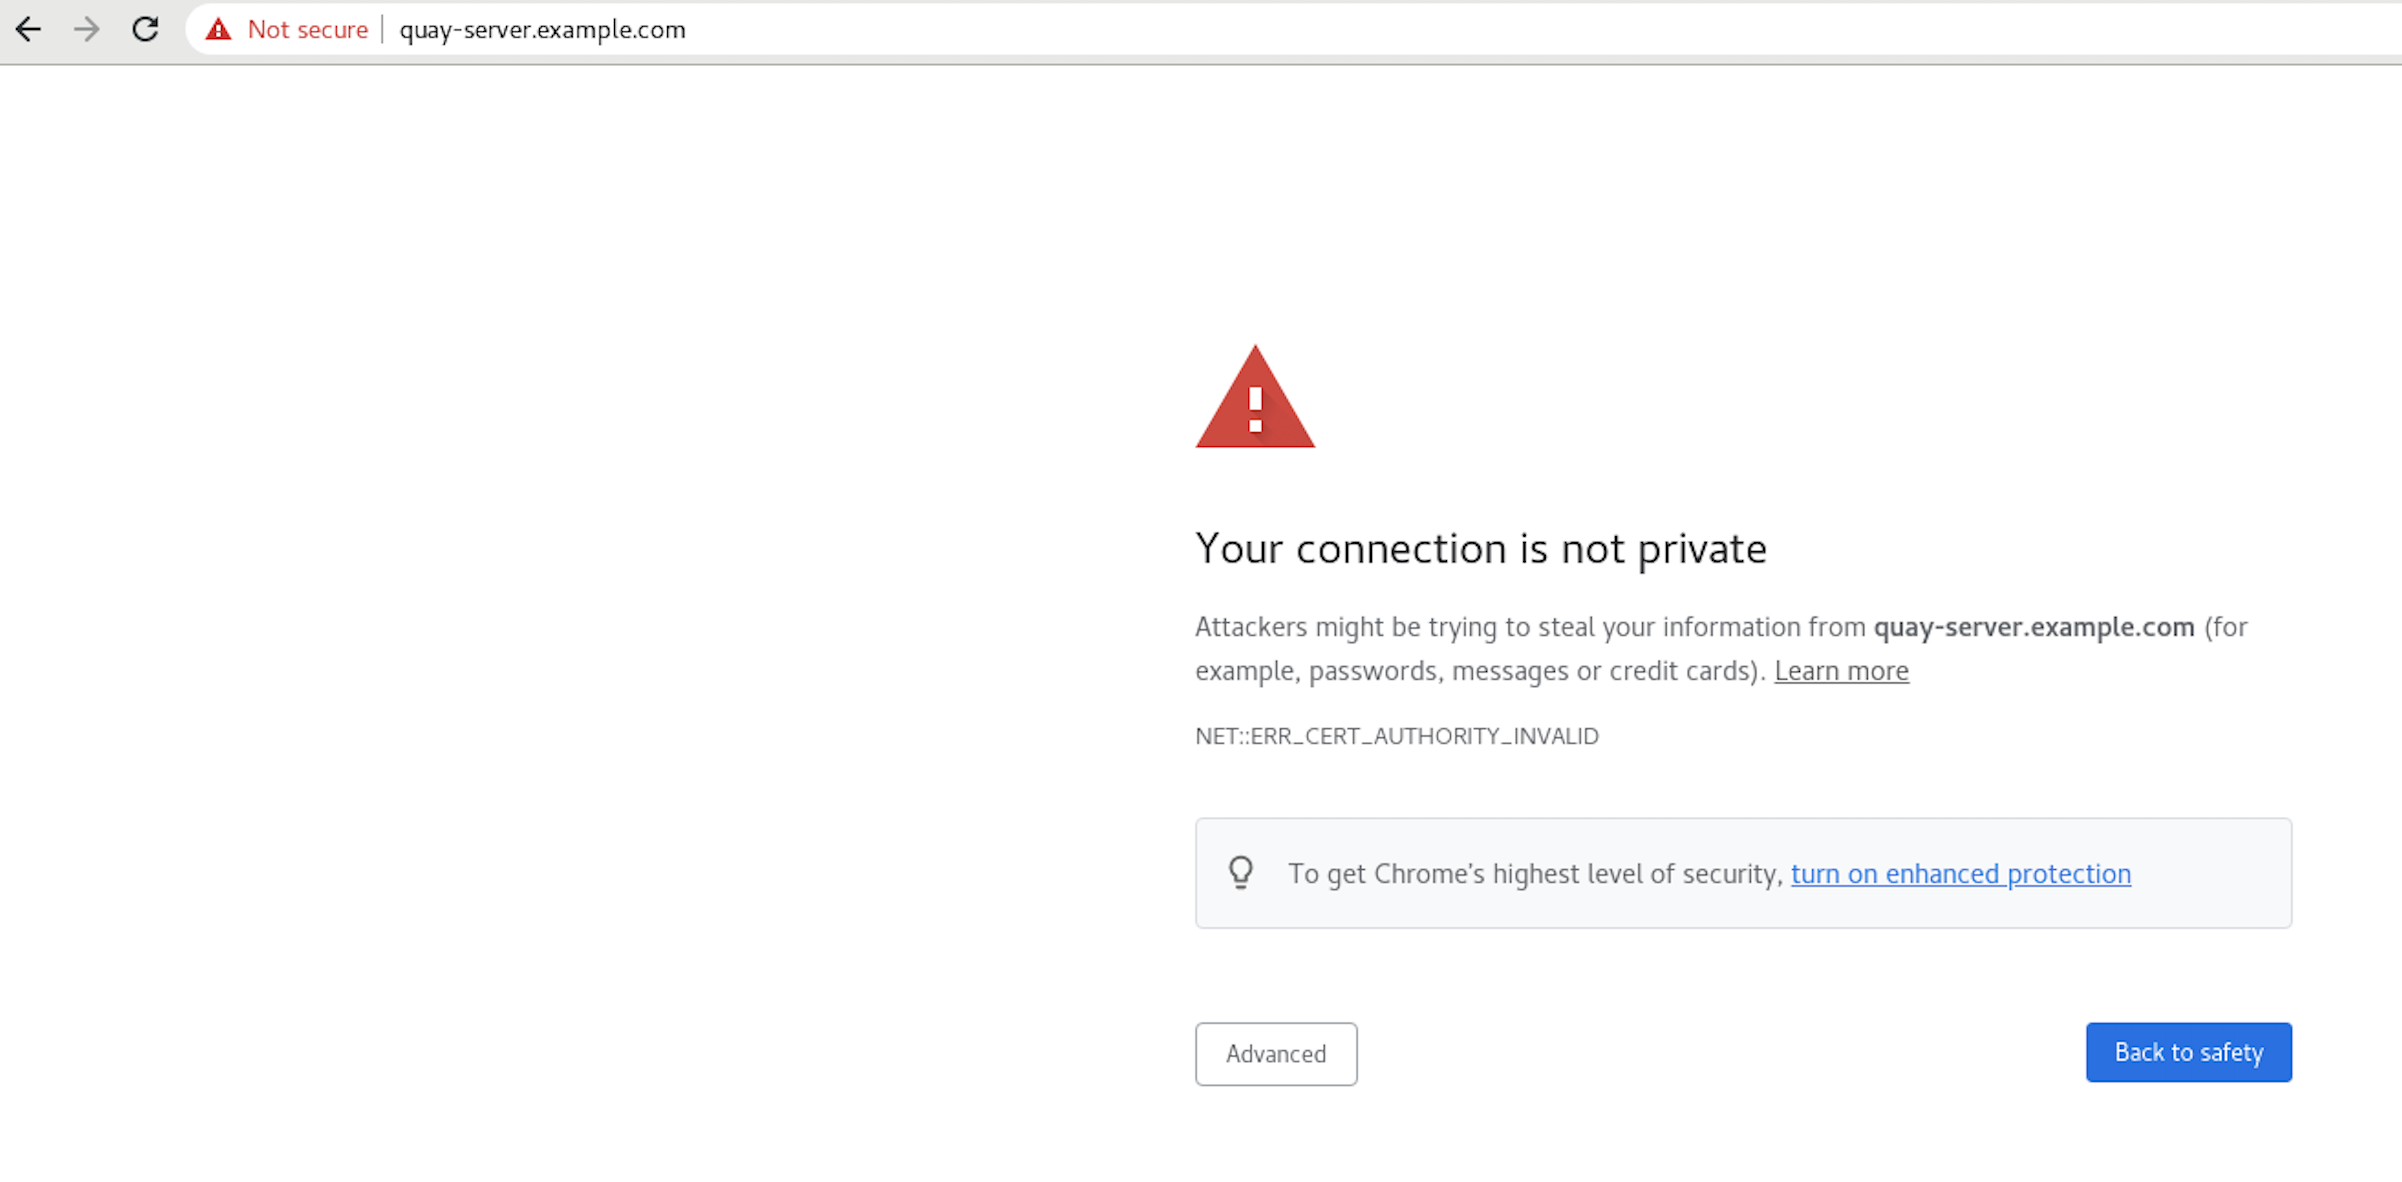
When you attempt to access the Quay registry, in this case, https://quay-server.example.com, the browser warns of the potential risk:
Proceed to the log in screen, and the browser will notify you that the connection is not secure:
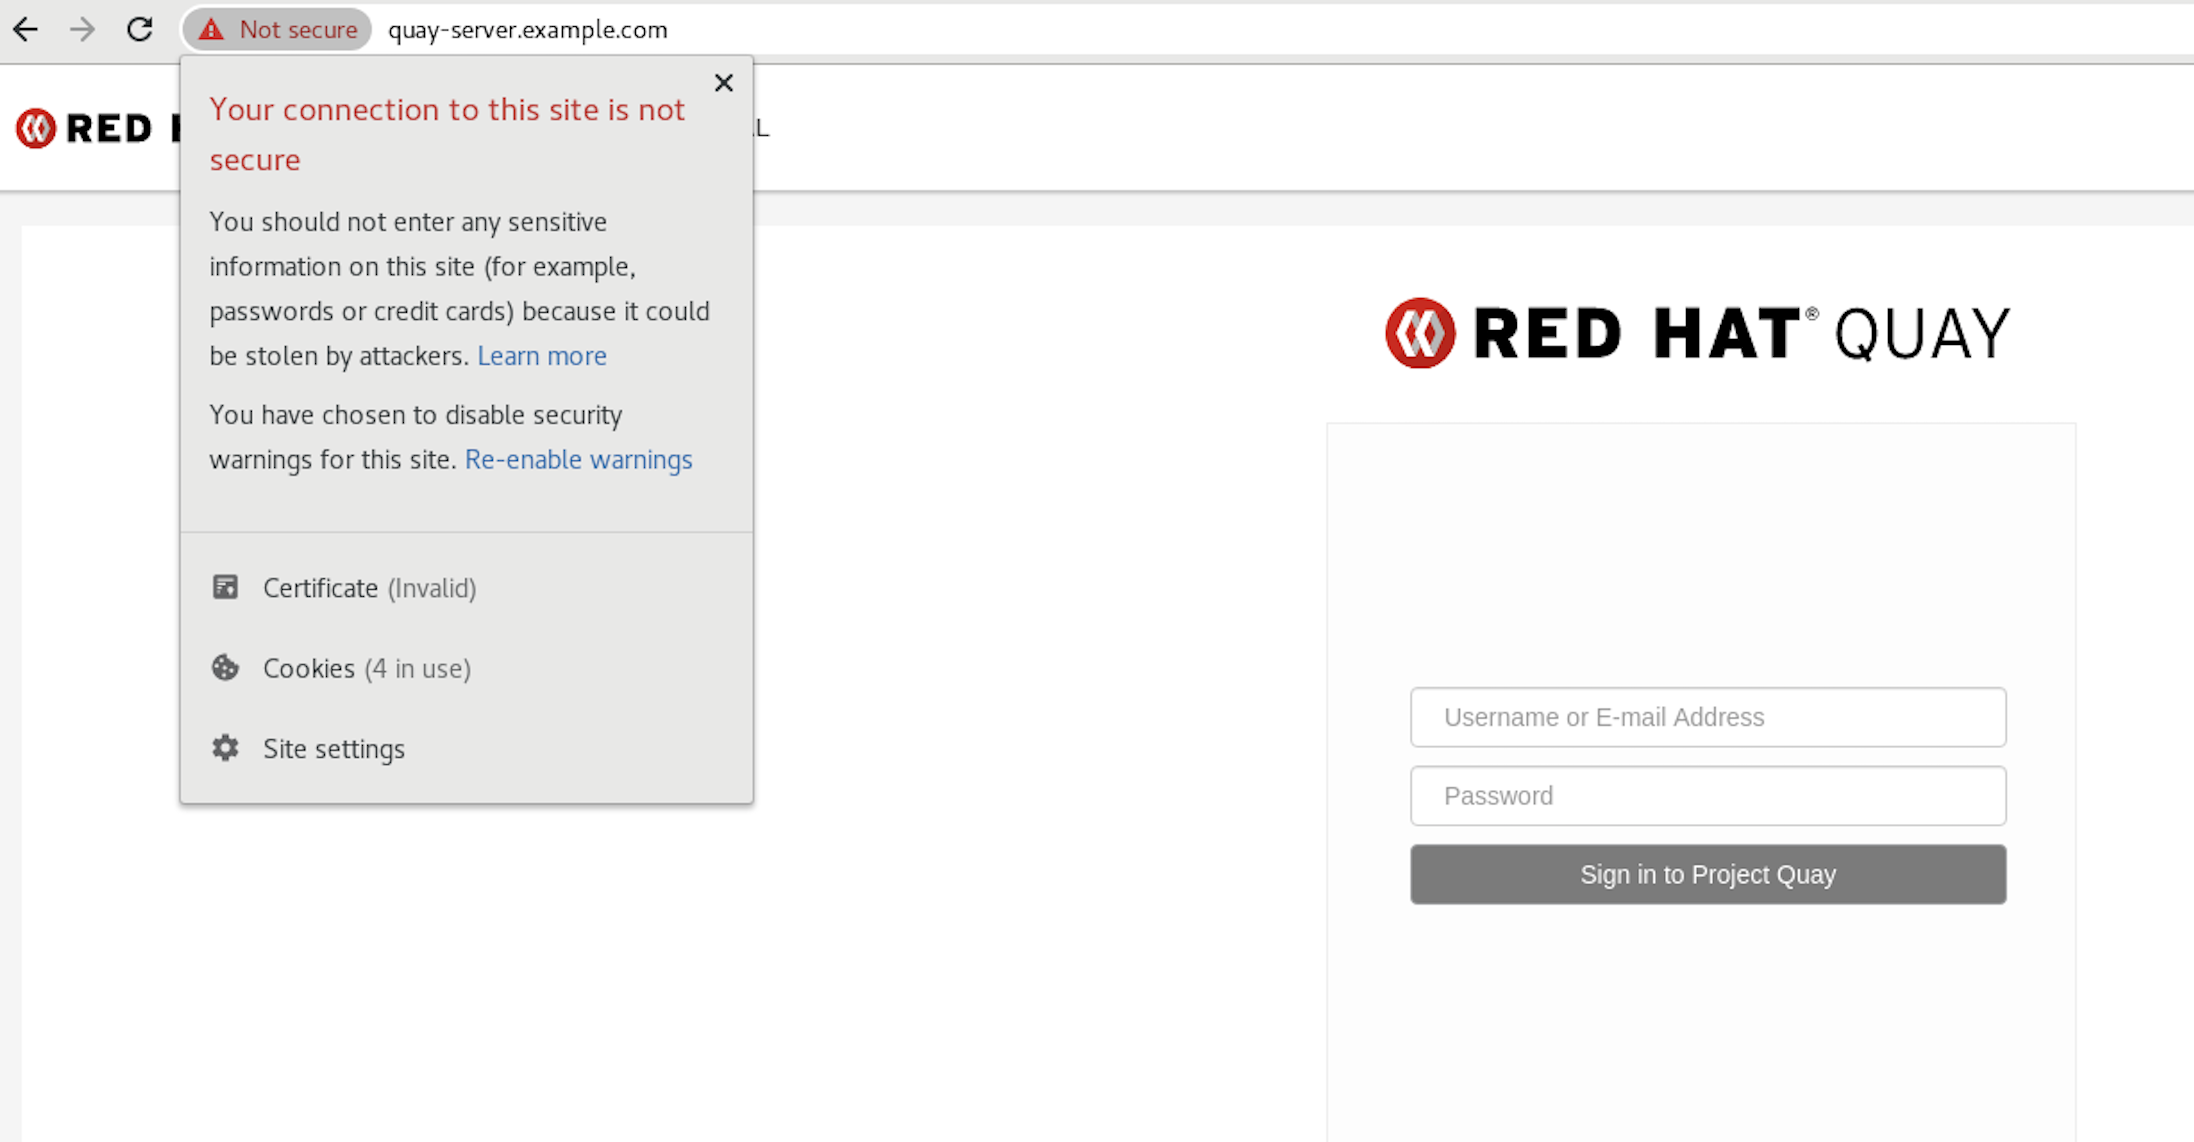
Configuring the system to trust the root Certificate Authority (CA) is covered in the subsequent section.
3.1.6. Configuring podman to trust the Certificate Authority
Podman uses two paths to locate the CA file, namely, /etc/containers/certs.d/ and /etc/docker/certs.d/.
Copy the root CA file to one of these locations, with the exact path determined by the server hostname, and naming the file
ca.crt:sudo cp rootCA.pem /etc/containers/certs.d/quay-server.example.com/ca.crt
$ sudo cp rootCA.pem /etc/containers/certs.d/quay-server.example.com/ca.crtCopy to Clipboard Copied! Toggle word wrap Toggle overflow Alternatively, if you are using Docker, you can copy the root CA file to the equivalent Docker directory:
sudo cp rootCA.pem /etc/docker/certs.d/quay-server.example.com/ca.crt
$ sudo cp rootCA.pem /etc/docker/certs.d/quay-server.example.com/ca.crtCopy to Clipboard Copied! Toggle word wrap Toggle overflow
You should no longer need to use the --tls-verify=false option when logging in to the registry:
sudo podman login quay-server.example.com
$ sudo podman login quay-server.example.com

Username: quayadmin
Password:
Login Succeeded!3.1.7. Configuring the system to trust the certificate authority
Use the following procedure to configure your system to trust the certificate authority.
Procedure
Enter the following command to copy the
rootCA.pemfile to the consolidated system-wide trust store:sudo cp rootCA.pem /etc/pki/ca-trust/source/anchors/
$ sudo cp rootCA.pem /etc/pki/ca-trust/source/anchors/Copy to Clipboard Copied! Toggle word wrap Toggle overflow Enter the following command to update the system-wide trust store configuration:
sudo update-ca-trust extract
$ sudo update-ca-trust extractCopy to Clipboard Copied! Toggle word wrap Toggle overflow Optional. You can use the
trust listcommand to ensure that theQuayserver has been configured:trust list | grep quay
$ trust list | grep quay
    label: quay-server.example.com
Copy to Clipboard Copied! Toggle word wrap Toggle overflow Now, when you browse to the registry at
https://quay-server.example.com, the lock icon shows that the connection is secure: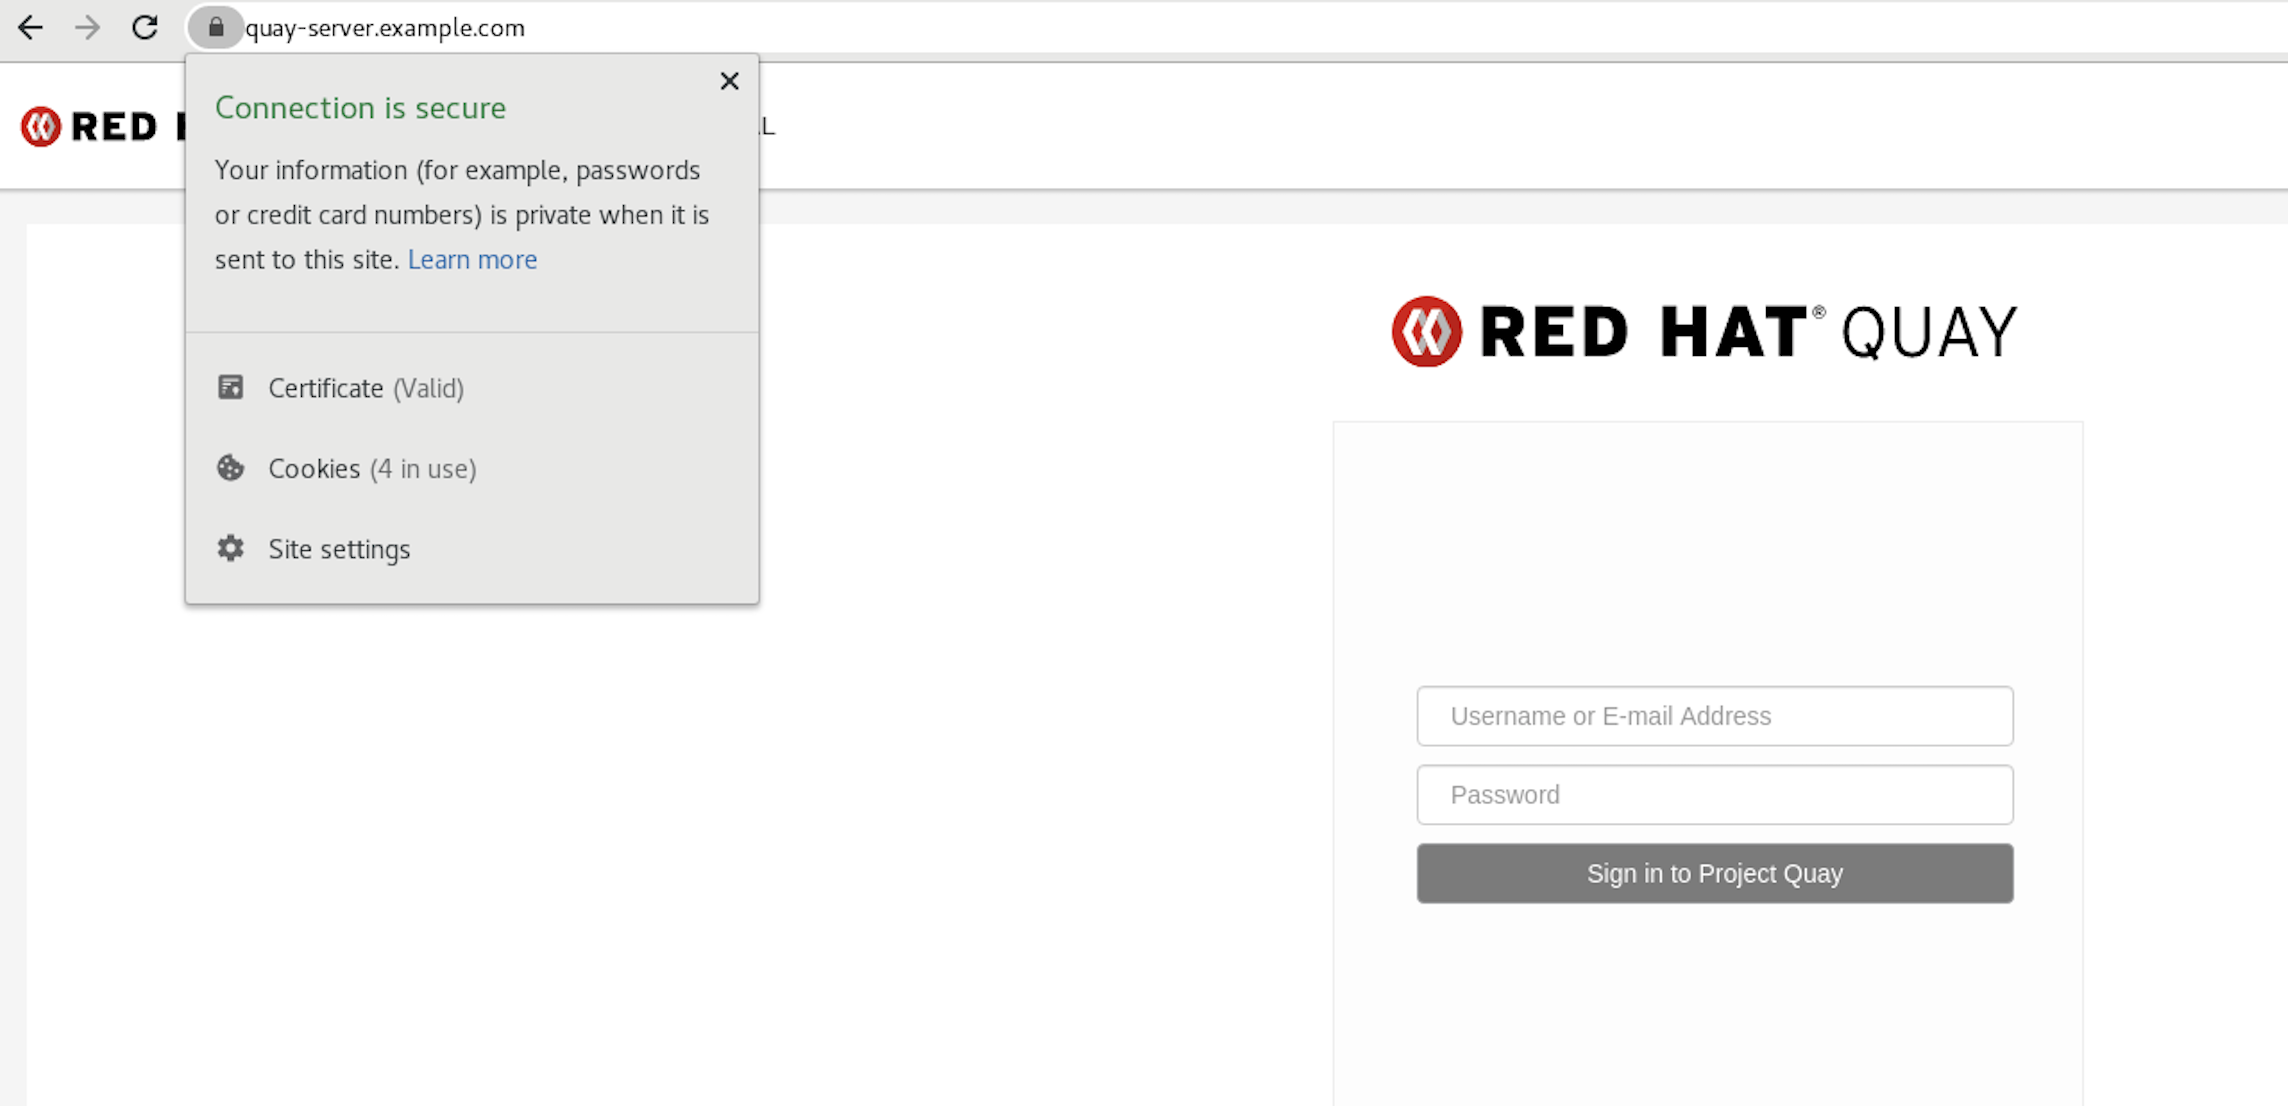
To remove the
rootCA.pemfile from system-wide trust, delete the file and update the configuration:sudo rm /etc/pki/ca-trust/source/anchors/rootCA.pem
$ sudo rm /etc/pki/ca-trust/source/anchors/rootCA.pemCopy to Clipboard Copied! Toggle word wrap Toggle overflow sudo update-ca-trust extract
$ sudo update-ca-trust extractCopy to Clipboard Copied! Toggle word wrap Toggle overflow trust list | grep quay
$ trust list | grep quayCopy to Clipboard Copied! Toggle word wrap Toggle overflow
More information can be found in the RHEL 8 documentation in the chapter Using shared system certificates.
3.2. Red Hat Quay superuser
A superuser is a Quay user account that has extended privileges, including the ability to:
- Manage users
- Manage organizations
- Manage service keys
- View the change log
- Query the usage logs
- Create globally visible user messages
3.2.1. Adding a superuser to Quay using the UI
This section covers how to add a superuser using the Quay UI. To add a superuser using the command line interface, see the following section.
Start the
Quaycontainer in configuration mode, loading the existing configuration as a volume:sudo podman run --rm -it --name quay_config \ -p 8080:8080 \ -p 443:8443 \ -v $QUAY/config:/conf/stack:Z \ registry.redhat.io/quay/quay-rhel8:v3.8.15 config secret
$ sudo podman run --rm -it --name quay_config \
  -p 8080:8080 \
  -p 443:8443 \
  -v $QUAY/config:/conf/stack:Z \
  registry.redhat.io/quay/quay-rhel8:v3.8.15 config secret
Copy to Clipboard Copied! Toggle word wrap Toggle overflow -
Under the
Access Settingssection of the UI, enter the name of the user (in this instance,quayadmin) in theSuper Usersfield and clickAdd. Validate and download the
configurationfile and then terminate theQuaycontainer that is running in config mode. Extract theconfig.yamlfile to the configuration directory and restart theQuaycontainer in registry mode:Copy to Clipboard Copied! Toggle word wrap Toggle overflow
3.2.2. Editing the config.yaml file to add a superuser
You can also add a superuser by editing the config.yaml file directly. The list of superuser accounts is stored as an array in the field SUPER_USERS.
Stop the container registry if it is running, and add the
SUPER_USERSarray to theconfig.yamlfile:SERVER_HOSTNAME: quay-server.example.com SETUP_COMPLETE: true SUPER_USERS: - quayadmin ...
SERVER_HOSTNAME: quay-server.example.com SETUP_COMPLETE: true SUPER_USERS: - quayadmin ...Copy to Clipboard Copied! Toggle word wrap Toggle overflow
3.2.3. Accessing the superuser admin panel
Restart the Quay registry:
Copy to Clipboard Copied! Toggle word wrap Toggle overflow Access the Super User Admin Panel by clicking on the current user’s name or avatar in the top right-hand corner of the UI. If the user has been added as a superuser, an extra item is presented in the drop-down list called Super User Admin Panel.

3.2.3.1. Creating a globally visible user message
Using the Superuser Admin Panel, you can create Normal, Warning, or Error messages for your organization.
-
Click your user name in the top right-hand corner of the UI. Select
Super User Admin Panel. -
On the Red Hat Quay Management page, click
Globally visible user messageson the left hand pane. Click
Create Messageto show a drop-down menu containingNormal,Warning, andErrormessage types:
-
Enter a message by selecting
Click to set message, then clickCreate Message.
Messages can be deleted by clicking Options and then Delete Message.
3.3. Repository Mirroring
3.3.1. Repository mirroring
Red Hat Quay repository mirroring lets you mirror images from external container registries, or another local registry, into your Red Hat Quay cluster. Using repository mirroring, you can synchronize images to Red Hat Quay based on repository names and tags.
From your Red Hat Quay cluster with repository mirroring enabled, you can perform the following:
- Choose a repository from an external registry to mirror
- Add credentials to access the external registry
- Identify specific container image repository names and tags to sync
- Set intervals at which a repository is synced
- Check the current state of synchronization
To use the mirroring functionality, you need to perform the following actions:
- Enable repository mirroring in the Red Hat Quay configuration file
- Run a repository mirroring worker
- Create mirrored repositories
All repository mirroring configurations can be performed using the configuration tool UI or by the Red Hat Quay API.
3.3.2. Mirroring configuration UI
Start the
Quaycontainer in configuration mode and select the Enable Repository Mirroring check box. If you want to require HTTPS communications and verify certificates during mirroring, select the HTTPS and cert verification check box.
-
Validate and download the
configurationfile, and then restart Quay in registry mode using the updated config file.
3.3.3. Mirroring worker
Use the following procedure to start the repository mirroring worker.
Procedure
If you have not configured TLS communications using a
/root/ca.crtcertificate, enter the following command to start aQuaypod with therepomirroroption:sudo podman run -d --name mirroring-worker \ -v $QUAY/config:/conf/stack:Z \ registry.redhat.io/quay/quay-rhel8:v3.8.15 repomirror
$ sudo podman run -d --name mirroring-worker \
  -v $QUAY/config:/conf/stack:Z \
  registry.redhat.io/quay/quay-rhel8:v3.8.15 repomirror
Copy to Clipboard Copied! Toggle word wrap Toggle overflow If you have configured TLS communications using a
/root/ca.crtcertificate, enter the following command to start the repository mirroring worker:sudo podman run -d --name mirroring-worker \ -v $QUAY/config:/conf/stack:Z \ -v /root/ca.crt:/etc/pki/ca-trust/source/anchors/ca.crt:Z \ registry.redhat.io/quay/quay-rhel8:v3.8.15 repomirror
$ sudo podman run -d --name mirroring-worker \
  -v $QUAY/config:/conf/stack:Z \
  -v /root/ca.crt:/etc/pki/ca-trust/source/anchors/ca.crt:Z \
  registry.redhat.io/quay/quay-rhel8:v3.8.15 repomirror
Copy to Clipboard Copied! Toggle word wrap Toggle overflow
3.3.4. Creating a mirrored repository
When mirroring a repository from an external container registry, you must create a new private repository. Typically, the same name is used as the target repository, for example, quay-rhel8.

3.3.4.1. Repository mirroring settings
Use the following procedure to adjust the settings of your mirrored repository.
Prerequisites
- You have enabled repository mirroring in your Red Hat Quay configuration file.
- You have deployed a mirroring worker.
Procedure
In the Settings tab, set the Repository State to
Mirror: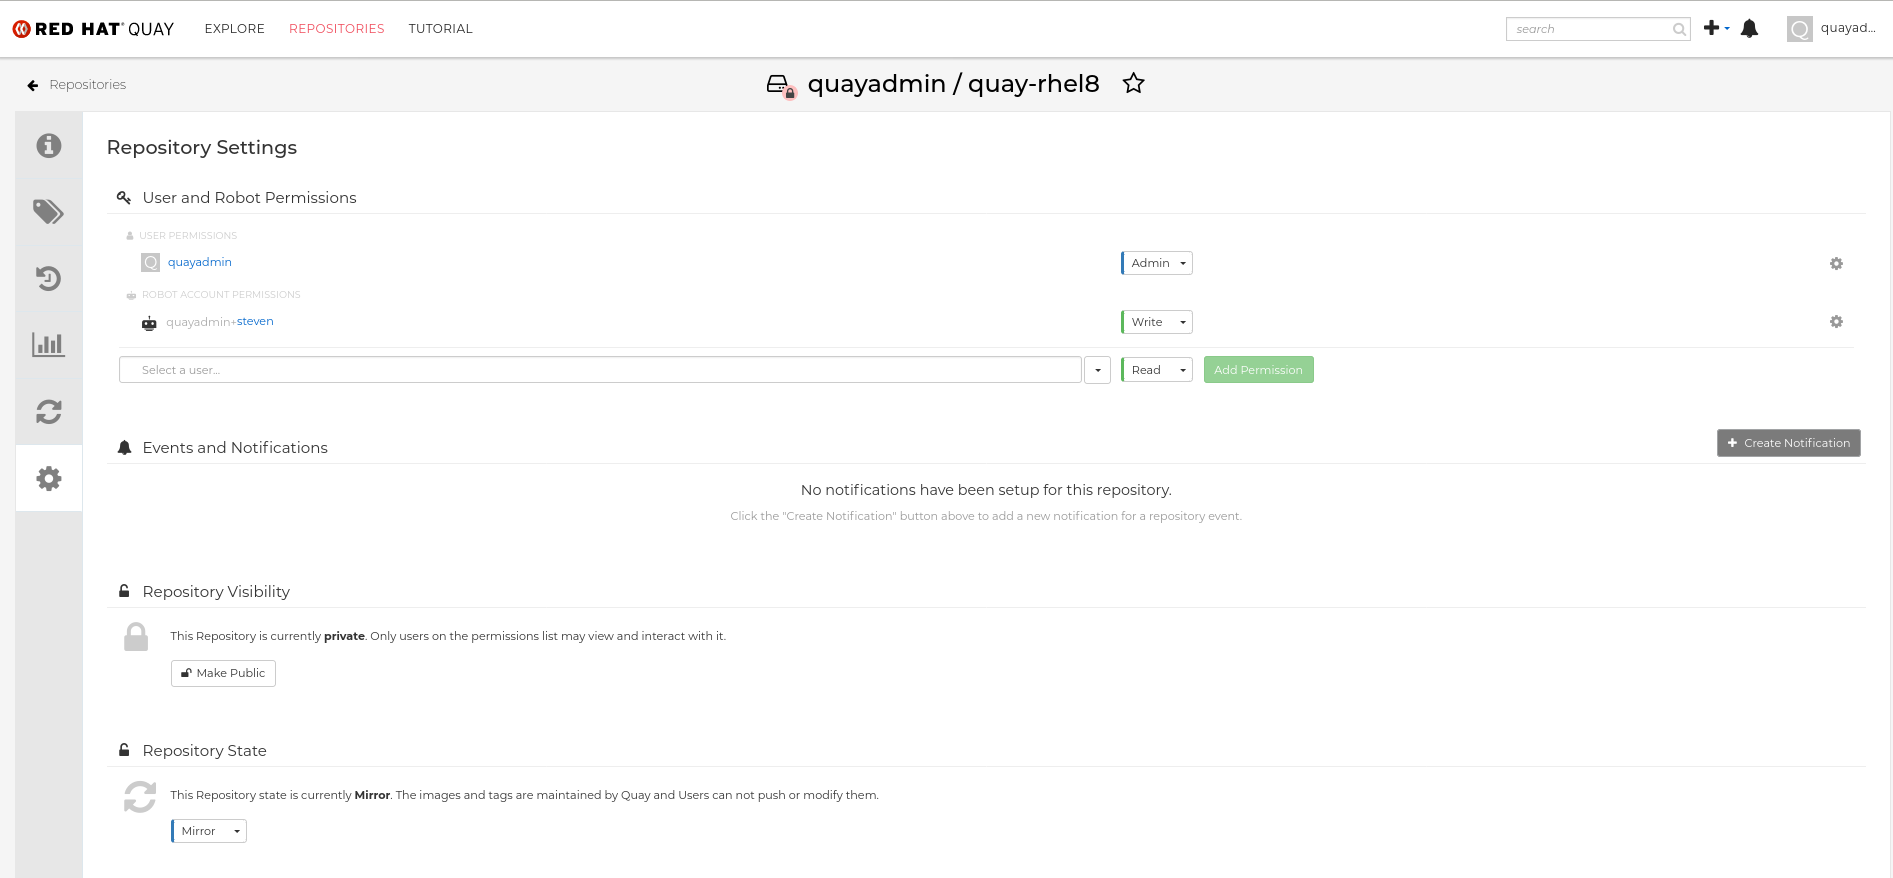
In the Mirror tab, enter the details for connecting to the external registry, along with the tags, scheduling and access information:
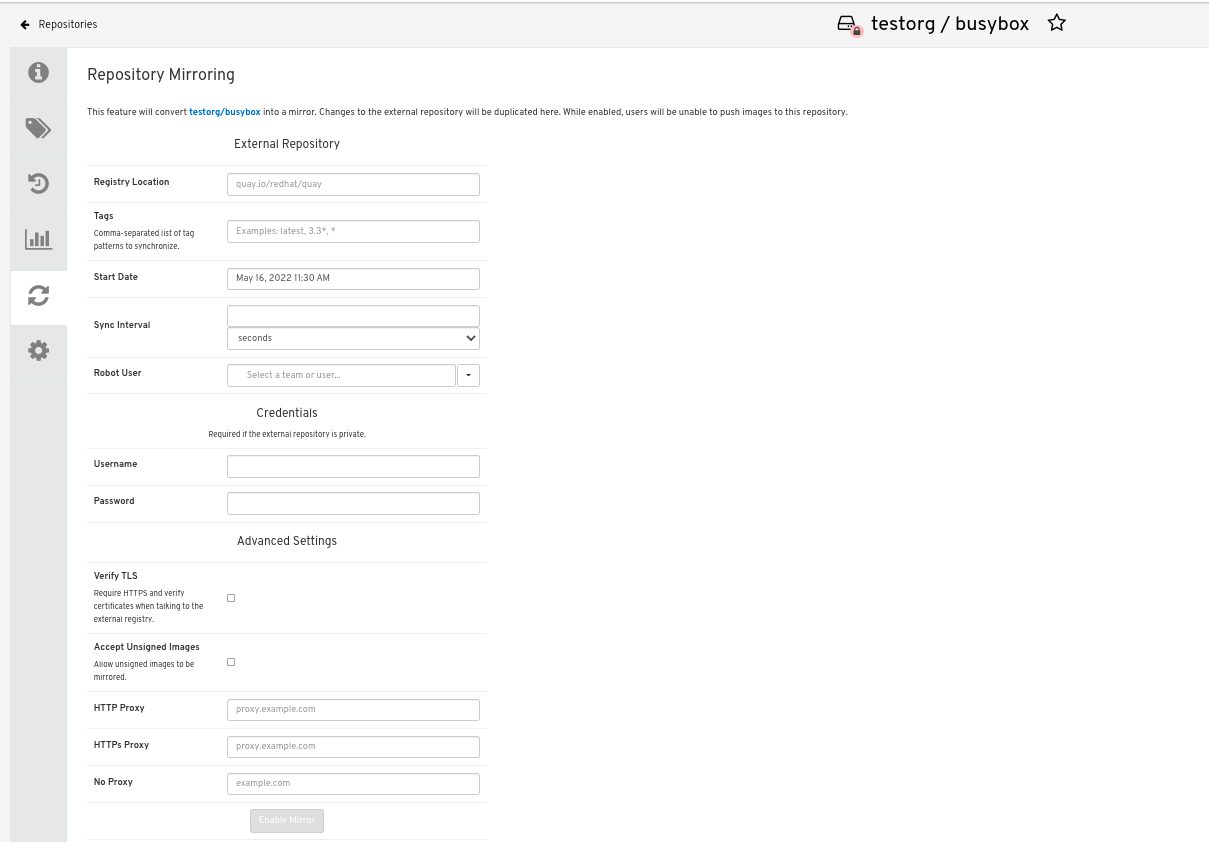
Enter the details as required in the following fields:
-
Registry Location: The external repository you want to mirror, for example,
registry.redhat.io/quay/quay-rhel8 - Tags: This field is required. You may enter a comma-separated list of individual tags or tag patterns. (See Tag Patterns section for details.)
- Start Date: The date on which mirroring begins. The current date and time is used by default.
- Sync Interval: Defaults to syncing every 24 hours. You can change that based on hours or days.
- Robot User: Create a new robot account or choose an existing robot account to do the mirroring.
- Username: The username for accessing the external registry holding the repository you are mirroring.
- Password: The password associated with the Username. Note that the password cannot include characters that require an escape character (\).
-
Registry Location: The external repository you want to mirror, for example,
3.3.4.2. Advanced settings
In the Advanced Settings section, you can configure SSL/TLS and proxy with the following options:
- Verify TLS: Select this option if you want to require HTTPS and to verify certificates when communicating with the target remote registry.
- Accept Unsigned Images: Selecting this option allows unsigned images to be mirrored.
- HTTP Proxy: Select this option if you want to require HTTPS and to verify certificates when communicating with the target remote registry.
- HTTPS PROXY: Identify the HTTPS proxy server needed to access the remote site, if a proxy server is needed.
- No Proxy: List of locations that do not require proxy.
3.3.4.3. Synchronize now
Use the following procedure to initiate the mirroring operation.
Procedure
To perform an immediate mirroring operation, press the Sync Now button on the repository’s Mirroring tab. The logs are available on the Usage Logs tab:
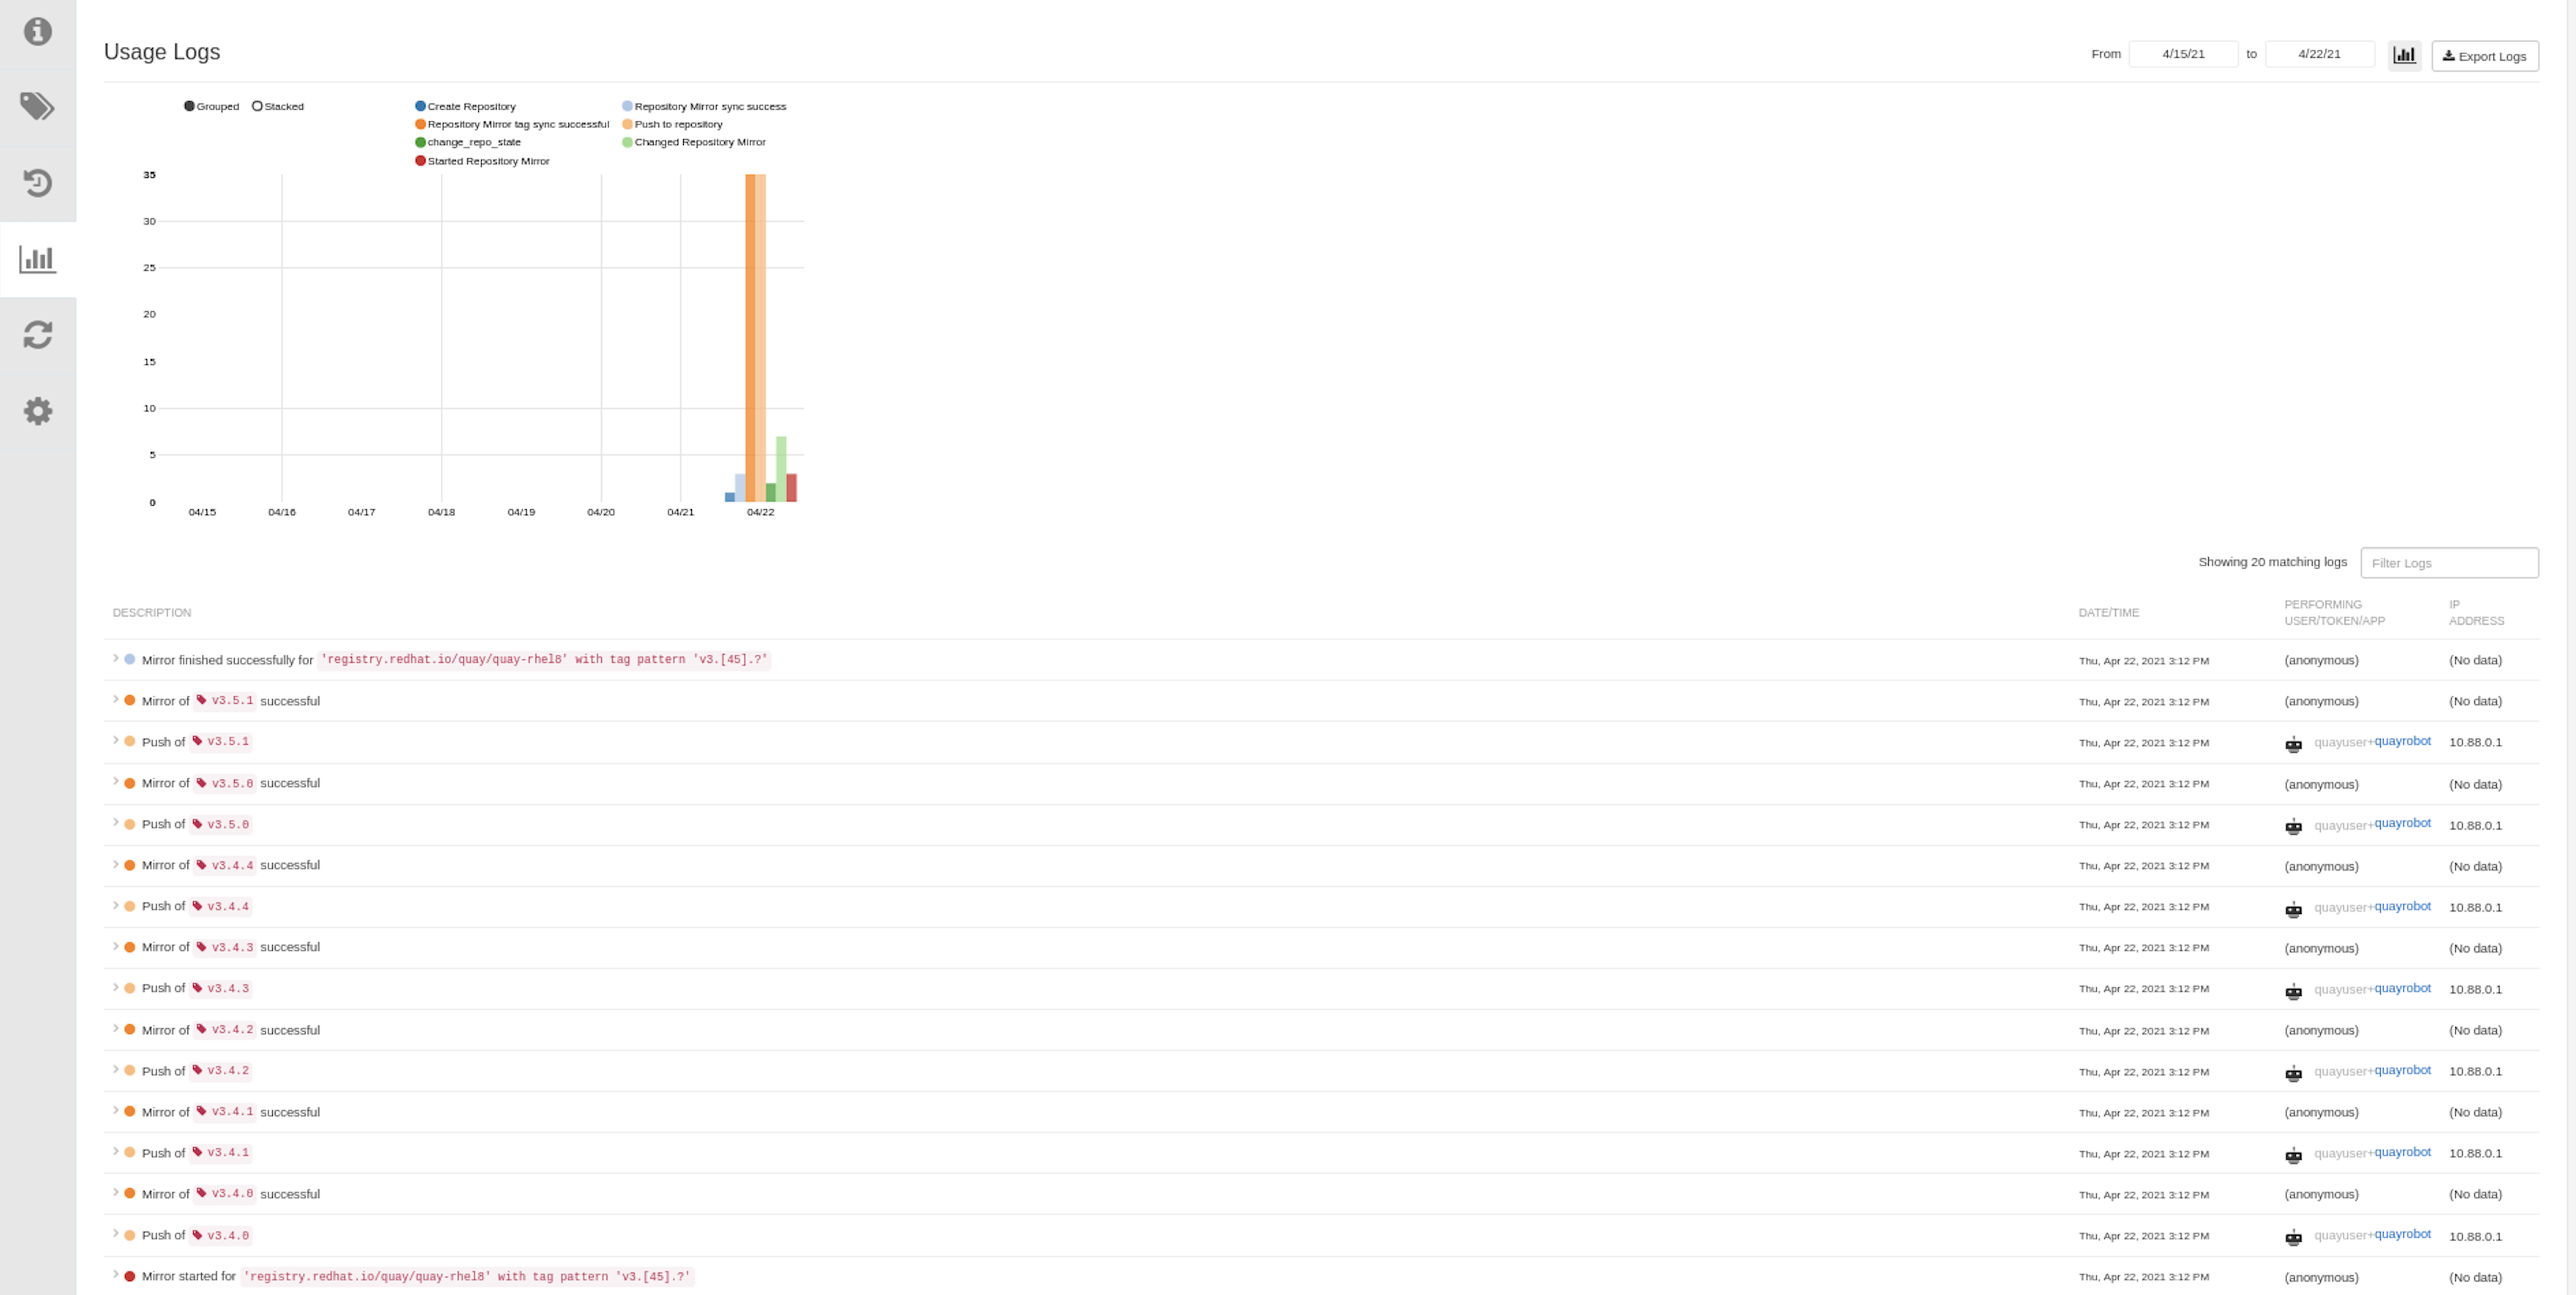
When the mirroring is complete, the images will appear in the Tags tab:

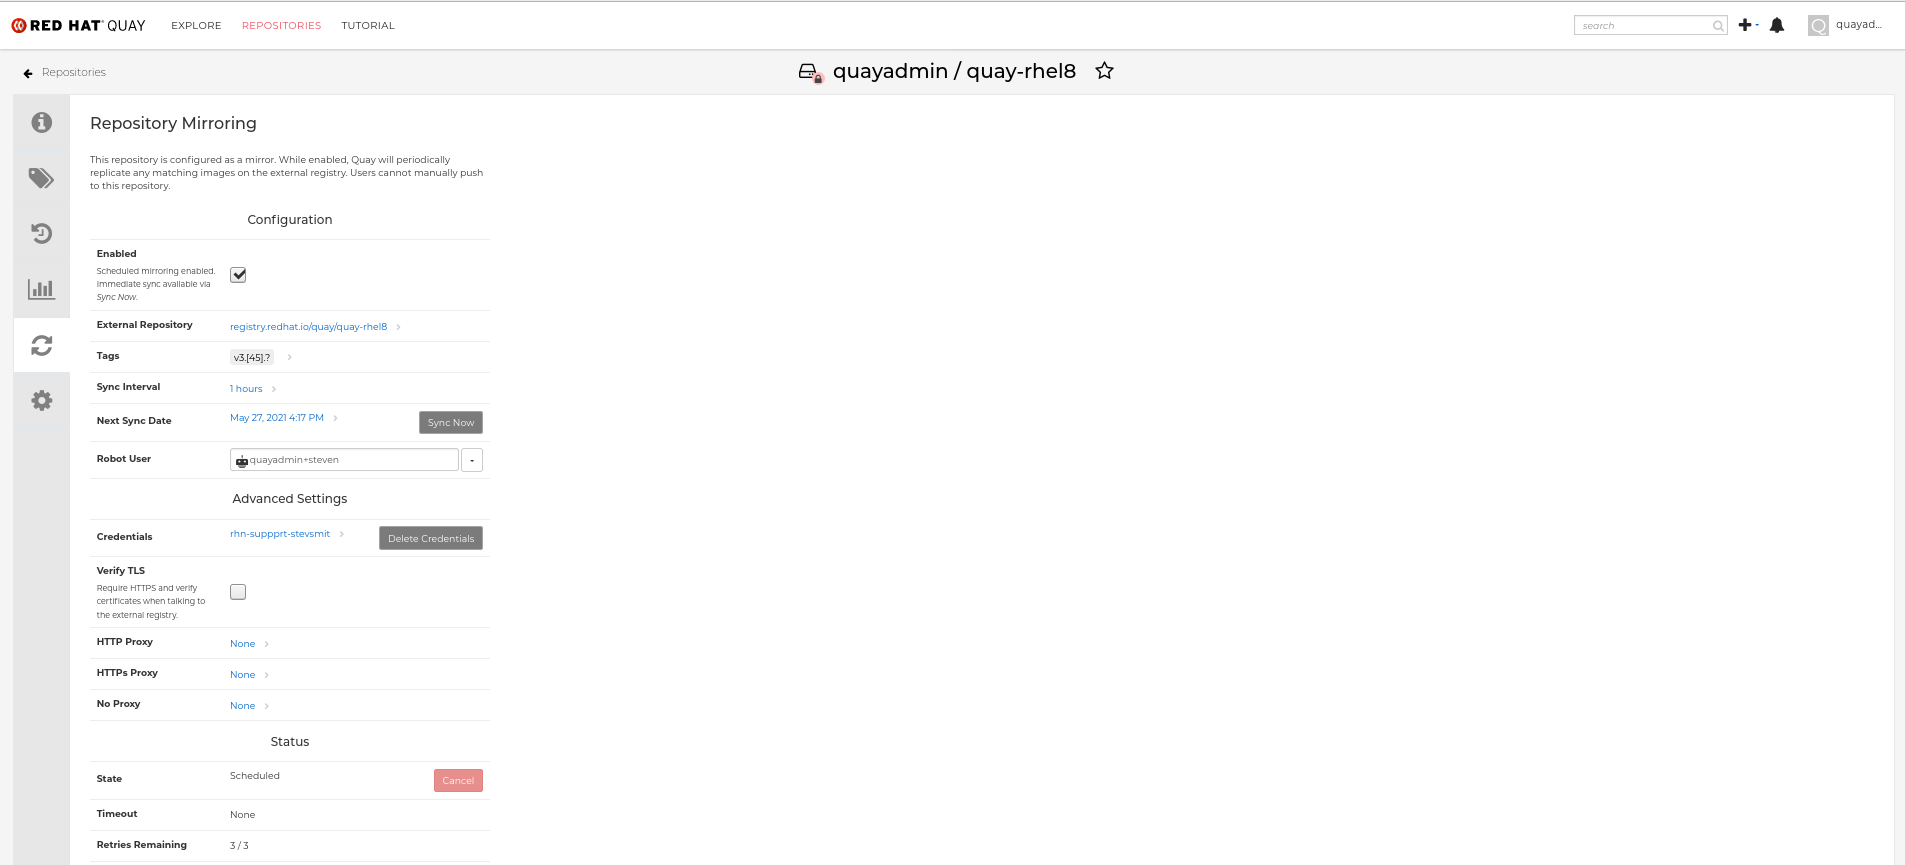
Below is an example of a completed Repository Mirroring screen:
3.3.5. Mirroring tag patterns
At least one tag must be entered. The following table references possible image tag patterns.
3.3.5.1. Pattern syntax
| Pattern | Description |
| * | Matches all characters |
| ? | Matches any single character |
| [seq] | Matches any character in seq |
| [!seq] | Matches any character not in seq |
3.3.5.2. Example tag patterns
| Example Pattern | Example Matches |
| v3* | v32, v3.1, v3.2, v3.2-4beta, v3.3 |
| v3.* | v3.1, v3.2, v3.2-4beta |
| v3.? | v3.1, v3.2, v3.3 |
| v3.[12] | v3.1, v3.2 |
| v3.[12]* | v3.1, v3.2, v3.2-4beta |
| v3.[!1]* | v3.2, v3.2-4beta, v3.3 |
3.4. Clair for Red Hat Quay
Clair v4 (Clair) is an open source application that leverages static code analyses for parsing image content and reporting vulnerabilities affecting the content. Clair is packaged with Red Hat Quay and can be used in both standalone and Operator deployments. It can be run in highly scalable configurations, where components can be scaled separately as appropriate for enterprise environments.
3.4.1. Setting up Clair on standalone Red Hat Quay deployments
For standalone Red Hat Quay deployments, you can set up Clair manually.
Procedure
In your Red Hat Quay installation directory, create a new directory for the Clair database data:
mkdir /home/<user-name>/quay-poc/postgres-clairv4
$ mkdir /home/<user-name>/quay-poc/postgres-clairv4Copy to Clipboard Copied! Toggle word wrap Toggle overflow Set the appropriate permissions for the
postgres-clairv4file by entering the following command:setfacl -m u:26:-wx /home/<user-name>/quay-poc/postgres-clairv4
$ setfacl -m u:26:-wx /home/<user-name>/quay-poc/postgres-clairv4Copy to Clipboard Copied! Toggle word wrap Toggle overflow Deploy a Clair Postgres database by entering the following command:
Copy to Clipboard Copied! Toggle word wrap Toggle overflow Install the Postgres
uuid-osspmodule for your Clair deployment:podman exec -it postgresql-clairv4 /bin/bash -c 'echo "CREATE EXTENSION IF NOT EXISTS \"uuid-ossp\"" | psql -d clair -U postgres'
$ podman exec -it postgresql-clairv4 /bin/bash -c 'echo "CREATE EXTENSION IF NOT EXISTS \"uuid-ossp\"" | psql -d clair -U postgres'Copy to Clipboard Copied! Toggle word wrap Toggle overflow Example output
CREATE EXTENSION
CREATE EXTENSIONCopy to Clipboard Copied! Toggle word wrap Toggle overflow NoteClair requires the
uuid-osspextension to be added to its Postgres database. For users with proper privileges, creating the extension will automatically be added by Clair. If users do not have the proper privileges, the extension must be added before start Clair.If the extension is not present, the following error will be displayed when Clair attempts to start:
ERROR: Please load the "uuid-ossp" extension. (SQLSTATE 42501).Stop the
Quaycontainer if it is running and restart it in configuration mode, loading the existing configuration as a volume:sudo podman run --rm -it --name quay_config \ -p 80:8080 -p 443:8443 \ -v $QUAY/config:/conf/stack:Z \ {productrepo}/{quayimage}:{productminv} config secret$ sudo podman run --rm -it --name quay_config \ -p 80:8080 -p 443:8443 \ -v $QUAY/config:/conf/stack:Z \ {productrepo}/{quayimage}:{productminv} config secretCopy to Clipboard Copied! Toggle word wrap Toggle overflow - Log in to the configuration tool and click Enable Security Scanning in the Security Scanner section of the UI.
-
Set the HTTP endpoint for Clair using a port that is not already in use on the
quay-serversystem, for example,8081. Create a pre-shared key (PSK) using the Generate PSK button.
Security Scanner UI

-
Validate and download the
config.yamlfile for Red Hat Quay, and then stop theQuaycontainer that is running the configuration editor. Extract the new configuration bundle into your Red Hat Quay installation directory, for example:
tar xvf quay-config.tar.gz -d /home/<user-name>/quay-poc/
$ tar xvf quay-config.tar.gz -d /home/<user-name>/quay-poc/Copy to Clipboard Copied! Toggle word wrap Toggle overflow Create a folder for your Clair configuration file, for example:
mkdir /etc/opt/clairv4/config/
$ mkdir /etc/opt/clairv4/config/Copy to Clipboard Copied! Toggle word wrap Toggle overflow Change into the Clair configuration folder:
cd /etc/opt/clairv4/config/
$ cd /etc/opt/clairv4/config/Copy to Clipboard Copied! Toggle word wrap Toggle overflow Create a Clair configuration file, for example:
Copy to Clipboard Copied! Toggle word wrap Toggle overflow For more information about Clair’s configuration format, see Clair configuration reference.
Start Clair by using the container image, mounting in the configuration from the file you created:
Copy to Clipboard Copied! Toggle word wrap Toggle overflow NoteRunning multiple Clair containers is also possible, but for deployment scenarios beyond a single container the use of a container orchestrator like Kubernetes or OpenShift Container Platform is strongly recommended.
3.4.2. Testing Clair
Use the following procedure to test Clair on either a standalone Red Hat Quay deployment, or on an OpenShift Container Platform Operator-based deployment.
Prerequisites
- You have deployed the Clair container image.
Procedure
Pull a sample image by entering the following command:
podman pull ubuntu:20.04
$ podman pull ubuntu:20.04Copy to Clipboard Copied! Toggle word wrap Toggle overflow Tag the image to your registry by entering the following command:
sudo podman tag docker.io/library/ubuntu:20.04 <quay-server.example.com>/<user-name>/ubuntu:20.04
$ sudo podman tag docker.io/library/ubuntu:20.04 <quay-server.example.com>/<user-name>/ubuntu:20.04Copy to Clipboard Copied! Toggle word wrap Toggle overflow Push the image to your Red Hat Quay registry by entering the following command:
sudo podman push --tls-verify=false quay-server.example.com/quayadmin/ubuntu:20.04
$ sudo podman push --tls-verify=false quay-server.example.com/quayadmin/ubuntu:20.04Copy to Clipboard Copied! Toggle word wrap Toggle overflow - Log in to your Red Hat Quay deployment through the UI.
- Click the repository name, for example, quayadmin/ubuntu.
In the navigation pane, click Tags.
Report summary

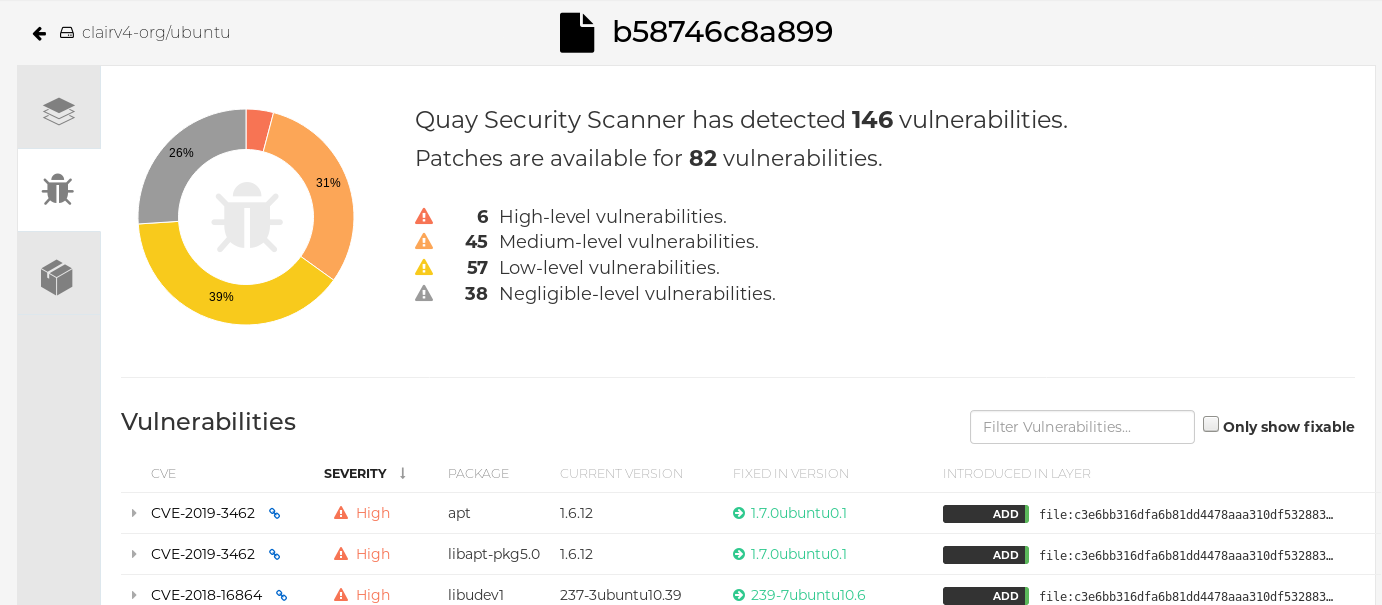
Click the image report, for example, 45 medium, to show a more detailed report:
Report details
3.4.3. CVE ratings from the National Vulnerability Database
As of Clair v4.2, Common Vulnerability Scoring System (CVSS) enrichment data is now viewable in the Red Hat Quay UI. Additionally, Clair v4.2 adds CVSS scores from the National Vulnerability Database for detected vulnerabilities.
With this change, if the vulnerability has a CVSS score that is within 2 levels of the distribution score, the Red Hat Quay UI present’s the distribution’s score by default. For example:

This differs from the previous interface, which would only display the following information:

Additional resources
3.5. Restarting containers
Because the --restart option is not fully supported by podman, you can configure podman as a systemd service, as described in Porting containers to systemd using Podman
3.5.1. Using systemd unit files with Podman
By default, Podman generates a unit file for existing containers or pods. You can generate more portable systemd unit files using the podman generate systemd --new command. The --new flag instructs Podman to generate unit files that create, start and remove containers.
Create the systemd unit files from a running Red Hat Quay registry as follows:
sudo podman generate systemd --new --files --name redis
sudo podman generate systemd --new --files --name postgresql-quay
sudo podman generate systemd --new --files --name quay
sudo podman generate systemd --new --files --name postgresql-clairv4
sudo podman generate systemd --new --files --name clairv4
$ sudo podman generate systemd --new --files --name redis
$ sudo podman generate systemd --new --files --name postgresql-quay
$ sudo podman generate systemd --new --files --name quay
$ sudo podman generate systemd --new --files --name postgresql-clairv4
$ sudo podman generate systemd --new --files --name clairv4
Copy to Clipboard Copied! Toggle word wrap Toggle overflow Copy the unit files to
/usr/lib/systemd/systemfor installing them as a root user:sudo cp -Z container-redis.service /usr/lib/systemd/system sudo cp -Z container-postgresql-quay.service /usr/lib/systemd/system sudo cp -Z container-quay.service /usr/lib/systemd/system sudo cp -Z container-postgresql-clairv4.service /usr/lib/systemd/system sudo cp -Z container-clairv4.service /usr/lib/systemd/system
$ sudo cp -Z container-redis.service /usr/lib/systemd/system
$ sudo cp -Z container-postgresql-quay.service /usr/lib/systemd/system
$ sudo cp -Z container-quay.service /usr/lib/systemd/system
$ sudo cp -Z container-postgresql-clairv4.service /usr/lib/systemd/system
$ sudo cp -Z container-clairv4.service /usr/lib/systemd/system
Copy to Clipboard Copied! Toggle word wrap Toggle overflow Reload systemd manager configuration:
sudo systemctl daemon-reload
$ sudo systemctl daemon-reloadCopy to Clipboard Copied! Toggle word wrap Toggle overflow Enable the services and start them at boot time:
sudo systemctl enable --now container-redis.service
sudo systemctl enable --now container-postgresql-quay.service
sudo systemctl enable --now container-quay.service
sudo systemctl enable --now container-postgresql-clairv4.service
sudo systemctl enable --now container-clairv4.service
$ sudo systemctl enable --now container-redis.service
$ sudo systemctl enable --now container-postgresql-quay.service
$ sudo systemctl enable --now container-quay.service
$ sudo systemctl enable --now container-postgresql-clairv4.service
$ sudo systemctl enable --now container-clairv4.service
Copy to Clipboard Copied! Toggle word wrap Toggle overflow
3.5.2. Starting, stopping and checking the status of services
Check the status of the Quay components:
sudo systemctl status container-redis.service
sudo systemctl status container-postgresql-quay.service
sudo systemctl status container-quay.service
sudo systemctl status container-postgresql-clairv4.service
sudo systemctl status container-clairv4.service
$ sudo systemctl status container-redis.service
$ sudo systemctl status container-postgresql-quay.service
$ sudo systemctl status container-quay.service
$ sudo systemctl status container-postgresql-clairv4.service
$ sudo systemctl status container-clairv4.service
Copy to Clipboard Copied! Toggle word wrap Toggle overflow To stop the Quay component services:
sudo systemctl stop container-redis.service
sudo systemctl stop container-postgresql-quay.service
sudo systemctl stop container-quay.service
sudo systemctl stop container-postgresql-clairv4.service
sudo systemctl stop container-clairv4.service
$ sudo systemctl stop container-redis.service
$ sudo systemctl stop container-postgresql-quay.service
$ sudo systemctl stop container-quay.service
$ sudo systemctl stop container-postgresql-clairv4.service
$ sudo systemctl stop container-clairv4.service
Copy to Clipboard Copied! Toggle word wrap Toggle overflow To start the Quay component services:
sudo systemctl start container-redis.service
sudo systemctl start container-postgresql-quay.service
sudo systemctl start container-quay.service
sudo systemctl start container-postgresql-clairv4.service
sudo systemctl start container-clairv4.service
$ sudo systemctl start container-redis.service
$ sudo systemctl start container-postgresql-quay.service
$ sudo systemctl start container-quay.service
$ sudo systemctl start container-postgresql-clairv4.service
$ sudo systemctl start container-clairv4.service
Copy to Clipboard Copied! Toggle word wrap Toggle overflow
3.5.3. Testing restart after reboot
Once you have the services configured and enabled, reboot the system. When the system has re-started, use podman ps to check that all the containers for the Quay components have been restarted:
In this instance, the Quay container itself has failed to start up. This is due to the fact that, when security scanning is enabled in Quay, it tries to connect to Clair on startup. However, Clair has not finished initializing and cannot accept connections and, as a result, Quay terminates immediately. To overcome this issue, you need to configure the Quay service to have a dependency on the Clair service, as shown in the following section.
3.5.4. Configuring Quay’s dependency on Clair
In the systemd service file for Quay, set up a dependency on the Clair service in the [Unit] section by setting After=container-clairv4.service. To give the Clair container time to initialize, add a delay in the [Service] section, for example RestartSec=30. Here is an example of the modified Quay file, after configuring the dependency on Clair:
/usr/lib/systemd/system/container-quay.service
Once you have updated the Quay service configuration, reboot the server and immediately run podman ps:
Initially, the Quay container will not be available, but once the RestartSec delay has expired, it should start up:
The CREATED field for the Quay container shows the 30 second difference in creation time, as configured in the service definition.
Log in to the Red Hat Quay registry at quay-server.example.com and ensure that everything has restarted correctly.
3.6. Federal Information Processing Standard (FIPS) readiness and compliance
The Federal Information Processing Standard (FIPS) developed by the National Institute of Standards and Technology (NIST) is regarded as the highly regarded for securing and encrypting sensitive data, notably in highly regulated areas such as banking, healthcare, and the public sector. Red Hat Enterprise Linux (RHEL) and OpenShift Container Platform support the FIPS standard by providing a FIPS mode, in which the system only allows usage of specific FIPS-validated cryptographic modules like openssl. This ensures FIPS compliance.
Red Hat Quay supports running on FIPS-enabled RHEL and OpenShift Container Platform environments from Red Hat Quay version 3.5.0.