Este conteúdo não está disponível no idioma selecionado.
Chapter 3. Managing LVM physical volumes
The physical volume (PV) is a partition or whole disk designated for LVM use. To use the device for an LVM logical volume, the device must be initialized as a physical volume.
If you are using a whole disk device for your physical volume, the disk must have no partition table. For DOS disk partitions, the partition id should be set to 0x8e using the fdisk or cfdisk command or an equivalent. If you are using a whole disk device for your physical volume, the disk must have no partition table. Any existing partition table must be erased, which will effectively destroy all data on that disk. You can remove an existing partition table using the wipefs -a <PhysicalVolume>` command as root.
3.1. Overview of physical volumes
Initializing a block device as a physical volume places a label near the start of the device. The following describes the LVM label:
- An LVM label provides correct identification and device ordering for a physical device. An unlabeled, non-LVM device can change names across reboots depending on the order they are discovered by the system during boot. An LVM label remains persistent across reboots and throughout a cluster.
- The LVM label identifies the device as an LVM physical volume. It contains a random unique identifier, the UUID for the physical volume. It also stores the size of the block device in bytes, and it records where the LVM metadata will be stored on the device.
- By default, the LVM label is placed in the second 512-byte sector. You can overwrite this default setting by placing the label on any of the first 4 sectors when you create the physical volume. This allows LVM volumes to co-exist with other users of these sectors, if necessary.
The following describes the LVM metadata:
- The LVM metadata contains the configuration details of the LVM volume groups on your system. By default, an identical copy of the metadata is maintained in every metadata area in every physical volume within the volume group. LVM metadata is small and stored as ASCII.
- Currently LVM allows you to store 0, 1, or 2 identical copies of its metadata on each physical volume. The default is 1 copy. Once you configure the number of metadata copies on the physical volume, you cannot change that number at a later time. The first copy is stored at the start of the device, shortly after the label. If there is a second copy, it is placed at the end of the device. If you accidentally overwrite the area at the beginning of your disk by writing to a different disk than you intend, a second copy of the metadata at the end of the device will allow you to recover the metadata.
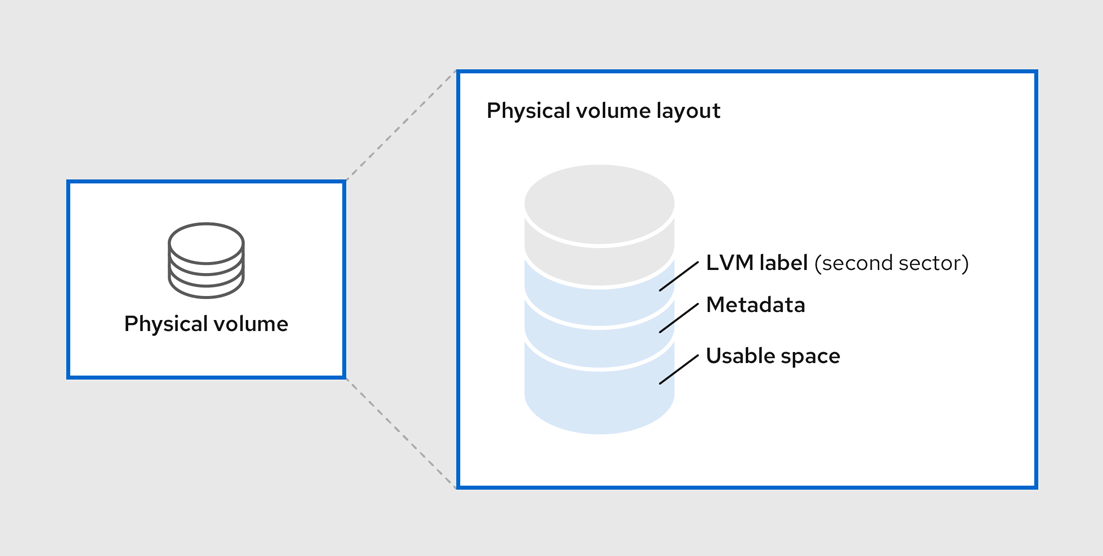
The following diagram illustrates the layout of an LVM physical volume. The LVM label is on the second sector, followed by the metadata area, followed by the usable space on the device.
In the Linux kernel and throughout this document, sectors are considered to be 512 bytes in size.
Figure 3.1. Physical volume layout
Additional resources
3.2. Multiple partitions on a disk
You can create physical volumes (PV) out of disk partitions by using LVM.
Red Hat recommends that you create a single partition that covers the whole disk to label as an LVM physical volume for the following reasons:
- Administrative convenience
- It is easier to keep track of the hardware in a system if each real disk only appears once. This becomes particularly true if a disk fails.
- Striping performance
- LVM cannot tell that two physical volumes are on the same physical disk. If you create a striped logical volume when two physical volumes are on the same physical disk, the stripes could be on different partitions on the same disk. This would result in a decrease in performance rather than an increase.
- RAID redundancy
- LVM cannot determine that the two physical volumes are on the same device. If you create a RAID logical volume when two physical volumes are on the same device, performance and fault tolerance could be lost.
Although it is not recommended, there may be specific circumstances when you will need to divide a disk into separate LVM physical volumes. For example, on a system with few disks it may be necessary to move data around partitions when you are migrating an existing system to LVM volumes. Additionally, if you have a very large disk and want to have more than one volume group for administrative purposes then it is necessary to partition the disk. If you do have a disk with more than one partition and both of those partitions are in the same volume group, take care to specify which partitions are to be included in a logical volume when creating volumes.
Note that although LVM supports using a non-partitioned disk as physical volume, it is recommended to create a single, whole-disk partition because creating a PV without a partition can be problematic in a mixed operating system environment. Other operating systems may interpret the device as free, and overwrite the PV label at the beginning of the drive.
3.3. Creating LVM physical volume
This procedure describes how to create and label LVM physical volumes (PVs).
In this procedure, replace the /dev/vdb1, /dev/vdb2, and /dev/vdb3 with the available storage devices in your system.
Prerequisites
-
The
lvm2package is installed.
Procedure
Create multiple physical volumes by using the space-delimited device names as arguments to the
pvcreatecommand:# pvcreate /dev/vdb1 /dev/vdb2 /dev/vdb3 Physical volume "/dev/vdb1" successfully created. Physical volume "/dev/vdb2" successfully created. Physical volume "/dev/vdb3" successfully created.
This places a label on /dev/vdb1, /dev/vdb2, and /dev/vdb3, marking them as physical volumes belonging to LVM.
View the created physical volumes by using any one of the following commands as per your requirement:
The
pvdisplaycommand, which provides a verbose multi-line output for each physical volume. It displays physical properties, such as size, extents, volume group, and other options in a fixed format:# pvdisplay --- NEW Physical volume --- PV Name /dev/vdb1 VG Name PV Size 1.00 GiB [..] --- NEW Physical volume --- PV Name /dev/vdb2 VG Name PV Size 1.00 GiB [..] --- NEW Physical volume --- PV Name /dev/vdb3 VG Name PV Size 1.00 GiB [..]
The
pvscommand provides physical volume information in a configurable form, displaying one line per physical volume:# pvs PV VG Fmt Attr PSize PFree /dev/vdb1 lvm2 1020.00m 0 /dev/vdb2 lvm2 1020.00m 0 /dev/vdb3 lvm2 1020.00m 0
The
pvscancommand scans all supported LVM block devices in the system for physical volumes. You can define a filter in thelvm.conffile so that this command avoids scanning specific physical volumes:# pvscan PV /dev/vdb1 lvm2 [1.00 GiB] PV /dev/vdb2 lvm2 [1.00 GiB] PV /dev/vdb3 lvm2 [1.00 GiB]
Additional resources
-
pvcreate(8),pvdisplay(8),pvs(8),pvscan(8), andlvm(8)man pages
3.4. Removing LVM physical volumes
If a device is no longer required for use by LVM, you can remove the LVM label by using the pvremove command. Executing the pvremove command zeroes the LVM metadata on an empty physical volume.
Procedure
Remove a physical volume:
# pvremove /dev/vdb3
Labels on physical volume "/dev/vdb3" successfully wiped.
View the existing physical volumes and verify if the required volume is removed:
# pvs
  PV         VG   Fmt    Attr    PSize      PFree
/dev/vdb1  	    lvm2           1020.00m   0
/dev/vdb2  	    lvm2           1020.00m   0
If the physical volume you want to remove is currently part of a volume group, you must remove it from the volume group with the vgreduce command. For more information, see Removing physical volumes from a volume group
Additional resources
-
pvremove(8)man page
3.5. Creating logical volumes in the web console
Logical volumes act as physical drives. You can use the RHEL 9 web console to create LVM logical volumes in a volume group.
Prerequisites
You have installed the RHEL 9 web console.
For instructions, see Installing and enabling the web console.
-
The
cockpit-storagedpackage is installed on your system. - The volume group is created.
Procedure
Log in to the RHEL 9 web console.
For details, see Logging in to the web console.
- Click Storage.
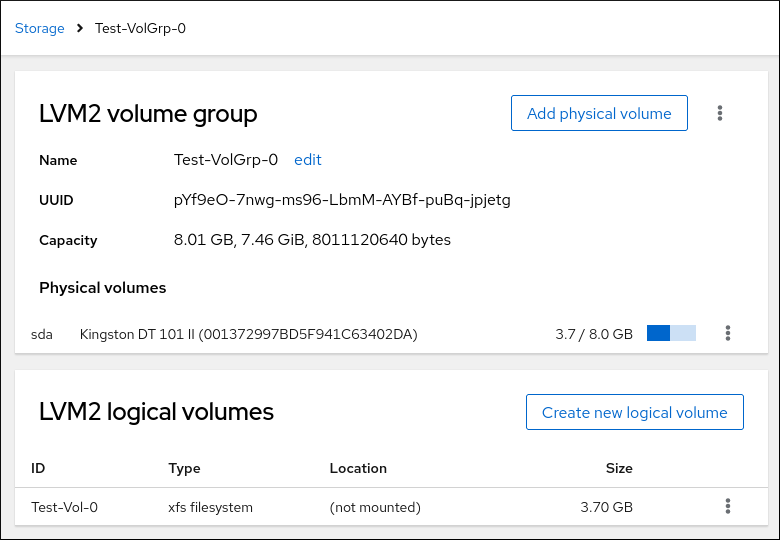
- In the Storage table, click the volume group in which you want to create logical volumes.
- On the Logical volume group page, scroll to the LVM2 logical volumes section and click .
- In the Name field, enter a name for the new logical volume. Do not include spaces in the name.
In the drop-down menu, select Block device for filesystems.
This configuration enables you to create a logical volume with the maximum volume size which is equal to the sum of the capacities of all drives included in the volume group.

Define the size of the logical volume. Consider:
- How much space the system using this logical volume will need.
- How many logical volumes you want to create.
You do not have to use the whole space. If necessary, you can grow the logical volume later.
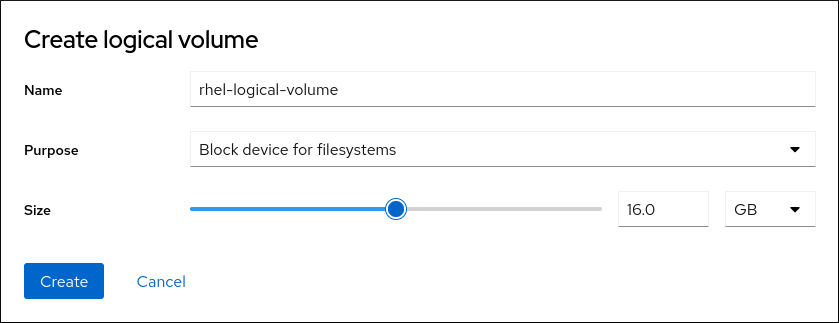
Click .
The logical volume is created. To use the logical volume you must format and mount the volume.
Verification
On the Logical volume page, scroll to the LVM2 logical volumes section and verify whether the new logical volume is listed.

3.6. Formatting logical volumes in the web console
Logical volumes act as physical drives. To use them, you must format them with a file system.
Formatting logical volumes erases all data on the volume.
The file system you select determines the configuration parameters you can use for logical volumes. For example, the XFS file system does not support shrinking volumes.
Prerequisites
You have installed the RHEL 9 web console.
For instructions, see Installing and enabling the web console.
-
The
cockpit-storagedpackage is installed on your system. - The logical volume created.
- You have root access privileges to the system.
Procedure
Log in to the RHEL 9 web console.
For details, see Logging in to the web console.
- Click .
- In the Storage table, click the volume group in the logical volumes is created.
- On the Logical volume group page, scroll to the LVM2 logical volumes section.
- Click the menu button, , next to the volume group you want to format.
From the drop-down menu, select .
- In the Name field, enter a name for the file system.
In the Mount Point field, add the mount path.

In the drop-down menu, select a file system:
XFS file system supports large logical volumes, switching physical drives online without outage, and growing an existing file system. Leave this file system selected if you do not have a different strong preference.
XFS does not support reducing the size of a volume formatted with an XFS file system
ext4 file system supports:
- Logical volumes
- Switching physical drives online without an outage
- Growing a file system
- Shrinking a file system
Select the Overwrite existing data with zeros checkbox if you want the RHEL web console to rewrite the whole disk with zeros. This option is slower because the program has to go through the whole disk, but it is more secure. Use this option if the disk includes any data and you need to overwrite it.
If you do not select the Overwrite existing data with zeros checkbox, the RHEL web console rewrites only the disk header. This increases the speed of formatting.
From the drop-down menu, select the type of encryption if you want to enable it on the logical volume.
You can select a version with either the LUKS1 (Linux Unified Key Setup) or LUKS2 encryption, which allows you to encrypt the volume with a passphrase.
- In the drop-down menu, select when you want the logical volume to mount after the system boots.
- Select the required Mount options.
Format the logical volume:
- If you want to format the volume and immediately mount it, click .
If you want to format the volume without mounting it, click .
Formatting can take several minutes depending on the volume size and which formatting options are selected.
Verification
On the Logical volume group page, scroll to the LVM2 logical volumes section and click the logical volume to check the details and additional options.
- If you selected the option, click the menu button at the end of the line of the logical volume, and select to use the logical volume.
3.7. Resizing logical volumes in the web console
You can extend or reduce logical volumes in the RHEL 9 web console. The example procedure demonstrates how to grow and shrink the size of a logical volume without taking the volume offline.
You cannot reduce volumes that contains GFS2 or XFS filesystem.
Prerequisites
You have installed the RHEL 9 web console.
For instructions, see Installing and enabling the web console.
-
The
cockpit-storagedpackage is installed on your system. - An existing logical volume containing a file system that supports resizing logical volumes.
Procedure
- Log in to the RHEL web console.
- Click .
- In the Storage table, click the volume group in the logical volumes is created.
On the Logical volume group page, scroll to the LVM2 logical volumes section and click the menu button, , next to volume group you want to resize.
From the menu, select Grow or Shrink to resize the volume:
Growing the Volume:
- Select to increase the size of the volume.
In the Grow logical volume dialog box, adjust the size of the logical volume.
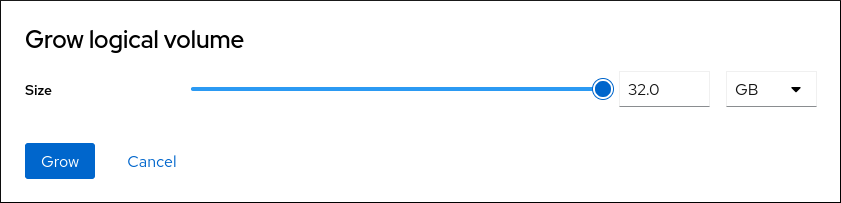
Click .
LVM grows the logical volume without causing a system outage.
Shrinking the Volume:
- Select to reduce the size of the volume.
In the Shrink logical volume dialog box, adjust the size of the logical volume.

Click .
LVM shrinks the logical volume without causing a system outage.
3.8. Additional resources
- Creating a partition table on a disk with parted.
-
parted(8)man page.