Este conteúdo não está disponível no idioma selecionado.
Chapter 3. Managing partitions using the web console
Learn how to manage file systems on RHEL 9 using the web console.
3.1. Displaying partitions formatted with file systems in the web console
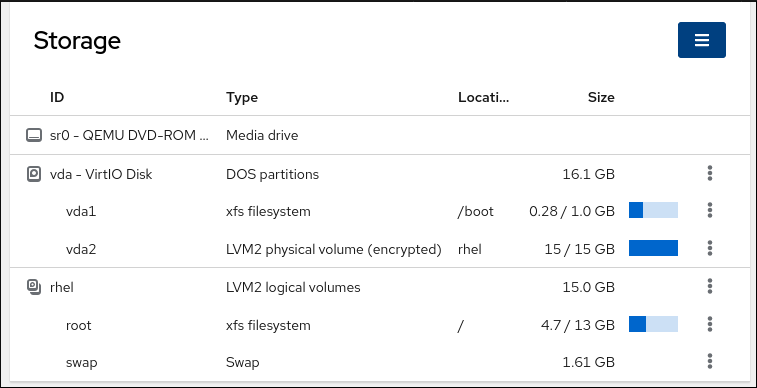
The Storage section in the web console displays all available file systems in the Filesystems table.
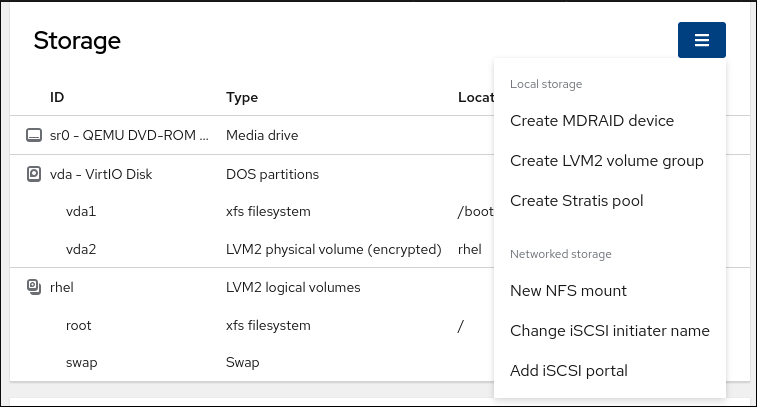
Besides the list of partitions formatted with file systems, you can also use the page for creating new storage.
Prerequisites
-
The
cockpit-storagedpackage is installed on your system.
- You have installed the RHEL 9 web console.
- You have enabled the cockpit service.
Your user account is allowed to log in to the web console.
For instructions, see Installing and enabling the web console.
Procedure
Log in to the RHEL 9 web console.
For details, see Logging in to the web console.
Click the Storage tab.
In the Storage table, you can see all available partitions formatted with file systems, their ID, types, locations, sizes, and how much space is available on each partition.
You can also use the drop-down menu in the top-right corner to create new local or networked storage.
3.2. Creating partitions in the web console
To create a new partition:
- Use an existing partition table
- Create a partition
Prerequisites
-
The
cockpit-storagedpackage is installed on your system. - The web console must be installed and accessible. For details, see Installing the web console.
- An unformatted volume connected to the system is visible in the Storage table of the Storage tab.
Procedure
Log in to the RHEL 9 web console.
For details, see Logging in to the web console.
- Click the Storage tab.
- In the Storage table, click the device which you want to partition to open the page and options for that device.
- On the device page, click the menu button, , and select Create partition table.
In the Initialize disk dialog box, select the following:
Partitioning:
- Compatible with all systems and devices (MBR)
- Compatible with modern system and hard disks > 2TB (GPT)
- No partitioning
Overwrite:
Select the Overwrite existing data with zeros checkbox if you want the RHEL web console to rewrite the whole disk with zeros. This option is slower because the program has to go through the whole disk, but it is more secure. Use this option if the disk includes any data and you need to overwrite it.
If you do not select the Overwrite existing data with zeros checkbox, the RHEL web console rewrites only the disk header. This increases the speed of formatting.
- Click .
- Click the menu button, , next to the partition table you created. It is named Free space by default.
- Click .
- In the Create partition dialog box, enter a Name for the file system.
- Add a Mount point.
In the Type drop-down menu, select a file system:
- XFS file system supports large logical volumes, switching physical drives online without outage, and growing an existing file system. Leave this file system selected if you do not have a different strong preference.
ext4 file system supports:
- Logical volumes
- Switching physical drives online without outage
- Growing a file system
- Shrinking a file system
Additional option is to enable encryption of partition done by LUKS (Linux Unified Key Setup), which allows you to encrypt the volume with a passphrase.
- Enter the Size of the volume you want to create.
Select the Overwrite existing data with zeros checkbox if you want the RHEL web console to rewrite the whole disk with zeros. This option is slower because the program has to go through the whole disk, but it is more secure. Use this option if the disk includes any data and you need to overwrite it.
If you do not select the Overwrite existing data with zeros checkbox, the RHEL web console rewrites only the disk header. This increases the speed of formatting.
If you want to encrypt the volume, select the type of encryption in the Encryption drop-down menu.
If you do not want to encrypt the volume, select No encryption.
- In the At boot drop-down menu, select when you want to mount the volume.
In Mount options section:
- Select the Mount read only checkbox if you want the to mount the volume as a read-only logical volume.
- Select the Custom mount options checkbox and add the mount options if you want to change the default mount option.
Create the partition:
- If you want to create and mount the partition, click the button.
If you want to only create the partition, click the button.
Formatting can take several minutes depending on the volume size and which formatting options are selected.
Verification
- To verify that the partition has been successfully added, switch to the Storage tab and check the Storage table and verify whether the new partition is listed.
3.3. Deleting partitions in the web console
You can remove partitions in the web console interface.
Prerequisites
-
The
cockpit-storagedpackage is installed on your system.
- You have installed the RHEL 9 web console.
- You have enabled the cockpit service.
Your user account is allowed to log in to the web console.
For instructions, see Installing and enabling the web console.
Procedure
Log in to the RHEL 9 web console.
For details, see Logging in to the web console.
- Click the Storage tab.
- Click the device from which you want to delete a partition.
- On the device page and in the GPT partitions section, click the menu button, next to the partition you want to delete.
From the drop-down menu, select .
The RHEL web console terminates all processes that are currently using the partition and unmount the partition before deleting it.
Verification
- To verify that the partition has been successfully removed, switch to the Storage tab and check the Storage table.