此内容没有您所选择的语言版本。
4.4.11. Plug-n-Skin
Plug-n-Skin lets you easily create, customize, and plug in a custom skin to your project. You can create skins based on the parameters of predefined RichFaces skins. Plug-n-Skin also lets you unify the appearance of rich controls with standard HTML elements. This section contains step-by-step instructions for creating your own skin with Plug-n-Skin.
First, use Maven to create a template for your new skin. (You can find more information about configuring Maven for RichFaces in the JBoss wiki article. These Maven instructions can be copied and pasted into the command line interface to execute them.
Primary keys for the command:
archetypeVersion— indicates the RichFaces version; for example,3.3.1.GAartifactId— the artifact ID of the projectgroupId— the group ID of the projectversion— the version of the project you create. By default, this is set to1.0.-SNAPSHOT
This operation creates a directory named after your
ARTIFACT-ID. The directory contains a template of the Maven project.
The following steps will guide you though creating of the skin itself.
Run the following command from the root directory of the Maven project. (This directory will contain your
pom.xml file.)
...
mvn cdk:add-skin -Dname=SKIN-NAME -Dpackage=SKIN-PACKAGE
...
...
mvn cdk:add-skin -Dname=SKIN-NAME -Dpackage=SKIN-PACKAGE
...
Primary keys for the command:
name— defines the name of the new skinpackage— the base package of the skin. By default, the project'sgroupIdis used.
Additional optional keys for the command:
baseSkin— defines the name of the base skin.createExt— if set totrue, extended CSS classes are added. For more information, please, see Section 4.4.8, “Standard Controls Skinning”.
Refer to Table 4.34, “Files and Fodlers Created By the
mvn cdk:add-skin -Dname=SKIN-NAME -Dpackage=SKIN-PACKAGE Command” for which files are created by the command.
|
File Name
|
Location
|
Description
|
|---|---|---|
BaseImage.java
| \src\main\java\SKIN-PACKAGE\SKIN-NAME\images\
|
the base class used to store images.
|
|
BaseImageTest.java
| \src\test\java\SKIN-PACKAGE\SKIN-NAME\images\
|
a test version of a class that stores images.
|
|
XCSS files
| \src\main\resources\SKIN-PACKAGE\SKIN-NAME\css\
|
define the new look of RichFaces components affected by the new skin.
|
SKIN-NAME.properties
| \src\main\resources\SKIN-PACKAGE\SKIN-NAME\css\
|
a file that contains the new skin's properties.
The following properties are used to configure the
SKIN-NAME.properties file:
|
SKIN-NAME.xcss
| src\main\resources\META-INF\skins
|
an XCSS file that imports the component's XCSS files to be modified by the new skin.
|
|
XCSS files
| \src\main\resources\SKIN-PACKAGE\SKIN-NAME\css\
|
determine styles for standard controls (
extended_classes.xcss and extended.xcss), if the createExt key is set to true.
|
SKIN-NAME-ext.xcss
| src\main\resources\META-INF\skins.
|
imports defining styles for standard controls if
createExt is set to true.
|
SKIN-NAME-resources.xml
| src\main\config\resources.
|
contains descriptions of all files listed previously.
|
You can now start editing the XCSS files located in
\src\main\resources\SKIN-PACKAGE\SKIN-NAME\css\. Assign new style properties to your selectors (listed in the XCSS files) in either of the following ways:
- Standard CSS coding approach (that is, add CSS properties to the selectors). Remember that the selectors must be within
<f:verbatim> </f:verbatim>tags. For example:... .rich-calendar-cell { background: #537df8; } ...... .rich-calendar-cell { background: #537df8; } ...Copy to Clipboard Copied! Toggle word wrap Toggle overflow - XCSS coding approach (the usual method of creating XCSS files in RichFaces). XCSS tags must be placed outside
<f:verbatim> </f:verbatim>tags.Copy to Clipboard Copied! Toggle word wrap Toggle overflow
Once you have performed these steps and edited the XCSS files, build the new skin and plug it into the project. To build the skin, execute the following command from the root directory of your skin project (the directory that contains your
pom.xml file):
...
mvn clean install
...
...
mvn clean install
...
The Plug-n-skin feature also has a number of predefined gradients. The following code can be used to apply a gradient:
The
background-image CSS property is defined with <f:resource f:key="org.richfaces.renderkit.html.CustomizeableGradient">, which sets the gradient. The gradient type can be specified in the SKIN-NAME.properties with the gradientType property, which can be set to glass, plastic, or plain. The gradient can then be adjusted with the baseColor, gradientColor, gradientHeight, valign attributes, as seen in the previous code snippet.
You can now use your newly-created skin in your project by adding your new skin parameters to the
web.xml file, and placing the JAR file containing your skin (located in the target directory of your skin project) in the \WebContent\WEB-INF\lib\.
4.4.11.1. Details of Usage
复制链接链接已复制到粘贴板!
This section covers some practical aspects of Plug-n-Skin implementation. We assume that you have read the section of the guide describing the Plug-n-Skin prototype creation process.
First, we must create a new skin (as described in the previous section). The following creates a template of the new skin project:
You can now browse the
P-n-S directory to view the files and folders created.
Next, use Maven to add all required files to the skin project, like so:
mvn cdk:add-skin -DbaseSkin=blueSky -DcreateExt=true -Dname=PlugnSkinDemo -Dpackage=SKINPACKAGE
mvn cdk:add-skin -DbaseSkin=blueSky -DcreateExt=true -Dname=PlugnSkinDemo -Dpackage=SKINPACKAGE
As mentioned in the previous section,
-DbaseSkin defines the RichFaces built-in skin to use as a base, and -DcreateExt=true, which determines that the new skin will include XCSS files that unify the appearance of the rich components and the standard HTML controls.
Once your resources have been created, you can begin refining the newly-created skin. Begin by editing the rich components' XCSS files.
As an example of the Plug-n-Skin feature, we will edit some
<rich:calendar> style attributes and some basic HTML controls. We will show you how to:
- Recolor the background of the current day in the
<rich:calendar>; - Recolor a standard HTML submit button;
To edit
<rich:properties>'s style properties, you must open the calendar.xcss file, located in P-n-S\src\main\resources\skinpackage\plugnskindemo\css\.
In the
calendar.xcss file, find the .rich-calendar-today selector and amend it as follows:background-color: #075ad1;. This will change the background color of the current day.
Next we will change the font style of a standard HTML submit button. Open the
extended.xcss file from the P-n-S\src\main\resources\skinpackage\plugnskindemo\css\ directory and insert font-weight: bold; between the curly braces of these selectors, like so:
button[type="button"], button[type="reset"], button[type="submit"], input[type="reset"], input[type="submit"], input[type="button"] {
	font-weight: bold;
}
button[type="button"], button[type="reset"], button[type="submit"], input[type="reset"], input[type="submit"], input[type="button"] {
	font-weight: bold;
}
The desired changes have now been made, and you can proceed to building the new
PlugnSkinDemo skin and importing it into the project.
Build the skin by executing
mvn clean install from the P-n-S directory. This creates a target directory containing a JAR file with a newly-compiled skin. In our case, the file is named P-n-S-1.0.-SNAPSHOT.jar.
Next, import the new
PlugnSkinDemo skin into your project:
- Copy the
P-n-S-1.0.-SNAPSHOT.jarfile to the\WebContent\WEB-INF\lib\directory. - Add the name of the new skin to the
web.xmlfile, like so:<context-param> <param-name>org.ajax4jsf.SKIN</param-name> <param-value>PlugnSkinDemo</param-value> </context-param>
<context-param> <param-name>org.ajax4jsf.SKIN</param-name> <param-value>PlugnSkinDemo</param-value> </context-param>Copy to Clipboard Copied! Toggle word wrap Toggle overflow
Remember, standard controls skinning must be enabled in
web.xml. Add the following to enable standard controls skinning:
<context-param>
	<param-name>org.richfaces.CONTROL_SKINNING</param-name>
	<param-value>enable</param-value>
</context-param>
<context-param>
	<param-name>org.richfaces.CONTROL_SKINNING</param-name>
	<param-value>enable</param-value>
</context-param>
The results of each alteration to the skin are shown in the figures that follow:
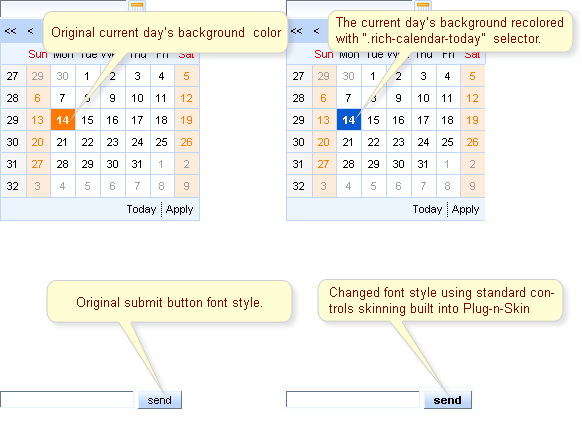
Figure 4.6. Plug-n-Skin feature in action.