此内容没有您所选择的语言版本。
11.9.5. Configure Group Role Assignment
Roles can be assigned to a user based on the user's membership of a user group.
Groups to be included or excluded from a role can be configured in the Management Console and the
jboss-cli.sh tool. This topic only shows using the Management Console.
Only users in the SuperUser or Administrator roles can perform this configuration.
The Group roles configuration in the management console can be found by following these steps:
- Login to the Management Console.
- Click on the Administration tab.
- Expand the Access Control item on the left and select Role Assignment.
- Select the GROUPS tab.

Figure 11.4. Group Role Management in the Management Console
Procedure 11.13. Create a new role assignment for a group
- Login to the Management console
- Navigate to the GROUPS tab of the Role Assignment section.
- Click the Add button at the top right of the user list. Add Group dialog appears
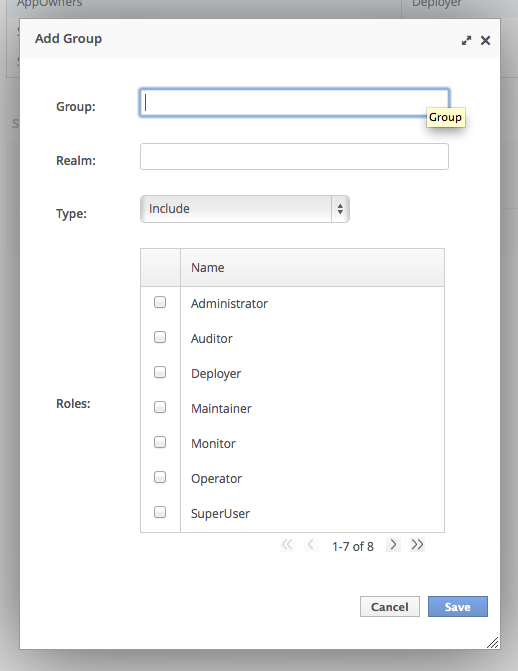
Figure 11.5. Add Group Dialog
- Specify the group name, and optionally the realm.
- Set the type menu to include or exclude.
- Click the checkbox of the roles to include or exclude. You can use the Control key (Command key on OSX) to check multiple items.
- Click save.When successful, the Add Group dialog closes, and the list of groups is updated to reflect the changes made. If unsuccessful a "Failed to save role assignment" message is displayed.
Procedure 11.14. Update a role assignment for a group
- Login to the Management console.
- Navigate to the GROUPS tab of the Role Assignment section.
- Select the group from the list.
- Click Edit. The Selection view enters Edit mode.
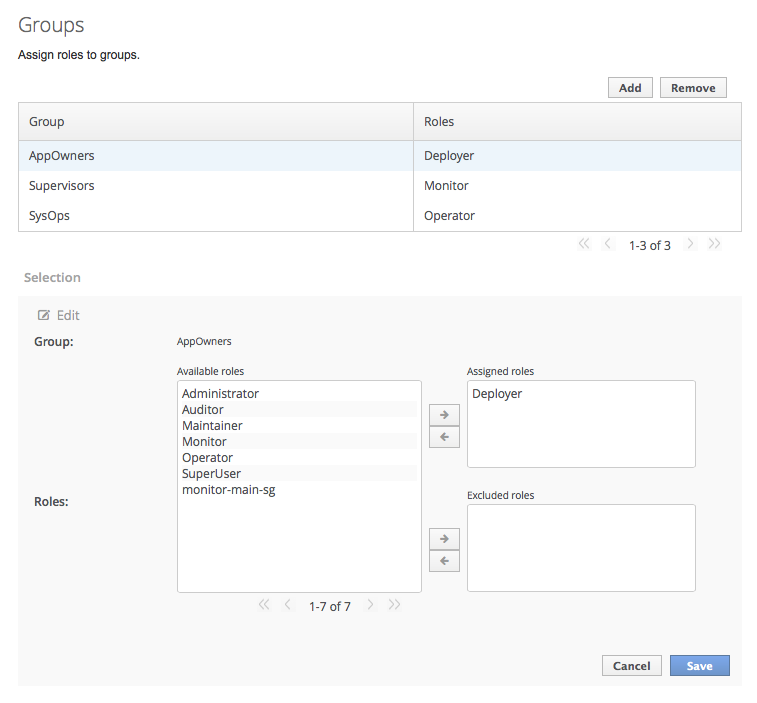
Figure 11.6. Selection View Edit Mode
Here you can add and remove assigned and excluded roles from the group:- To add assigned role, select the required role from the list of available roles on the left and click button with the right-facing arrow next to the assigned roles list. The role moves from the available list to the assigned list.
- To remove an assigned role, selected the required role from the assigned roles list on the right and click the button with the left-facing arrow next to the assigned roles list. The role moves from the assigned list to the available list.
- To add an excluded role, select the required role from the list of available roles on the left and click button with the right-facing arrow next to the excluded roles list. The role moves from the available list to the excluded list.
- To remove an excluded role, selected the required role from the excluded roles list on the right and click the button with the left-facing arrow next to the excluded roles list. The role moves from the excluded list to the available list.
- Click save.When successful, the edit view closes, and the list of groups is updated to reflect the changes made. If unsuccessful a "Failed to save role assignment" message is displayed.
Procedure 11.15. Remove role assignment for a group
- Login to the Management console.
- Navigate to the GROUPS tab of the Role Assignment section.
- Select the group from list.
- Click the Remove button. The Remove Role Assignment confirmation prompt appears.
- Click the Confirm button.When successful, the role will no longer appear in the list of user role assignments.Removing the group from the list of role assignments does not remove the user group from the system, nor does it guarantee that no roles will be assigned to members of that group. Each group member might still have a role assigned to them directly.