ActionFilter 可用于过滤操作。
Expand Name 值类型 选填 描述
contextId
string
否
上下文 ID 有助于将贡献操作的范围缩小到应用的特定区域。示例包括 topology 和 helm。
filter
CodeRef<(scope: any, action: Action) ⇒ boolean>
否
将根据某些条件过滤操作的功能。
scope:为其提供操作的范围。如果要使用 Pod 横向自动扩展 (HPA) 从部署中删除 ModifyCount 操作,则可能需要 hook。
Show more
ActionGroup 贡献一个操作组,也可以是一个子菜单
Expand Name 值类型 选填 描述
id
string
否
用于识别操作部分的 ID。
label
string
是
UI 中显示的标签。子菜单是必需的。
submenu
布尔值
是
此组是否应显示为子菜单。
insertBefore
string | string[]
是
在此处引用的项目前插入此项。对于数组,使用按顺序找到的第一个。
insertAfter
string | string[]
是
在此处引用的项目后插入此项。对于数组,使用按顺序找到的第一个。insertBefore 值具有优先权。
Show more
ActionProvider 贡献了一个 hook,用于返回特定上下文的操作列表。
Expand Name 值类型 选填 描述
contextId
string
否
上下文 ID 有助于将贡献操作的范围缩小到应用的特定区域。示例包括 topology 和 helm。
provider
CodeRef<ExtensionHook<Action[], any>>
否
一个 React hook,用于返回给定范围的操作。如果 contextId = resource,则范围始终为 Kubernetes 资源对象。
Show more
ResourceActionProvider 贡献 hook,用于返回特定资源模型的操作列表。
Expand Name 值类型 选填 描述
model
ExtensionK8sKindVersionModel
否
此提供程序提供操作的模型。
provider
CodeRef<ExtensionHook<Action[], any>>
否
反应 hook,它返回给定资源模型的操作
Show more
当控制台根据其 rule.name 值观察特定 Prometheus 警报时,此扩展可用于触发特定操作。
Expand Name 值类型 选填 描述
alert
string
否
由 alert.rule.name 属性定义的警报名称
text
string
否
action
CodeRef<(alert: any) ⇒ void>
否
执行副作用的功能
Show more
此扩展可用于插件,以生成一个可以过滤特定目录项的处理程序。例如,插件可以贡献从特定提供程序过滤 helm chart 的过滤器。
Expand Name 值类型 选填 描述
catalogId
string | string[]
否
此提供程序参与的目录的唯一标识符。
type
string
否
目录项目类型的类型 ID。
filter
CodeRef<(item: CatalogItem) ⇒ boolean>
否
过滤特定类型的项目。值是采用 CatalogItem[] 且根据过滤器标准返回子集的功能。
Show more
此扩展允许插件为目录项类型贡献供应商。例如,Helm 插件可以添加一个供应商来获取所有 Helm Charts。此扩展也可以被其他插件使用,来向特定的目录项类型添加更多项目。
Expand Name 值类型 选填 描述
catalogId
string | string[]
否
此提供程序参与的目录的唯一标识符。
type
string
否
目录项目类型的类型 ID。
title
string
否
目录项提供程序的标题
provider
CodeRef<ExtensionHook<CatalogItem<any>[], CatalogExtensionHookOptions>>
否
为目录获取项目并进行规范化。值是对 hook 做出反应。
priority
number
是
此提供程序的优先级。默认值为 0。优先级更高的提供程序可能会覆盖由其他供应商提供的目录项。
Show more
此扩展允许插件生成新的目录项。例如,Helm 插件可将新的目录项类型定义为它希望向 Developer Catalog 贡献的 HelmCharts。
Expand Name 值类型 选填 描述
type
string
否
目录项的类型。
title
string
否
目录项的标题。
catalogDescription
string | CodeRef<React.ReactNode>
是
特定与目录类型的描述。
typeDescription
string
是
目录项类型的描述。
filters
CatalogItemAttribute[]
是
特定于目录项的自定义过滤器。
groupings
CatalogItemAttribute[]
是
特定于目录项的自定义分组。
Show more
将新清单项添加到集群概览页面中。
Expand Name 值类型 选填 描述
component
CodeRef<React.ComponentType<{}>>
否
要呈现的组件。
Show more
添加新的集群概述多行使用项。
Expand Name 值类型 选填 描述
title
string
否
使用项目的标题。
getUtilizationQueries
CodeRef<GetMultilineQueries>
否
Prometheus 使用率查询。
humanize
CodeRef<Humanize>
否
将 Prometheus 数据转换为人类可读形式。
TopConsumerPopovers
CodeRef<React.ComponentType<TopConsumerPopoverProps>[]>
是
显示顶部消费者弹出而不是普通值
Show more
添加新的集群概览使用率项目。
Expand Name 值类型 选填 描述
title
string
否
使用项目的标题。
getUtilizationQuery
CodeRef<GetQuery>
否
Prometheus 使用率查询。
humanize
CodeRef<Humanize>
否
将 Prometheus 数据转换为人类可读形式。
getTotalQuery
CodeRef<GetQuery>
是
Prometheus 总计查询。
getRequestQuery
CodeRef<GetQuery>
是
Prometheus 请求查询。
getLimitQuery
CodeRef<GetQuery>
是
Prometheus 限制查询。
TopConsumerPopover
CodeRef<React.ComponentType<TopConsumerPopoverProps>>
是
显示顶部消费者弹出而不是普通值
Show more
在 web 控制台应用程序根目录中添加新的 React 上下文提供程序。
Expand Name 值类型 选填 描述
provider
CodeRef<Provider<T>>
否
上下文提供程序组件。
useValueHook
CodeRef<() ⇒ T>
否
上下文值的 hook。
Show more
添加新的仪表板卡。
Expand Name 值类型 选填 描述
tab
string
否
将添加到卡的仪表板标签的 ID。
position
'LEFT' | 'RIGHT' | 'MAIN'
否
该卡在仪表板上的网格位置。
component
CodeRef<React.ComponentType<{}>>
否
仪表板卡组件。
span
OverviewCardSpan
是
栏中卡的垂直范围。对于小屏幕会忽略,默认为 12。
Show more
在 Overview 仪表板的详情卡中添加项目。
Expand Name 值类型 选填 描述
title
string
否
详情卡标题
component
CodeRef<React.ComponentType<{}>>
否
由 OverviewDetailItem 组件呈现的值
valueClassName
string
是
className 的值
isLoading
CodeRef<() ⇒ boolean>
是
返回组件的加载状态的功能
错误
CodeRef<() ⇒ string>
是
组件显示的功能返回错误
Show more
在 Overview 仪表板的活动卡中添加一个活动,其中根据监视 Kubernetes 资源触发活动。
Expand Name 值类型 选填 描述
k8sResource
CodeRef<FirehoseResource & { isList: true; }>
否
要替换的 utilization 项。
component
CodeRef<React.ComponentType<K8sActivityProps<T>>>
否
操作组件。
isActivity
CodeRef<(resource: T) ⇒ boolean>
是
确定给定资源是否代表该操作的功能。如果没有定义,则每个资源都代表活动。
getTimestamp
CodeRef<(resource: T) ⇒ Date>
是
给定操作的时间戳,用于排序。
Show more
在 Overview
Expand Name 值类型 选填 描述
title
string
否
弹出菜单中的 Operators 部分的标题。
资源
CodeRef<FirehoseResource[]>
否
将获取并传递给 healthHandler 的 Kubernetes 资源。
getOperatorsWithStatuses
CodeRef<GetOperatorsWithStatuses<T>>
是
解析 Operator 的状态。
operatorRowLoader
CodeRef<React.ComponentType<OperatorRowProps<T>>>
是
弹出行组件的加载程序。
viewAllLink
string
是
链接到所有资源页面。如果没有提供,则使用资源 prop 中第一个资源的列表页面。
Show more
在 Status 为 Prometheus 的 Overview 仪表板的状态卡中添加一个健康子系统。
Expand Name 值类型 选填 描述
title
string
否
子系统的显示名称。
queries
string[]
否
Prometheus 查询。
healthHandler
CodeRef<PrometheusHealthHandler>
否
解决子系统的健康状况。
additionalResource
CodeRef<FirehoseResource>
是
将获取并传递给 healthHandler 的其他资源。
popupComponent
CodeRef<React.ComponentType<PrometheusHealthPopupProps>>
是
弹出式菜单内容的加载程序。如果定义,健康项表示为链接,它会打开一个带有给定内容的弹出窗口。
popupTitle
string
是
弹出的标题。
disallowedControlPlaneTopology
string[]
是
应该隐藏子系统的 control plane 拓扑。
Show more
在状态仪表板的 Overview 卡中添加一个健康子系统,其中状态源是一个 Kubernetes 资源。
Expand Name 值类型 选填 描述
title
string
否
子系统的显示名称。
资源
CodeRef<WatchK8sResources<T>>
否
将获取并传递给 healthHandler 的 Kubernetes 资源。
healthHandler
CodeRef<ResourceHealthHandler<T>>
否
解决子系统的健康状况。
popupComponent
CodeRef<WatchK8sResults<T>>
是
弹出式菜单内容的加载程序。如果定义,健康项表示为链接,它会打开一个带有给定内容的弹出窗口。
popupTitle
string
是
弹出的标题。
Show more
在状态仪表板的 Overview 卡中添加一个健康子系统,其中状态源是一个 Kubernetes REST API。
Expand Name 值类型 选填 描述
title
string
否
子系统的显示名称。
url
string
否
从中获取数据的 URL。它将以基本 Kubernetes URL 作为前缀。
healthHandler
CodeRef<URLHealthHandler<T, K8sResourceCommon | K8sResourceCommon[]>>
否
解决子系统的健康状况。
additionalResource
CodeRef<FirehoseResource>
是
将获取并传递给 healthHandler 的其他资源。
popupComponent
CodeRef<React.ComponentType<{ healthResult?: T; healthResultError?: any; k8sResult?: FirehoseResult<R>; }>>
是
弹出内容的加载程序。如果定义,则一个健康项目将显示为一个链接,该链接会打开给定内容弹出窗口中。
popupTitle
string
是
弹出的标题。
Show more
在概述清单卡中添加资源标题。
Expand Name 值类型 选填 描述
model
CodeRef<T>
否
将获取的资源模型。用于获取模型的 label 或 abbr。
mapper
CodeRef<StatusGroupMapper<T, R>>
是
将各种状态映射到组的功能。
additionalResources
CodeRef<WatchK8sResources<R>>
是
将获取并传递给映射程序函数的其他资源。
Show more
添加清单状态组。
Expand Name 值类型 选填 描述
id
string
否
状态组的 ID。
icon
CodeRef<React.ReactElement<any, string | React.JSXElementConstructor<any>>>
否
响应代表状态组图标的组件。
Show more
替换概述清单卡。
Expand Name 值类型 选填 描述
model
CodeRef<T>
否
将获取的资源模型。用于获取模型的 label 或 abbr。
mapper
CodeRef<StatusGroupMapper<T, R>>
是
将各种状态映射到组的功能。
additionalResources
CodeRef<WatchK8sResources<R>>
是
将获取并传递给映射程序函数的其他资源。
Show more
在 Prometheus Overview 仪表板的 Activity 卡中添加一个活动,该仪表板根据监视 Kubernetes 资源来触发活动。
Expand Name 值类型 选填 描述
queries
string[]
否
要监视的查询。
component
CodeRef<React.ComponentType<PrometheusActivityProps>>
否
操作组件。
isActivity
CodeRef<(results: PrometheusResponse[]) ⇒ boolean>
是
确定给定资源是否代表该操作的功能。如果没有定义,则每个资源都代表活动。
Show more
为项目概述清单卡中添加资源标题。
Expand Name 值类型 选填 描述
model
CodeRef<T>
否
将获取的资源模型。用于获取模型的 label 或 abbr。
mapper
CodeRef<StatusGroupMapper<T, R>>
是
将各种状态映射到组的功能。
additionalResources
CodeRef<WatchK8sResources<R>>
是
将获取并传递给映射程序函数的其他资源。
Show more
添加新仪表板选项卡,它位于 Overview
Expand Name 值类型 选填 描述
id
string
否
唯一标签页标识符,用作标签链接 href 以及在此标签页中添加卡时。
navSection
'home' | 'storage'
否
选项卡所属的导航部分。
title
string
否
选项卡的标题。
Show more
此扩展可用于为特定文件扩展提供文件丢弃操作的处理程序。
Expand Name 值类型 选填 描述
fileExtensions
string[]
否
支持的文件扩展。
handler
CodeRef<FileUploadHandler>
否
处理文件丢弃操作的功能。
Show more
提供对 Web 控制台功能标记的完整控制。
Expand Name 值类型 选填 描述
handler
CodeRef<FeatureFlagHandler>
否
用于设置或取消设置任意功能标记。
Show more
提供对带有 hook 处理程序的 Web 控制台功能标记的完整控制。
Expand Name 值类型 选填 描述
handler
CodeRef<FeatureFlagHandler>
否
用于设置或取消设置任意功能标记。
Show more
通过在集群中存在 CustomResourceDefinition (CRD) 对象来添加新的 Web 控制台功能标记。
Expand Name 值类型 选填 描述
flag
string
否
在检测到 CRD 后要设置的标记名称。
model
ExtensionK8sModel
否
引用 CRD 的模型。
Show more
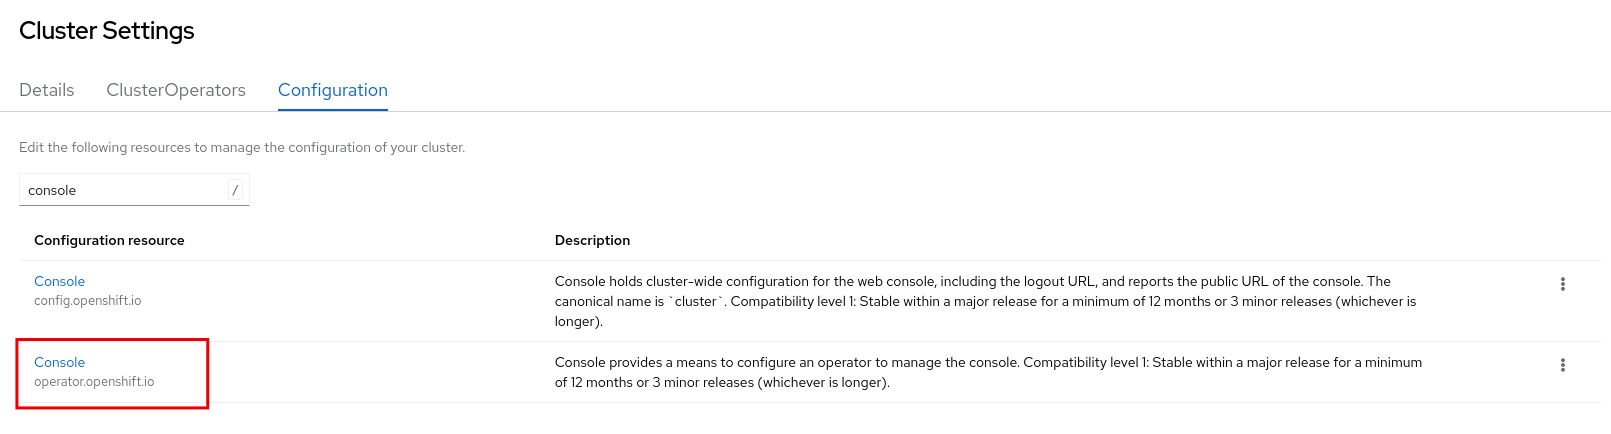
此扩展标识用于管理集群配置的资源。资源的链接将添加到 Administration Cluster Settings Configuration
Expand Name 值类型 选填 描述
id
string
否
集群配置资源实例的唯一标识符。
name
string
否
集群配置资源实例的名称。
model
ExtensionK8sModel
否
指代集群配置资源的模型。
namespace
string
否
集群配置资源实例的命名空间。
Show more
此扩展可用于贡献指向 UI 中特定链接的导航项。
Expand Name 值类型 选填 描述
id
string
否
此项目的唯一标识符。
name
string
否
此项目的名称。
href
string
否
链接 href 值。
perspective
string
是
此项目所属的视角 ID。若未指定,则向默认视角。
节
string
是
导航此项目所属的导航部分。如果未指定,请将此项目呈现为顶级链接。
dataAttributes
{ [key: string]: string; }
是
在 DOM 中添加数据属性。
startsWith
string[]
是
当 URL 从其中一个路径之一时,将此项标记为 active。
insertBefore
string | string[]
是
在此处引用的项目前插入此项。对于数组,使用按顺序找到的第一个。
insertAfter
string | string[]
是
在此处引用的项目后插入此项。对于数组,使用按顺序找到的第一个。insertBefore 具有高优先级。
namespaced
布尔值
是
如果为 true,请在末尾添加 /ns/active-namespace。
prefixNamespaced
布尔值
是
如果为 true,将 /k8s/ns/active-namespace 添加到起始位置。
Show more
此扩展可用于贡献指向集群资源详情页面的导航项。该资源的 K8s 模型可用于定义导航项。
Expand Name 值类型 选填 描述
id
string
否
此项目的唯一标识符。
model
ExtensionK8sModel
否
此导航项目所链接的模型。
perspective
string
是
此项目所属的视角 ID。若未指定,则向默认视角。
节
string
是
导航此项目所属的导航部分。如果未指定,请将此项目呈现为顶级链接。
dataAttributes
{ [key: string]: string; }
是
在 DOM 中添加数据属性。
startsWith
string[]
是
当 URL 从其中一个路径之一时,将此项标记为 active。
insertBefore
string | string[]
是
在此处引用的项目前插入此项。对于数组,使用按顺序找到的第一个。
insertAfter
string | string[]
是
在此处引用的项目后插入此项。对于数组,使用按顺序找到的第一个。insertBefore 具有高优先级。
name
string
是
覆盖默认名称。如果没有提供链接的名称,则会与模型的复数值相同。
Show more
此扩展可用于贡献指向命名空间资源详情页面的导航项。该资源的 K8s 模型可用于定义导航项。
Expand Name 值类型 选填 描述
id
string
否
此项目的唯一标识符。
model
ExtensionK8sModel
否
此导航项目所链接的模型。
perspective
string
是
此项目所属的视角 ID。若未指定,则向默认视角。
节
string
是
导航此项目所属的导航部分。如果未指定,请将此项目呈现为顶级链接。
dataAttributes
{ [key: string]: string; }
是
在 DOM 中添加数据属性。
startsWith
string[]
是
当 URL 从其中一个路径之一时,将此项标记为 active。
insertBefore
string | string[]
是
在此处引用的项目前插入此项。对于数组,使用按顺序找到的第一个。
insertAfter
string | string[]
是
在此处引用的项目后插入此项。对于数组,使用按顺序找到的第一个。insertBefore 具有高优先级。
name
string
是
覆盖默认名称。如果没有提供链接的名称,则会与模型的复数值相同。
Show more
此扩展可用于在导航选项卡中定义导航项的新部分。
Expand Name 值类型 选填 描述
id
string
否
此项目的唯一标识符。
perspective
string
是
此项目所属的视角 ID。若未指定,则向默认视角。
dataAttributes
{ [key: string]: string; }
是
在 DOM 中添加数据属性。
insertBefore
string | string[]
是
在此处引用的项目前插入此项。对于数组,使用按顺序找到的第一个。
insertAfter
string | string[]
是
在此处引用的项目后插入此项。对于数组,使用按顺序找到的第一个。insertBefore 具有高优先级。
name
string
是
本节的名称。如果没有提供,上面部分将仅显示一个分隔符。
Show more
此扩展可用于在导航中的导航项目之间添加分隔符。
Expand Name 值类型 选填 描述
id
string
否
此项目的唯一标识符。
perspective
string
是
此项目所属的视角 ID。若未指定,则向默认视角。
节
string
是
导航此项目所属的导航部分。如果未指定,请将此项目呈现为顶级链接。
dataAttributes
{ [key: string]: string; }
是
在 DOM 中添加数据属性。
insertBefore
string | string[]
是
在此处引用的项目前插入此项。对于数组,使用按顺序找到的第一个。
insertAfter
string | string[]
是
在此处引用的项目后插入此项。对于数组,使用按顺序找到的第一个。insertBefore 具有高优先级。
Show more Expand Name 值类型 选填 描述
model
ExtensionK8sGroupKindModel
否
此资源页面链接到的型号。
component
CodeRef<React.ComponentType<{ match: match<{}>; namespace: string; model: ExtensionK8sModel; }>>
否
路由匹配时要呈现的组件。
Show more
向控制台路由器添加新的资源列表页面。
Expand Name 值类型 选填 描述
model
ExtensionK8sGroupKindModel
否
此资源页面链接到的型号。
component
CodeRef<React.ComponentType<{ match: match<{}>; namespace: string; model: ExtensionK8sModel; }>>
否
路由匹配时要呈现的组件。
Show more
在 Web 控制台路由器中添加新页面。请参阅 React Router 。
Expand Name 值类型 选填 描述
component
CodeRef<React.ComponentType<RouteComponentProps<{}, StaticContext, any>>>
否
路由匹配时要呈现的组件。
path
string | string[]
否
path-to-regexp@^1.7.0 可以理解的有效 URL 路径或路径数组。
perspective
string
是
此页面所属的视图。如果没有指定,则会对所有视角贡献。
exact
布尔值
是
为 true 时,只有在路径与 location.pathname 完全匹配时才会匹配。
Show more
向 web 控制台路由器中添加在通用页面布局外呈现的新独立页面。请参阅 React Router 。
Expand Name 值类型 选填 描述
component
CodeRef<React.ComponentType<RouteComponentProps<{}, StaticContext, any>>>
否
路由匹配时要呈现的组件。
path
string | string[]
否
path-to-regexp@^1.7.0 可以理解的有效 URL 路径或路径数组。
exact
布尔值
是
为 true 时,只有在路径与 location.pathname 完全匹配时才会匹配。
Show more
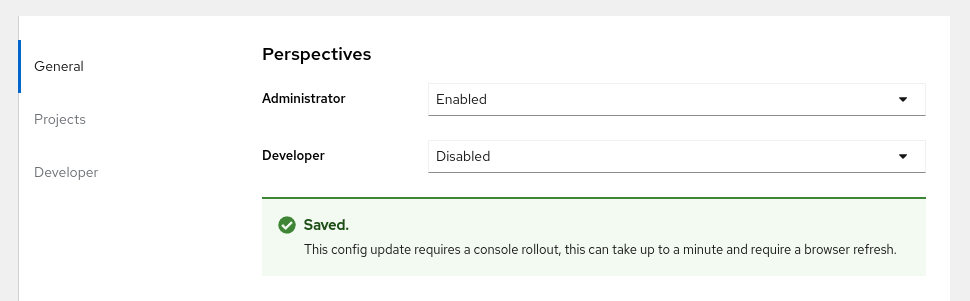
此扩展为控制台贡献一个新的视角,它允许自定义导航菜单。
Expand Name 值类型 选填 描述
id
string
否
透视图标识符。
name
string
否
视角显示名称。
icon
CodeRef<LazyComponent>
否
视角显示图标。
landingPageURL
CodeRef<(flags: { [key: string]: boolean; }, isFirstVisit: boolean) ⇒ string>
否
获取视角登录页面 URL 的功能。
importRedirectURL
CodeRef<(namespace: string) ⇒ string>
否
获取导入流的重定向 URL。
default
布尔值
是
这个视角是默认的。只能有一个默认值。
defaultPins
ExtensionK8sModel[]
是
nav 上的默认固定资源
usePerspectiveDetection
CodeRef<() ⇒ [boolean, boolean]>
是
要检测默认视角的 hook
Show more
在 Project Overview
Expand Name 值类型 选填 描述
component
CodeRef<React.ComponentType<{ projectName: string; }>>
否
要呈现的组件。
Show more
添加新项目概述使用率项目。
Expand Name 值类型 选填 描述
title
string
否
使用项目的标题。
getUtilizationQuery
CodeRef<GetProjectQuery>
否
Prometheus 使用率查询。
humanize
CodeRef<Humanize>
否
将 Prometheus 数据转换为人类可读形式。
getTotalQuery
CodeRef<GetProjectQuery>
是
Prometheus 总计查询。
getRequestQuery
CodeRef<GetProjectQuery>
是
Prometheus 请求查询。
getLimitQuery
CodeRef<GetProjectQuery>
是
Prometheus 限制查询。
TopConsumerPopover
CodeRef<React.ComponentType<TopConsumerPopoverProps>>
是
显示 top consumer 弹出窗而不是纯值。
Show more
此扩展可用于在 PVC 详情页面中贡献自定义警报。
Expand Name 值类型 选填 描述
alert
CodeRef<React.ComponentType<{ pvc: K8sResourceCommon; }>>
否
警报组件。
Show more
此扩展可以用来指定在 PVC 列表页面中创建 PVC 资源时使用的附加属性。
Expand Name 值类型 选填 描述
label
string
否
创建 prop 操作的标签。
path
string
否
创建 prop 操作的路径。
Show more
此扩展允许 hook 删除 PVC 资源。它可以为警报提供额外的信息和自定义 PVC 删除逻辑。
Expand Name 值类型 选填 描述
predicate
CodeRef<(pvc: K8sResourceCommon) ⇒ boolean>
否
告知是否使用扩展名的 predicate。
onPVCKill
CodeRef<(pvc: K8sResourceCommon) ⇒ Promise<void>>
否
PVC 删除操作的方法。
alert
CodeRef<React.ComponentType<{ pvc: K8sResourceCommon; }>>
否
警报组件以显示其他信息。
Show more Expand Name 值类型 选填 描述
priority
number
否
状态组件的优先级。较大的值代表优先级更高。
status
CodeRef<React.ComponentType<{ pvc: K8sResourceCommon; }>>
否
状态组件。
predicate
CodeRef<(pvc: K8sResourceCommon) ⇒ boolean>
否
指示是否呈现状态组件的 predicate。
Show more
为 Console Red Hatux 存储添加了新的减少程序,该存储在 plugins.<scope> 子状态上运行。
Expand Name 值类型 选填 描述
scope
string
否
代表 Red Hatux 状态对象中减少管理的子状态的关键。
reducer
CodeRef<Reducer<any, AnyAction>>
否
reducer 函数,在 reducer-managed substate 中操作。
Show more
此扩展允许插件为特定资源提供自定义资源(如向导或表单)的自定义资源,当用户尝试创建新资源实例时,这些组件会被呈现。
Expand Name 值类型 选填 描述
model
ExtensionK8sModel
否
此创建资源页面将呈现的型号
component
CodeRef<React.ComponentType<CreateResourceComponentProps>>
否
当模型匹配时要呈现的组件
Show more
在详情页面的默认资源摘要中添加一个新的详情项。
Expand Name 值类型 选填 描述
model
ExtensionK8sModel
否
主题资源的 API 组、版本和类型。
id
string
否
唯一标识符。
column
DetailsItemColumn
否
确定项目是否将显示在详细信息页面上的资源摘要的"左"或"右"列中。默认:"右"
title
string
否
详情项标题。
path
string
是
一个可选的、完全限定的、资源属性的路径,用作详情项目值。只能直接渲染 primitive type 值。使用 component 属性处理其他数据类型。
component
CodeRef<React.ComponentType<DetailsItem ComponentProps<K8sResourceCommon, any>>>
是
可选的 React 组件,用于呈现详情项目值。
sortWeight
number
是
可选的排序权重,相对于同一列中的所有其他详细信息项目。由任何有效的 JavaScriptNumber 表示。每个列中的项目都被独立排序,从最低到最高。没有排序权重的项目在带有排序权重的项目排序。
Show more
在存储类创建过程中,添加新的存储类置备程序作为选项。
Expand Name 值类型 选填 描述
CSI
ProvisionerDetails
是
Container Storage Interface provisioner 类型
OTHERS
ProvisionerDetails
是
其他置备程序类型
Show more
此扩展可用于生成新的存储供应商,以便在附加存储和供应商特定组件时进行选择。
Expand Name 值类型 选填 描述
name
string
否
显示提供程序的名称。
组件
CodeRef<React.ComponentType<Partial<RouteComponentProps<{}, StaticContext, any>>>>
否
要呈现的供应商特定组件。
Show more
向与 contextId 匹配的 nav 中添加一个标签页。
Expand Name 值类型 选填 描述
contextId
string
否
分配给水平 nav 的上下文 ID,在其中注入选项卡。可能的值: dev-console-observe
name
string
否
选项卡的显示标签
href
string
否
href 附加到现有 URL
component
CodeRef<React.ComponentType<PageComponentProps<K8sResourceCommon>>>
否
选项卡内容组件。
Show more
此扩展可用于在资源详情页面中添加标签页。
Expand Name 值类型 选填 描述
model
ExtensionK8sKindVersionModel
否
此提供程序显示选项卡的型号。
page
{ name: string; href: string; }
否
要在水平标签页中显示的页面。它取标签名称作为名称,并且是 href 的选项卡
component
CodeRef<React.ComponentType<PageComponentProps<K8sResourceCommon>>>
否
路由匹配时要呈现的组件。
Show more
此组件可用于注册接收遥测事件的监听程序功能。这些事件包括用户识别、页面导航和其他特定应用程序的事件。侦听器可以使用这些数据进行报告和分析目的。
Expand Name 值类型 选填 描述
listener
CodeRef<TelemetryEventListener>
否
侦听遥测事件
Show more
BuildAdapter 贡献适配器将元素适应 Build 组件可以使用的数据
Expand Name 值类型 选填 描述
adapt
CodeRef<(element: GraphElement) ⇒ AdapterDataType<BuildConfigData> | undefined>
否
用于调整元素以适用于 Build 组件的适配器。
Show more
NetworkAdpater 贡献适配器,将元素适应数据,以供 Networking 组件使用
Expand Name 值类型 选填 描述
adapt
CodeRef<(element: GraphElement) ⇒ NetworkAdapterType | undefined>
否
用于调整元素以适用于 Networking 组件的适配器。
Show more
PodAdapter 贡献一个适配器,将元素适应 Pod 组件可以使用的数据。
Expand Name 值类型 选填 描述
adapt
CodeRef<(element: GraphElement) ⇒ AdapterDataType<PodsAdapterDataType> | undefined>
否
用于调整元素以适用于 Pod 组件的适配器。
Show more
ViewComponentFactory 的 getter。
Expand Name 值类型 选填 描述
getFactory
CodeRef<ViewComponentFactory>
否
ViewComponentFactory 的 getter。
Show more
创建连接器功能的 getter。
Expand Name 值类型 选填 描述
getCreateConnector
CodeRef<CreateConnectionGetter>
否
创建连接器功能的 getter。
Show more
拓扑数据模型工厂扩展
Expand Name 值类型 选填 描述
id
string
否
工厂的唯一 ID。
priority
number
否
工厂的优先级
资源
WatchK8sResourcesGeneric
是
要从 useK8sWatchResources hook 获取的资源。
workloadKeys
string[]
是
包含工作负载的资源中的密钥。
getDataModel
CodeRef<TopologyDataModelGetter>
是
数据模型工厂的 getter。
isResourceDepicted
CodeRef<TopologyDataModelDepicted>
是
用于确定资源是否由这个模型描述的 getter。
getDataModelReconciler
CodeRef<TopologyDataModelReconciler>
是
在所有扩展模型加载后用于协调数据模型的功能。
Show more
拓扑声明器供应商扩展
Expand Name 值类型 选填 描述
id
string
否
拓扑 decorator 的 ID,特定于扩展
priority
number
否
拓扑 decorator 的优先级,特定于扩展
quadrant
TopologyQuadrant
否
拓扑 decorator 的 Quadrant,特定于扩展
decorator
CodeRef<TopologyDecoratorGetter>
否
特定于扩展的 decorator
Show more
DetailsResourceAlert 为特定拓扑上下文或图形元素贡献警报。
Expand Name 值类型 选填 描述
id
string
否
此警报的 ID。用于保存状态,如果警报在丢弃后不应显示。
contentProvider
CodeRef<(element: GraphElement) ⇒ DetailsResourceAlertContent | null>
否
返回警报内容的 hook。
Show more
DetailsResourceLink 为特定拓扑上下文或图形元素贡献一个链接。
Expand Name 值类型 选填 描述
link
CodeRef<(element: GraphElement) ⇒ React.Component | undefined>
否
如果提供,则返回资源链接,否则未定义。将 ResourceIcon 和 ResourceLink 属性用于风格。
priority
number
是
一个高的优先级可以在第一个机会出现时创建链接。
Show more
DetailsTab 为拓扑详情面板提供标签页。
Expand Name 值类型 选填 描述
id
string
否
此详细信息标签的唯一标识符。
label
string
否
要在 UI 中显示的标签标签。
insertBefore
string | string[]
是
在此处引用的项目前插入此项。对于数组,使用按顺序找到的第一个。
insertAfter
string | string[]
是
在此处引用的项目后插入此项。对于数组,使用按顺序找到的第一个。insertBefore 值具有优先权。
Show more
DetailsTabSection 对拓扑详情面板中的特定标签页贡献了一个部分。
Expand Name 值类型 选填 描述
id
string
否
此详细信息选项卡部分的唯一标识符。
tab
string
否
本节应贡献的父选项卡 ID。
provider
CodeRef<DetailsTabSectionExtensionHook>
否
返回组件的 hook,或者如果为 null 或未定义,会在拓扑栏中显示。SDK 组件:<Section title=\{}>… padded 区域
节
CodeRef<(element: GraphElement, renderNull?: () ⇒ null) ⇒ React.Component | undefined>
否
Deprecated: 如果没有定义供应商会 Fallback,renderNull 已是一个 no-op。
insertBefore
string | string[]
是
在此处引用的项目前插入此项。对于数组,使用按顺序找到的第一个。
insertAfter
string | string[]
是
在此处引用的项目后插入此项。对于数组,使用按顺序找到的第一个。insertBefore 值具有优先权。
Show more
拓扑显示过滤器扩展
Expand Name 值类型 选填 描述
getTopologyFilters
CodeRef<() ⇒ TopologyDisplayOption[]>
否
特定于扩展的拓扑过滤器的 getter
applyDisplayOptions
CodeRef<TopologyApplyDisplayOptions>
否
将过滤器应用到模型的功能
Show more
拓扑关系供应商连接器扩展
Expand Name 值类型 选填 描述
provides
CodeRef<RelationshipProviderProvides>
否
用于确定是否可以在源和目标节点之间创建连接
工具提示
string
否
显示连接器操作将鼠标悬停在 drop 目标的工具,例如:"Create a Visual Connector"
create
CodeRef<RelationshipProviderCreate>
否
连接器通过目标节点丢弃时执行的回调以创建连接
priority
number
否
关系的优先级,在有多个情况下,首选更高的优先级
Show more
此扩展可用于在控制台 user-preferences 页面中添加组。它将在控制台 user-preferences 页面中显示为垂直标签页选项。
Expand Name 值类型 选填 描述
id
string
否
用于识别用户首选项组的 ID。
label
string
否
用户首选项组的标签
insertBefore
string
是
应该放置此组前的用户首选项组群 ID
insertAfter
string
是
应该放置此组的用户首选项组群 ID
Show more
此扩展可用于在控制台用户首选项页面中的用户首选项组群中添加项目。
Expand Name 值类型 选填 描述
id
string
否
ID 用于识别用户首选项项目,并在 insertAfter 和 insertBefore 中引用来定义项目顺序
label
string
否
用户首选项的标签
description
string
否
用户首选项的描述
field
UserPreferenceField
否
用于呈现值来设置用户首选项的输入字段选项
groupId
string
是
用于识别项目所属的用户首选项组的 ID
insertBefore
string
是
应放置此项目前的用户首选项项目 ID
insertAfter
string
是
用户首选项项目的 ID,之后应放置此项目
Show more
通过 yaml 编辑器编辑资源的 YAML 模板。
Expand Name 值类型 选填 描述
model
ExtensionK8sModel
否
与模板关联的模型。
模板
CodeRef<string>
否
YAML 模板。
name
string
否
模板的名称。使用名称 default 将其标记为默认模板。
Show more
此扩展允许插件在开发人员视角的 add 页面中贡献 add action 项。例如,无服务器插件可以添加一个新的 action 项,用于在开发人员控制台的添加页面中添加无服务器功能。
Expand Name 值类型 选填 描述
id
string
否
用于识别操作的 ID。
label
string
否
操作的标签。
description
string
否
操作的描述。
href
string
否
要进入到的 href。
groupId
string
是
用于识别该操作所属的操作组的 ID。
icon
CodeRef<React.ReactNode>
是
视角显示图标。
accessReview
AccessReviewResourceAttributes[]
是
可选访问查看来控制操作的可见性或启用。
Show more
此扩展允许插件在开发人员控制台的添加页面中继续组。组可以被操作引用,这些操作将根据它们的扩展定义在 add 操作页面中分组。例如,Serverless 插件可以贡献 Serverless 组,以及多个 add 操作。
Expand Name 值类型 选填 描述
id
string
否
用于识别操作组的 ID
name
string
否
操作组的标题
insertBefore
string
是
应该放置此组的操作组群 ID
insertAfter
string
是
应该放置此组的操作组群 ID
Show more
此扩展可用于在开发人员控制台 git import 表单的构建器镜像选择器下指定额外的构建环境变量字段。设置后,字段将覆盖 build 部分中相同名称的环境变量。
Expand Name 值类型 选填 描述
imageStreamName
string
否
为提供自定义环境变量的镜像流名称
imageStreamTags
string[]
否
支持的镜像流标签列表
environments
ImageEnvironment[]
否
环境变量列表
Show more
弃用。使用 CustomOverviewDetailItem 类型
Expand Name 值类型 选填 描述
component
CodeRef<React.ComponentType<{}>>
否
基于 DetailItem 组件的值
Show more
已弃用。使用 console.tab/horizontalNav 替代。添加新资源选项卡页面到控制台路由器。
Expand Name 值类型 选填 描述
model
ExtensionK8sGroupKindModel
否
此资源页面链接到的型号。
component
CodeRef<React.ComponentType<RouteComponentProps<{}, StaticContext, any>>>
否
路由匹配时要呈现的组件。
name
string
否
选项卡的名称。
href
string
是
选项卡链接的可选 href。如果没有提供,则使用第一个 path。
exact
布尔值
是
为 true 时,只有在路径与 location.pathname 完全匹配时才会匹配。
Show more
提供用于设置活跃视角的 hook,以及用于设置活跃视角的回调。它返回一个包含当前活跃视角和 setter 回调的元组。
显示绿色勾号图标的组件。
Expand 参数名称 描述
className
(可选)组件的额外类名称
title
(可选)图标标题
size
(可选)图标大小:(sm,md,lg,xl)
Show more
用于显示感叹号圆圈图标的组件。
Expand 参数名称 描述
className
(可选)组件的额外类名称
title
(可选)图标标题
size
(可选)图标大小:(sm,md,lg,xl)
Show more
用于显示一个黄色三角形感叹号图标的组件。
Expand 参数名称 描述
className
(可选)组件的额外类名称
title
(可选)图标标题
size
(可选)图标大小:(sm,md,lg,xl)
Show more
用于显示信息的蓝色圆圈图标的组件。
Expand 参数名称 描述
className
(可选)组件的额外类名称
title
(可选)图标标题
size
(可选)图标大小:('sm', 'md', 'lg', 'xl')
Show more
用于显示错误状态弹出的组件。
Expand 参数名称 描述
title
(可选)状态文本
iconOnly
(可选)如果为 true,则仅显示图标
noTooltip
(可选)如果为 true,则不会显示工具提示
className
(可选)组件的额外类名称
popoverTitle
(可选)弹出的标题
Show more
用于显示信息状态弹出窗口的组件。
Expand 参数名称 描述
title
(可选)状态文本
iconOnly
(可选)如果为 true,则仅显示图标
noTooltip
(可选)如果为 true,则不会显示工具提示
className
(可选)组件的额外类名称
popoverTitle
(可选)弹出的标题
Show more
显示进度状态弹出的组件。
Expand 参数名称 描述
title
(可选)状态文本
iconOnly
(可选)如果为 true,则仅显示图标
noTooltip
(可选)如果为 true,则不会显示工具提示
className
(可选)组件的额外类名称
popoverTitle
(可选)弹出的标题
Show more
用于显示成功状态弹出窗口的组件。
Expand 参数名称 描述
title
(可选)状态文本
iconOnly
(可选)如果为 true,则仅显示图标
noTooltip
(可选)如果为 true,则不会显示工具提示
className
(可选)组件的额外类名称
popoverTitle
(可选)弹出的标题
Show more
提供有关用户对给定资源的访问权限的信息。它返回一个具有资源访问信息的对象。
Expand 参数名称 描述
resourceAttributes
访问查看的资源属性
impersonate
模拟详情
Show more
hook,提供有关用户对给定资源的访问权限的信息。它返回一个带有 isAllowed 和 loading 值的数组。
Expand 参数名称 描述
resourceAttributes
访问查看的资源属性
impersonate
模拟详情
Show more
使用已解析的 CodeRef 属性为消耗控制台扩展做出反应 hook。此 hook 接受与 useExtensions hook 相同的参数,并返回自适应扩展实例列表,从而解析每个扩展属性中的所有代码引用。
最初,hook 返回一个空数组。完成解析后,React 组件将重新渲染,使用 hook 返回已修改的扩展列表。当匹配扩展列表更改时,会重启解析。hook 将继续返回前面的结果,直到解析完成为止。
hook 结果元素保证在重新方之间保持稳定。它返回一个包含已解析代码引用的自适应扩展实例列表的元组、指示解析是否完成的布尔值标志,以及在解析过程中检测到的错误列表。
Expand 参数名称 描述
typeGuards
每个接受动态插件扩展作为参数的回调列表,并返回布尔值标记,指示扩展是否满足所需的类型限制
Show more
为页面创建导航栏的组件。路由作为组件的一部分进行处理。console.tab/horizontalNav 可用于向任何横向导航中添加额外的内容。
Expand 参数名称 描述
resource
与这个 Navigation 关联的资源,对象为 K8sResourceCommon 类型
pages
页面对象数组
match
匹配 React Router 提供的对象
Show more
创建虚拟化表的组件。
Expand 参数名称 描述
data
表的数据
loaded
表示数据已加载的标记
loadError
如果问题载入数据,则错误对象
columns
列设置
Row
行设置
unfilteredData
没有过滤器的原始数据
NoDataEmptyMsg
(可选)没有数据空消息组件
EmptyMsg
(可选)空消息组件
scrollNode
(可选)处理滚动的功能
label
(可选)表的标签
ariaLabel
(可选)aria 标签
gridBreakPoint
调整用于响应的网格如何分隔
onSelect
(可选)处理表选择的功能
rowData
(可选)特定于行的数据
Show more
用于在表行中显示表数据的组件。
Expand 参数名称 描述
id
表的唯一 ID
activeColumnIDs
active 列
className
(可选) 风格的选项类名称
Show more
一个 hook,它提供了用户选择的 active TableColumns 列表。
Expand 参数名称 描述
options
哪些作为键-值映射传递
\{TableColumn[]} options.columns
所有可用 TableColumns 的数组
{boolean} [options.showNamespaceOverride]
(可选)如果为 true,则会包括命名空间列,无论列管理选择是什么
{string} [options.columnManagementID]
(可选)用于保留和检索列管理选择的唯一 ID,并从用户设置中保留和检索列管理选择。通常,一个资源的 group/version/kind (GVK) 字符串。
Show more
包含当前用户所选活跃列(options.columns 的子集)和布尔值标志,指示用户设置是否已加载。
用于为特定资源类型添加创建按钮的组件,它们会自动为该资源创建 YAML 生成链接。
Expand 参数名称 描述
groupVersionKind
要代表的资源组/版本/类型
Show more
用于创建样式链接的组件。
Expand 参数名称 描述
至
链接应连接到的字符串位置
createAccessReview
(可选)用于决定访问的命名空间和 kind 的对象
children
(可选)组件的子项
Show more
创建按钮的组件。
Expand 参数名称 描述
createAccessReview
(可选)用于决定访问的命名空间和 kind 的对象
pfButtonProps
(可选) Patternfly Button props
Show more
创建权限检查嵌套的下拉菜单的组件。
Expand 参数名称 描述
items
Key:ReactNode 对,以便在组件下拉列表中显示
onClick
点下拉菜单项目的回调功能
createAccessReview
(可选)用于决定访问的命名空间和 kind 的对象
children
(可选)下拉菜单的子项
Show more
为列表页面生成过滤器的组件。
Expand 参数名称 描述
data
一个数据点的数组
loaded
表示数据已加载
onFilterChange
更新过滤器时的回调功能
rowFilters
(可选)定义可用过滤器选项的 RowFilter 元素的数组
nameFilterPlaceholder
(可选)名称过滤器的占位符
labelFilterPlaceholder
(可选)标签过滤器的占位符
hideLabelFilter
(可选)仅显示 name 过滤器,而不是 name 和 label 过滤器
hideNameLabelFilter
(可选)隐藏 name 和 label filter
columnLayout
(可选)列布局对象
hideColumnManagement
(可选)隐藏列管理的标记
Show more
管理 ListPageFilter 组件的过滤器状态的 hook。它返回一个 tuple,其中包含由所有静态过滤器过滤的数据、由所有静态和行过滤器过滤的数据,以及更新 rowFilters 的回调。
Expand 参数名称 描述
data
一个数据点的数组
rowFilters
(可选)定义可用过滤器选项的 RowFilter 元素的数组
staticFilters
(可选)静态应用到数据的 FilterValue 元素的数组
Show more
创建指向带有图标徽标的特定资源类型的链接的组件。
Expand 参数名称 描述
kind
(可选)资源(如 Pod、Deployment、Namespace)的类型
groupVersionKind
(可选)带有 group、version 和 kind 的对象
className
(可选)组件类风格
displayName
(可选)组件显示名称,如果设置则覆盖资源名称
inline
(可选)使用子项创建图标徽标和名称标记
linkTo
(可选)创建 Link 对象的标记 - 默认为 true
name
(可选)资源名称
namesapce
(可选)要链接到的 kind 资源的特定命名空间
hideIcon
(可选)隐藏图标徽标的标记
title
(可选)链接对象的标题(未显示)
dataTest
(可选)用于测试的标识符
onClick
(可选)当点组件时的回调功能
truncate
(可选)用于截断链接(如果太长)的标记
Show more
为特定资源类型创建图标徽标的组件。
Expand 参数名称 描述
kind
(可选)资源(如 Pod、Deployment、Namespace)的类型
groupVersionKind
(可选)带有 group、version 和 kind 的对象
className
(可选)组件类风格
Show more
用于为来自 redux 的 K8sGroupVersionKind 获取 k8s 模型的 hook。它返回一个数组,第一个项为 k8s 模型,第二个项目为 inFlight 状态。
Expand 参数名称 描述
groupVersionKind
group, version, k8s 资源 kind K8sGroupVersionKind 是首选的,或为 group, version 传递引用,kind 已弃用,例如 group/version/kind (GVK) K8sResourceKindReference。
Show more
从 redux 检索所有当前 k8s 模型的 hook。它返回一个数组,第一个项是 k8s 模型列表,第二个项目是 inFlight 状态。
检索 k8s 资源以及加载和错误的状态的 hook。它返回一个数组,包含第一个项目作为资源,第二个项目作为加载的状态,第三个项目则作为错误状态(若有)。
Expand 参数名称 描述
initResource
监视资源所需的选项。
Show more
检索 k8s 资源的 hook,以及它们的相应状态用于加载和错误。它返回一个映射,在 initResouces 中提供的键,值有三个属性 data, loaded 和 error。
Expand 参数名称 描述
initResources
资源需要被监视为键值对,其中键对于资源是唯一的,值将是监视相应资源的选项。
Show more
一个围绕 fetch 添加控制台特定标头的自定义打包程序,并允许重试和超时。它还验证响应状态代码,并抛出适当的错误或根据需要注销用户。它返回一个可以解析到响应的承诺。
Expand 参数名称 描述
url
要获取的 URL
options
传递给获取的选项
timeout
以毫秒为单位的超时时间
Show more
围绕 fetch 的自定义打包程序,添加特定于控制台的标头并允许重试和超时。它还验证响应状态代码,并在需要时抛出适当的错误或注销用户。它将响应返回为 JSON 对象。在内部使用 consoleFetch。它返回一个承诺,它将解析为 JSON 对象的响应。
Expand 参数名称 描述
url
要获取的 URL
方法
要使用的 HTTP 方法。默认为 GET
options
传递给获取的选项
timeout
以毫秒为单位的超时时间
cluster
发出请求的集群名称。默认为用户选择的活跃集群
Show more
围绕 fetch 的自定义打包程序,添加特定于控制台的标头并允许重试和超时。它还验证响应状态代码,并在需要时抛出适当的错误或注销用户。它将响应返回为文本。在内部使用 consoleFetch。它返回一个能以文本方式解析到响应的承诺。
Expand 参数名称 描述
url
要获取的 URL
options
传递给获取的选项
timeout
以毫秒为单位的超时时间
cluster
发出请求的集群名称。默认为用户选择的活跃集群
Show more
它根据提供的选项从集群获取资源。如果提供了名称,它会返回一个资源,它会返回与模型匹配的所有资源。如果名称被提供,它会返回一个承诺,它将作为 JSON 对象解析到 JSON 对象(如果其返回与模型匹配的所有资源)。如果出现故障,则承诺将被拒绝,并附带 HTTP 错误响应。
Expand 参数名称 描述
options
在映射中作为键值对传递
options.model
k8s 模型
options.name
如果没有提供资源名称,它将查找与模型匹配的所有资源。
options.ns
要查找的命名空间,不应为集群范围的资源指定。
options.path
如果提供,请附加为子路径
options.queryParams
URL 中包含的查询参数。
options.requestInit
要使用的 fetch init 对象。这可以具有请求标头、方法、重定向等。如需更多信息,请参阅 Interface RequestInit 。
Show more
它会根据提供的选项在集群中创建资源。它返回一个能够解析所创建的资源响应的承诺。如果失败承诺,则拒绝 HTTP 错误响应。
Expand 参数名称 描述
options
在映射中作为键值对传递
options.model
k8s 模型
options.data
要创建的资源的有效负载
options.path
如果提供,请附加为子路径
options.queryParams
URL 中包含的查询参数。
Show more
它根据提供的选项更新集群中的整个资源。当客户端需要完全替换现有资源时,它们可以使用 k8sUpdate。或者,也可以使用 k8sPatch 执行部分更新。它返回一个可以解析到更新的资源响应的承诺。如果失败承诺,则拒绝 HTTP 错误响应。
Expand 参数名称 描述
options
在映射中作为键值对传递
options.model
k8s 模型
options.data
要更新的 k8s 资源的有效负载
options.ns
要查找的命名空间,不应为集群范围的资源指定。
options.name
要更新的资源名称。
options.path
如果提供,请附加为子路径
options.queryParams
URL 中包含的查询参数。
Show more
它根据提供的选项对集群中的任何资源进行补丁。当客户端需要执行部分更新时,可以使用 k8sPatch。或者可以使用 k8sUpdate 来完全替换现有资源。如需更多信息,请参阅数据跟踪器 。它返回一个可以解析到修补资源响应的承诺。如果失败承诺,则拒绝 HTTP 错误响应。
Expand 参数名称 描述
options
在映射中作为键值对传递。
options.model
k8s 模型
options.resource
要修补的资源。
options.data
只有现有资源使用操作、路径和值修补的数据。
options.path
如果提供,请附加为子路径。
options.queryParams
URL 中包含的查询参数。
Show more
它根据提供的模型资源从集群中删除资源。垃圾回收基于 Foreground|Background,可以在提供的模型中使用 propagationPolicy 属性进行配置,或者在 json 中传递。它返回一个解析为 Status 的响应的承诺。如果失败承诺,则拒绝 HTTP 错误响应。
Expand 参数名称 描述
options
在映射中作为键值对传递。
options.model
k8s 模型
options.resource
要删除的资源。
options.path
如果提供,请附加为子路径
options.queryParams
URL 中包含的查询参数。
options.requestInit
要使用的 fetch init 对象。这可以具有请求标头、方法、重定向等。如需更多信息,请参阅 Interface RequestInit 。
options.json
如果其他提供的资源被默认设置为"propagationPolicy",则可以明确控制资源的垃圾回收。
Show more
根据提供的选项,将资源列为集群中的数组。它返回一个可以解析到响应的承诺。
Expand 参数名称 描述
options
在映射中作为键值对传递
options.model
k8s 模型
options.queryParams
URL 中包含的查询参数,并可使用键 "labelSelector" 传递标签选择器。
options.requestInit
要使用的 fetch init 对象。这可以具有请求标头、方法、重定向等。如需更多信息,请参阅 Interface RequestInit 。
Show more
与 k8sListResource 相同的接口,但会返回子项目。它返回模型的 apiVersion,即 group/version。
为资源提供组、版本和类型。它返回提供的资源的组 version 和 kind。如果资源没有 API 组,则返回组"core"。如果资源具有无效的 apiVersion,它将抛出错误。
为仪表板创建一个打包程序组件。
Expand 参数名称 描述
className
(可选) div 的风格类
children
(可选)仪表板的元素
Show more
为仪表板创建卡元素的网格;在 Overview 中使用。
Expand 参数名称 描述
mainCards
网格的卡
leftCards
(可选)网格左侧的卡
rightCards
(可选)网格右侧的卡
Show more
创建清单卡项。
Expand 参数名称 描述
children
在项目内呈现的元素
Show more
为清单卡项目创建标题;在 InventoryItem 内使用。
Expand 参数名称 描述
children
在标题内呈现的元素
Show more
创建清单卡的正文;在 InventoryCard 中使用,并可与 InventoryTitle 一起使用。
Expand 参数名称 描述
children
在清单卡或标题内呈现的元素
错误
div 的元素
Show more
为带有可选链接地址的清单卡创建一个计数和图标;在 InventoryItemBody 中使用
Expand 参数名称 描述
数�
显示计数
icon
显示图标
linkTo
(可选)链接地址
Show more
为清单卡加载时创建框架容器;与 InventoryItem 和相关组件一起使用
从 FLAGS redux 状态返回给定功能标记的 hook。它返回请求的功能标记或未定义的布尔值。
一个基本的 lazy 加载的代码编辑器,带有悬停的帮助和完成。
Expand 参数名称 描述
value
代表要呈现的 yaml 代码的字符串。
language
代表编辑器语言的字符串。
options
Monaco 编辑器选项.如需更多详细信息,请访问 Interface IStandAloneEditorConstructionOptions 。
minHeight
有效 CSS 高度中的值的最小编辑器高度。
showShortcuts
布尔值,以显示编辑器顶部的快捷方式。
toolbarLinks
编辑器顶部的工具栏链接部分上 ReactNode rendered 的数组。
onChange
代码更改事件的回调。
onSave
触发命令 CTRL / CMD + S 时调用的回调。
ref
对 { editor?: IStandaloneCodeEditor } 的响应参考。使用 editor 属性,您可以访问所有方法来控制编辑器。如需更多信息,请访问 Interface IStandaloneCodeEditor 。
Show more
一个 lazy 载入的 Kubernetes 资源的 YAML 编辑器,带有悬停的帮助和完成。组件使用 YAMLEditor 并在其之上添加更多功能,如资源更新处理、警报、保存、取消和重新加载按钮、可访问性等。除非提供了 onSave 回调,否则自动处理资源更新。它应该嵌套在 React.Suspense 组件中。
Expand 参数名称 描述
initialResource
代表编辑器显示资源的 YAML/Object。这个 prop 仅在初始呈现过程中使用
header
在 YAML 编辑器之上添加一个标头
onSave
保存按钮的回调。传递它将覆盖编辑器对资源执行的默认更新
Show more
显示与特定资源相关的事件的组件。
Expand 参数名称 描述
resource
应该会显示相关事件的对象。
Show more
为单个查询设置对 Prometheus 的轮询。它返回一个包含查询响应的元组、指示响应是否已完成的布尔值标志,以及请求请求或后处理过程中遇到的任何错误。
Expand 参数名称 描述
{PrometheusEndpoint} props.endpoint
PrometheusEndpoint 中的一个(label, query, range, rules, targets)
{string} [props.query]
(可选)Prometheus 查询字符串。如果为空或未定义,则不会启动轮询。
{number} [props.delay]
(可选)轮询延迟间隔 (ms)
{number} [props.endTime]
(可选)用于 QUERY_RANGE enpoint,查询范围的末尾
{number} [props.samples]
(可选)用于 QUERY_RANGE enpoint
{number} [options.timespan]
(可选)用于 QUERY_RANGE enpoint
{string} [options.namespace]
(可选)要附加的搜索参数
{string} [options.timeout]
(可选)要附加的搜索参数
Show more
呈现时间戳的组件。时间戳在 Timestamp 组件的 invidual 实例之间同步。提供的时间戳会根据用户区域设置进行格式化。
Expand 参数名称 描述
timestamp
呈现的时间戳。格式预期为 ISO 8601 (由 Kubernetes 使用)、epo 时间时间戳或日期的实例。
simple
呈现组件的简单版本,省略图标和工具提示。
omitSuffix
格式化日期消息后缀。
className
组件的额外类名称。
Show more
允许从 console.action/provider 扩展类型的其他插件接收贡献的组件。
Expand 参数名称 描述
context
带有 contextId 和可选插件数据的对象
Show more
一个组件,它呈现一个水平工具栏,其中有一个命名空间下拉菜单(在最左边)。其他组件可以作为子项传递,并呈现到命名空间下拉菜单的右侧。此组件设计为在页面的顶部使用。它应用于用户需要更改活动命名空间的页面,如 k8s 资源的页面中。
Expand 参数名称 描述
onNamespaceChange
(可选)当选择命名空间选项时执行的功能。它接受字符串形式的新命名空间作为其唯一参数。选择了选项时,活跃命名空间会自动更新,但可通过此功能应用其他逻辑。当更改命名空间时,URL 中的 namespace 参数将从以前的命名空间改为新选择的命名空间。
isDisabled
(可选)如果设为 true,则禁用命名空间下拉菜单的布尔值标志。这个选项只适用于命名空间下拉菜单,对子组件没有影响。
children
(可选)在命名空间下拉菜单右侧的工具栏中呈现的其他元素。
Show more
创建全页 ErrorBoundaryFallbackPage 组件以显示 "Oh no!Something went wrong." 消息与堆栈跟踪和其他有帮助的调试信息一起。这与组件一起使用。
Expand 参数名称 描述
errorMessage
错误消息的文本描述
componentStack
异常的组件追踪
queue
异常的堆栈追踪
title
将标题显示为错误边界页面的标头
Show more
一个组件,它呈现来自 Prometheus PromQL 查询的结果图,以及用于与图形交互的控制。
Expand 参数名称 描述
customDataSource
(可选)处理 PromQL 查询的 API 端点的基本 URL。如果提供,则使用此选项而不是默认的 API 获取数据。
defaultSamples
(可选)每个数据系列绘制的默认数据样本数量。如果有多个数据系列,QueryBrowser 可能会自动选择比此处指定的数据样本的数量较低。
defaultTimespan
(可选)图形的默认时间跨度(以毫秒为单位) - 默认为 1,800,000 (30 分钟)。
disabledSeries
(可选)禁用(不显示)带有这些准确标签/值对的数据系列。
disableZoom
(可选)禁用图形缩放控制的标记。
filterLabels
(可选)将返回的数据系列过滤到仅与这些标签/值对匹配的数据系列。
fixedEndTime
(可选)为显示的时间范围设置结束时间,而不是显示到当前时间的数据。
formatSeriesTitle
(可选)返回字符串的功能,用作单个数据系列的标题。
GraphLink
(可选)呈现到另一个页面的链接(例如,获取有关此查询的更多信息)。
hideControls
(可选)用于隐藏用于更改图形 timespan 的图形控制的标记,等等。
isStack
(可选) 显示堆栈图而不是行图的标记。如果设置了 showStackedControl,用户仍然可以切换到行图。
namespace
(可选)如果提供,则只为这个命名空间返回数据(只有具有此命名空间标签的系列)。
onZoom
(可选)当图形缩放时调用的回调。
pollInterval
(可选)如果设置,请确定图形更新的频率,以显示最新数据(以毫秒为单位)。
queries
运行 PromQL 查询的数组,并显示图表中的结果。
showLegend
(可选)启用在图形下显示图下的标记。
showStackedControl
启用显示图形模式和行图形模式切换的图形控制的标志。
timespan
(可选)图形应涵盖的时间持续时间(以毫秒为单位)。
units
(可选)要在 Y 轴和工具提示中显示的单元。
Show more
提供回调来启动用于编辑 Kubernetes 资源注解的模态的 hook。
Expand 参数名称 描述
resource
用于编辑 K8sResourceCommon 类型的对象的注解的资源。
Show more
提供回调用于启动删除资源的模态的 hook。
Expand 参数名称 描述
resource
要删除的资源。
redirectTo
(可选)在删除资源后重定向到的位置。
message
(可选)要在界面中显示的消息。
btnText
(可选)在删除按钮显示的文本。
deleteAllResources
(可选)删除同一类型的所有资源的功能。
Show more
提供回调的 hook,以启动模态来编辑 Kubernetes 资源标签。
Expand 参数名称 描述
resource
用于编辑标签的资源,这是 K8sResourceCommon 类型的对象。
Show more
提供当前活跃的命名空间和回调来设置活跃命名空间的 hook。
提供用户设置值和设定用户设置值的回调的 hook。
提供当前快速启动上下文值的 hook。这允许插件与控制台快速启动功能交互。
弃用: 使用提供的 usePerspectiveContext 替代。创建视角上下文。
Expand 参数名称 描述
PerspectiveContextType
带有活跃视角和 setter 的对象
Show more
弃用:使用来自 @console/dynamic-plugin-sdk 的 useAccessReview 替代。hook,提供有关用户对给定资源的访问权限的允许状态。它返回 isAllowed 布尔值。
Expand 参数名称 描述
resourceAttributes
访问查看的资源属性
impersonate
模拟详情
Show more
弃用:此 hook 与控制台功能无关。在可以卸载给定组件时,确保安全 asynchronnous 设置 React 状态的 hook。它返回一个数组,它带有一对状态值及其 set 功能。
Expand 参数名称 描述
initialState
初始状态值
Show more
已弃用:一个基本 lazy 加载的 YAML 编辑器,带有悬停的帮助和完成。
Expand 参数名称 描述
value
代表要呈现的 yaml 代码的字符串。
options
Monaco 编辑器选项.
minHeight
有效 CSS 高度中的值的最小编辑器高度。
showShortcuts
布尔值,以显示编辑器顶部的快捷方式。
toolbarLinks
编辑器顶部的工具栏链接部分上 ReactNode rendered 的数组。
onChange
代码更改事件的回调。
onSave
触发命令 CTRL / CMD + S 时调用的回调。
ref
对 { editor?: IStandaloneCodeEditor } 的响应参考。使用 editor 属性,您可以访问所有方法来控制编辑器。
Show more