1.8. 故障排除
您可以查看迁移自定义资源 (CR),并下载日志来排除迁移失败的问题。
如果应用程序在迁移失败时停止,您必须手动回滚,以防止数据崩溃。
如果应用程序在迁移过程中没有停止,则不需要手动回滚,因为原始应用程序仍然在源集群中运行。
1.8.1. 查看迁移自定义资源
集群应用程序迁移 (CAM) 工具会创建以下 CR:
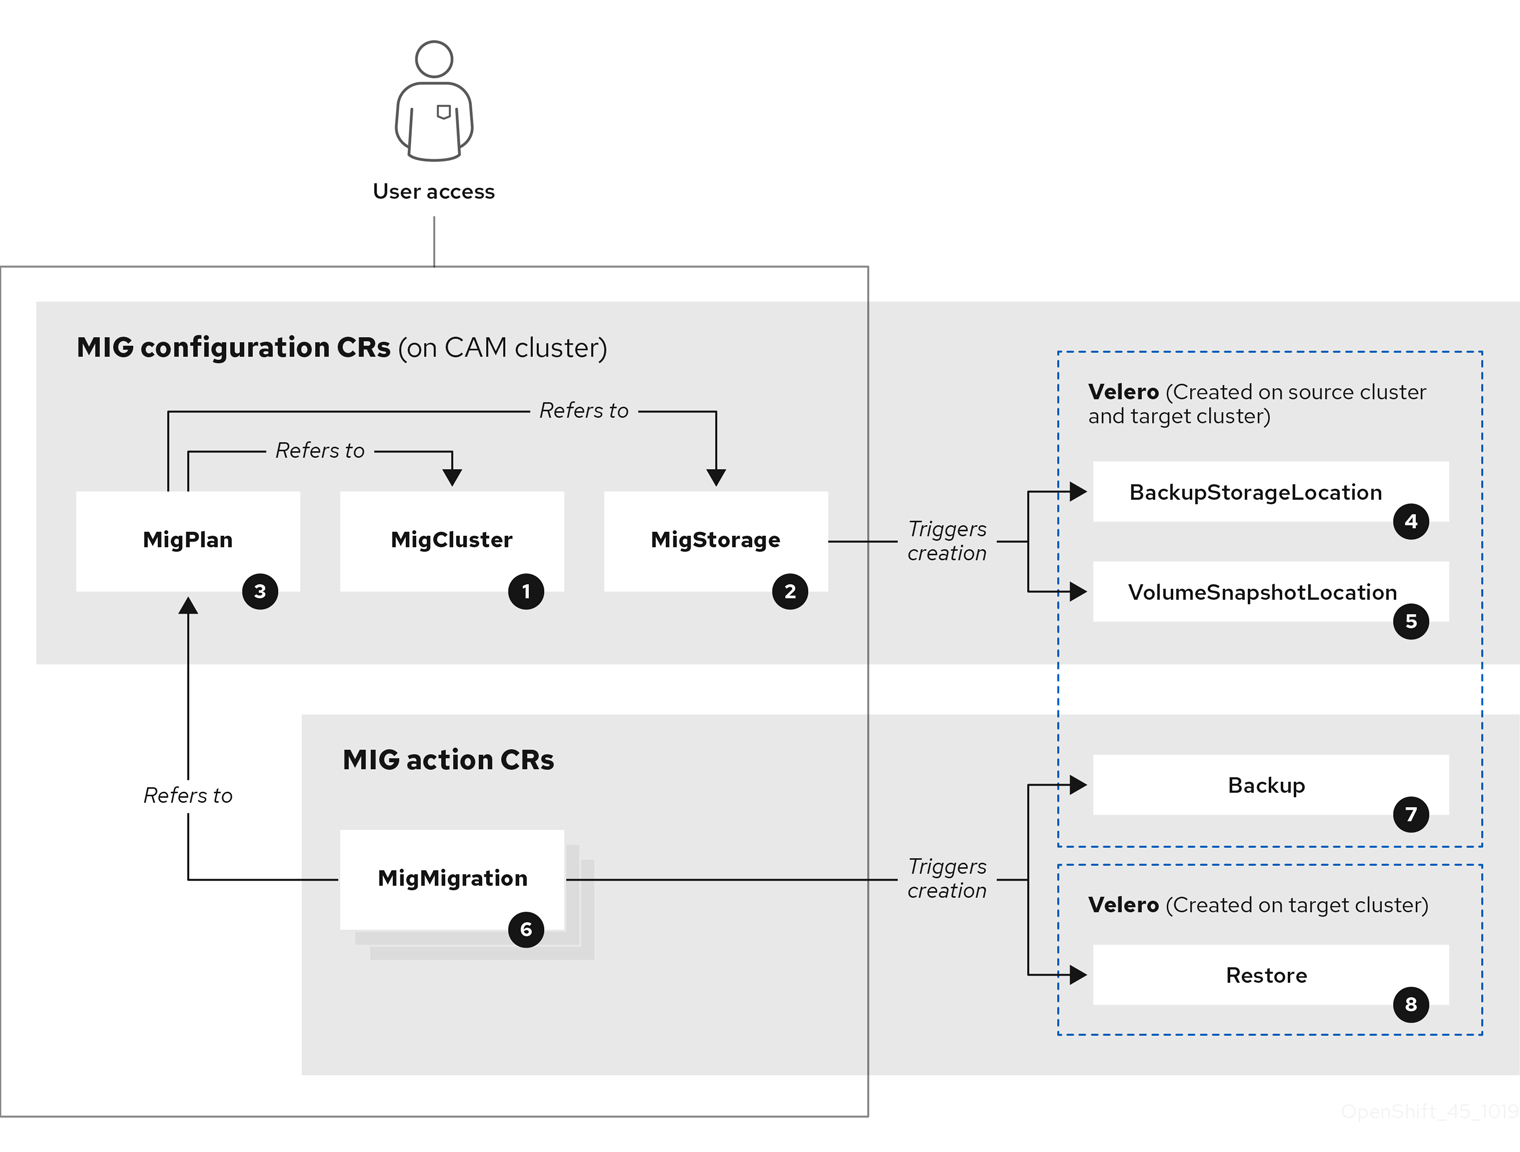
![]() MigCluster (配置,CAM 集群): 集群定义
MigCluster (配置,CAM 集群): 集群定义
![]() MigStorage (配置,CAM 集群): 存储定义
MigStorage (配置,CAM 集群): 存储定义
![]() MigPlan (配置,CAM 集群):迁移计划
MigPlan (配置,CAM 集群):迁移计划
MigPlan CR 描述了要迁移的源和目标集群、存储库和命名空间。它与 0 个 、1 个 或多个 MigMigration CR 关联。
删除 MigPlan CR 会删除关联的 MigMigration CR。
![]() BackupStorageLocation (配置,CAM 集群): Velero 备份对象的位置
BackupStorageLocation (配置,CAM 集群): Velero 备份对象的位置
![]() VolumeSnapshotLocation (配置,CAM 集群): Velero 卷快照的位置
VolumeSnapshotLocation (配置,CAM 集群): Velero 卷快照的位置
![]() MigMigration(操作,CAM 集群):Migration,在迁移期间创建
MigMigration(操作,CAM 集群):Migration,在迁移期间创建
在每次进行 stage 或迁移数据时都会创建一个 MigMigration CR。每个 MigMigration CR 都会与一个 MigPlan CR 关联。
![]() Backup(操作,源集群):当运行迁移计划时,MigMigration CR 在每个源集群上创建两个 Velero 备份 CR:
Backup(操作,源集群):当运行迁移计划时,MigMigration CR 在每个源集群上创建两个 Velero 备份 CR:
- 备份 CR #1 用于Kubernetes 对象
- 备份 CR #2 用于 PV 数据
![]() Restore (操作,目标集群):在运行迁移计划时,MigMigration CR 在目标集群上创建两个 Velero 恢复 CR:
Restore (操作,目标集群):在运行迁移计划时,MigMigration CR 在目标集群上创建两个 Velero 恢复 CR:
- 恢复 CR #1(使用备份 CR #2)用于 PV 数据
- 恢复 CR #2(使用备份 CR #1)用于 Kubernetes 对象
流程
获取 CR 名称:
$ oc get <migration_cr> -n openshift-migration1 - 1
- 指定迁移 CR,如
migmigration。
输出结果类似以下:
NAME                                   AGE
88435fe0-c9f8-11e9-85e6-5d593ce65e10   6m42s
查看 CR:
$ oc describe <migration_cr> <88435fe0-c9f8-11e9-85e6-5d593ce65e10> -n openshift-migration输出结果类似以下示例。
MigMigration 示例
name:         88435fe0-c9f8-11e9-85e6-5d593ce65e10
namespace:    openshift-migration
labels:       <none>
annotations:  touch: 3b48b543-b53e-4e44-9d34-33563f0f8147
apiVersion:  migration.openshift.io/v1alpha1
kind:         MigMigration
metadata:
  creationTimestamp:  2019-08-29T01:01:29Z
  generation:          20
  resourceVersion:    88179
  selfLink:           /apis/migration.openshift.io/v1alpha1/namespaces/openshift-migration/migmigrations/88435fe0-c9f8-11e9-85e6-5d593ce65e10
  uid:                 8886de4c-c9f8-11e9-95ad-0205fe66cbb6
spec:
  migPlanRef:
    name:        socks-shop-mig-plan
    namespace:   openshift-migration
  quiescePods:  true
  stage:         false
status:
  conditions:
    category:              Advisory
    durable:               True
    lastTransitionTime:  2019-08-29T01:03:40Z
    message:               The migration has completed successfully.
    reason:                Completed
    status:                True
    type:                  Succeeded
  phase:                   Completed
  startTimestamp:         2019-08-29T01:01:29Z
events:                    <none>
Velero 备份 CR #2 示例(PV 数据)
apiVersion: velero.io/v1
kind: Backup
metadata:
  annotations:
    openshift.io/migrate-copy-phase: final
    openshift.io/migrate-quiesce-pods: "true"
    openshift.io/migration-registry: 172.30.105.179:5000
    openshift.io/migration-registry-dir: /socks-shop-mig-plan-registry-44dd3bd5-c9f8-11e9-95ad-0205fe66cbb6
  creationTimestamp: "2019-08-29T01:03:15Z"
  generateName: 88435fe0-c9f8-11e9-85e6-5d593ce65e10-
  generation: 1
  labels:
    app.kubernetes.io/part-of: migration
    migmigration: 8886de4c-c9f8-11e9-95ad-0205fe66cbb6
    migration-stage-backup: 8886de4c-c9f8-11e9-95ad-0205fe66cbb6
    velero.io/storage-location: myrepo-vpzq9
  name: 88435fe0-c9f8-11e9-85e6-5d593ce65e10-59gb7
  namespace: openshift-migration
  resourceVersion: "87313"
  selfLink: /apis/velero.io/v1/namespaces/openshift-migration/backups/88435fe0-c9f8-11e9-85e6-5d593ce65e10-59gb7
  uid: c80dbbc0-c9f8-11e9-95ad-0205fe66cbb6
spec:
  excludedNamespaces: []
  excludedResources: []
  hooks:
    resources: []
  includeClusterResources: null
  includedNamespaces:
  - sock-shop
  includedResources:
  - persistentvolumes
  - persistentvolumeclaims
  - namespaces
  - imagestreams
  - imagestreamtags
  - secrets
  - configmaps
  - pods
  labelSelector:
    matchLabels:
      migration-included-stage-backup: 8886de4c-c9f8-11e9-95ad-0205fe66cbb6
  storageLocation: myrepo-vpzq9
  ttl: 720h0m0s
  volumeSnapshotLocations:
  - myrepo-wv6fx
status:
  completionTimestamp: "2019-08-29T01:02:36Z"
  errors: 0
  expiration: "2019-09-28T01:02:35Z"
  phase: Completed
  startTimestamp: "2019-08-29T01:02:35Z"
  validationErrors: null
  version: 1
  volumeSnapshotsAttempted: 0
  volumeSnapshotsCompleted: 0
  warnings: 0
Velero 恢复 CR #2 示例(Kubernetes 资源)
apiVersion: velero.io/v1
kind: Restore
metadata:
  annotations:
    openshift.io/migrate-copy-phase: final
    openshift.io/migrate-quiesce-pods: "true"
    openshift.io/migration-registry: 172.30.90.187:5000
    openshift.io/migration-registry-dir: /socks-shop-mig-plan-registry-36f54ca7-c925-11e9-825a-06fa9fb68c88
  creationTimestamp: "2019-08-28T00:09:49Z"
  generateName: e13a1b60-c927-11e9-9555-d129df7f3b96-
  generation: 3
  labels:
    app.kubernetes.io/part-of: migration
    migmigration: e18252c9-c927-11e9-825a-06fa9fb68c88
    migration-final-restore: e18252c9-c927-11e9-825a-06fa9fb68c88
  name: e13a1b60-c927-11e9-9555-d129df7f3b96-gb8nx
  namespace: openshift-migration
  resourceVersion: "82329"
  selfLink: /apis/velero.io/v1/namespaces/openshift-migration/restores/e13a1b60-c927-11e9-9555-d129df7f3b96-gb8nx
  uid: 26983ec0-c928-11e9-825a-06fa9fb68c88
spec:
  backupName: e13a1b60-c927-11e9-9555-d129df7f3b96-sz24f
  excludedNamespaces: null
  excludedResources:
  - nodes
  - events
  - events.events.k8s.io
  - backups.velero.io
  - restores.velero.io
  - resticrepositories.velero.io
  includedNamespaces: null
  includedResources: null
  namespaceMapping: null
  restorePVs: true
status:
  errors: 0
  failureReason: ""
  phase: Completed
  validationErrors: null
  warnings: 15
1.8.2. 下载迁移日志
您可以在 CAM web 控制台中下载 Velero 、Restic 和 Migration controller 日志,以排除出现故障的迁移问题。
流程
- 登录到 CAM 控制台。
- 点击 Plans 查看迁移计划列表。
-
点击特定迁移计划
 的 Options 菜单并选择 Logs。
- 点 Download Logs 为所有集群下载迁移控制器、Velero 和 Restic 的日志。
要下载特定的日志:
指定日志选项:
- Cluster:选择源、目标或 CAM 主机集群。
- Log source:选择 Velero、Restic 或 Controller。
Pod source:选择 Pod 名称,例如:
controller-manager-78c469849c-v6wcf此时会显示所选日志。
您可以通过更改您的选择来清除日志选择设置。
- 点 Download Selected 下载所选日志。
另外,您可以使用 CLI 访问日志,如下例所示:
$ oc get pods -n openshift-migration | grep controller
controller-manager-78c469849c-v6wcf           1/1     Running     0          4h49m

$ oc logs controller-manager-78c469849c-v6wcf -f -n openshift-migration
1.8.3. 更新已弃用的 API GroupVersionKinds
在 OpenShift Container Platform 4.3 中,一些在 OpenShift Container Platform 3.x 中使用的 API GroupVersionKinds (GVKs)已被弃用。
如果您的源集群使用已弃用的 GVK,在创建迁移计划时会显示以下警告信息: Some namespaces contain GVKs incompatible with destination cluster。您可以点击 See details 来查看命名空间和不兼容的 GVK。
这个警告并不会阻止迁移继续进行。
在迁移过程中,已弃用的 GVK 保存在用于 Kubernetes 对象的 Velero 备份自定义资源 (CR) #1 中。您可以下载备份 CR,提取已弃用的 GVK yaml 文件,并使用 oc convert 命令更新它们。然后,您在目标集群中创建更新的 GVK。
流程
- 运行迁移计划
查看 MigPlan CR:
$ oc describe migplan <migplan_name> -n openshift-migration1 - 1
- 指定迁移计划的名称。
输出结果类似以下:
metadata:
  ...
  uid: 79509e05-61d6-11e9-bc55-02ce4781844a
1 status: ... conditions: - category: Warn lastTransitionTime: 2020-04-30T17:16:23Z message: 'Some namespaces contain GVKs incompatible with destination cluster. See: `incompatibleNamespaces` for details' status: "True" type: GVKsIncompatible incompatibleNamespaces: - gvks: - group: batch kind: cronjobs2 version: v2alpha1 - group: batch kind: scheduledjobs3 version: v2alpha1获取与 MigPlan UID 关联的 MigMigration 名称:
$ oc get migmigration -o json | jq -r '.items[] | select(.metadata.ownerReferences[].uid=="<migplan_uid>") | .metadata.name'1 - 1
- 指定 MigPlan UID。
获取与 MigMigration 名称关联的 MigMigration UID:
$ oc get migmigration <migmigration_name> -o jsonpath='{.metadata.uid}'1 - 1
- 指定 MigMigration 名称。
获取与 MigMigration UID 关联的 Velero 备份名称:
$ oc get backup.velero.io --selector migration-initial-backup="<migmigration_uid>" -o jsonpath={.items[*].metadata.name}1 - 1
- 指定 MigMigration UID。
在您的本地机器中下载 Velero 备份内容:
对于 AWS S3:
$ aws s3 cp s3://<bucket_name>/velero/backups/<backup_name> <backup_local_dir> --recursive1 - 1
- 指定存储桶、备份名称和您的本地备份目录名称。
对于GCP:
$ gsutil cp gs://<bucket_name>/velero/backups/<backup_name> <backup_local_dir> --recursive1 - 1
- 指定存储桶、备份名称和您的本地备份目录名称。
对于 Azure:
$ azcopy copy 'https://velerobackups.blob.core.windows.net/velero/backups/<backup_name>' '<backup_local_dir>' --recursive1 - 1
- 指定备份名称和您的本地备份目录名称。
解压 Velero 备份归档文件:
$ tar -xfv <backup_local_dir>/<backup_name>.tar.gz -C <backup_local_dir>在每个已弃用的 GVK 中以离线模式运行
oc convert:$ oc convert -f <backup_local_dir>/resources/<gvk>.yaml1 - 1
- 指定已弃用的 GVK。
在目标集群中创建转换的 GVK:
$ oc create -f <gvk>.yaml1 - 1
- 指定转换的 GVK。
1.8.4. 错误信息
1.8.4.1. Velero Pod 日志中的 Restic 超时错误消息
如果因为 Restic 超时造成迁移失败,以下出错信息会出现在 Velero Pod 日志中:
level=error msg="Error backing up item" backup=velero/monitoring error="timed out waiting for all PodVolumeBackups to complete" error.file="/go/src/github.com/heptio/velero/pkg/restic/backupper.go:165" error.function="github.com/heptio/velero/pkg/restic.(*backupper).BackupPodVolumes" group=v1
restic_timeout 的默认值为一小时。您可以为大型迁移增加这个参数值,请注意,高的值可能会延迟返回出错信息。
流程
-
在 OpenShift Container Platform web 控制台中导航至 Operators
Installed Operators。 - 点 Cluster Application Migration Operator。
- 在 MigrationController 标签页中点 migration-controller。
在 YAML 标签页中,更新以下参数值:
spec:
  restic_timeout: 1h
1 - 1
- 有效单元是
h(小时)、m(分钟)和s(秒),例如3h30m15s。
- 点 Save。
如果迁移使用文件系统数据复制方法的 PV 时数据验证失败,在 MigMigration 自定义资源 (CR) 中会出现以下错误:
status:
  conditions:
  - category: Warn
    durable: true
    lastTransitionTime: 2020-04-16T20:35:16Z
    message: There were verify errors found in 1 Restic volume restores. See restore `<registry-example-migration-rvwcm>`
      for details
    status: "True"
type: ResticVerifyErrors 数据验证错误不会导致迁移过程失败。
您可以检查目标集群的 Restore CR,以识别数据验证错误的来源。
流程
- 登录到目标集群。
查看 Restore CR:
$ oc describe <registry-example-migration-rvwcm> -n openshift-migration输出通过
PodVolumeRestore错误来指定 PV:status: phase: Completed podVolumeRestoreErrors: - kind: PodVolumeRestore name: <registry-example-migration-rvwcm-98t49> namespace: openshift-migration podVolumeRestoreResticErrors: - kind: PodVolumeRestore name: <registry-example-migration-rvwcm-98t49> namespace: openshift-migration查看
PodVolumeRestoreCR:$ oc describe <migration-example-rvwcm-98t49>输出中标识了记录错误的 Restic Pod:
  completionTimestamp: 2020-05-01T20:49:12Z
  errors: 1
  resticErrors: 1
  ...
  resticPod: <restic-nr2v5>
查看 Restic Pod 日志:
$ oc logs -f restic-nr2v5
1.8.5. 手动回滚迁移
如果您的应用程序在迁移失败时停止,您必须手动回滚,以防止 PV 中的数据被破坏。
如果应用程序在迁移过程中没有停止,则不需要进行手动回滚,因为原始应用程序仍然在源集群中运行。
流程
在目标集群中,切换到迁移的项目:
$ oc project <project>获取部署的资源:
$ oc get all删除部署的资源以确保应用程序没有在目标集群中运行,并访问 PVC 上的数据:
$ oc delete <resource_type>要停止 DaemonSet 而不删除它,在 YAML 文件中更新
nodeSelector:apiVersion: apps/v1 kind: DaemonSet metadata: name: hello-daemonset spec: selector: matchLabels: name: hello-daemonset template: metadata: labels: name: hello-daemonset spec: nodeSelector: role: worker1 - 1
- 指定一个没有存在于任何节点上的
nodeSelector值。
更新每个 PV 的重新声明策略,以便删除不必要的数据。在迁移过程中,绑定 PV 的重新声明策略是
reclaim,以确保应用程序从源集群中被删除时不会丢失数据。您可以在回滚过程中删除这些 PV。apiVersion: v1 kind: PersistentVolume metadata: name: pv0001 spec: capacity: storage: 5Gi accessModes: - ReadWriteOnce persistentVolumeReclaimPolicy: Retain1 ... status: ...- 1
- 指定
Recycle或Delete。
在源集群中,切换到迁移的项目:
$ oc project <project_name>获取项目部署的资源:
$ oc get all启动每个部署资源的一个或多个副本:
$ oc scale --replicas=1 <resource_type>/<resource_name>-
如果在操作中被更改了,把 DaemonSet 的
nodeSelector改回其原始值。
1.8.6. 为客户支持问题单收集数据
如果创建一个客户支持问题单,您可以使用 openshift-migration-must-gather-rhel8 镜像的 must-gather 工具来收集与您的集群相关的信息,并把这些信息上传到红帽客户门户网站。
openshift-migration-must-gather-rhel8 镜像会收集默认的 must-gather 镜像不收集的日志和 CR 数据。
流程
-
进入要存储
must-gather数据的目录。 运行
oc adm must-gather命令:$ oc adm must-gather --image=registry.redhat.io/rhcam-1-2/openshift-migration-must-gather-rhel8must-gather工具程序收集集群数据,并把它保存在must-gather.local.<uid>目录中。-
从
must-gather数据中删除验证密钥和其他敏感信息。 创建一个包含
must-gather.local.<uid>目录内容的归档文件:$ tar cvaf must-gather.tar.gz must-gather.local.<uid>/在红帽客户门户中,为您的问题单附上这个压缩文件。
1.8.7. 已知问题
这个版本有以下已知问题:
在迁移过程中,集群应用程序迁移 (CAM) 工具会保留以下命名空间注解:
-
openshift.io/sa.scc.mcs -
openshift.io/sa.scc.supplemental-groups openshift.io/sa.scc.uid-range这些注解会保留 UID 范围,确保容器在目标集群中保留其文件系统权限。这可能会存在一定的风险。因为迁移的 UID 可能已存在于目标集群的现有或将来的命名空间中。(BZ#1748440)
-
-
如果一个 AWS 存储桶被添加到 CAM web 控制台,然后将其删除,则其状态会保持为
True,这是因为 MigStorage CR 没有被更新。(BZ#1738564) - 大多数集群范围的资源尚未由 CAM 工具处理。如果应用程序需要集群范围的资源,则可能需要在目标集群上手动创建。
- 如果迁移失败,则迁移计划不会为静默的 pod 保留自定义 PV 设置。您必须手动回滚,删除迁移计划,并使用 PV 设置创建新的迁移计划。(BZ#1784899)
-
如果因为 Restic 超时造成大型迁移失败,您可以提高 Migration controller CR 中的
restic_timeout参数值。 - 如果您选择了为使用文件系统复制方法迁移的 PV 数据进行验证的选项,则性能会非常慢。Velero 为每个文件生成一个 checksum,并在恢复该文件时对其进行检查。
-
在当前发行版本 (CAM 1.2) 中,您无法从 OpenShift Container Platform 3.7 迁移到 4.4,因为某些被源集群使用的 API
GroupVersionKinds(GVKs) 已被弃用。您可以在迁移后手动更新 GVK。(BZ#1817251) -
如果您无法在 OpenShift Container Platform 3 集群上安装 CAM 1.2,请下载当前的
operator.yml文件,这可以解决这个问题。(BZ#1843059)